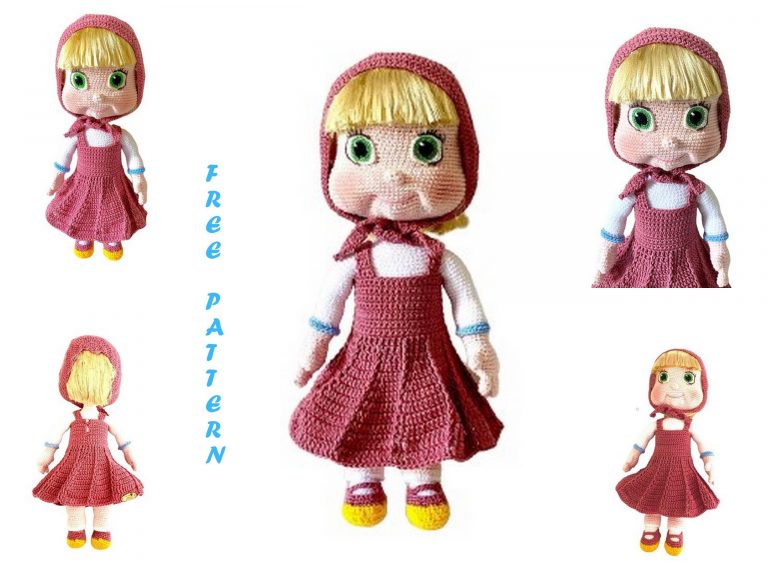
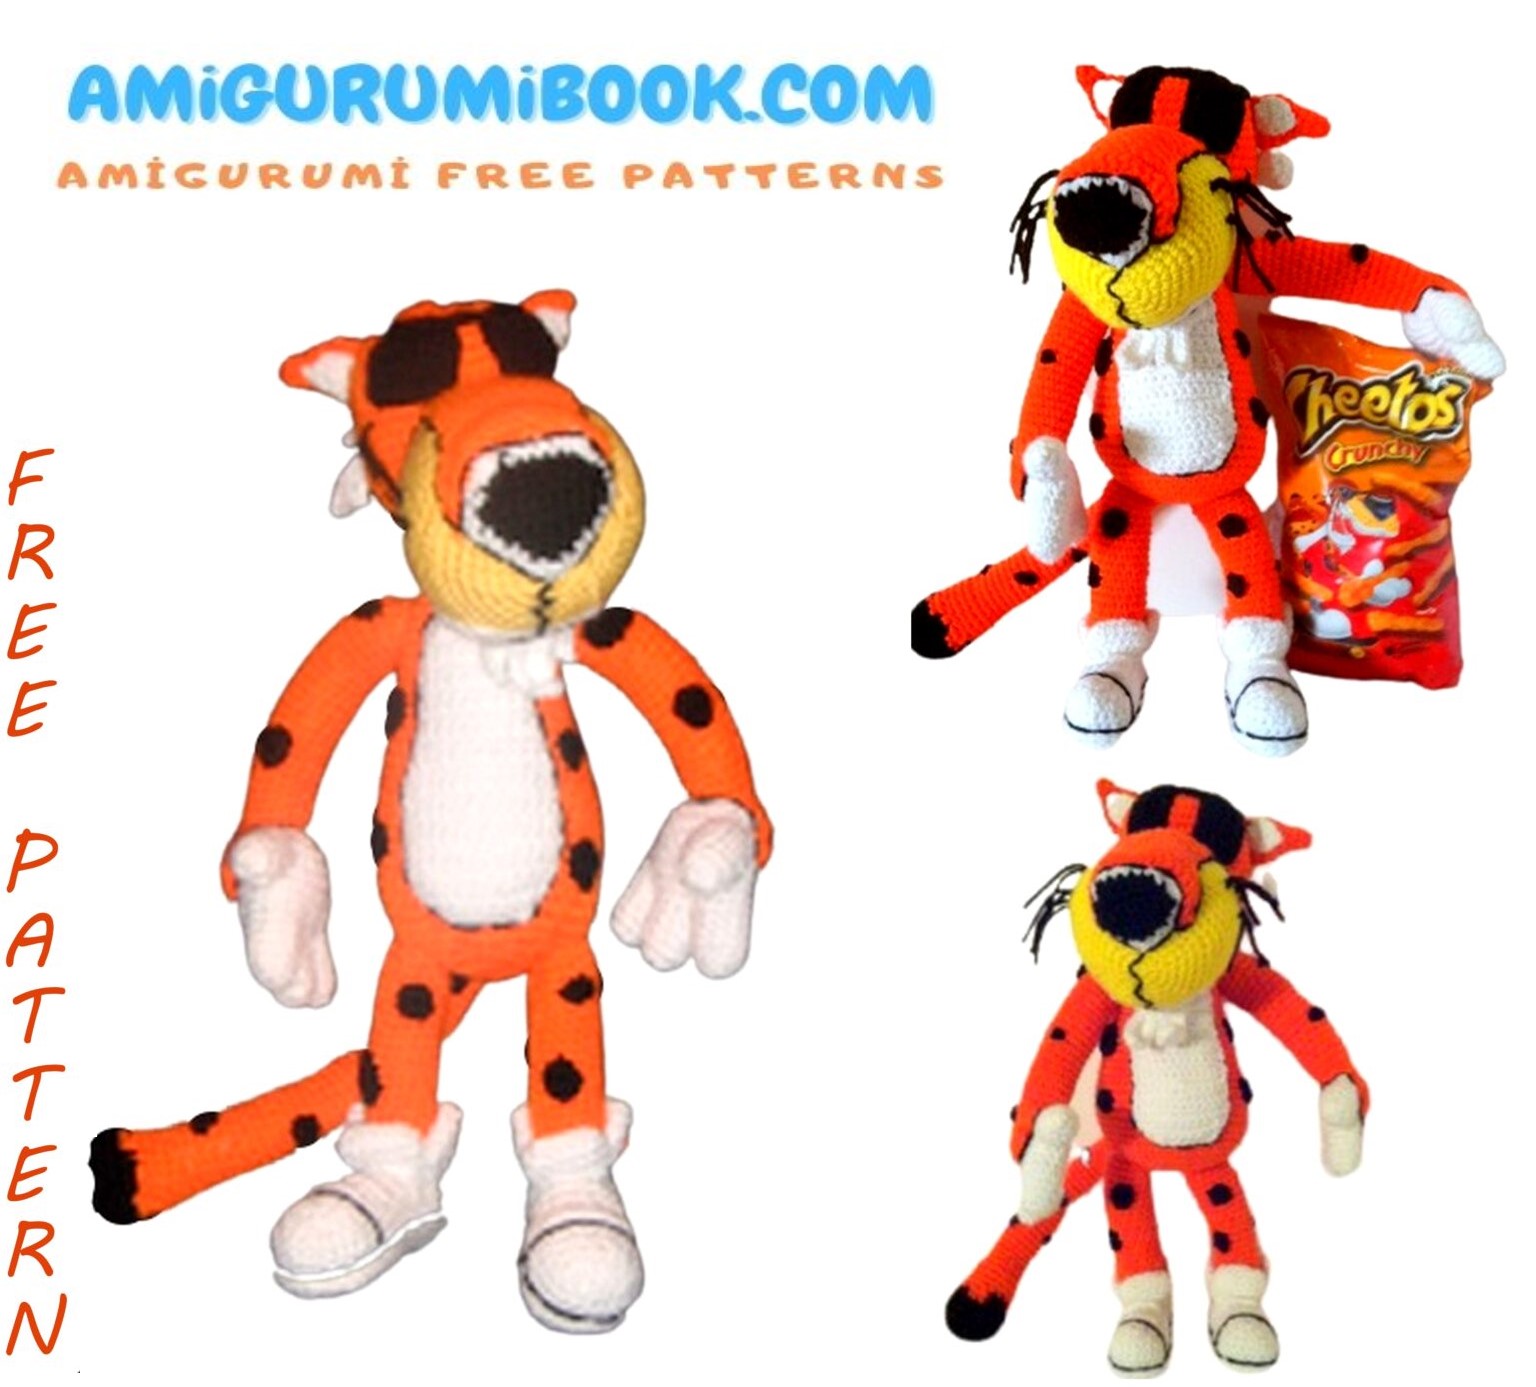
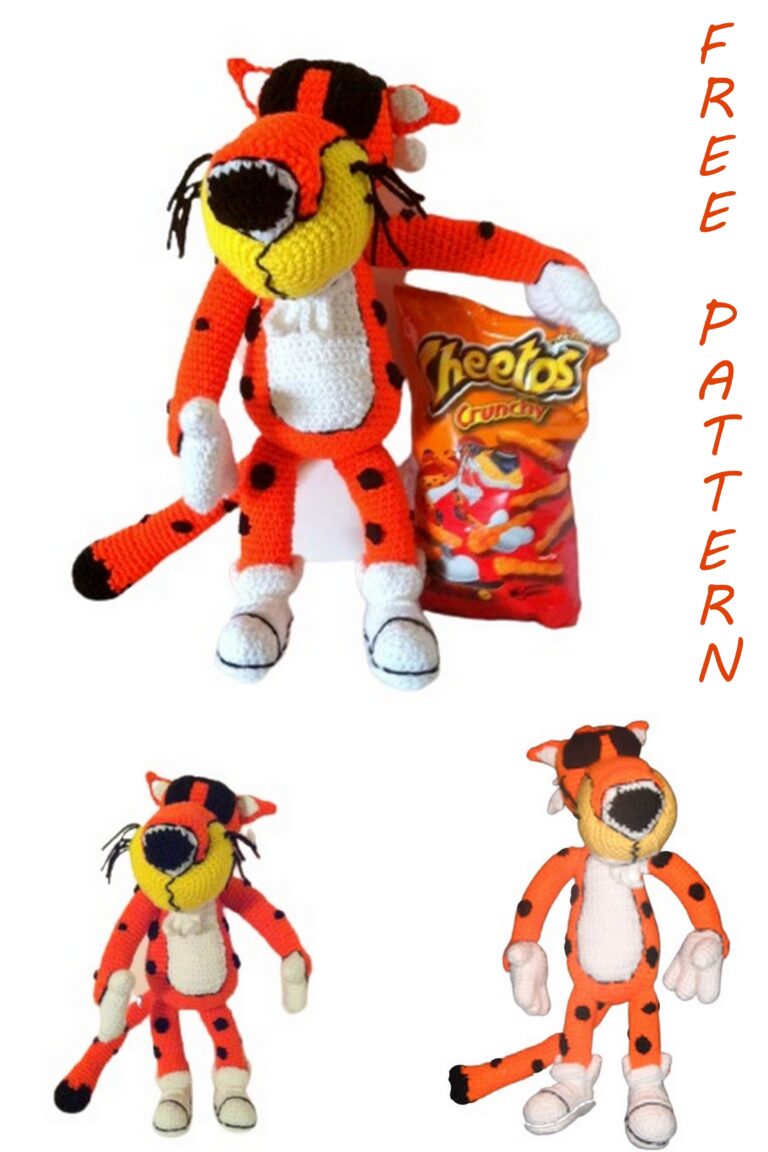
Chester Cheetah Amigurumi Free Pattern
We continue to bring you these beautiful amigurumi patterns. In this article, we will share a great amigurumi Chester Cheetah model.
Materials:
(Red Heart Super Saver 4 Ply)
Pumpkin Brt. Yellow
White Black
White Felt Black Felt (optional)
Poly-Fill Wooden Dowel
You’ll Need:
Size G Crochet Hook
Large Sewing Needle
Scissors
Glue Gun (optional)
Abbreviations:
Rnd./Rnds.- round/rounds
Sc- single crochet
Sc Dec- single crochet decrease
Hdc- half double crochet
Hdc Dec- half double crochet decrease
Ch- chain
Sl St- slip stitch
Sk- skip
BLO- back loops only
FLO- front loops only
Tog- together
F/O- fasten off
Magic Ring- (ch2, sc # in 1st ch from hook)
Muzzle:
Using Brt. Yellow
Rnd. 1: 6sc in magic ring, join w/sl st, ch1 (6)
Rnd. 2: (2sc in each sc), around, join w/sl st, ch1 (12)
Rnd. 3: (2sc in 1st sc, sc in next sc), around, join w/sl st, ch1 (18)
Rnd. 4: (2sc in 1st sc, sc in next 2 sc), around, join w/sl st, ch1 (24)
Rnd. 5: (2sc in 1st sc, sc in next 3 sc), around, join w/sl st, ch1 (30)
Rnd. 6: (2sc in 1st sc, sc in next 4 sc), around, join w/sl st, ch1 (36)
Rnd. 7: (2sc in 1st sc, sc in next 5 sc), around, join w/sl st, ch1 (42)
Rnd. 8: (2sc in 1st sc, sc in next 6 sc)5x, turn (40) leave remaining sc unworked, do NOT ch1
Rnd. 9: (2sc in 1st sc, sc in next 7 sc)5x, turn (45) do NOT ch1
Rnd. 10: sc in 1st 45 sc, 2 sc down the side of the last 2 rnds., sc across the unworked 7 sc on Rnd. 8, 2 sc in the side of the last 2 rnds., join w/sl st, ch1 (56)
NOTE: unworked side will be the bottom of your muzzle.
Rnd. 11: sc in 1st 46, sc dec next 2 sc tog, sc in next 5 sc, sc dec next 2 sc tog, sc in last sc, join w/sl st, ch1 (54)
Rnds. 12-16: (sc in each sc), around, join w/sl st, ch1 (54)
Rnd. 17: (sc dec 1st 2 sc tog, sc in next 7 sc), around, join w/sl st, ch1 (48)
Rnds. 18-19: (sc in each sc), around, join w/sl st, ch1 (48)
Rnd. 20: (sc dec 1st 2 sc tog, sc in next 6 sc), around, join w/sl st, ch1 (42)
Rnds. 21-25: (sc in each sc), around, join w/sl st, ch1 (42) F/O leave 12” to sew muzzle to head, in later step… Stuff
Head:
Using Pumpkin
Rnd. 1: 6sc in magic ring, join w/sl st, ch1 (6)
Rnd. 2: (2sc in each sc), around, join w/sl st, ch1 (12)
Rnd. 3: (2sc in 1st sc, sc in next sc), around, join w/sl st, ch1 (18)
Rnd. 4: (2sc in 1st sc, sc in next sc), around, join w/sl st, ch1 (27)
Rnd. 5: (2sc in 1st sc, sc in next 2 sc), around, join w/sl st, ch1 (36)
Rnd. 6: (2sc in 1st sc, sc in next 3 sc), around, join w/sl st, ch1 (45)
Rnd. 7: (2sc in 1st sc, sc in next 4 sc), around, join w/sl st, ch1 (54)
Rnds. 8-9: (sc in each sc), around, join w/sl st, ch1 (54)
Rnd. 10: (sc dec 1st 2 sc tog, sc in next 7 sc), around, join w/sl st, ch1 (48)
Rnds. 11-17: (sc in each sc), around, join w/sl st, ch1 (48)
Rnd. 18: (sc dec 1st 2 sc tog, sc in next 6 sc), around, join w/sl st, ch1 (42)
Rnd. 19: (sc dec 1st 2 sc tog, sc in next 5 sc), around, join w/sl st, ch1 (36) begin stuffing
Rnd. 20: (sc dec 1st 2 sc tog, sc in next 4 sc), around, join w/sl st, ch1 (30)
Rnd. 21: (sc dec 1st 2 sc tog, sc in next 3 sc), around, join w/sl st, ch1 (24) continue stuffing
Rnd. 22: (sc dec 1st 2 sc tog, sc in next 2 sc), around, join w/sl st, ch1 (18)
Rnd. 23: (sc dec 1st 2 sc tog, sc in next sc), around, join w/sl st, ch1 (12) finish stuffing
Rnd. 24: (sc dec 1st 2 sc tog), around, join w/sl st, F/O (6) leave end open and hide extra yarn in the head. Set to the side for now…
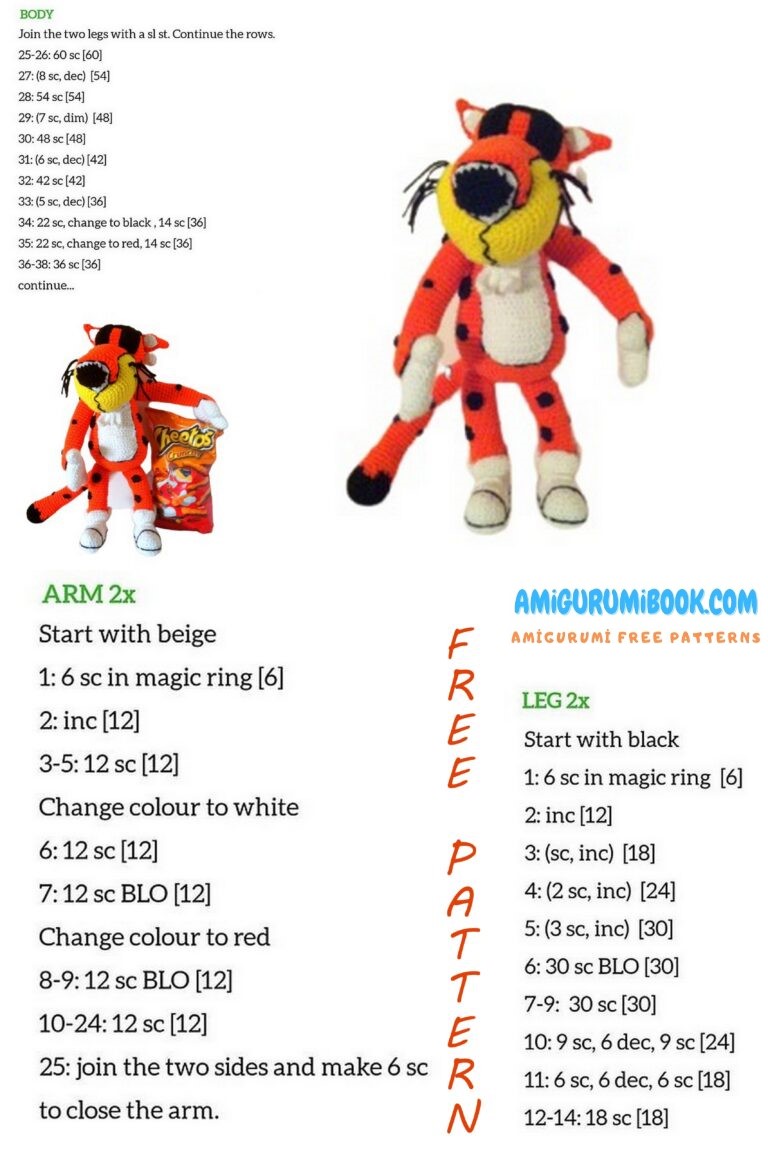
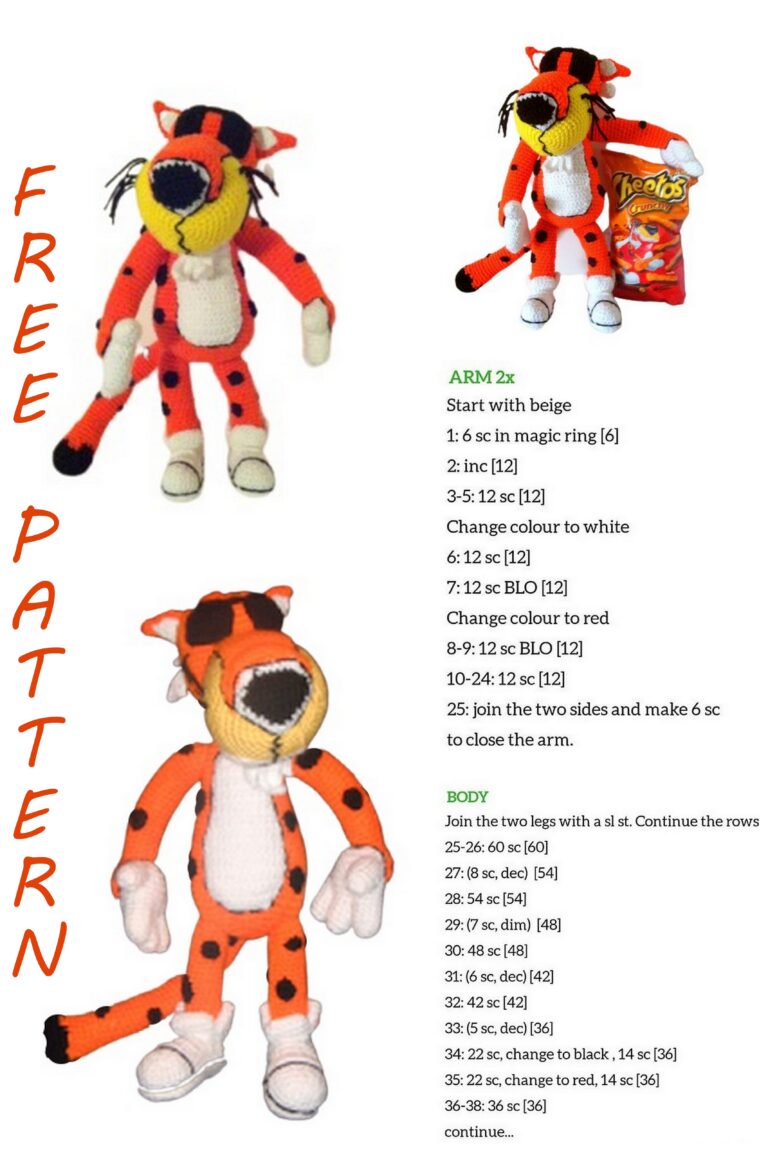
Body:
Using Pumpkin
Rnd. 1: 6sc in magic ring, join w/sl st, ch1 (6)
Rnd. 2: (2sc in each sc), around, join w/sl st, ch1 (12)
Rnd. 3: (2sc in 1st sc, sc in next sc), around, join w/sl st, ch1 (18)
Rnd. 4: (2sc in 1st sc, sc in next 2 sc), around, join w/sl st, ch1 (24)
Rnd. 5: (2sc in 1st sc, sc in next 3 sc), around, join w/sl st, ch1 (30)
Rnd. 6: (2sc in 1st sc, sc in next 4 sc), around, join w/sl st, ch1 (36)
Rnd. 7: (2sc in 1st sc, sc in next 5 sc), around, join w/sl st, ch1 (42)
Rnd. 8: (2sc in 1st sc, sc in next 6 sc), around, join w/sl st, ch1 (48)
Rnd. 9: (2sc in 1st sc, sc in next 7 sc), around, join w/sl st, ch1 (54)
Rnds. 10-16: (sc in each sc), around, join w/sl st, ch1 (54)
Rnd. 17: (sc dec 1st 2 sc tog, sc in next 7 sc), around, join w/sl st, ch1 (48)
Rnds. 18-20: (sc in each sc), around, join w/sl st, ch1 (48)
Rnd. 21: (sc dec 1st 2 sc tog, sc in next 6 sc), around, join w/sl st, ch1 (42)
Rnd. 22-24: (sc in each sc), around, join w/sl st, ch1 (42)
Rnd. 25: (sc dec 1st 2 sc tog, sc in next 5 sc), around, join w/sl st, ch1 (36) begin stuffing
Rnds. 26-32: (sc in each sc), around, join w/sl st, ch1 (36)
Rnd. 33: (sc dec 1st 2 sc tog, sc in next 4 sc), around, join w/sl st, ch1 (30)
Rnd. 34: (sc dec 1st 2 sc tog, sc in next 3 sc), around, join w/sl st, ch1 (24) continue stuffing
Rnd. 35: (sc dec 1st 2 sc tog, sc in next 2 sc), around, join w/sl st, ch1 (18)
Rnd. 36: (sc dec 1st 2 sc tog, sc in next 2 sc)4x, sc in last sc, join w/sl st, ch1 (13)
Rnds. 37-39: (sc in each sc), around, join w/sl st, ch1 (13) F/O leave 6” to sew body to head. First finish stuffing body, next you need to insert half the wooden dowel into the neck of the body. You may need to wiggle it around to get it to go in. Now insert the other side of the wooden dowel into the bottom of the head (rnd. 24). Next with your 6” sew the head and the body together.
Now you need to sew the muzzle to the head. Sew the muzzle to the head between rnd. 10 and to the head, one rnd. up from where the body and head are attached.
NOTE: I strongly suggest you pin this piece and every other piece on BEFORE you sew it together. To ensure you’re happy with the placement!


Stomach Patch:
Using White
(Note: When working in rows. DO NOT ch1, it give a straighter edge without the ch1. This principle applies to whole pattern.)
Row 1: ch4, 2sc in 1st ch from hook, sc in next ch, 2sc in last ch, turn (5)
Row 2: 2sc in 1st sc, sc in next 3 sc, 2sc in last sc, turn (7)
Row 3: 2sc in 1st sc, sc in next 5 sc, 2sc in last sc, turn (9)
Rows 4-10: (sc in each sc), across, turn (9)
Row 11: 2sc in 1st sc, sc in next 7 sc, 2sc in last sc, turn (11)
Row 12: (sc in each sc), across, turn (11)
Row 13: 2sc in 1st sc, sc in next 9 sc, 2sc in last sc, turn (13)
Rows 14-22: (sc in each sc), across, turn (13)
Row 23: sc dec 1st 2 sc tog, sc in next 9 sc, sc dec last 2 sc tog, turn (11)
Row 24: sc dec 1st 2 sc tog, sc in next 7 sc, sc dec last 2 sc tog, turn (9)
Row 25: sc dec 1st 2 sc tog, sc in next 5 sc, sc dec last 2 sc tog, F/O (7) leave a very long tail to sew stomach patch to body. Sew the stomach patch to the body between rnds. 8 & 34 on the body, with
Row 1 at the top. Once you have that complete add some details by using a 15” piece of Black. Simply make a black line around the outside of the stomach patch using a simple in and out stitch.
Under Muzzle:
Using White
Row 1: ch15, sc in 1st ch from hook and last 13 ch, turn (14)
Rows. 2-15: (sc in each sc), across, turn (14)
Row 16: sc dec 1st 2 sc tog, sc in next 10 sc, sc dec last 2 sc tog, turn (12)
Row 17: sc dec 1st 2 sc tog, sc in next 8 sc, sc dec last 2 sc tog, F/O (10) leave 15” to sew Under Muzzle to the muzzle. Sew the piece to the bottom of the “Muzzle” with Row 1 directly next to where the muzzle is sewed to the head and out to rnd. 8 on the muzzle. (Make sure you sew it to the MIDDLE on the bottom of the muzzle.)
NOTE: the next two pieces will be sewed on just about at the same time… same time…
Nose:
Starting w/Black
Row 1: ch2, 2sc in 1st ch from hook, turn (2)
Row 2: 2sc in both sc, turn (4)
Row 3: 2sc in 1st sc, sc in next 2 sc, 2sc in last sc, turn (6)
Row 4: 2sc in 1st sc, sc in next 4 sc, 2sc in last sc, turn (8)
Row 5: 2sc in 1st sc, sc in next 6 sc, 2sc in last sc, turn (10)
Row 6: 2sc in 1st sc, sc in next 8 sc, 2sc in last sc, turn (12) you’re at the middle corners now
Row 7: sc dec 1st 2 sc tog, sc in next 8 sc, sc dec last 2 sc tog, turn (10)
Row 8: sc dec 1st 2 sc tog, sc in next 6 sc, sc dec last 2 sc tog, turn (8)
Row 9: sc dec 1st 2 sc tog, sc in next 4 sc, sc dec last 2 sc tog, turn (6)
join White
Row 10: sc around whole piece w/3sc in each corner, join w/sl st in st sc, F/O (?) leave 10” to sew with in later steps. For now only PIN the nose to the end of the muzzle. Starting at the bottom on the nose having it covering rnd. 1 on the muzzle, pin it there. Now pin the two middle corners of the nose where they rest on the muzzle. Now set the body to the side for now…
Muzzle Stripe:
Using Pumpkin
Row 1: ch21, sc in 1st ch from hook and last 19 ch, turn (20)
Row 2: sc dec 1st 2 sc tog, sc in next 16 sc, sc dec last 2 sc tog, turn (18)
Row 3: sc dec 1st 2 sc tog, sc in next 14 sc, sc dec last 2 sc tog, turn (16)
Row 4: sc dec 1st 2 sc tog, sc in next 12 sc, sc dec last 2 sc tog, turn (14)
Row 5: sc dec 1st 2 sc tog, sc in next 10 sc, sc dec last 2 sc tog, turn (12)
Row 6: sc dec 1st 2 sc tog, sc in next 8 sc, sc dec last 2 sc tog, turn (10)
Rows 7-20: (sc in each sc), across, turn (10) F/O leave a very long tail to sew the Muzzle Stripe to the muzzle. Again you have to pin this piece on first. Starting with Row 20. You want Row 20 on the muzzle directly next to where the muzzle and head meet. Now at the opposite end, where the nose is, you need to pin Row 1’s corners to the middle/sides of the nose. Refer to pictures: Finish pinning the rest of the Muzzle stripe. Now that you have that done you can start sewing the muzzle stripe to the muzzle. Sew around till you get to the nose, before you finish sewing the muzzle stripe to the top of the nose stuff the space in between it a little, not much, than continue to sew muzzle stripe on. (Be careful when stuffing. I was poked by one of the pins. It didn’t feel good.)
Once you have the muzzle stripe on and sewed you can sew the nose to the muzzle using the left over White from the nose.
Inside of Ear: (Make 2)
Using White
Row 1: ch2, 2sc in 1st ch from hook, turn (2)
Row 2: 2sc in each sc, turn (4)
Row 3: (sc in each sc), across, turn (4)
Row 4: (sc dec 1st 2 sc tog)2x, turn (2)
Row 5: sc dec both sc tog, F/O (1) leave 6” to sew inside of ear to outside of ear in later step. Set to the side for now…
Outside of Ear: (Make 2)
Using Pumpkin
Rnd. 1: 4sc in magic ring, join w/sl st, ch1 (4)
Rnd. 2: (sc in each sc), around, join w/sl st, ch1 (4)
Rnd. 3: 3sc in 1st sc, sc in last 3 sc, join w/sl st, ch1 (6)
Rnd. 4: sc in 1st sc, 3sc in next sc, sc in last 4 sc, join w/sl st, ch1 (8)
Rnd. 5: sc in 1st 2 sc, 3sc in next 2 sc, sc in last 4 sc, join w/sl st, ch1 (12)
Rnds. 6-7: (sc in each sc), around, join w/sl st, ch1 (12)
Rnd. 8: (sc dec 1st 2 sc tog), around, join w/sl st, F/O (6) leave 5” to sew ear to head. Do NOT stuff! Flatten and sew outside of ear to the inside of ear. Once you have that done you can sew the completed ears to the side of the head between rnds. 6 & 10 on the head with about 13 sc between the two ears. NOTE: Notice that the ears curve backwards. Make sure you sew the inside of the ear on the right side for one ear and the left side for the other ear.
Hair:
Using White
Big Piece: (Make 2, one for each side of head)
Ch10, hdc in 1st ch from hook and next 3 ch, sc in next 3 ch, sl st in next 2 ch, (working on opposite side of ch10) sk 1st ch, sl st in next 2 ch, sc in next 2 ch, hdc in last 4 ch, F/O (17) leave 8” to sew the hair pieces to the head. Wait till you have both the big and two small pieces of hair finished so you can sew them all on at the same time…
Small Piece: (Make 4, two for each side of the head)
Ch5, sl st in 1st ch from hook, sc in next ch, hdc in last 2 ch, F/O (4) leave 4” sew you can hide the extra yarn in the head once it’s sewed on.
Now to sew the hair to the head. First pin the small piece to the head one rnd. down from the bottom of the ear. Pin the big piece in front of the small piece, over lapping the bottom corner of the small piece slightly. Next pin the last small piece behind the big piece. You need the pieces to go straight down from the ear. Now with your 8” from the big piece sew all the pieces to the head. Now hide all the remaining pieces of extra yarn by weaving them into the head.
Chin “Go- Chin “Go-tee“:
Using White
Big Piece: (Make 2, one for each side of head)
Repeat the Big Piece on the hair…
Small Piece: (Make 2)
Repeat the Small Pieces on the hair…
You will be sewing the “go-tee” on the same way you did the hair only sew it on side to side, NOT up and down. Sew the “go-tee” to the bottom of the muzzle on the white patch. Sewing it on about 5 rows back from the end of the white patch on the muzzle.
Sun Glasses:
Using Black
Part 1: (Make 2) Part 1: (Make 2)
Row 1: ch7, sc in 1st ch from hook and last 5 ch, turn (6)
Rows 2-3: (sc in each sc), across, turn (6)
Row/Rnd. 4: sc around whole piece w/3sc in each corner, join w/sl st, in 1st sc, F/O (?) hide extra yarn and set to the side for now…
Make both Part 1 pieces before you continue…
Part 2:
Ch 29, sc in 1st ch from hook and next 5 ch, *place one Part 1 next to the remaining ch29, sc through both the top of Part 1 and the next 6 ch (make sure you sc through the middle 6 sc on Part 1)*, now sc in only the ch29 for the next 4 ch, repeat steps between * & *, now sc in only the ch29 for the last 6 ch, F/O (28) leave 18” to sew/pin the sun glasses to the head. Only pin the glasses to the head, using a simple in and out stitch working across the ch28, down and around both part 1’s, and back across the other side of ch28. Refer to picture for placement ideas.
Fingers: (Make 6)
Using White
Rnd. 1: 6sc in magic ring, join w/sl st, ch1 (6)
Rnd. 2: (2sc in 1st sc, sc in next sc)3x, join w/sl st, ch1 (9)
Rnds. 3-6: (sc in each sc), around, join w/sl st, ch1 (9) F/O no extra needed. Take two fingers and tie the ending yarn in a knot, connecting two fingers, you need two sets like this. The last two fingers will be used as thumbs. Set to the side for now…
Hand:
Using White
RIGHT HAND:
Rnds. 1-6: Repeat one finger, only do NOT F/O, ch1 (9)
Rnd. 7: Connecting the fingers tog.; pick up one of the connected finger sets, count four sc away from the knot, in that 4th space make a sc, sc in next 3 sc, this will join the last finger you made to the two connected fingers, skip over to the next finger and sc around that finger (9 sc), skip back over to the middle finger and sc in the last 5 sc on that finger, sk over to the last finger you made (1st in picture) and sc around the last 9 sc on that finger, join w/sl st into the 1st sc in the middle finger, ch1 (27) NOTE: you MUST have 27 sc!
Rnds. 8-9: (sc in each sc), around, join w/sl st, ch1 (27)
Rnd. 10: sc in 1st 8 sc, place the thumb next to the hand, sc through the next 3 sc on the inside of the thumb through to the hand (sc the thumb to the hand), sc the last 16 sc on just the hand, join w/sl st, ch1 (27)
Rnd. 11: sc in 1st 8 sc, sk over to the outside of the thumb and sc around it, make 7 sc in the thumb, sk back to the hand and sc in the next 10 sc, (sc dec next 2 sc tog)3x, join w/sl st, ch1 (28)
Rnd. 12: sc in 1st 6 sc, (sc dec next 2 sc)2x, sc in next 8 sc, (sc dec next 2 sc tog)3x, sc in last 4 sc, join w/sl st, ch1 (23)
Rnd. 13: (sc in each sc), around, join w/sl st, ch1 (23) stuff fingers and thumb
Rnd. 14: (sc dec 1st 2 sc tog, sc in next 2 sc)5x, sc in last 3 sc, join w/sl st, ch1 (18) stuff palm, NOT firmly
Rnd. 15: (sc dec 1st 2 sc tog, sc in next sc), around, join w/sl st, ch1 (12)
Rnd. 16: (sc dec 1st 2 sc tog), around, join w/sl st, ch1 (6) leave 4” to cinch closed. To cinch: weave 4” through remaining sc, pull tight, fasten down, and hide remaining yarn. Set to the side for now…
LEFT HAND/ARM:
Rnds. 1-9: repeat rnds. 1-9 on right arm
Rnd. 10: sc in 1st 10 sc, place the thumb next to the hand (same as with the right hand/arm) sc through next 3, sc in last 14 sc of just the hand, join w/sl st, ch1 (27)
Rnd. 11: sc in 1st 10 sc, sc around the outside of the thumb (again make 7 sc around the thumb), sc in next 8 sc, (sc dec next 2 sc tog)3x, join w/sl st, ch1 (28)
Rnd. 12: sc in 1st 10 sc, (sc dec next 2 sc tog)3x, sc in next 8 sc, (sc dec next 2 sc tog)2x, join w/sl st, ch1 (23)
Rnd. 13: (sc in each sc), around, join w/sl st, ch1 (23) stuff fingers and thumb
Rnd. 14: (sc dec 1st 2 sc tog, sc in next 2 sc)5x, sc in last 3 sc, join w/sl st, ch1 (18)
Rnd. 15: (sc dec 1st 2 sc tog, sc in next sc), around, join w/sl st, ch1 (12)
Rnd. 16: (sc dec 1st 2 sc tog), around, join w/sl st, ch1 (6) leave 4” to cinch closed. To cinch: weave 4” through remaining sc, pull tight, fasten down, and hide remaining yarn. Set to the side for now…
Arm:
(Make 2)
Using Pumpkin
Rnd. 1: start w/8” extra, ch15, join w/sl st in 1st ch forming a ring (be sure not to let it twist), ch1, (sc in each ch), around, join w/sl st, ch1 (15)
Rnds. 2-23: (sc in each sc), around, join w/sl st, ch1 (15)
Row 24: 2sc in 1st sc, sc in next 5 sc, 2sc in next sc, turn (9) leave remaining sc unworked remaining sc unworked
Row 25: (sc in each sc), around, join w/sl st, ch1 (9)
Row 26: 2sc in 1st sc, sc in next 7 sc, 2sc in last sc, turn (11)
Rows 27-28: (sc in each sc), across, turn (11)
Row 29: sc dec 1st 2 sc tog, sc in next 7 sc, sc dec last 2 sc tog, turn (9)
Row 30: sc dec 1st 2 sc tog, sc in next 5 sc, sc dec last 2 sc tog, F/O (7) leave 12” to sew arm to hand. Stuff the arm, than place the “Rows” on the top of the hand. Sew them in place. After you have that done you can sew the completed arm to the body. Sew the arm to the body between rnds. 30 & 34 on the body. When you sew the arm to the body fold the bottom/under part of the arm in one rnd., so the arms don’t stick out.
Shoe Sole:
(Make 2) Part 1
Using White
Rnd. 1: ch16, sc in 1st ch from hook and next 9 ch, hdc in next 4 ch, 5hdc in next ch, (working on opposite side of ch16) hdc in next 5 ch, sc in next 9 ch, 3sc in last ch, join w/sl st, ch1 (36)
Rnd. 2: sc in 1st 10 st, hdc in next 6 st, 2hdc in next 3 st, hdc in next 6 st, sc in next 10 st, 3sc in last st, join w/sl st, F/O (41)
Rnd. 3: sc in 1st 16 sc, (2sc in next sc, sc in next sc)4x, sc in next 14 sc, 2sc in last 3 sc, join w/sl st, F/O (48) No extra yarn needed.
Now this is different, you don’t have to do this step but it looks better. Cut a piece of felt a little smaller than the inside of the bottom of your shoe sole
Shoe Top:
(Make 2) Part 2
Using White
Rnd. 1: ch16, sc in 1st ch from hook and next 9 ch, hdc in next 4 ch, 5hdc in next ch, (working on opposite side of ch16) hdc in next 5 ch, sc in next 9 ch, 3sc in last ch, join w/sl st, ch1 (36)
Rnd. 2: sc in 1st 10 st, hdc in next 6 st, 2hdc in next 3 st, hdc in next 6 st, sc in next 10 st, 3sc in last st, join w/sl st, ch1 (41)
Rnd. 3: sc in 1st 10 sc, hdc in next 6 hdc, (2hdc in next hdc, hdc in next hdc)4x, hdc in next 4 hdc, sc in next 10 sc, 2sc in last 3 sc, join w/sl st, ch1 (48)
Rnds. 4-5: (sc in each st), around, join w/sl st, ch1 (48)
Rnd. 6: place shoe top over shoe sole, matching the stitches, sl st through and around both the shoe top and shoe sole, sl st-ing the two pieces tog., stuff before you finis stuff before you finis stuff before you finish, join w/sl st in 1st sl st, F/O (?) hide extra yarn and set this piece to the side for now.
Leg:
(Make 2) Part 3
Using Pumpkin
Rnd. 1: start w/8” extra, ch15, join w/sl st in 1st ch forming a ring (be sure not to let it twist), ch1, (sc in each ch), around, join w/sl st, ch1 (15)
Rnds. 2-20: (sc in each sc), around, join w/sl st, ch1 (15) F/O leave 8” to sew the leg to the back/top of the shoe. Sew the leg to the outside/back of rnd. 2 on the top of shoe. Stuff the leg.
Top of Shoe:
(Make 2) Part 4
Using White
Rnd. 1: ch13, sc in 1st ch from hook and next 10 ch, 3sc in next ch, (working on opposite side of ch13) sc in next 11 ch, 3sc in last ch, join w/sl st, ch1 (28)
Rnd. 2: (sc in each sc), around, join w/sl st, ch1 (28)
Rnd. 3: sc in 1st 12 sc, 2sc in next 3 sc, sc in next 11 sc, 2sc in last 2 sc, join w/sl st, ch1 (33)
Rnd. 4: (sc in each sc), around, join w/sl st, ch1 (33)
Rnd. 5: sc dec 1st 2 sc tog, sc in next 10 sc, (sc dec next 2 sc tog)3x, sc in next 11 sc, (sc dec next 2 sc tog)2x, join w/sl st, ch1 (27)
Rnd. 6: Flatten piece and sl st across, F/O (12 or 13) leave 12” to sew “Top of Shoe” to the top shoe. Wrap this piece around the back part of the leg with rnd. 5 on the bottom, sew rnd. 5 to the top of the “shoe”.
Shoe Tongue:
(Make 2) Part 5
Using White
Rnd. 1: ch6, sc in 1st ch from hook and next 3 ch, 3sc in next ch, (working on opposite side of ch6) sc in next 3 ch, 3sc in last ch, join w/sl st, ch1 (14)
Rnds. 2-3: (sc in each sc), around, join w/sl st, ch1 (14)
Rnd. 4: flatten piece and sc across and though both sides, F/O (6) leave 6” to sew tongue to shoe. Sew rnd. 4 to the top of the shoe, in the front (in front of where the leg still shows.
Shoe Spot:
(Make 2) Part 6
Using Pumpkin
Ch3, sc in 1st ch from hook, 3sc in next ch, (working on opposite side of ch3) sc in next sc, 3sc in last sc, join w/sl st, F/O (8) leave 4” to sew shoe spot to the side of the shoe side. Sew one on the “left” side for the left shoe and the “right” side for the right shoe. Refer to picture.
Shoe Strings:
(Make 6, 2 for each shoe) Part 7
Using White
Start w/4”, ch7, F/O (7) leave 4” to sew to shoe. Using your ends sew the shoe strings to the top of shoe. Refer to picture:
Finishing the Shoe:
Using Black
With a 18” piece add the details around the shoe. Add a line around the shoe, just above the sl st that connected the shoe and shoe sole, using a simple in and out stitch. Then make a line that goes over the toe of the shoe. Refer to picture:
Tail:
Starting w/Black
Rnd. 1: 6sc in magic ring, join w/sl st, ch1 (6)
Rnd. 2: (2sc in each sc), around, join w/sl st, ch1 (12)
Rnd. 3: (2sc in 1st sc, sc in next sc), around, join w/sl st, ch1 (18)
Rnd. 4: (2sc in 1st sc, sc in next 2 sc), around, join w/sl st, ch1 (24)
Rnds. 5-7: (sc in each sc), around, join w/sl st, ch1 (24)
The next rnd. You will be switching the colors. To make it a little more simple I am abbreviating the colors: BL=black and P=pumpkin.
Rnd. 8: sc in 1st 3 sc, (change color by simply tying P to the BL, do NOT cute the BL yet. Drop the BL from your hand and continue with the P and repeat for the color change), (sw to P, sc in next 3 sc, sw to BL, sc in next 3 sc)3x BL, sw to P (cut off BL now), sc in last 3 sc, join w/sl st, ch1 (24)
Rnd. 9: (sc dec 1st 2 sc tog, sc in next 2 sc), around, join w/sl st, ch1 (18)
Rnds. 10-13: (sc in each sc), around, join w/sl st, ch1 (18) begin stuffing
Rnd. 14: (sc dec 1st 2 sc tog, sc in next 4 sc), around, join w/sl st, ch1 (15)
Rnds. 15-24: (sc in each sc), around, join w/sl st, ch1 (15) continue stuffing
Rnd. 25: (sc dec 1st 2 sc tog, sc in next 3 sc), around, join w/sl st, ch1 (12)
Rnds. 26-40: (sc in each sc), around, join w/sl st, ch1 (12) continue stuffing as you go
Rnd. 41: (sc dec 1st 2 sc tog, sc in next 2 sc), around, join w/sl st, ch1 (9)
Rnds. 42-50: (sc in each sc), around, join w/sl st, ch1 (9) F/O leave 5” to sew tail to the body. Finish stuffing and sew the tail to the body between rnds. 5 & 10 on the body.
Spots:
(I personally made 10 of each spot.)
For the spots, make as many as you like in which ever sizes you like.
Spot 1:
6sc in magic ring, join w/sl st, F/O (6) leave 4” to sew with.
Spot 2:
(2sc, hdc)2x in magic ring, join w/sl st, F/O (6) leave 4” to sew with.
Spot 3:
Ch4, sc in 1st ch from hook and next ch, 3sc in next ch, (working on opposite side of ch4) sc in next 2 ch, 3sc in last ch, join w/sl st, F/O (10) leave 6” to sew with.
Spot 4:
Ch3, sc in 1st ch from hook and last ch, F/O (2) leave 4” to sew with.
First take the beginning and ending yarn and tie them in a knot. Now you can sew them on.
Finishing:
Part 1:
Add the facial details using a 15” piece of Black, you‘ll probably need more than one piece of 15“. Refer to pictures:
Part 2:
Add the whiskers using a 5” piece of Black. Make a spot using a simple in and out stitch then in the same spot run the remaining yarn up and out of the middle of the spot then cut your whiskers to the length you like best. Make 3 whiskers on both sides of the checks.
Refer to picture:
Part 3:
Add the lines around the hand. Refer to picture:
And that’s all there is! I hope you’ve enjoy my version of Chester Cheetah. I know I have! Have a great one!