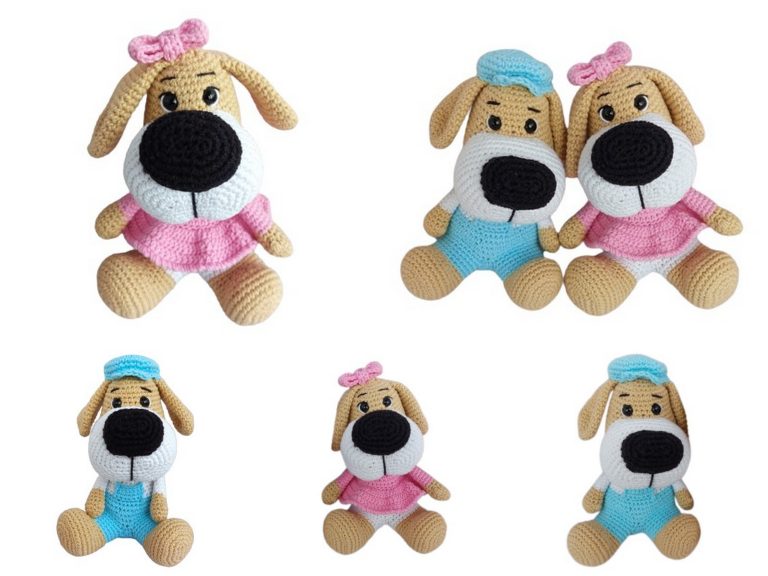
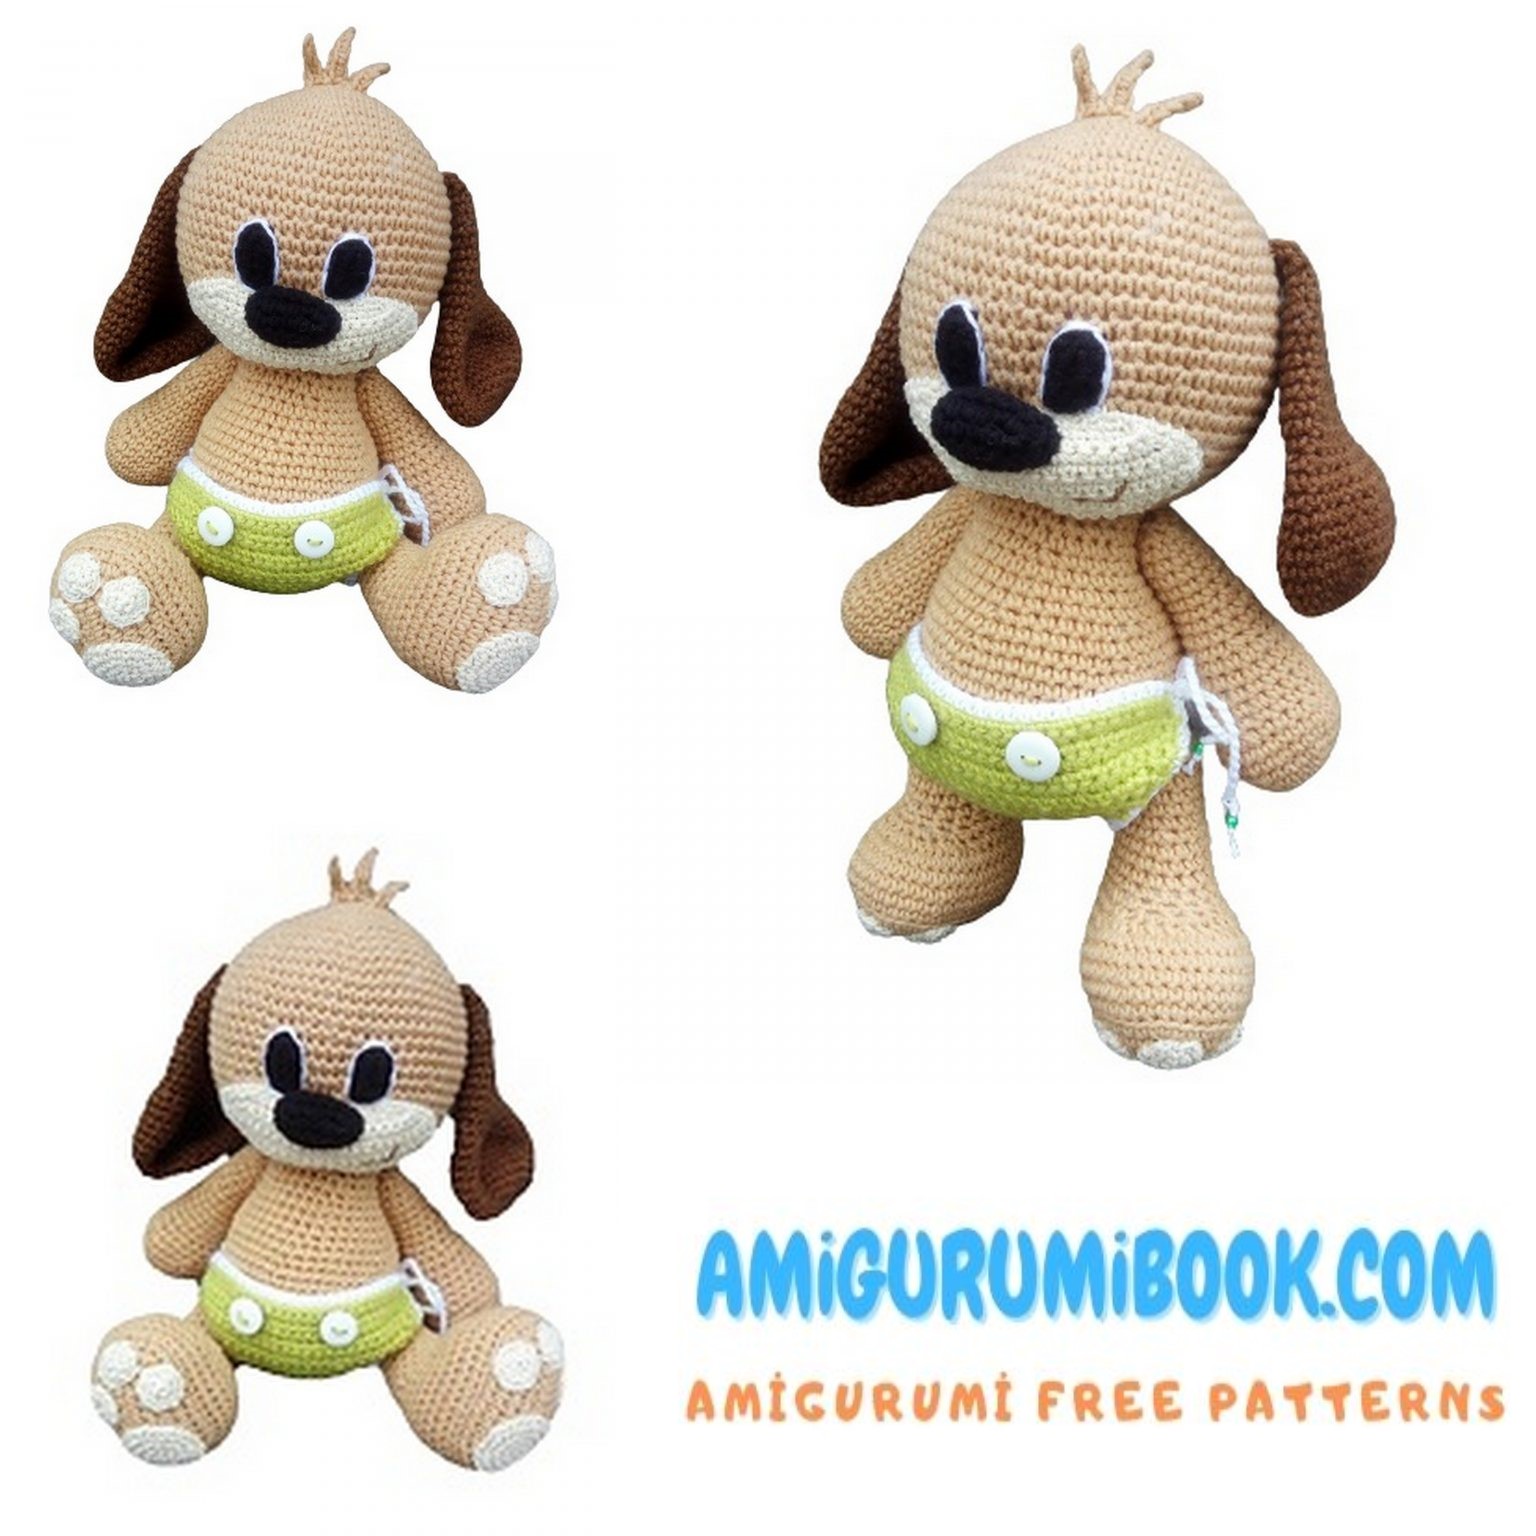
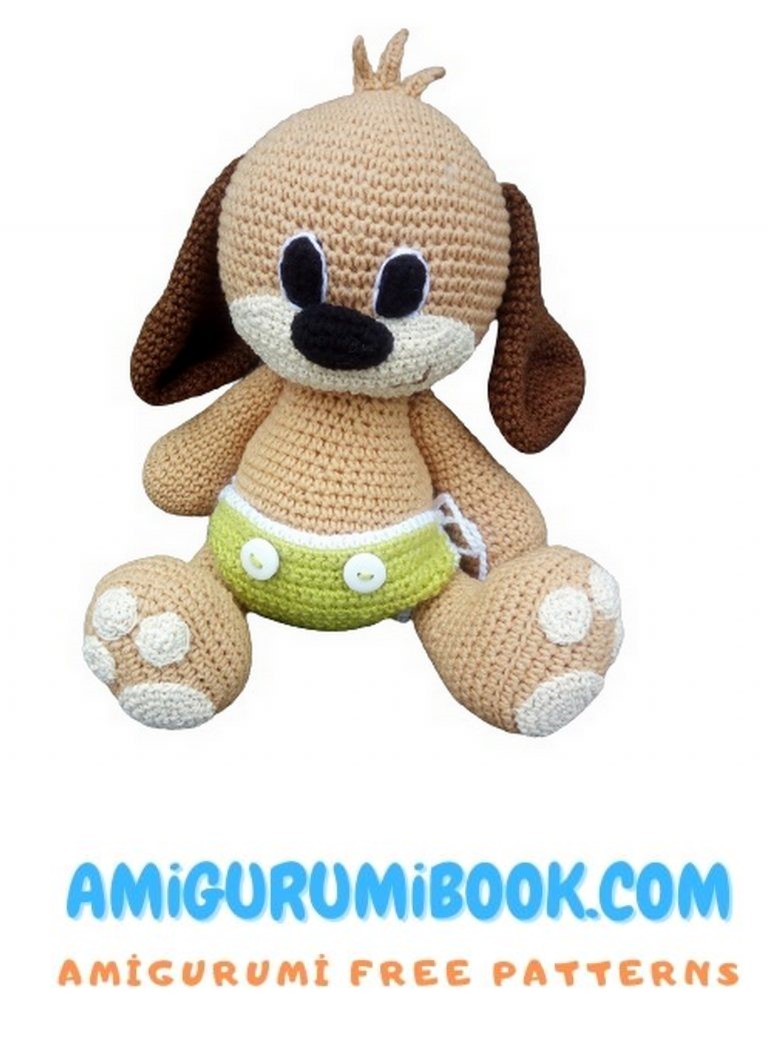
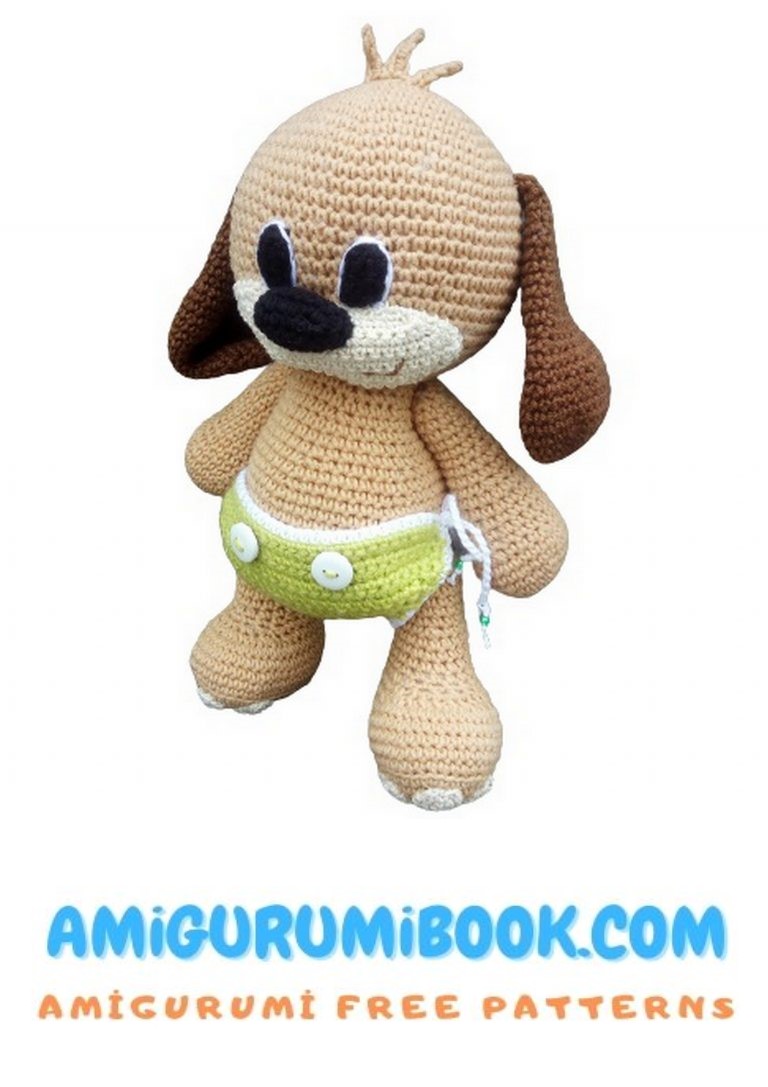
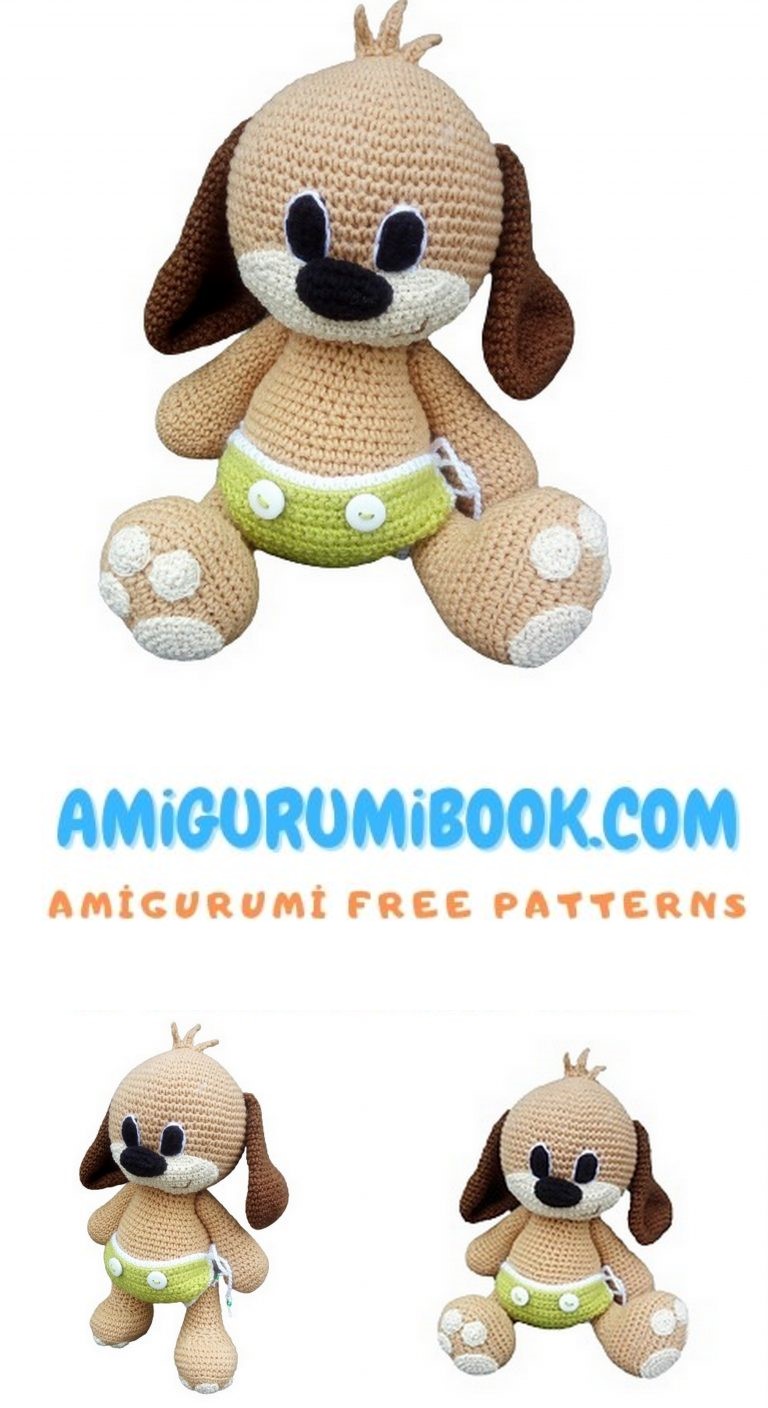
Sweet Puppy Dog Amigurumi Free Pattern
I am sharing unique amigurumi dog patterns with you for free. You will love this wonderful amigurumi cute puppy pattern.
Materials
– 1 skein (50 g) of Yarn Art Jeans light brown
– appr. 18 g of Yarn Art Jeans dark brown
– appr. 5 g of Schachenmayr Glanzperle for the muzzle and the patches on the feet
– a little of black Yarn Art Jeans for the nose and eyes
– appr. 10 g of Madame Tricote Paris Star light green for the diaper
– 2 buttons
– hooks 2.5 and 3 mm
My finished toy size : 30 cm high
Abbrevations:
Mr – magic ring
Ch – chain
Sl St – slip stitch
Sc – single crochet
Inc – increase
Dec – decrease
BLO – crochet into the back loops only
Always work in continuous rounds, unless otherwise stated.
Do not forget to mark the beginning of your crochet rounds!
For the whole body use crochet hook 2.5 mm.
Head
1. 6 sc in mr
2. 6 x inc (12)
3. (1 sc, inc) -6x (18)
4. (2 sc, inc) -6x (24)
5. (3 sc, inc) -6x (30)
6. (4 sc, inc) -6x (36)
7. (5 sc, inc) -6x (42)
8. (6 sc, inc) -6x (48)
9. (7 sc, inc) -6x (54)
10. (8 sc, inc) -6x (60)
11. (9 sc, inc) -6x (66)
12.-23. 66 sc
24. (9 sc, dec) -6x (60)
25. (8 sc, dec) -6x (54)
26. (7 sc, dec) -6x (48) – begin filling
27. (6 sc, dec) -6x (42)
28. (5 sc, dec) -6x (36)
29. (4 sc, dec) -6x (30)
30. (3 sc, dec) -6x (24) – fasten off, finish
Body
1. 6 sc in mr
2. 6 x inc (12)
3. (1 sc, inc) -6x (18)
4. (2 sc, inc) -6x (24)
5. (3 sc, inc) -6x (30)
6. (4 sc, inc) -6x (36)
7. (5 sc, inc) -6x (42)
8. (6 sc, inc) -6x (48)
9. (7 sc, inc) -6x (54)
10. (8 sc, inc) -6x (60)
11. -16. 60 sc
17. (8 sc, dec) -6x (54)
18. 54 sc
19. (7 sc, dec) -6x (48)
20. 48 sc – fill gradually
21. (6 sc, dec) -6x (42)
22. -24. 42 sc
25. (5 sc, dec) -6x (36)
26. 36 sc
27. (4 sc, dec) -6x (30)
28. (3 sc, dec) -6x (24) – fasten off
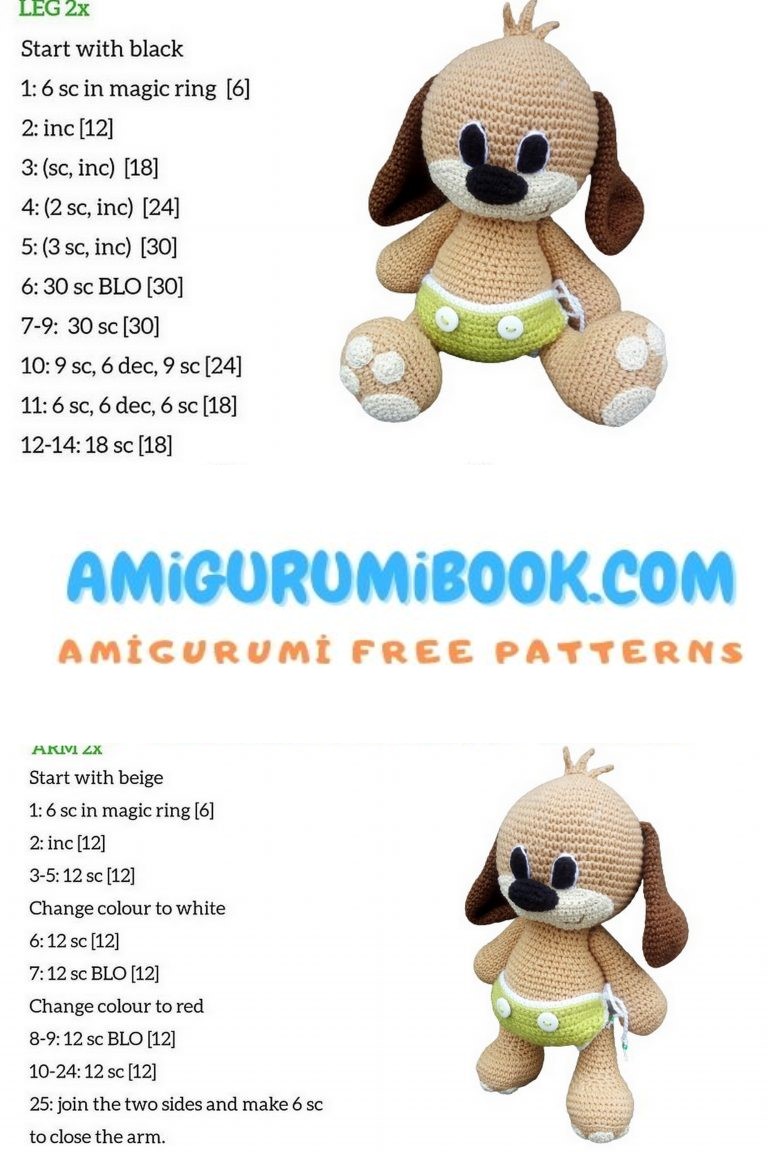
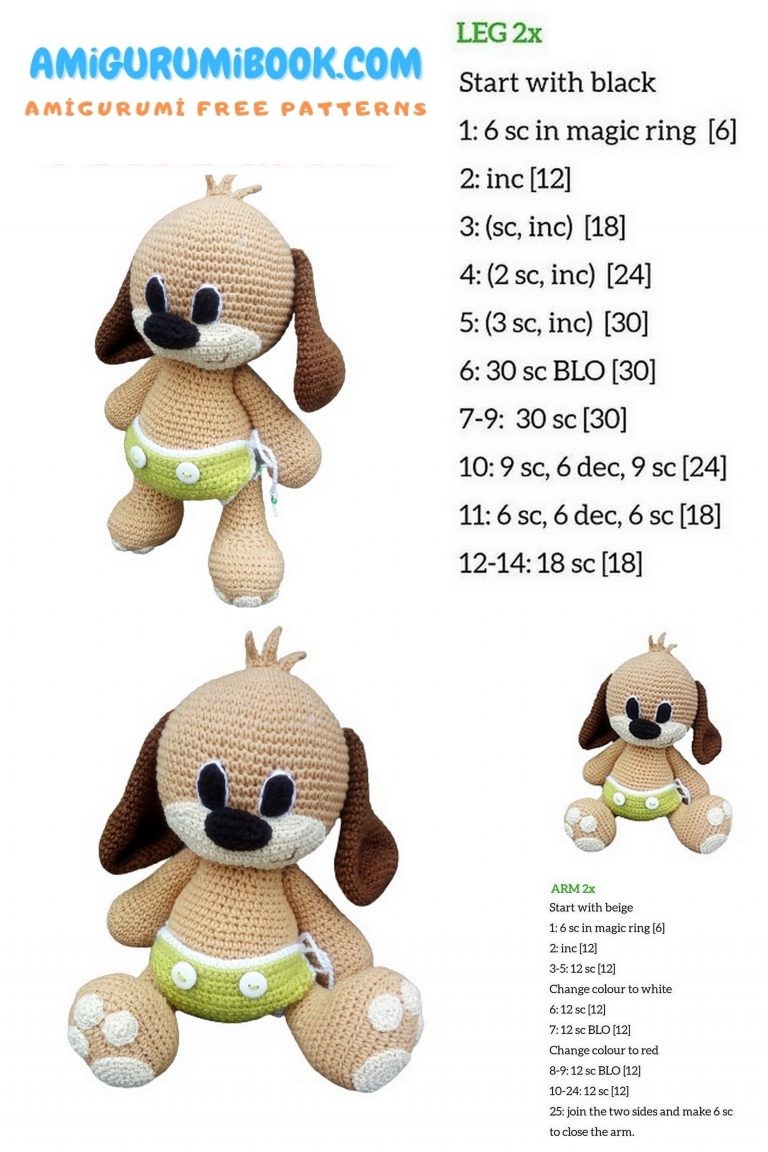
Arms(2 x)
1. 6 sc in mr
2. 6 x inc (12)
3. (1 sc, inc) -6x (18)
4. (2 sc, inc) -6x (24)
5. (3 sc, inc) -6x (30)
6.-7. 30 sc – begin filling
8. (3 sc, dec) -6x (24)
9. dec, 10 sc, dec, 10 sc (22)
10. dec, 9 sc, dec, 9 sc (20)
11. dec, 8 sc, dec, 8 sc (18)
12.-13. 18 sc
14. (4 sc, dec) -3x (15)
15.-16. 15 sc
17. (3 sc, dec) -3x (12)
18.-21. 12 sc
22. 6 x dec (6) – fasten off.
Legs (2x)
Crochet 9 Ch.
We are going to work around these chains.
Begin in the 2nd chain from the hook:
1. 7 sc, 3 sc in the next chain, continue with 6 sc, inc in the
last chain (18)
2. 6 sc, 3 x inc, 6 sc, 3 x inc (24)
3. 1 sc, inc, 6 sc, (1 sc, inc) – 3x, 6 sc, (1 sc, inc) -2x (30)
4. 2 sc, inc, 6 sc, (2 sc, inc) – 3x, 6 sc, (2 sc, inc) -2x (36)
5. 3 sc, inc, 6 sc, (3 sc, inc) – 3x, 6 sc, (3 sc, inc) -2x (42)
6. BLO : 42 sc (crochet into the back loops only)
7.-10. 42 sc
11. 8 sc, 12 x dec, 10 sc (30)
12. 8 sc, 6 x dec, 10 sc (24) – fill
13. (2 sc, dec) -6x (18)
14.-17. 18 sc
18. (4 sc, dec) -3x (15)
19.-23. 15 sc
24. (3 sc, dec) -3x (12)
25. 12 sc
26. 6 x dec – finish, leave long yarn at the end.
Ears(2x)
with dark brown
1. 6 sc in mr
2. 6 x inc (12)
3. (1 sc, inc) -6x (18)
4. (2 sc, inc) -6x (24)
5. (3 sc, inc) -6x (30)
6. (4 sc, inc) -6x (36)
7. (5 sc, inc) -6x (42)
8.-9. 42 sc
10. (5 sc, dec) -6x (36)
11.-12. 36 sc
13. (4 sc, dec) -6x (30)
14. (3 sc, dec) -6x (24)
15.-18. 24 sc
19. (2 sc, dec) -6x (18)
20.-24. 18 sc
25. (1 sc, dec) -6x (12)
26.-28. 12 sc – fasten off
Footprints
Make 6 pcs of small, 2 pcs of big.
Small
1. 6 sc in mr
2. 6 x inc (12) – finish, leave a
longer tail for sewing.
Big
1. 6 sc in mr
2. 6 x inc
3. (1 sc, inc) -6x(18)
4. (2 sc, inc) -6x (24) – finish
Muzzle
Here you are going to work in rows.
Make 17 Ch.
Start in the 2nd Ch from the hook:
1. 16 sc, Ch 1, turn
2. inc, 14 sc, inc , Ch 1, turn (18)
3. inc, 16 sc, inc, Ch 1, turn (20)
4. inc, 18 sc, inc, Ch 1, turn (22)
5. inc, 20 sc, inc, Ch 1, turn (24)
6. 24 sc, Ch 1, turn (24)
7. dec, 20 sc, dec, Ch 1, turn (22)
8. dec, 18 sc, dec , Ch 1, turn (20)
9. dec, 16 sc, dec, Ch 1, turn (18)
10. dec, 14 sc, dec, Ch 1, turn (16)
11. dec, 12 sc, dec (14) – fasten off.
You can crochet around the shape with sc for a nicer look .
Eyes (2x)
Make 5 Ch.
Work around the chains, start in the 2nd chain from the hook:
1. 3 sc, 3 sc in the next stitch, 2 sc, inc in the last stitch – finish
Nose
Crochet 7 Ch. Work around the chains, start
in the 2nd chain from the hook.
1. 5 sc, 3 sc in the next stitch, 4 sc, inc (14)
2.-3. 14 sc – fasten off.
Tail
1. 6 sc in mr
2. 6 sc (6)
3. (inc, 2 sc) -2x (8)
4. 8 sc
5. (inc, 3 sc) -2x (10)
6. 10 sc
7. (inc, 4 sc) -2x (12)
8.-10. 12 sc – finish, fill.
Diaper
The yarn for the diaper was thicker, so here I used a 3 mm hook.
We are working in rows, so at the end of each row you have to turn the work.
Begin with crocheting 31 Ch.
Start in the 2nd chain from the hook:
1. 30 sc, Ch 1, turn
2- 4. repeat with 30 sc
5. 1 sc, dec, 24 sc, dec, 1 sc, Ch 1, turn (28)
6. 1 sc, dec, 22 sc, dec, 1 sc, Ch 1, turn (26)
7. 1 sc, dec, 20 sc, dec, 1 sc, Ch 1, turn (24)
8. 1 sc, dec, 18 sc, dec, 1 sc, Ch 1, turn (22)
9. 1 sc, dec, 16 sc, dec, 1 sc, Ch 1, turn (20)
10. 1 sc, dec, 14 sc, dec, 1 sc,, Ch 1, turn (18)
11. 1 sc, dec, 12 sc, dec, 1 sc, Ch 1, turn (16)
12.-24. 16 sc
25. 1 sc, inc, 12 sc, inc, Ch 1, turn (18)
26. 1 sc, inc, 14 sc, inc, Ch 1, turn (20)
27. 20 sc, Ch 1, turn
28. 1 sc, inc, 16 sc, inc, Ch 1, turn (22)
29. 8 sc, make 6 chains and leave out 6
sc, 8 sc, Ch 1, turn – here will be the
hole for the tail
30. 8 sc, 6 sc into each of the 6 chains, 8
sc, Ch 1, turn (22)
31. 1 sc, inc, 18 sc, inc, 1 sc, Ch 1, turn (24)
32. (3 sc, inc) -6x, Ch 1, turn (30)
33.-35. 30 sc – fasten off.
I have used a small amount of white cotton yarn and crocheted the diaper all around with sc, fastened two buttons as decorations and made 20 chain long straps to each 4 corners.
The straps were decorated with little beads.
Now we have all body parts ready and can begin with the assembly. Start with attaching the head to the body.
The legs and the arms a going to move, so you can use any method you prefer. I have used just the yarns, which were left at the ends of each piece. However, do not forget to close the holes on the top of each leg and arm.
Here is a little help with creating joint parts using your thread.
My puppy looks like this
The next step is sewing on the muzzle (do not stuff it!), the nose and the ears. The ears can be attached flatly or folded in half.
Next I have made the eyes, embroidered a little mouth on the right side of the muzzle.
Now sew the tail, and the footprints on the feet.
Hair on the head
At the top of the head, somwhere at the center, slip stitch into one of the stitches on the head and make 5 chains. Make sure there is a little piece of yarn left sticking out.
Starting in the second chain, make 4 sc and sl st into another stitch on the head.
Crochet 6 chains, and turn back, crocheting 5 sc.
Repeat this step one more time again with 5 chains.
At the end of the 3rd row sl st into the head and fasten off your work.
Pull one of the yarn ends next to the other under your work (inside the head). This way you can knot the two ends together and hide them.
The puppy is finished!