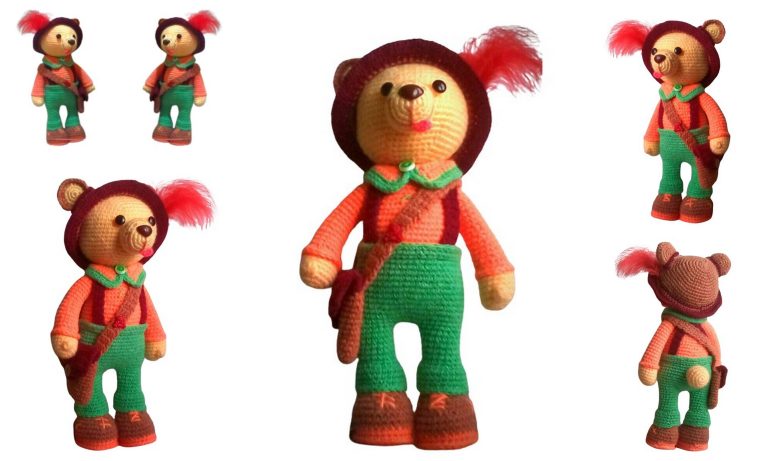
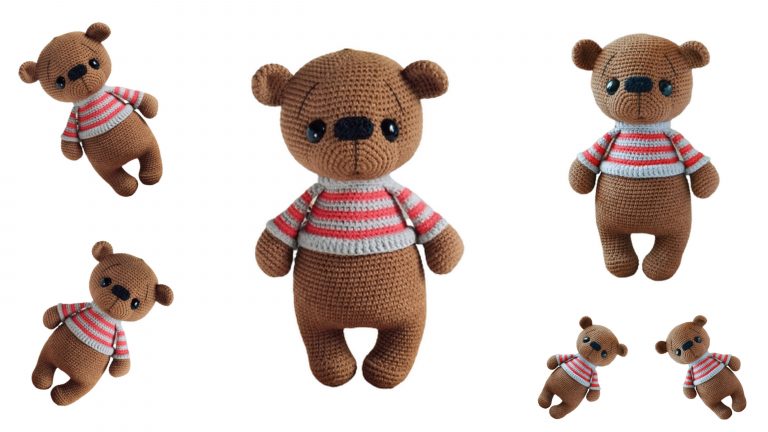
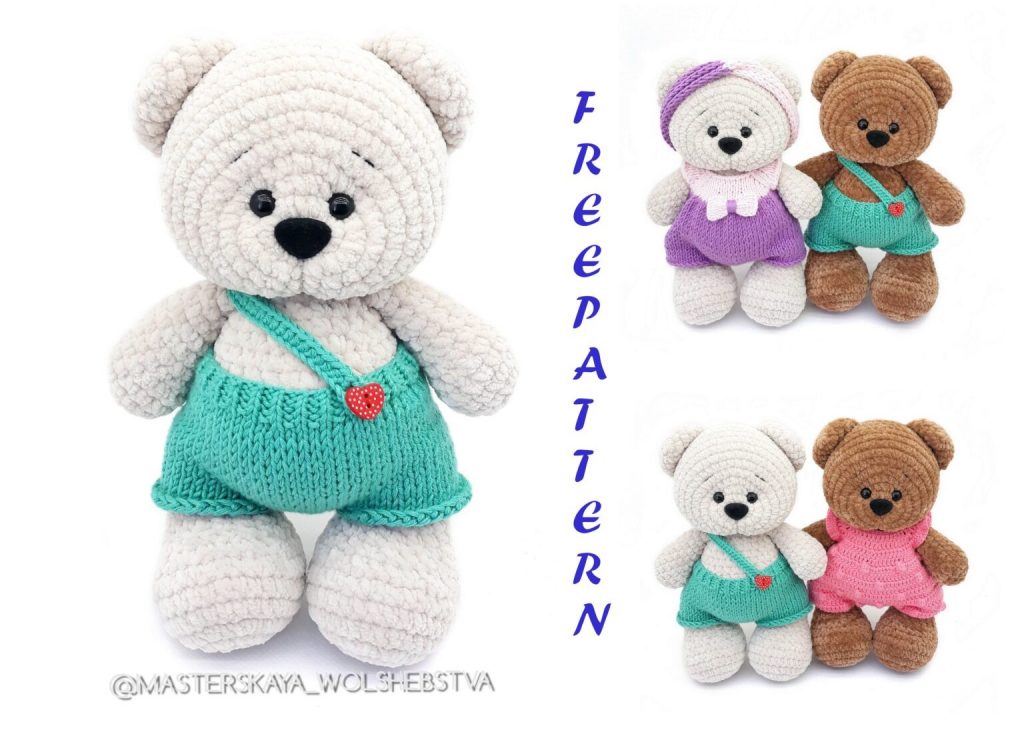
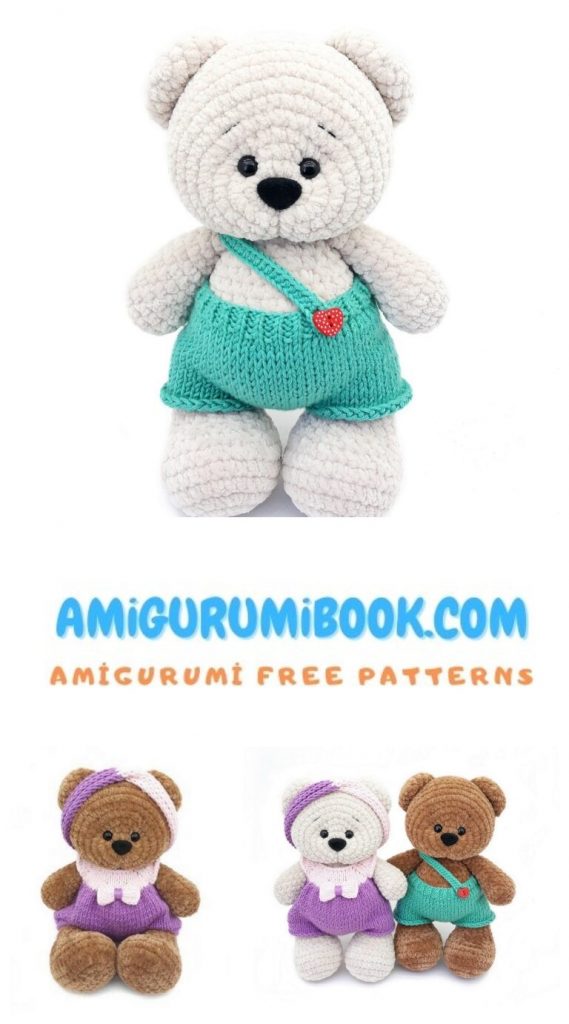
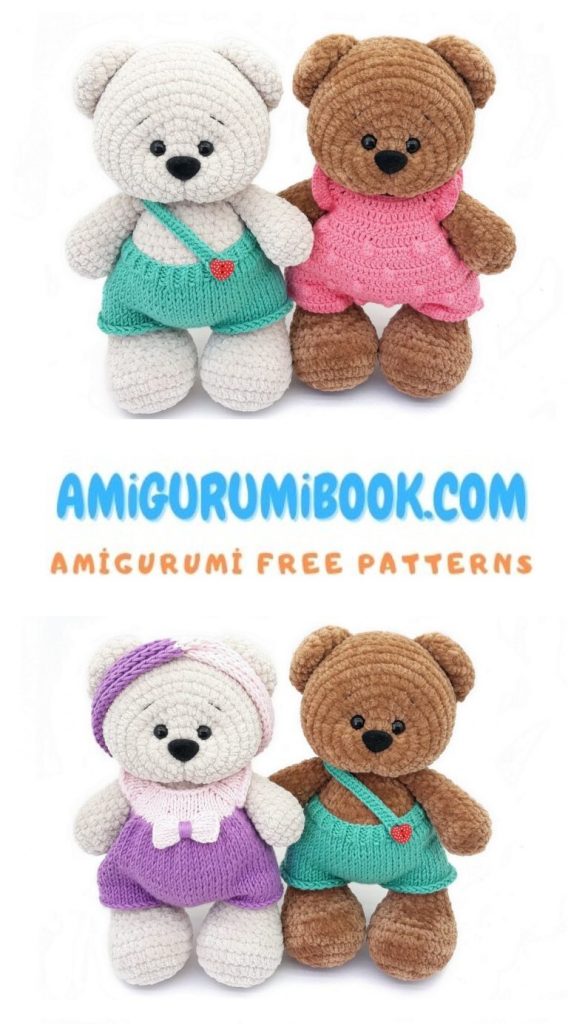
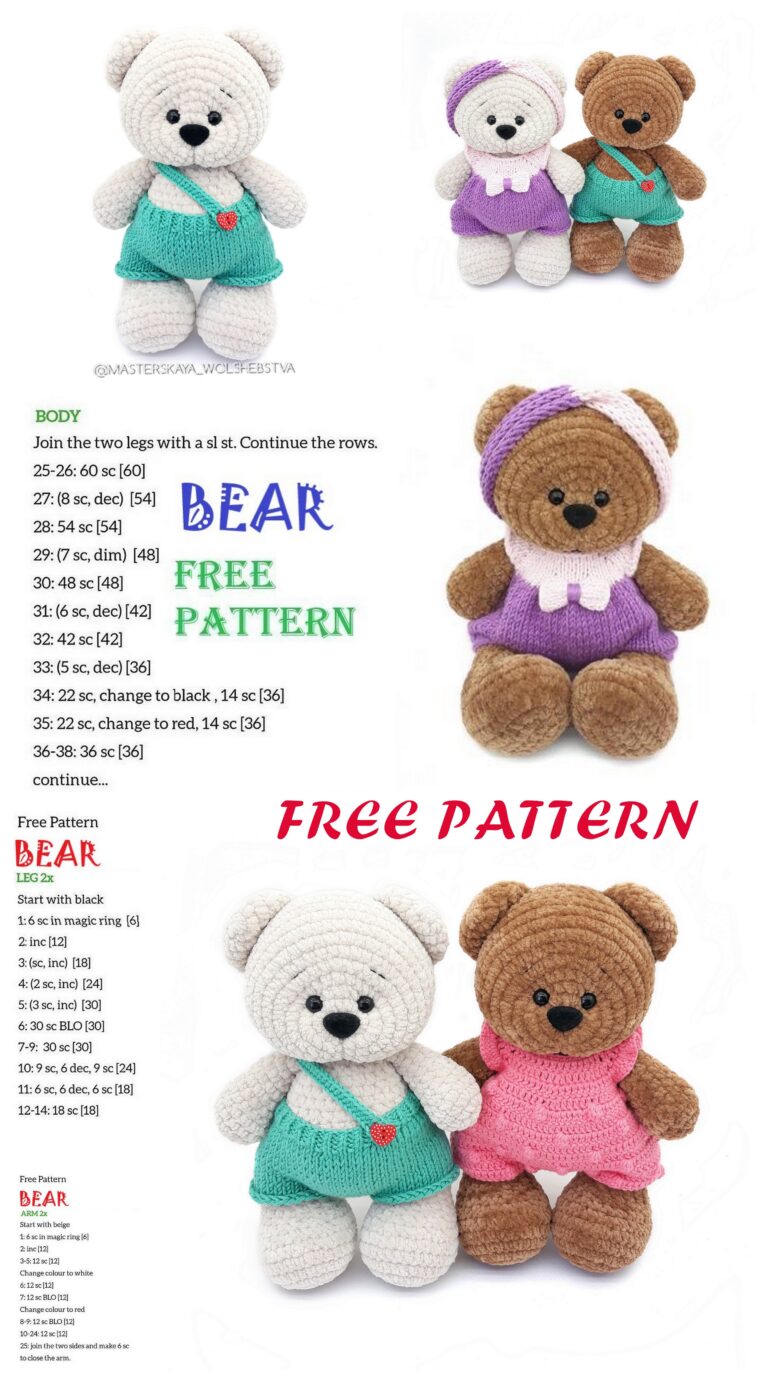
Teddy Bear in Dress Amigurumi Free Pattern
I am sharing amigurumi free patterns. teddy bears with dress are waiting for you in amigurumi free pattern.
REQUIRED MATERIALS FOR TEDDY:
The main plush yarn of Himalaya Dolphin Baby – 1 skein (or a little more – depending on the individual knitting density)
Black yarn for embroidering eyelashes and tightening the muzzle – at your discretion (I used Alize FOREVER acrylic)
Semi-cotton or acrylic yarn to match the main one for sewing parts (I sew with plush yarn)
Filler – holofiber
Hook – No. 3.5-4.5 for the body, depending on preference (I used No. 4)
Safety or sewn eyes – diameter 9.5-10 mm (I advise – sewn eyes)
Black velvet nose on screw fastening – width 2.0 cm,
height – 1.5 cm
Needle for sewing details and embroidery
Scissors
Marker for marking the beginning of a row
REQUIRED CLOTHING MATERIALS:
Semi-cotton yarn – Gazzal baby cotton XL – slightly less than 1 skein for overalls and bandages, 0.5 skein for shorts – pink No. 3411, purple No. 3414, turquoise No. 3426
Semi-cotton yarn – Alize cotton gold – 1/3 skein – pink No. 33, jeans No. 40
Hook – No. 2.1
Knitting needles – No. 3 mm and No. 4.5 mm
Buttons – 2-3 pieces with a diameter of 10-15 mm (depending on the chosen clothes)
Needle for sewing on buttons, sewing on items
Scissors
Marker for marking the beginning of the row When using Himalaya Dolphin Baby yarn and hook # 4 (tight knit), the toy comes out about 23-25 cm in size.
ABBREVİATİONS
Crochet:
Sc – single crochet
Dec – decrease
Inc – increase
Sl-st – connecting post
* – repeat the number of times
PATTERN

HEAD:
The marker runs down the center of the bottom of the bear’s face. If necessary – knit an offset loop – depends on the individual knitting density.
1. MAGIC RING, 9 sc into magic ring (9)
2.9 inc (18)
Remove the marker, knit another 2 sc, put the marker – this is necessary to level the spiral transition of knitting under the nose and it became more invisible.
3.3 sc, 4 inc, 2 sc, 1 inc, 2 sc, 4 inc, 2 sc (27)
4.27 sc (27)
5.3 sc, (inc, 1 sc) * 4, 2 sc, 2 inc, 2 sc, (1 sc, inc) * 4, 2 sc (37)
6.37 sc (in this row I have + 1 offset loop, be guided by your knitting density) (37)
7.3 sc, (2 sc, inc) * 4, 1 sc, inc, 1 sc, 2 inc, 1 sc, inc, 1 sc, (inc, 2 sc) * 4, 2 sc (49)
• Increases marked in blue – the relative center of the toy’s muzzle.
8-12. 49 sc (49)
13.47 sc, dec (48) – the decrease should be located in the center of the lower part of the head
14. (6 sc, dec) * 6 (42)
15.42 sc (42)
16. (5 sc, dec) * 6 (36)
17. (4 sc, dec) * 6 (30)
18. (3 sc, dec) * 6 (24)
At this stage, without tying it to the end, put the holofiber, spreading it well on the sides. And we do a nose-tightening. The muzzle of the toy depends on how well the holofiber is distributed.
NOSE TIGHTENING:
• Insert a needle with acrylic thread of yarn color or black color from the lower side of the muzzle (green pin or pink) – in the center between 9-10 row. We display amigurumi in the center of the ring.
We again insert the needle under the muzzle in the center between 9-10 rows and draw the amigurumi in the center of the ring. The result is a loop over the knitted fabric. We make another such loop into the same holes and tighten – we pull the ends of the thread in opposite directions, pulling the muzzle, – the muzzle is slightly flattened, and cheeks are formed. We fasten it by tying 2-3 knots under the muzzle in the area of the 9-10 row
Insert the spout into the amigurumi ring. We make sure that the acrylic thread of the tightening coincides with the center of the nose, so that the muzzle is symmetrical and beautiful. We take out a part of the holofiber from the head so that you can put the plug on the spout, nothing more. We put a plug, watch the symmetry of the thread. We put back the holofiber.
We distribute the holofiber well into the cheeks and forehead, forming a triangle.
We finish knitting the head.
19. (2 sc, dec) * 6 (18)
20. (1 sc, dec) * 6 (12)
21.6 dec (6).
We report the holofiber, tighten, fasten, cut and hide the thread.
If you have difficulties with the plug and tightening, you can first insert the spout, fixing it, and do the tightening under it after finishing knitting the head. But the expression of the toy’s muzzle is already changing! You can also glue or embroider the spout.


EYE TREATMENT:
• If you used a long enough thread to tighten your nose, you can continue to tighten your eyes with it. Or take a new one.
We insert the needle under the muzzle at the fixation point of the nose tightening (point D) and bring it out above the nose between rows 3 and 4 (point A), insert the needle between rows 3 and 2 (point B), as if grabbing 1 sc and pull it out under the muzzle in in the center of 11-12 rows (point D1).
Tightening according to the scheme: D A B D1.
Pull, pulling the eye. We fix by tying 2-3 knots.
Similarly, we tighten the second eye.
Tightening according to the scheme: D1 B D D
Repeat a couple of times for each eye. The distance between the ties is 6-7 sc. The distance between the eyes after sewing is about 4 sc.
• We take the sewn eyes and sew them in the places of the tightening, with their help, also pulling the muzzle a little. If you have false eyes, they must be fixed at the same time as the nose is installed.
We embroider eyelashes, eyebrows – at will.
IMPORTANT! The expression of the toy’s muzzle depends on the quality and strength of the tightening, the location of the eyes, and the stuffing of the head! Make 2-3 knots after each tightening or fixing the eye – if the thread breaks, the ties made earlier will remain in place.
BODY:
1. MAGIC RING, 6 sc into magic ring (6)
2.6 inc (12)
3. (1 sc, inc) * 6 (18)
4.1 sc, inc, (2 sc, inc) * 5, 1 sc (24)
5. (3 sc, inc) * 6 (30)
6.2 sc, inc, (4 sc, inc) * 5, 2 sc (36)
7. (5 sc, inc) * 6 (42)
8-10. 42 sc (42)
11. (5 sc, dec) * 6 (36)
12.36 sc (36)
13. (4 sc, dec) * 6 (30)
14.30 sc (30)
15. (3 sc, dec) * 6 (24)
16.24 sc (24)
17. (2 sc, dec) * 6 (18)
18.18 sc (18)
19. (4 sc, dec) * 3 (15)
20.15 sc, sl-st (15)
• Leave the thread to be sewn to the head.
Fill the body with holofiber, evenly distributing it from the center to the sides.
Sew the head to the body. Due to the tightening, the head itself seems to sit on the body at an angle, absorbing the last 2 rows (according to the pyramid principle).
UPPER LEGS (2 parts):
Both legs up to the 6th row are knitted in the same way, from the 6th row there are small discrepancies for the symmetry of the legs.
1. MAGIC RING, 6 sc into magic ring (6)
2.6 inc (12)
3. (3 sc, inc) * 3 (15)
4-5. 15 sc (15)
Left foot:
6.2 dec, 11 sc (13)
7.13 sc (13)
8.dec, 11 sc (12)
9.12 sc (12)
10.dec, 10 sc (11)
Right foot
6.2 sc, 2 dec, 9 sc (13)
7.13 sc (13)
8.2 sc, dec, 9 sc (12)
9.12 sc (12)
10.2 sc, dec, 8 sc (11)
Place holofiber in the lower part of the legs.
11.dec, 9 sc (10)
12.dec, 8 sc (9)
13.dec, 7 sc (8)
11.2 sc, dec, 7 sc (10)
12.2 sc, dec, 6 sc (9)
13.2 sc, dec, 5 sc (8)
Optionally, row 13 can not be knitted – 12 rows of paws are connected in a beige bear, 13 rows of paws are connected in a peach bear.
Put in a little holofiber, in the last 2 rows put a little holofiber so that after sewing the paws do not stick out, but neatly bend around the body contour.
Fold in half, connect with 4 sc
• Leave the thread for sewing.
When sewing the paws to the body, the places of decreases in the 6th row should be clearly expressed and facing the body – the paws, as it were, repeat the contour of the body.
Sew on the paws, stepping back 1 row from the junction of the head with the body. Distance between paws in front is 5-6 sc, behind – 5-6 sc. You can sew on the paws at different distances in the front and back, but keep this in mind when knitting clothes.
LOWER FEET (2 parts):
1. Cast on 6 ch Begin to knit into the second stitch from the hook – inc, 3 sc, 5 sc in 1, continue to knit along the second side of the ch chain – 3 sc, 3 sc into the first unknitted stitch of the ch chain that we skipped at the beginning row (16)
2.2 inc, 3 sc, 5 inc, 3 sc, 3 inc (26)
3. (1 sc, inc) * 2, 3 sc, (1 sc, inc) * 5, 3 sc, (1 sc, inc) * 3 (36)
4-6. 36 sc (36)
• The marker runs down the center of the heel, the reference point is the ch chain from the first row. If necessary, knit an offset loop to reach the center. The offset loop is individual and depends on the yarn and knitting density.
Right paw:
7.9 sc, (dec, 1 sc) * 6, 9 sc (30)
8.6 sc, (1 sc, dec) * 6, 6 sc (24)
9.3 sc, (dec, 1 sc) * 6, 3 sc (18)
10.18 sc (18)
Left paw:
7.9 sc, (1 sc, dec) * 6, 9 sc (30)
8.6 sc, (dec, 1 sc) * 6, 6 sc (24)
9.3 sc, (1 sc, dec) * 6, 3 sc (18)
10.18 sc (18)
Fill the paws with holofiber, distributing the filler well on the sides. Pay special attention to the heel.
11.7 sc, 3 sc together, 8 sc (16)
12.16 sc (16)
13.7 sc, dec, 7 sc (15)
14.15 sc (15)
15.7 sc, dec, 6 sc (14)
16.14 sc (14)
17.7 sc, dec, 5 sc (13)
11.8 sc, 3 sc together, 7 sc (16)
12.16 sc (16)
13.7 sc, dec, 7 sc (15)
14.15 sc (15)
15.6 sc, dec, 7 sc (14)
16.14 sc (14)
17.5 sc, dec, 7 sc (13)
Put in the holofiber, in the last 3 rows put a little holofiber so that after sewing the paws do not stick out, but neatly bend around the body contour.
Fold in half, connect by knitting 5 sc (knit on 1 side with a decrease)
Sew the paws to the body between the 9th and 10th row.
TAIL:
1. MAGIC RING, 6 sc into magic ring
2. (1 sc, inc) * 3 (9)
3.9 sc (9)
4. (1 sc, dec) * 3, sl-st (6)
• Leave the thread for sewing.
Fill with holofiber.
Sew on between 6-8 rows and make sure the correct position is symmetrical about the legs and the center of the back.
Ears (2 parts):
1. MAGIC RING, 6 sc into magic ring (6)
2.6 inc (12)
3. (1 sc, inc) * 6 (18)
4. (2 sc, inc) * 6 (24)
5. (2 sc, dec) * 6 (18)
Fold each ear in half, knit 9 sc. Leave the thread for sewing.
Sew to head between 12 and 13 side by side at a distance of 6-7 sc
TEDDY IS READY!
CLOTHES FOR BEARS
SPOKES
NECESSARY MATERIALS:
Semi-cotton yarn – Gazzal baby cotton XL – slightly less than 1 skein for overalls and bandages, 0.5 skein for shorts – pink No. 3411, purple No. 3414, turquoise No. 3426
Hook – No. 2.1
Knitting needles – No. 3 mm and No. 4.5 mm
Buttons – 2-3 pieces with a diameter of 10-15 mm (depending on the chosen clothes)
Needle for sewing on buttons, sewing on items
Scissors
Marker for marking the beginning of a row
ABBREVATİONS
Spokes:
persons – front loop
Purl – purl loop
N – yarn
КР – edge loop – ALWAYS REMOVED UNSECURED
Inc – increase through yarn
* – repeat the number of times
Crochet:
Sc – single crochet
Sl-st – slip stitch
Ch – chain
SHORTS
Cast on 59 stitches on needles # 3.
We begin to knit with a 1×1 elastic band.
1.1 KP, (knit, purl) * 29 (59)
2.1 KP, (purl, knit) * 28, 2 purl (59)
3.1 KP, (knit, purl) * 29 (59)
4.1 KP, (purl, knit) * 28, 2 purl (59)
5.1 KP, (knit, purl) * 29 (59)
• Change the needles to size 4.5.
6.1 KP, 5 knit, inc, (6 knit, inc) * 8, 4 knit, purl (68)
7.1 KP, 67 purl (68)
8.1 KP, 66 knit, purl (68)
9. Bind off 3 loops with purl loops by tying 2 loops together, 57 purl. When there are 7 loops on the needles, use a hook on the other side of the knitting needle to close 6 loops. Purl the remaining loop after closing knitting (59)
10.1 KP, 57 knit, purl (59)
11.1 KP, 58 purl (59)
12.1 КР, 57 knit, from the last loop we knit 3 loops – for the back wall 1 knit, for the front wall 1 knit, for the front wall 1 purl (61)
13.1 КР, 59 purl, from the last loop we knit 3 loops – behind the back wall 1 purl, behind the front wall 1 purl, behind the back wall 1 purl (63)
14.1 КР, 61 knit, from the last loop we knit 2 loops – for the front wall 1 knit, for the back wall 1 purl (64)
15.1 КР, 62 purl, from the last loop we knit 2 loops – for the front wall 1 purl, for the back wall 1 purl (65)
16.1 KP, 63 knit, purl (65)
17.1 KP, 64 purl (65)
18.1 KP, 63 knit, purl (65)
19.1 KP, 64 purl (65)
20.1 KP, 63 knit, purl (65)
21.1 KP, 64 purl (65)
22.1 KP, 63 knit, purl (65)
23.1 KP, 64 purl (65)
24.1 KP, 63 knit, purl (65)
25. Close knitting in an elastic way with purl loops – remove 1, purl 1, transfer 2 loops from the right knitting needle to the left knitting needle, knit 2 together with the purl; 1 purl, from the right knitting needle, transfer 2 loops to the left knitting needle, knit 2 together with the purl. Thus, close the news row.
• Leave a long end to connect the shorts under the ponytail.
With the help of a crochet hook and the left thread at the beginning of knitting, we form a loop for the button – we knit 8-9 ch, fasten in the place of the decrease in the 9th row.
• Sew a button on the opposite side.
• Connect 2 halves under the tail with a crochet hook with connecting posts or sew with a needle and thread.
Using a crochet / needle and thread, connect the section between the legs – 2-3 loops before and after the seam. No more, tk. paws may not fit in the diameter of the paw holes in the shorts.
• Sew on the front button for the strap.
Shorts strap:
From the side of the back we attach the thread, with the help of a hook we collect 48 ch. skip 9 loops (hole for the button), at 10 loops from the hook, we begin to knit hdc to the end of the ch chain, fasten the thread.
Perhaps your chain and the number of skipped loops will be more / less – depending on the size of the toy and the density of knitting.
OVERALLS
We collect 36 loops on the needles No. 3, we knit with yarn of an additional (pink for me) color.
The sleeve placket is highlighted in blue.
1.1 KP, 35 purl (36)
2.1 KP, 5 knit, inc, 1 knit, 1 knit, inc, 5 knit, inc, 1 knit, 1 knit, inc, 8 knit, inc, 1 knit, 1 knit, inc, 5 knit, inc, 1 knit, 1 knit, inc, 3 knit, 1 purl (44)
3.1 KP, 43 purl (44)
4.1 KP, 6 knit, inc, 1 knit, 1 knit, inc, 7 knit, inc, 1 knit, 1 knit, inc, 10 knit, inc, 1 knit, 1 knit, inc, 7 knit, inc, 1 knit, 1 knit, inc, 4 knit, 1 purl (52)
5.1 KP, 51 purl (52)
6.1 KP, 2 knit, inc, 5 knit, inc, 1 knit, 1 knit, inc, 9 knit, inc, 1 knit, 1 knit, inc, (4 knit, inc) * 2, 4 knit, inc, 1 knit, 1 knit, inc, 9 knit, inc, 1 knit, 1 knit, inc, 3 knit, inc, 2 knit, 1 purl (64)
7.1 KP, 63 purl (64)
8.1 KP, 3 knit, inc, 6 knit, inc, 1 knit, 1 knit, inc, 3 knit, inc, 5 knit, inc, 3 knit, inc, 1 knit, 1 knit, inc, 5 knit, inc , 6 knit, inc, 5 knit, inc, 1 knit, 1 knit, inc, 3 knit, inc, 5 knit, inc, 3 knit, inc, 1 knit, 1 knit, inc, 4 knit, inc, 3 knit, 1 purl (70)
9. 1 КР, 10 purl, close the next 15 stitches of the sleeves in an elastic way, knitting with purl loops (the last loop goes to the front placket). Knit 23 more persons (in total, the front plank is 24 loops), close the next 16 loops of the sleeves, knitting with purl loops (the last loop goes to the back plank). Knit 11 more knit, purl (48)
Close the loops marked in blue.
Change the knitting needles to No. 4.5 and the color of the yarn to another (optional, I have purple).
10.1 КР, (2 knit, inc) * 5, 1 knit, from the next loop we knit 2 faces of the loop (first behind the front wall of the loop, then behind the back wall of the loop), cast on 3 loops (due to the closed loops of the sleeve), from next loop we knit 2 faces of the loop (first behind the front wall of the loop, then behind the back wall of the loop), (2 knit, inc) * 10, 2 knit, from the next loop we knit 2 faces of the loop (first for the front wall of the loop, then behind the back wall loops), cast on 3 loops (due to the closed loops of the sleeves), from the next loop we knit 2 faces of the loop (first behind the front wall of the loop, then behind the back wall of the loop), (2 knit, inc) * 4, knit, purl (77)
11.1 KP, 76 purl (77)
12.1 KP, 75 knit, purl (77)
13.1 KP, 76 purl (77)
14.1 KP, 75 knit, purl (77)
15.1 KP, 76 purl (77)
16.1 KP, 75 knit, purl (77)
If you close the loops in the 17th row, you get a cute dress.
17.1 KP, 76 purl (77)
18.1 KP, 75 knit, purl (77)
19.1 KP, 76 purl (77)
20.1 KP, 75 knit, purl (77)
21.2 close loops by knitting 2 loops together with purl (the last loop counts towards the total number of loops in the row), 68 purl, when 6 loops remain to the end of the row, use a hook on the other side of the knitting needle to close 5 loops, knit the last loop formed with purl (70 )
22.1 KP, 68 knit, purl (70)
23.1 КР, 68 purl, from the last loop tie 3 loops – 1 purl behind the back wall of the loop, 1 purl behind the front wall of the loop, 1 purl behind the back wall of the loop) (72)
24.1 KP, 70 knit, from the last loop work 3 loops – K1 for the front wall of the loop, K1 for the back wall of the loop, 1 purl for the front wall of the loop (74)
25.1 KP, 72 purl, from the last loop tie 2 loops – 1 purl behind the front wall of the hinge, 1 purl behind the back wall of the hinge (75)
26.1 KP, 73 knit, from the last loop, tie 2 loops – K1 for the front wall of the loop, 1 purl for the back wall of the loop (76)
27.1 KP, 75 purl (76)
28.1 KP, 74 knit, purl (76)
29.1 KP, 75 purl (76)
30.1 KP, 74 knit, purl (76)
31.1 KP, 75 purl (76)
32.1 CD, 74 knit, purl (76)
33.1 KP, 75 purl (76)
34.1 CD, 74 knit, purl (76)
35.1 KP, 75 purl (76)
36.1 KP, 74 knit, purl (76)
37. Close row by knitting 2 stitches together with purl. Do not tighten the edge, close it loosely enough, otherwise the paw will not get through.
Or close it in an elastic way like in shorts – it depends on the individual knitting density.
• Leave a long end for connection under the tail.
In the place of the decrease in the 21st row, attach the thread and using the hook No. 2.1 we knit the loops for the buttons – 6 ch, (+ skip 1 loop along the bar), 5 sc, 5 ch (+ skip 1 loop along the bar), 5 sc , 6 ch
Sew 3 buttons on the opposite side.
Connect 2 halves under the tail using a crochet hook
connecting posts or sew with a needle and thread.
Using a crochet / needle and thread, connect the section between the legs – 2-3 loops before and after the seam. No more, tk. paws may not fit in the diameter of the paw holes in the shorts.
Bow on jumpsuit:
Cast on 7 stitches on # 3 needles tight enough.
1.1 KP, 6 purl (7)
2.1 KP, 5 knit, purl (7)
Knit 16 rows, alternating rows 1 and 2.
Closing with a hook.
Using a needle, pull the center, rewind the middle, tie / sew to the jumpsuit.
Headband:
Cast on 8 stitches on needles # 3.
We knit with a lush elastic band 1×1 55-56 rows (when knitting front loops, insert a knitting needle 1 row lower, purl loops are knitted as usual), change the color of the yarn at will and knit 55-56 more rows (the number of rows may differ due to individual density knitting and head size of the toy).
Close knitting. We hold by 1 end of the bandage, scroll the second one 1 time, and in this position we connect / sew 2 halves using a hook and connecting posts.
FLUFFY RUBBER:
1.1 CD, (knit, purl) * 3, purl (8)
2.1 KP, (purl, knit) * 3, 1 purl (8)
• We always knit the faces of the loop in the loop of the previous row!
Alternate rows 1 and 2.
The number of rows depends on the volume of the elastic head, in the process of knitting, try on a toy.
CLOTHES FOR BEARS
HOOK
NECESSARY MATERIALS:
Semi-cotton yarn – Alize cotton gold – 1/3 skein – pink No. 33, jeans No. 40.
Hook – No. 2.1
Knitting needles – No. 3 mm and No. 4.5 mm
Buttons – 2-3 pieces with a diameter of 10-15 mm (depending on the chosen clothes)
Needle for sewing on buttons, sewing on items
Scissors
Marker for marking the beginning of a row
ABBREVATİONS
Crochet:
KA – amigurumi ring
Sc – single crochet
hdc – half double crochet
Dc – double crochet
W – bump – 5 loose dc in 1 loop
Dec – decrease
Inc – increase
Sl-st – connecting post
Ch – chain
V – combination “dc, ch, dc”
* – repeat the number of times
JACKET WITH WOOL
Knit with crochet stitches. At the beginning of each row, we do 2 ch lifts. In the next row, 2 ch lifts are considered a separate dc.
We collect 48 ch + 1 ch lifting.
1. In the second loop from the hook, knit 48 sc (48)
• Start each subsequent row with 2 ch lifts, which are considered separate dc and are counted in the total number of stitches in the row.
2. Turn, 2 ch, 1 dc, 2 ch, 2 loops on the canvas skip (form a buttonhole), 5 dc, V, 8 dc, V, 12 dc, V, 8 dc, V, 8 dc (57)
• V – this icon means that in 1 dc you need to knit the following combination: (dc, ch, dc). Further in the description, this combination is replaced by this symbol V. This combination in each row is knitted one above the other under the ch of the combination. It forms the sleeves and the front + back of the dress.
3. Rotate, 2 ch, 4 dc, inc, 4 dc, V, 2 dc, inc, 4 dc, inc, 2 dc, V, (3 dc, inc) * 3, 2 dc, V, 2 dc, inc , 4 dc, inc, 2 dc, V, 4 dc, inc, 5 dc (75)
4. Pivot, 2 ch, 6 dc, inc, 5 dc, V, (3 dc in 1 loop) * 14, V, 3 dc, inc, 5 dc, inc, 5 dc, inc, 3 dc, V, ( 3 dc in 1 loop) * 14, V, 12 dc (144)
To reduce the puffiness of the sleeve, you can do 2 dc in 1 loop, or alternate 2 dc in 1/3 dc in 1.
5. Twist, 2 ch, 14 dc (the last 14th dc we knit under ch V), 7 ch, skip the sleeve line, and start knitting in ch of the next combination V, 4 dc, inc, 8 dc, inc, 7 dc, inc, 4 dc, 7 ch, skip the sleeve line and start knitting in ch next V, 16 dc (74)
6. Turn, 2 ch, 1 dc, 2 ch, 2 loops on the canvas skip (we form a loop for the button), 2 dc, (3 dc in 1 loop) * 64, 5 dc (203)
To reduce the flounce of the shuttlecock, you can do 2 dc in 1 loop, or alternate 2 dc in 1/3 dc in 1.
7. Turn, 2 ch, 203 dc (204)
Fasten the thread, cut.
• Sew on 2 buttons on the opposite side of the strip.
OVERALLS
Knit with crochet stitches. At the beginning of each row, we do 2 ch lifts. In the next row, 2 ch lifts are considered a separate dc.
We collect 48 ch + 1 ch lifting.
1. In the second loop from the hook, knit 48 sc (48)
• Start each subsequent row with 2 ch lifts, which are considered separate dc and are counted in the total number of stitches in the row.
2. Turn, 2 ch, 1 dc, 2 ch, 2 loops on the canvas skip (form a buttonhole), 5 dc, V, 8 dc, V, 12 dc, V, 8 dc, V, 8 dc (57)
• V – this icon means that in 1 dc you need to knit the following combination: (dc, ch, dc). Further in the description, this combination is replaced by this symbol V. This combination in each row is knitted one above the other under the ch of the combination. It forms the sleeves and the front + back of the dress.
3. Rotate, 2 ch, 4 dc, inc, 4 dc, V, 2 dc, inc, 4 dc, inc, 2 dc, V, (3 dc, inc) * 3, 2 dc, V, 2 dc, inc , 4 dc, inc, 2 dc, V, 4 dc, inc, 5 dc (75)
4. Pivot, 2 ch, 6 dc, inc, 5 dc, V, (3 dc in 1 loop) * 14, V, 3 dc, inc, 5 dc, inc, 5 dc, inc, 3 dc, V, ( 3 dc in 1 loop) * 14, V, 12 dc (144)
To reduce the puffiness of the sleeve, you can do 2 dc in 1 loop, or alternate 2 dc in 1/3 dc in 1.
5. Twist, 2 ch, 14 dc (last 14th dc we knit under ch V), 7 ch, skip the sleeve line, and start knitting under ch of the next combination V, 4 dc, inc, 8 dc, inc, 7 dc, inc, 4 dc (last dc we knit under ch V), 7 ch, skip the sleeve line, and start knitting under ch of the next combination V, 16 dc (74)
6. Rotate, 2 ch, 4 dc, (inc, dc, W, dc, inc, 3 dc) * 8, inc, 5 dc (92)
• If you are crocheting very tightly, it may be worth changing the crochet hook to 0.5 sizes larger, i.e. to number 2.5, so that at the end of the legs they can pass well through the pants – be guided by your knitting density and size toys.
7. Turn, 2 ch, 92 dc (93)
8. Swivel, 2 ch, 4 dc, (W, 9 dc) * 8, W, 8 dc (94)
9. Swivel, 2 ch, 90 dc, 2 ch, 2 dc (95)
10.Swivel, 1 ch, 3 sl-st, 1 sc, 1 hdc, 5 dc, (W, 9 dc) * 8, 1 hdc, 1 sc, 3 sl-st (95)
11. Turn, 1 ch, 4 dc, 1 sc, 1 hdc, 83 dc, 1 hdc (90)
12.Pivot, 2 ch, 10 dc, (W, 9 dc) * 7, W, 2 dc, 1 hdc (85)
13. Twist, 2 ch, 85 dc, 5 ch, attach to second plank with sl-st (91)
Next, we continue to knit in twisting rows so that the lower part of the overalls does not differ from the upper part.
14. Twist, 2 ch, 2 dc, (W, 9 dc) * 9, sl-st in ch lift, knit at start of row (93)
15. Twist, 2 ch, 93 dc, sl-st in ch up, knit at start of row (94)
16. Twist, 2 ch, 8 dc, (W, 9 dc) * 8, W, 4 dc, sl-st in ch lift, knit at start of row (94)
Next, we knit a jumper between the legs – it should go in the center
overalls, under the tail – if necessary, knit sl-st left / right,
to align the beginning of the knitting of the lintel.
JUMPER BETWEEN SHAFT:
1. Turn, 2 ch lift, 7 dc (8)
2. Swivel, 2 ch lift, 7 dc (8)
Fold the part clearly in half, use slst and a hook to tie the jumper between the legs to the opposite side of the canvas (or sew with a needle).