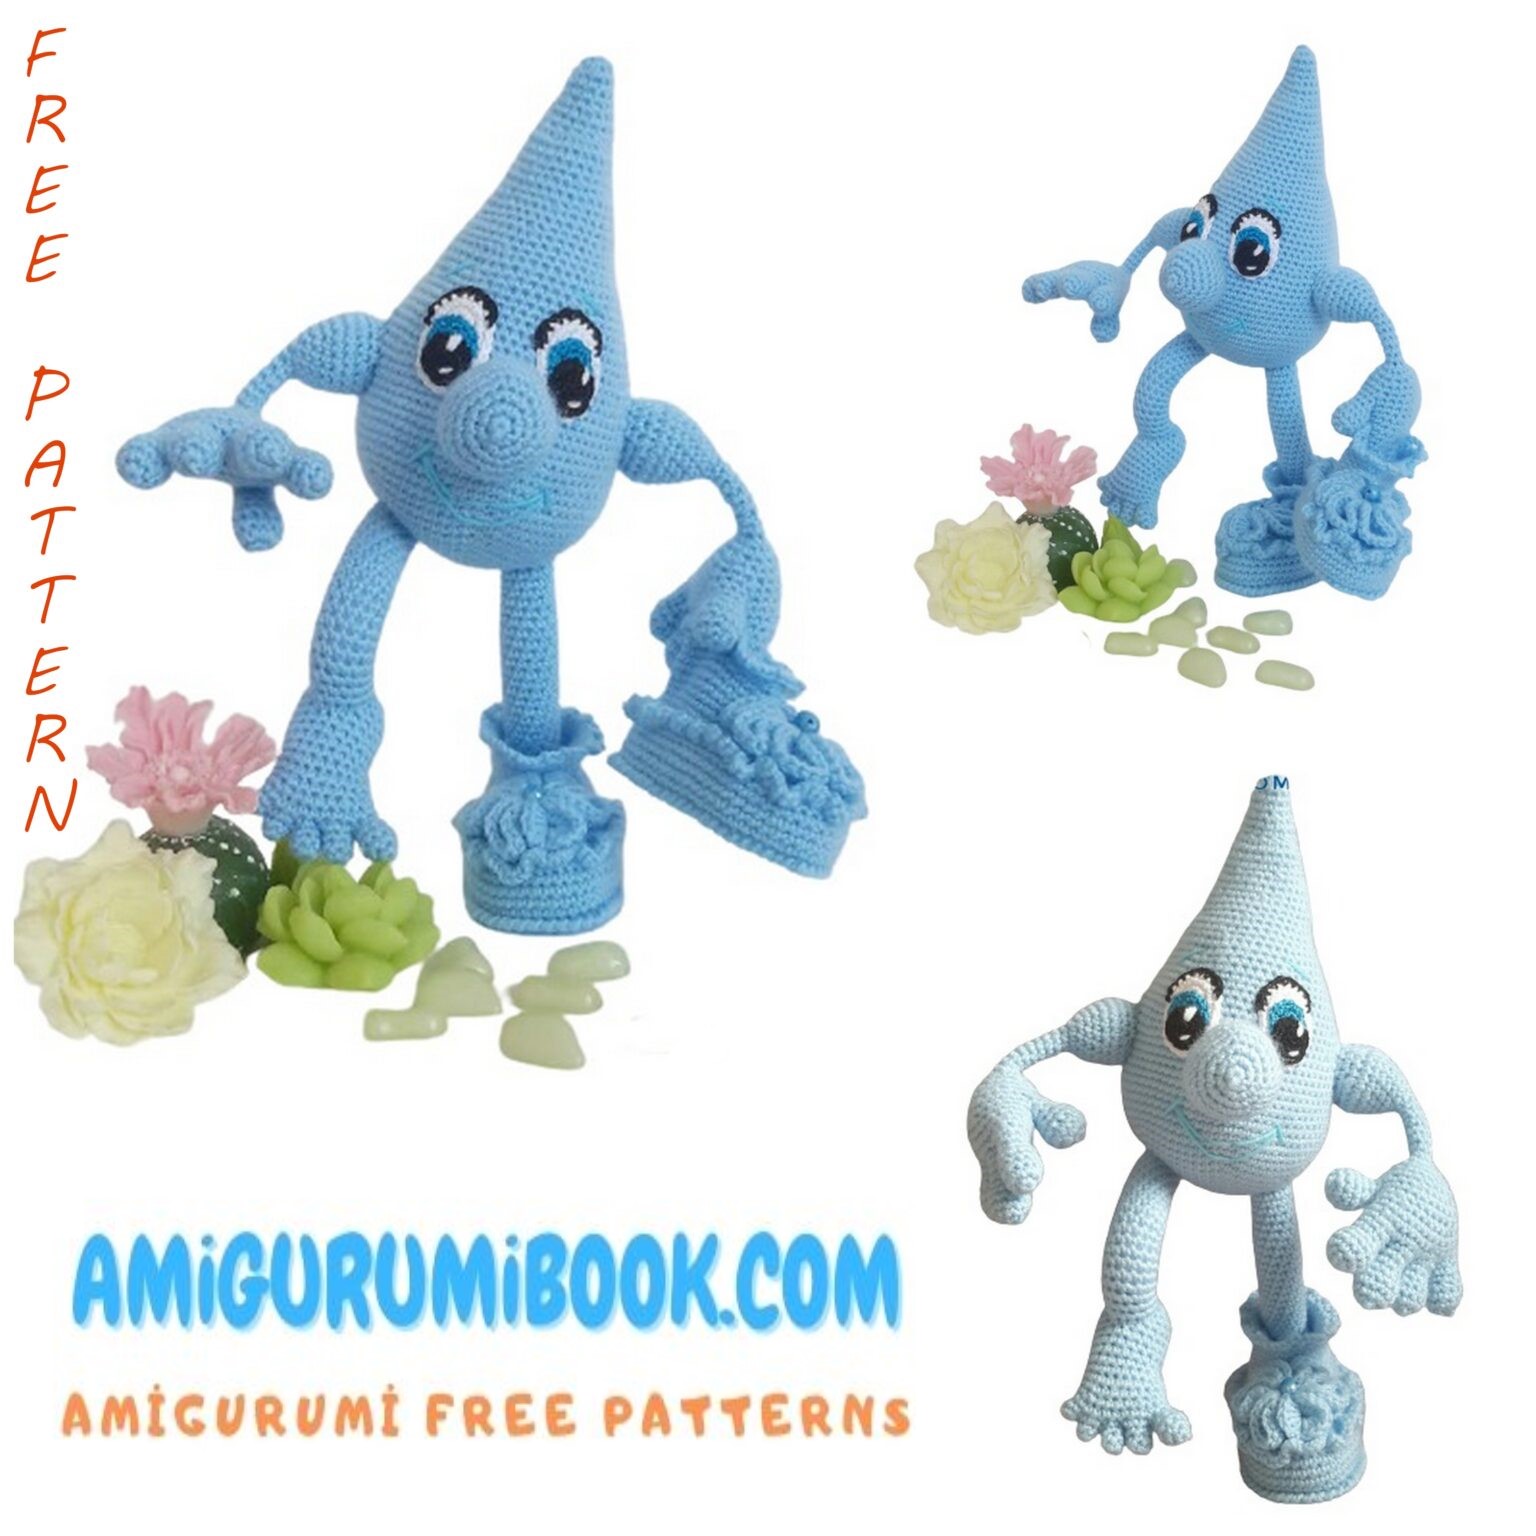
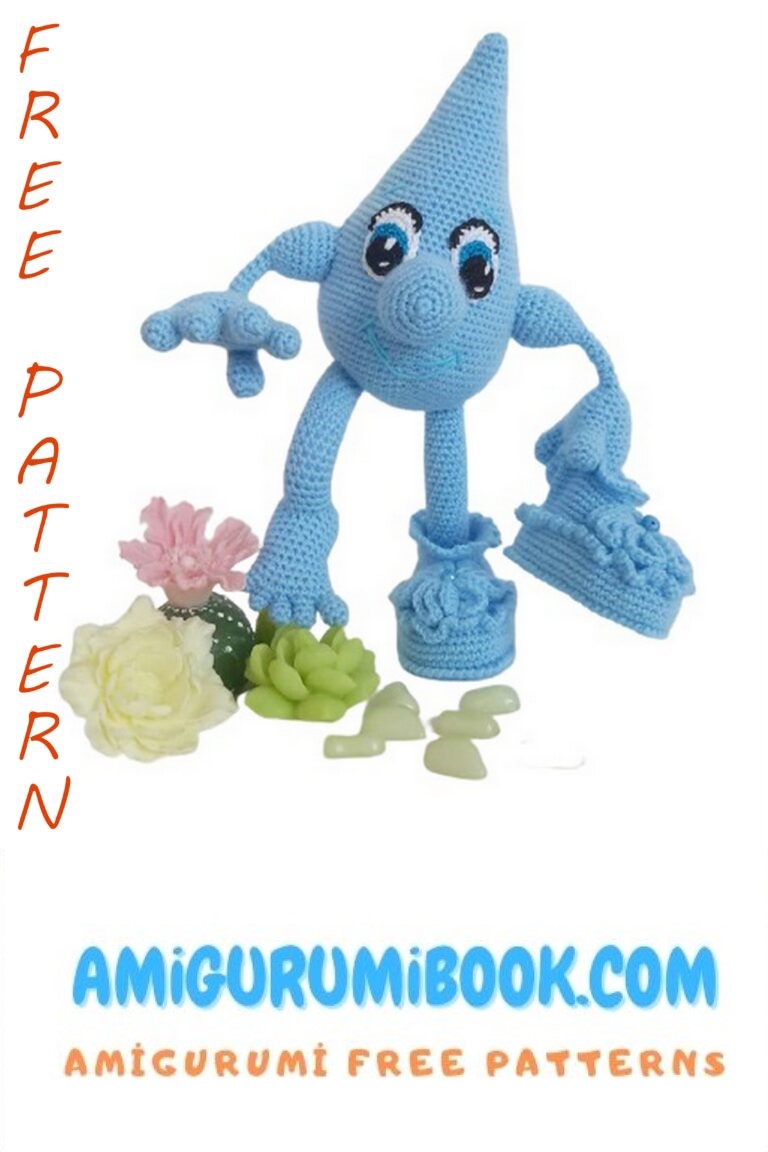
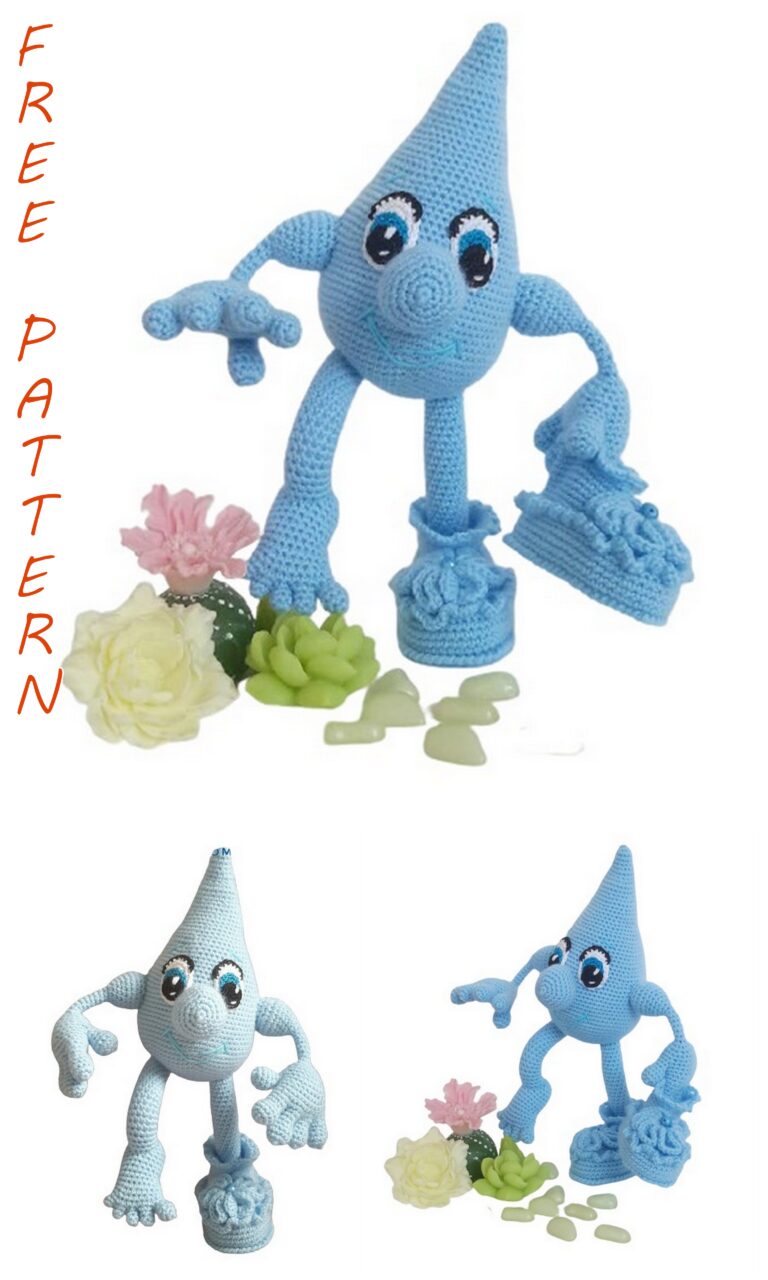
Water Drop Amigurumi Free Pattern
Interesting amigurumi patterns are available for free on this site. I shared with you the amigurumi water drop pattern in this article.
For the toy you will need:
Blue yarn (in the toy presented in this MK is Pekhorka “Children’s novelty”, color “lady’s shoe”. 1.5 skeins)
Iris yarn for eyes (pupil and iris)
Yarn for the white of the eyes (“Delicate” from Pekhorka)
Crochet hook 1.9 for basic knitting
Hook 1.4 for eyes
Cardboard for insoles
Filler
Copper wire for the frame (section 0.25 mm or any at your discretion)
Needle for stitching parts
When using the specified materials, the size of the toy is 30 cm.
Abbrevations:
ch- chain
sc – single crochet
sl-st – slip stitch
DC – double crochet
inc – increase
dec – decrease
All parts of the toy (except for shoes) are knitted in a spiral. A marker or thread in a contrasting color is used. The offset loops are indicated.
Shoes (2 pcs.):
The sole is tied according to the following pattern:
Cut the insoles along the sole, which then insert into the shoes.
Then we knit like this:
7 row – behind the back walls 56 sc
8-11 rows – 56 sc each
12 row – behind the back walls of the hinges 56 sc
13 row – 20 sc, dec * 7, 22 sc
Row 14 – 16 sc, 7 dec from DC, 19 sc
Decreasing from DC is two DCs with a common top
15 row – 16 sc, 4 dec from DC, 18 sc
16 row – 15 sc, dec * 4, 15 sc
Row 17 – 15 sc, 4 sts together, 15 sc
18 row – 15 sc, dec, 14 sc
19-22 rows – 30 sc each
23 row – harness: sc 3 ch, skip 1 st – to the end of the row. Fasten the thread, hide the tip with a needle.
In the 12th row, strapping along the left half-loops: 5 sc in 1 p., Skip 1 p. – until the end of the row In the 7th row, strapping along the left half-loops is a step.
The shoes are adorned with voluminous flowers linked according to the following description:
with the only difference that it is connected not by 7, but by 5 DC. The center of the flowers is decorated with blue beads.
Leg without shoes (1 pc.):
We fill the part in the knitting process.
We begin to knit the fingers, which we will then connect.
Thumb:
1 row – 5 sc into magic ring
2nd row – (inc) * 5
3 row – 10 sc
4 row – (dec) * 5
Cut and fasten the thread.
Second finger:
1 row – 6 sc into magic ring
2-3 rows – 6 sc each
Cut and fasten the thread.
Third finger:
1 row – 5 sc into magic ring
2-3 rows – 5 sc each
Cut and fasten the thread.
Fourth finger:
1 row – 5 sc into magic ring
2nd row – 5 sc
Cut and fasten the thread.
Fifth finger:
1 row – 5 sc into magic ring
Do not cut the thread.
We start collecting fingers:
Row 1 – 3 sc on the 5th finger, 3 sc on the fourth, 3 sc on the third, 3 sc on the second, 5 sc on the high, 3 sc on the second, 2 sc on the third, 2 sc on the fourth, 2 sc on the fifth. – (26)
2 row – (4 sc, dec) * 4, 2 sc – (22)
3 row – 22 sc
4 row – 22 sc, 1 offset loop
5 row – 10 sc, 2 dec, 8 sc
6-7 rows – 20 sc each
8 row – 11 sc, inc, 8 sc, 1 offset loop
9-11 rows – 21 sc each
12 row – 21 sc, 1 offset loop
13 row – (5 sc, dec) * 3 – (18)
14 row – 18 sc
15 row – (1 sc, dec) * 6
16 row – dec * 6
Cut the thread, fasten. Pull off the hole.
Insert a wire 25-28 cm long into the foot, having previously made a loop at the end so that the wire does not come out of the part.
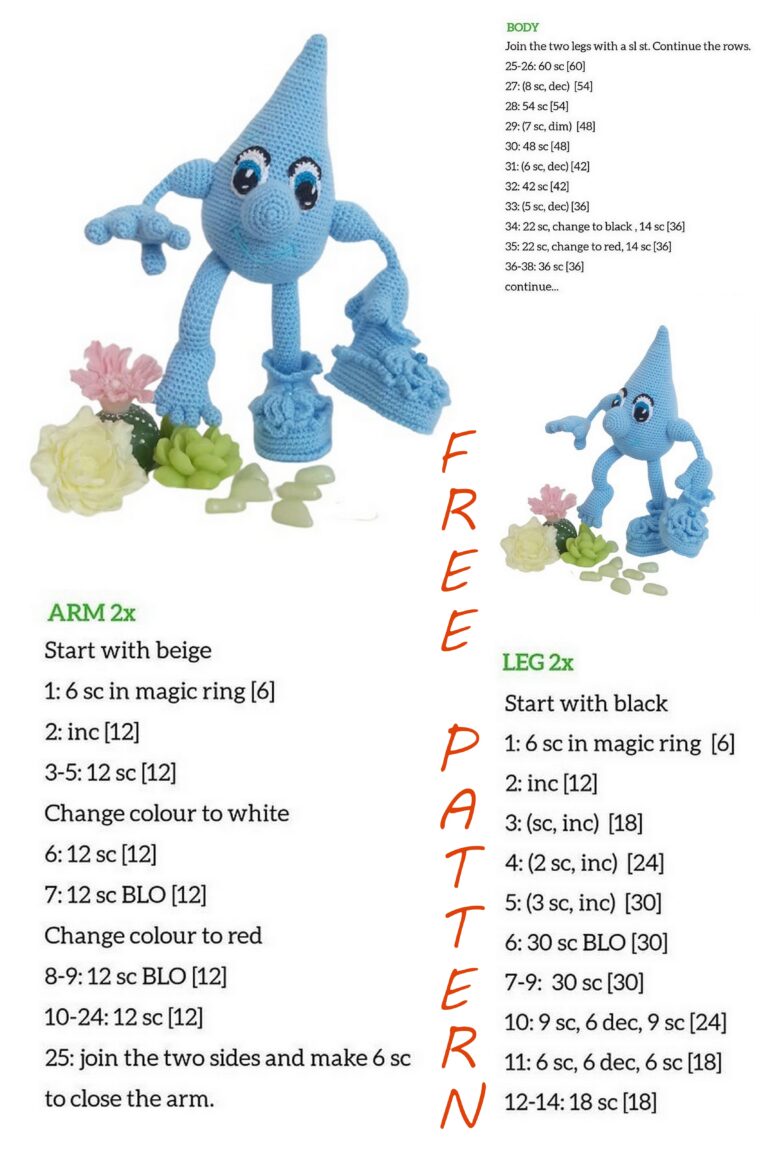
Legs (2 children):
Leave the thread for sewing on and tie a 12 ch chain, which is closed into a ring.
1-22 rows – 12 sc each
Finish. Leave the thread for sewing. Assemble the leg (see photo) and sew the parts together.
Support leg (1 piece):
We knit the foot not completely, but only the part that we insert into the shoes.
Leave the thread for sewing and type a chain of 21 ch, close it into a ring and continue knitting the part.
1-7 rows – 21 sc each
8 row – (5 sc, dec) * 3 – (18)
9 row – 18 sc
10 row – (1 sc, dec) * 6
11 row – dec * 6
Pull off the hole. Fill in the detail.
A wire twice as long as the previous one, first insert it into the shoes, forming a loop for the stability of the toy (see photo), then insert this entire structure into the shoes and sew the foot in a circle, fixing it in the shoe.
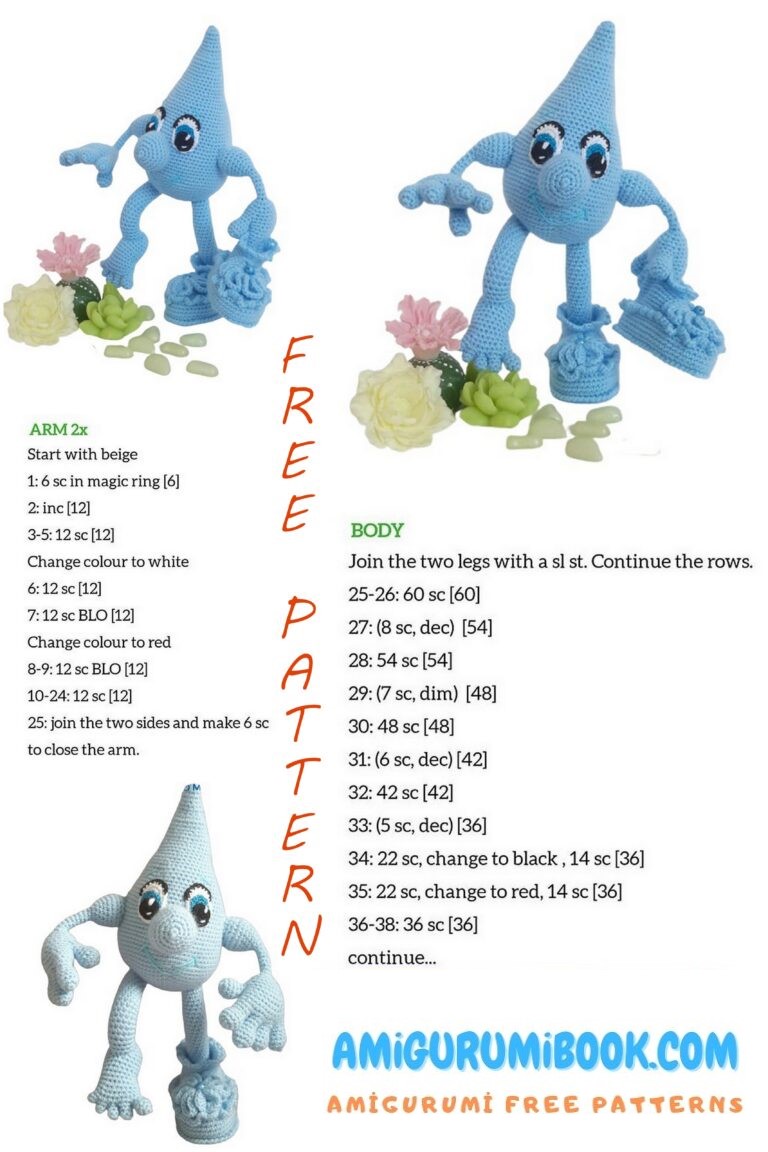
Body (1 child):
1 row – 6 sc into magic ring
2nd row – (inc) * 6 – (12)
3 row – (1 sc, inc) * 6 – (18)
4 row – (2 sc, inc) * 6 – (24)
5 row – (3 sc, inc) * 6 – (30)
6 row – (4 sc, inc) * 6 – (36)
7 row – (5 sc, inc) * 6 – (42)
8 row – (6 sc, inc) * 6 – (48)
9 row – (7 sc, inc) * 6 – (54)
10 row – (8 sc, inc) * 6 – (60)
11 row – (9 sc, inc) * 6 – (66)
12 row – (10 sc, inc) * 6 – (72)
13-24 rows – 72 sc each – (12 rows)
25 row – (10 sc, dec) * 6 – (66)
26-27 rows – 66 sc each
28 row – (9 sc, dec) * 6 – (60)
29-30 rows – 60 sc each
31 row – (8 sc, dec) * 6 – (54)
32-33 rows – 54 sc each
34 row – (7 sc, dec) * 6 – (48)
35-36 rows – 48 sc each
Fill. Insert the legs between 6 and 7 rows of the body, connect the wire and close the ends with tape or tape.
Next, fill in the part as you knit.
37 row – (6 sc, dec) * 6 – (42)
38-39 rows – 42 sc each
40 row – (5 sc, dec) * 6 – (36)
41-42 rows – 36 sc each
43 row – (4 sc, dec) * 6 – (30)
44-45 rows – 30 sc each
46 row – (3 sc, dec) * 6 – (24)
47-49 rows – 24 sc each
40 row – 12 sc, 6 dec – (18)
51-52 rows – 18 sc each
53 row – (1 sc, dec) * 6 – (12)
54-56 rows – 12 sc
57 row – 6 dec
Finish. Pull off the hole.

Nose (1 child):
1 row – 6 sc into magic ring
2nd row – 6 inc – (12)
3 row – (1 sc, inc) * 6 – (18)
4 row – (2 sc, inc) * 6 – (24)
5 row – (3 sc, inc) * 6 – (30)
6-8 rows – 30 sc each
9 row – (3 sc, dec) * 6 – (24)
10 row – (2 sc, dec) * 6 – (18)
11 row – (1 sc, dec) * 6 – (12)
Cut the thread, leaving the tip for sewing, fasten. Fill in the detail.
Eyes:
We knit the protein with a crochet hook, which was used to knit the toy itself.
1 row – 5 ch, in the 2nd from the hook along the chain: inc, 2 sc, 3 sc in 1 loop, 2 sc, inc
2nd row – inc, 3 sc, 3 inc, 3 sc, 2 inc
3rd row – 1 sc, inc, 3 sc, (1 sc, inc) * 3, 3 sc, (1 sc, inc) * 2
Finish. Leave the thread for sewing.
With the black thread that you chose for the pupil, tie the lash line (hook 1,9): sl-st, sc, inc, (2 sc, inc) * 2, sl-st
The iris and pupil are knitted according to the same pattern:
1 row – 6 sc into magic ring
2nd row – (inc) * 6
3 row – (1 sc, inc) * 6
Leave the threads for sewing.
Hands (2 children):
We start with the fingers, which we will then collect.
Thumb:
1 row – 6 scinto magic ring
2nd row – (inc) * 6 – (12)
3-4 rows – 12 sc each
5 row – (1 sc, dec) * 4 – (8)
6-7 rows – 8 sc each
Fasten the thread.
Index finger:
1 row – 6 scinto magic ring
2nd row – (inc) * 6 – (12)
3-4 rows – 12 sc each
5 row – (1 sc, dec) * 4 – (8)
6-7 rows – 8 sc each
Fasten the thread.
Middle finger:
1 row – 6 scinto magic ring
2nd row – (inc) * 6 – (12)
3-4 rows – 12 sc each
5 row – (1 sc, dec) * 4 – (8)
6-8 rows – 8 sc each
Fasten the thread.
Ring finger:
1 row – 6 scinto magic ring
2nd row – (inc) * 6 – (12)
3-4 rows – 12 sc each
5 row – (1 sc, dec) * 4 – (8)
6-7 rows – 8 sc each
Fasten the thread.
Little finger:
1 row – 6 scinto magic ring
2nd row – (inc) * 6 – (12)
3-4 rows – 12 sc each
5 row – (1 sc, dec) * 4 – (8)
6-7 rows – 8 sc each
Do not fasten the thread. We begin to collect the hand:
Knit on the fingers: 4 sc for the little finger, 4 sc for the ring finger, 4 sc for the middle, 8 sc for the index, 4 sc for the middle, 4 sc for the nameless, 4 sc for the little finger – (32)
Further:
1 row – 32 sc
2 row – (6 sc, dec) * 4 – (28)
3 row – 28 sc
4 row – (5 sc, dec) * 4 – (24)
5 row – attach the thumb:
Right hand: 9 sc, with thumb on both canvases 4 sc, 11 sc
Left hand: 15 sc, with thumb on both canvases 4 sc, 5 sc
6 row – 24 sc
Stuff your fingers
7 row – (2 sc, dec) * 6 – (18)
8 row – 18 sc
9 row – (1 sc, dec) * 6 – (12)
10 row – 12 sc
Stuff your palm. If desired, the fingers are reinforced at this stage, then it will be impossible to do it. But if you do not want to reinforce your fingers, then during assembly we will insert the wire into the handles, protecting the ends with tape.
The wire will run from the middle finger of one hand to the middle finger of the other through the torso, connecting the arms.
11 row – dec * 6
12-19 rows – 6 sc from 11 to 19 rows do not fill the hand.
20 row – (1 sc, inc) * 3 – (9)
21 row – (2 sc, inc) * 3 – (12)
22 row – (3 sc, inc) * 3 – (15)
23 row – 15 sc
24 row – (4 sc, inc) * 3 – (18)
25 row – (2 sc, inc) * 6 – (24)
26 row – 24 sc
We fill the upper part of the hand. Add filler as you knit
27 row – (2 sc, dec) * 6 – (18)
28 row – 18 sc
29 row – (1 sc, dec) * 6 – (12)
30 row – 6 dec
Leave the thread for sewing. Insert wire. Protecting the ends with a plaster.
We put the second shoe in the toy’s left hand and fix it with several stitches.