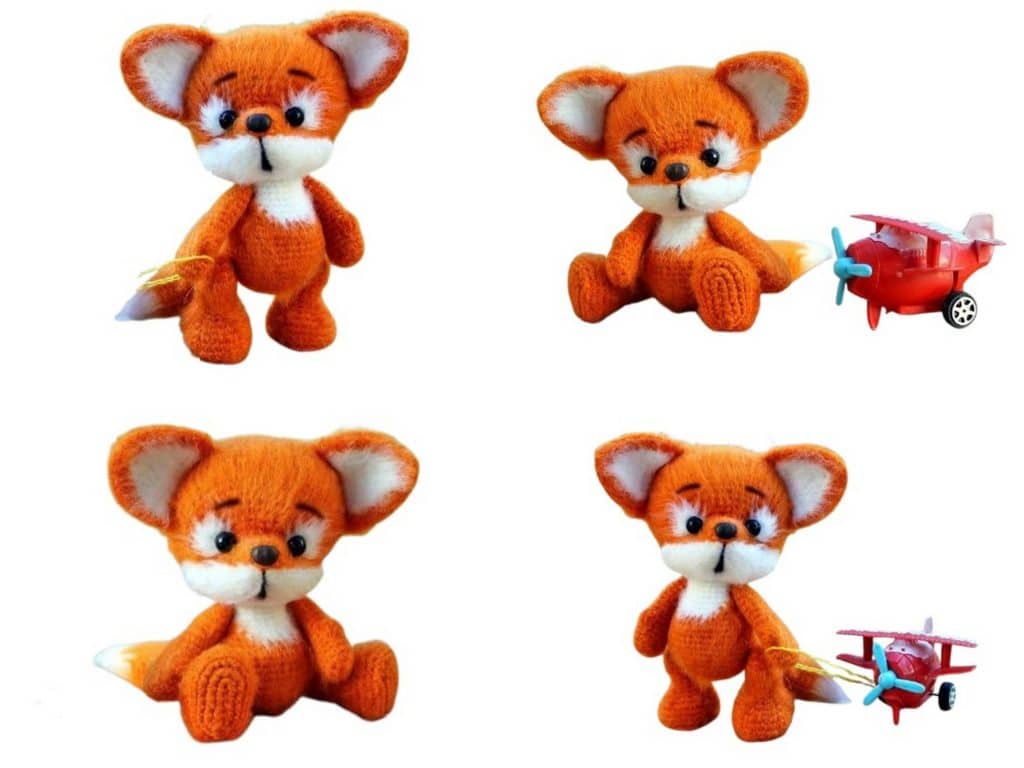
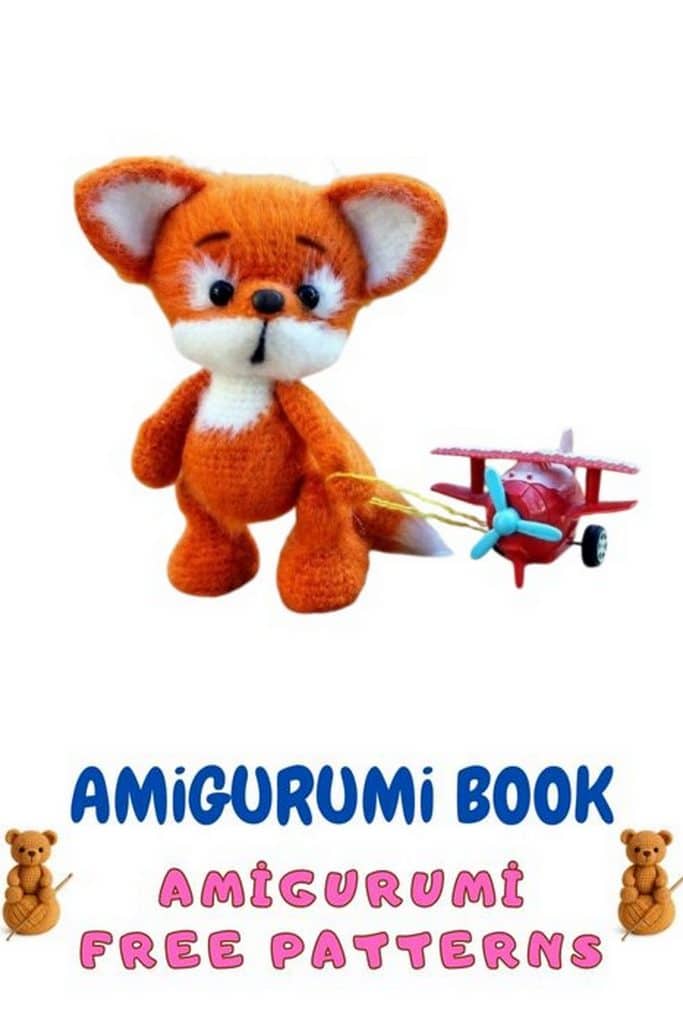
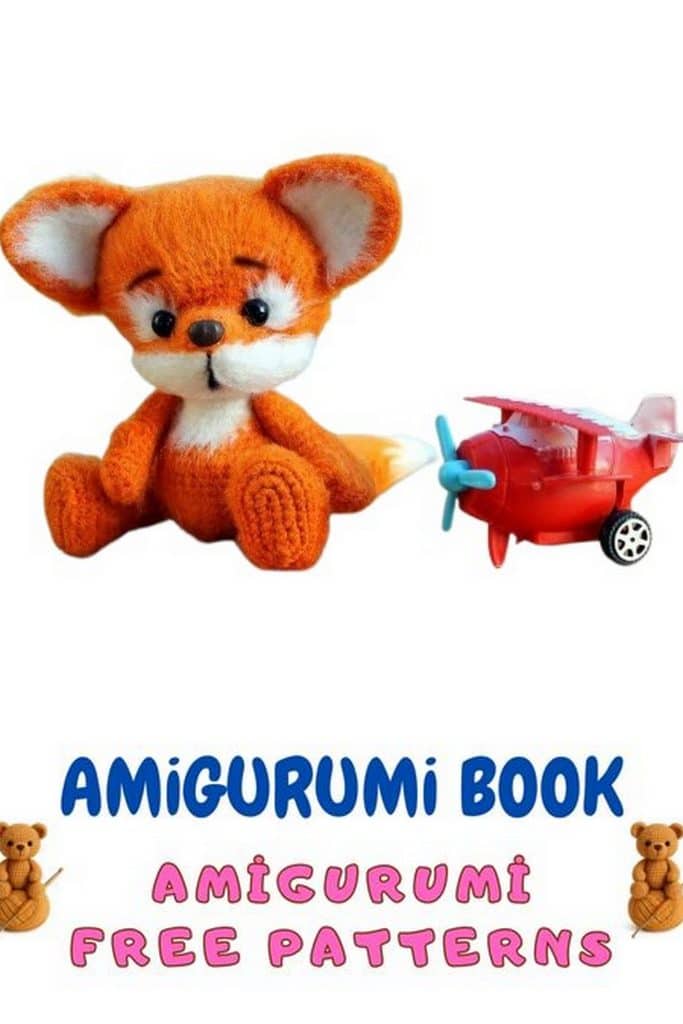
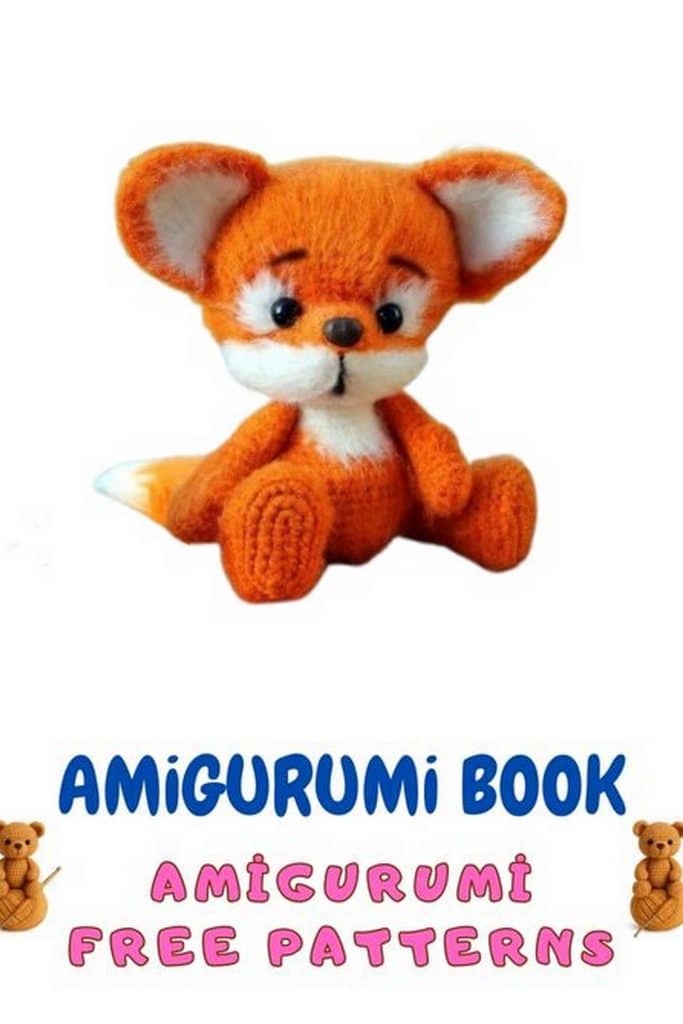
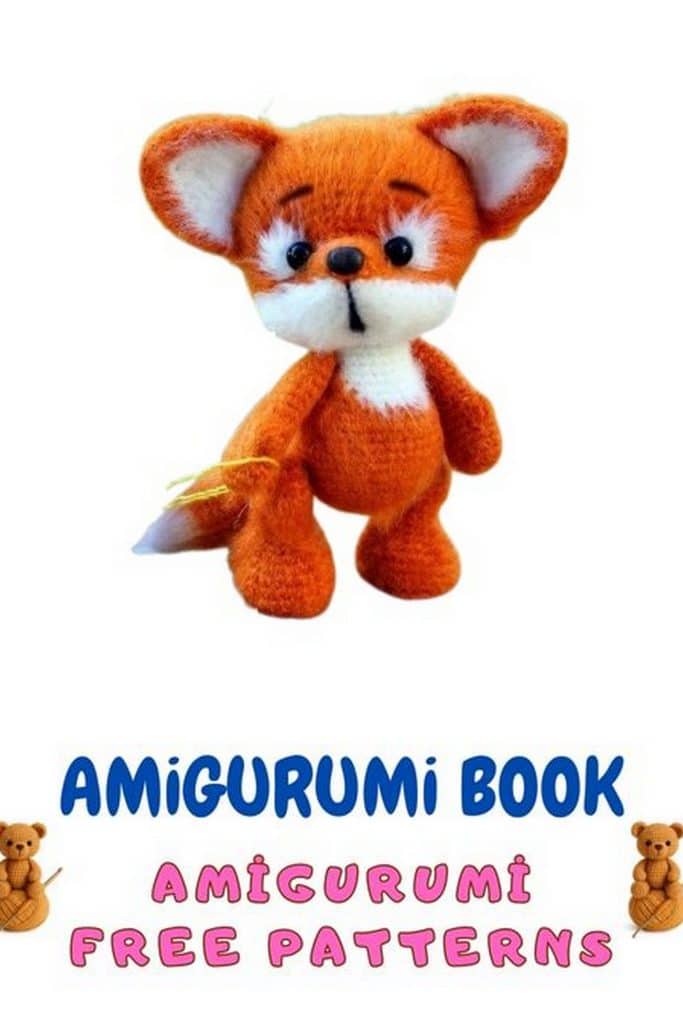
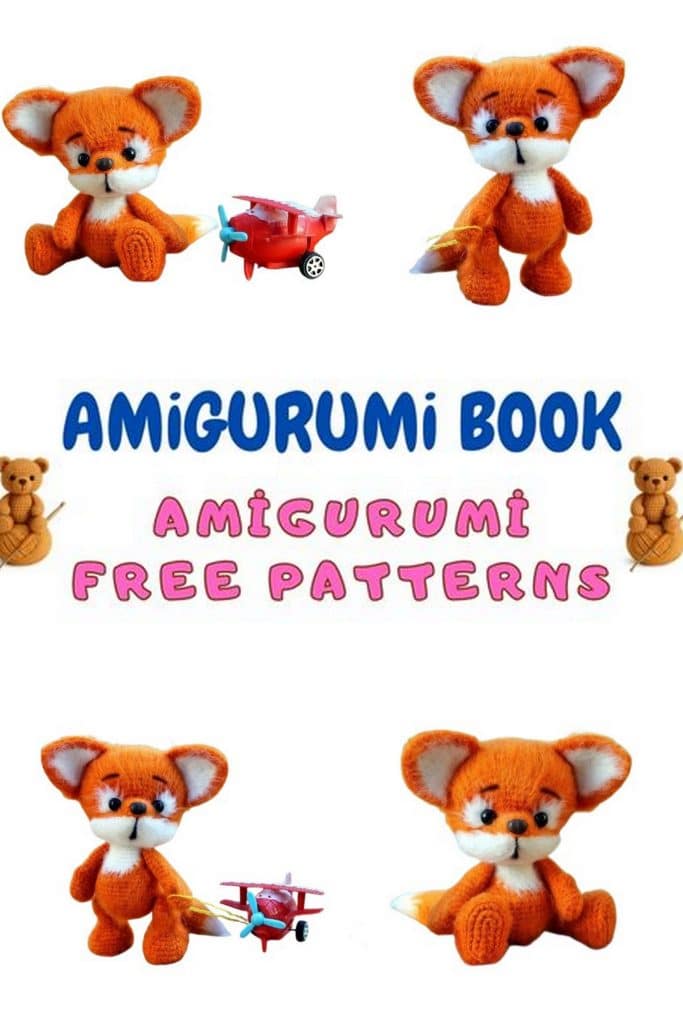
Looking for an adorable Baby Fox amigurumi pattern to crochet? This free step-by-step crochet baby fox tutorial is perfect for beginners and experienced makers alike. With its soft orange and white fur, tiny tail, and sweet expression, this amigurumi baby fox makes a charming handmade gift or nursery decoration. Follow the detailed instructions, use your favorite yarn, and create your own cute little forest friend today!
If you want to access 1000+ free amigurumi patterns, you can download our application from this link!
Materials
Yarn (your choice of similar color, fiber and thickness): acrylic/wool/velour/cotton.
Example used: acrylic 400 m / 100 g. Finished height with these materials ≈ 11 cm (size varies with yarn/hook).
Colors: orange and white.
Hook: 1.5 mm (or to match yarn).
Stuffing: polyester fiberfill.
Sewing needle + matching sewing thread.
Long needle + strong thread for face sculpting.
Eyes: 2 half-beads or 1 pair of safety eyes (choose size for your toy).
Ready-made nose ~8 mm (or embroider with black/brown yarn).
A few strands of black & white yarn for embroidery.
Clear all-purpose glue (e.g., UHU).
Optional: hook & loop (Velcro) tape or pet brush to fluff surface.
Optional: 1 doll joint (14 mm) for the head–neck connection (or sew head on permanently).
Abbreviations
MR – magic ring
ch – chain
sl st – slip stitch
sc – single crochet
hdc – half double crochet
dc – double crochet
inc – increase (2 sc in 1 st)
dec – invisible decrease (sc2tog)
(…) x N – repeat instructions in brackets N times
Special stitch
Puff stitch (thumb): work 4 dc into the same st, leave last loop of each dc on hook (5 loops on hook), yarn over, pull through all loops to close the puff.
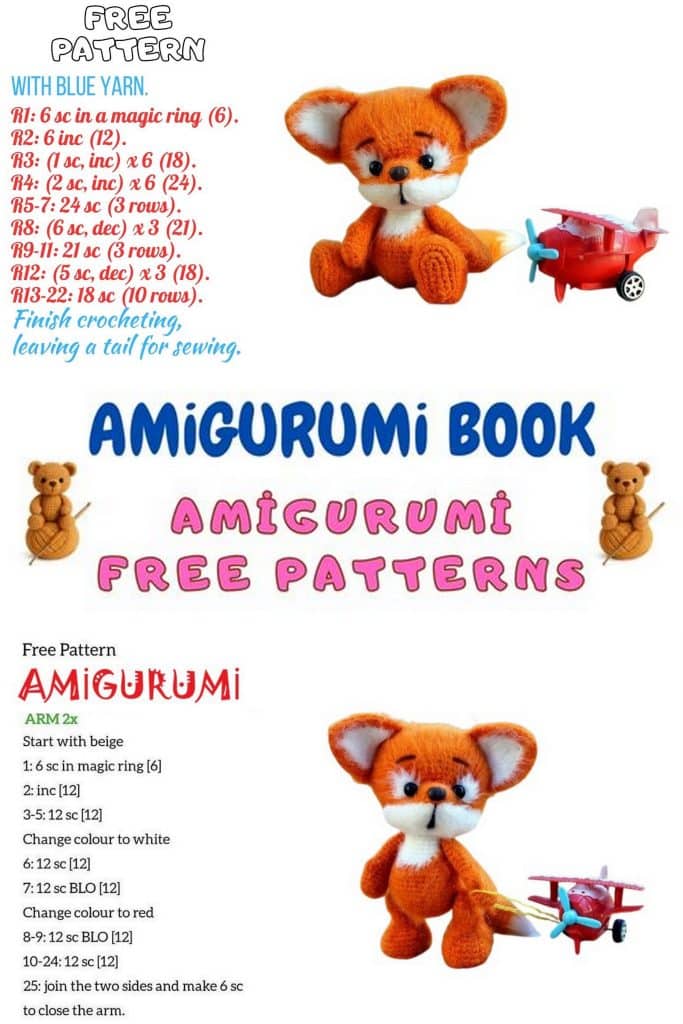
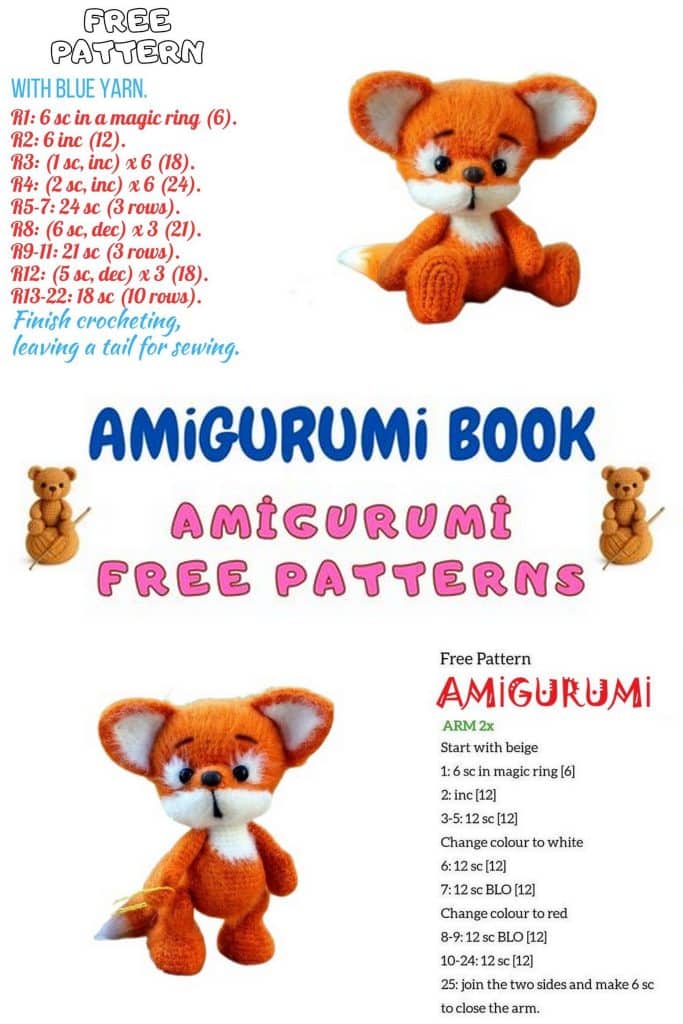
Baby Fox Arms (make 2) — orange
1: ch 4, from 2nd ch from hook: 2 sc, 3 sc in last ch, along other side: 1 sc, inc (8)
Then 1 sc more; place marker here.
2: (1 sc, 3 inc) x2 (14)
3–4: 14 sc
5: 12 sc, dec (13)
6: 5 sc, Puff stitch (thumb), 1 sc, dec, 4 sc (12)
7: 12 sc
8: 10 sc, dec (11)
9: 11 sc
10: 5 sc, dec, 4 sc (10)
11–13: 10 sc
14: 8 sc, dec (9)
15: (1 sc, dec) x3 (6)
Stuff lightly. Fasten off, close opening, weave in end.
Baby Fox Legs (make 2) — orange
1: ch 6, from 2nd ch: 4 sc, 4 sc in last ch, along other side: 3 sc, inc (13)
2: inc, 3 sc, 4 inc, 3 sc, 2 inc (20)
3: 1 sc, inc, 3 sc, (1 sc, inc) x4, 3 sc, inc, 1 sc, inc, sl st (27)
4: BLO: 10 sc, inc, 4 sc, inc, 11 sc (29)
5–6: 29 sc
7: 27 sc, dec (28)
8: 6 sc, (dec, 1 sc) x5, 7 sc (23)
9: 6 sc, 5 dec, 5 sc, 2 sl st (18)
10: sl st, 17 sc (18)
11: (2 sc, dec, 2 sc) x3 (15)
12: 15 sc
13: (2 sc, inc) x5 (20)
14–16: 20 sc
17: (dec, 1 sc) x6, dec (13)
18: 6 dec, sl st (7)
Stuff. Fasten off and close.
Tail – Baby Fox
— start white, then orange
1: 6 sc in MR
2: (1 sc, inc) x3 (9)
3: 9 sc
4: (2 sc, inc) x3 (12)
5: (3 sc, inc) x3 (15)
6: 15 sc
7: (2 sc, inc, 2 sc) x3 (18)
8: Colorwork: (white 1 sc, orange 2 sc) x6 (18) → cut white, continue orange only
9: (5 sc, inc) x3 (21)
10: (3 sc, inc, 3 sc) x3 (24)
11–14: 24 sc
15: (3 sc, dec, 3 sc) x3 (21)
16: 21 sc
17: (dec, 5 sc) x3 (18)
18: 18 sc
19: (2 sc, dec, 2 sc) x3 (15)
20: (dec, 3 sc) x3 (12)
21: 6 dec (6)
Stuff the base lightly, fasten off and close.
Baby Fox Inner Ears (make 2)
— white, then edge in orange
Work flat rows, turning each row.
1: ch 2, in 2nd ch: 3 sc in same st, ch 1, turn (3)
2: inc, 1 sc, inc, ch 1, turn (5)
3: 5 sc, ch 1, turn (5)
4: (inc, 1 sc) x2, inc, ch 1, turn (8)
5: 8 sc, ch 1, turn (8)
6: 4 sc, inc, 3 sc, ch 1, turn (9)
7: 9 sc, ch 1, turn (9)
8: 9 sc, ch 1, work around the triangular edge:
A→B: 7 sc, 3 sc in B, B→C: 7 sc (26). Fasten off white.
Attach orange at point A:
9: A→B: 8 sc, 3 sc in B, B→C: 8 sc (19). Fasten off orange.

Outer Ears (make 2) — orange
Flat rows, turning.
1: ch 2, 3 sc in 2nd ch, ch 1, turn (3)
2: inc, 1 sc, inc, ch 1, turn (5)
3: 5 sc, ch 1, turn (5)
4: (inc, 1 sc) x2, inc, ch 1, turn (8)
5: 8 sc, ch 1, turn (8)
6: 4 sc, inc, 3 sc, ch 1, turn (9)
7: 9 sc, ch 1, turn (9)
8: 4 sc, inc, 4 sc, ch 1, turn (10)
9: 10 sc, ch 1, then edge pass A→B: 8 sc, 3 sc in B, B→C: 8 sc, ch 1, turn (29)
Join each inner + outer ear together: place WS to WS, sc around the joined edge:
10: 9 sc, inc, 9 sc (20). Fasten off, leave ~30 cm tail for sewing to the head.
Baby Fox Body
— orange (with later orange/white colorwork)
1: 6 sc in MR
2: 6 inc (12)
3: (1 sc, inc) x6 (18)
4: (1 sc, inc, 1 sc) x6 (24)
+1 sc and move marker here (to adjust round start).
5: (3 sc, inc) x6 (30)
6: (2 sc, inc, 2 sc) x6 (36)
7: (5 sc, inc) x6 (42)
8–11: 42 sc
12: (dec, 12 sc) x3 (39)
13–14: 39 sc
Colorwork begins (orange + white). Change color on the last pull-through of the previous stitch. Carry unused yarn along the WS if you prefer not to cut.
15: Orange 14 sc, dec; White (2 sc, dec) x2; Orange 15 sc (36)
16: Orange (4 sc, dec) x2, 2 sc; White 2 sc, dec, 4 sc, dec; Orange (4 sc, dec) x2 (30)
Work 1 sc and move marker here.
17: Orange 10 sc; White 10 sc; Orange 10 sc (30)
18: Orange dec, 3 sc, dec, 2 sc; White 1 sc, dec, (3 sc, dec) x2; Orange 3 sc, dec, 3 sc (24)
19: Orange 6 sc; White 12 sc; Orange 6 sc (24)
20: Orange 6 sc; White 12 sc; Orange 6 sc (24)
21: Orange dec, 2 sc, dec; White (2 sc, dec) x3; Orange 2 sc, dec, 2 sc (18)
22: Orange 4 sc; White 9 sc; Orange 5 sc (18)
Lightly stuff the neck area. Insert the first part of the joint (disk with screw).
23: Orange 1 sc, dec, 1 sc; White (dec, 1 sc) x3; Orange dec, 1 sc, dec (12)
Cut yarns. Tighten sts neatly around the joint screw.
24: (4 sc, dec, 4 sc) x6 (54)
25: (7 sc, dec) x6 (48)
26: (3 sc, dec, 3 sc) x6 (42)
27: (5 sc, dec) x6 (36)
28: (2 sc, dec, 2 sc) x6 (30)
29: (3 sc, dec) x6 (24)
Stuff more if needed.
30: (2 sc, dec) x6 (18)
31: (1 sc, dec) x6 (12)
32: 6 dec (6)
Fasten off.
Head – Baby Fox
— orange + white
Marker stays centered. Adjust if needed to keep the face symmetrical. Change colors on the last pull-through of the previous stitch. “Multicolor inc” means: work 1 sc with orange + 1 sc with white into the same stitch.
1: 6 sc in MR
2: Orange 2 inc, White 2 inc, Orange 2 inc (12)
3: Orange 4 sc; White (1 sc, inc) x2; Orange 4 sc (14)
4: Orange 4 sc; Multicolor inc in next st (1 sc orange + 1 sc white into same st); White 1 sc, 2 inc, 2 sc; Orange inc, 3 sc (18)
5: Orange 5 sc; Multicolor inc in next st; White 2 sc, 2 inc, 2 sc, inc; Orange 5 sc (22)
6: Orange 5 sc, inc; White 10 sc, inc; Orange 5 sc (24) — move marker after next 1 sc
7: Orange 6 sc; White 2 sc, inc, 6 sc, inc, 2 sc; Orange 2 sc, (inc, 1 sc) x2 (28)
8: Orange (1 sc, inc) x2, 2 sc; White 5 sc, inc, 2 sc, inc, 5 sc; Orange (2 sc, inc) x2, 2 sc (34)
9: Orange (2 sc, inc) x2, 2 sc; White 15 sc, inc; Orange 5 sc, inc, 4 sc (38)
10: Orange 4 sc, inc, 5 sc; White 1 sc, inc, 2 sc, inc, 7 sc, inc, 2 sc, inc, 1 sc; Orange (3 sc, inc) x2, 3 sc (45)
11: Orange (3 sc, inc) x2, 3 sc; White 1 sc, inc, (5 sc, inc) x2, 6 sc, inc; Orange 2 sc, inc, (4 sc, inc) x2 (54)
12: Orange 5 sc, inc, 4 sc, inc, 2 sc, Multicolor inc in next st; White 24 sc; Orange 6 sc, inc, 9 sc (58)
13: Orange 9 sc, inc, 6 sc; White 25 sc; Orange (5 sc, inc) x2, 5 sc (61)
14: Orange (5 sc, inc) x2, 5 sc; White dec, 6 sc, dec, 5 sc, dec, 6 sc, dec; Orange 9 sc, inc, 9 sc (60)
15: Orange 9 sc, inc, 9 sc; White 2 dec, 13 sc, 2 dec; Orange 3 sc, (inc, 1 sc) x3, 11 sc (60)
Assembly & Face Sculpting / Finishing
Jointed head option (English)
1:After crocheting the body up to Rnd 23, place the joint (disk + screw) inside the neck.
2:Crochet the head separately (use Head Rnds 1–15 above; optionally add 1–2 plain rounds if you want extra height). Pass the opening at the base of the head over the joint screw.
3:Continue the body with Rnds 24–32, decreasing around the joint screw to close the neck completely.
Sculpting (eye pits & muzzle)
Head back opening = Point 0.
Points 1–2 and 3–4: at about Round 7 on both sides of muzzle, 2 sts apart.
Point 5: 1 round below MR; Point 6: 5 rounds below MR.
With strong thread & long needle:
Go 0→2, enter at 1, exit 0. Tighten, knot. Repeat once.
For left eye: 0→3→4→0.
For muzzle: 0→5→6→0. Tighten, knot, hide tail inside.
White eye spots (optional)
With white yarn: MR, 8 sc, close; sew over eye sockets.
Ears
Shape pairs (inner+outer) and sew to head.
Limbs & tail
a:Sew legs to body so the fox sits stable and aligned.
b: Sew arms.
c: Sew tail.
Face
Embroider a black line on muzzle; glue ready-made nose (or embroider).
Glue/attach eyes.
Embroider eyebrows.
(Fluffing) Brush gently with pet brush/Velcro before sewing parts if you want a fuzzier look.
Done! Your Little Fox is ready. 🦊