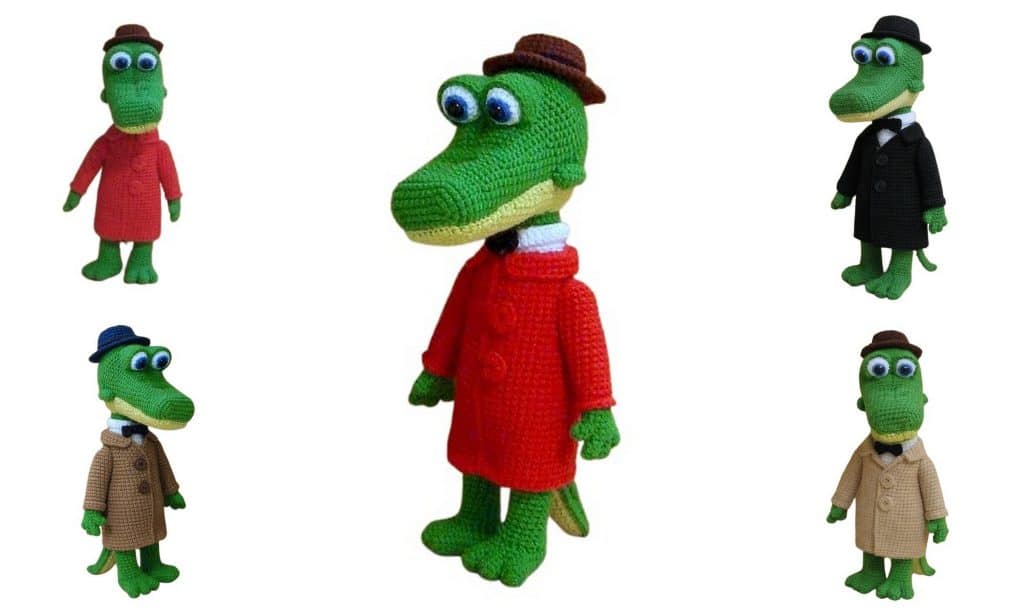
Mr. Gena the Cute Crocodile is an adorable amigurumi crochet pattern perfect for both beginners and experienced crafters. This free pattern guides you step-by-step to create a charming, handmade crocodile that makes a delightful gift or decoration. free crochet patterns
You may also like more amigurumi patterns.
If you’re looking for a cute crocodile amigurumi pattern, you’re in the right place!
This Cute Crocodile Crochet Pattern is designed for amigurumi lovers who enjoy creating adorable, character-style toys with detailed shaping and personality. With its friendly face, charming outfit, and soft curves, this cute crocodile is perfect as a handmade gift, nursery decoration, or collectible crochet toy.
The Cute Crocodile amigurumi is worked step by step using standard US crochet abbreviations, making the pattern easy to follow for both intermediate crocheters and confident beginners. Each part is carefully designed to help you achieve a clean finish and a professional-looking result.
Whether you want to crochet a lovable animal toy or expand your amigurumi collection, this Cute Crocodile Crochet Toy will quickly become one of your favorite projects. Grab your yarn, hook, and enjoy creating this adorable crocodile with a timeless, cute design.
If you want to access 1000+ free amigurumi patterns, you can download our application from this link!
Finished size
Approx. 30 cm (12 inches) tall
🧶 Materials & Tools
- Crochet hook 2.0 mm or 2.5 mm
- Fiberfill stuffing
- ALIZE Cotton Gold yarn
(55% cotton, 45% acrylic, 330 m / 100 g)
YarnArt Jeans can be used as an alternative - Yarn colors:
- yellow-green
- green
- white
- red
- brown
- black
- small amounts of dark green and dark blue
- Black safety eyes on posts, Ø 10 mm
📌 Abbreviations (US terms)
- ch – chain
- sc – single crochet
- sl st – slip stitch
- dc2tog – double crochet 2 together
- inc – increase
- dec – decrease
- 3 inc in one st – 3 single crochets worked into the same stitch
- BLO – back loop only
- FLO – front loop only
All parts are worked in a continuous spiral, unless stated otherwise.
Jaw – Cute Crocodile
Ch 7 (do not count the loop on the hook)
1: Starting from the 2nd ch from hook:
2 sc in first st, 4 sc, 5 sc in one st (end of chain),
continue around the other side:
4 sc, 3 sc in one st (starting chain st) = 18 sc
2: 8 sc, inc, 8 sc, inc = 20 sc
3: 20 sc
4: (9 sc, inc) ×2 = 22 sc
5: 22 sc
6: (9 sc, inc, 1 sc) ×2 = 24 sc
7: 24 sc
8: (10 sc, inc, 1 sc) ×2 = 26 sc
9–10: 26 sc
11: (11 sc, inc, 1 sc) ×2 = 28 sc
12–13: 28 sc
14: (11 sc, inc, 2 sc) ×2 = 30 sc
15–17: 30 sc
18: (12 sc, inc, 2 sc) ×2 = 32 sc
19–21: 32 sc
22: (13 sc, inc, 2 sc) ×2 = 34 sc
23–24: 34 sc
25: (13 sc, inc, 3 sc) ×2 = 36 sc
26: 36 sc
27: (14 sc, inc, 3 sc) ×2 = 38 sc
28: 38 sc
29: 5 sc, dec, 17 sc, dec, 12 sc = 36 sc
👉 Lightly stuff the jaw. It should remain completely flat.
30: (dec, 4 sc) ×6 = 30 sc
31: (2 sc, dec, 1 sc) ×6 = 24 sc
32: (dec, 2 sc) ×6 = 18 sc
33: (1 sc, dec) ×6 = 12 sc
34: 6 dec = 6 sc
Fold the piece in half and join through both edges with sc
(do not catch the side stitches — it’s easier this way).
Do not cut yarn.
Flatten the piece and single crochet evenly around the edge, directly into the fabric.
Make inc at the front corners.
Keep the edging aligned along the side edges.
Finish with sl st into the first stitch, cut yarn leaving a long tail for sewing, fasten off.


Cute Crocodile – Head (green yarn)
Ch 9 (do not count the loop on the hook)
Base (worked around the chain)
1: Starting from the 2nd ch from hook:
2 sc in first st, 6 sc, 5 sc in one st (end of chain),
continue around the other side:
6 sc, 3 sc in one st (starting chain st) = 22 sc
2: 1 sc, 3 inc in one st, 6 sc, 3 inc in one st,
2 sc, 3 inc in one st, 8 sc, 3 inc in one st, 1 sc = 30 sc
3: 2 sc, inc, 8 sc, inc, 4 sc, inc, 10 sc, inc, 2 sc = 34 sc
4–5: 34 sc
6: 2 sc, dec, 3 sc, dec, 3 sc, dec,
10 sc, dec, 8 sc = 30 sc
7–8: 30 sc
9: inc, 11 sc, inc, 17 sc = 32 sc
10: 32 sc
11: 7 sc, inc, 24 sc = 33 sc
12–13: 33 sc
14: 2 sc, inc, 12 sc, inc, 17 sc = 35 sc
15: 35 sc
16: 9 sc, inc, 25 sc = 36 sc
17–18: 36 sc
19: 2 sc, inc, 14 sc, inc, 18 sc = 38 sc
20: 38 sc
21: 11 sc, inc, 26 sc = 39 sc
22–23: 39 sc
24: 3 sc, inc, 16 sc, inc, 18 sc = 41 sc
25: 41 sc
Prepare for Joining the Jaw
Lightly stuff the crocheted part.
- On the head, find and mark 12 bottom stitches
(the bottom is where the working yarn is). - On the jaw, find and mark 24 back stitches.
👉 The jaw will be attached with the edging facing the head,
so the visible braid goes inside.
Along the jaw, work front-post single crochet stitches.
Joining the Jaw to the Head
26:
Work 29 sc on the head,
leave 12 head stitches unworked,
instead crochet approx. 24 front-post sc along the jaw.
Before closing the round, check that the green sides align evenly
(±1–2 stitches difference is acceptable to adjust).
Skip the 12 marked stitches on the head and close the round = ≈53 sc
Pull the sewing tail from the jaw between the jaw and the head.
27: Make dec at both jaw–head joins,
and 3 inc evenly across the top = 54 sc
If your stitch count was not exactly 53, adjust here
by adding inc at the top part.
28: Make dec at both joins,
and 4 inc evenly every 2 stitches on top = 56 sc
29: Make dec at both jaw–head joins = 54 sc
30–31: 54 sc
32: (dec, 16 sc) ×3 = 51 sc
33: (8 sc, dec, 7 sc) ×3 = 48 sc
34: (dec, 14 sc) ×3 = 45 sc
👉 Mark this point — this is the center of the head.
Head Shaping
35: (7 sc, dec, 6 sc) ×3 = 42 sc
36: (dec, 12 sc) ×3 = 39 sc
37: (6 sc, dec, 5 sc) ×3 = 36 sc
38: (dec, 4 sc) ×6 = 30 sc
39: (2 sc, dec, 1 sc) ×6 = 24 sc
40: (dec, 2 sc) ×6 = 18 sc
41: (1 sc, dec) ×6 = 12 sc
42: 6 dec = 6 sc
Sl st, cut yarn, pull tail through remaining stitches and close the opening.
Nose Shaping (Embroidery)
Stuff the head firmly.
Using dark green yarn doubled, embroider the nose:
- Work large stitches straight through the head
- Start 5 rows above the center mark
- Make vertical stitches every 6 rows, then 5 rows, then 5 rows
- Then add horizontal stitches on both sides:
- spacing: 3 stitches, then 4 stitches
Do not pull too tight — the nose should be shaped but not distorted.
Finish stuffing the head fully.
Close the gap between the jaws (neatness is not critical here, it just holds stuffing inside).


Cute Crocodile – Cheeks (green yarn, make 2)
1: 6 sc in MR
2: (inc, 2 sc) ×2 = 8 sc
3–4: 8 sc
5: dec, 6 sc = 7 sc
6: 7 sc
7: 3 sc, dec, 2 sc = 6 sc
Lightly stuff.
8: 6 sc
9: dec, 4 sc = 5 sc
Sl st, cut yarn leaving a sewing tail.
Finish stuffing and pull opening closed.
👉 Sew the cheeks along the color change line, slightly curved,
with the thicker edge facing forward.
👀 Eyes (white yarn, make 2)
1: 9 sc in MR (do not tighten too much)
2: 9 inc = 18 sc
3–4: 18 sc
Insert the safety eye post into the MR and tighten the ring to secure.
5: (4 sc, dec, 3 sc) ×2 = 16 sc
6: (dec, 6 sc) ×2 = 14 sc
7: (3 sc, dec, 2 sc) ×2 = 12 sc
Stuff lightly.
8: (dec, 4 sc) ×2 = 10 sc
9: 5 dec = 5 sc
Sl st, cut yarn leaving a sewing tail.
Finish stuffing and close the opening.
Eye Decoration
Using dark blue yarn, embroider the iris around the pupil with a chain stitch.
Stitches should be very close to the pupil, but not touching it.
👉 Sew the eyes starting from the nose stitch line upward,
leaving 2 stitches between the eyes.
The front eye seam should be 2 rows above the iris.
👁️ Eyelids (green yarn, make 2)
Work in rows, turning after each row.
Ch 1 at the end of each row, turn.
Each row starts in the 2nd stitch from hook.
Wrong-side sc are worked normally,
but insert hook from behind and pull yarn from the front.
1: 3 sc in MR (do not close the ring)
2 (WS): inc, 1 sc, inc = 5 sc
3: inc, 3 sc, inc = 7 sc
4 (WS): inc, 5 sc, inc = 9 sc
5: inc, 7 sc, inc = 11 sc
6 (WS): inc, 9 sc, inc = 13 sc
7: inc, 11 sc, inc = 15 sc
Continue around the piece, crocheting the edging:
- 1 sc into the last worked stitch
- 5 sc evenly along the side
- 3 inc in one st into the MR
- 6 sc evenly along the other side
- sl st into the first base stitch
Cut yarn, leave a sewing tail, fasten off.
👉 Sew eyelids around the eyes.


🐊 Tail – Cute Crocodile
(yellow-green & green yarn)
The tail is worked in rows, turning after each row.
Ch 1 at the end of each row, turn.
Each new row starts in the 2nd stitch from the hook.
Yellow-Green Part
1: 3 sc in MR (do not close the ring)
2 (WS): 3 sc
3: 3 sc
4 (WS): 3 sc
5: 1 sc, inc, 1 sc = 4 sc
6 (WS): 4 sc
7: 4 sc
8 (WS): 4 sc
9: 2 sc, inc, 1 sc = 5 sc
10 (WS): 5 sc
11: 5 sc
12 (WS): 5 sc
13: 2 sc, inc, 2 sc = 6 sc
14 (WS): 6 sc
15: 6 sc
16 (WS): 6 sc
17: 2 sc, inc, 3 sc = 7 sc
18 (WS): 7 sc
19: 7 sc
20 (WS): 7 sc
21: 7 sc
22 (WS): 7 sc
23: 7 sc, then continue around the piece, working the edging:
- 2 sc into the last worked stitch
- sc evenly along the side
- 3 inc in one st into the MR
- sc evenly along the other side
- inc into the last stitch
- sl st into the first base stitch
Cut yarn and fasten off.
Green Part
1: 3 sc in MR (do not close the ring)
2 (WS): inc, 1 sc, inc = 4 sc
3: 4 sc
4 (WS): 2 sc, inc, 1 sc = 5 sc
5: 5 sc
6 (WS): 5 sc
7: 2 sc, inc, 2 sc = 6 sc
8 (WS): 6 sc
9: 6 sc
10 (WS): 2 sc, inc, 3 sc = 7 sc
11: 7 sc
12 (WS): 7 sc
13: 3 sc, inc, 3 sc = 8 sc
14 (WS): 8 sc
15: 8 sc
16 (WS): 8 sc
17: 4 sc, inc, 3 sc = 9 sc
18 (WS): 9 sc
19: 9 sc
20 (WS): 9 sc
21: 9 sc
22 (WS): 9 sc
23: 9 sc, then continue around the piece, working the edging:
- 2 sc into the last worked stitch
- sc evenly along the side
- 3 inc in one st into the MR
- sc evenly along the other side
- inc into the last stitch
- sl st into the first base stitch
Do not cut yarn — this yarn will be used to join the pieces.
Joining the Tail Parts
Place both tail pieces wrong sides together,
with the lighter (yellow-green) side facing you.
- Start from the 7th stitch from the yarn end on the light side
(the middle stitch of the 3 inc in one st). - On the dark side, start from the 2nd stitch from the hook.
Work sc through both edges at the same time.
At the tail tip, make 3 inc in one st.
👉 The base of the tail remains unjoined.
Cut yarn, leave a sewing tail, fasten off.
Stuff the tail.
🦶 Legs & Body – Cute Crocodile
(green, white yarn)
Begin with green yarn.
Cute Crocodile – Toes (make 3)
1: 6 sc in MR
2: (inc, 1 sc) ×3 = 9 sc
3: 9 sc
4: 8 sc, sl st
Make three toes:
- On the first toe cut yarn short
- On the second toe leave a sewing tail
- On the third toe replace sl st with sc and do not cut yarn
Joining the Toes
5: Join the three toes in one round using sc.
Leave 2 stitches unworked between each toe (to be sewn later)
= 19 sc
👉 On the middle toe, one side will have 2 stitches, the other 3 stitches.
Pull the sewing tail outward.
6: Make a dec on the middle toe where there are 3 stitches = 18 sc
7–12: 18 sc
Stuff the foot lightly — it should remain flat, not round.
13: (dec, 1 sc) ×6 = 12 sc
14: 6 dec = 6 sc
Sl st, cut yarn, finish stuffing, close the opening.
Sew the gaps between the toes.
Cute Crocodile – Leg (green yarn)
Restart row counting.
1: Pick up sc evenly around the foot
(1 row above closing, 2 rows above toes) ≈ 18 sc
±1 stitch is acceptable (adjust next row if needed)
2: dec at the front and back = 16 sc
3: dec on both sides = 14 sc
4–17: 14 sc
Sl st, cut yarn, fasten off.
👉 Make the second leg the same way.
Leave a sewing tail on one leg.
Joining the Legs
Stuff the legs.
Position them evenly.
Between the legs: ch 3
Finish crocheting to the join point if needed.
18:
14 sc on first leg,
3 sc into chains (one loop only),
14 sc on second leg,
3 sc into chains (other loop)
= 34 sc
Pull sewing tail outward.
Attach the Tail
19:
7 sc, inc, 4 sc,
join 7 back loops of body + 7 light loops of tail together with sc,
4 sc, inc, 7 sc, 3 inc
= 39 sc
20:
12 sc,
1 sc catching side loop of green tail,
along tail: 4 sc, inc, 4 sc,
1 sc catching opposite side loop of tail,
18 sc
= 42 sc
Body – Cute Crocodile
21: 11 sc, inc, 12 sc, inc, 17 sc = 44 sc
22–27: 44 sc
28: (dec, 20 sc) ×2 = 42 sc
29: 42 sc
Change to white yarn, cut green yarn.
30–31: 42 sc
32: (10 sc, dec, 9 sc) ×2 = 40 sc
33–34: 40 sc
35: (dec, 18 sc) ×2 = 38 sc
36–37: 38 sc
38: (9 sc, dec, 8 sc) ×2 = 36 sc
39–40: 36 sc
Stuff the body.
41: (dec, 16 sc) ×2 = 34 sc
42–43: 34 sc
44: (8 sc, dec, 7 sc) ×2 = 32 sc
45–46: 32 sc
47: (dec, 14 sc) ×2 = 30 sc
48–50: 30 sc
Pull loop longer so it doesn’t unravel.
Leave the white yarn in front of the work.
👔 Waist Colorwork & Collar
Green Waist Band
Pick up green yarn.
51: 30 sc BLO
52: 30 sc
Sl st, cut yarn leaving a sewing tail, fasten off.
White Collar
Return to the white yarn left in front.
51 (FLO):
(inc, 7 sc, inc, 6 sc) ×2 = 34 sc
52 (FLO): 34 sc
53: 34 sc
Sl st, cut yarn, fasten off.
Fold the white collar outward.
Hide yarn ends inside the body.
👉 If needed, sew small gaps between the legs and near the tail.
Tail Decoration
Using dark green yarn doubled, embroider stripes on the green side of the tail with large stitches:
- First stripe: 9 rows from the tip
- Second stripe: 5 rows below the first
- Third stripe: 5 rows below the second
Stitches go from one edge of the tail to the other.
🧥 Coat (red yarn)
1: Attach yarn directly to the body, approx. 2 rows below the folded collar.
Start at the center front.
Work sc evenly around, making 4 inc evenly = 34 sc
Since the body is worked in a spiral, shift the beginning of the round
slightly higher toward the back (closer to the neck).
Do this gradually over several stitches.
2: Work BLO: (inc, 7 sc) ×4 = 36 sc
3: 36 sc
4: (inc, 17 sc) ×2 = 38 sc
5–6: 38 sc
7: (10 sc, inc, 8 sc) ×2 = 40 sc
8–9: 40 sc
10: (inc, 19 sc) ×2 = 42 sc
11–12: 42 sc
13: (11 sc, inc, 9 sc) ×2 = 44 sc
14–15: 44 sc
16: (inc, 21 sc) ×2 = 46 sc
17–18: 46 sc
19: (12 sc, inc, 10 sc) ×2 = 48 sc
20–21: 48 sc
22: (inc, 23 sc) ×2 = 50 sc
23–25: 50 sc
26: (13 sc, inc, 11 sc) ×2 = 52 sc
27–29: 52 sc
30: (inc, 25 sc) ×2 = 54 sc
31–36: 54 sc
Continue crocheting until you reach the center front.
Cut yarn, leaving a long tail.
👉 Using chain stitch embroidery, embroider the front placket all the way up.
👕 Coat Collar (red yarn)
Turn Gena facing you.
Work into the front loops only.
Leave 2 front stitches unworked.
1: 6 sc, inc, 9 sc, inc, 8 sc, inc, 6 sc = 35 sc
2: 35 WS sc
3: 35 sc
Cut yarn, fasten off.
Collar Edging
Attach yarn to one of the front stitches.
- 2 sc along the side
- 3 inc in one st into the first back stitch
- sc along the back
- 3 inc in one st into the last back stitch
- 2 sc along the other side
- sl st into the second front stitch
Cut yarn, fasten off.
Hide all yarn ends toward the neck and inside the body.
🔘 Buttons (red yarn, make 2)
Into MR, work 12 hdc.
Cut yarn.
Bring yarn ends to the wrong side, pull them out near the center from both sides,
hide inside the coat and tie securely.
🧵 Final Assembly – Cute Crocodile
Attach the Head
Stuff the body firmly.
Fix the head in place using 2–3 thin knitting needles inserted through the head into the body.
Sew the head to the body.
👉 While sewing, gently stretch the neck sideways so it doesn’t look too narrow.
Do not sew completely closed at first — when a small opening remains, add more stuffing, then finish sewing.
🎀 Bow Tie (black yarn)
Leave the starting tail slightly long.
Into MR work:
ch 2, 3 dc2tog, ch 2, sl st,
ch 2, 3 dc2tog, ch 2, sl st
Cut yarn (not too short).
Tighten the MR.
Using one yarn tail, wrap several times around the center of the bow.
Tie both ends together with a knot on the wrong side.
Pull the yarn ends outward, away from the center.
👉 Attach the bow tie to the front center of the folded collar.
Tie yarn ends (preferably at the top) and hide them inside the body.
✋ Arms (green & red yarn, make 2)
Begin with green yarn.
Finger 4
1: 6 sc in MR
2: 6 sc
Sl st, cut yarn leaving a sewing tail.
Fingers 1, 2, 3
1: 6 sc in MR
2: 6 sc
3: 5 sc, sl st
On two fingers, cut yarn short.
On the third finger, replace sl st with sc and do not cut yarn.
Join Fingers 1–3
4: Join the three fingers in one round with sc,
leaving 1 stitch unworked between fingers = 14 sc
5: 14 sc
In the next round, attach Finger 4.
👉 Skip 2 stitches on both the hand and finger at the join (to be sewn later).
Arm 1
6: 3 sc (hand), 4 sc (finger), 9 sc (hand) = 16 sc
Pull sewing tail outward.
7: 5 sc, dec, 5 sc, dec, 2 sc = 14 sc
8: dec, 5 sc, dec, 5 sc = 12 sc
Arm 2
6: 4 sc (hand), 4 sc (finger), 8 sc (hand) = 16 sc
Pull sewing tail outward.
7: 4 sc, dec, 7 sc, dec, 1 sc = 14 sc
8: dec, 5 sc, dec, 5 sc = 12 sc
Upper Arm (same for both arms)
Stuff lightly.
9: 12 sc
On the last stitch, change to red yarn.
Leave starting tail approx. 70 cm long.
Cut green yarn.
10: (inc, 3 sc) ×3 = 15 sc
Stuff gradually while crocheting.
11: 15 sc BLO
12–27: 15 sc
28: (dec, 3 sc) ×3 = 12 sc
29: 6 dec = 6 sc
Sl st, cut yarn leaving a sewing tail.
Finish stuffing and close the opening.
Using the long starting tail, work 14 sc FLO,
against the direction of crocheting (palm facing away),
sl st, fasten off, hide yarn inside.
👉 Sew arms under the collar, slightly angled forward and backward so they don’t stick out.
🎩 Hat -Cute Crocodile
(dark brown & black yarn)
Begin with dark brown yarn.
1: 7 sc in MR
2: 7 inc = 14 sc
3: (inc, 1 sc) ×7 = 21 sc
4: (2 sc, inc) ×7 = 28 sc
5: sl st, ch 1, work 28 raised WS sc,
starting from the nearest stitch already caught by the stitch.
Skip the last small stitch (it was the ch).
6–8: 28 sc
Switch to black yarn (do not cut brown).
9: sl st with brown yarn,
ch 1 with black yarn,
work 28 raised front sc, starting from the far stitch.
10: (inc, 13 sc) ×2 = 30 sc
Switch back to dark brown yarn.
Sl st with black yarn, ch 1 with brown yarn.
Cut black yarn, leaving a sewing tail.
11: Raised front sc: (3 sc, inc, 1 sc) ×6 = 36 sc
12: (inc, 5 sc) ×6 = 42 sc
13: (4 sc, inc, 2 sc) ×6 = 48 sc
14: (inc, 7 sc) ×6 = 54 sc
Sl st, cut yarn, fasten off.
Hide yarn ends inside the hat using small stitches.
👉 Stuff the hat.
Pin it to the head so the front brim touches the eyelids.
Sew almost all the way around, add more stuffing if needed, then finish sewing.
✅ GENA IS DONE! 🐊🎉