Create a charming holiday decoration with this Christmas Fox Crochet Pattern, perfect for adding a festive touch to your home. This adorable amigurumi fox toy is a delightful handmade gift that brings warmth and whimsy to the holiday season. free crochet patterns
You may also like more amigurumi patterns.
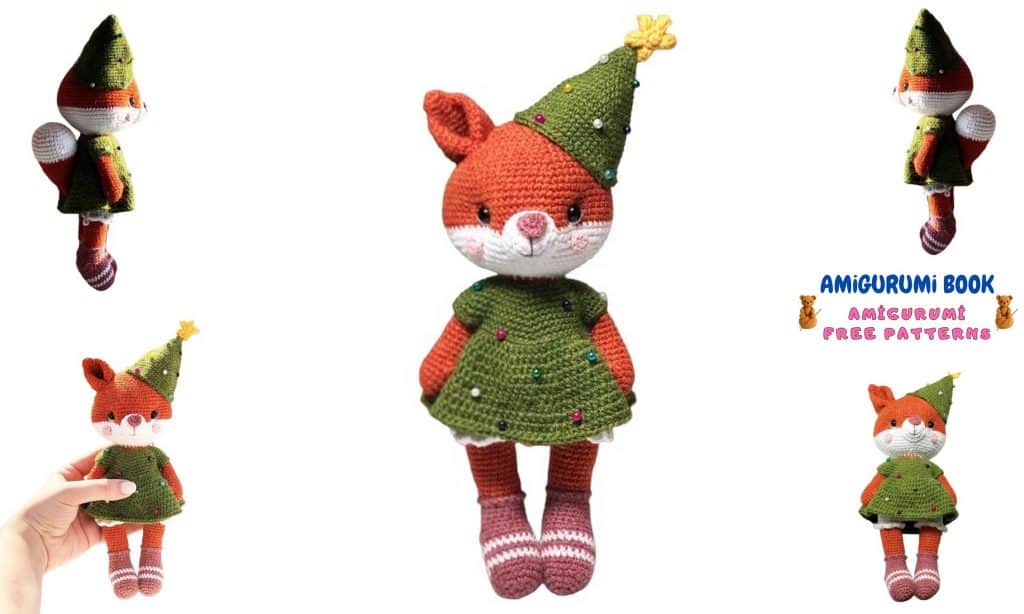
If you are searching for a charming Christmas Fox amigurumi pattern, this adorable crochet fox is the perfect holiday project. Designed with cozy winter colors, festive details, and a sweet expression, this Christmas Fox brings a warm and playful touch to your handmade Christmas decorations.
This Christmas Fox crochet pattern is written using standard US amigurumi abbreviations and easy step-by-step instructions, making it suitable for confident beginners and experienced crocheters alike. The fluffy tail, cute dress, and seasonal accessories give this fox a magical holiday look that makes it ideal as a Christmas gift, nursery decor, or festive home ornament.
Whether you are decorating for the holidays or looking for a special handmade gift, this Christmas Fox amigurumi will quickly become a favorite crochet project for the winter season.
If you want to access 1000+ free amigurumi patterns, you can download our application from this link!
🧶 Materials
- Yarn: main color (brown / gray – squirrel color)
- Additional colors: white, beige (for muzzle & details)
- Crochet hook suitable for your yarn
- Fiberfill stuffing
- Safety eyes
- Sewing needle
- Scissors
📌 Abbreviations (US terms)
- MR – magic ring
- sc – single crochet
- inc – increase (2 sc in one stitch)
- dec – decrease (sc2tog)
- sl st – slip stitch
- ch – chain
Work in continuous rounds, unless stated otherwise.
Christmas Fox – Head
1: 6 sc in MR (6)
2: inc ×6 (12)
3: (1 sc, inc) ×6 (18)
4: (2 sc, inc) ×6 (24)
5: (3 sc, inc) ×6 (30)
6: (4 sc, inc) ×6 (36)
7–12: 36 sc
👉 Insert safety eyes between rounds 8–9, with approx. 6–7 stitches between them.
13: (4 sc, dec) ×6 (30)
14: (3 sc, dec) ×6 (24)
15: (2 sc, dec) ×6 (18)
👉 Start stuffing the head.
16: (1 sc, dec) ×6 (12)
17: dec ×6 (6)
Fasten off, close the opening.


Christmas Fox – Muzzle
(white yarn)
1: 6 sc in MR (6)
2: inc ×6 (12)
3: (1 sc, inc) ×6 (18)
4: 18 sc
Lightly stuff.
Flatten slightly and sew to the head under the eyes.
👂 Ears – Christmas Fox
(make 2)
1: 6 sc in MR (6)
2: (1 sc, inc) ×3 (9)
3: 9 sc
4: (2 sc, inc) ×3 (12)
5: 12 sc
Fold ear slightly and sew to the top of the head.
Christmas Fox – Body
1: 6 sc in MR (6)
2: inc ×6 (12)
3: (1 sc, inc) ×6 (18)
4: (2 sc, inc) ×6 (24)
5: (3 sc, inc) ×6 (30)
6–10: 30 sc
👉 Start stuffing the body.
11: (3 sc, dec) ×6 (24)
12: (2 sc, dec) ×6 (18)
13: (1 sc, dec) ×6 (12)
14: dec ×6 (6)
Fasten off, close opening.
✋ Arms – Christmas Fox
(make 2)
Work with main color yarn.
1: 6 sc in MR (6)
2: inc ×6 (12)
3: (3 sc, inc) ×3 (15)
4–5: 15 sc
6: popcorn stitch (5 hdc in one stitch), 14 sc
7–8: 15 sc
9: (3 sc, dec) ×3 (12)
10–15: 12 sc
Lightly stuff.
Fasten off, leave a long tail for sewing.


🦵 Legs – Christmas Fox
(make 2)
Start with brown yarn.
1: 6 sc in MR (6)
2: inc ×6 (12)
3: (1 sc, inc) ×6 (18)
4: (2 sc, inc) ×6 (24)
5–6: 24 sc
7:Change color to white yarn
24 sc
8: Change color to burgundy yarn
24 sc
9: Change color to white yarn
24 sc
10: Change color to burgundy yarn
24 sc
11: 12 sc, ch 1
Continue working in rows.
12: dec, 8 sc, dec, ch 1 (10)
13: dec, 6 sc, dec, ch 1 (8)
14: dec, 4 sc, dec, ch 1 (6)
15: dec, 2 sc, dec, ch 1 (4)
16: dec ×2, ch 1 (2)
👉 Continue working in the round again.
17:
- side: 3 dec
- front: 5 sc
- dec
- back: 5 sc
- side: 3 dec
= 21 sc
18: 21 sc
19: (5 sc, dec) ×3 (18)
20–22: 18 sc
Change color to main body color
23–33: 18 sc
Change color to white yarn
34: 18 sc
35: 18 sc BLO
👉 Do not cut yarn on the second leg.
Make sure both legs face the same direction.
Joining Legs & Body
Ch 6, join the first leg, place a stitch marker — this is the first stitch of the round.
1:
18 sc on first leg,
6 sc on chain,
18 sc on second leg,
6 sc on chain
= 48 sc
2: (7 sc, inc) ×6 (54)
3–7: 54 sc
8: (7 sc, dec) ×6 (48)
Change color to main color
9–10: 48 sc
11: (6 sc, dec) ×6 (42)
12–15: 42 sc
16: (5 sc, dec) ×6 (36)
17–22: 36 sc
23: (4 sc, dec) ×6 (30)
24–25: 30 sc
26: (3 sc, dec) ×6 (24)
👉 Start stuffing the body firmly.


Christmas Fox – Tail
Start with white yarn.
1: 6 sc in MR (6)
2: inc ×6 (12)
3: (1 sc, inc) ×6 (18)
4: (2 sc, inc) ×6 (24)
5: (3 sc, inc) ×6 (30)
6: (4 sc, inc) ×6 (36)
7–13: 36 sc
Change color to main body color.
14: (4 sc, dec) ×6 (30)
15–19: 30 sc
20: (3 sc, dec) ×6 (24)
21–25: 24 sc
26: (2 sc, dec) ×6 (18)
27: 18 sc
Stuff the tail firmly.
Fasten off, leaving a long tail for sewing.
👉 Sew the tail to the back of the body, centered.
Dress – Christmas Fox
Ch 36, join into a ring with sl st.
Cut yarn, leaving a long sewing tail.
1: (5 sc, inc) ×6 (42)
2: (6 sc, inc) ×6 (48)
3: (7 sc, inc) ×6 (54)
4: (8 sc, inc) ×6 (60)
5: (9 sc, inc) ×6 (66)
6: (10 sc, inc) ×6 (72)
7: (11 sc, inc) ×6 (78)
8: (12 sc, inc) ×6 (84)
Sleeve Openings
9:
14 sc,
skip 15 sc,
25 sc,
skip 15 sc,
15 sc
= 54 sc
Skirt (worked in hdc)
10: BLO (8 hdc, inc) ×6 (60)
11: (9 hdc, inc) ×6 (66)
12: (10 hdc, inc) ×6 (72)
13: 72 hdc
14: (11 hdc, inc) ×6 (78)
15: 78 hdc
16: (12 hdc, inc) ×6 (84)
17: 84 hdc
18: (13 hdc, inc) ×6 (90)
19: 90 hdc
Put the dress on the doll.
Sew the top opening to the body.
Tighten the neckline and weave in all yarn ends.
🎩 Hat – Christmas Fox
Work in rows, turning after each row.
1: 6 sc in MR (6)
2: (1 sc, inc) ×3 (9)
3: (2 sc, inc) ×3 (12)
4: (3 sc, inc) ×3 (15)
5: (4 sc, inc) ×3 (18)
6: (5 sc, inc) ×3 (21)
7: (6 sc, inc) ×3 (24)
8: (7 sc, inc) ×3 (27)
9: (8 sc, inc) ×3 (30)
10: (9 sc, inc) ×3 (33)
11: (10 sc, inc) ×3 (36)
12: (11 sc, inc) ×3 (39)
13: 39 sc
14: (12 sc, inc) ×3 (42)
15: 42 sc
16: (13 sc, inc) ×3 (45)
17: 45 sc
18: (14 sc, inc) ×3 (48)
19: 48 sc
Fasten off.
Place the hat on the head and sew in place.
⭐ Star
1: 5 sc in MR (5)
2: inc ×5 (10)
3: (popcorn stitch: 5 dc in one st, 1 sc) ×5
Fasten off and sew the star onto the hat.
👃 Nose
1: 6 sc in MR (6)
2: 3 sc in one st, 1 sc,
3 sc in one st, 1 sc,
3 sc in one st, 1 sc
= 12 sc
Leave a long tail for sewing.
Sew the nose to the muzzle and embroider details with thin yarn.
😊 Cheeks
(make 2)
1: 6 sc in MR (6)
Leave a long tail for sewing.
Sew cheeks to the muzzle.
👂 Ears Assembly
Sew ears to the top sides of the head.
Make sure they are symmetrical.
👁️ Face Assembly
- Attach safety eyes (Ø 8 mm)
Distance between eyes: 15–16 stitches - Sew the muzzle
- Embroider eye details with white yarn
- Insert needle at top of one ear
- Pull down and out near the second ear
- Repeat for shaping
- Sew the nose
- Sew cheeks
- Sew ears to the head
🧵 Final Assembly
- Sew arms to the body
- Attach head to the body
- Sew tail securely to the back
- Put on the dress and secure at neckline
- Attach hat and star
- Weave in all yarn ends