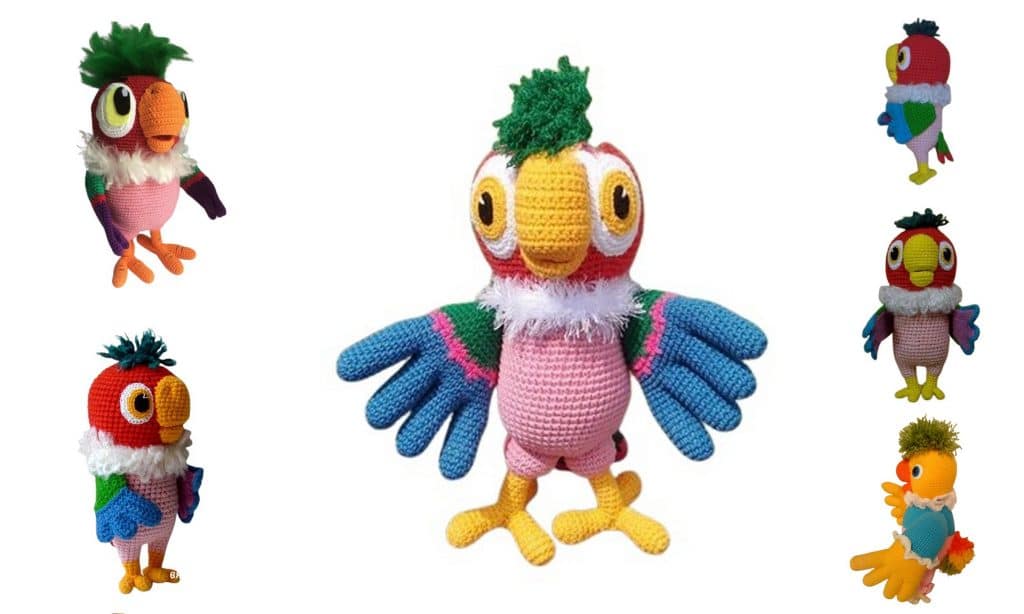
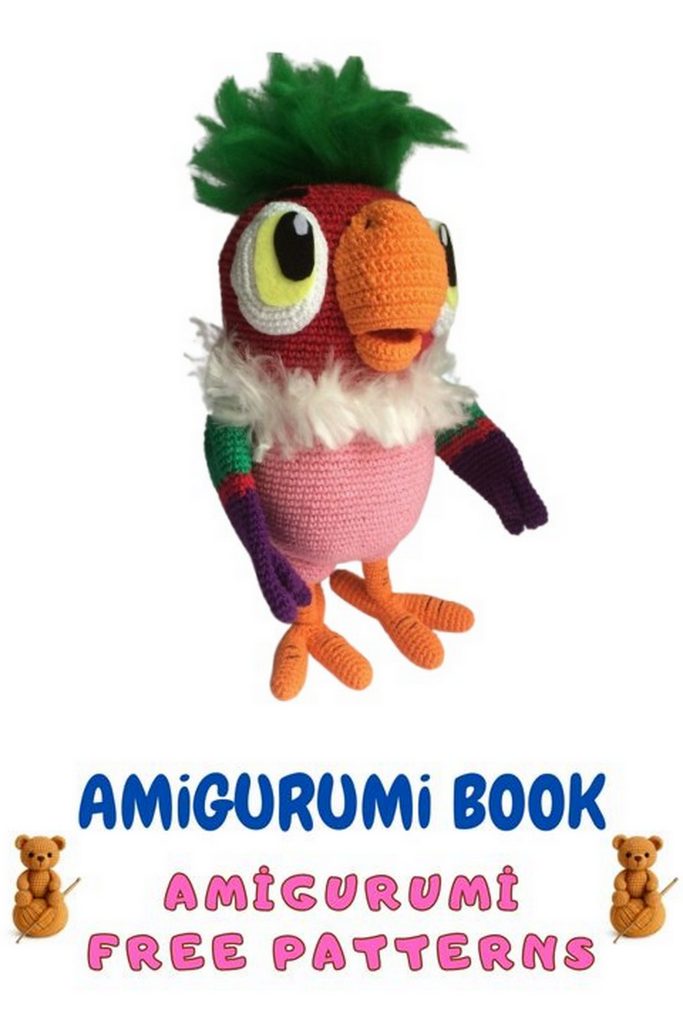
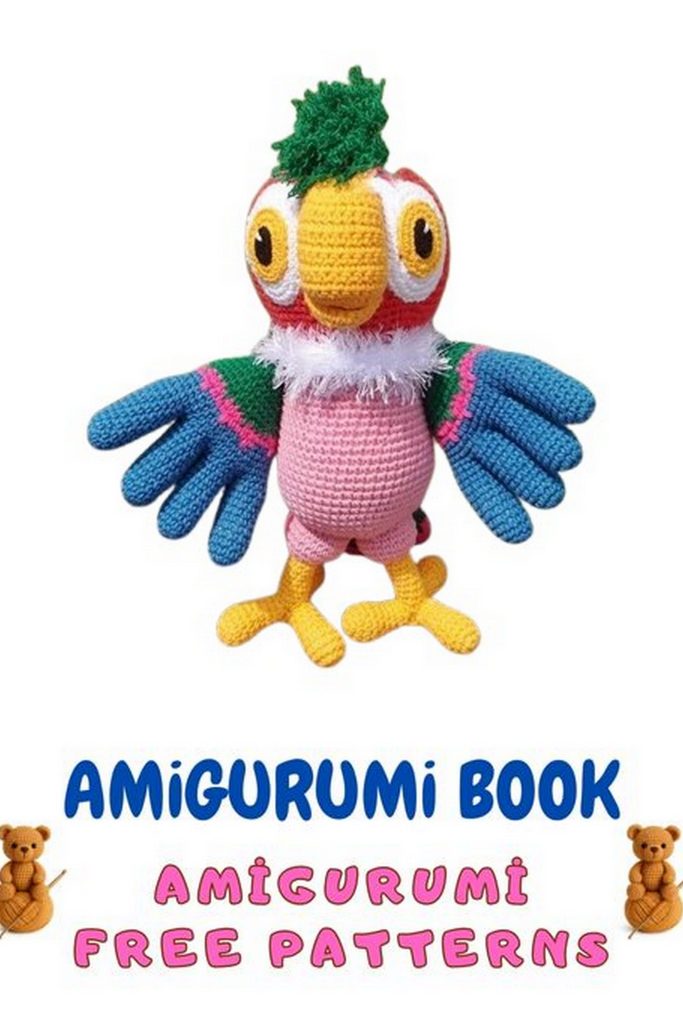
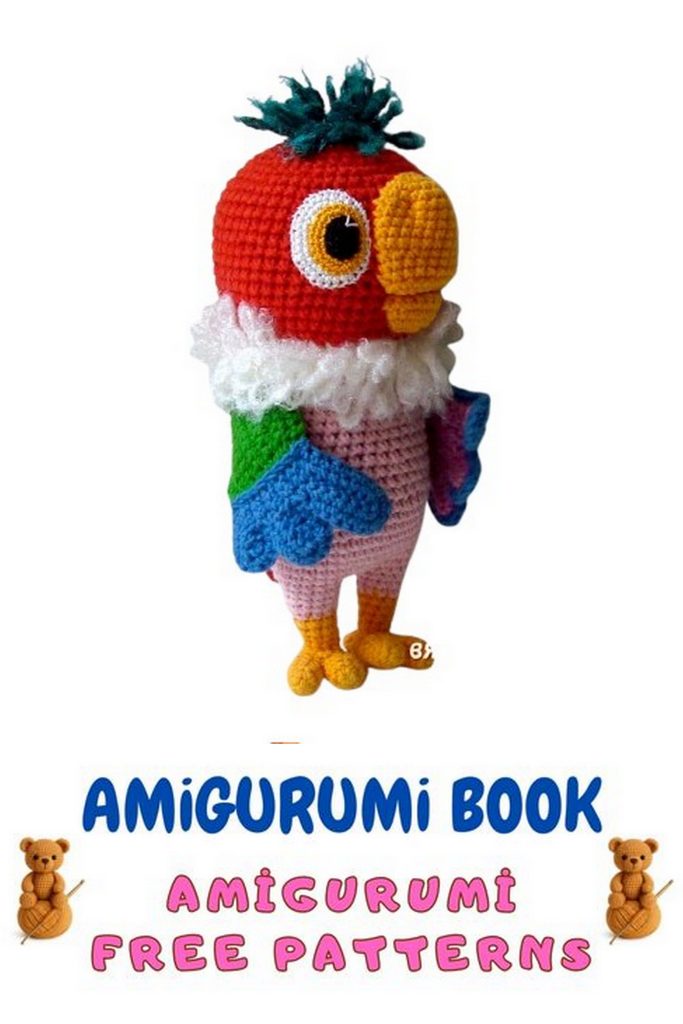
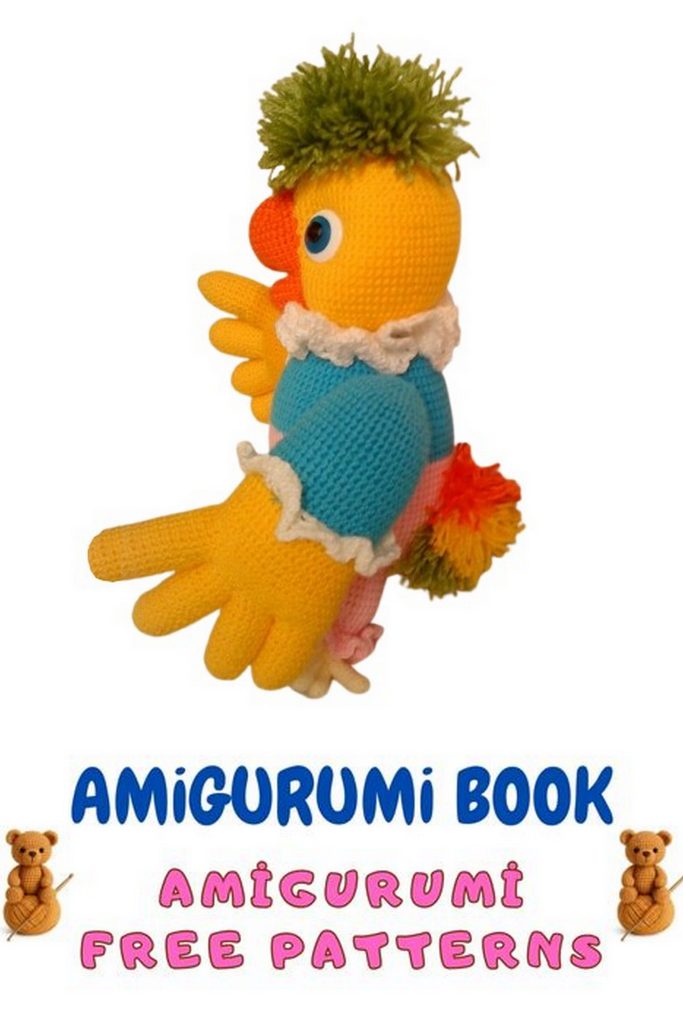
Bring your crochet skills to life with this amigurumi parrot pattern! Perfect for beginners and experienced crafters alike, this colorful and playful parrot, inspired by Kesha, will make a charming addition to your handmade toy collection. Follow the step-by-step instructions to create a vibrant, detailed amigurumi parrot that’s full of personality.
If you want to access 1000+ free amigurumi patterns, you can download our application from this link!
Height: ~20 cm
Tools and Materials:
Crochet hook: 2.5 mm or 2 mm; 1.25–1.5 mm hook for the eyes
Stuffing: hollow fiber (holofiber)
Yarn:
ALIZE Cotton Gold, 55% cotton, 45% acrylic, 330 m / 100 g. Alternative: YarnArt Jeans
Colors: yellow, pink, red, dark blue, green, light lilac
KAMTEX Cotton Moss, 65% cotton, 35% polyamide, 220 m / 100 g (alternatives: Lavita Moss, Adelia Valeri)
Colors: white and green
VITA cotton COCO for eyes
Colors: white, yellow, black
Abbreviations:
ch ( ) – chain
sc ( ) – single crochet
sl st ( ) – slip stitch
inc ( ) – increase
dec ( ) – decrease
inc 3in1 ( ) – 3 sc worked into 1 stitch of the previous row
inc 4in1 ( ) – 4 sc worked into 1 stitch of the previous row
dec 3in1 ( ) – 3 sc crocheted together
All pieces are crocheted in a spiral, unless otherwise specified.
Feet (yellow) – make 2
We start from the toes.
Rnd 1: 6 sc in magic ring
Rnd 2: (inc, 2 sc) *2 = 8 sc
Rnds 3–5: 8 sc
→ Make a sl st, cut the yarn leaving a tail for sewing the gaps between toes, secure.
Crochet another toe repeating Rnds 1–5, but do not cut the yarn.
Rnd 6: Crochet both toes together = 16 sc
Bring the sewing yarn tail to the outside.
Rnd 7: (dec, 2 sc) *4 = 12 sc
Stuff the toes.
Rnd 8: (1 sc, dec) *4 = 8 sc
Rnd 9–10: 8 sc
Stuff the foot.
Rnd 11: (dec, 2 sc) *2 = 6 sc
👉 Tip: it’s convenient to stuff small parts using closed, blunt-tipped scissors.
Make a sl st, cut the yarn, finish stuffing. Pull the yarn end through the remaining stitches and tighten to close the hole.
Sew the gaps between the toes.
Secure and hide all yarn ends inside the foot.
Amigurumi Parrot Legs – Body – Head
Legs (with yellow yarn):
Pick up 9 sc around the foot.
Rnd 1: Join yarn, make 1 ch (counts as the first st), crochet 8 sc more = 9 sc total.
Try to crochet in a circle — it won’t be perfectly even, but it will smooth out as you go.
Rnd 2–5: 9 sc
On the last stitch of Round 5, switch to pink yarn,
you can cut the yellow yarn.
Rnd 6: (inc, 2 sc) × 3 = 12 sc
Rnd 7–8: 12 sc
Make 1 sl st, cut the yarn leaving a tail to sew up the small gaps between the legs. Secure the end.
Crochet the second leg, repeating Rounds 1–8, but do not cut the yarn.
Note: Always change color on the last stitch of the previous round.
Stuff both legs lightly — we’ll now join them to form the body.
Position the legs facing forward, crochet to the inner side where they will be joined,
then make 3 ch between the legs.
The next stitch, where you join the first leg, marks the beginning of the new round.
Rnd 9: 12 sc on the first leg, 3 sc along the chain (working in one loop only),
12 sc on the second leg, 3 sc along the other side of the chain = 30 sc
Bring the yarn tail (for sewing gaps between legs) to the outside.
10. Rnd : 6 sc, inc, 5 sc, inc, 1 sc, inc, 5 sc, inc, 6 sc, inc, 1 sc, inc = 36 sc
11. Rnd : (inc, 11 sc) × 3 = 39 sc
12. Rnd : (7 sc, inc, 5 sc) × 3 = 42 sc
13-19. Rnd : 42 sc
20. Rnd : (dec, 12 sc) × 3 = 39 sc
21-25 Rnd : 39 sc
Rnd 26: (6 sc, dec, 5 sc) × 3 = 36 sc
Rnd 27–30: 36 sc
Stuff the body firmly, sew the small gaps between the legs.
Cut the pink yarn, then continue with white fluffy “cotton grass” yarn:
Rnd 31–33: 36 sc in loop stitch
It doesn’t matter which method you use for loop stitches,
just make sure the loops appear on the right side and are about 1.5 cm long.
Cut the white fluffy yarn, switch to red yarn:
34. Rnd : (inc, 3 sc) × 9 = 45 sc
35.Rnd : (3 sc, inc, 1 sc) × 9 = 54 sc
36-47.Rnd : 54 sc
48.Rnd : (4 sc, dec, 3 sc) × 6 = 48 sc
49.Rnd : (dec, 6 sc) × 6 = 42 sc
Rnd 50: (3 sc, dec, 2 sc) × 6 = 36 sc
Rnd 51: (dec, 4 sc) × 6 = 30 sc
Stuff the worked piece firmly.
Rnd 52: (2 sc, dec, 1 sc) × 6 = 24 sc
Rnd 53: (dec, 2 sc) × 6 = 18 sc
Stuff the head firmly.
Cut the red yarn, and continue with green fluffy “cotton grass” yarn.
Again, crochet loop stitches about 1.5 cm long — one in every stitch (even over decreases, so each decrease gives 2 loops).
Rnd 54: (1 sc, dec) × 6 = 12 sc (18 loops)
Rnd 55: 6 dec = 6 sc (12 loops)
Finish stuffing, cut the yarn, and tighten the opening closed.
Beak (yellow) – Parrot
Lower Part
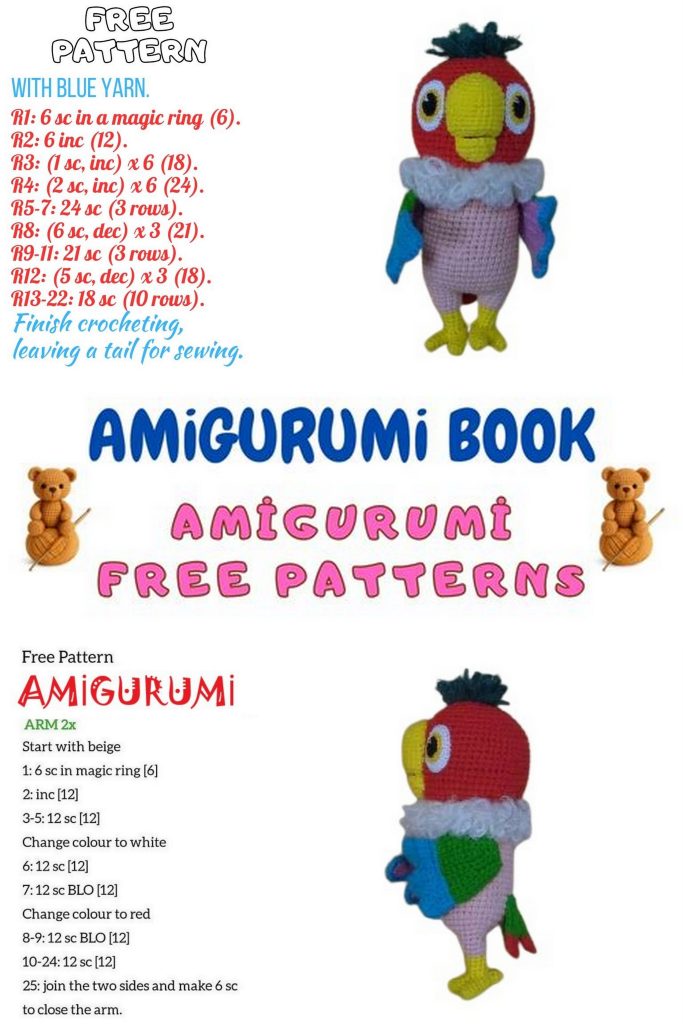
1: 6 sc in a magic ring
2: 6 inc = 12 sc
3: (inc, 1 sc) × 6 = 18 sc
4: 18 sc
Do not stuff this part.
Fold the piece in half with the wrong side facing inwards and crochet across both edges with sc = 8 sc (you can skip the edge stitches at the beginning and end to make it easier).
Cut the yarn, leaving a long tail for sewing, and fasten off.
Upper Part
1: 6 sc in a magic ring
2: 6 inc = 12 sc
3: (inc, 1 sc) × 6 = 18 sc
4: (2 sc, inc) × 6 = 24 sc
5–12: 24 sc
Lightly stuff the upper part — just enough so it feels like a thin layer of filling inside; it should remain almost flat.
Fold it in half the same way as the lower part and crochet along the edge with sc, skipping the edge stitches = 11 sc.
Cut the yarn, leaving a long tail for sewing, and fasten off.
Note:
The “right side” of each beak piece is the side where the yarn tail is on the left — this side should face outward when sewing.
Assembly – Amigurumi Parrot
Sew the lower beak approximately 2 rounds below the collar.
While sewing, keep your finger inside the character’s “mouth” to push the upper side away, making sure the beak sits correctly.
Sew the upper beak approximately 5 rounds below the green crest, positioned just above the lower part and slightly wider (about half a stitch extra on each side).
Again, keep your finger inside while sewing for better shaping.
After sewing both parts, you can secure the sides with a couple of stitches to hold the beak firmly in place.
Eyes (make 2) – Amigurumi Parrot
Use thin yarn and a small hook.
White Part (Sclera)
Ch 4 (the loop on the hook does not count).
1: Starting from the 2nd chain from the hook: inc, 1 sc, 5 sc in one stitch (this should be the last chain of the foundation), continue around: 1 sc, 3 sc in one stitch (this should be the first chain you started the row with) = 12 sc
2: inc, 3 sc, 3 inc, 3 sc, 2 inc = 18 sc
3: inc, 5 sc, 4 inc, 5 sc, 3 inc = 26 sc
Fasten off, leaving a long tail for sewing.
Iris (Yellow) – Parrot
Ch 4 (the loop on the hook does not count).
1: Starting from the 2nd chain from the hook: inc, 1 sc, 5 sc in one stitch (this should be the last chain of the foundation), continue around: 1 sc, 3 sc in one stitch (this should be the first chain you started with) = 12 sc
2: (inc, 1 sc) × 6 = 18 sc
3: 17 sc, sl st
Fasten off, leaving a long tail for sewing, and secure the yarn.
Pupil (black) – Amigurumi Parrot
1: 6 sc in a magic ring
2: (4-in-1 inc, 2 sc) × 2 = 12 sc
3: 2 sc, sl st — partial round (do not complete the circle)
Cut the yarn, leaving a tail for sewing, and fasten off.

Eye Assembly
Sew the white part (sclera) at the level of the top of the beak, about half a stitch away from it.
Do not cut the white yarn yet — you’ll use it later to embroider the highlights.
Sew the iris (yellow) in the center of the white part, about half a stitch away from the inner edge.
Sew the pupil (black) slightly closer to the inner side of the eye.
Using white thread, make a few simple stitches from the edge of the pupil toward the center to create eye highlights.
Wings (make 2)
Work in rows back and forth.
After each row, turn the work.
Each new row starts in the 2nd chain from the hook (the loop on the hook does not count).
Amigurumi Parrot – Wing 1
Blue Part
1: Ch 10
2: 9 sc, ch 1
3: 3 sc, ch 1
4: 3 sc, ch 1
5: 3 sc, ch 5
6: 7 sc, ch 1
7: 3 sc, ch 1
8: 3 sc, ch 1
9: 3 sc, ch 3
10: 5 sc, ch 1
Turn the piece and crochet around the edges with sc, except for the bottom edge (the base).
Between the feathers, make decreases (dec), and at the tips of the feathers, crochet 3 sc in one stitch.
Do not cut the yarn yet — set this part aside.
Green Part
1: Ch 10
2: 9 sc, ch 1
3: 4 sc, sl st, ch 1 — partial row
4: 5 sc, ch 1
5: 9 sc, ch 1
6: 9 sc, ch 1
7: 6 sc, sl st, ch 1 — partial row
8: 7 sc, ch 1
9: 9 sc, ch 1
10: 9 sc, ch 1
Turn the piece and crochet around the edges with sc, except for the wide side.
Make increases (inc) in the corners.
Do not cut the yarn — set this part aside.
Purple Part
1: Ch 15
2: 14 sc, ch 1
3: 12 sc, ch 1 — partial row
4: 7 sc, sl st, ch 1 — partial row
(Do not edge with sc yet)
5: 8 sc, ch 5
6: 16 sc, ch 1
7: 12 sc, ch 1 — partial row
8: 9 sc, sl st, ch 1 — partial row
9: 10 sc, ch 7
10: 18 sc, ch 1
Turn the piece and crochet around the entire piece with sc.
Between feathers, make decreases (dec); at the feather tips, crochet 3 sc in one stitch.
In the corners at the base, make increases (inc).
Cut the yarn and fasten off.
Now we have two wing pieces:
Purple – inner part
Blue + Green – outer part
Next, we will assemble the wing, joining the parts together.
If the stitch counts on the inner and outer parts do not match perfectly, make adjustments (inc/dec) only along the side edges, not at the corners or feather tips.
Join the pieces with sc, holding the purple side facing you.
Start by attaching the blue part:
Align the tips of the first feather (according to the direction of crocheting), carefully count the stitches, and find the joining point.
Join the pieces along the edge with sc — between feathers, make 3-in-1 decreases (dec3tog), and at the tips, make 3 consecutive inc (3 sc in one stitch each).
After attaching the blue part, cut the yarn, leaving about 50 cm tail, do not fasten — just pull through the last loop.
Then, starting from the next stitch, attach the green part, making increases in the corners at the base of the wing.
Cut the yarn, leaving a tail for sewing, and pull it through the last loop.
Hide all yarn ends inside the wing.
Sew the blue and green parts together along the very edge using the green yarn.
Then, using the blue yarn, make a chain (tambour) stitch along the color border to cover the seam — make sure this stitch only runs along the outer side of the wing, without catching the purple inner layer.
Wing 2
Blue Part
1: Ch 6
2: 5 sc, ch 1
3: 3 sc, ch 1
4: 3 sc, ch 1
5: 3 sc, ch 5
6: 7 sc, ch 1
7: 3 sc, ch 1
8: 3 sc, ch 1
9: 3 sc, ch 7
10: 9 sc, ch 1
Turn the piece and crochet around the edges with sc, except for the base.
Between feathers, make decreases, and at feather tips, crochet 3 sc in one stitch.
Do not cut the yarn — set aside.
Green Part
1: Ch 10
2: 9 sc, ch 1
3: 6 sc, sl st, ch 1 — partial row
4: 7 sc, ch 1
5: 9 sc, ch 1
6: 9 sc, ch 1
7: 4 sc, sl st, ch 1 — partial row
8: 5 sc, ch 1
9: 9 sc, ch 1
10: 9 sc, ch 1
Turn the piece and crochet around with sc, except for the wide side.
Make increases (inc) at the corners.
Do not cut the yarn — set aside.
Lilac Part:
1: ch 19
2: 18 sc, ch 1, turn
3: 12 sc, ch 1 – partial row
4: 9 sc, sl st, ch 1 – partial row
5: 10 sc, ch 5
6: 16 sc, ch 1, turn
7: 12 sc, ch 1 – partial row
8: 7 sc, sl st, ch 1 – partial row
9: 8 sc, ch 3
10: 14 sc, ch 1
Turn and crochet around the entire piece with sc.
Between the feather tips, make dec (sc2tog); at the tips of the feathers, crochet 3 sc in one stitch; at the corners of the base, make inc (2 sc in one stitch).
Fasten off and secure the thread.
Assemble the second wing in the same way as the first.
First, attach the blue part: join the ends of the first feather, count the stitches to find the starting point for joining.
Between the feathers, make dec 3 into 1, and at the tips of the feathers crochet 3 inc in a row (3×inc).
Cut the yarn, leaving about 50 cm tail.
Starting from the next stitch, attach the green part.
At the base corners of the wing, make inc, cut the yarn leaving a tail for sewing.
Hide the yarn ends inside the wing.
Sew the blue and green parts together using the green yarn.
Make a chain stitch embroidery (tambour stitch) along the color border with the blue yarn.
Sew the wings one row below the white collar, on the sides slightly towards the back (the top corner of the wing should be level with the back of the leg) and at a slight downward angle.
Attach the side of each wing by grabbing 2–3 stitches.
Tail (Red & Green):
The tail is not stuffed.
Red yarn:
1: 6 sc in a magic ring
2: (inc, 2 sc) × 2 = 8 sc
3: 8 sc
On the last stitch of row 3, switch to green yarn (do not cut the red yarn, leave it for later).
Green yarn:
4: 8 front-post sc (fp sc)
5: (2 sc, dec) × 2 = 6 sc
6: 6 sc
7: (dec, 1 sc) × 2 = 4 sc
8–10: 4 sc each row
Fold the piece in half (red yarn on the side) and crochet along the side sc.
Insert the hook between rows, piercing the folded fabric completely.
Continue with green yarn (not cut).
When finishing the green part of the feather, switch to red yarn on the last stitch.
Always crochet the stitch at the color boundary in red.
Top of the feather: finish with red, at the tip make 3 sc together (dec 3in1).
Cut the green yarn leaving ~50 cm, pull it through the feather to the other side.
After finishing the red edging, continue green yarn for the final outline.
At the end, make a slip stitch to the base of the feather, secure the yarn, cut leaving a tail for sewing.
Cut the red yarn, secure it on the wrong side, hide inside the piece.
The wrong side will not be very neat but it won’t be visible.
Repeat this process to make 3 feathers.
Sewing the tail:
Attach the tail at the back, roughly 7 rows from the legs.
Start with the middle feather, then attach the side feathers at a slight angle—just enough so they don’t interfere with each other.
KESHA IS READY!
Height from legs: 7 rows.