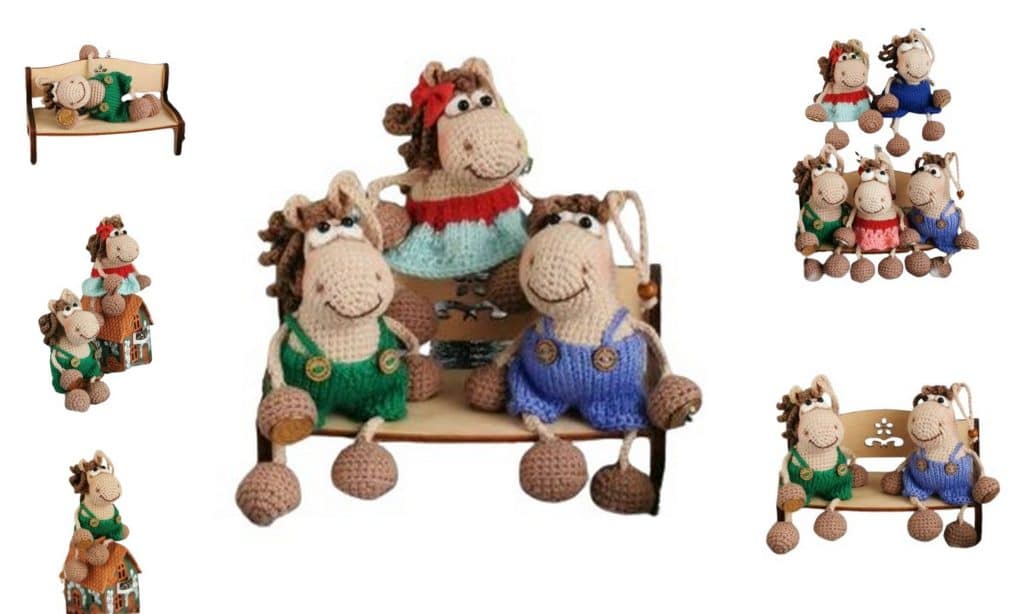
If you are looking for a charming horse amigurumi pattern, this Smiling Horse crochet design is a perfect choice for amigurumi lovers. With its sweet expression, soft shapes, and adorable proportions, this crochet horse makes a wonderful handmade toy, decorative piece, or gift for children and collectors.
This horse amigurumi pattern is written with clear, step-by-step instructions using standard US crochet abbreviations. The design includes detailed shaping for the head, body, legs, mane, and tail, allowing you to create a professional-looking crochet pony with a friendly personality.
Whether you want to expand your animal amigurumi collection or crochet a cute pony toy, this Smiling Horse amigurumi is a joyful and satisfying project to work on.
If you want to access 1000+ free amigurumi patterns, you can download our application from this link!
Materials
- YarnArt Jeans yarn
- Color 05 or 87 – body
- Color 71 – hooves
- Pekhorka “Children’s New” yarn
- Color 01 (white) – eyes
- Color 187 (cappuccino) – mane & tail
- Any colors – scarf, skirt, pants, bow
- Crochet hook 1.9 mm (or 1.7 mm)
- Knitting needles 2 mm
- Fiberfill stuffing
- Sewing needle
- Black beads 3 mm (eyes)
Finished size: approx. 14 cm (10 cm sitting)
Abbreviations (US Terms)
- MR – magic ring
- ch – chain
- sc – single crochet
- inc – increase
- dec – decrease
- sl st – slip stitch
- dc – double crochet
- RS – right side
- WS – wrong side
All parts are crocheted in a spiral through both loops unless stated otherwise.
Horse Amigurumi – Head & Body
(worked as one piece)
YarnArt Jeans, hook 1.9 mm
1: 6 sc in MR (6)
2: inc ×6 (12)
3: (sc, inc) ×6 (18)
4: sc, inc, (2 sc, inc) ×5, sc (24)
5: (3 sc, inc) ×6 (30)
6: 2 sc, inc, (4 sc, inc) ×5, 2 sc (36)
7: (5 sc, inc) ×6 (42)
8: 15 sc (partial row)
Remove loop from hook, insert hook into the last stitch of the previous round, pull loop through.
Continue crocheting the neck and body, then return to the muzzle later.
9–10: 15 sc (15)
11: (4 sc, inc) ×3 (18)
12–13: 18 sc (18)
14: sc, inc, (2 sc, inc) ×5, sc (24)
15: 19 sc (partial row – new round start)
16: (sc, inc) ×6, 12 sc (30)
17: 30 sc (30)
18: 2 sc, inc, (4 sc, inc) ×5, 2 sc (36)
19: (5 sc, inc) ×6 (42)
20–24: 42 sc (42)
25: (5 sc, dec) ×6 (36)
26: 2 sc, dec, (4 sc, dec) ×5, 2 sc (30)
27: (3 sc, dec) ×6 (24)
28: sc, dec, (2 sc, dec) ×5, sc (18)
Add stuffing.
29: (sc, dec) ×6 (12)
30: (sc, dec) ×4 (8)
Pull opening closed, fasten off.


Muzzle – Horse Amigurumi
(continue from front opening)
Attach yarn at the bottom of the muzzle.
1–2: 21 sc
3: (6 sc, inc) ×3 (24)
4–5: 24 sc (24)
6: (3 sc, inc) ×6 (30)
7: 2 sc, inc, (4 sc, inc) ×5, 2 sc (36)
8–11: 36 sc (36)
12: 2 sc, dec, (4 sc, dec) ×5, 2 sc (30)
13: (3 sc, dec) ×6 (24)
14: sc, dec, (2 sc, dec) ×5, sc (18)
Add stuffing.
15: (sc, dec) ×6 (12)
16: (sc, dec) ×4 (8)
Pull opening closed, fasten off.
Eye Indentation & Eyes
Mark eye positions.
Insert needle from the back of the head and bring it out at the first eye point.
Insert needle at the second eye point and bring it back out at the back of the head.
Pull slightly to create indentation. Secure.
Sew on 3 mm black bead eyes.


Horse Amigurumi – Ears
(2 pieces)
Work 6 sc in MR, do not close ring.
Ch 1, then work:
2 inc, 2 inc with dc, 2 inc
Leave yarn tail, fold ear in half, secure with a few stitches.
Sew ears 2 rows below the MR.
Legs – Horse Amigurumi
(2 pieces)
Hoof color first
1: 6 sc in MR (6)
2: inc ×6 (12)
3: (sc, inc) ×6 (18)
4–5: 18 sc (18)
Change to body color.
6–9: 18 sc (18)
Add stuffing.
10: (sc, dec) ×6 (12)
11: dec ×6 (6)
Pull closed, fasten off.
Arms – Horse Amigurumi
(2 pieces)
1: 6 sc in MR (6)
2: inc ×6 (12)
3–4: 12 sc (12)
Change to hoof color.
5–6: 12 sc (12)
Stuff lightly.
7: (sc, dec) ×4 (8)
Flatten and close with sc. Leave yarn tail.


Mane (knitted)
Cast on 18 stitches.
Knit 30 rows in stockinette stitch
(RS knit, WS purl).
Bind off loosely.
Fold lengthwise and sew from forehead to neck.
Tail
Cut yarn strands 12–14 cm long.
Fold in half and attach to the back of the body.
Trim evenly.
Scarf (optional)
Ch 70.
Starting from 2nd ch from hook, sc across.
Fasten off.
Skirt (optional)
Attach yarn at waist.
Crochet dc in the round, slightly increasing.
Work 3–4 rounds.
Pants (optional)
Crochet directly onto body from waist.
Divide stitches for legs and work each leg in the round with sc.
Assembly
- Sew legs to body
- Sew arms to sides
- Attach mane and tail
- Add accessories as desired