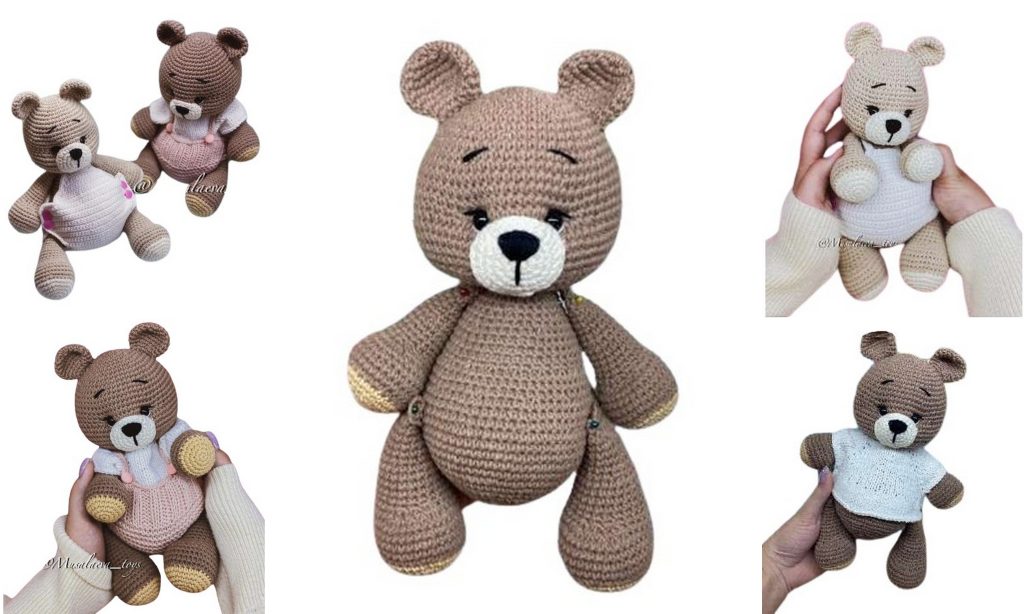
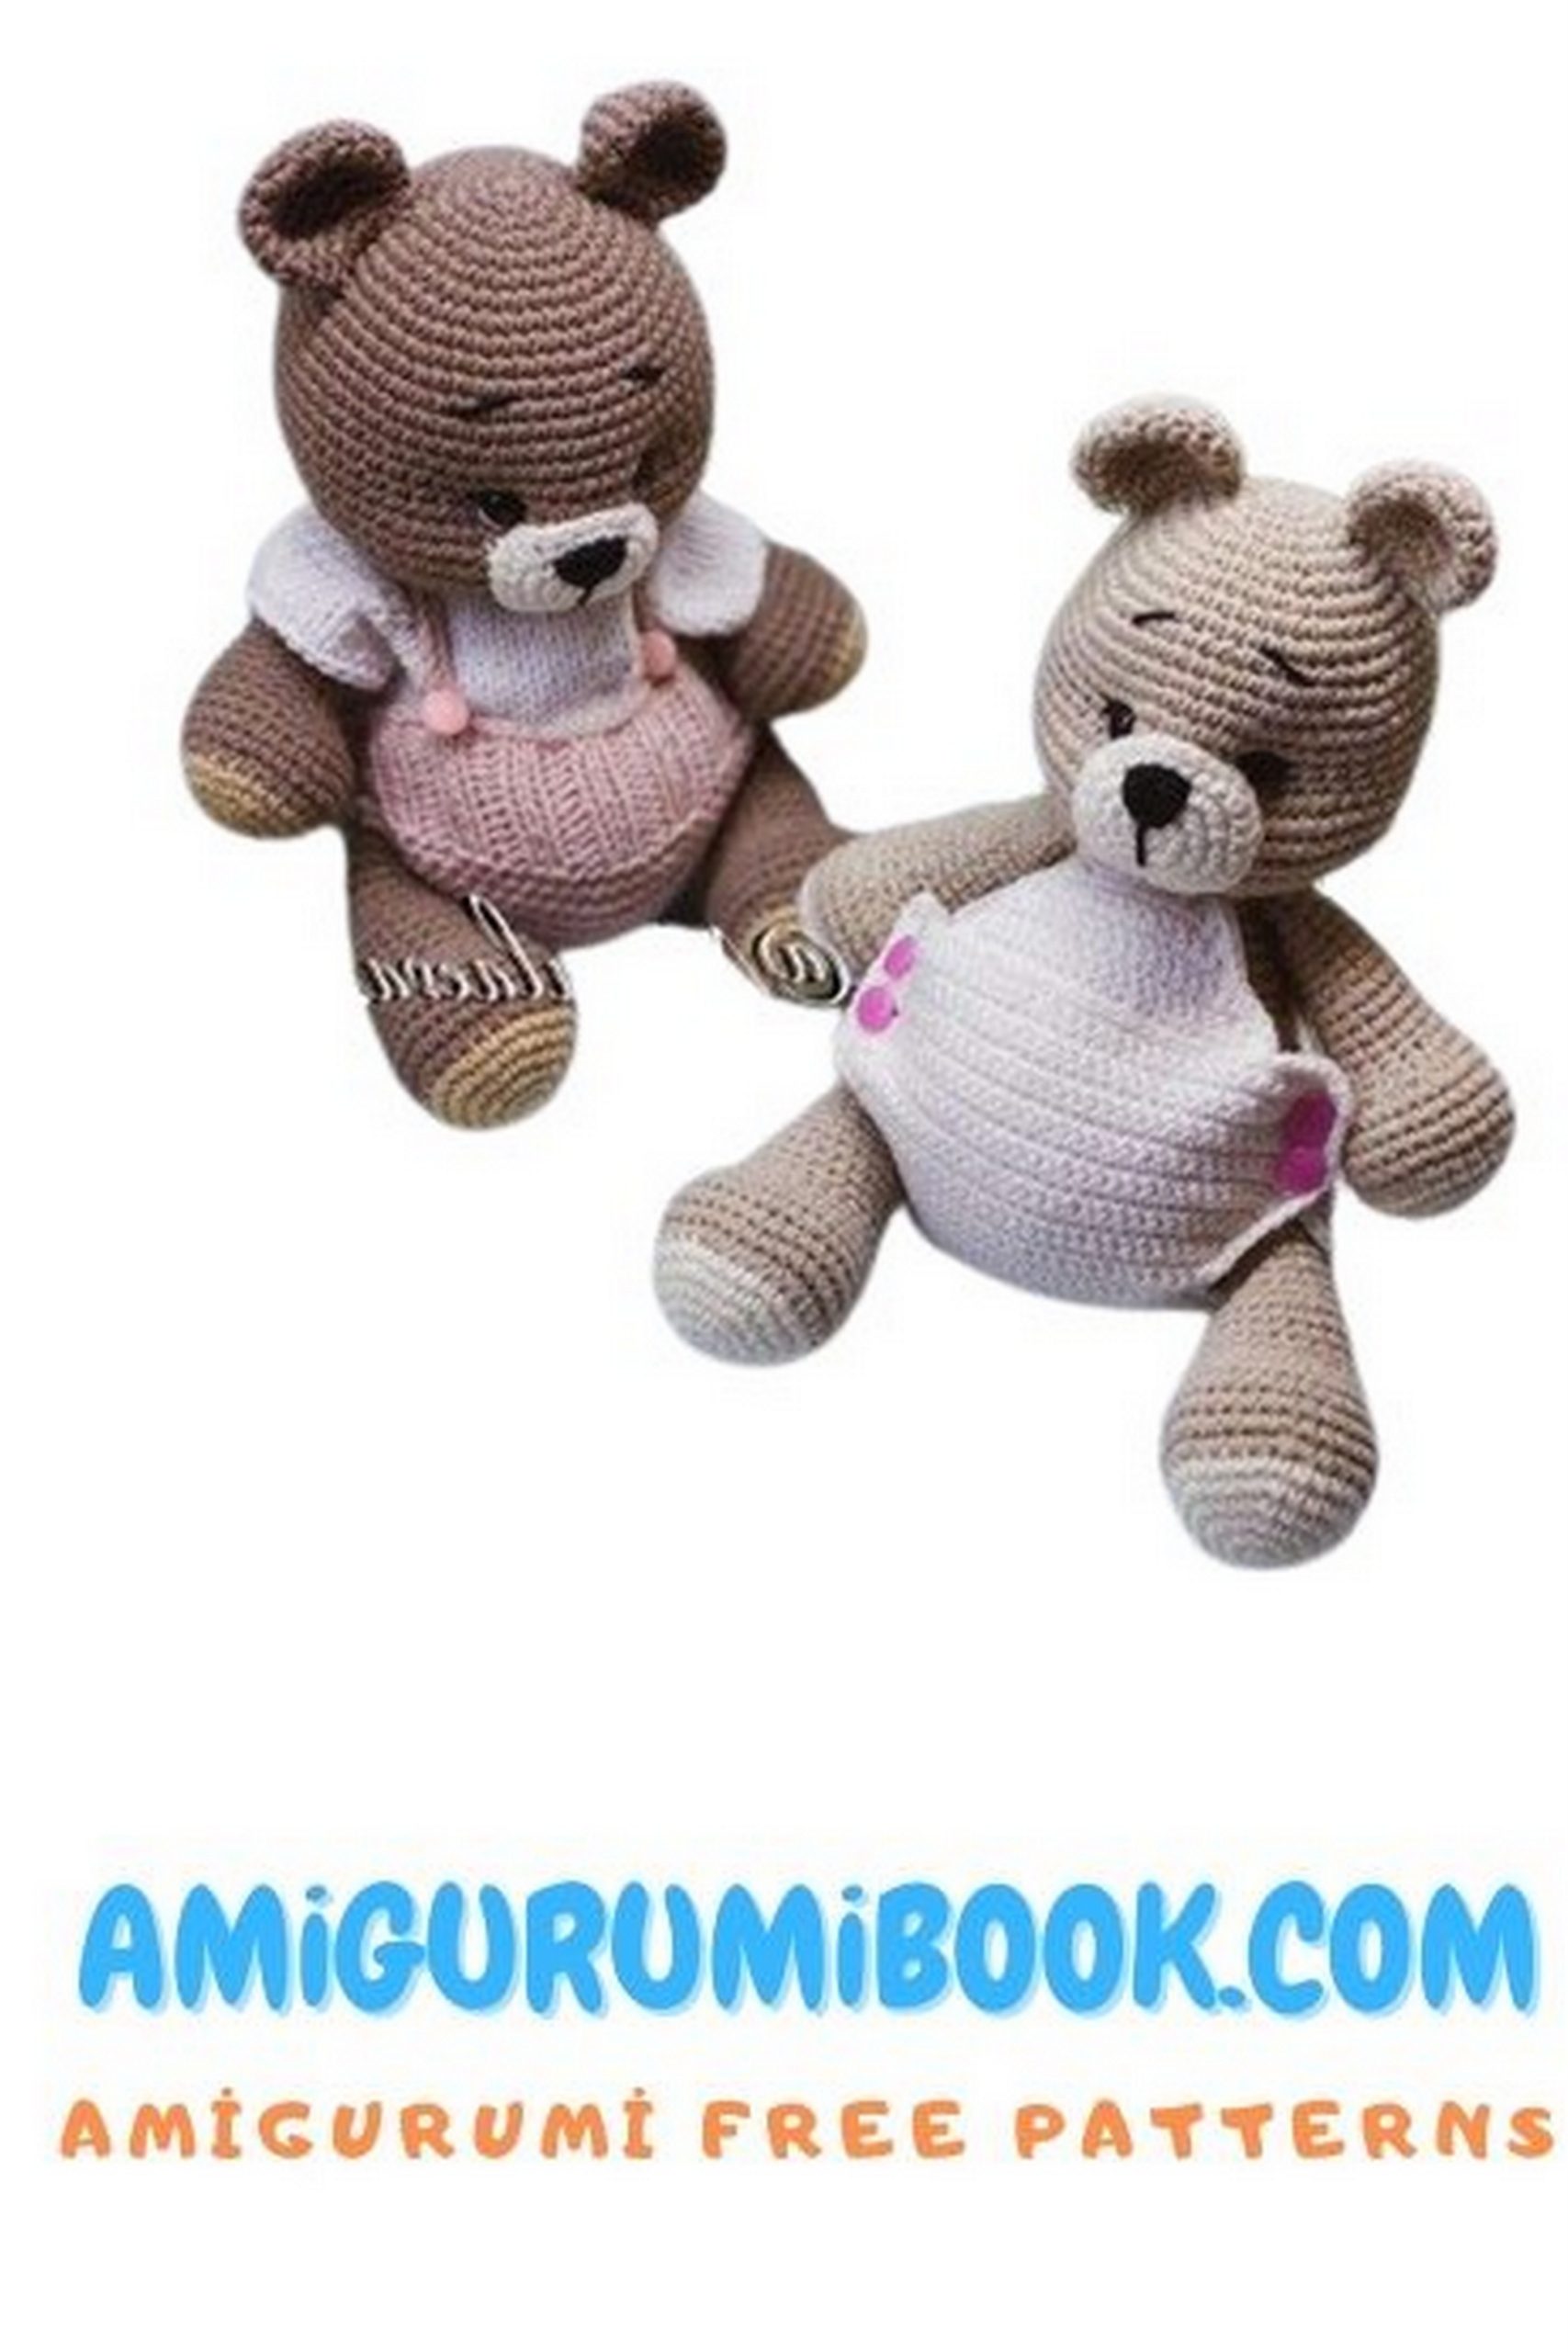
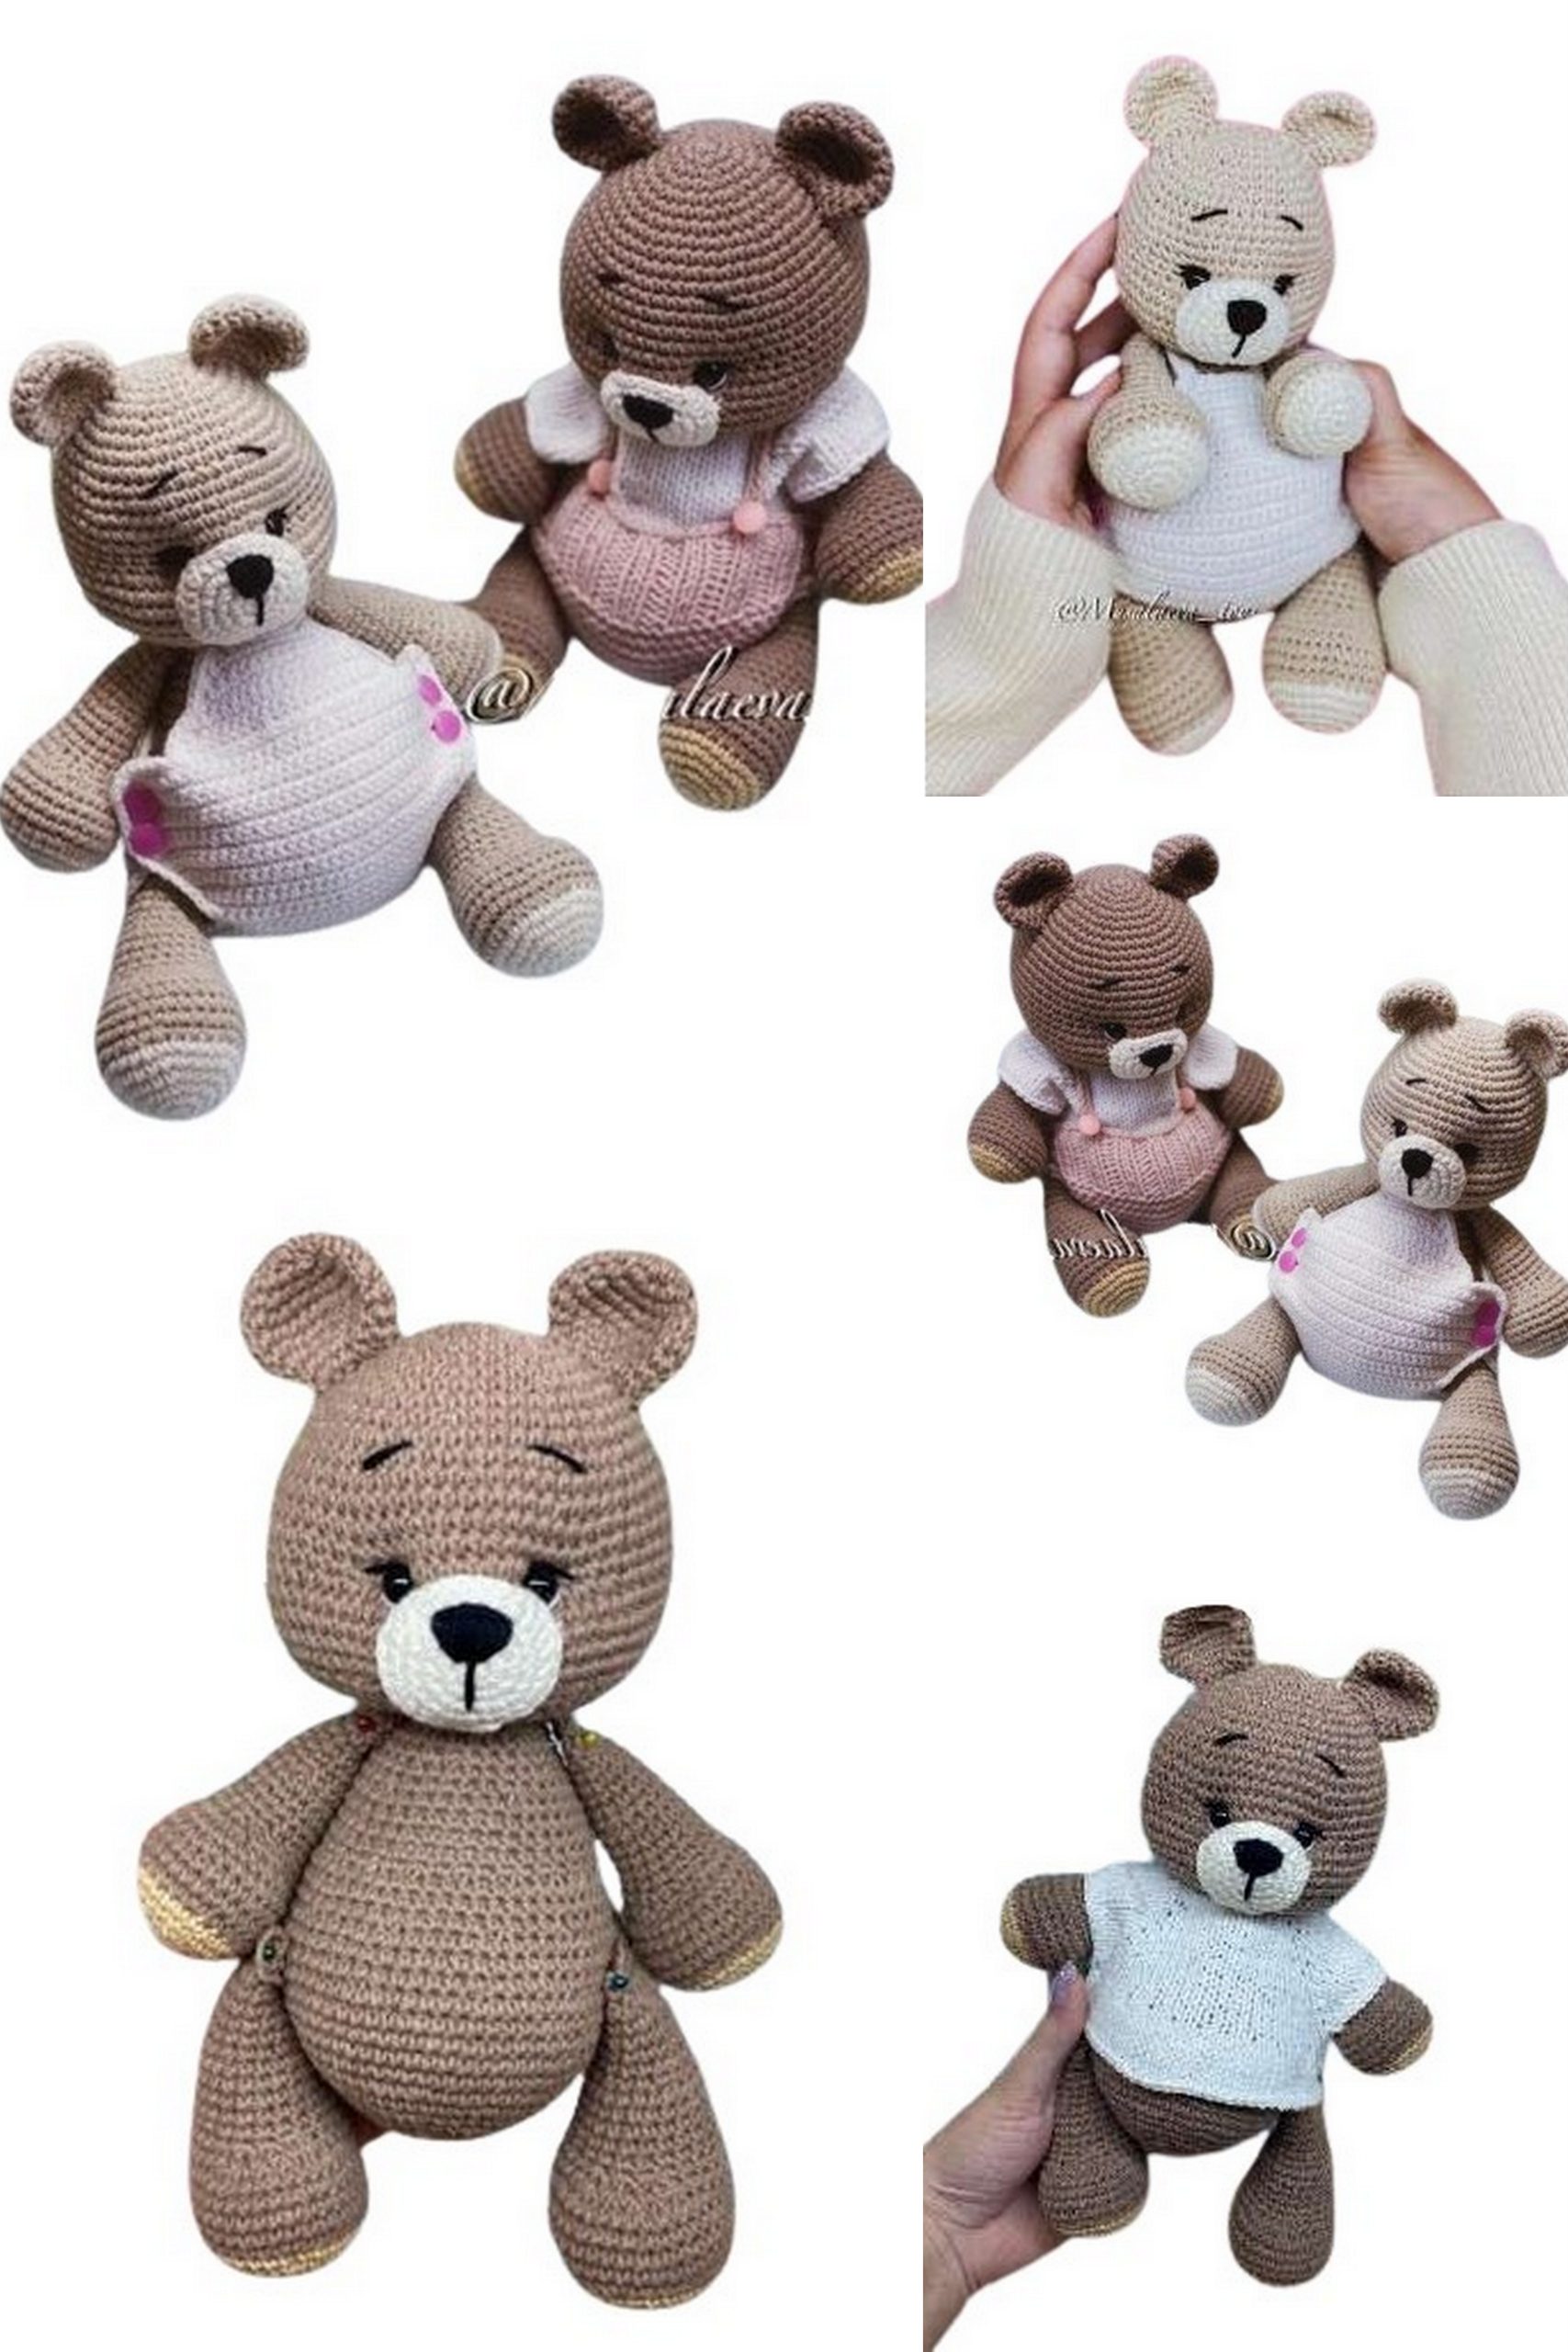
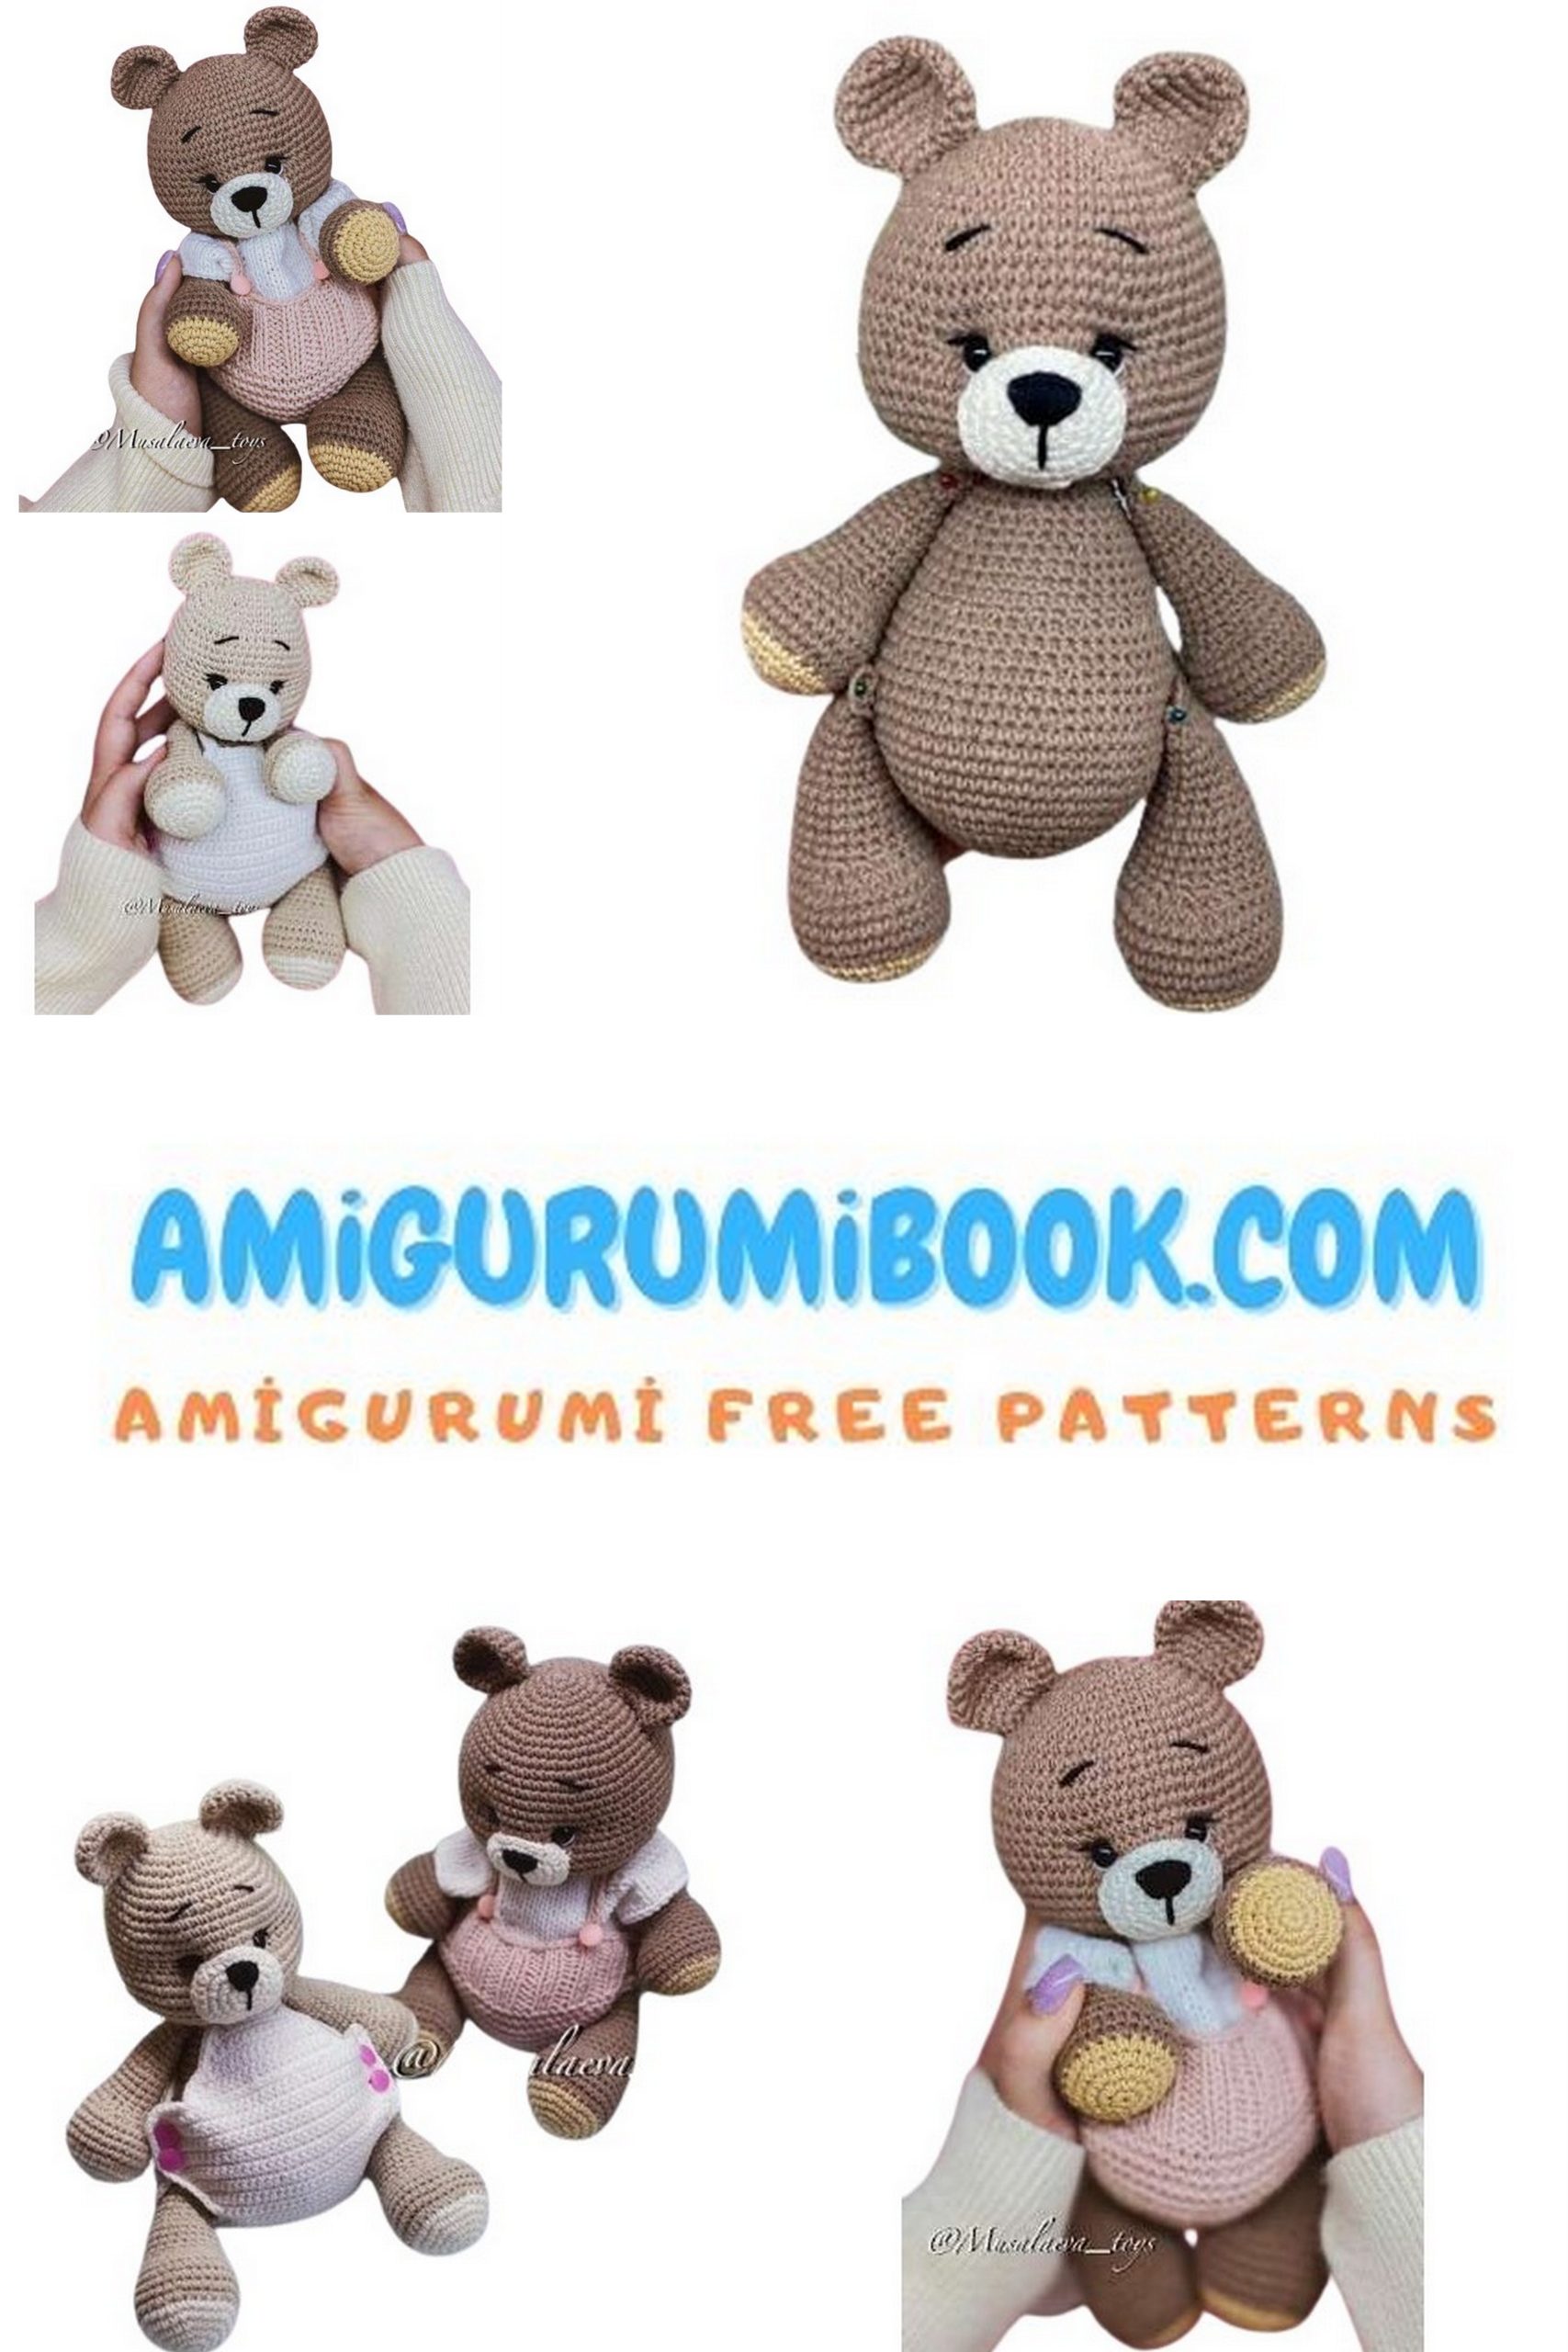
Welcome to our enchanting world of Amigurumi Bear! Immerse yourself in the art of crochet with our comprehensive tutorial for crafting adorable amigurumi bear, featuring a delightful boy and girl duo.
Whether you’re a crochet enthusiast or a novice, this step-by-step guide empowers you to create your very own cuddly Amigurumi Bear.
From selecting the perfect yarn to mastering intricate stitches, we provide all the guidance you need.
These lovable bears are not only fantastic gifts but also charming additions to your amigurumi collection.
Let’s embark on a crochet journey together and bring these Amigurumi Bear to life!
You can download our Amigurumi Book Mobile application here.
List of Necessary Materials:
1: YarnArt Jeans and Alize Cotton Gold hobby yarn. Also, white and black thread for eye and nose embellishments.
2: Crochet hook No. 2 – No. 2.25.
3: Sewing needle, preferably with a blunt end, and a long needle for tightening.
4: Safety eyes with a diameter of 10 mm.
5: Polyester fiberfill, can use holofiber.
6: Scissors.
7: Buttons (optional).
8: Contrasting thread for marking, markers.
9: 2mm knitting needles: sock needles/corded needles 40cm long.
Attention! Using the list of necessary materials, the toy will be approximately 26 cm in size. When choosing a crochet hook, refer to the density of your crochet. I crochet quite tightly, so I use a 2.25mm hook. If you crochet quite loosely, you can use a 1.75mm to 2mm hook.
Color Palette
Yarn – YarnArt Jeans:
Main color No.71;
Paws No.07;
Face No.03.
Clothing:
Top No.01;
Pants No.83.
Yarn consumption – more than one skein.
(Variant 1)
Yarn – YarnArt Jeans:
Main color No.87;
Face, paws No.03;
Clothing:
Overall No.01
Yarn consumption – 1 skein.
(Variant 2)
Abbreviation List:
MC – Magic Circle.
SC – Single Crochet.
HDC – Half Double Crochet.
DC – Double Crochet.
INC – Increase.
DEC – Decrease.
CH – Chain.
SLST – Slip Stitch.
ST – Stitch.
Bear Amigurumi Pattern
Head (Variant 1)
1: 6 SC in MC;
2: 6 INC (12);
3: (1 SC, INC) * 6; (18);
4: 1 SC, INC (2 SC, INC) * 5, 1 SC; (24);
5: (3 SC, INC) * 6; (30);
6: 2 SC, INC (4 SC, INC) * 5, 2 SC; (36);
7: (5 SC, INC) * 6; (42);
8: 3 SC, INC (6 SC, INC) * 5, 3 SC; (48);
9: 48 SC (1 row);
10: (7 SC, INC) * 6; (54);
11: 4 SC, INC (8 SC, INC) * 5, 4 SC; (60);
12: (19 SC, INC) * 3; (63);
13: 10 SC, INC (20 SC, INC) * 2, 10 SC; (66);
14-17: 66 SC (4 rows);
18: 24 SC, 4 INC, 10 SC, 4 INC, 24 SC; (74);
19-22: 74 SC (4 rows);
Insert eyes in the 18th row, in the last and first increases.
23: 24 SC, 4 DEC, 10 SC, 4 DEC, 24 SC; (66);
24: (9 SC, DEC) * 6; (60);
25: 4 SC, DEC (8 SC, DEC) * 5, 4 SC; (54);
26: (7 SC, DEC) * 6; (48);
27: 3 SC, DEC (6 SC, DEC) * 5, 3 SC; (42);
28: (5 SC, DEC) * 6; (36);
29: 2 SC, DEC (4 SC, DEC) * 5, 2 SC; (30);
30: (3 SC, DEC) * 6; (24);
31: 3 SC, DEC (6 SC, DEC) * 2, 3 SC; (21);
SLST, fasten off, leaving a long tail for sewing. Stuff the head lightly to create a taper. Pay special attention to the cheeks; you can add more stuffing to the cheeks after tapering.
Recommendation for crocheting paired parts: it’s better to crochet them in one day because the density of crocheting and yarn tension may vary on different days.

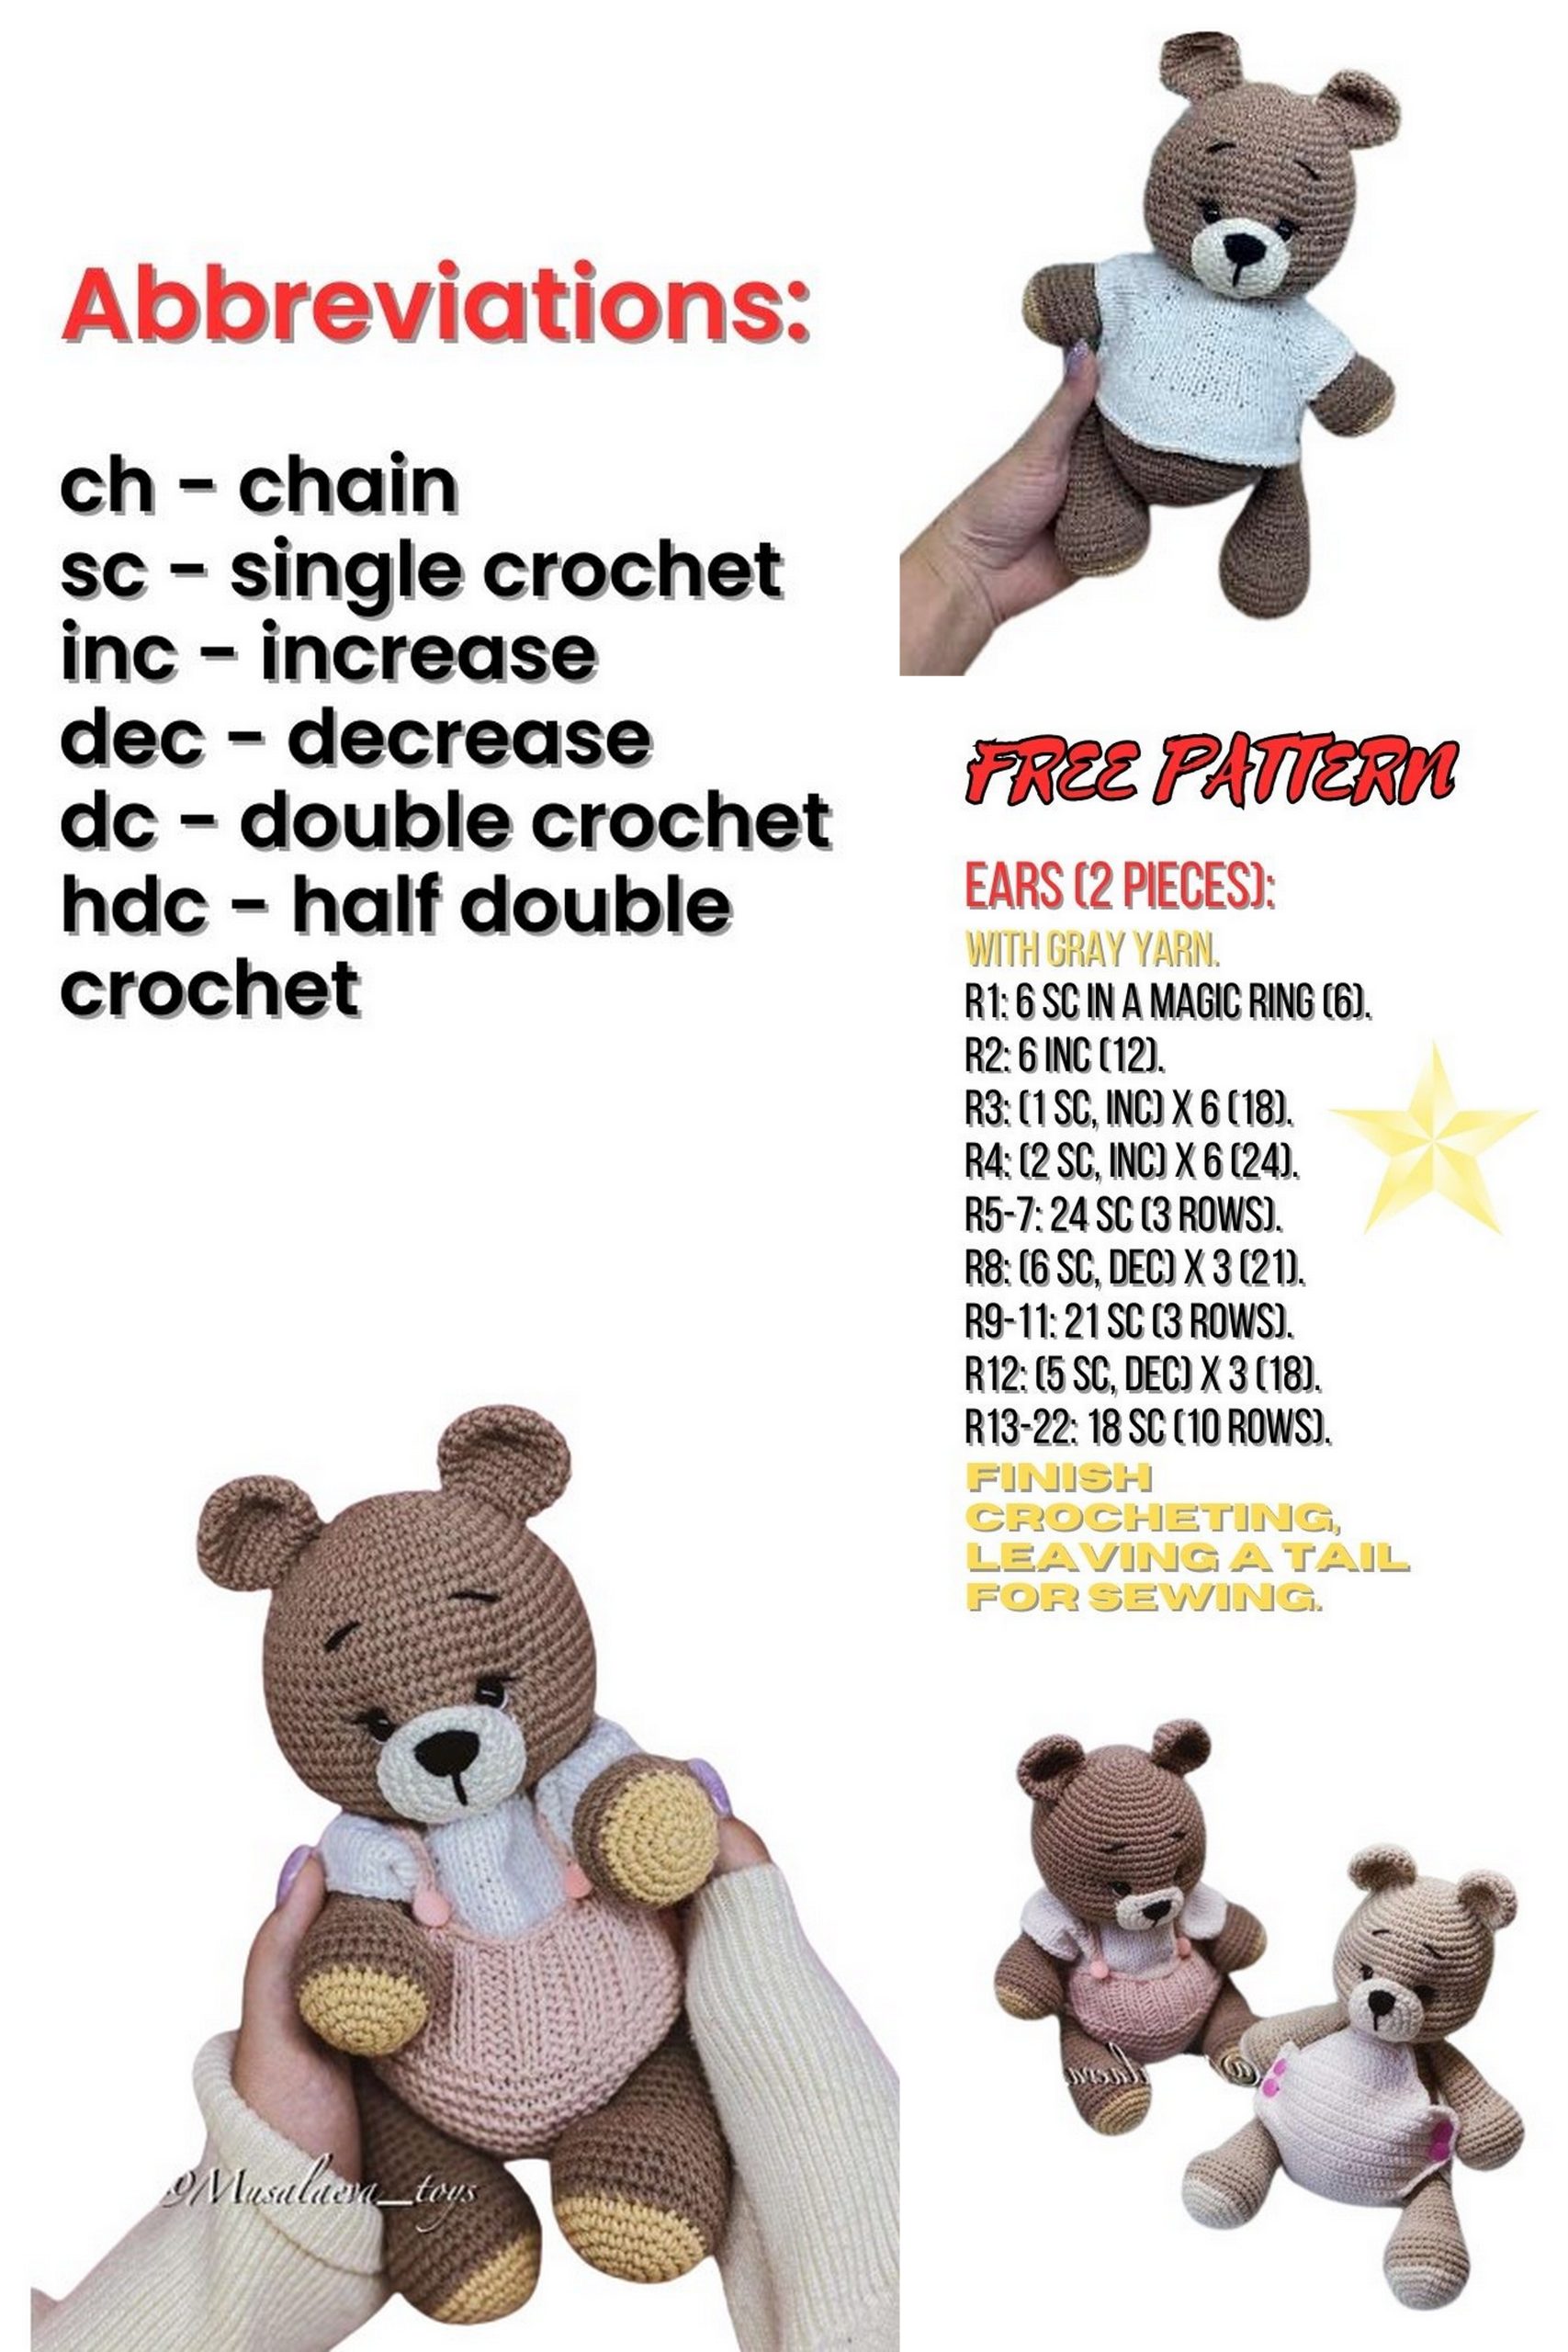
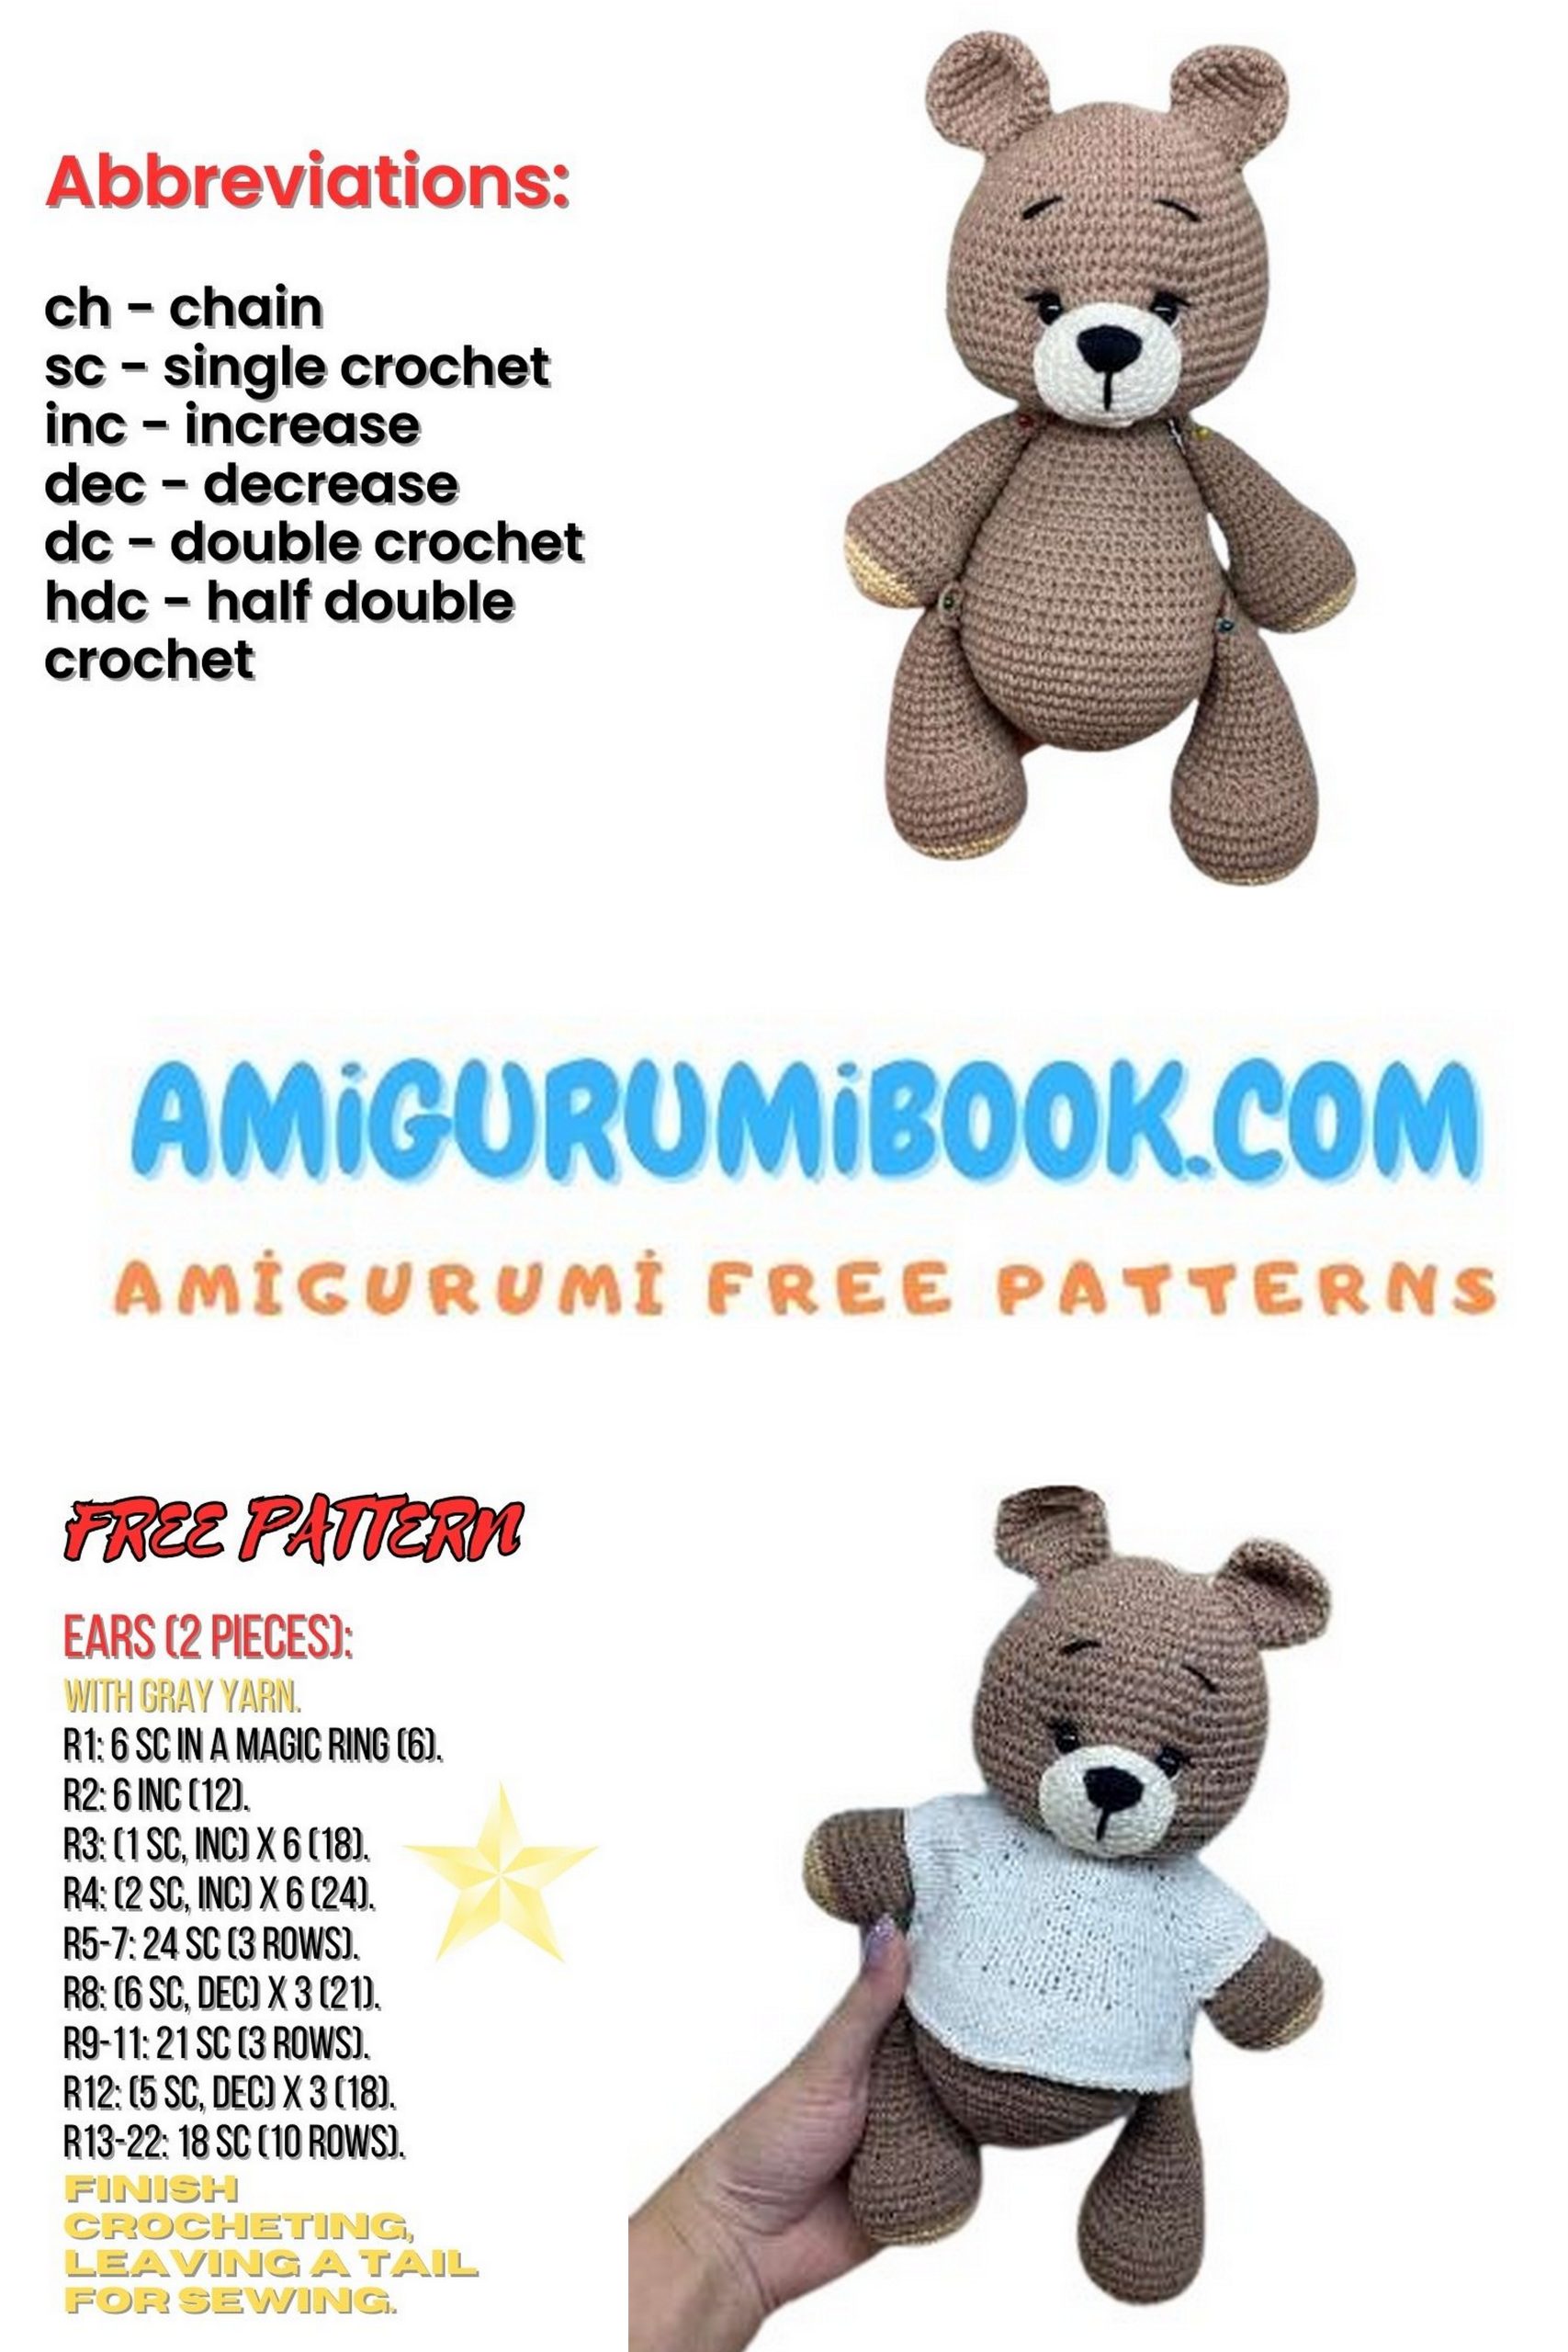
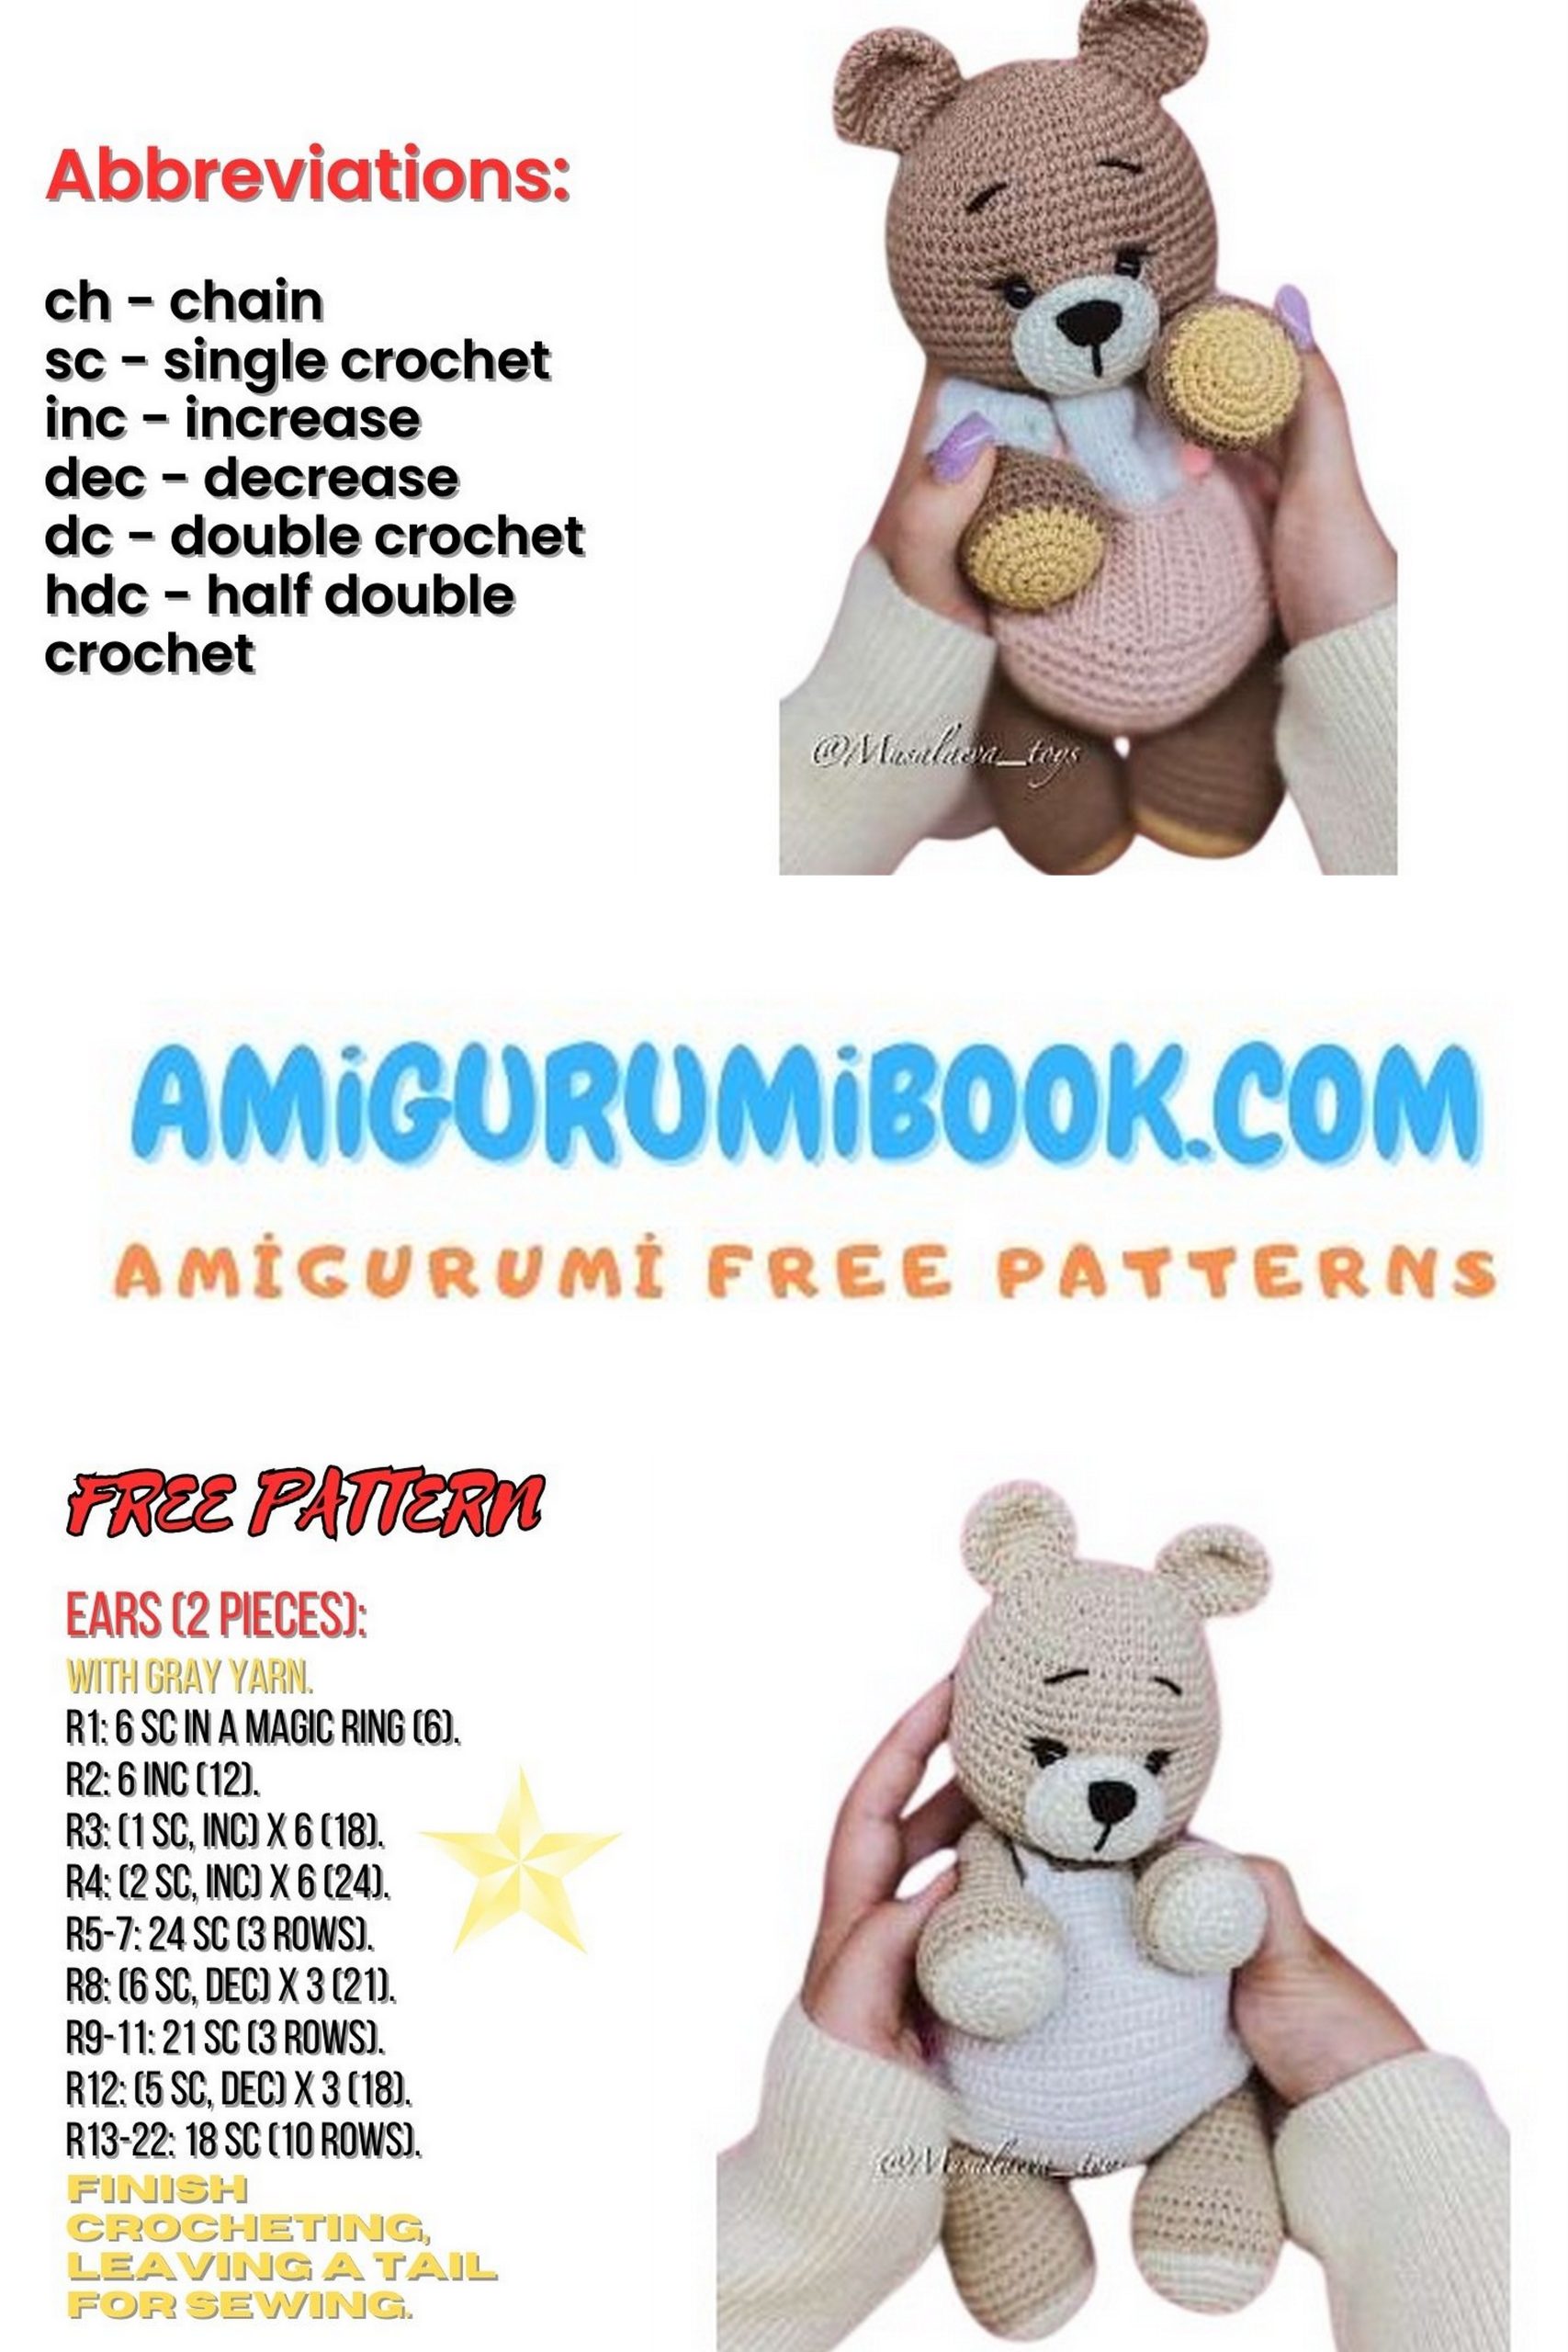
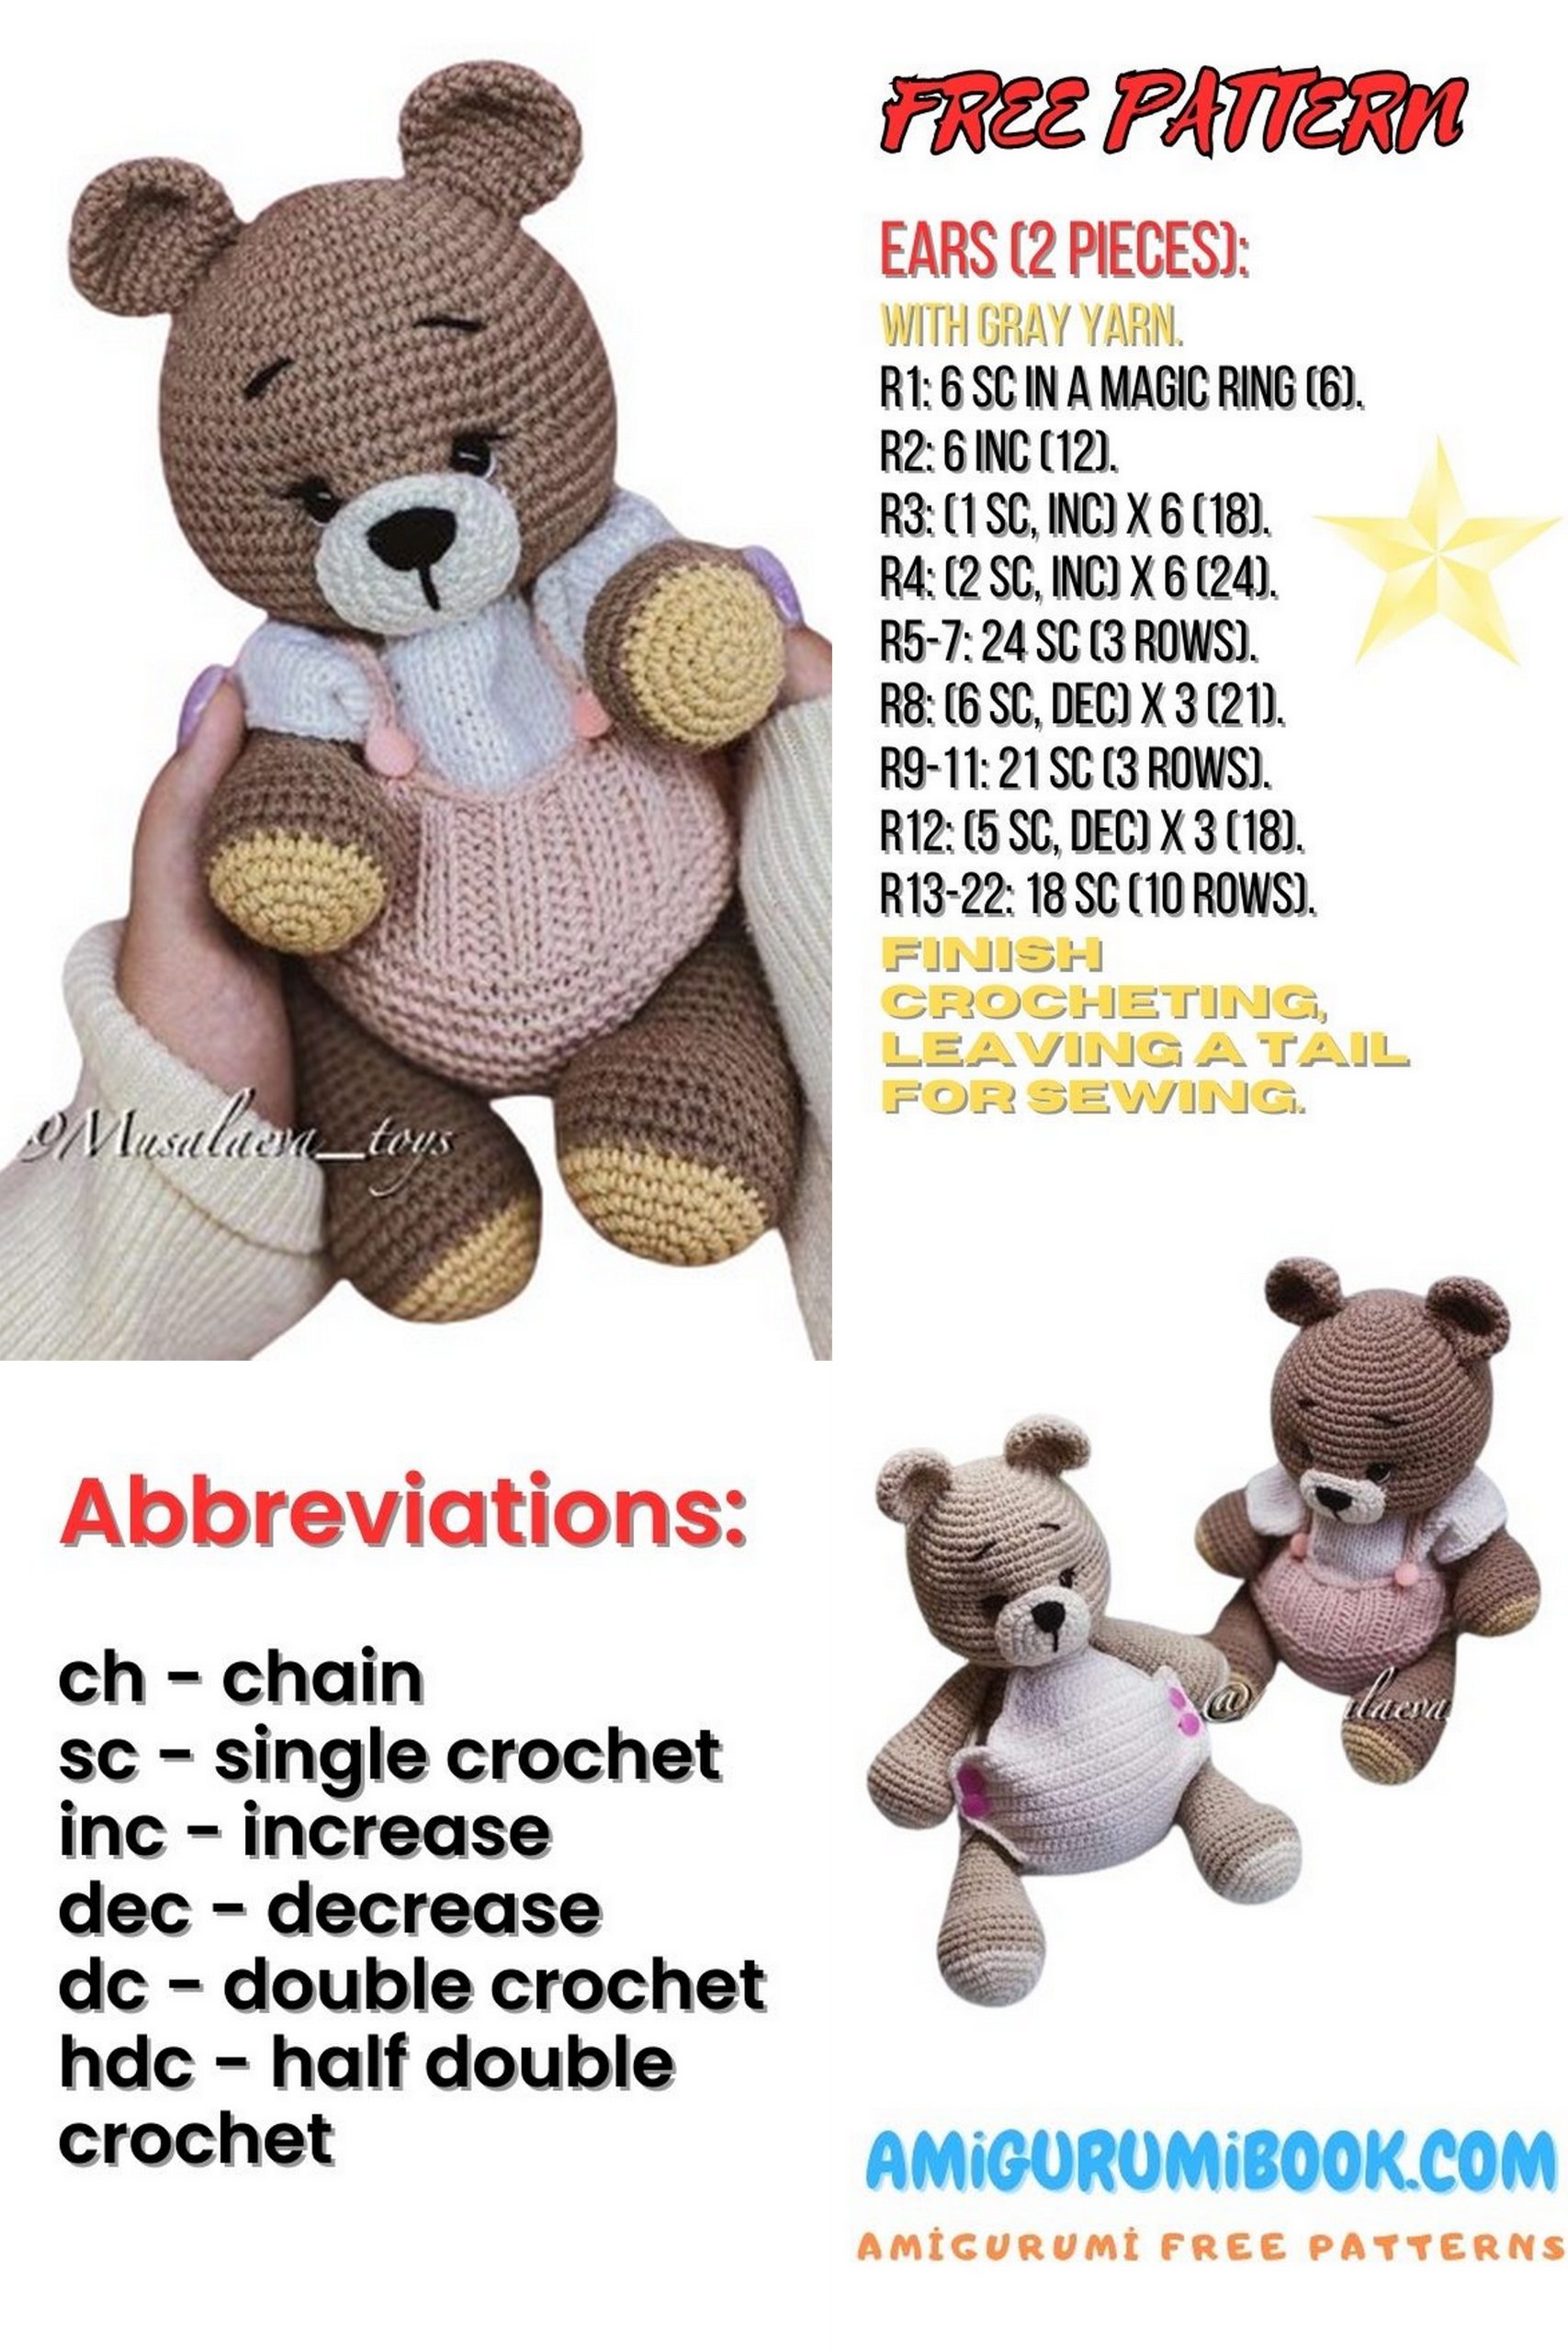
Ears – Amigurumi Bear
Variant 1.
1: 6 SC in MC;
2: 6 INC (12);
3: (1 SC, INC) * 6; (18);
4: (2 SC, INC) * 6; (24);
5: (3 SC, INC) * 6; (30);
6: 30 SC (1 row);
7: (3 SC, DEC) * 6; (24);
8: (2 SC, DEC) * 6; (18);
9: (1 SC, DEC) * 6; (12);
Fold in half and crochet 6 SC. Cut the yarn, leaving a long tail for sewing. Shape the ears with fingers as shown in the photo.
Amigurumi Bear – Variant 2.
1: 6 SC in MC;
2: 6 INC (12);
3: (1 SC, INC) * 6; (18);
4: (2 SC, INC) * 6; (24);
5: (3 SC, INC) * 6; (30);
6: (3 SC, DEC) * 6; (24);
7: (2 SC, DEC) * 6; (18);
8: (1 SC, DEC) * 6; (12).
Amigurumi Bear- Head (Variant 2)
1: 6 SC in MC;
2: 6 INC (12);
3: (1 SC, INC) * 6; (18);
4: 1 SC, INC (2 SC, INC) * 5, 1 SC; (24);
5: (3 SC, INC) * 6; (30);
6: 2 SC, INC (4 SC, INC) * 5, 2 SC; (36);
7: (5 SC, INC) * 6; (42);
8: 3 SC, INC (6 SC, INC) * 5, 3 SC; (48);
9: 48 SC (1 row);
10: (7 SC, INC) * 6; (54);
11: (17 SC, INC) * 3; (57);
12: (18 SC, INC) * 3; (60);
13-16: 60 SC (4 rows);
17: 21 SC, 3 INC, 12 SC, 3 INC, 21 SC; (66);
Insert eyes between rows 15 and 16, 9 SC apart from edge to edge.
Leaving 1 SC before INC / 1 SC before SC;
18-20: 66 SC (3 rows);
21: (9 SC, DEC) * 6; (60);
22: (8 SC, DEC) * 6; (54);
23: (7 SC, DEC) * 6; (48);
24: (6 SC, DEC) * 6; (42);
25: (5 SC, DEC) * 6; (36);
26: (4 SC, DEC) * 6; (30);
27: (3 SC, DEC) * 6; (24);
28: (6 SC, DEC) * 3; (21);
Cut yarn, leaving a long tail for sewing.
Amigurumi Bear – Muzzle.
Crochet with color No.03.
1: 6 SC in MC;
2: 6 INC (12);
3: (1 SC, INC) * 6; (18);
4: (2 SC, INC) * 6; (24);
5: 3 SC, INC, 3 HDC, INC DC, 1 HDC, 2 SC, INC, 2 SC, 1 HDC, INC HDC, 3 HDC, INC SC, 3 SC; (30);
6: 30 SLST.
Close with invisible join. Cut yarn, leaving a long tail for sewing.
Amigurumi Bear – Body.
1: 6 SC in MC;
2: 6 INC (12);
3: (1 SC, INC) * 6; (18);
4: 1 SC, INC (2 SC, INC) * 5, 1 SC; (24);
5: (3 SC, INC) * 6; (30);
6: 2 SC, INC (4 SC, INC) * 5, 2 SC; (36);
7: (5 SC, INC) * 6; (42);
8: 3 SC, INC (6 SC, INC) * 5, 3 SC; (48);
9: (7 SC, INC) * 6; (54);
10: 4 SC, INC (8 SC, INC) * 5, 4 SC; (60);
11: (9 SC, INC) * 6; (66);
12-16: 66 SC (5 rows);
17: 15 SC, DEC (5 SC, DEC) * 5, 14 SC; (60);
18-19: 60 SC (2 rows);
20: 14 SC, DEC (4 SC, DEC) * 5, 14 SC; (54);
21-22: 54 SC (2 rows);
23: 14 SC, DEC (1 SC, DEC) * 8, 14 SC; (45);
24: 45 SC (1 row);
25: (13 SC, DEC) * 3; (42);
26: 42 SC (1 row);
27: (5 SC, DEC) * 6; (36);
28: 36 SC (1 row);
29: 2 SC, DEC (4 SC, DEC) * 5, 2 SC; (30);
30: 30 SC (1 row);
31: (3 SC, DEC) * 6; (24);
32: (6 SC, DEC) * 3; (21);
SLST, cut yarn, hide.
Upper Legs 2 pcs.
Different colors for different palettes are denoted by “/”.
Start with color 07/03:
1: 6 SC in MC;
2: 6 INC (12);
3: (1 SC, INC) * 6; (18);
4: (2 SC, INC) * 6; (24);
5: 24 SC (1 row), change to main color 71/87 on the last stitch.
6: (3 SC, INC) * 6; (30);
7-10: 30 SC (4 rows);
11: 9 SC, 6 DEC, 9 SC; (24);
12: 9 SC, 3 DEC, 9 SC; (21);
Stuff as you go, paying special attention to decreases.
13: (5 SC, DEC) * 3; (18);
14-17: 18 SC; (4 rows)
18: (4 SC, DEC) * 3; (15);
19-23: 15 SC; (5 rows)
Stuff tightly up to row 18, from 19-20 (just a bit), then you can skip stuffing to prevent legs from bulging after sewing.
24: (3 SC, DEC) * 3; (12) + 3 chains. Fold in half and crochet 6 SC. Cut yarn, leaving a long tail for sewing.
Crochet the second leg similarly.
Lower Legs 2 pcs.
Different colors for different palettes are denoted by “/”.
Start with color 07/03:
1: 6 SC in MC;
2: 6 INC (12);
3: (1 SC, INC) * 6; (18);
4: (2 SC, INC) * 6; (24);
5: (3 SC, INC) * 6; (30);
6: 30 SC (1 row), change to main color 71/87 on the last stitch.
7: (4 SC, INC) * 6; (36);
8-11: 36 SC (4 rows);
12: 12 SC, 6 DEC, 12 SC; (30);
13: 12 SC, 3 DEC, 12 SC; (27);
14: (7 SC, DEC) * 3; (24);
15-18: 24 SC (4 rows);
19: (2 SC, DEC) * 6; (18);
20-24: 18 SC (5 rows);
Stuff tightly up to row 15, from 15 to 21 rows, the stuffing is less dense, then you can skip stuffing to prevent legs from bulging after sewing.
25: (4 SC, DEC) * 3; (15) + 3 chains. Fold in half and crochet 7-8 SC. Cut yarn, leaving a long tail for sewing.
Crochet the second leg similarly.
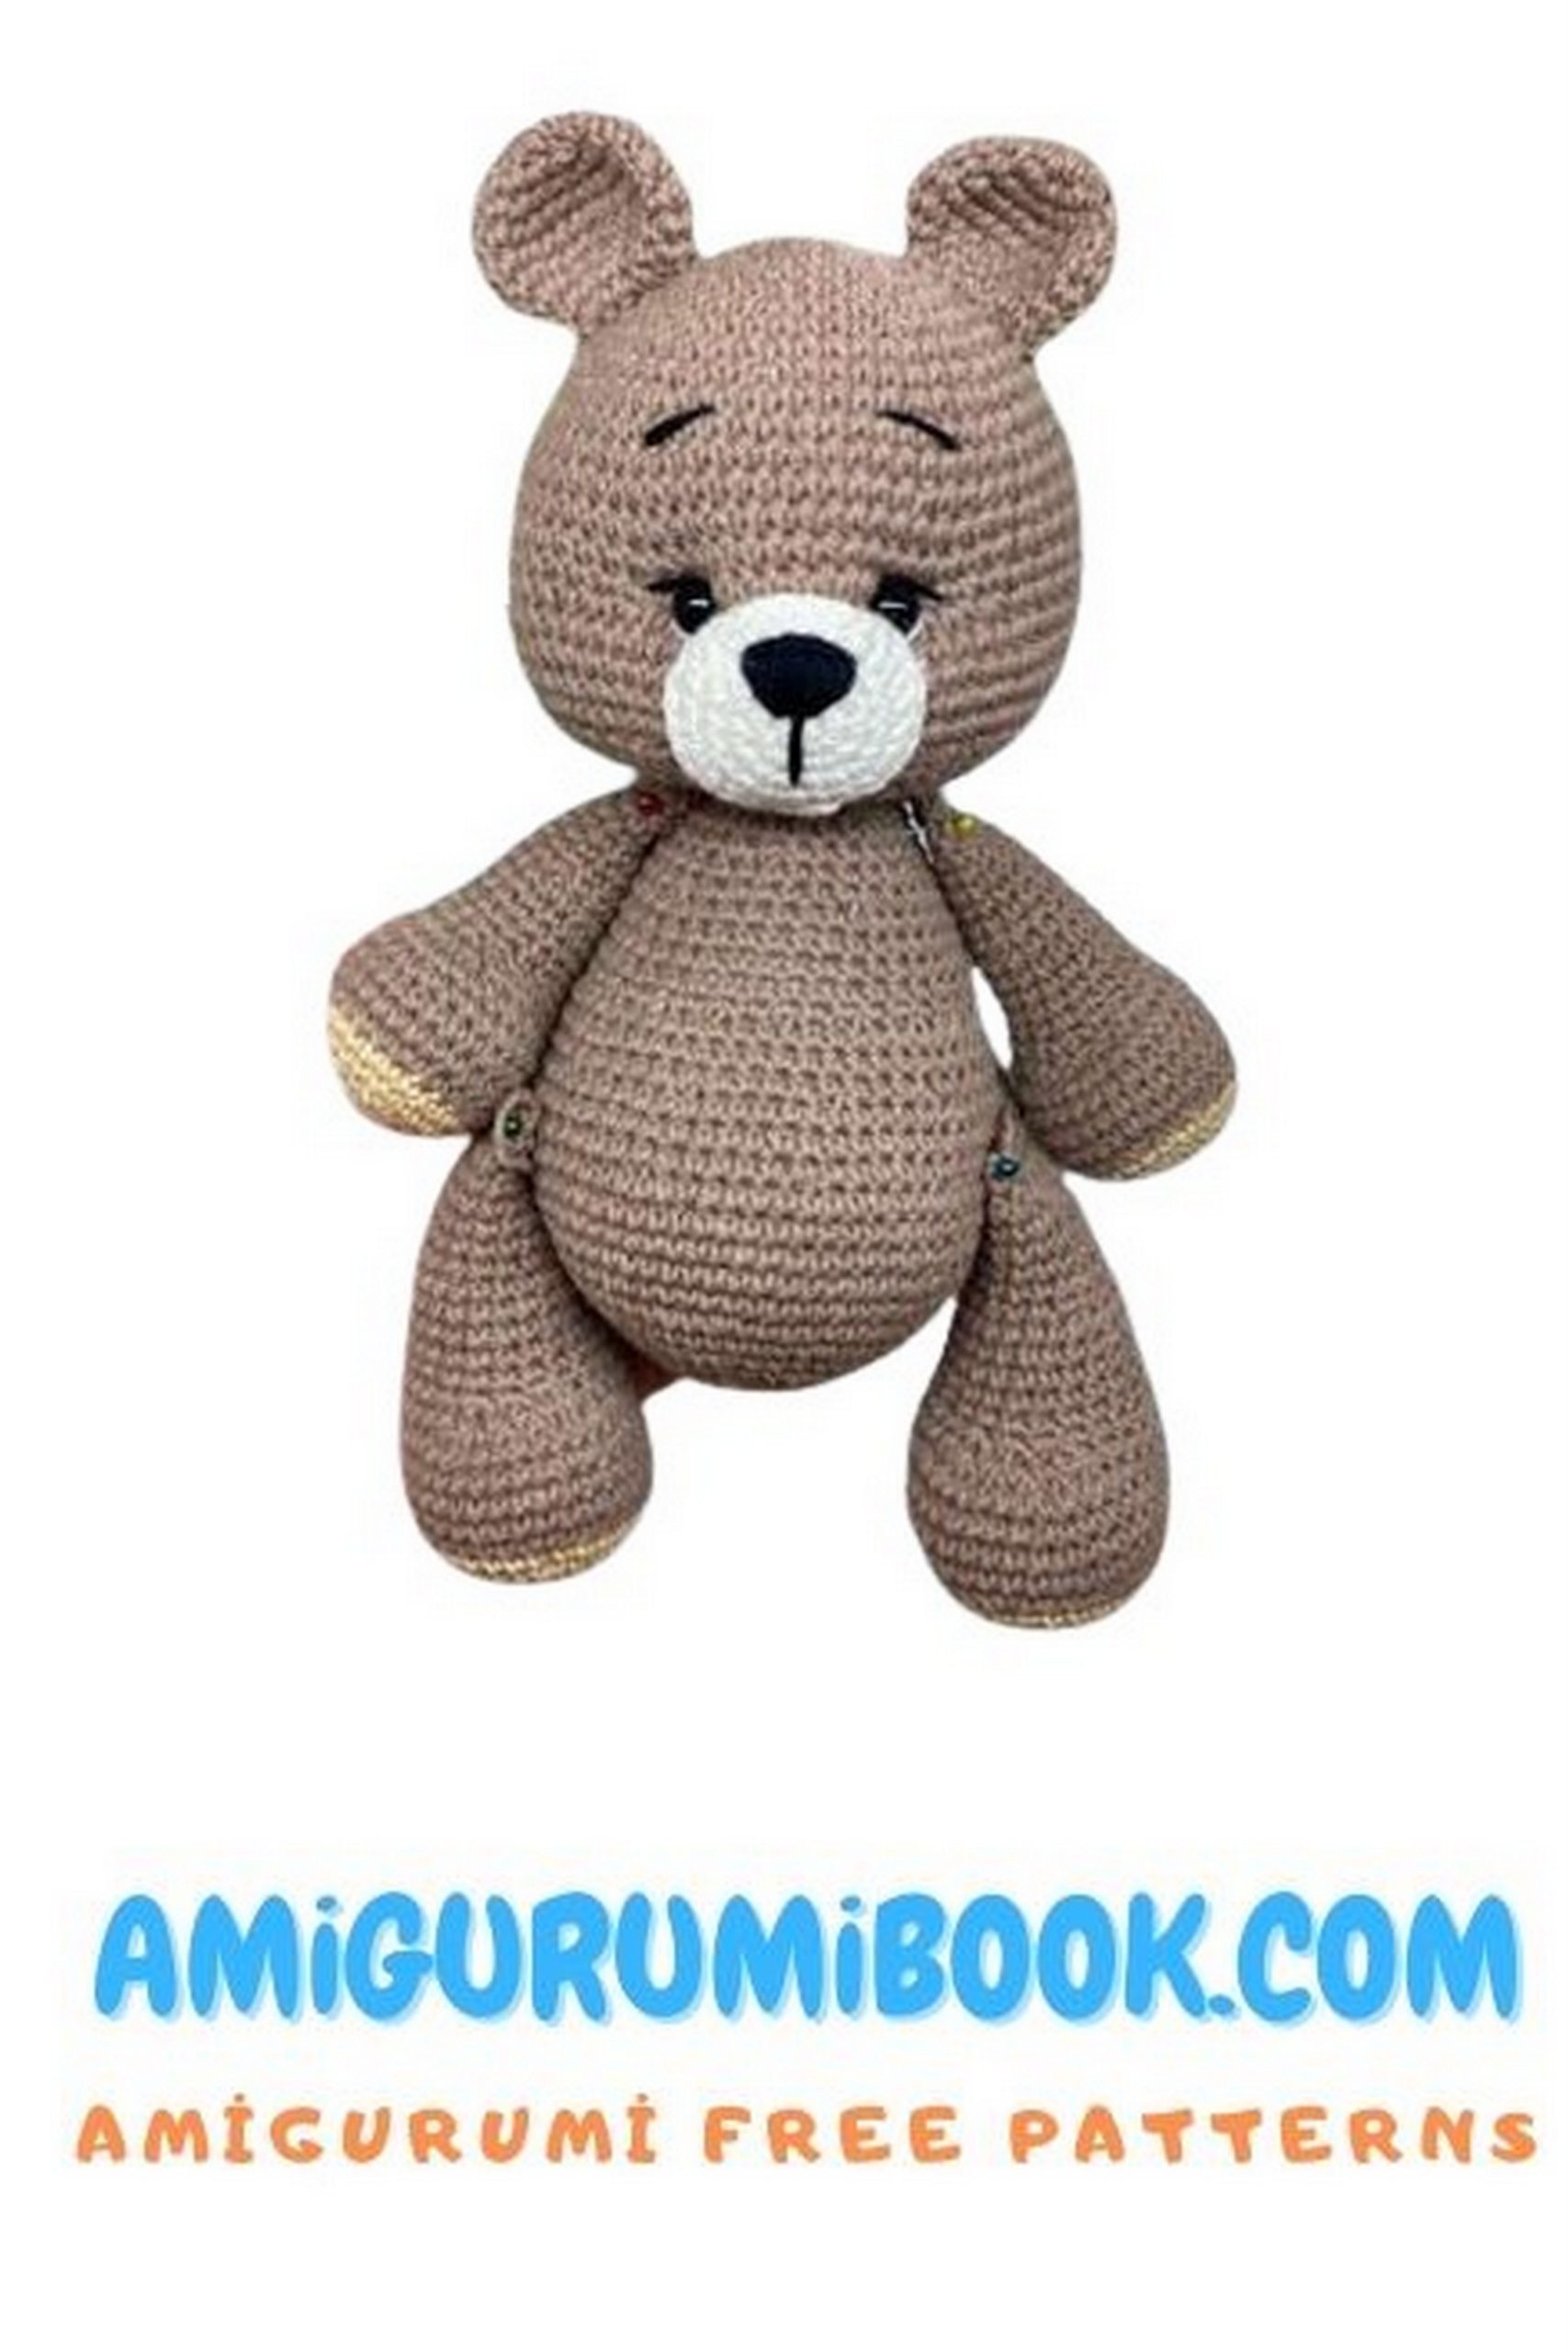
Decoration and assembly of the face.
Sew the ears between rows 4 and 11. Where the upper and lower points are parallel, and the third point is at an angle, about 3 SC away from the edge. (photo 2)
Sew through the loops of the ears and bridges along the head. Below are photo instructions.
Sew on the face.
Stretch the face slightly sideways in the area of SC. Then mark the placement. SC on both sides will be at the bottom right corner of the eye and the bottom left corner of the eye. Since we made shaping, the rows between the eyes have a curved appearance. Sew the face along the row that is in the center of the eye. (with increases)
In the “face” details, the final row was row 30 SC. Sew behind the loops of the previous row. Photo below.
Next, embroider with black thread: eyelashes, eyebrows, and nose. The lower part of the nose is 1 SC from the MC, the upper part is 2 rows to the edge: – (3 SC, INC… and a row of SS). Pay special attention to making the nose symmetrical. Embroider with white thread: eye highlights.
Sew the head to the body. In row 24 of the body, we made 9 decreases, this row can serve as a guide for the symmetrical placement of the head. The 5th decrease serves as the center of the tummy, mark the head so that points (5 decreases) and (center of the nose) are parallel. Check for symmetry from different angles and sew the head to the body, adding filling to the neck if necessary, so it doesn’t wobble during use.
Sew on the legs.
Sew the lower legs between rows 15 and 16. At a distance of approximately 26-27 SC from edge to edge.
Sew on the upper legs, stepping back 1 row from the head. At a distance of approximately 6-7 SC above the lower legs.
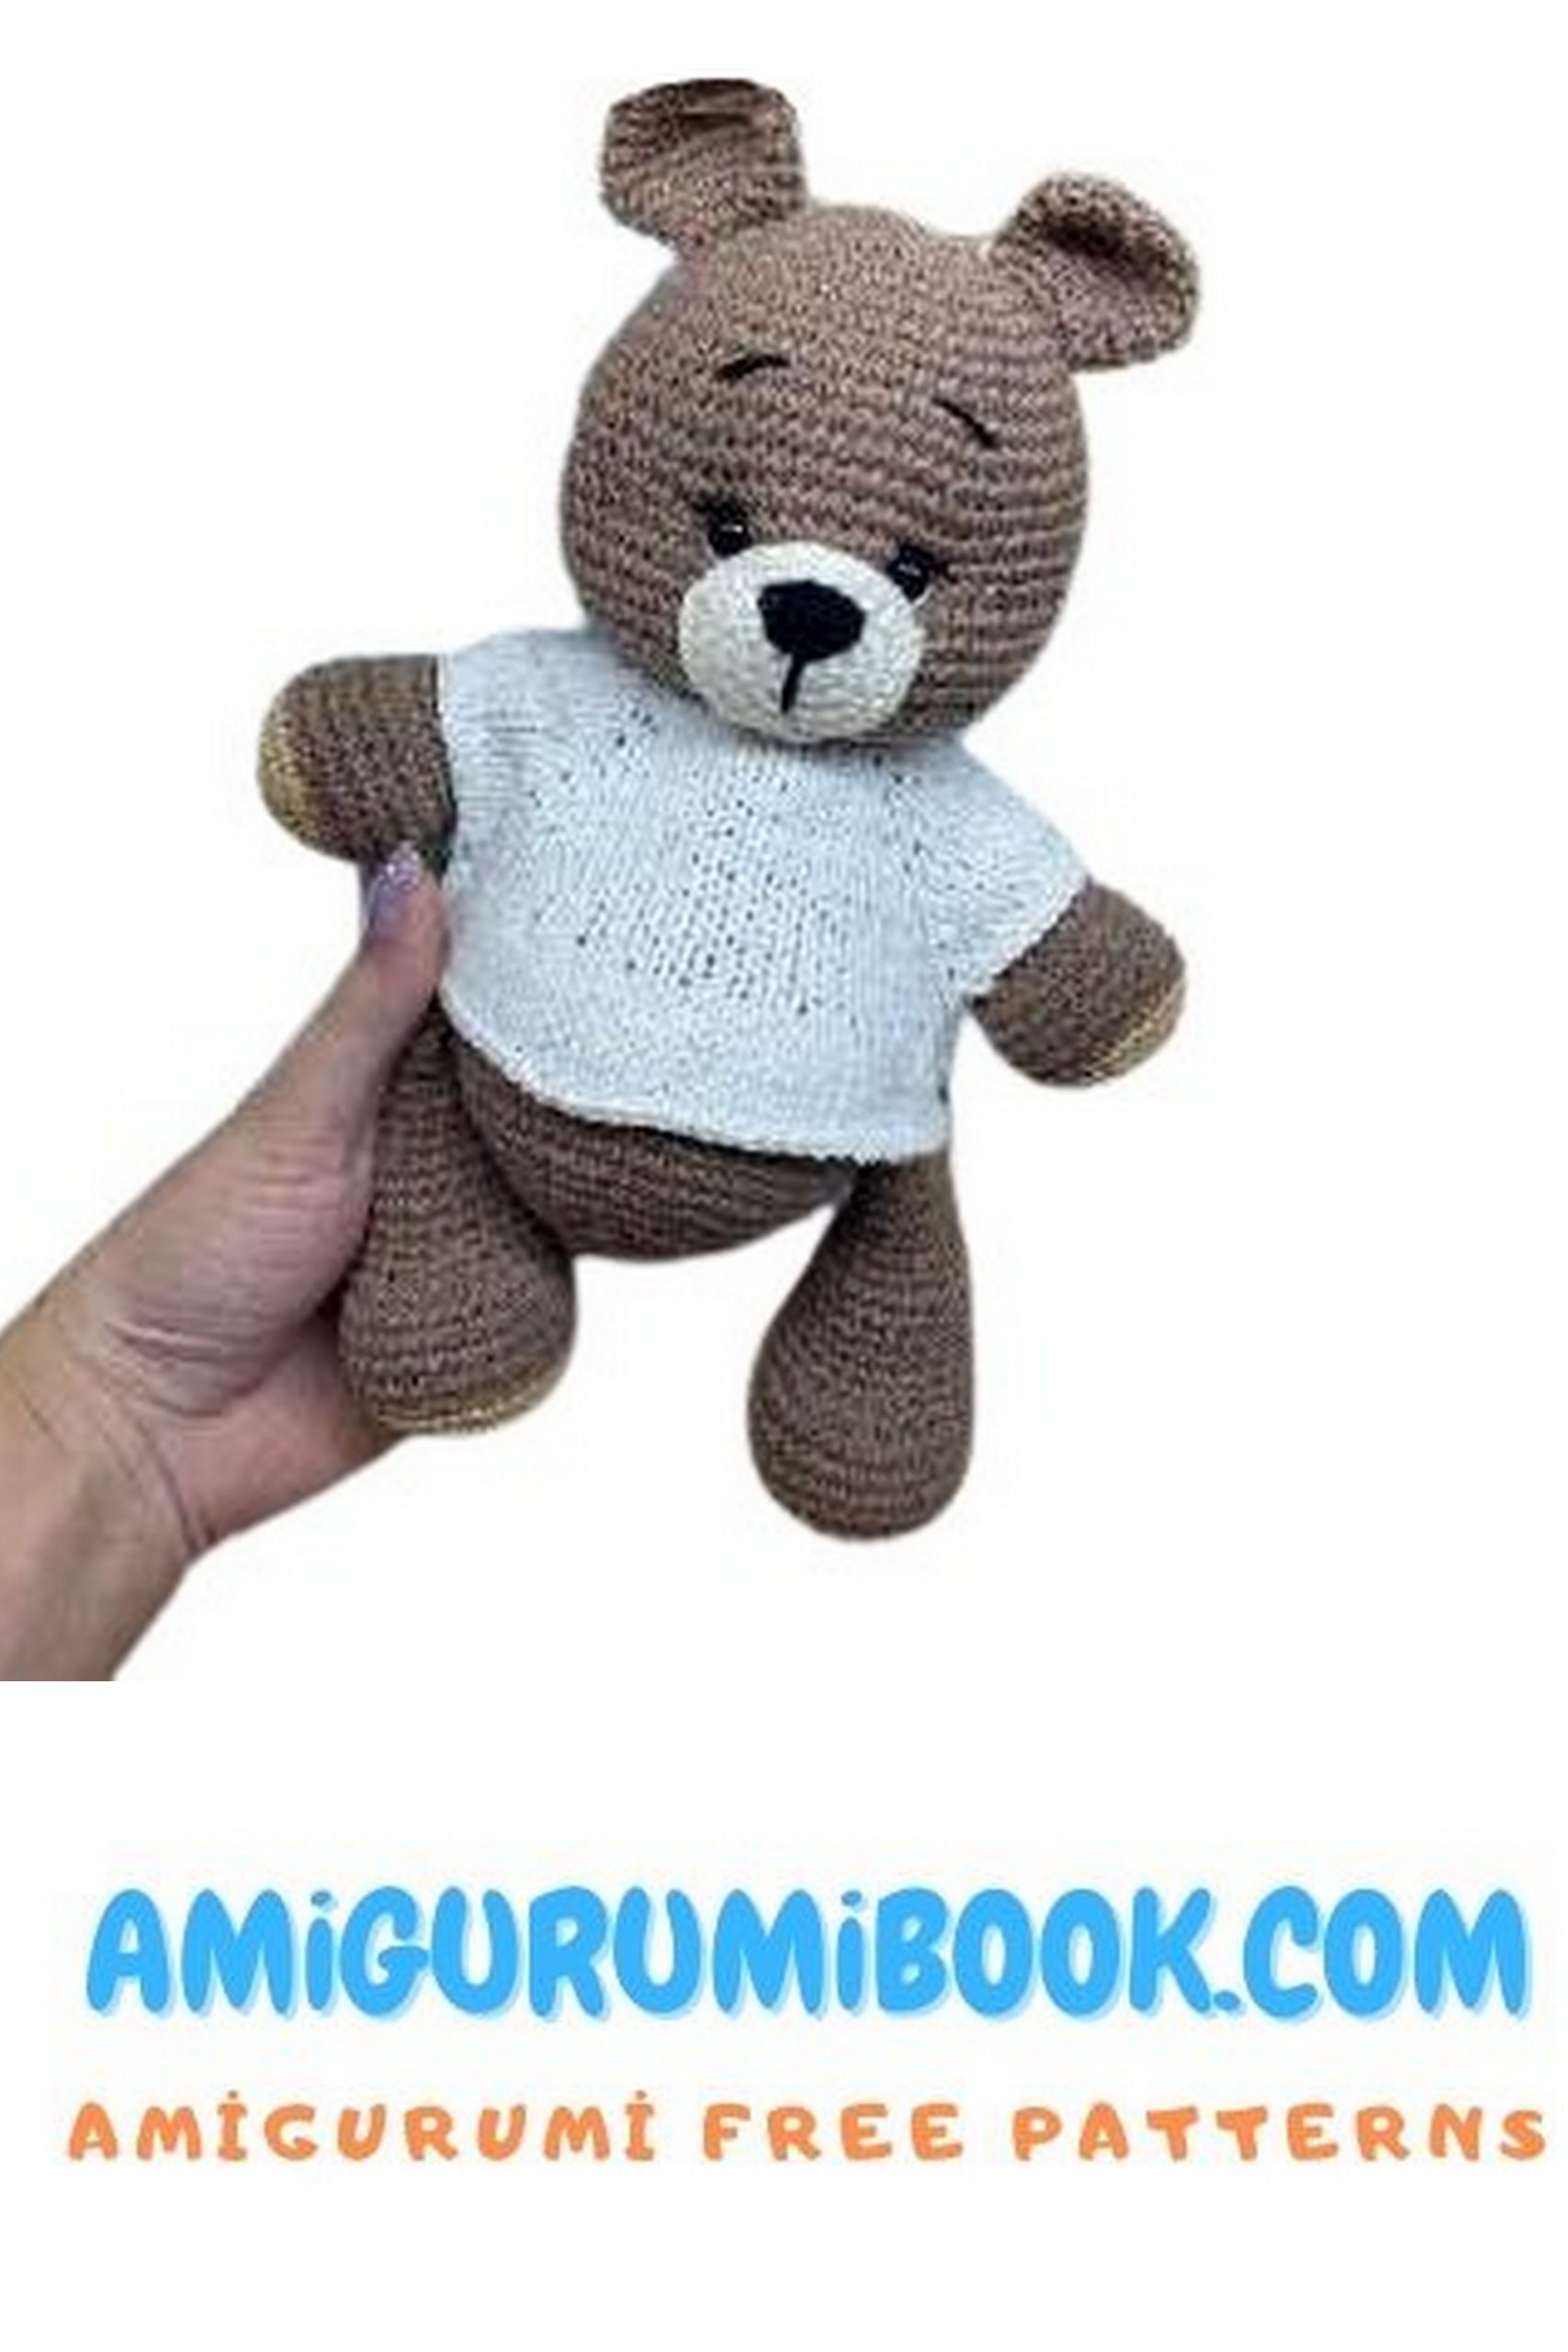
Amigurumi Bear Clothing.
Abbreviation List.
Kn – knit edge (slip stitch at the beginning of the row, always knit on the wrong side).
Purl – purl stitches.
YO – yarn over (use yarn overs for increases).
St – stitches.
2/2 – knit ribbing (2 knit, 2 purl).
Sweater (knitted).
Cast on 32 stitches using any method convenient for you.
1: Knit, 30 purl, knit; (32)
2: Knit, 4 knit, YO, knit 5, YO, knit 8, YO, knit 5, YO, knit 4, knit; (40)
Continue with the increases.
3: Knit, 38 purl, knit; (40)
4: Knit, 5 knit, YO, knit 7, YO, knit 10, YO, knit 7, YO, knit 5, knit; (48)
5: Knit, 46 purl, knit; (48)
6: Knit, 6 knit, YO, knit 9, YO, knit 12, YO, knit 9, YO, knit 6, knit; (56)
7: Knit, 54 purl, knit; (56)
8: Knit, 7 knit, YO, knit 11, YO, knit 14, YO, knit 11, YO, knit 7, knit; (64)
9: Knit, 62 purl, knit; (64)
10: Knit, 8 knit, YO, knit 13, YO, knit 16, YO, knit 13, YO, knit 8, knit; (72)
11: Knit, 70 purl, knit; (72)
12: Knit, 9 knit, YO, knit 15, YO, knit 18, YO, knit 15, YO, knit 9, knit; (80)
13: Knit, 78 purl, knit; (80)
14: Knit, 10 knit, YO, knit 17, YO, knit 20, YO, knit 17, YO, knit 10, knit; (88)
15: Knit, 86 purl, knit; (88) Close the sleeve loops thereafter.
16: Knit, 1 knit, (purl 2, knit) x 5, bind off 21 stitches using any convenient method, (knit 2, purl) x 10, bind off 21 stitches, (knit 2, purl) x 5, 1 knit, knit; (66)
(The first stitch remaining on the needle after closing the sleeve is counted as the first knit stitch)
17: Switch to sock needles. Knit, 64 purl, knit; (66)
18: Close in a circle and knit the required length with knit stitches. I have 8 rows.
Then, bind off stitches. Along the edge stitches, make edging with slip stitches or single crochet, as you prefer, and add a loop for the button. Try it on the teddy bear.
Amigurumi Bear – Pants (knitted)
Part 1, back piece.
Cast on 22 stitches using any convenient method.
1: Knit, 20 purl, knit; (22)
After knitting the first row, place a marker; this will be the front side. Yarn over and knit into the front loop of the stitch if I am not mistaken (twisted knit stitch). See photo below.
2: Knit, 20 purl, knit; (22)
3: Knit, 1 knit, YO, 18 purl, YO, 1 knit, knit; (24)
4: Knit, 22 purl, knit; (24)
5: Knit, 1 knit, YO, 20 purl, YO, 1 knit, knit; (26)
6: Knit, 24 purl, knit; (26)
7: Knit, 1 knit, YO, 22 purl, YO, 1 knit, knit; (28)
8: Knit, 26 purl, knit; (28)
9: Knit, 1 knit, YO, 24 purl, YO, 1 knit, knit; (30)
10: Knit, 28 purl, knit; (30)
11: Knit, 1 knit, YO, 26 purl, YO, 1 knit, knit; (32)
12: Knit, 30 purl, knit; (32)
13: Knit, 1 knit, YO, 28 purl, YO, 1 knit, knit; (34)
14-21: Knit, 32 purl, knit; (34) (8 rows)
22-32: Knit 2/2 ribbing. Knit according to the pattern, where purl stitches are knitted as purl stitches and knit stitches are knitted as knit stitches. (11 rows)
On the 33rd row, close all stitches.
Second part, front side.
Take the item with the marker facing you. In the first row (forming a braid), pick up 22 stitches on the needle through the back loops.
1: Knit, 20 purl, knit; (22)
2: Knit, 20 purl, knit; (22)
3: Knit, 20 purl, knit; (22)
4: Knit, 20 purl, knit; (22)
5: Knit, 20 purl, knit; (22)
6: Knit, 20 purl, knit; (22)
7: Knit, 1 knit, YO, 18 purl, YO, 1 knit, knit; (24)
8: Knit, 22 purl, knit; (24)
9: Knit, 1 knit, YO, 20 purl, YO, 1 knit, knit; (26)
10: Knit, 24 purl, knit; (26)
11: Knit, 1 knit, YO, 22 purl, YO, 1 knit, knit; (28)
12: Knit, 26 purl, knit; (28)
13: Knit, 1 knit, YO, 24 purl, YO, 1 knit, knit; (30)
14: Knit, 28 purl, knit; (30)
15: Knit, 1 knit, YO, 26 purl, YO, 1 knit, knit; (32)
16: Knit, 30 purl, knit; (32)
17: Knit, 1 knit, YO, 28 purl, YO, 1 knit, knit; (34)
18: Knit, 32 purl, knit; (34)
19: Knit, 1 knit, YO, 30 purl, YO, 1 knit, knit; (36)
20: Knit, 34 purl, knit; (36)
21-25: Knit 2/2 ribbing. (36)
26: Knit, knit according to the pattern for 1 stitch, bind off 1 stitch, knit according to the pattern for 30 stitches, bind off 1 stitch, knit according to the pattern for 1 stitch, knit; (34)
27: Knit, knit according to the pattern for 1 stitch, yarn over, knit according to the pattern for 30 stitches, yarn over, knit according to the pattern for 1 stitch, knit; (36)
28-29: Knit 2/2 ribbing. (36)
30: Knit, knit according to the pattern for 1 stitch, bind off 1 stitch, knit according to the pattern for 30 stitches, bind off 1 stitch, knit according to the pattern for 1 stitch, knit; (34)
31: Knit, knit according to the pattern for 1 stitch, yarn over, knit according to the pattern for 30 stitches, yarn over, knit according to the pattern for 1 stitch, knit; (36)
32: Knit 2/2 ribbing. (36)
On the 33rd row, close all stitches.
Proceed to edging and straps.
Use crochet hook No. 2.
With the item facing you, attach the yarn to the 1st row (which serves as the center), and crochet slip stitches along the edge without tightening the stitches. From the corner of the back of the pants, crochet 36 chain stitches (the number may vary depending on the density of your crochet work and the desired length of the strap). In the 7th chain stitch from the hook, single crochet to the end of the chain, thus creating a loop for the button. Then, crochet 10 slip stitches, followed by another 36 chain stitches, crocheting in the same manner as the first strap. Next, crochet slip stitches along the edge of the entire item, closing them invisibly. Hide the yarn.
Sew on the buttons. On the front piece, sew the buttons for the strap about 8 stitches in from each side, ensuring they are symmetrically placed.
On the back piece, sew the buttons on the front side under the stitches that were closed on the front piece.
Amigurumi Bear – jumpsuit.
(Important! I crochet clothing quite tightly using crochet hook No. 2.25. The jumpsuit fits loosely on the toy but is not oversized. If your crochet tension is looser, I recommend using crochet hook No. 1.75. You can also change the yarn if desired. During testing, I used “Children’s Novelty” yarn 50g/200m and crochet hook No. 1.75, and the jumpsuit fit perfectly according to the description.)
Chain 25 stitches. Work in turning rows, i.e., at the end of each row, chain 1 and turn the work clockwise. (Front piece)
1-6: Single crochet 24 stitches from the second chain from the hook.
7: Increase, 22 single crochet, increase; (26)
8: Increase, 24 single crochet, increase; (28)
9: Increase, 26 single crochet, increase; (30)
10: Increase, 28 single crochet, increase; (32)
11: Increase, 30 single crochet, increase; (34)
12: Increase, 32 single crochet, increase; (36)
13-15: Single crochet 36 stitches; (3 rows)
16: Single crochet 1 stitch, chain 2, (skip 2 single crochet stitches, 30 single crochet stitches, chain 2, skip 2 single crochet stitches) repeat, single crochet 1 stitch; (32)
Note: You can chain 3 and skip 3 single crochet stitches, depending on the diameter of the selected buttons.
17-18: Single crochet 36 stitches; (2 rows) Work slip stitches under the chains as shown in the photo.
19: Single crochet 1 stitch, chain 2, (skip 2 single crochet stitches, 30 single crochet stitches, chain 2, skip 2 single crochet stitches) repeat, single crochet 1 stitch; (32)
20-22: Single crochet 36 stitches; (3 rows) Cut the yarn, hide the end.
Crochet the second part (back piece).
Attach the yarn to the first row.
1: Single crochet 24 stitches along the first row.
2-5: Single crochet 24 stitches.
6: Increase, 22 single crochet, increase; (26)
7: Increase, 24 single crochet, increase; (28)
8: Increase, 26 single crochet, increase; (30)
9: Increase, 28 single crochet, increase; (32)
10: Increase, 30 single crochet, increase; (34)
11: Increase, 32 single crochet, increase; (36)
12: Increase, 34 single crochet, increase; (38)
13: Increase, 36 single crochet, increase; (40)
14: Triple increase (3 single crochet stitches in 1 stitch), 38 single crochet, triple increase; (44)
15: Triple increase, 42 single crochet, triple increase; (48)
16-25:Single crochet 48 stitches; (10 rows).
Do not cut the yarn, continue → Crochet edging.
Single crochet along the edge of the entire piece. Then, cut the yarn and hide the end.
Next, on the front side, move 8 single crochets in from each edge, place a marker in the 8th stitch. Join the yarn in the 8th stitch (important: not in the single crochets, but in the stitches below them).
1: Joining the yarn in the 8th stitch, without chaining, crochet 22 stitches to the marker, single crochet in the 8th single crochet;
2: Turn the work, without chaining, crochet 19 single crochets from the second stitch from the hook, then single crochet;
3: Turn without chaining, crochet 17 single crochets from the second stitch;
4: Turn without chaining, crochet 15 single crochets from the second stitch;
5: Turn without chaining, crochet 13 single crochets from the second stitch;
6: Turn without chaining, crochet 11 single crochets from the second stitch;
7: Turn without chaining, crochet 9 single crochets from the second stitch;
8: Turn without chaining, crochet 9 single crochets from the first stitch, single crochet into the side bridge.
Make the edging and straps. Attach the yarn at the corner, on the right side, in a single crochet (under the single crochets), crochet single crochets to the corner.
Then, chain 34 stitches, single crochet in the 7th chain from the hook along the chain to its base, single crochet in the next stitch, single crochet around the piece. Before the last stitch, chain 34 stitches, single crochet in the 7th chain from the hook along the chain to its base, single crochet in the next stitch. Single crochet along the edge to the corner, single crochet. Cut the yarn and hide it.