
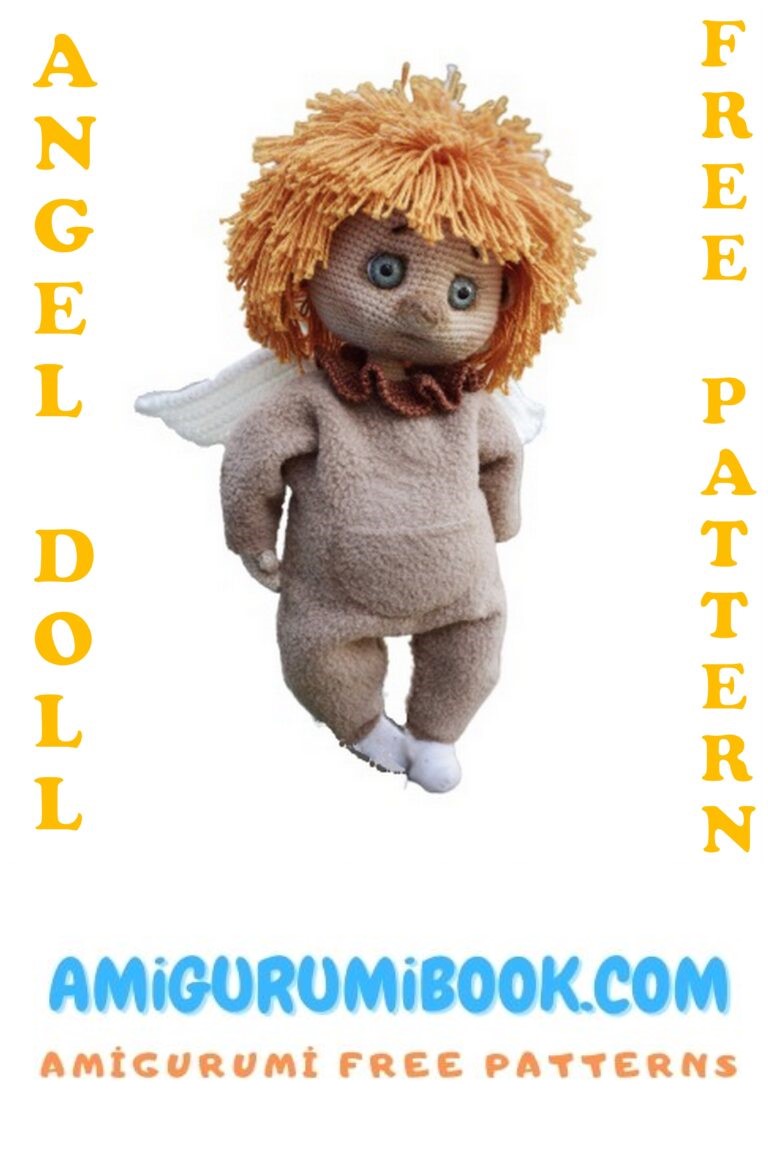
The Angel Boy Amigurumi free pattern is a delightful and easy-to-follow guide for creating a charming handmade angel doll. Perfect for beginners and experienced crafters alike, this pattern brings a touch of whimsy and warmth to any collection or gift. free crochet patterns – Free Amigurumi Rhino Pattern: Craft Your Own Adorable Rhinoceros
You may also like more amigurumi patterns.
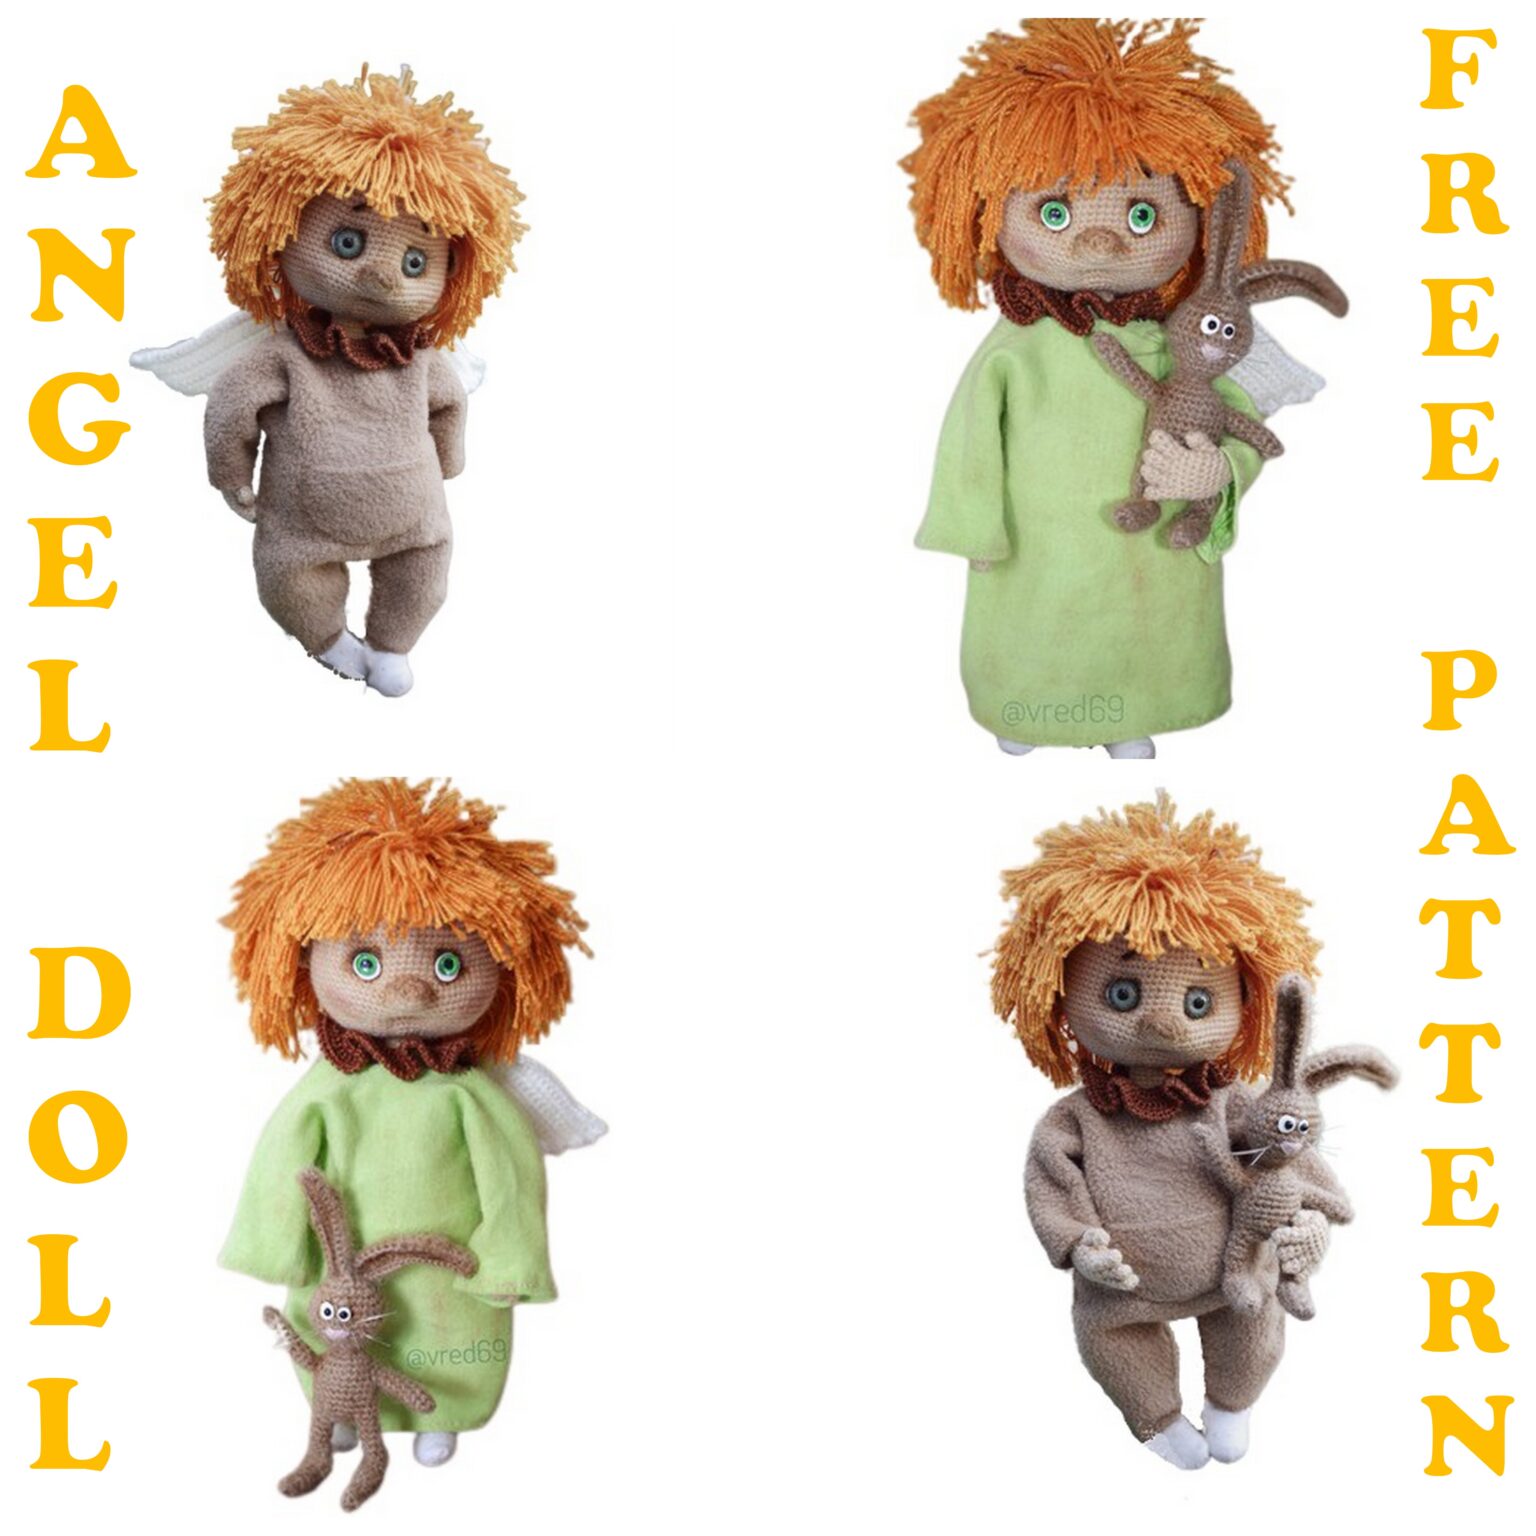
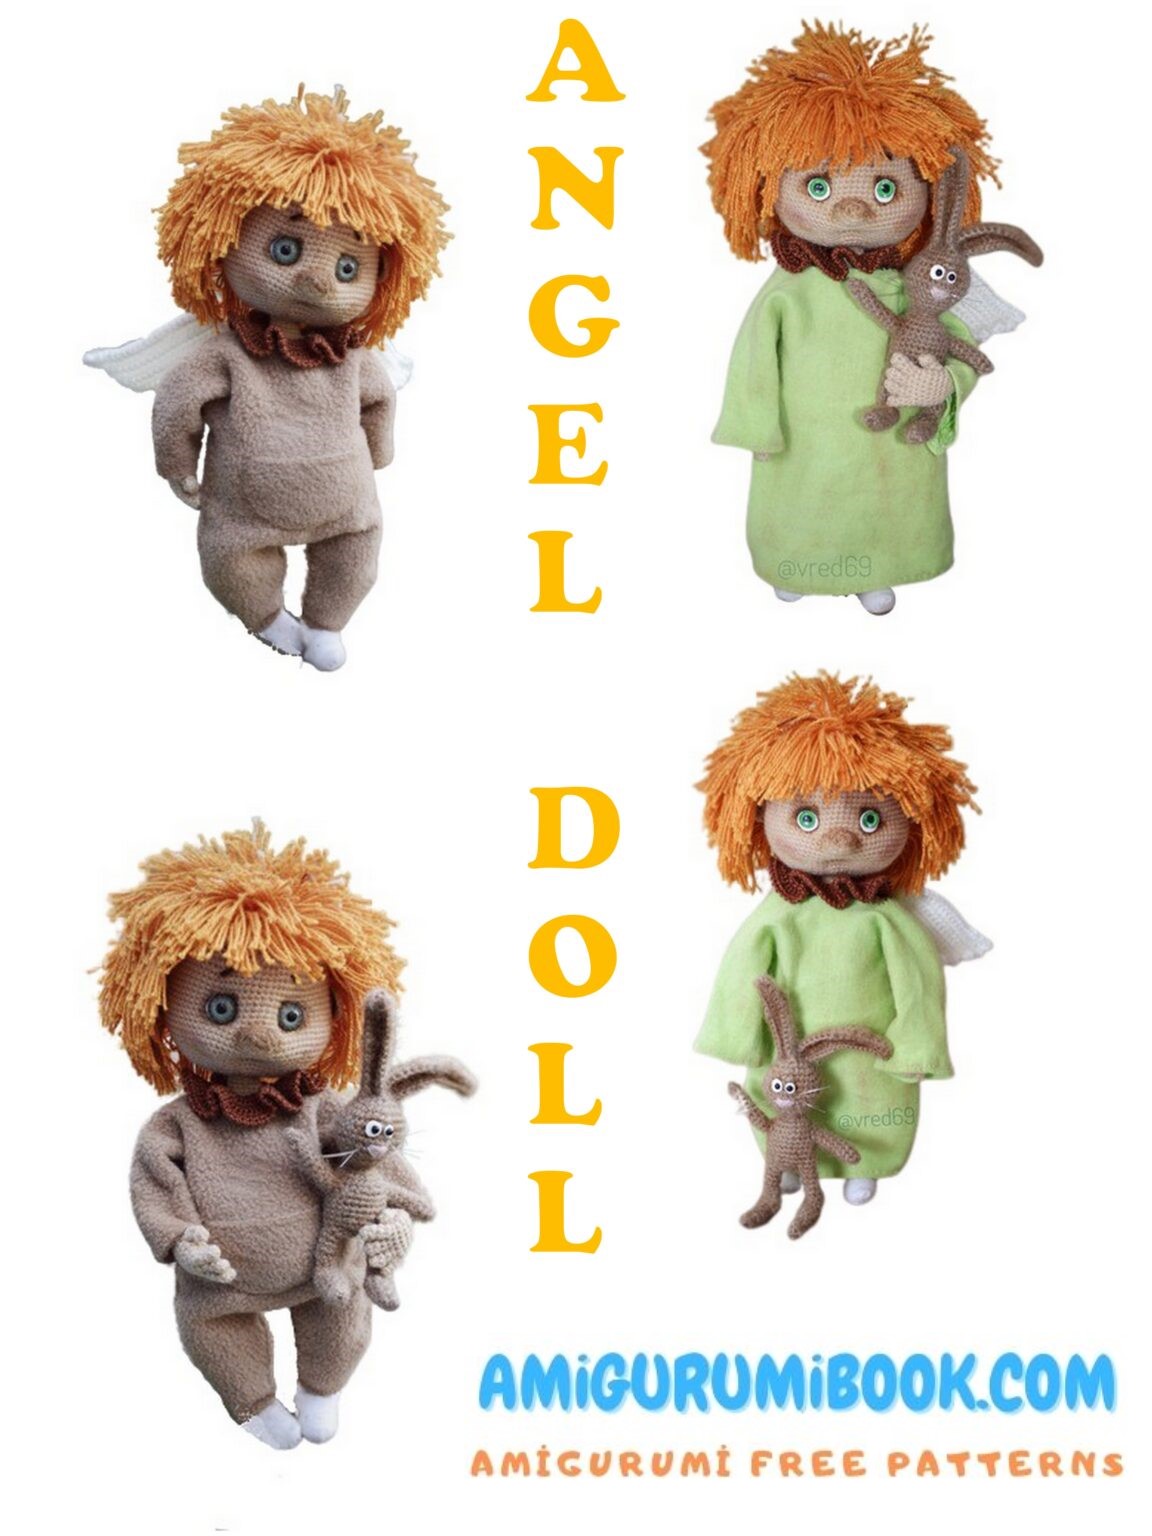
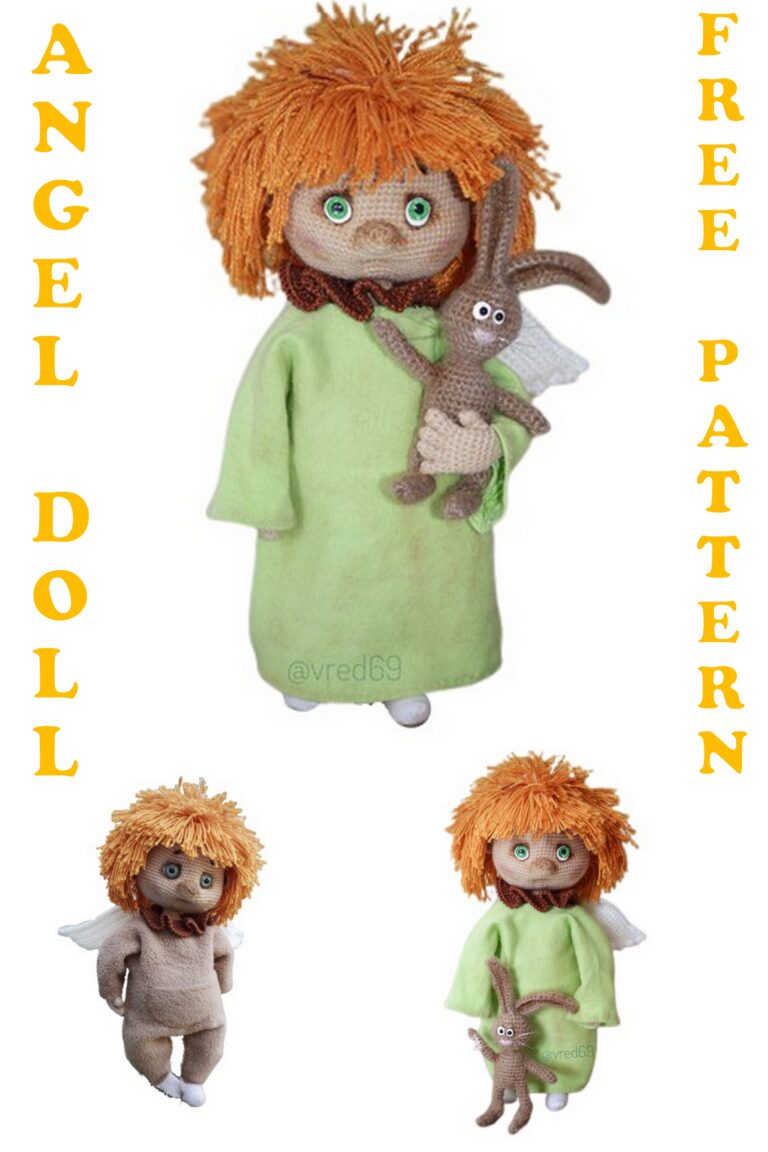
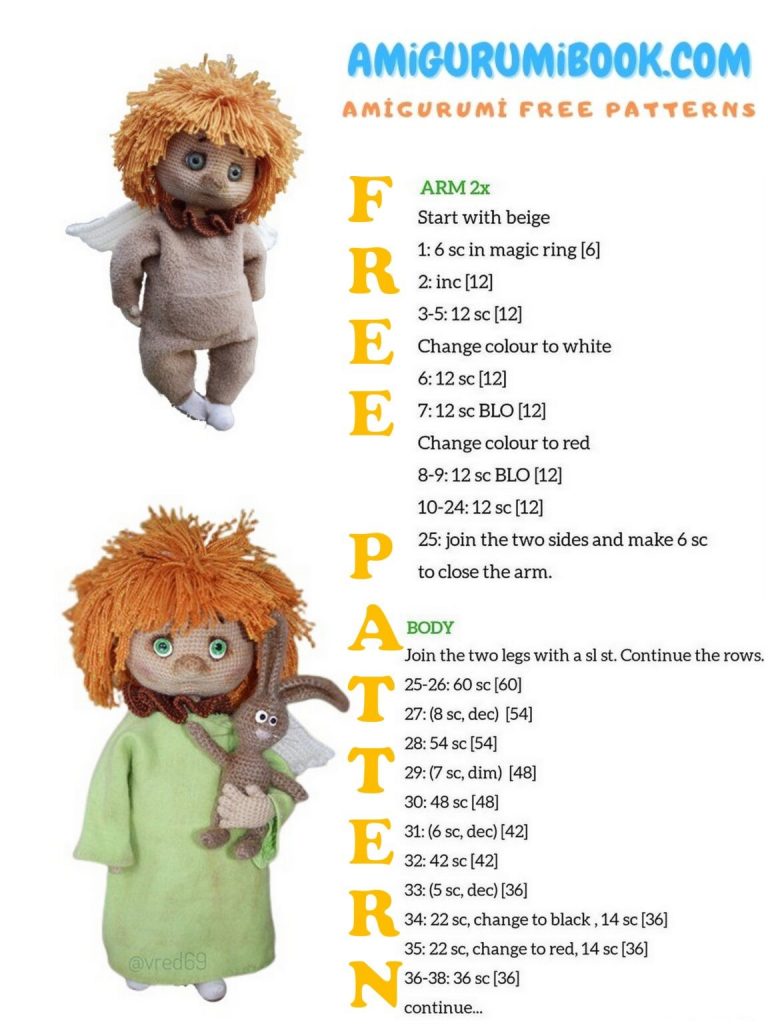
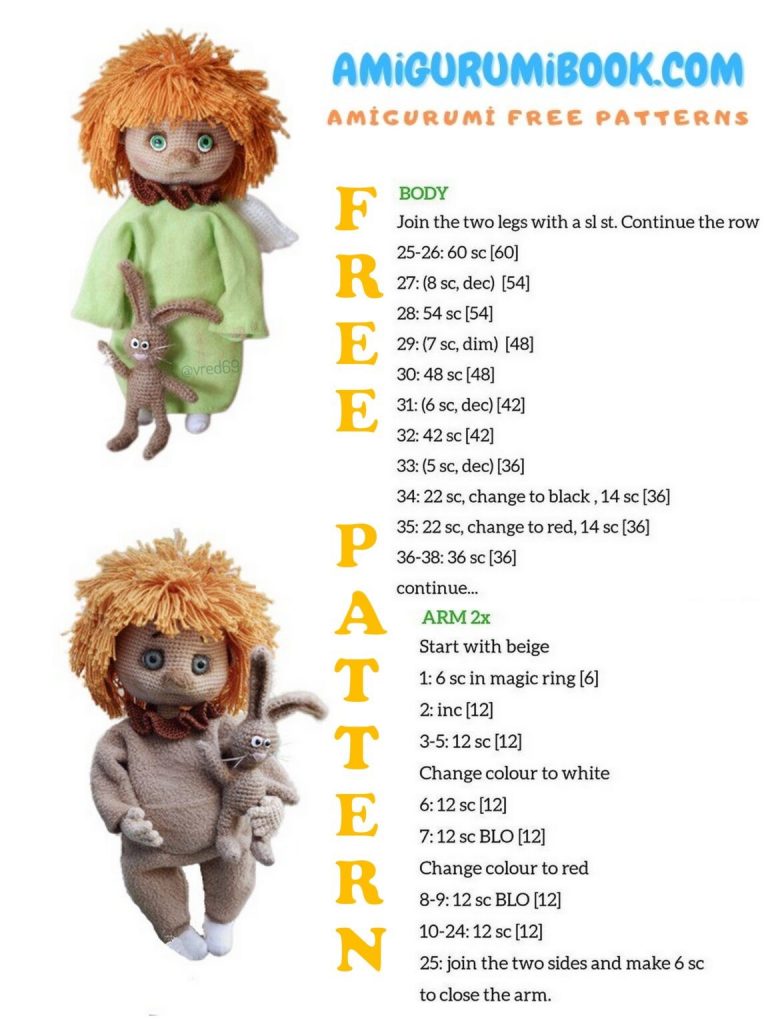
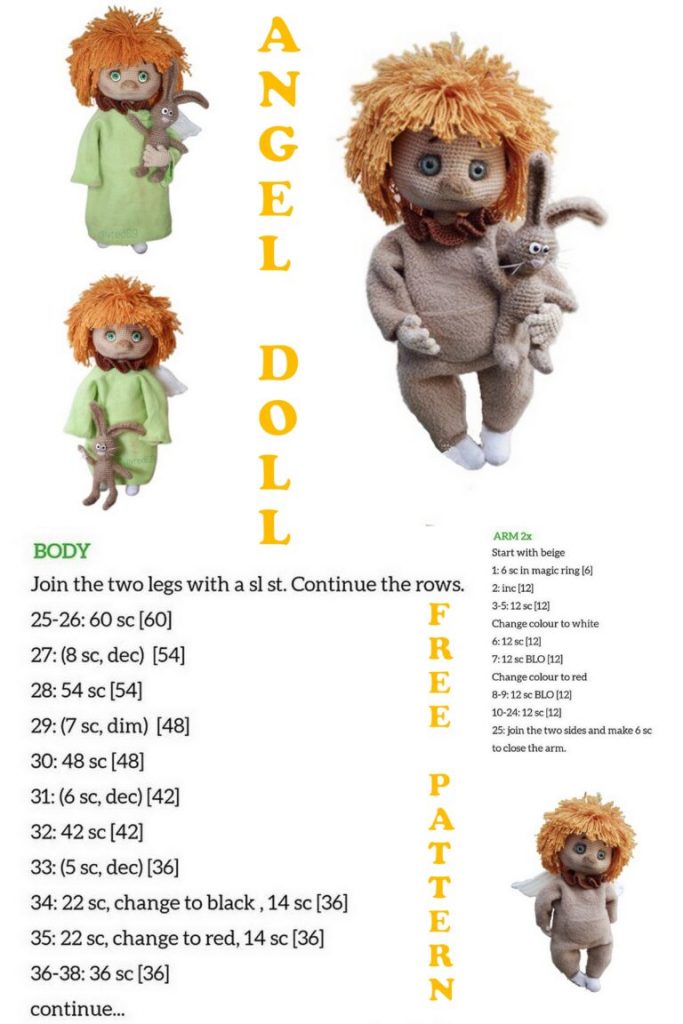
Wonderful amigurumi doll patterns are available on this site for free. I shared the amigurumi angel doll pattern in this article.
Abbrevations:
-CH – chain
-SC – single crochet;
-DEC – decrease, knit 2sc together;
-INC – increase, knit 2sc in one loop;
-W. – knit 3sc from one loop;
-INCHDC – knit 2 double crochet in one loop;
-SL-ST – slip stitch
-Double dec: 1sc into 3sc
Materials:
-yarn YarnArt Jeans (color 07 beige) (the thread is divided into two);
– hook 1.1 regular (or other suitable size for the selected yarn);
– Yarn PNK named after SM Kirov “Iris” for red hair (No. 0512);
-a little mohair white yarn for the wings (100g / 500m);
– floristic wire (any other) for reinforcement (for fingers with a section of 0.8; for hands and feet – 1.5);
-filler;
– ready-made eyes 8mm or cabochons 6mm;
-white felt a little for the eyes or white plastic;
– oil paints (or dry pastels) for toning;
– glue “Moment”;
-strong thread for pulling, needle;
– knitted or cotton fabric 50 * 50 for clothes.
The angel is knitted in one piece, only the ears are sewn. When using the same materials as mine, it will turn out to be 20cm, not worth it yourself.
ATTENTION!
All parts are spirally linked unless otherwise noted. Use a marker or contrasting thread to keep track of the beginning of the row. If, during knitting, the marker line has shifted to the right, then we make offset loops (knit an additional sc). The offset loop is not included in the description.
HANDLES (2 parts):
Fingers 10 pcs:
1st row: 4sc into magic ring
2-4 rows: 4sc (3 rows)
We do not break the thread with the little fingers, we knit the palm.
We begin to collect the palm from the little finger, a marker along the outer edge of the palm.
1 row: 2sc (on the little finger), 2sc (on the nameless), 2sc (on the middle), 4sc (on the index), 2sc (on the middle), 2sc (on the nameless), 2sc (on the little finger) – (16)
2nd row: 16sc – (16)
3rd row: 7sc, inc, 7sc, inc – (18)
4th row: 18sc – (18)
Right hand:
5 row: 7sc, 2sc (thumb + palm together), 9sc – (18)
6 row: 7sc, 2sc (on the thumb), 9sc – (18)
Left hand:
5 row: 10sc, 2sc (thumb + palm together), 6sc – (18)
6 row: 10sc, 2sc (on the thumb), 6sc – (18)
For both hands:
7 row: 18sc – (18)
Insert the wire frame into the fingers, connect together and wrap with adhesive plaster. Add a little filler to the palm.
Next, we continue to knit around the frame. If necessary, fill as you knit.
8 row: (1sc, dec) * 6 times – (12)
9th row: (2sc, dec) * 3 times – (9)
10-15 rows: 9sc – (9) (6 rows)
Right hand:
16 row: 8sc, inc – (10)
17th row: 9sc, inc – (11)
18th row: 10sc, inc – (12)
19-21 rows: 12sc – (12) (3 rows)
22 row: 1sc, 2dec, 3sc, 2inchdc, 2sc – (12)
23rd row: 2dec, 3sc, 2inchdc, 3sc – (12)
Left hand:
16 row: inc, 8sc – (10)
17th row: inc, 9sc – (11)
18th row: inc, 10sc – (12)
19-21 rows: 12sc – (12) (3 rows)
22 row: 2sc, 2inchdc, 3sc, 2dec, 1sc – (12)
23 row: 3sc, 2inchdc, 3sc, 2dec – (12)
For both hands:
24 row: 12sc – (12)
25 row: (5sc, inc) * 2 times – (14)
Rows 26-39: 14sc – (14) (14 rows), cut the thread, fasten.
LEGS (2 parts):
1st row: cast on a chain of 4 ch., Continue knitting from the 2nd loop from the hook: 2 sc, w, 1sc, inc – (8)
2nd row: inc, 1sc, 3inc, 1sc, 2inc – (14)
3-8 rows: 14sc – (14) (6 rows)
we knit in rotary rows:
9th row: ch., Turn, 6sc – (6)
10 row: ch., Turn, 6sc – (6)
11 row: ch., Turn, dec, 2sc, dec – (4)
12th row: ch., Turn, 4sc – (4)
13 row: ch., Turn, 2dec – (2)
14 row: ch., Turn, 1sc, put a marker (center of the leg behind)
further in a circle:
15th row: 1sc, 4sc (on the side of the heel), 8sc, 4sc (on the side of the heel), 1sc – (18)
16 row: 4sc, dec, 6sc, dec, 4sc – (16)
17th row: 4sc, dec, 4sc, dec, 4sc – (14)
18th row: 4sc, dec, 2sc, dec, 4sc – (12)
19 row: 3sc, dec, 2sc, dec, 3sc – (10)
Fill your foot a little. Insert the wire frame (approx 40-45cm, depending on the size of your toy): make a loop, wrap with adhesive tape, insert the frame into the foot. Add filler to the foot.
Next, we continue to knit around the frame.
20 row: 10sc – (10)
21 row: 2sc, inc, 4sc, inc, 2sc – (12)
22 row: 12sc – (12)
23 row: 2sc, inc, 6sc, inc, 2sc – (14)
Rows 24-29: 14sc – (14) (6 rows)
30 row: 2sc, dec, 6sc, dec, 2sc – (12)
Rows 31-32: 12sc (2 rows)
33 row: dec, 3sc, 2inchdc, 3sc, dec – (12)
34 row: dec, 3sc, 2inchdc, 3sc, dec – (12)
35 row: 12sc – (12)
36 row: 2sc, inc, 6sc, inc, 2sc – (14)
37 row: 2sc, inc, 8sc, inc, 2sc – (16)
38 row: 2sc, inc, 10sc, inc, 2sc – (18)
39-46 rows: 18sc – (18) (8 rows) cut the thread, hide.
TRUNK:
1 row: chain of 8ch., From the 2nd loop from the hook: 6sc, w (in the last loop of the chain), 6sc, w (in the first loop of the chain) – (18)
2nd row: (6sc, 3inc) * 2 times – (24)
3rd row: 6sc, (inc, 1sc) * 3 times, 6sc, (inc, 1sc) * 3 times – (30)
4th row: 6sc, (inc, 2sc) * 3 times, 6sc, (inc, 2sc) * 3 times – (36)
5 row: 6sc, (inc, 3sc) * 3 times, 6sc, (inc, 3sc) * 3 times – (42)
Knit 4sc, fold the part in half, see that the beginning of the row goes along the middle (if necessary, we make offset loops).
We put a new marker (on the back).
We attach the legs, we look so that the knees look forward:
6 row: 8sc, 5sc (leg + body together), 16sc, 5sc (leg + body), 8sc – (42)
7 row: 8sc, 13sc on the leg, 16sc, 13sc on the leg, 8sc – (58)
8 row: 20sc, inc, 16sc, inc, 20sc – (60)
9th row: 17sc, (inc, 2sc) * 4 times, 2inc, (2sc, inc) * 4 times, 17sc – (70)
10-19 rows: 70sc – (70) (10 rows) ch
20 row: 3sc, dec, 5sc, dec, 46sc, dec, 5sc, dec, 3sc – (66)
21-24 rows: 66sc – (66) (4 rows)
25 row: 14sc, (dec, 5sc) * 2 times, dec, 6sc, dec (5sc, dec) * 2 times, 14sc – (60)
26 row: 14sc, (dec, 4sc) * 2 times, dec, 4sc, dec, (4sc, dec) * 2 times, 14sc – (54)
27 row: 14sc, (dec, 3sc) * 2 times, dec, 2sc, dec, (3sc, dec) * 2 times, 14sc – (48)
28 row: 48sc, ch – (48)
29 row: 3sc, (dec, 6sc) * 5 times, dec, 3sc – (42)
Rows 30-37: 42sc – (42) (8 rows) ch
38 row: 7sc, 7sc (arm + body together), 14sc, 7sc (arm + body together), 7sc – (42)
Row 39: 6sc, dec (grab one body loop and one arm loop), 5sc, dec (grab one body loop and one hand loop), 12sc, dec (grab one body loop and one hand loop), 5sc, dec (grab one body loop and one arm loop), 6sc – (38)
40 row: 5sc, double dec, 3sc, double dec, 10sc, double dec, 3sc, double dec, 5sc – (30)
41 row: 4sc, double dec, 1sc, double dec, 8sc, double dec, 1sc, double dec, 4sc – (22)
42 row: 3sc, 2dec, 8sc, 2dec, 3sc – (18)
43 row: (4sc, dec) * 3 times – (15)
44-45 rows: 15sc – (15) (2 rows), cut the thread, fasten.
NOSE:
1st row: 4ch, from 2nd loop from hook: 2sc, w, 1sc, inc – (8)
2nd row: inc, 1sc, 3inc, 1sc, 2inc – (14)
3-4 rows: 14sc – (14) (2 rows)
HEAD (marker behind):
1st row: 6sc into magic ring
2nd row: 6inc – (12)
3rd row: (1sc, inc) * 6 times – (18)
4th row: 1sc, inc, (2sc, inc) * 5 times, 1sc – (24)
5 row: 3sc, 2inc, 6sc, 2inc, 6sc, 2inc, 3sc – (30)
6 row: inc, 3sc, (inc, 1sc) * 2 times, inc, 3sc, inc, 4sc, inc, 3sc, inc, (1sc, inc) * 2 times, 3sc, inc – (40)
7 row: 1sc, inc, 3sc, (inc, 2sc) * 2 times, inc, 4sc, inc, 6sc, inc, 4sc, inc, (2sc, inc) * 2 times, 3sc, inc, 1sc – (50)
8 row: 50sc – (50)
9th row: 6sc (inc, 3sc) * 2 times, inc, 5sc, inc, 3sc, 2inc, 3sc, inc, 5sc, inc, (3sc, inc) * 2 times, 6sc – (60)
10 row: 60sc – (60)
11 row: inc, 14sc, inc, 28sc, inc, 14sc, inc – (64)
12 row: 64sc – (64)
13 row: 5sc, inc, 12sc, inc, 12sc, 2inc, 12sc, inc, 12sc, inc, 5sc – (70)
14 row: 1sc, inc, 14sc, inc, 10sc, inc, 14sc, inc, 10sc, inc, 14sc, inc, 1sc – (76)
15 row: 18sc, w, 10sc, inc, 16sc, inc, 10sc, w, 18sc – (82)
Rows 16-23: 82sc – (8 rows) ch
24 row: 38sc, 6sc (nose + head together), 38sc – (82)
25 row: 38 sc, (dec, 4sc, dec) – along the nose, 38sc – (82)
Rows 26-27: 82sc – (82) (2 rows)
28 row: dec, (14sc, dec) * 2 times, 14sc, (dec, 14sc) * 2 times, dec – (76)
29 row: (14sc, dec) * 2 times, 12sc, (dec, 14sc) * 2 times – (72)
30 row: 9sc, dec, 14sc, dec, 18sc, dec, 14sc, dec, 9 sc – (68)
31 row: 16sc, dec, 32sc, dec, 16sc – (66)
32 row: dec, 5sc, dec, 12sc, dec, 20sc, dec, 12 sc, dec, 5sc, dec – (60)
33 row: 4sc, (dec, 8sc) * 5 times, dec, 4sc – (54)
34 row: (7sc, dec) * 6 times – (48)
35 row: 3sc, (dec, 6sc) * 5 times, dec, 3sc – (42)
36 row: (5sc, dec) * 6 times – (36)
37 row: 2sc, (dec, 4sc) * 5 times, dec, 2sc – (30)
Fill very tightly, especially carefully on the nose and cheeks.
38 row: (3sc, dec) * 6 times – (24)
39 row: (2sc, dec) * 6 times – (18)
40 row: (1sc, dec) * 6 times – (12), leave the thread for sewing.
Ears (2 parts):
1st row: 8sc into magic ring, turn, ch.
2nd row: 8sc, turn, ch.
3rd row: (1sc, inc) * 4 – (12),
fasten the thread, leave for sewing.
DECOR:
HAIR: Cut the yarn into 16-18cm pieces, a little shorter at the crown (you can choose any length, it all depends on the size of your toy and how long you want your hair to be). Start fastening from the top of the head, and so on in a spiral up to 15-16 rows. You need to fasten in each loop of each row.
Hook the thread into the loops of the head as you usually attach the fringe to a scarf.
Then fasten along the back of the head in a straight line. We pass the thread through 1 loop, and through 1 row. When all the hairs are attached, carefully align the ends.
FACE TIGHTENING: put pins for the eyes: two rows above and 2-3sc to the side of the nose, the distance between the eyes is 9-10 loops; mouth – 6 rows down from the nose in the middle. Fasten the thread in the neck, bring it out at the point of the eye, grab 2-3 loops and bring it out to the point of the mouth. We do the same with the second eye, repeat several times, fasten the thread and hide it.
Pin the ears with pins, count 14 loops to the side from the eyes, sew at eye level.
Add some filler. Sew the head to the body.
TONING: tint with oil paints the hollows for the eyes, nose, mouth, cheeks slightly.
Eyes: cut out a circle of felt slightly larger than the size of the eyes 8mm, glue, ready-made eyes on top, glue cilia if desired.
Option 2 of the eyes: we paint a cabochon, we sculpt a small flat circle from plastic a little more than the circumference of the eye, wait for solidification, glue it.
Embroider the eyebrows.
WINGS (2 parts):
1st row: dial 6 ch., From 2nd loop 3sc, 2sl-st, ch., Turn
2nd row: 4 sc, 4ch., Turn
3rd row: 3sc in a chain, 4 sc, ch., Turn
4th row: skip the first column, 4sc, 5ch., Turn
5 row: 4sc on the chain, 4 sc, ch., Turn
6 row: 8sc, 5ch., Turn
7 row: 4sc on the chain, 8 sc, ch., Turn
8 row: 12sc, 5ch., Turn
9th row: 4sc by chain, 12 sc, ch., Turn
10 row: 12sc, 4ch., Turn
Row 11: 3sc chain, 12 sc, ch., Turn
12th row: 12sc, 4ch., Turn
Row 13: 3sc chain, 12 sc, ch., Turn
14th row: 12sc, 4ch., Turn
15th row: (we knit in the wire) 3sc along the chain, 12 sc, 2sc in ch, along the side 10 sc. Leave the thread for sewing.
The wings are designed for an angel with a height of 20cm, you may have to adjust the toy to your size, add the required number of loops at the very beginning and proceed from this.
Punch holes on the back (about 14-15 rows from the head), into which we insert the wings, carefully sew.
We dress, decorate to your taste. The angel is ready!
Enjoy your knitting and light loops!