Creating a Big King Lion Amigurumi is a fun and rewarding project for crochet enthusiasts of all skill levels. This free pattern guides you step-by-step to make a charming and cuddly lion that’s perfect as a gift or a decorative piece. free crochet patterns – Large Bunny Amigurumi Free Pattern – Crochet Tutorial
You may also like more amigurumi patterns.
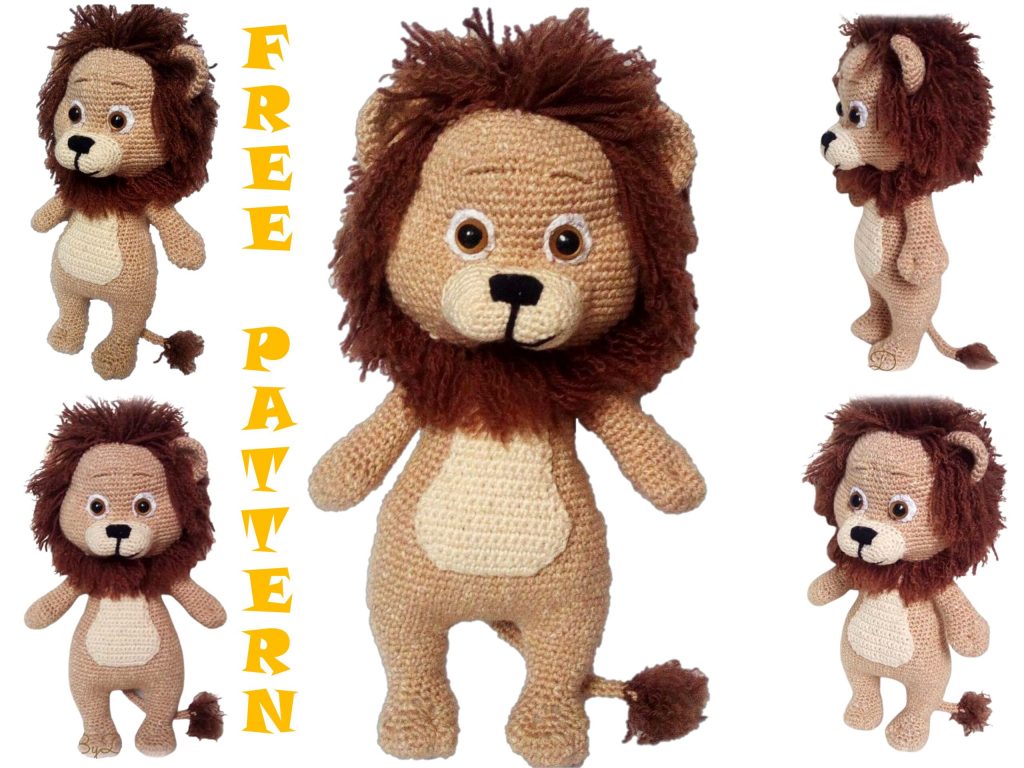
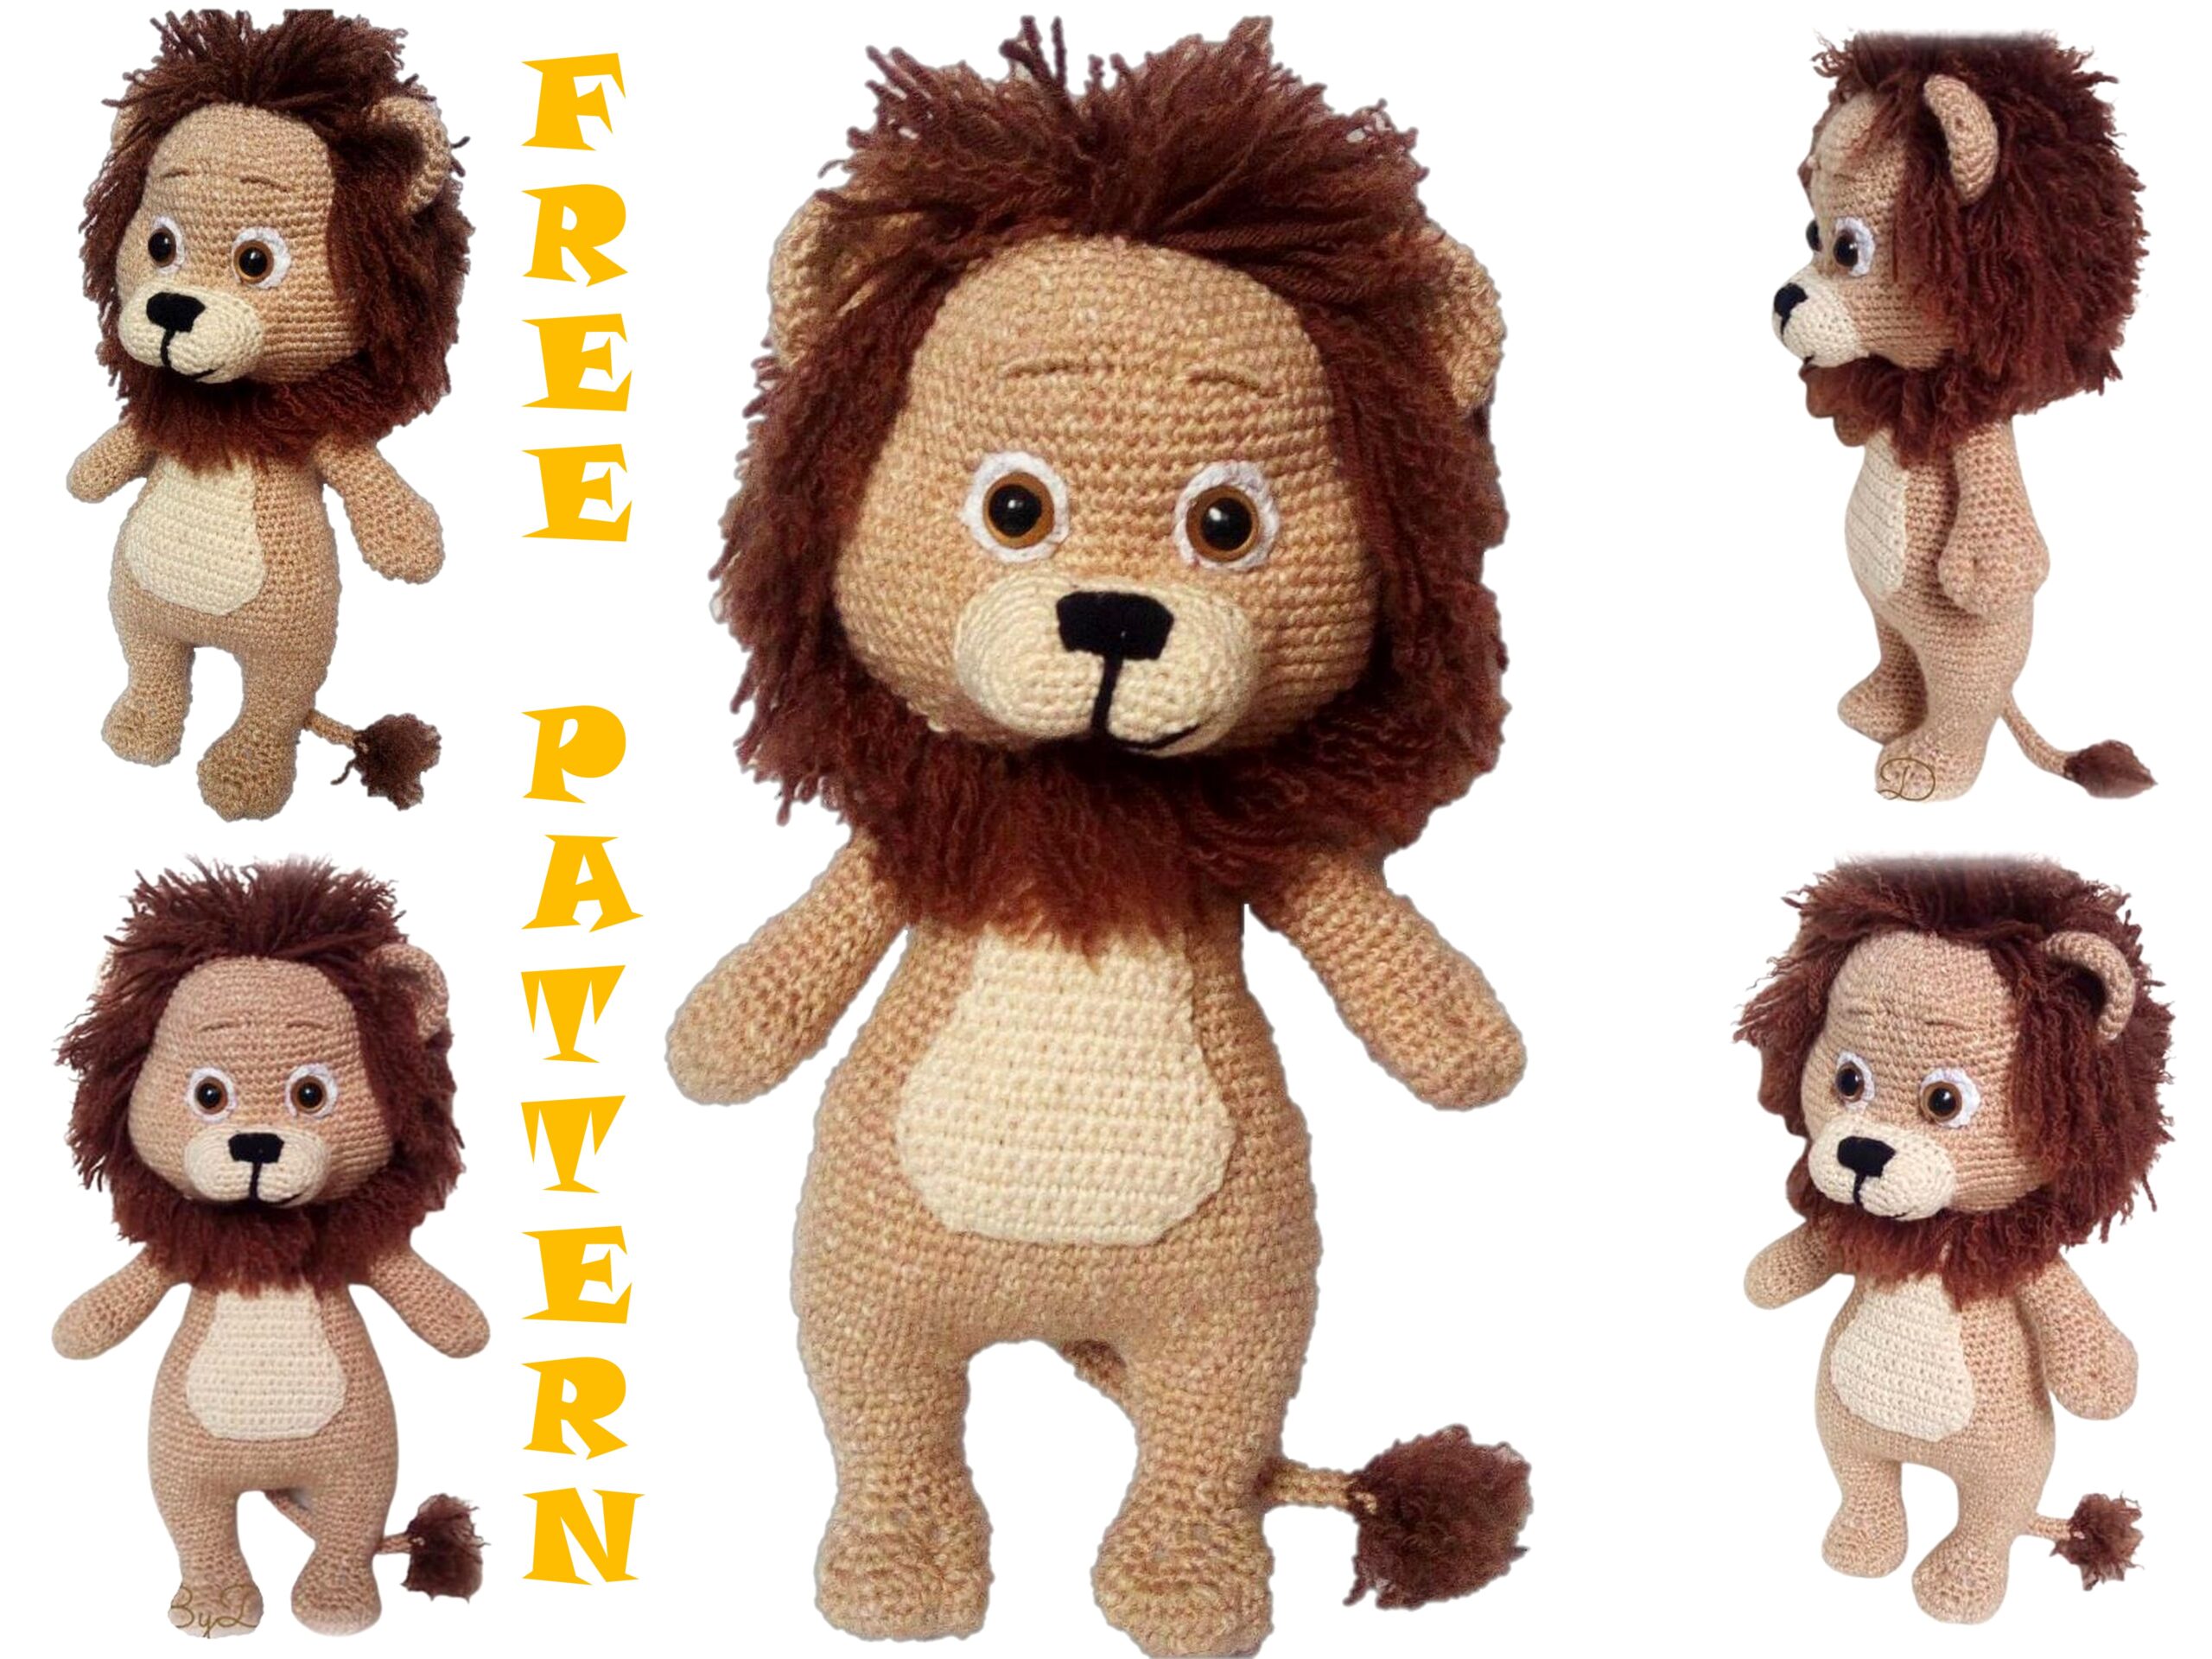
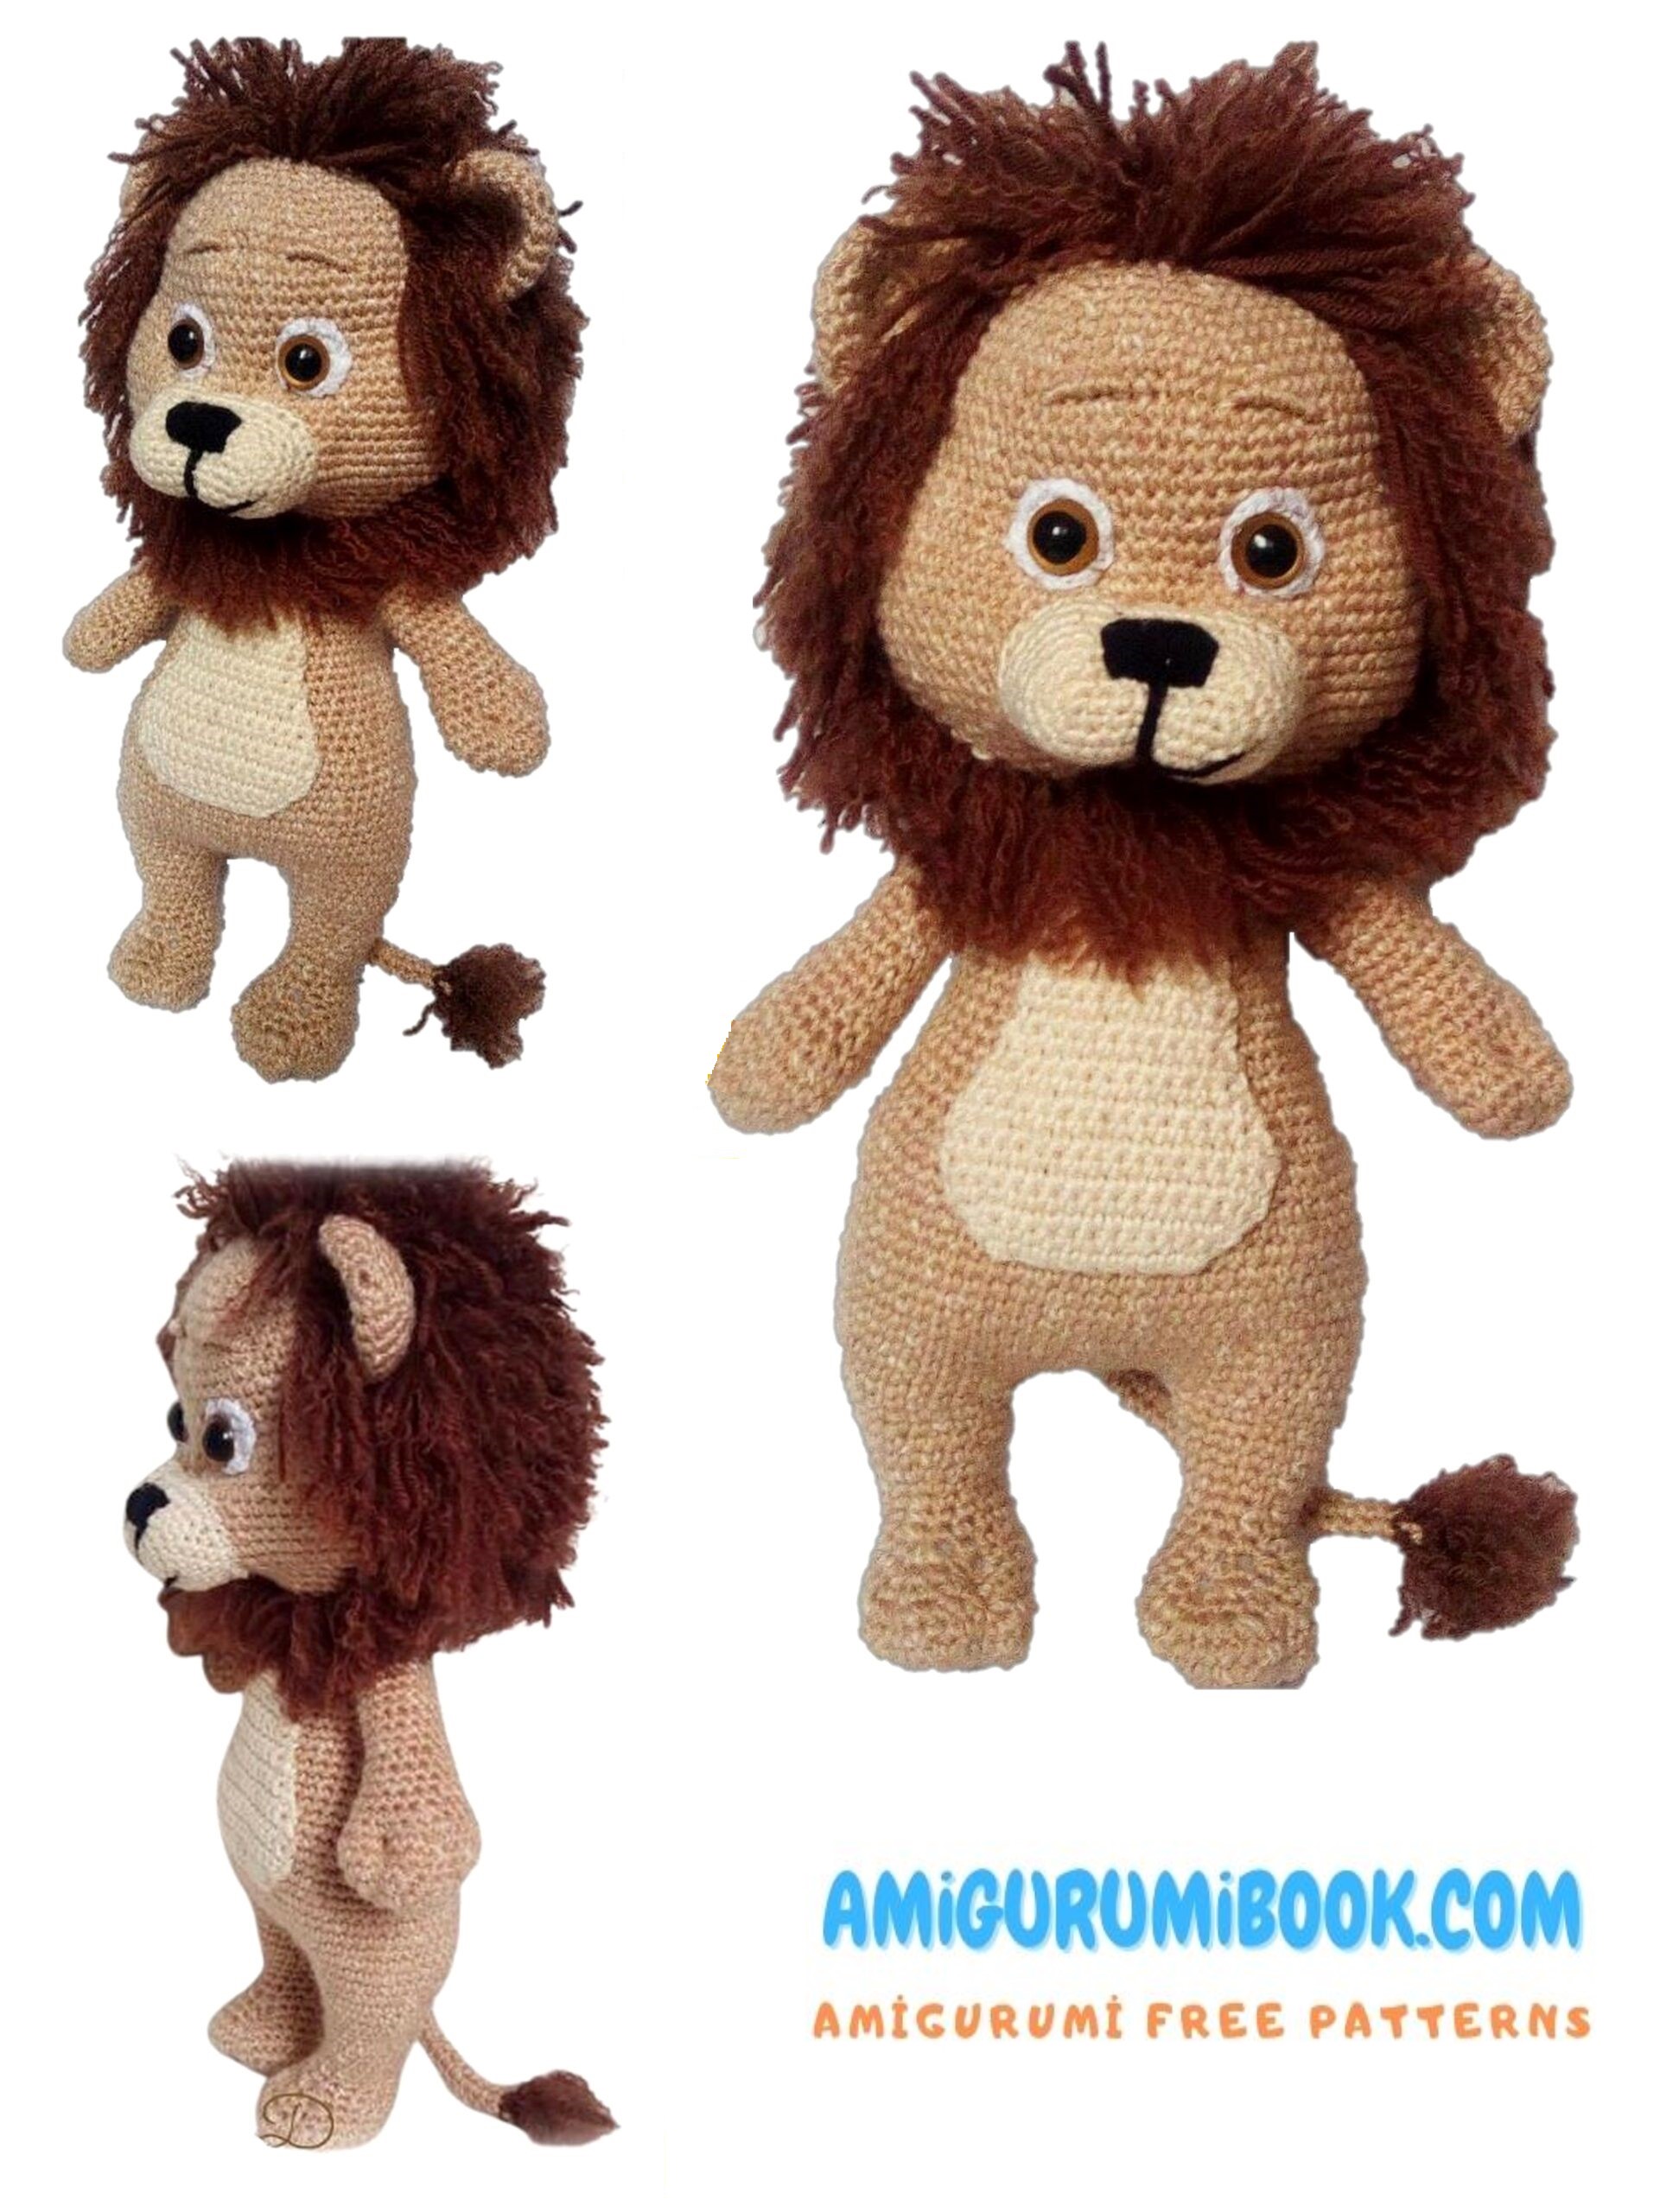
Amigurumi animal patterns are available for free on this site with the best quality models. In this article, amigurumi lion free pattern is with you.
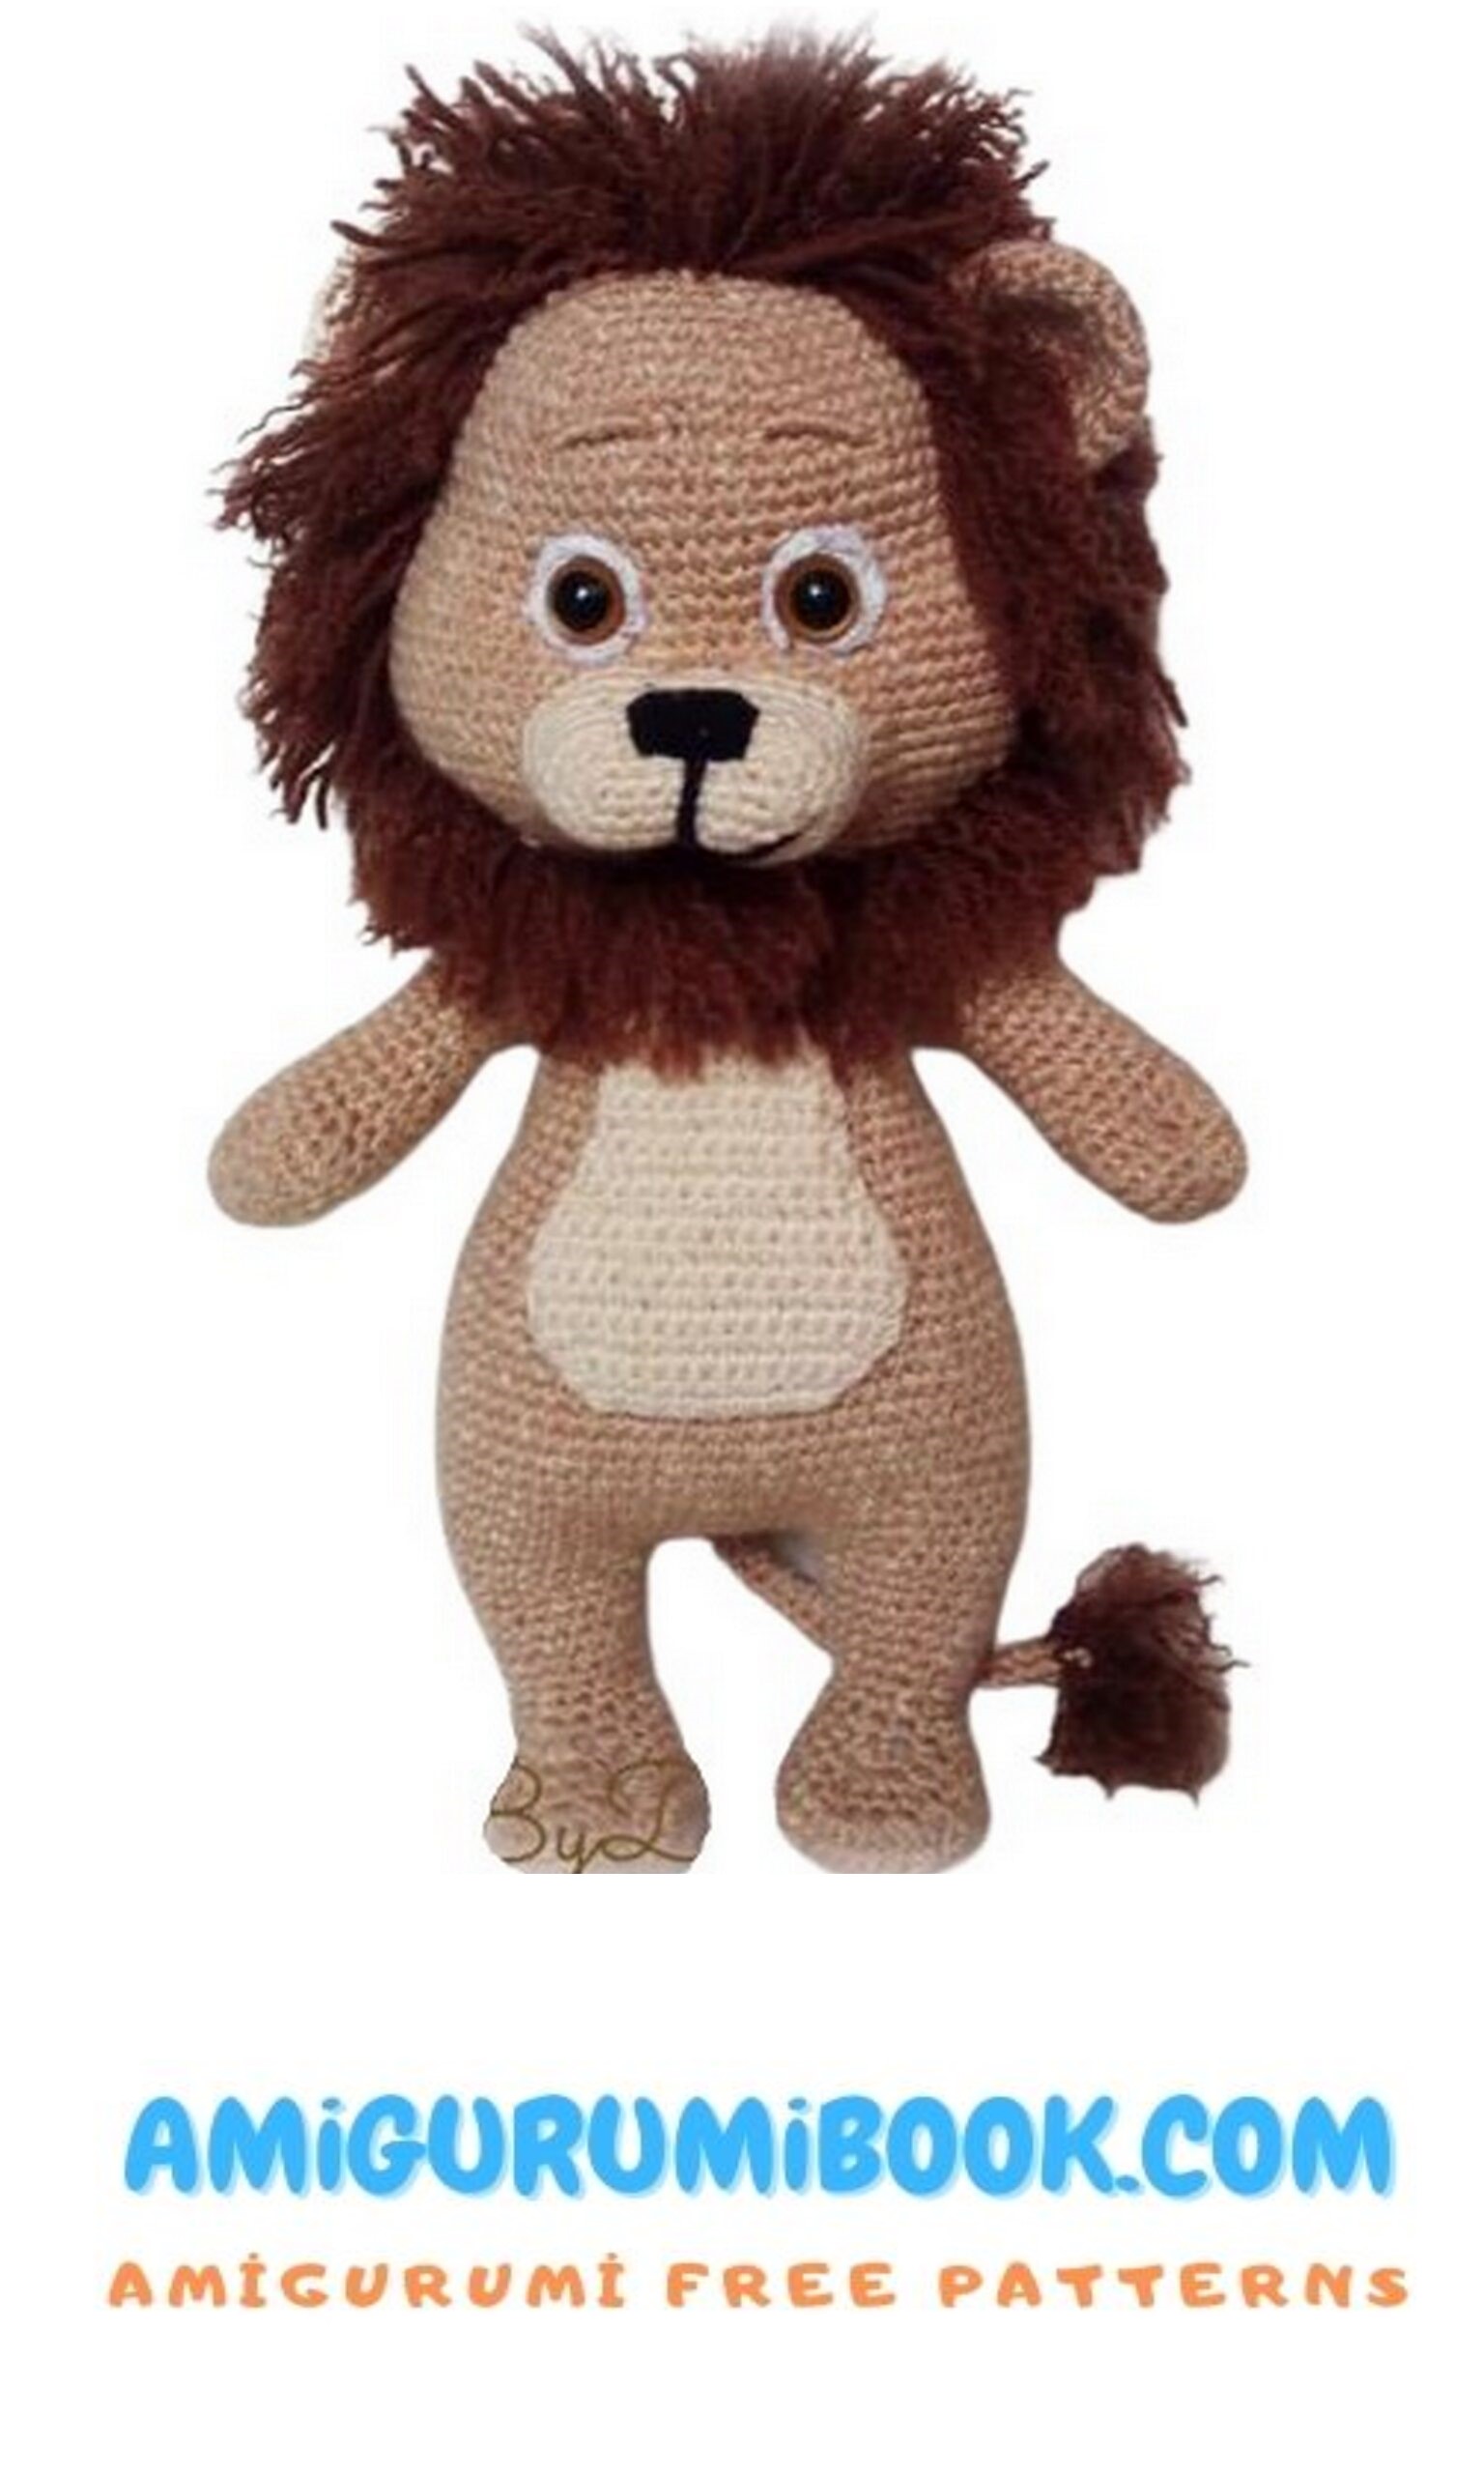
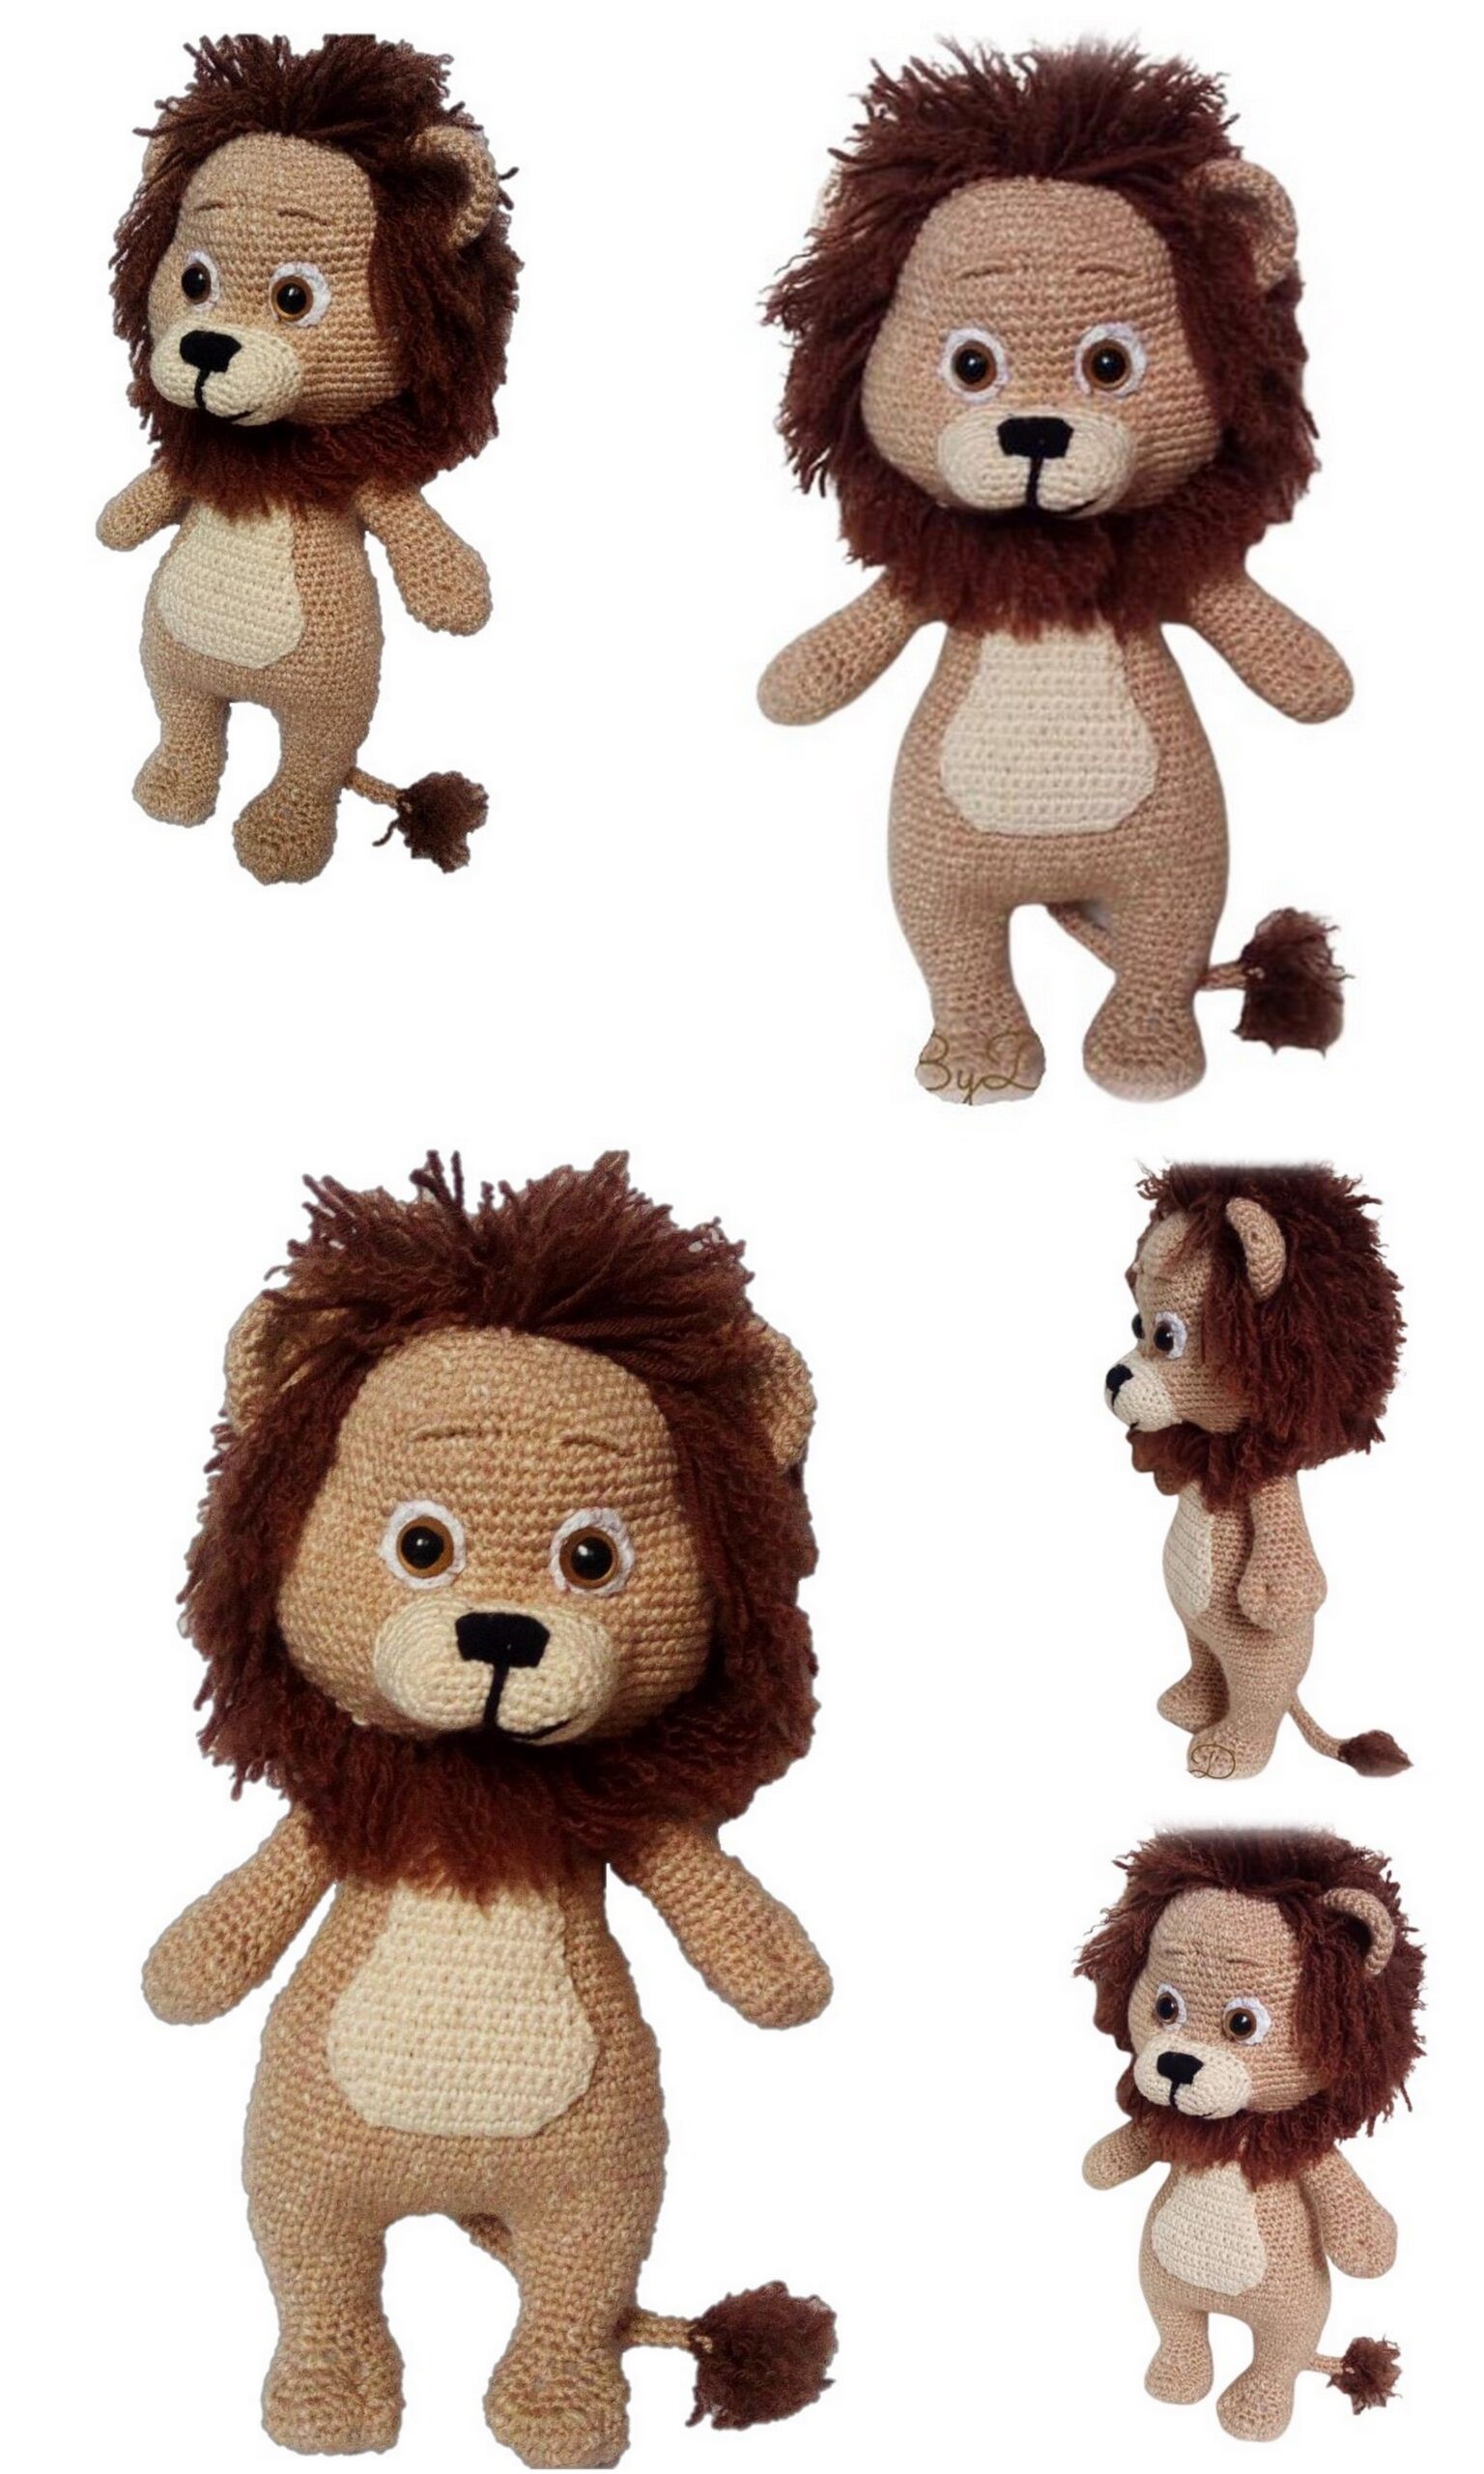
Kimba the lion
Level: Intermediate
Kimba the lion
This pattern is suitable for intermediate crocheters.
The finished toy is appr. 33 cm high if using the yarn listed in the materials.
Materials used :
– 100 g Nako Natural Bebe yarn( beige )
– Appr. 60 g Schachenmayr Baby Smiles Bravo Baby (dark brown)
– Appr. 8-10g Camilla cotton (light beige) – for the muzzle and belly patch
– A little amount of any black yarn for embroidering the nose
– A bit of white yarn for the eyeballs
– Hook: 2.5 mm
– Safety eyes
– Filling
– Long needle
Abbrevations:
Mr – magic ring
CH – chain
Sl St – slip stitch
Sc – single crochet
Inc – increase
Dec – decrease
If not instructed otherwise, always work in continuous rounds.
PATTERN
Head
1. 6 sc in mr
2. 6 x inc (12)
3. (1 sc, inc) -6x (18)
4. (2 sc, inc) -6x (24)
5. (3 sc, inc) -6x (30)
6. (4 sc, inc) -6x (36)
7. (5 sc, inc) -6x (42)
8. (6 sc, inc) -6x (48)
9. (7 sc, inc) -6x (54)
10.. (8 sc, inc) -6x (60)
11.-16. 60 sc
17. 6 sc, (1 sc, inc)-6x, 16 sc, (inc, 1 sc) -6x, 14 sc (72)
18. 72 sc
19. 9 sc, (2 sc, inc) -3x, 26 sc, (inc, 3 sc) -3x, 19 sc (78)
20.-28. 78 sc
29. 12 sc, (1 sc, dec) – 16 x, 18 sc (62)
30. 4 sc, dec, 44 sc, dec, 10 sc (60)
31. 60 sc – begin to fill gradually
32. ( 8 sc, dec) -6x (54)
33. (7 sc, dec) -6x (48)
34. (6 sc, dec) -6x (42)
35. (5 sc, dec) -6x (36)
36. (4 sc, dec) -6x (30)
37. (3 sc, dec) -6x (24)
38. (2 sc, dec) -6x (18) – finish, fasten off.
Safety eyes should be here
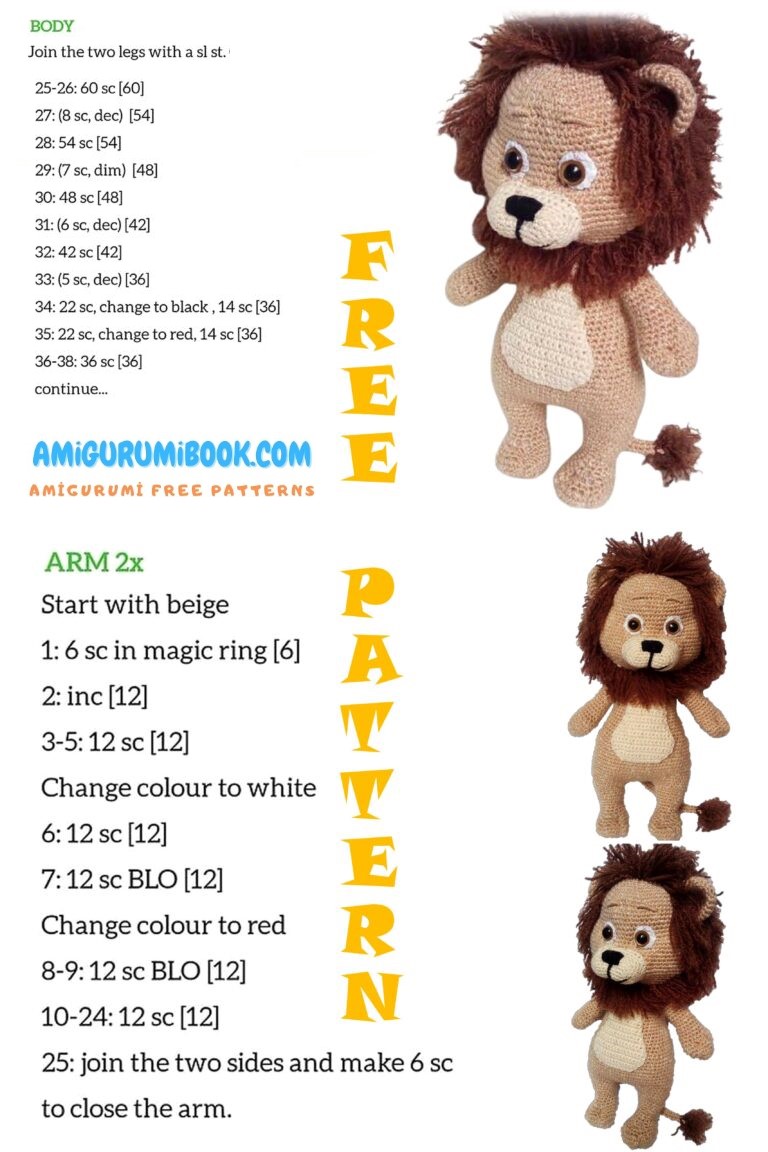
Arms (2x)
1. 6 sc in mr
2. 6 x inc (12)
3. (1 sc, inc) -6x (18)
4. (2 sc, inc) -6x (24)
5. (3 sc, inc) -6x (30)
6. 30 sc – fill gradually
7. (3 sc, dec) -6x (24)
8. (2 sc, dec) -6x (18)
9.-11. 18 sc
12. (4 sc, dec) -3x (15)
13.-17. 15 sc
18. (3 sc, dec) -3x (12)
19.-24. 12 sc – finish, fasten off
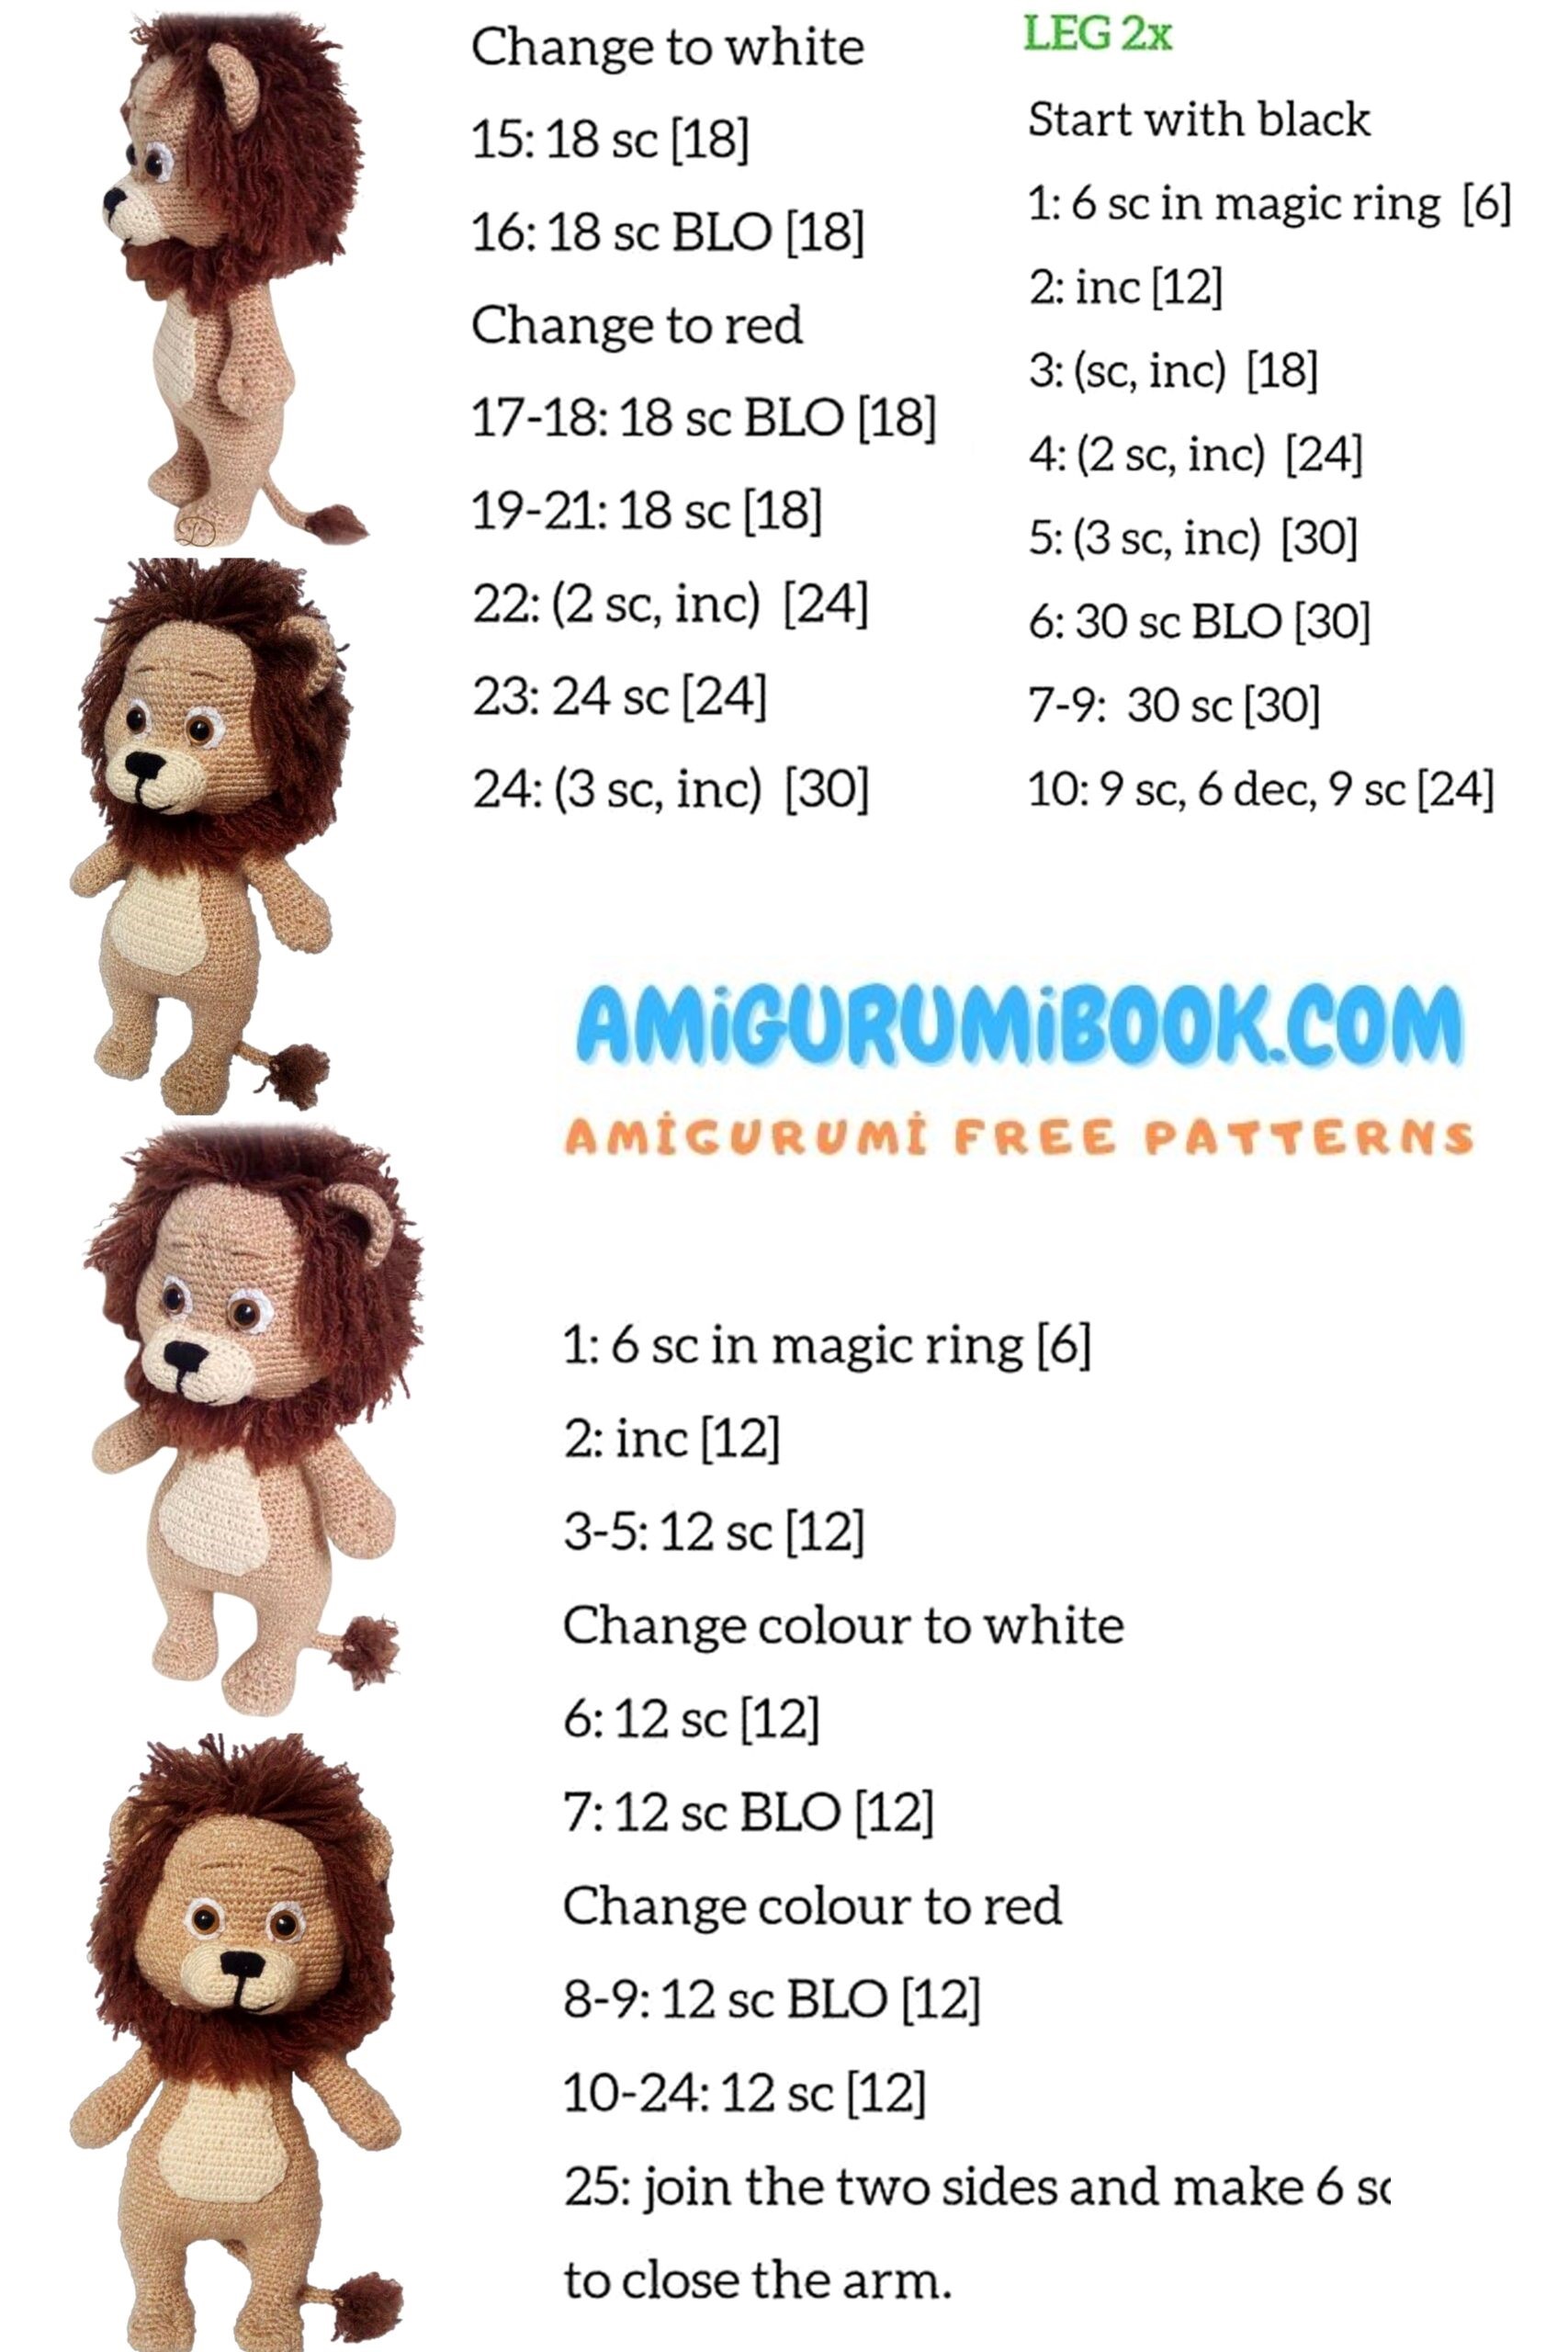
Legs
1. 6 sc in mr
2. 6 x inc (12)
3. (1 sc, inc) -6x (18)
4. (2 sc, inc) -6x (24)
5. (3 sc, inc) -6x (30)
6. 30 sc – start filling
7. 9 sc, 6 x dec, 9 sc (24)
8. 24 sc
9. 8 sc, 4 x dec, 8 sc (20)
10. 8 sc, 2 x dec, 8 sc (18)
11. ( 4 sc, dec) -3x (15)
12.-13. 15 sc
14. (4 sc, inc) -3x (18)
15. 18 sc
16. (2 sc, inc) -6x (24)
17.-18. 24 sc – finish, fasten off. Do the 2nd leg the same way.
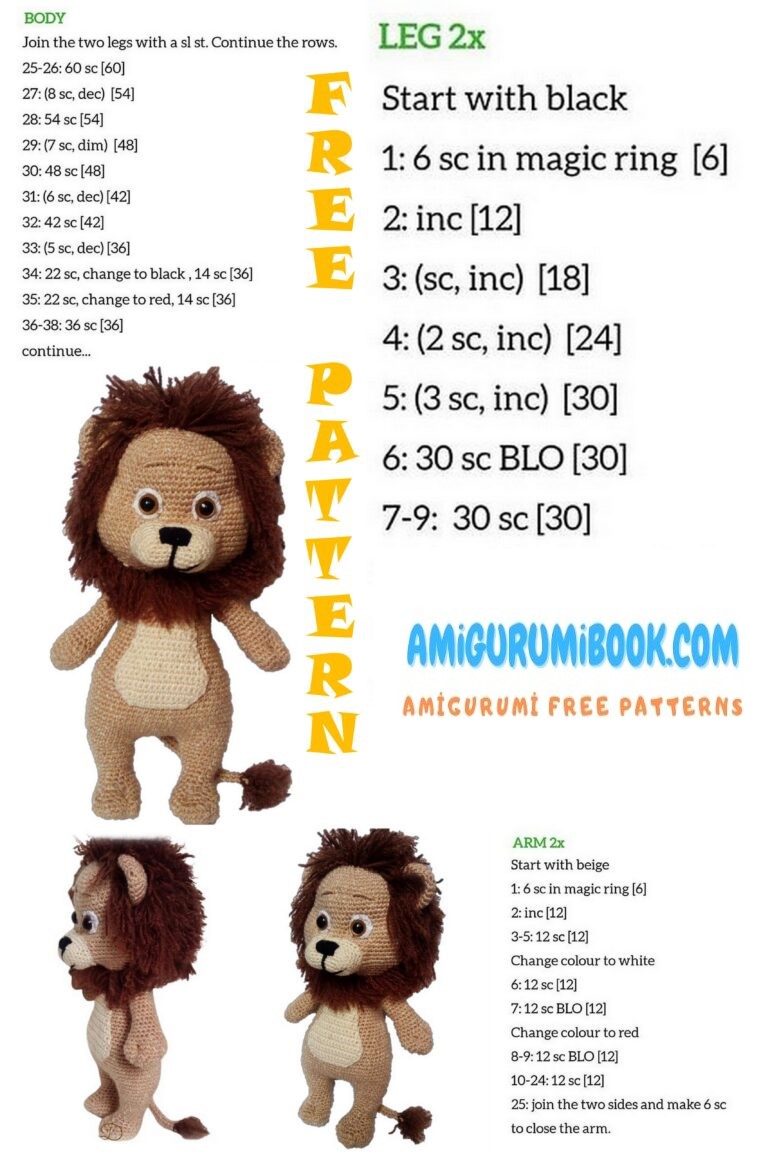
Body
Take both legs and align them to each other. From the middle of the inside part make 6 chains and join the other leg with a slip stitch.
Beginning in the same stitch continue like this:
1. 24 sc around the leg, 6 sc in the chains, 24 sc around the 2nd leg, 6 sc into the front part of the chains (you should have 60 sc)
2. 60 sc
3. (9 sc, inc) -6x (66)
4. (10 sc, inc) -6x (72)
5. -11. 72 sc
12. (10 sc, dec) -6x (66)
13.-14. 66 sc
15. ( 9 sc, dec) -6x (60)
16. 60 sc – fill gradually
17. (8 sc, dec) -6x (54)
18. (7 sc, dec) -6x (48)
19.-21. 48 sc
22. 14 sc, dec, 21 sc, dec, 9 sc (46)
23. 46 sc
24. 14 sc, dec, 20 sc, dec, 8 sc (44)
25.-26. 44 sc
27. 16 sc, dec, 19 sc, dec, 7 sc (42)
28. 42 sc
If your last sc is somewhere as mine(pic.1.)), continue to crochet 4-5 sc, until you reach the aprroximate middle of the body – there will be the beginning of the next round (mark it!)
Continue from here:
29. 7 sc, align one arm to the body (as in the picture) and crochet 6 sc of the body and the arm together.(pic. 1-2-3.)..
Continue with 15 sc, attach the 2nd arm with 6 sc, 8 sc (42)
30. 7 sc, 6 sc on the outside part of the arm, 15 sc, 6 sc on the other arm, 8 sc (42)
If you are not able to attach the arms this way, you can crochet the body normally (rounds 29.-30. 42 sc) and then later sew the arms to their places.
31. (5 sc, dec) -6x (36)
32. (4 sc, dec) -6x (30)
33. (3 sc, dec) -6x (24)
34. (2 sc, dec)- 6x (18)
35. 18 sc – finish, fasten off. Leave longer tail of yarn for sewing the body to the head.
Muzzle
Chain 9 – you are going to work around these chains.
Begin in the 2nd ch from the hook:
1. inc, 6 sc, 3 sc in the next ch, 7 sc (18)
2. 2 x inc, 6 sc, 3x inc, 6 sc, inc (24)
3. (1 sc, inc) -2x, 6 sc, (1 sc, inc)-3x, 6 sc, (1 sc, inc) -1x (30)
4.-6. 30 sc –fasten off, leave longer tail at the end.
Ears (2x)
1. 6 sc in mr
2. 6 x inc (12)
3. (1 sc, inc) -6x (18)
4. (2 sc, inc) -6x (24)
5.-8. 24 sc
9. (2 sc, dec) -6x (18)
10.-11. 18 sc – fasten off
Belly patch
Here you are going to crochet in rows, always turning your work at the end of each row.
Chain 12, begin your first row in the 2nd chain from the hook:
1. 11 sc, turn, Ch 1
2. inc, 9 sc, inc , turn, Ch 1 (13)
3. Inc, 11 sc, inc , turn, Ch 1 (15)
4. Inc, 13 sc, inc, turn, Ch 1 (17)
5.-7. 17 sc
8. dec, 13 sc, dec, turn, Ch 1 (15)
9. 15 sc, turn, Ch 1 (15)
10. dec, 11 sc, dec, turn, Ch 1 (13)
11. 13 sc, turn, Ch 1 (13)
12. dec, 9 sc, dec, turn, Ch 1 (11)
13.-15. 11 sc, turn, Ch 1 (11)
16. dec, 7 sc, dec, turn, Ch 1 (9)
17. 9 sc, turn, Ch 1 (9)
18. dec, 5 sc, dec (7) – fasten off, leaver longer yarn for sewing
White eyeballs (2x)
1. 6 sc in mr
2. 6 x inc (12) – finish, fasten off. I put the safety eyes in the middle.
You can use a piece of white felt instead of crocheting this part, or you do not even have to crochet it. It is up to you.
Tail
Chain 36 and beginning in the 2nd ch from the hook crochet :
1. 35 sc, turn, Ch 1
2.-3. 35 sc -fasten off , leave long tail of yarn for sewing
Now fold the tail lengthwise and sew the edges together.
Assembly
If you were working according to the instructions, you have the body and the arms in their places. You just need to sew the head to the body.
If you decided to attach the arms later, you should do it now.
Now you can go on with shaping the face. For this you will need a longer needle and appr. 30 cm yarn (color of the body).
Step 1. Find the middle of the head, near the bottom and stick your needle into the head…
As you can see, I did not have the safety eyes on the face yet, I preferred glueing them there later, because their place sometimes depends on how my shaping comes out.
Step 2. Come out with your yarn and needle at point 2., a bit to the left from the center of the head.
(note: if you have the safety eyes already there, you come out under the eye).
Important! When you pull out the yarn from the head, make sure you leave at least a 8-10 cm long tail sticking out from the head at point 1, where you began.
Step 3. Now one row bellow, 2-3 stitches to the left, stick your needle into the head (point 3.) and going through the head come out at the beginning point.
The whole process now has to be repeated symmetrically, on the other side of the head, so continue like this:
Step 4. From point 1. go through the head to point 4.(on the right side)..
Step 5. Pull out the needle, stick it again into the head at point 5. and pulling through the head come out at point 1.
The head now should look like this.
You can put aside the needle now.
All you need to do now is take the 2 leftover yarn tails into your hands and pull them simultaneously downwards. This way the cheeks will form. The depth of the shape will depend on how strong you pull the yarn. If you are satisfied with the outcome, tie a knot on your yarns and hide them inside the head with your crochet hook.
Next you can sew the ears to the head. I am really sorry, I forgot to take a picture about this step, so I am showing you their places with arrows:
As the next step, sew on the belly patch and the muzzle – Do not forget to fill the muzzle first!
And now comes the most timeconsuming part: making the mane (hair).
There are more ways to do it, the most simple is to find a piece of faux fur and sew or glue it to the head. I did not have any, so I had to knot each piece separately to the head.
For this you will need appr. 70 g of dark brown yarn. I cut 8-10 cm long pieces of yarn. You can cut them as long as you wish.
Stick your hook into a stitch on the head..
Fold the yarn in half and partly pull it through the stitch..
Now you have a little loop on one side – pull the remaining yarn ends through the loop and tigthen it.
I made this on the whole back part of the head, on the sides bellow the ears and also in front, around the neck. It is up to you how many of these pieces are you going to attach to the head. I did not make them very dense, because at the end I have combed out the yarn , so it became dense by itself.
If you do not have the eyes in their places, now you can glue them on and with a piece of black yarn embroider the nose. I have also divided the muzzle with a black line.
We still have a little detail that has to be done on the tail.
Cut at least 10 pieces of appr. 8 cm long brown yarn. Take 3-4 of them and pull them through the end tip of the tail.
Simply tie them into a knot.
Then take the remaining yarnpieces and in the same way as on the head, attach them to the tail.
Comb out the yarn and cut it into shape.
The tail itself can be now attached to the body.
If I did not forget anything, I think our little lion is finished and ready to see the world.