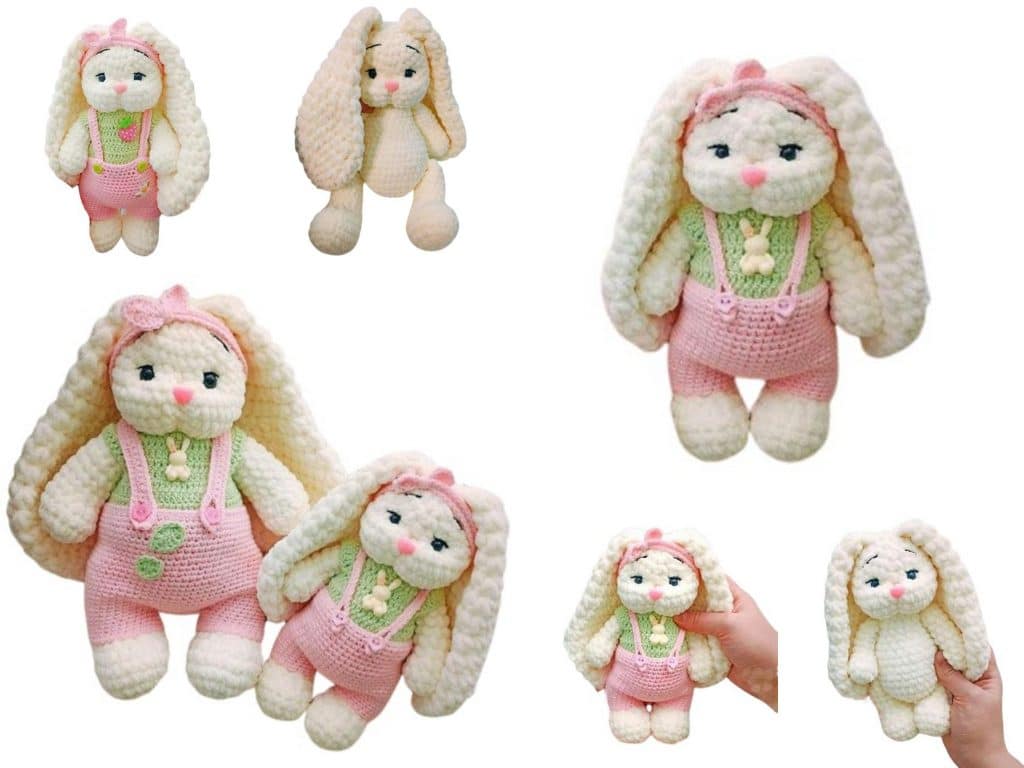
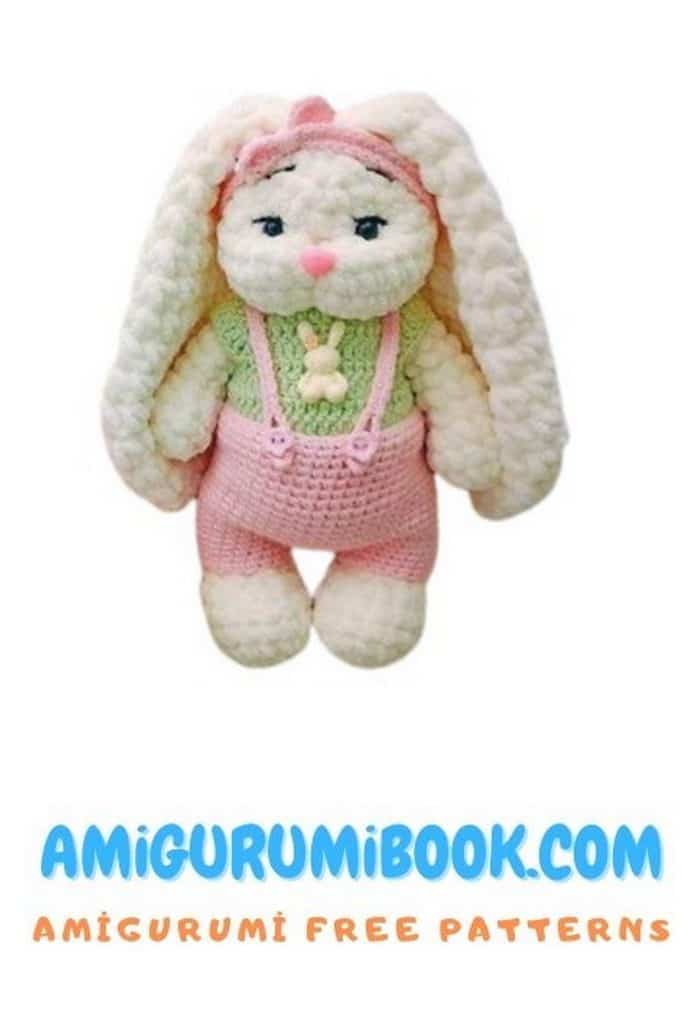
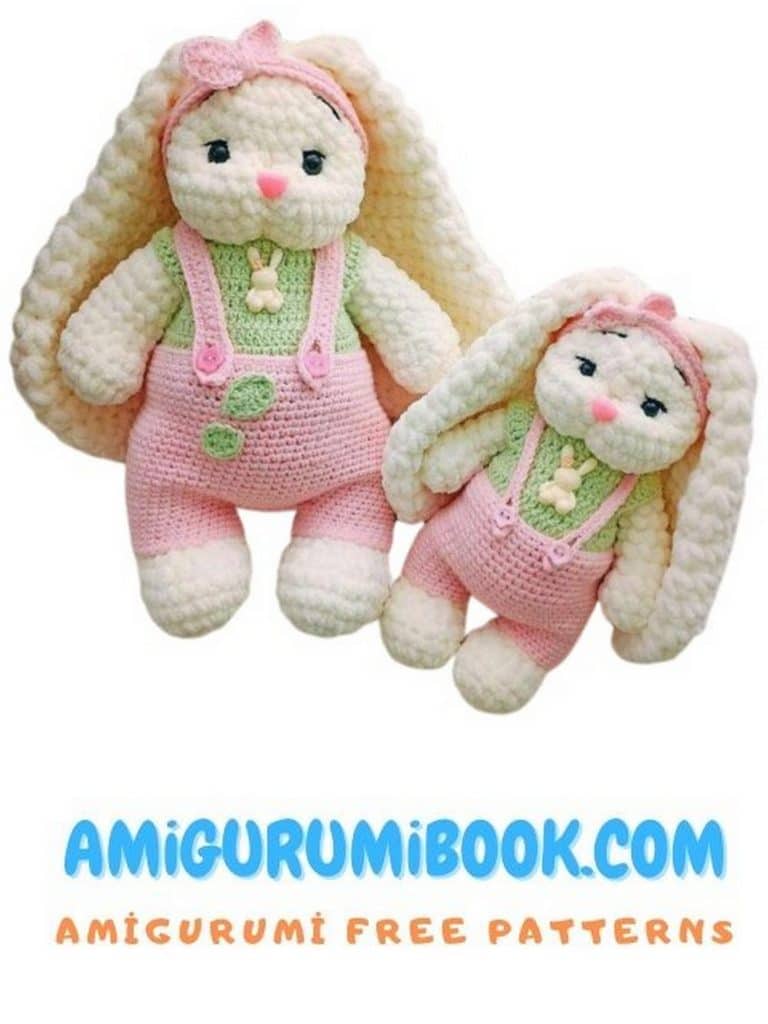
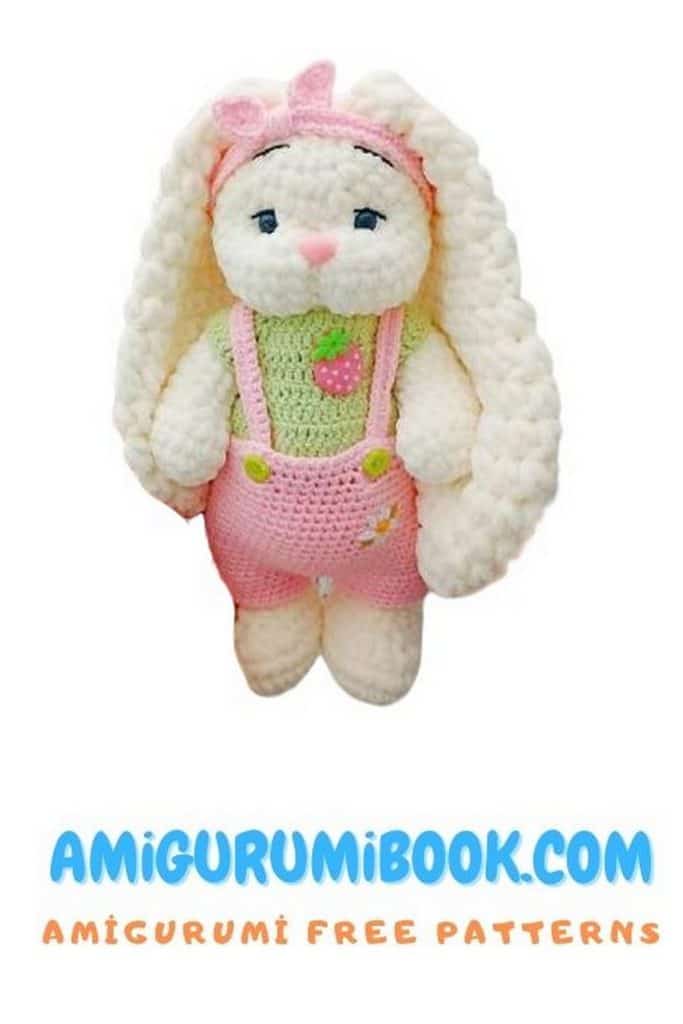
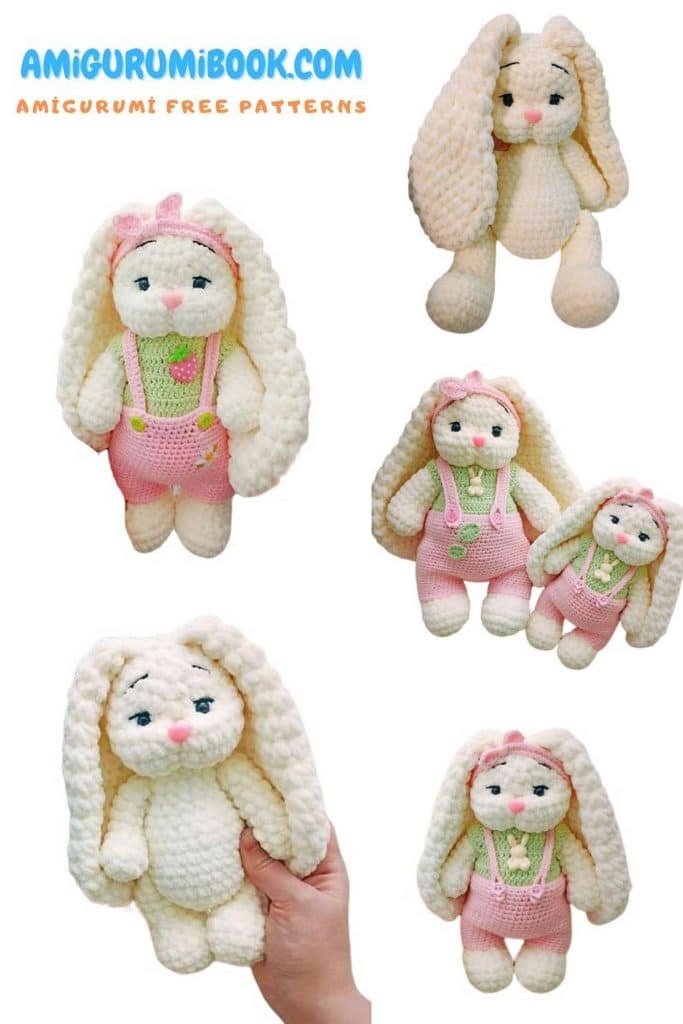
Meet Bunny Bu – an irresistibly cute crochet bunny that’s perfect for spring gifts, baby showers, or your amigurumi collection! This Bunny Bu Free amigurumi pattern is beginner-friendly and includes clear step-by-step instructions to help you crochet an adorable bunny with floppy ears, tiny paws, and a sweet expression.
Whether you’re new to amigurumi or a seasoned crocheter, this pattern is a fun and relaxing project made using soft yarn and basic stitches. Bunny Bu makes a charming handmade gift or a lovable toy for little ones.
Bunny Bu amigurumi free pattern and start creating your own lovable bunny today!
If you want to access 1000+ free amigurumi patterns, you can download our application from this link!
ABBREVIATIONS
MR – magic ring
hdc – half double crochet
ch – chain
sc – single crochet
dec – decrease
inc – increase
sl st – slip stitch
*x – repeat as many times as indicated
MATERIALS FOR BUNNY BU
Yarn: WOLANS Bunny Baby 100-02 – 2 skeins
Semi-cotton yarn for sculpting and facial details
Sewing thread
12 mm black safety eyes
17 mm x 12 mm pink velvet safety nose
Crochet hooks: 3.5 mm and 6.0 mm (for ears)
Yarn needle (for plush yarn) and regular sewing needle
Stitch marker
Scissors
Stuffing
Optional: Moment Crystal glue
MATERIALS Little Bunny
Yarn: WOLANS Bunny Baby 100-02 – 1 skein
Semi-cotton yarn for sculpting and facial details
Sewing thread
8 mm black safety eyes
10 mm x 10 mm pink velvet safety nose
Crochet hooks: 3.5 mm and 5.0 mm (for ears)
Yarn needle (for plush yarn) and regular sewing needle
Stitch marker
Scissors
Stuffing
Optional: Moment Crystal glue
PATTERN – Amigurumi Bunny Bu
Legs (make 2): – Amigurumi Bunny Bu
1: Ch 8, starting in 2nd ch from hook: inc, 5 sc, 3 sc in last ch; continue on other side: 4 sc, place marker (16)
2: (inc, 1 sc) x3, 1 sc, (inc, 1 sc) x3, 3 sc (22)
3: (1 sc, inc) x4, 3 sc, (1 sc, inc) x4, 3 sc (30)
4-5: 30 sc (2 rounds)
6: 1 sc, 5 dec, 3 sc, 1 dec, 10 sc, 1 dec, 2 sc (23)
7: 1 sc, 3 dec, 16 sc (20)
8: 1 sc, 2 dec, 15 sc (18)
Stuff legs gradually
9-15: 18 sc (7 rounds)
Then: 4 sc, fold the piece in half and crochet through both sides: dec, 5 sc, dec (7) — decreases on sides
Fasten off, cut the yarn, hide the tail inside the leg. Make a second leg the same way.

Arms (make 2): – Amigurumi Bunny Bu
1: 6 sc in MR (6)
2: 6 inc (12)
3: (1 sc, inc) x6 (18)
4: 18 sc
5: 2 sc, 3 dec, 10 sc (15)
6: 3 sc, 1 dec, 10 sc (14)
7-12: 14 sc (6 rounds)
Stuff arms gradually
Then: 5 sc, fold piece in half and crochet through both sides: dec, 3 sc, dec (5) — decreases on sides
Fasten off, cut yarn, hide tail inside the arm. Make second arm the same.
Tail:
1: 6 sc in MR (6)
2: 6 inc (12)
3: 6 dec (6)
sl st, cut yarn — no stuffing needed.
Body: – Amigurumi Bunny Bu
1: 6 sc in MR (6)
2: 6 inc (12)
3: (1 sc, inc) x6 (18)
4: (2 sc, inc) x6 (24)
5: (3 sc, inc) x6 (30)
6: (4 sc, inc) x6 (36)
7: (5 sc, inc) x6 (42)
8: 42 sc
Attach legs here.
The designer notes that attaching legs with only one round makes them dangle and look untidy. They recommend crocheting two rounds together with the body for a cleaner result.
First round: crochet through the inside of the last leg round
Second round: crochet through the round where legs are folded in half
A detailed video is available in the designer’s group.
9: 3 sc, 7 sc through leg (inner side), 14 sc, 7 sc through second leg, 11 sc (42)
10: 3 sc, 7 sc through folded leg round, 14 sc, 7 sc through other leg, 11 sc (42)
11-13: 42 sc (3 rounds)
Shift marker after 1 sc
Stuff body gradually
14: 3 sc, 7 sc (above leg), 1 sc, (dec, 1 sc) x4, 1 sc, 7 sc (above other leg), 11 sc (38)
15: 6 sc, dec, 14 sc, dec, 14 sc (36)
16: (4 sc, dec) x6 (30)
17: (3 sc, dec) x6 (24)
18-20: 24 sc (3 rounds)
21: 3 sc, 5 sc through arm, 7 sc, 5 sc through other arm, 4 sc (24)
Stuff body
sl st, fasten off and secure.
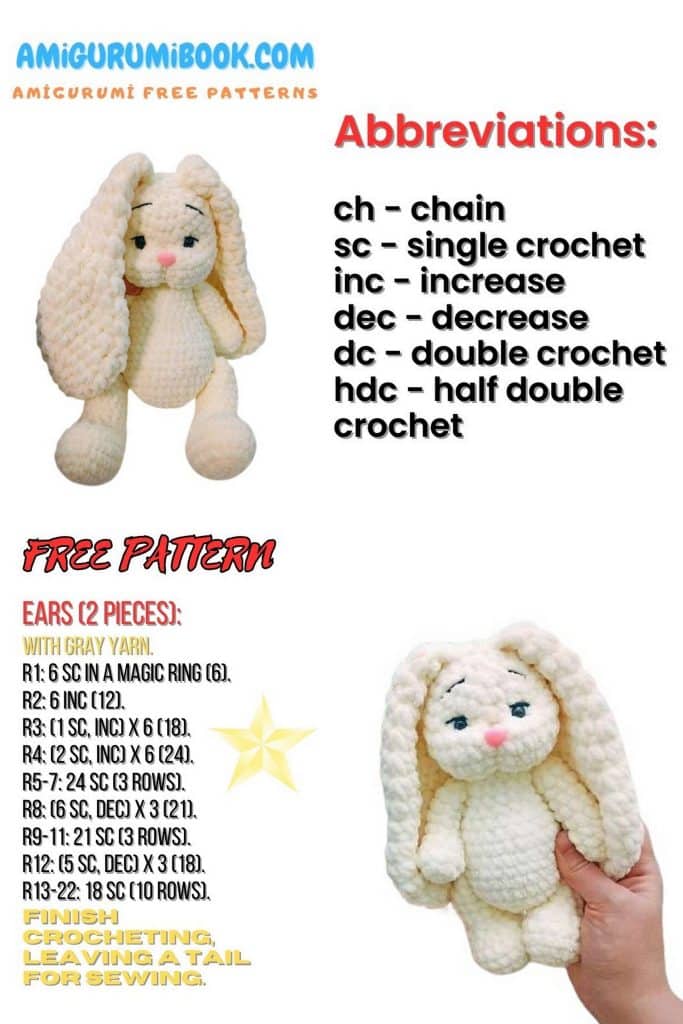

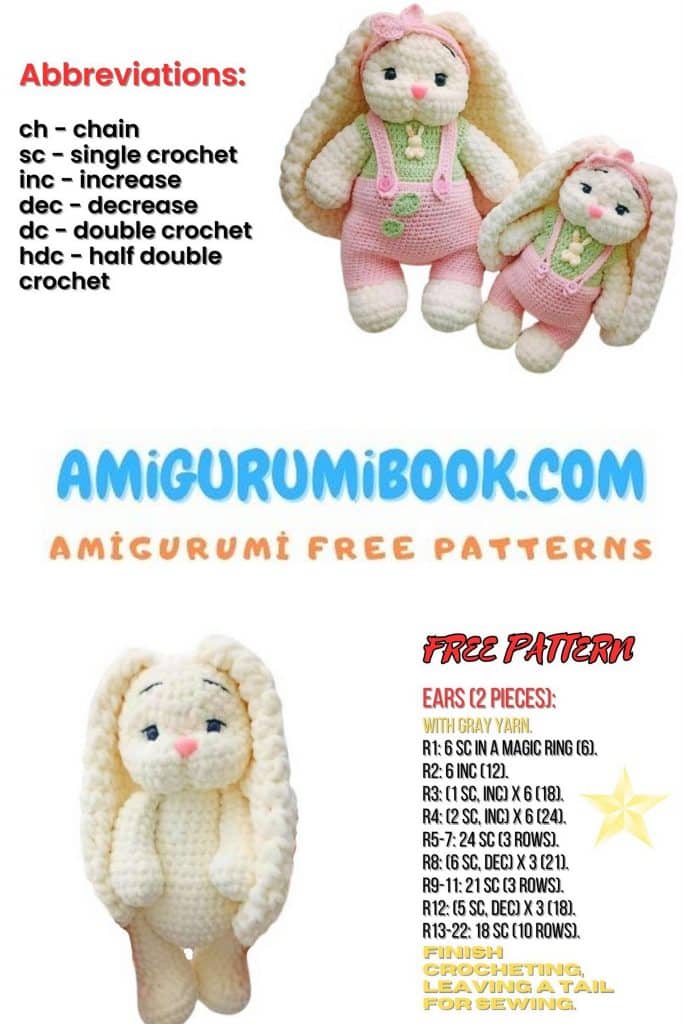
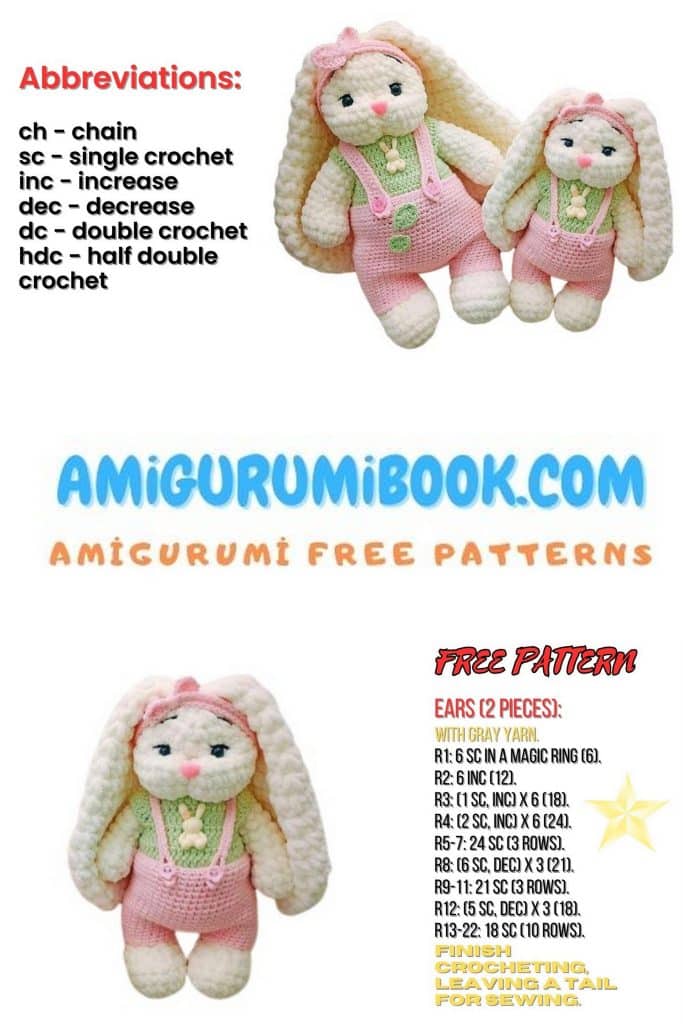
Ears (make 2): – Amigurumi Bunny Bu
Use 6.0 mm hook and hdc stitches. Do not stuff.
1: 6 hdc in MR (6)
2: 6 hdc (12)
3: (1 hdc, inc) x6 (18)
4: (2 hdc, inc) x6 (24)
5: (3 hdc, inc) x6 (30)
6: 6 hdc, dec, 13 hdc, dec, 7 hdc (28)
7: 6 hdc, dec, 12 hdc, dec, 6 hdc (26)
8: 5 hdc, dec, 11 hdc, dec, 6 hdc (24)
9: 5 hdc, dec, 10 hdc, dec, 5 hdc (22)
10: (3 hdc, dec) x4 (18)
Work 2 hdc more so the marker is centered at one side of the ear.
11: dec, 16 hdc (17)
Head: – Amigurumi Bunny Bu
1: 6 sc in MR (6)
2: 6 inc (12)
3: (1 sc, inc) x6 (18)
4: (2 sc, inc) x6 (24)
5: (3 sc, inc) x6 (30)
6: (4 sc, inc) x6 (36)
7: (5 sc, inc) x6 (42)
8-10: 42 sc (3 rounds)
11: 10 sc, dec, 2 sc, dec, 2 sc, dec, 22 sc (39)
12: 9 sc, dec, 2 sc, dec, 2 sc, dec, 20 sc (36)
The 2 sc between decreases should be aligned
13: 36 sc
14: (4 sc, dec) x6 (30)
15: (3 sc, dec) x6 (24)
Insert eyes between rounds 12 and 11 above the first and last dec in round 11, about 6 sc apart.
Stuff the head.
16: (2 sc, dec) x6 (18)
17: (1 sc, dec) x6 (12)
18: 6 dec (6)
Finish stuffing, close the hole, fasten off, and hide yarn inside the head.
12: 8 hdc, 1 dec from hdc, 7 hdc (16)
13: 1 dec from hdc, 14 hdc (15)
Crochet 2 hdc so that the stitch marker is centered on one side of the ear.
14: 7 hdc, 1 dec from hdc, 6 hdc (14)
15: 3 hdc, 1 dec from hdc, 5 hdc, 1 dec from hdc, 2 hdc (12)
16: 12 hdc (12)
17: 3 hdc, 1 dec from hdc, 4 hdc, 1 dec from hdc (10)
Now fold the ear in half. Using a 3.5 mm hook, crochet 5 hdc through both layers, fasten off, cut the yarn, and secure. Make the second ear the same way.
SHAPING THE HEAD
Create eye indentations using semi-cotton white yarn (YarnArt Jeans).
Take the head and insert the needle with the thread into the starting point of the first round of the head, bring it out at point “2”, pull the thread to “3” and bring it out at “1”. Pull tight. Tie a knot.
Then make the combination “1”–“4”–“5”–“1”. Pull tight and tie a knot.
Next, do the combo “1”–“6”–“7”–“1”. Tighten and tie.
Lastly, “1”–“8”–“9”–“1”. Tighten and tie.
With the same white thread, create the whites of the eyes. Use black thread for the eyelashes (just a simple line, or add one extra lash to the side if you like) and for the eyebrows. I don’t pull too tight. Sometimes I secure the thread with Kristall glue so the whites and lashes don’t shift on the eye.
If the nose has a safety back, break it off and glue the nose in place.
There is a detailed video in my group on how to shape and decorate the head.
ASSEMBLING THE BODY
Sew the head to the body using sewing thread in two rounds to prevent it from wobbling.
It’s best to sew several times so the head doesn’t tilt forward due to the heavy ears.
Sew on the tail. Sew the ears above the eyebrows, about 4–5 rounds higher, using sewing thread.
Bunny BU is ready!
LEGS (Make 2) – Amigurumi Bunny Bu
1: ch 5, starting from second ch from hook: 1 inc, 2 sc, 3 sc in last ch, continue on other side: 2 sc, place marker (10)
2: 2 inc, 3 sc, 2 inc, 3 sc (14)
3: (1 sc, 1 inc)2, 4 sc, 1 inc, 1 sc, 1 inc, 3 sc (18)
4–5: 18 sc (2 rounds) (18)
Stuff the legs gradually.
6: 1 sc, 3 dec, 11 sc (15)
7: 1 sc, 2 dec, 10 sc (13)
8: 13 sc (4 rounds) (13)
Crochet 3 sc, fold the piece in half and crochet through both layers: 1 dec, 2 sc, 1 dec (4) (decreases on the sides).
Fasten off, cut yarn, and hide inside the leg. Make the second leg the same way.
ARMS (Make 2) – Amigurumi Bunny Bu
1: 6 sc in MR (6)
2: 6 inc (12)
3: 12 sc (1 round) (12)
4: 1 sc, 3 dec, 5 sc (9)
5–9: 9 sc (5 rounds) (9)
Stuff the arms gradually.
Crochet 3 sc, fold the piece in half (one stitch will be at the fold), and crochet through both layers: 1 dec, 2 sc (3).
Fasten off, cut yarn, hide the tail inside. Make the second arm the same way.
TAIL
1: 6 sc in MR (6)
2–3: 6 sc (2 rounds) (6)
Sl st, cut yarn. Stuffing is optional.
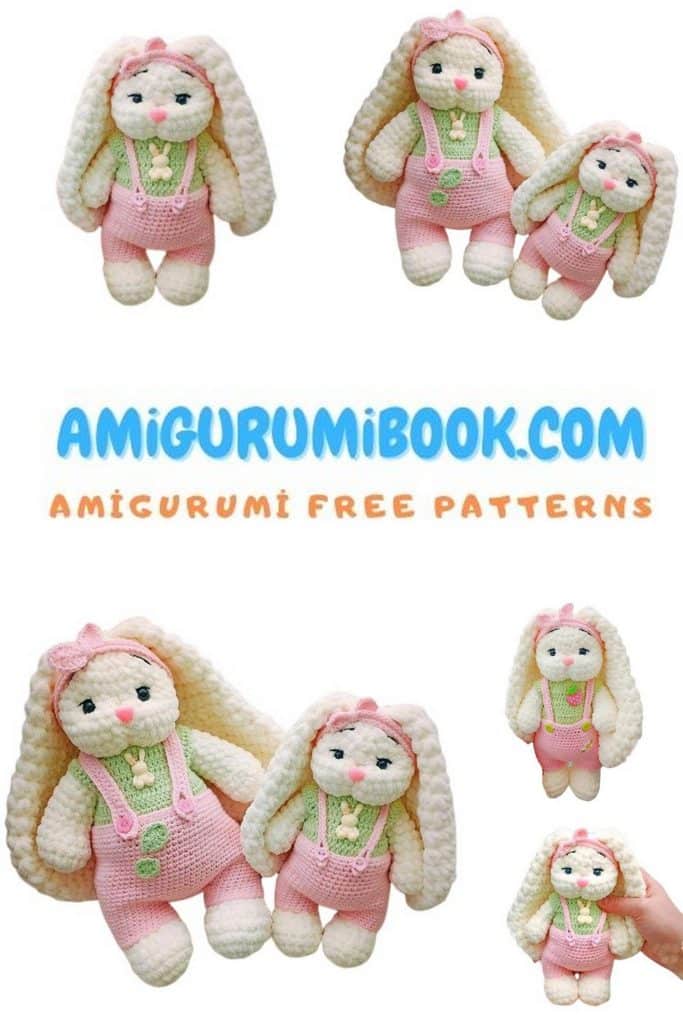
CROCHETING LITTLE BUNNY BUBU
BODY
1: 6 sc in MR (6)
2: 6 inc (12)
3: (1 sc, 1 inc) * 6 (18)
4: (2 sc, 1 inc) * 6 (24)
5: (3 sc, 1 inc) * 6 (30)
6: 30 sc (30)
The stitch marker goes along the back. Attach the legs.
I don’t like when legs are joined with just one row — they look messy and hang too loosely. I crochet two rows together with the legs.
In the first row, I crochet the last row of the leg along the inner side.
In the second row, I crochet the row where the leg is folded in half.
There is a detailed video in my group where I show how to attach the legs.
7: 3 sc, 4 sc with leg (working through the last row of the leg on the inner side), 11 sc, 4 sc with leg (same), 8 sc (30)
8: 3 sc, 4 sc with leg (through the folded row), 11 sc, 4 sc with leg (same), 8 sc (30)
9: 3 sc, 4 sc, 1 sc, (1 sc, 1 dec) * 3, 1 sc, 4 sc, 8 sc (27)
Work 1 sc, move marker. Begin stuffing the body gradually.
10: 6 sc, (2 sc, 1 dec) * 1, 2 sc, (2 sc, 1 dec) * 1, 3 sc, 8 sc (25)
11: (2 sc, 1 dec) * 6, 1 sc (19)
12: 19 sc (19)
13: 2 sc, 3 sc with arm, 7 sc, 3 sc with arm, 4 sc (19)
14: 19 sc (19)
Stuff the body.
Make 1 sl st, fasten off, cut and secure the yarn.
EARS (Make 2)
Use half double crochet (hdc) and a 5.0 mm hook. Do not stuff.
1: 6 hdc in MR (6)
2: 6 inc (12)
3: (1 hdc, 1 inc) * 6 (18)
4: (2 hdc, 1 inc) * 6 (24)
5: 24 hdc (24)
6: 4 hdc, 1 dec, 10 hdc, 1 dec, 6 hdc (22)
7: 4 hdc, 1 dec, 9 hdc, 1 dec, 5 hdc (20)
8: 4 hdc, 1 dec, 8 hdc, 1 dec, 4 hdc (18)
9: 18 hdc (18)
Work 1 hdc so the marker is centered on one side of the ear.
10: 3 hdc, 1 dec, 7 hdc, 1 dec, 4 hdc (16)
11: 3 hdc, 1 dec, 6 hdc, 1 dec, 3 hdc (14)
12: 2 hdc, 1 dec, 5 hdc, 1 dec, 3 hdc (12)
13: 2 hdc, 1 dec, 4 hdc, 1 dec, 2 hdc (10)
14: 2 hdc, 1 dec, 3 hdc, 1 dec, 1 hdc (8)
15: 8 hdc (8)
Fold the ear in half and crochet 4 hdc across.
Fasten off, cut, and secure the yarn. Make the second ear the same way.
HEAD
1: 6 sc in MR (6)
2: 6 inc (12)
3: (1 sc, 1 inc) * 6 (18)
4: (2 sc, 1 inc) * 6 (24)
5: (3 sc, 1 inc) * 6 (30)
6–8: 30 sc (3 rounds) (30)
9: 6 sc, 1 dec, 1 sc, 1 dec, 1 sc, 1 dec, 16 sc (27)
10: 5 sc, 1 dec, 4 sc, 1 dec, 14 sc (25)
11: 7 sc, 1 dec, 16 sc (24)
Insert safety eyes in round 9 above the visible decreases, with about 5 sc between them.
Start stuffing the head.
12: (2 sc, 1 dec) * 6 (18)
13: (1 sc, 1 dec) * 6 (12)
14: 6 dec (6)
Finish stuffing the head, make the remaining decreases, fasten off and hide the yarn end inside the head.
HEAD SHAPING
Use white semi-cotton yarn (e.g., YarnArt Jeans) for eye indentation:
Insert the needle with yarn at point 1 (first round of the head), come out at point 2.
Pull yarn across to point 3, and exit again at point 1.
Tighten, knot the yarn.
Repeat the following sequences, always returning to point 1 and tightening:
1)1 → 4 → 5 → 1
2)1 → 6 → 7 → 1
3)1 → 8 → 9 → 1
Use the same white yarn to embroider the whites of the eyes.
Use black yarn for eyelashes (a simple strip, you can add a side lash) and eyebrows.
I don’t pull the yarn too tightly. Sometimes I fix the yarn with “Crystal” glue so the whites and lashes stay in place.
If the nose has a screw backing, break it off and glue the nose in place.
There is a separate, detailed video in my group on eye shaping and face finishing.
BODY ASSEMBLY
Sew the head to the body using sewing thread over two rounds so the head doesn’t wobble.
Better to reinforce with several stitches so the head doesn’t tilt — the ears are heavy.
Sew on the tail.
Sew on the ears above the eyebrows, about 2–3 rounds higher.
🎉 Bunny Bubu is ready! 🎉