
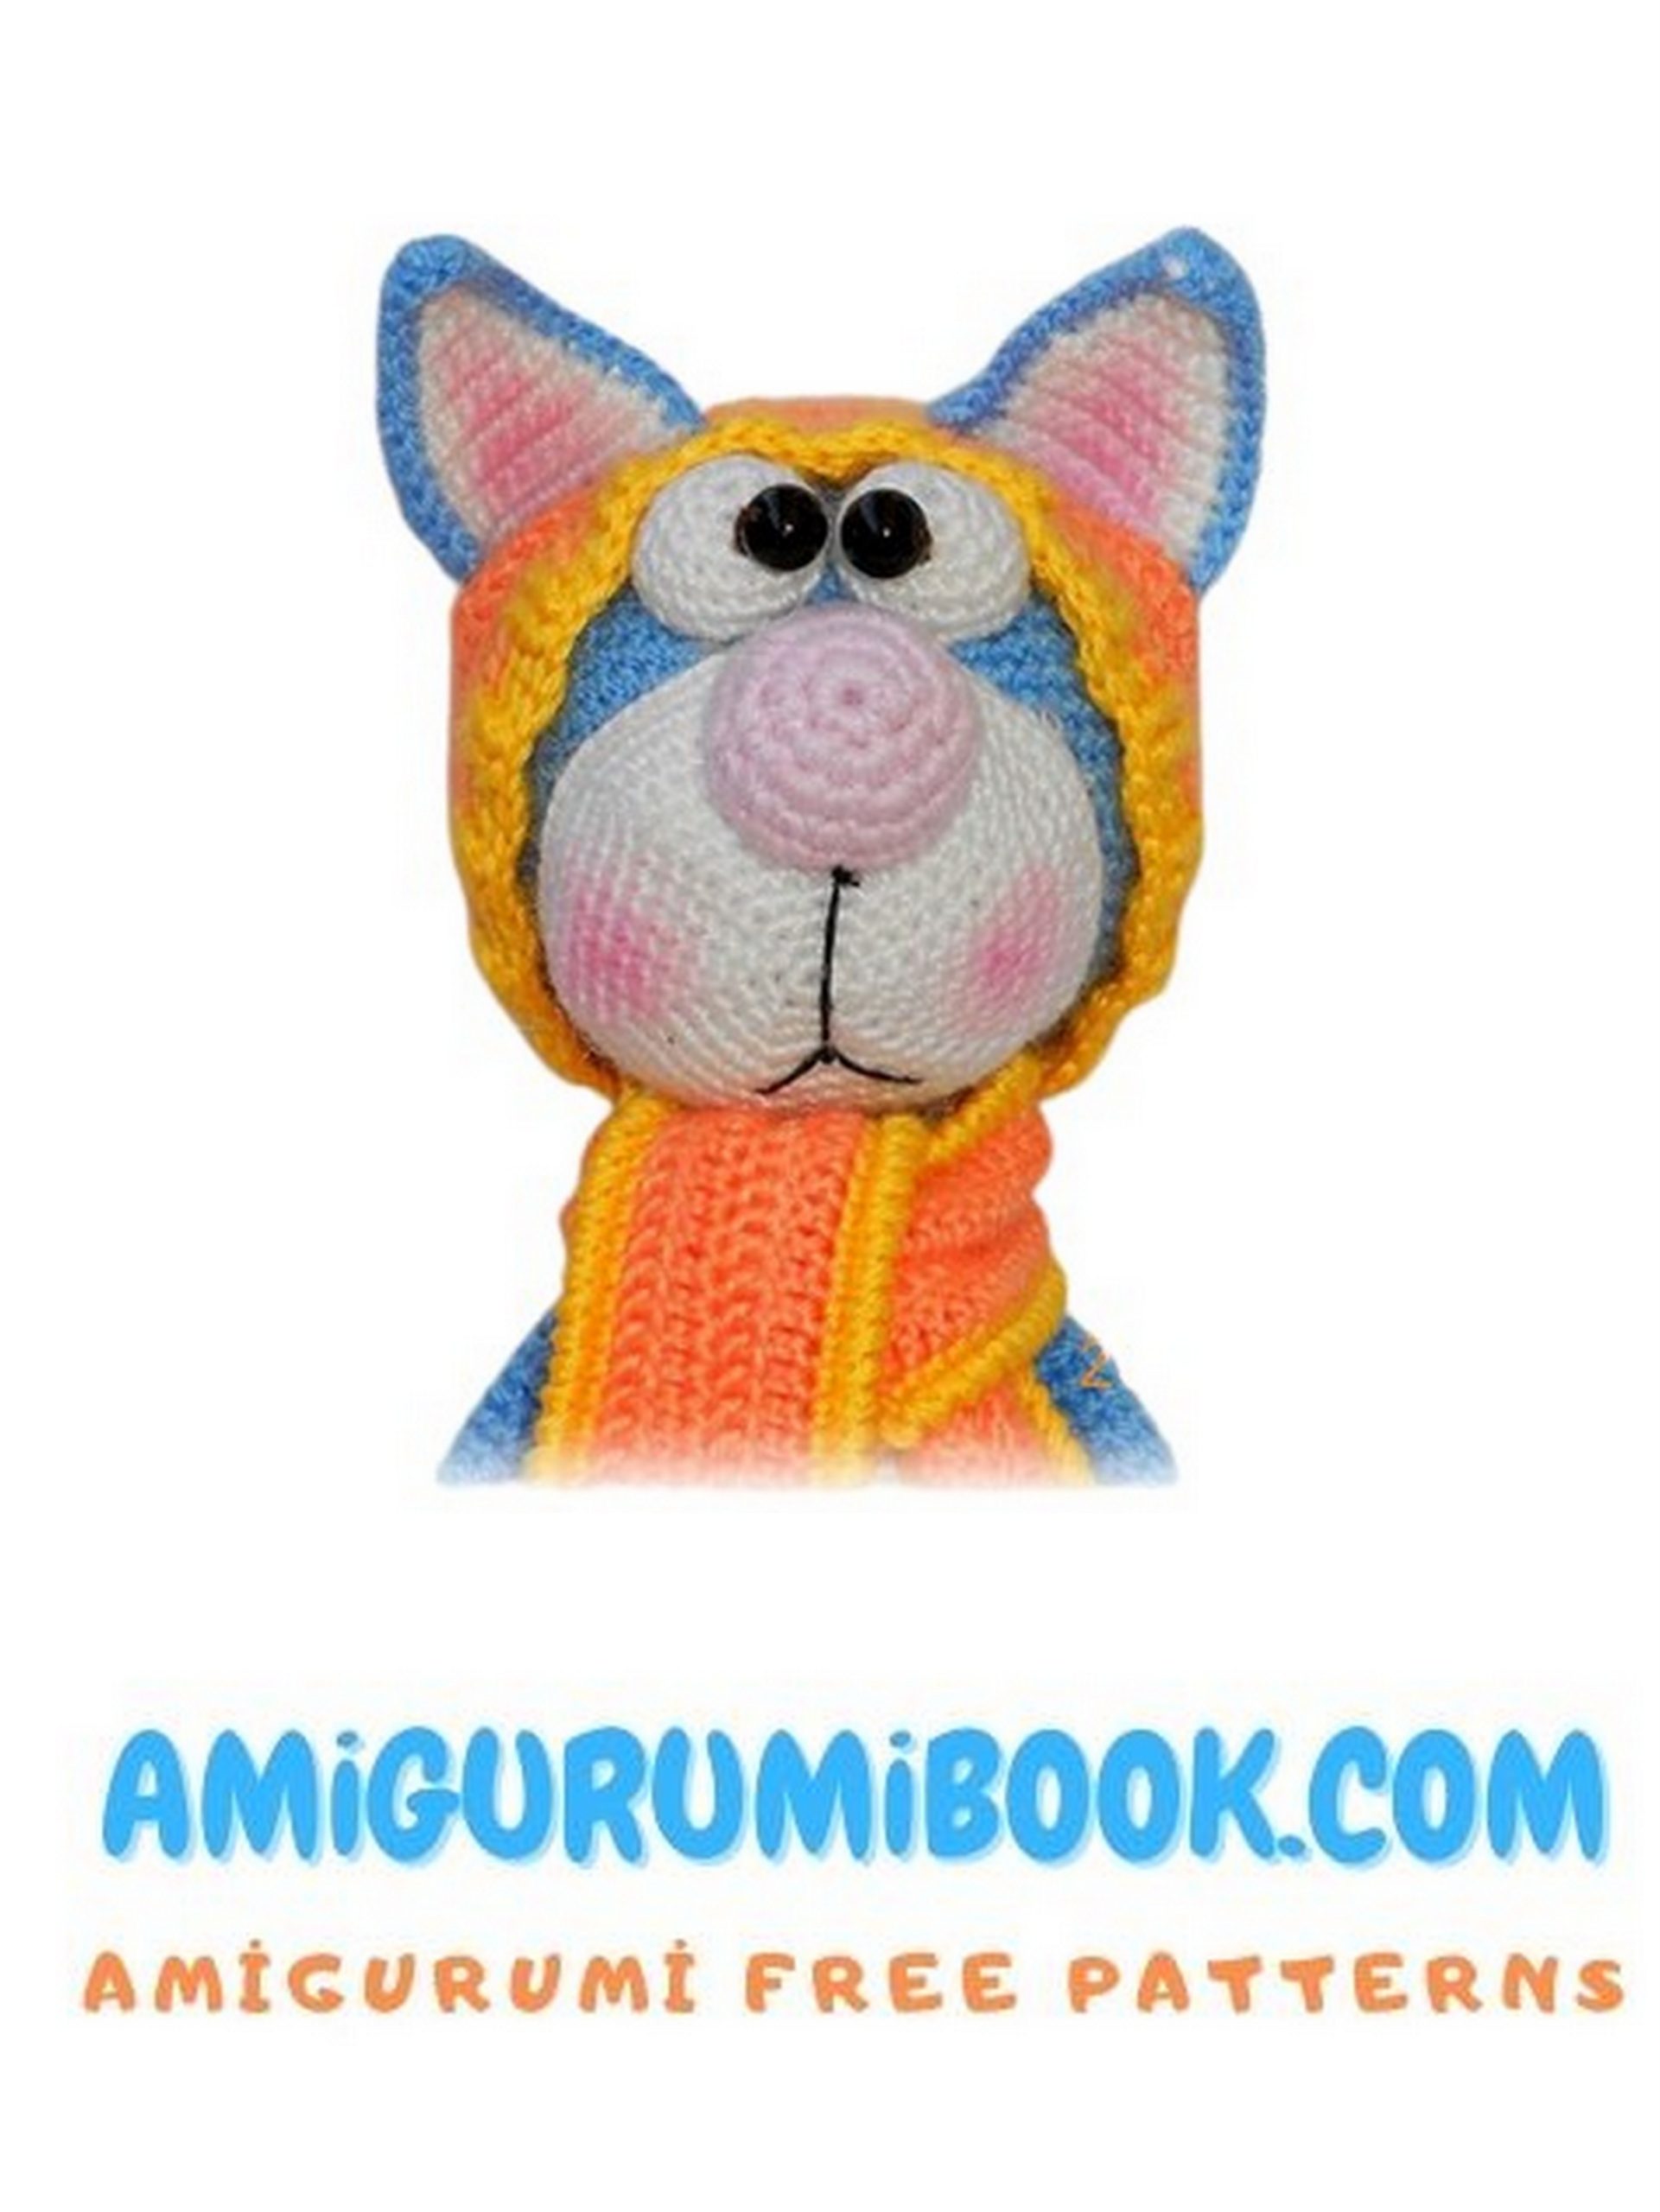
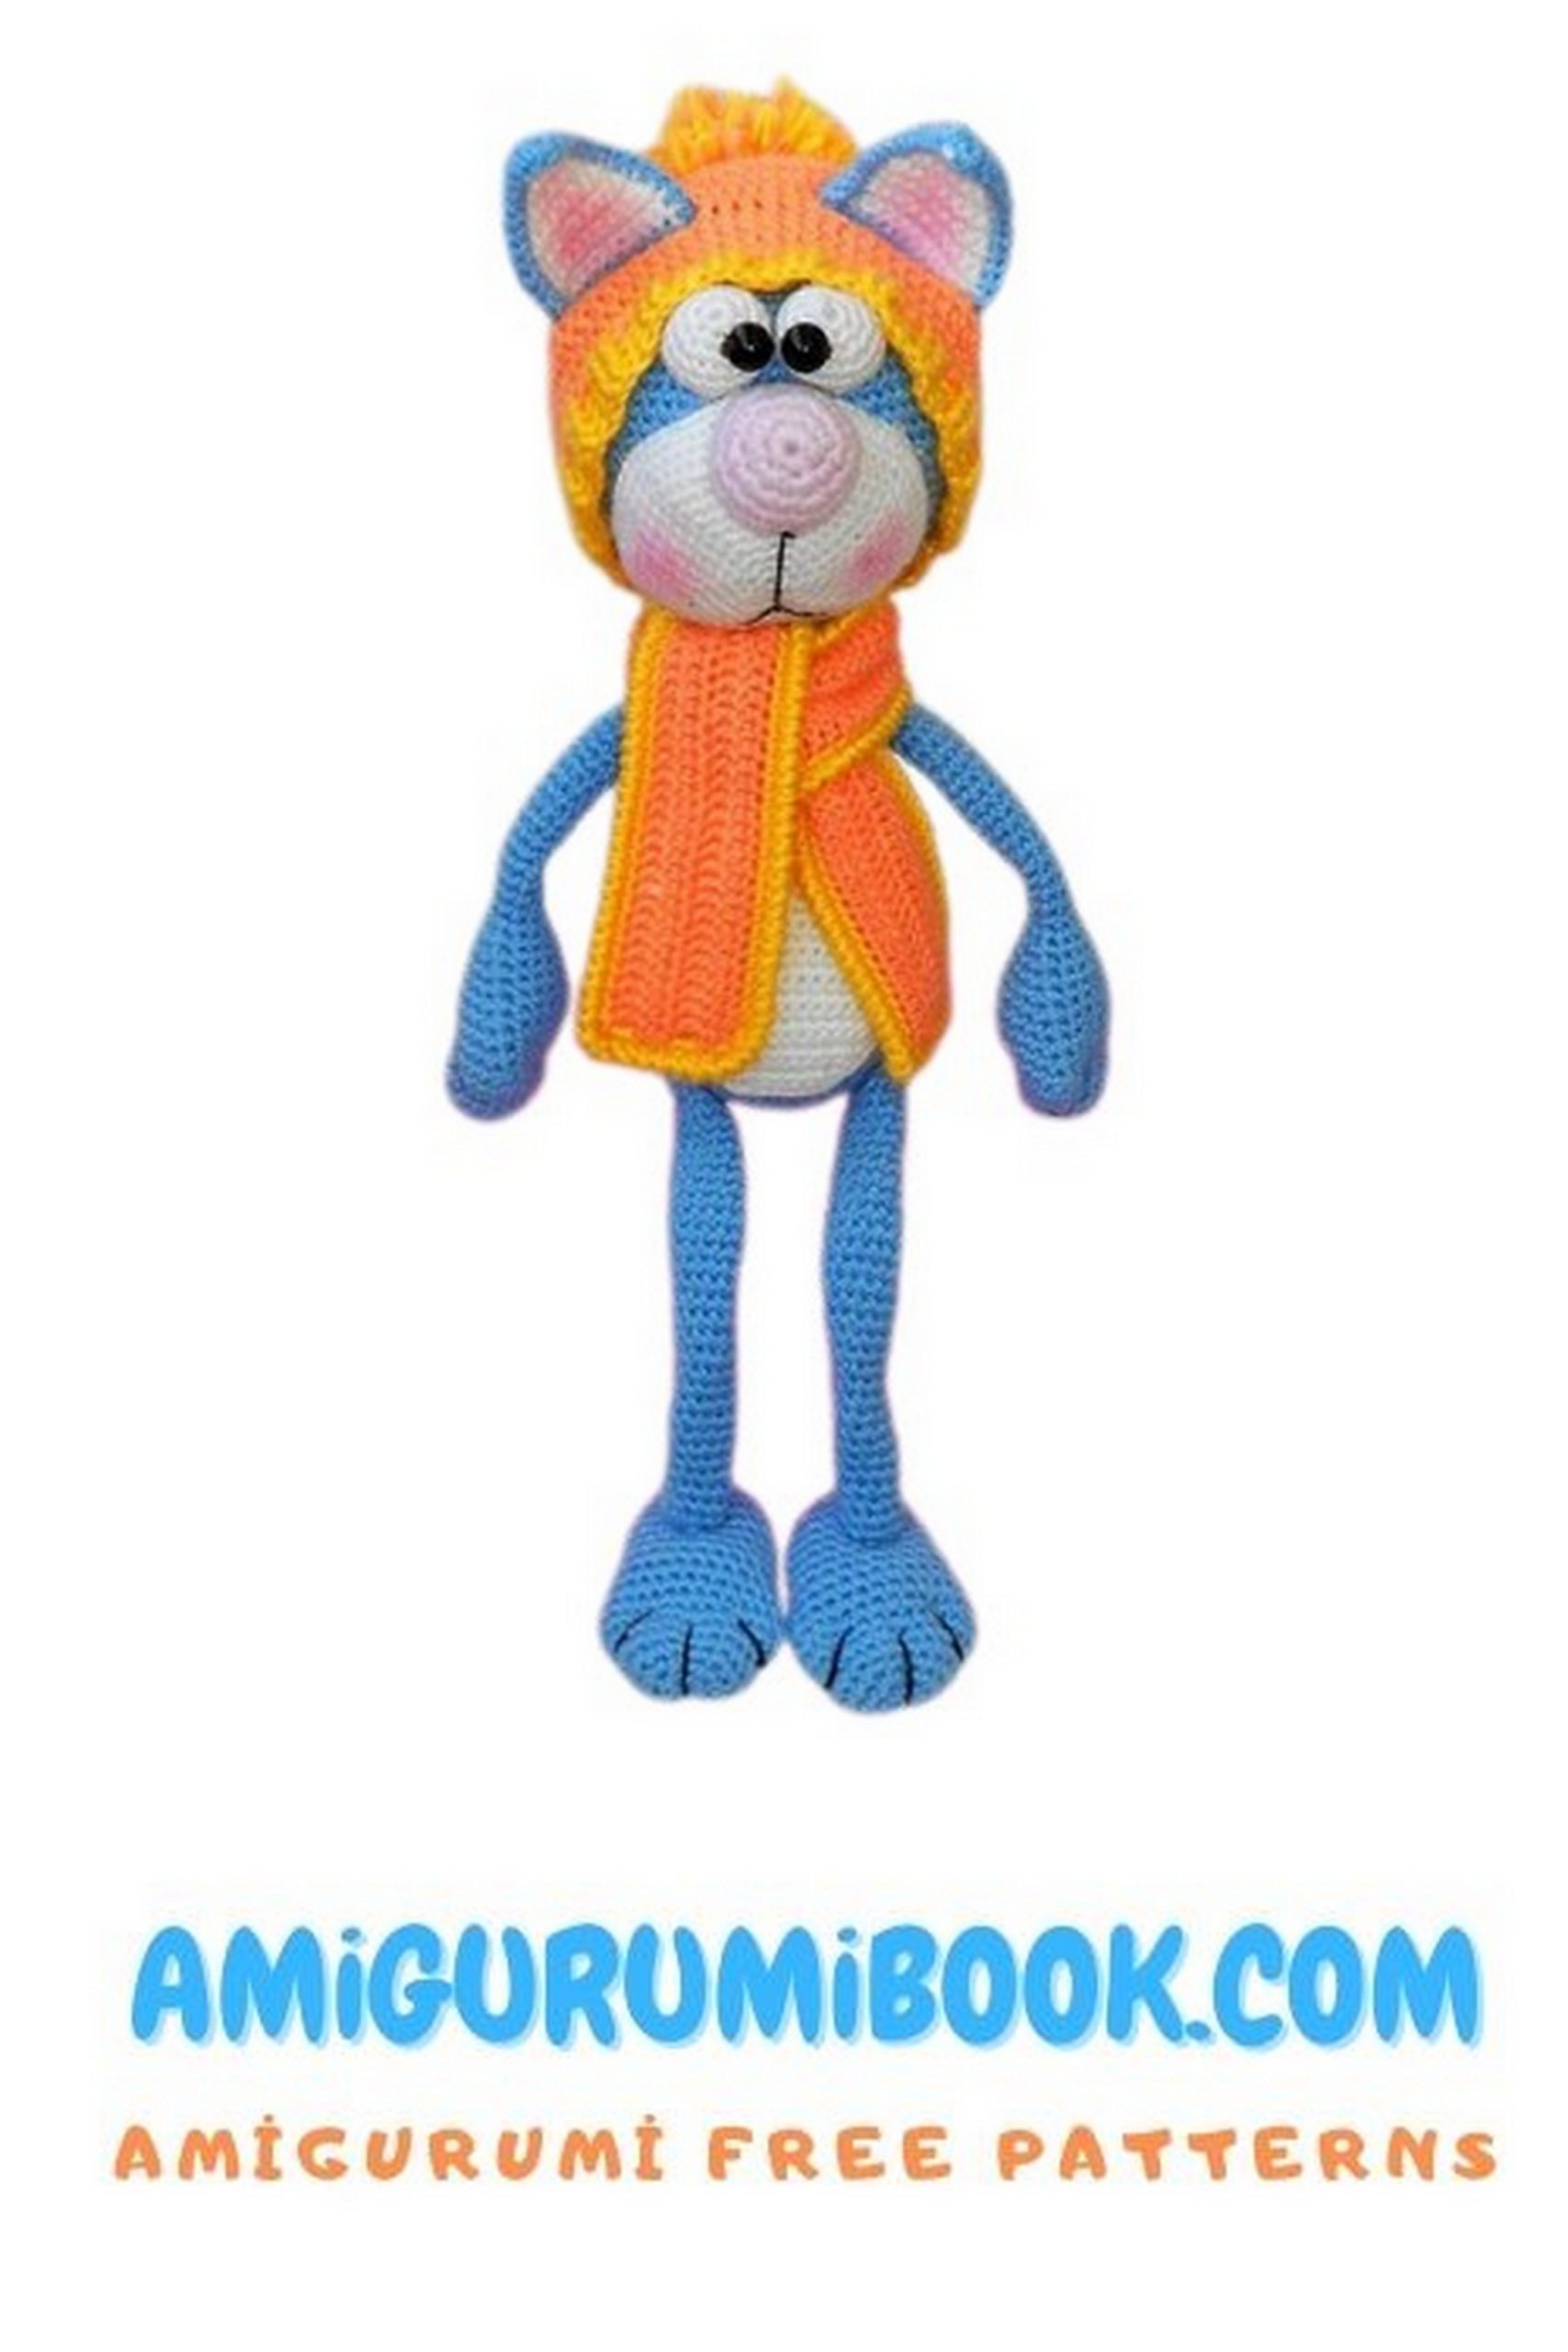
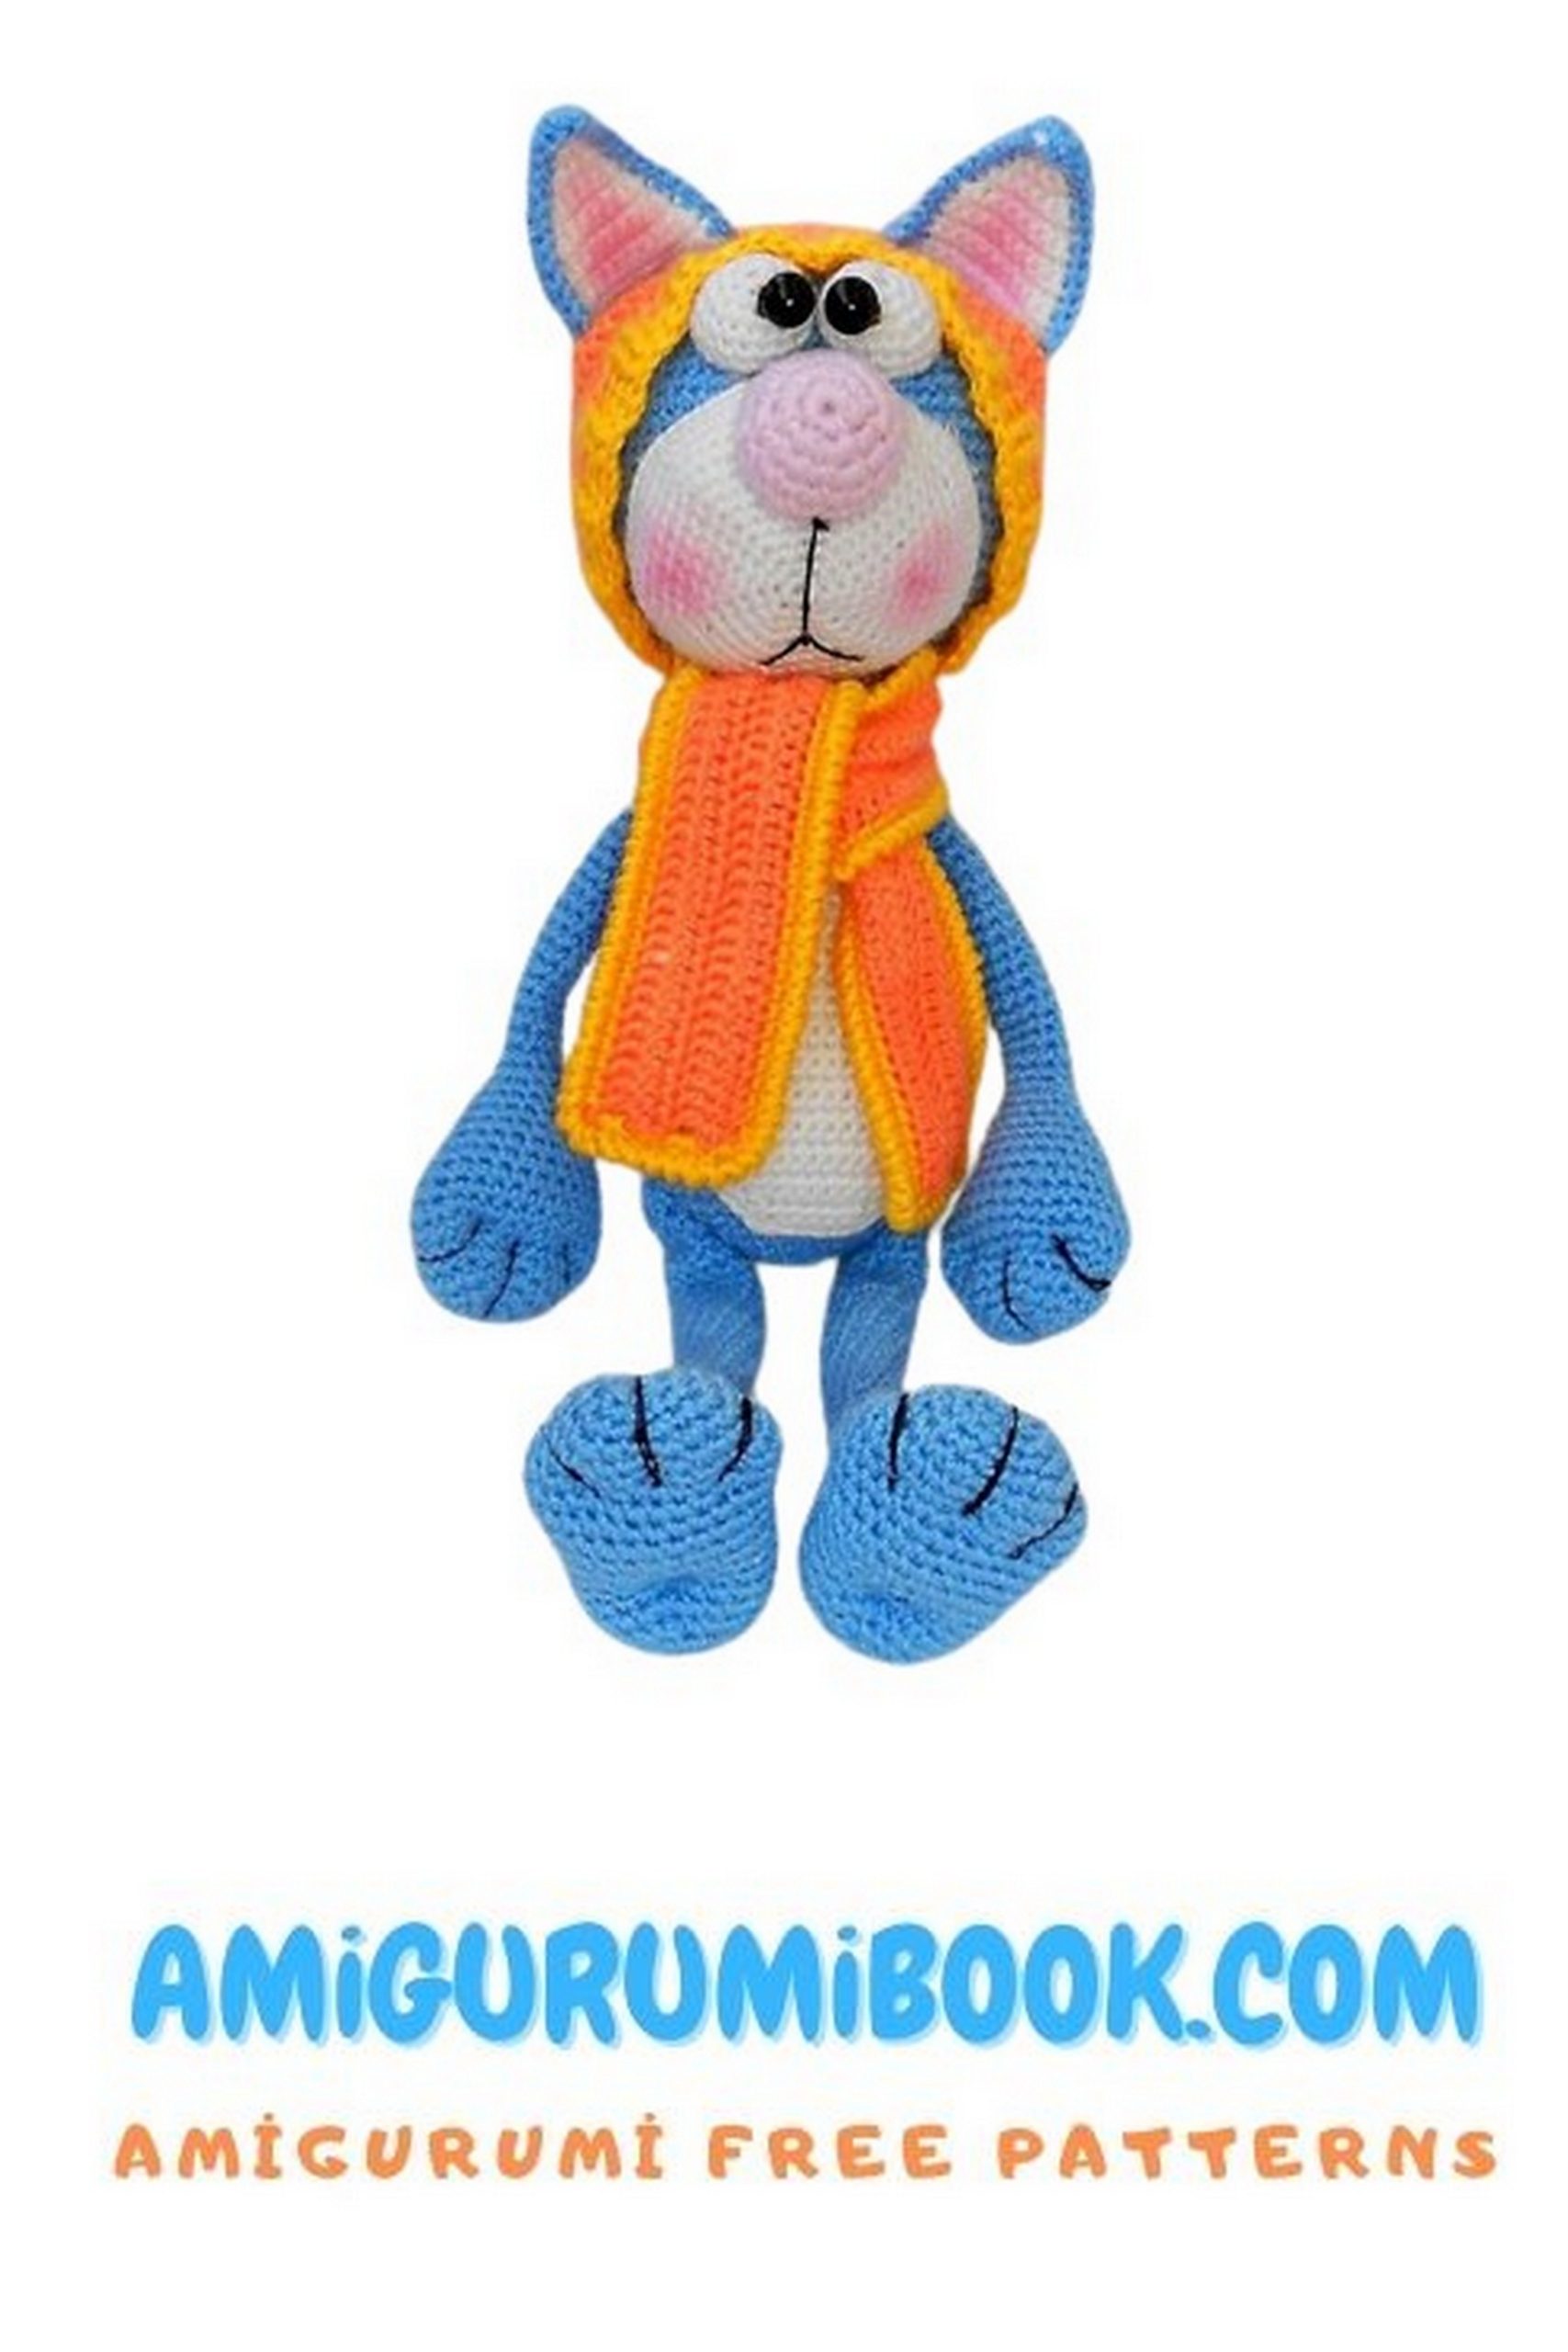
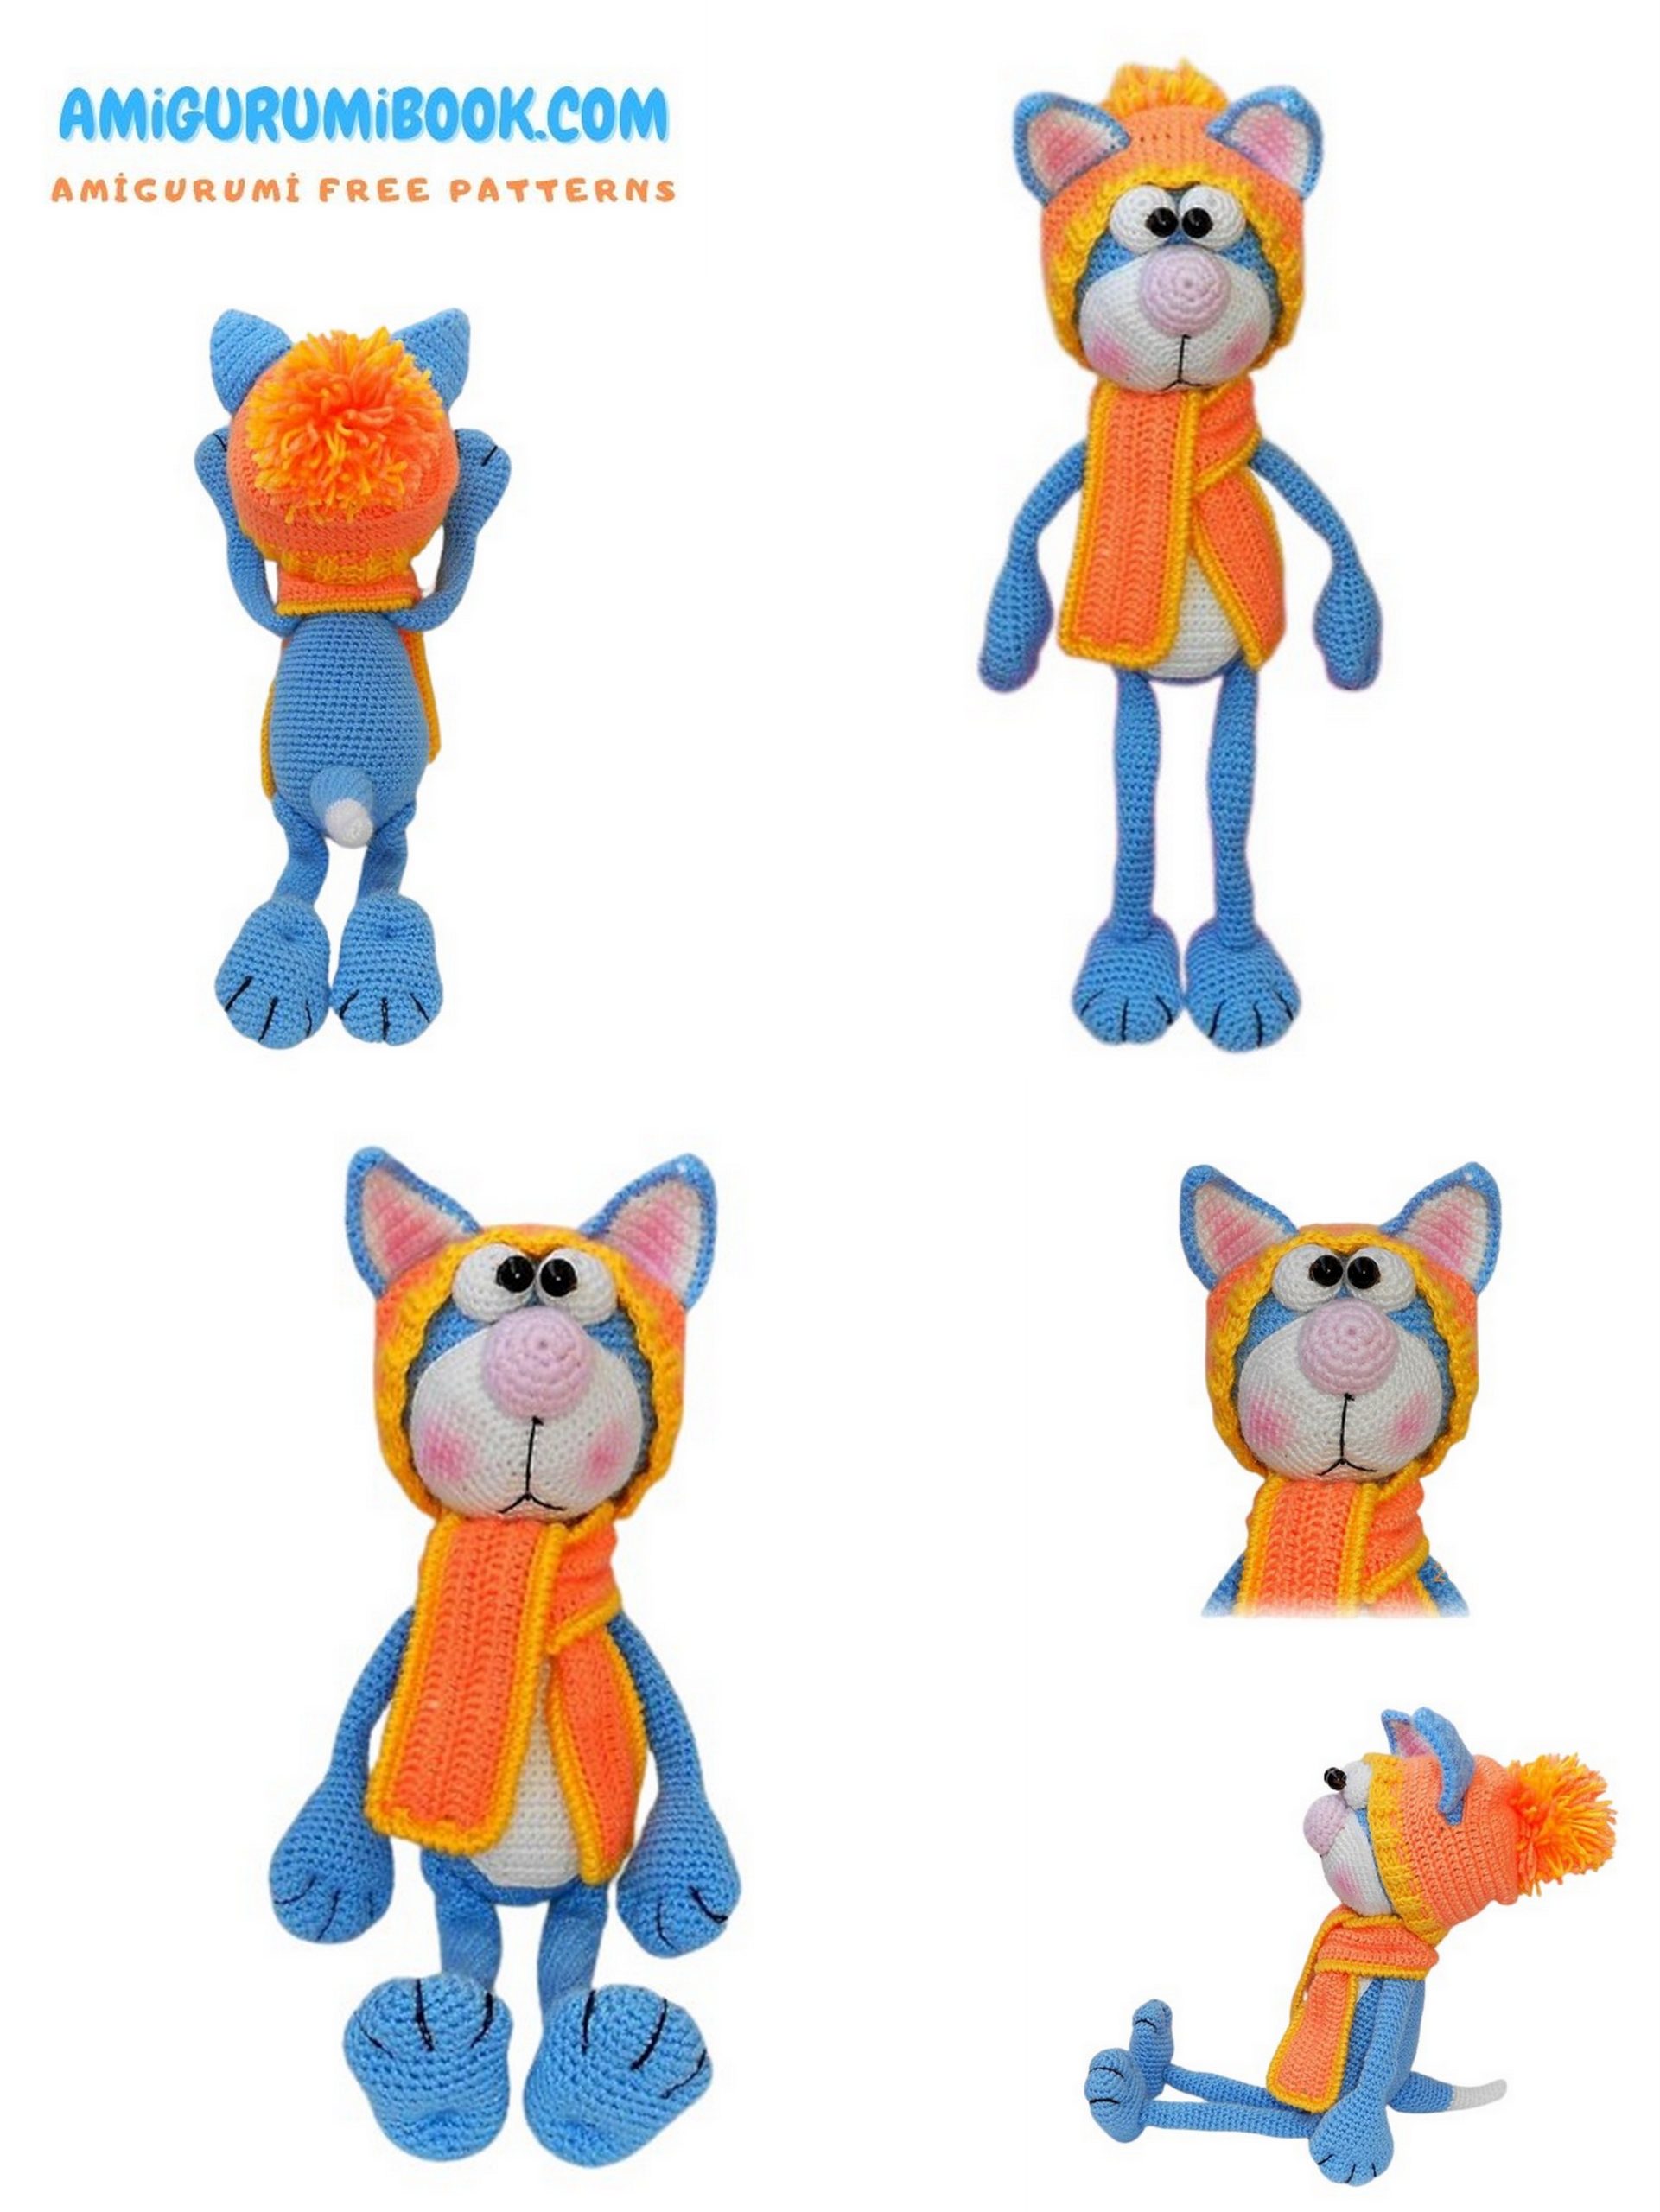
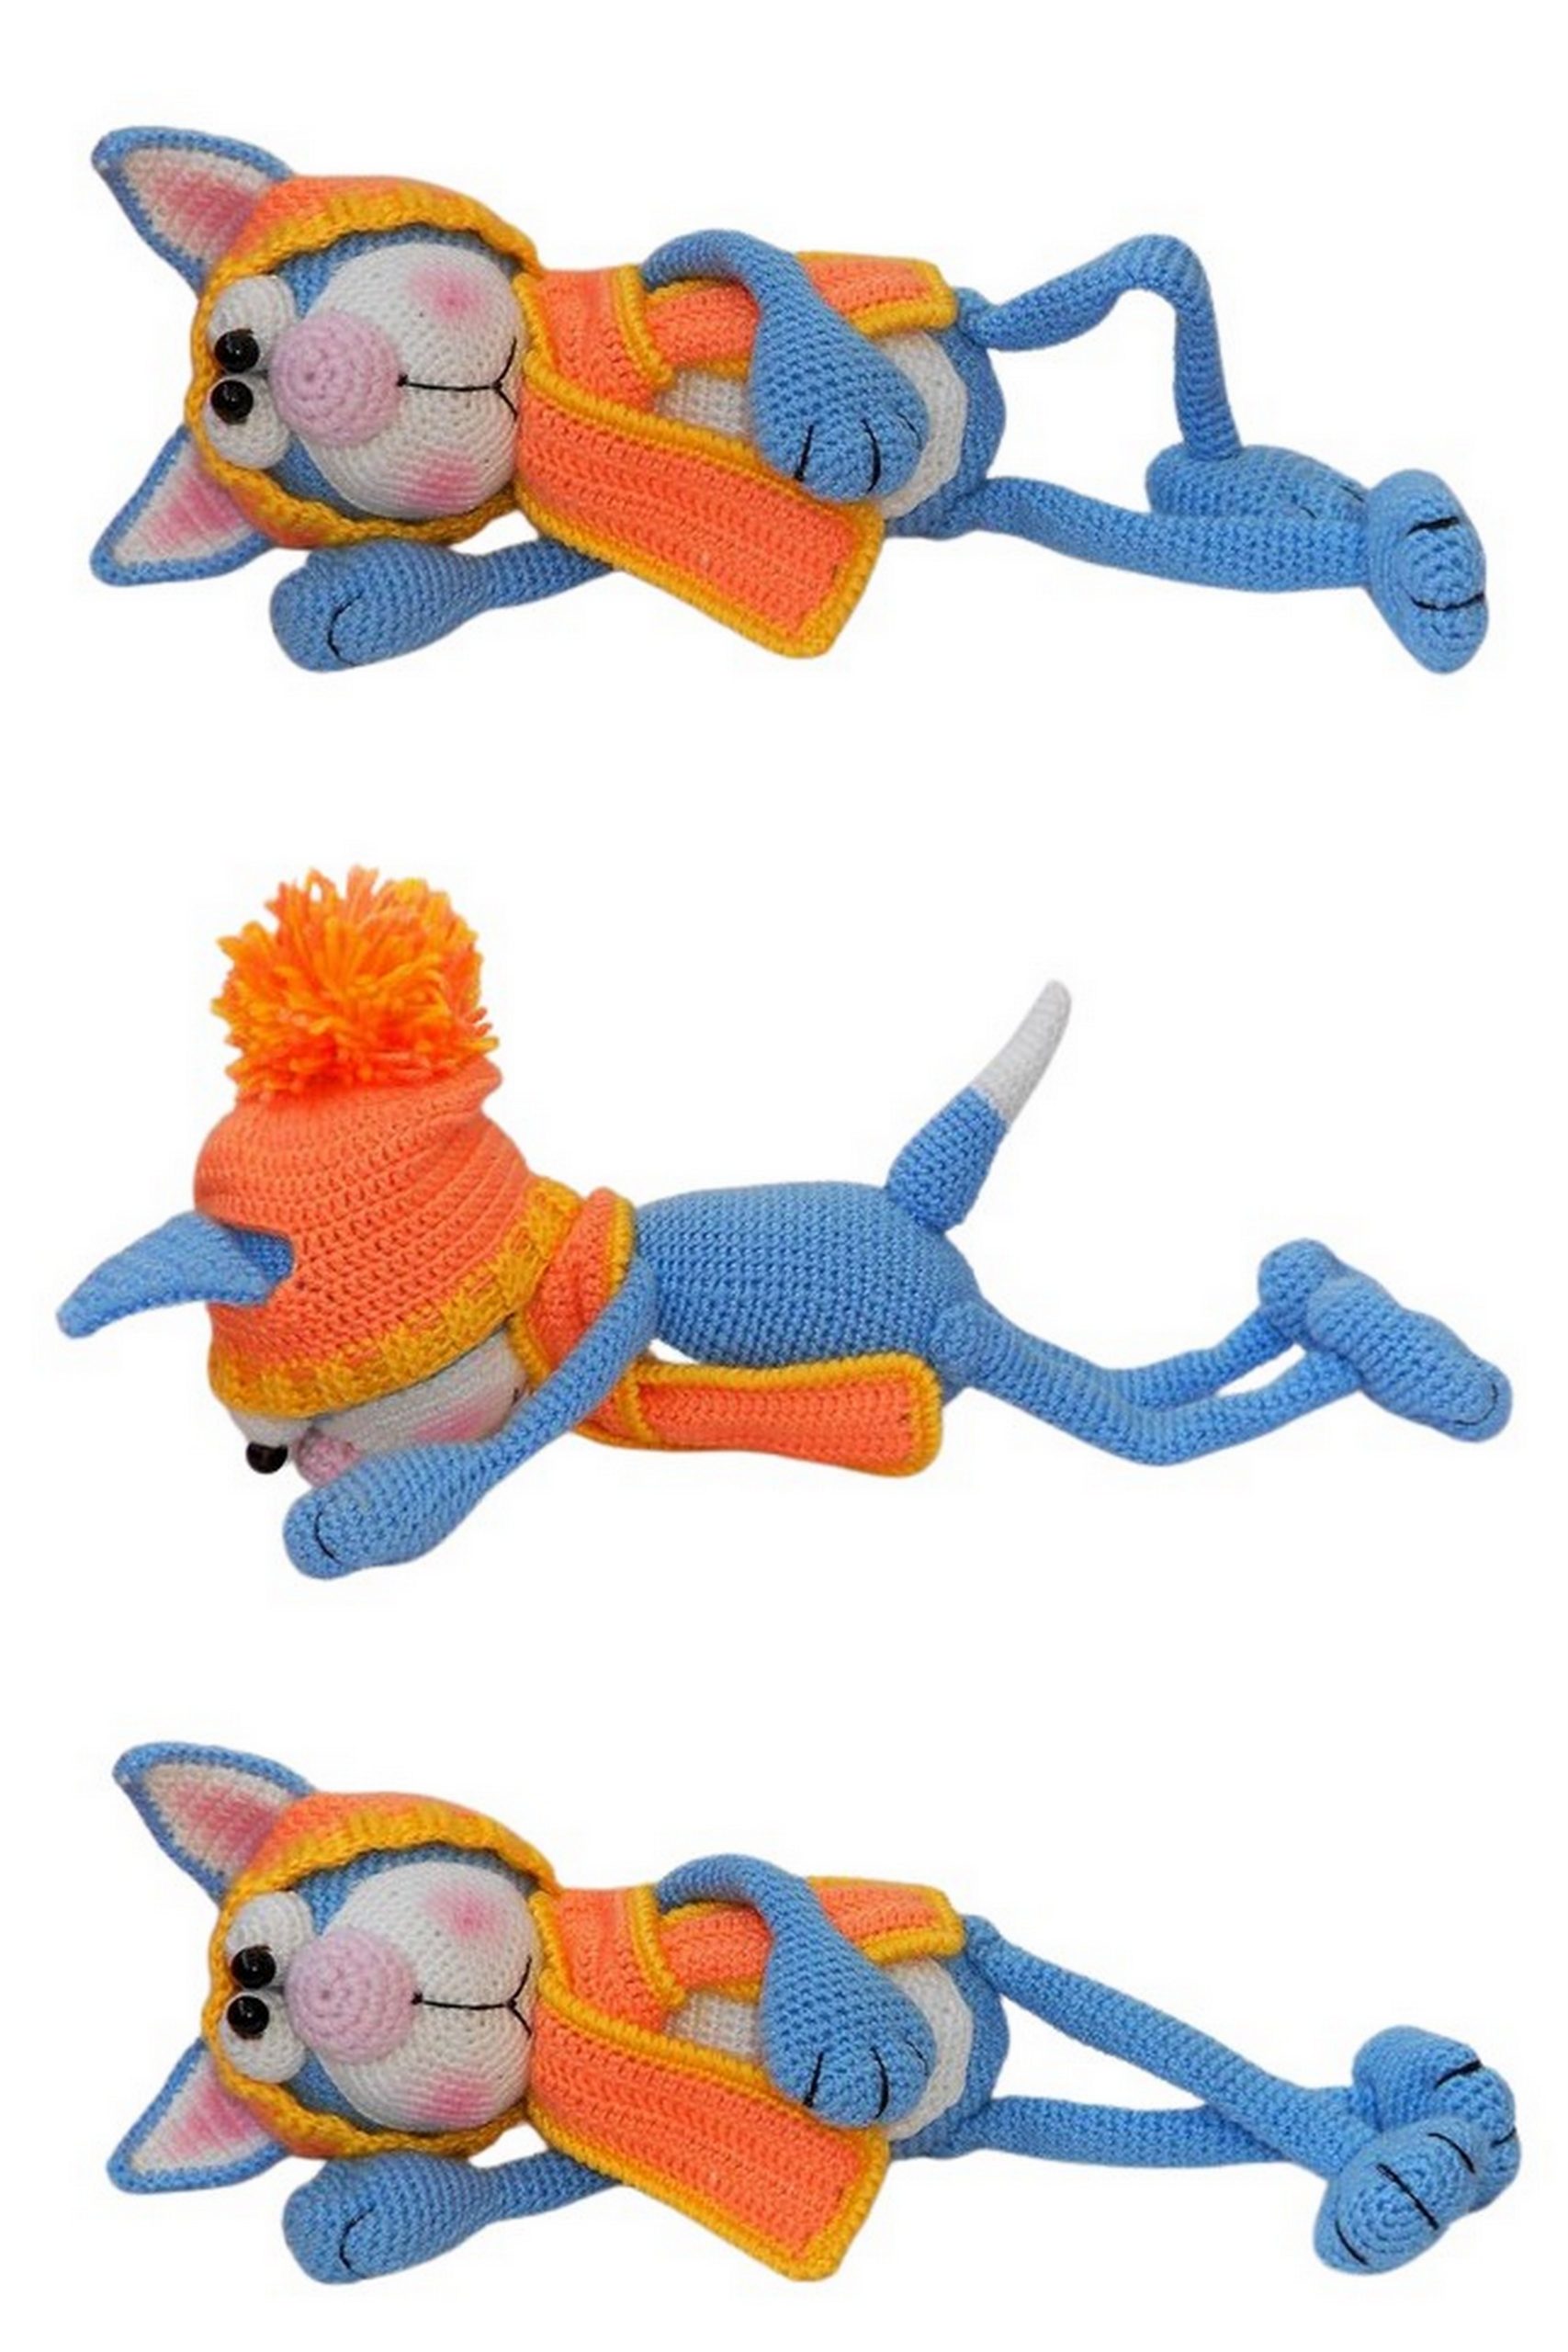
Welcome to the world of DIY crochet crafting! If you’re a fan of amigurumi and love creating your own plush companions, you’re in for a treat. Our free pattern introduces you to the enchanting world of a Cute Cat Amigurumi, complete with a fashionable scarf and hat. Whether you’re a crochet novice or a seasoned pro, this step-by-step guide will walk you through the process of bringing this charming feline friend to life.
Crafting your own amigurumi cat is not only a delightful pastime but also a rewarding experience. With our comprehensive pattern, you’ll be guided through each stitch, ensuring your finished creation is as adorable as can be. The addition of a scarf and hat adds a touch of style to your cat, making it a perfect handmade gift or a whimsical decoration for your space.
You can also find great amigurumi cat patterns here.
Get ready to dive into the world of crochet creativity as we provide you with the tools and instructions needed to make your own Cute Cat Amigurumi masterpiece. Follow along, let your creativity flow, and enjoy the satisfaction of bringing this charming kitty to life. Happy crocheting!
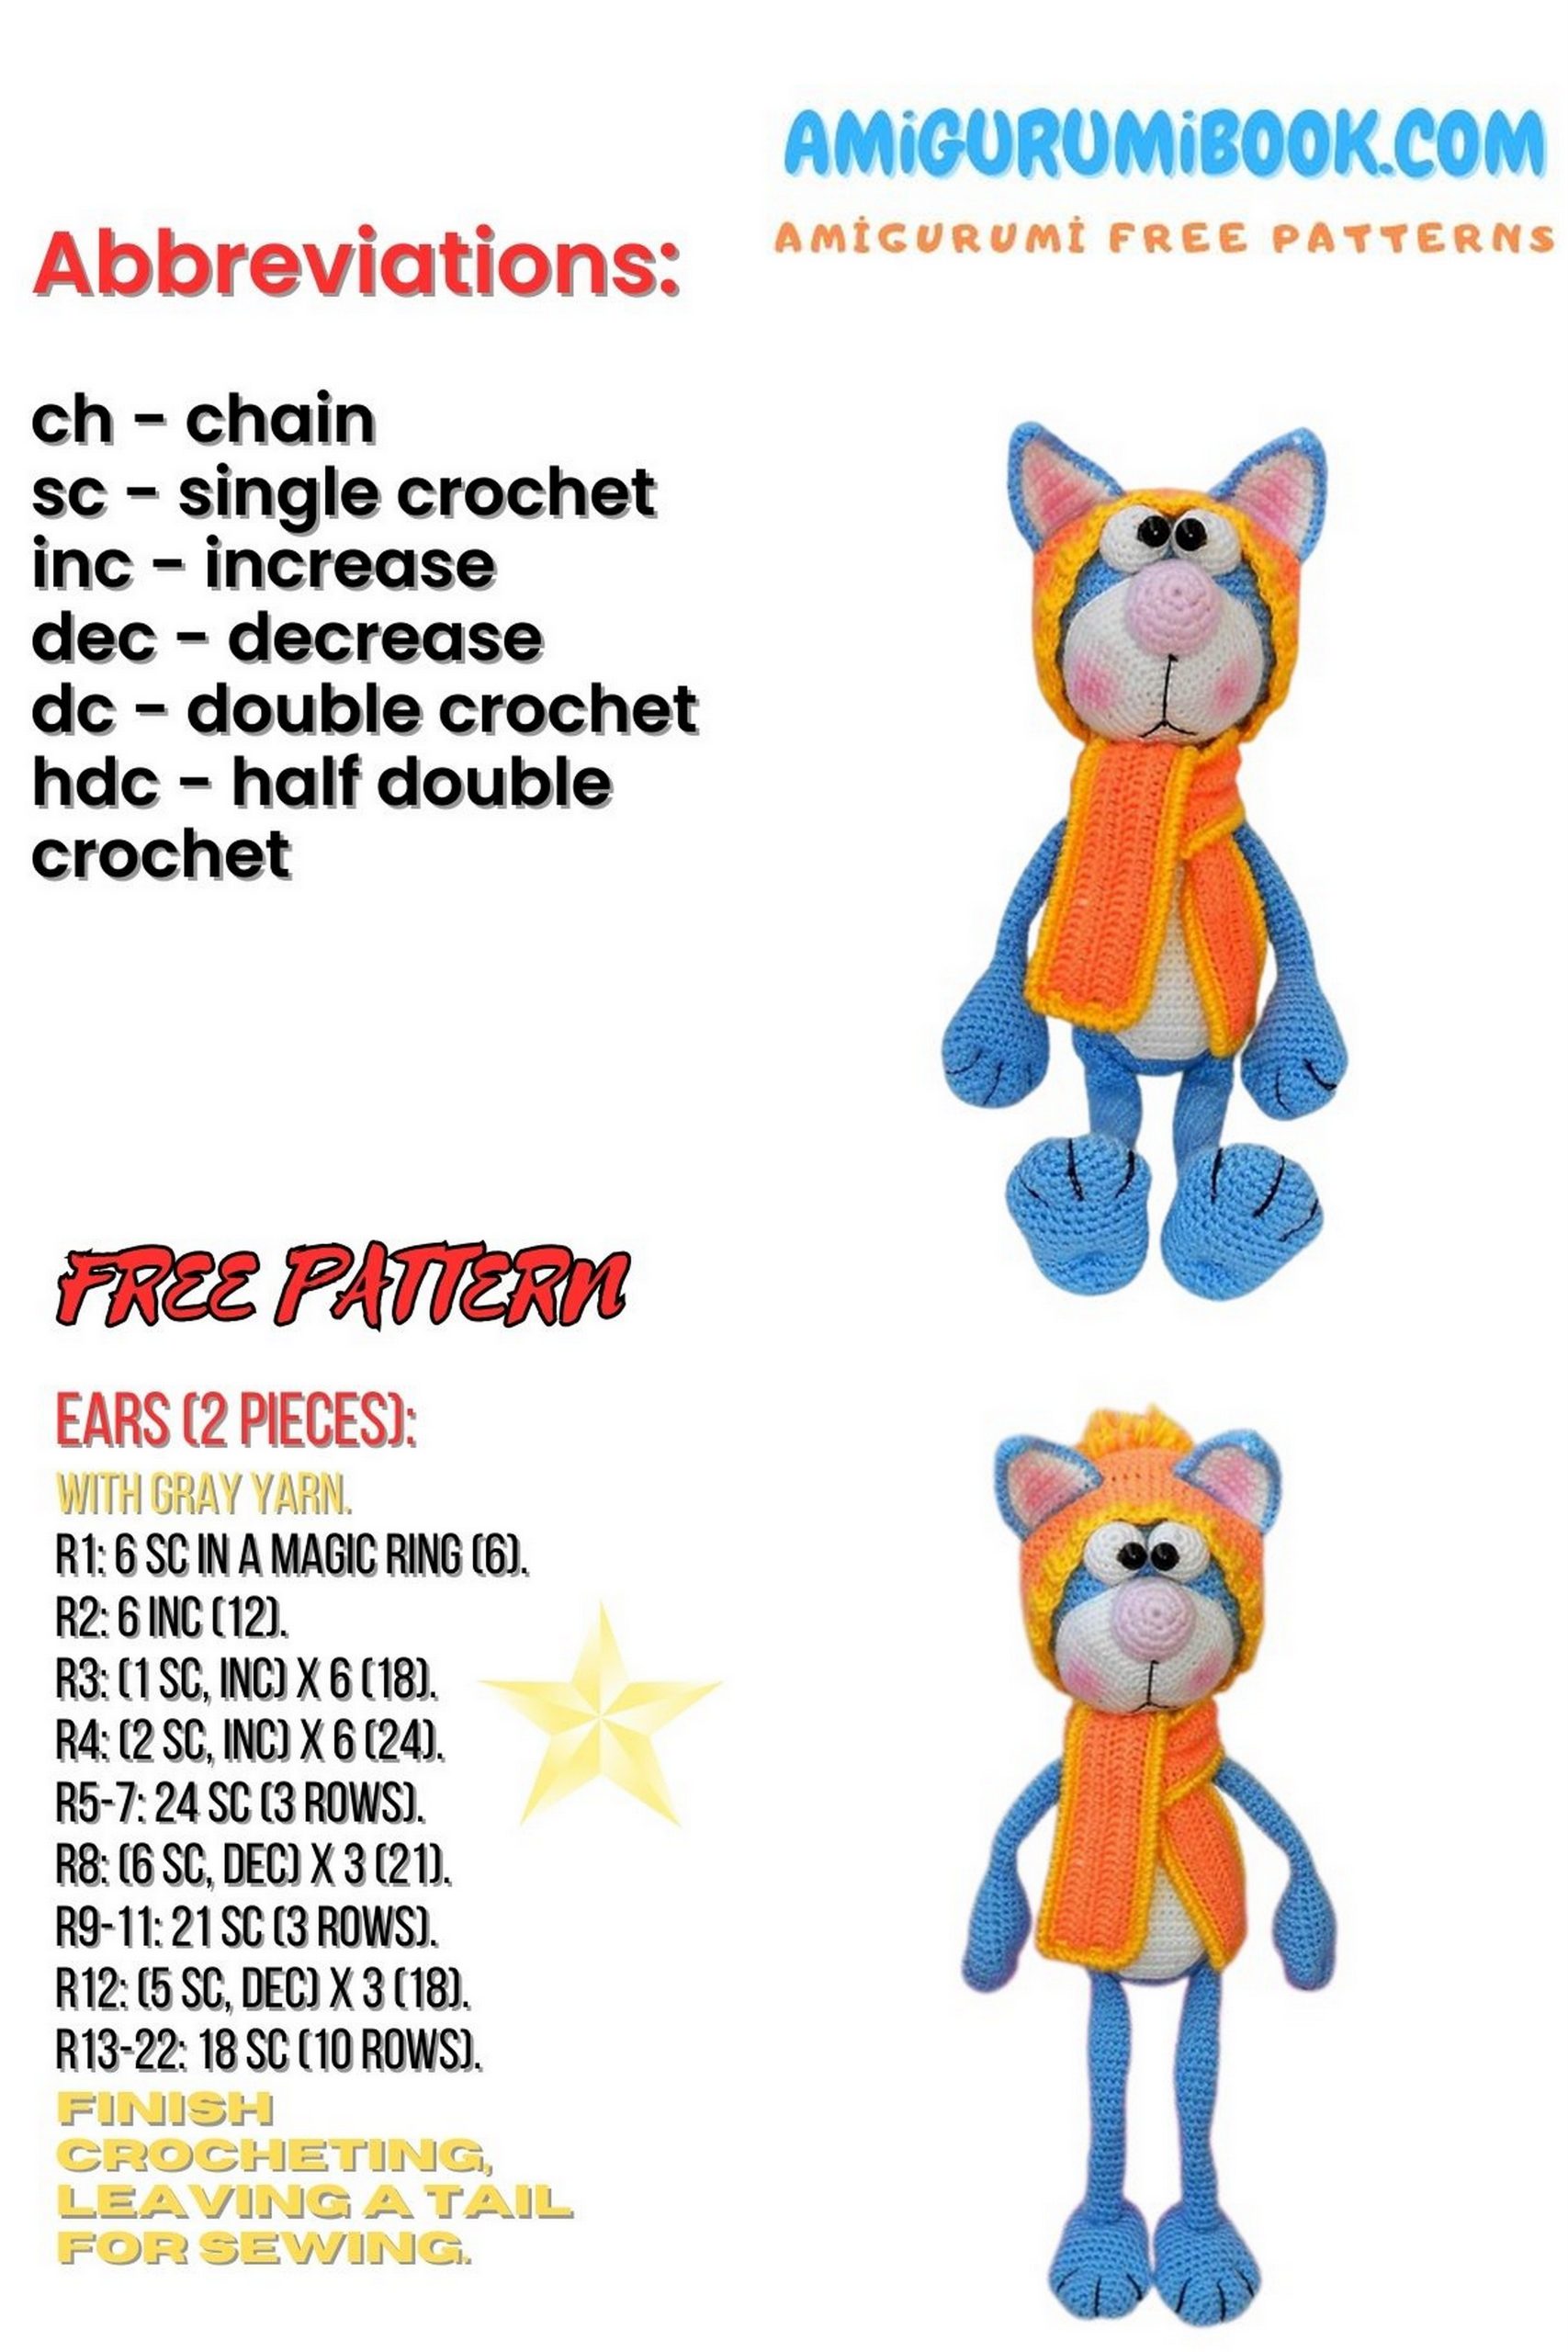
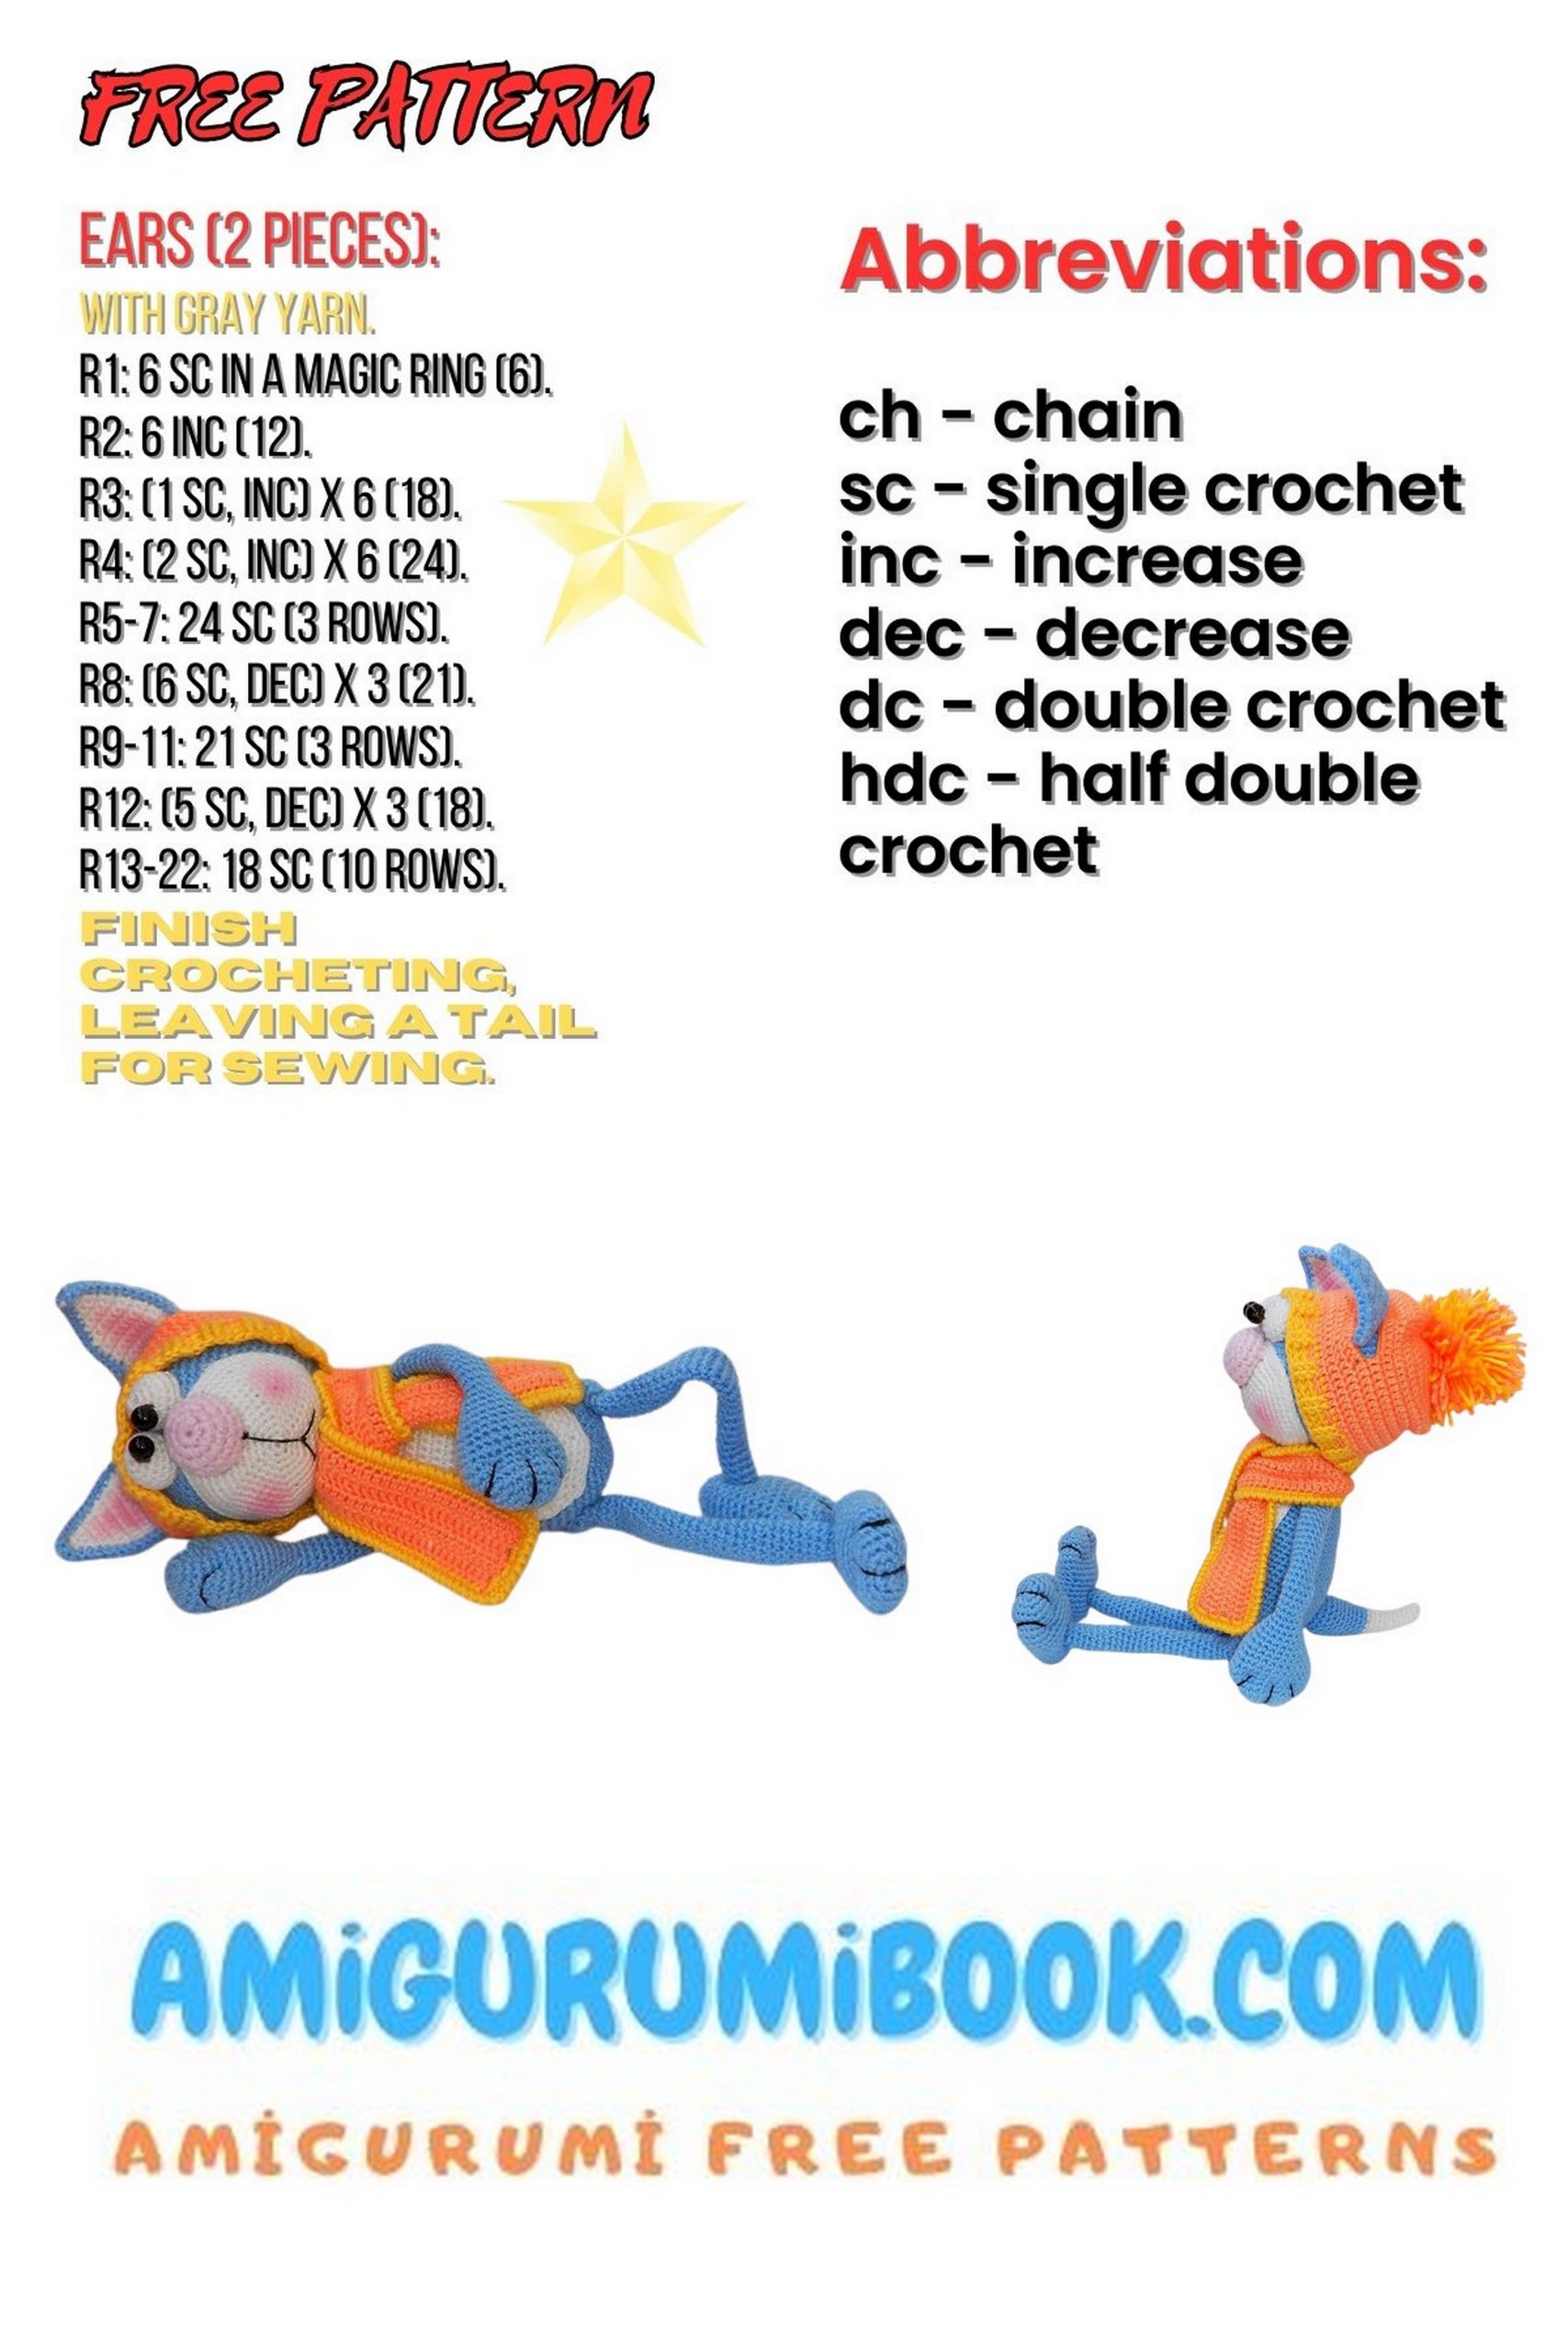
Abbreviations
ch- chain
sc – single crochet
dec- decrease
inc – increase
AMİGURUMİ CAT PATTERN

AMİGURUMİ CAT BODY
1 row – 6 single crochet (6)
2 row – increase to the end (12)
3 row – 1 sc increase to the end (18)
4 row – 2 sc increase to the end (24)
5 row – 3 sc increase to the end (30)
6 row – 4 sc increase to the end (36)
7 row – 5 sc increase to the end (42)
8 row – 6 sc increase to the end (48)
9 row – 17 row – 48 sc (48)
18 row – decrease 22 sc, 2 times (46)
19 row – 46 sc (46)
20 row – decrease 21 sc, 2 times (44)
21 row – 44 sc (44)
22 row – decrease 20 sc, 2 times (42)
23 row – 42 sc (42)
24 row – decrease 19 sc, 2 times (40)
25 row – 40 sc (40)
26 row – decrease 18 sc, 2 times (38)
27 row – 38 sc (38)
28 row – decrease 17 sc, 2 times (36)
29 row – 36 sc (36)
30 row – decrease 10 sc, 2 times (33)
31 row – 33 sc (33)
32 row – decrease 9 sc, 2 times (30)
33 row – 30 sc (30)
34 row – decrease 8 sc, 2 times (27)
35 row – 27 sc (27)
36 row – decrease 7 sc, 2 times (24)
37 row – 40 row – 24 sc (24) ss
Leave a 20 cm thread for sewing and cut. DO NOT TIGHTEN!!!!
AMİGURUMİ CAT BELLY
Crochet back and forth
1 row – chain of 8 ch
2 row – single crochet in the second loop from the hook, 6 sc in each loop (7), ch, turn
3 row – 7 sc (7), ch, turn
4 row – decrease 6 sc (8), ch, turn
5 row – decrease 7 sc (9), ch, turn
8 row – 9 sc (9), ch, turn
9 row – 8 sc, increase (10), ch, turn
10 row – 9 sc, increase (11), ch, turn
11 row – 11 sc (11), ch, turn
12 row – 5 sc, increase, 5 sc (12), ch, turn
13 row – 22 row – 12 sc (12), ch, turn
23 row – 11 sc, increase (13), ch, turn
24 row – 12 sc, increase (14), ch, turn
25 row – 31 row – 14 sc (14), ch, turn
32 row – decrease 10 sc, decrease (12), ch, turn
33 row – decrease, single crochet, decrease (10), ch, turn
34 row – decrease 6 sc, decrease (8), ch, turn
35 row – decrease, single crochet, decrease (6), ch, turn
You can crochet a row of single crochet around the belly, leave a 30 cm thread for sewing and cut.
Fill the body with synthetic padding, you can put granules in the bottom, and sew the belly, place the first row of the belly at the level of the first row of the body.
MUZZLE AMİGURUMİ CAT
1 row – 6 single crochet in the ring (6)
2 row – increase to the end (12)
3 row – 1 sc increase to the end (18)
4 row – 2 sc increase to the end (24)
5 row – 3 sc increase to the end (30)
6 row – 4 sc increase to the end (36)
7 row – 5 sc increase to the end (42)
8 row – 6 sc increase to the end (48)
9 row – 7 sc increase to the end (54)
10 row – 8 sc increase to the end (60)
11 row – 60 sc (60)
12 row – 9 sc increase to the end (66)
13 row – 66 sc (66)
Sew the muzzle to the head, not pulling tight, making it slightly convex and adding a little synthetic padding, distributing it evenly.
HEAD AMİGURUMİ CAT
1 row – 6 sc in the ring (6)
2 row – increase to the end (12)
3 row – 1 sc increase to the end (18)
4 row – 2 sc increase to the end (24)
5 row – 3 sc increase to the end (30)
6 row – 4 sc increase to the end (36)
7 row – 5 sc increase to the end (42)
8 row – 6 sc increase to the end (48)
9 row – 7 sc increase to the end (54)
10 row – 8 sc increase to the end (60)
11 row – 9 sc increase to the end (66)
12 row – 10 sc increase to the end (72)
13 row – 11 sc increase to the end (78)
14 row – 24 row – 78 sc (78)
25 row – decrease 11 sc, to the end (72)
26 row – decrease 10 sc, to the end (66)
27 row – decrease 9 sc, to the end (60)
28 row – decrease 8 sc, to the end (54)
29 row – decrease 7 sc, to the end (48)
30 row – decrease 6 sc, to the end (42)
31 row – decrease 5 sc, to the end (36)
32 row – decrease 4 sc, to the end (30)
33 row – decrease, 30 sc (24)
34 row – decrease, 2 sc, to the end (18)
35 row – decrease, sc, to the end (12)
Fill the head
36 row – decrease to the end (6)
Pull tight, cut the thread.
EARS AMİGURUMİ CAT
1 row – chain of 13 ch
2 row – 12 sc, ch (12), turn
3 row – decrease 10 sc, ch (11), turn
4 row – 11 sc (11), turn
5 row – decrease 9 sc (10), turn
6 row – 10 sc, ch (10), turn
7 row – 15 row – single crochet, decreasing by 1 sc in each row, don’t forget to make a ch at the end of each row, decrease until there is 1 sc left. Do not cut the thread.
Crochet the inner part the same way as the outer ear, but cut the thread.
Then fold the inner and outer parts and connect them with a row of single crochet. Sew the ears to the head at the level of the 3-4 row of the head on both sides.
NOSE (pink)
1 row – 6 sc in the ring
2 row – (increase) to the end (12)
3 row – (1 sc, increase) to the end (18)
4-5 row – straight
6 row – (decrease) to the end
NOSE – sausage shape (pink)
1 row – 6 sc in the ring (6)
2 row – increase to the end (12)
3 row – 1 sc increase to the end (18)
4 row – 2 sc increase to the end (24)
5 row – 3 sc increase to the end (30)
6 row – 17 row – 30 sc (30)
18 row – decrease to the end (24)
19 row – 2 sc decrease, to the end (18)
20 row – 1 sc decrease, to the end (12)
Fill the nose with synthetic padding.
21 row – decrease to the end (6)
Pull tight and sew the nose to the muzzle, the upper line of the nose lies strictly on the border of the muzzle and head.
AMİGURUMİ CAT EYES
Cut two circles with a diameter of 5-6 cm from cotton or fleece fabric, edge with thread, slightly tighten, fill with filler, and tighten. Glue the eyes with silicone to the muzzle, glue the pupils – semi-beads.
UPPER PAW
1 row – 6 sc in the ring (6)
2 row – increase to the end (12)
3 row – 1 sc increase to the end (18)
4 row – 2 sc increase to the end (24)
5 row – increase to the end (30)
6 row – 7 row – 30 sc (30)
8 row – decrease 13 sc (2 times) (28)
9 row – decrease 12 sc (2 times) (26)
10 row – decrease 11 sc (2 times) (24)
11 row – decrease 10 sc (2 times) (22)
12 row – decrease 9 sc (2 times) (20)
13 row – decrease 8 sc (2 times) (18)
14 row – decrease 7 sc (2 times) (16)
15 row – decrease 6 sc (2 times) (14)
16 row – decrease 5 sc (2 times) (12)
17 row – decrease 4 sc (2 times) (10)
18 row – 40 row – 10 sc (10)
41 row – decrease to the end (5)
Cut the thread.
LOWER PAW
Foot:
1 row – 6 sc in the ring (6)
2 row – increase to the end (12)
3 row – 1 sc increase to the end (18)
4 row – 2 sc increase to the end (24)
5 row – increase to the end (30)
6 row – 7 row – 30 sc (30)
8 row – decrease 13 sc (2 times) (28)
9 row – decrease 12 sc (2 times) (26)
10 row – decrease 11 sc (2 times) (24)
11 row – 16 row – 24 sc (24)
17 row – 2 sc decrease, to the end (18)
18 row – 1 sc decrease, to the end (12)
Fill with synthetic padding.
19 row – decrease to the end (6)
Cut the thread.
Leg:
1 row – 10 sc in the ring (10)
2 row – 34 row – 10 sc (10)
Attach the leg to the foot using a drawstring, forming a heel.
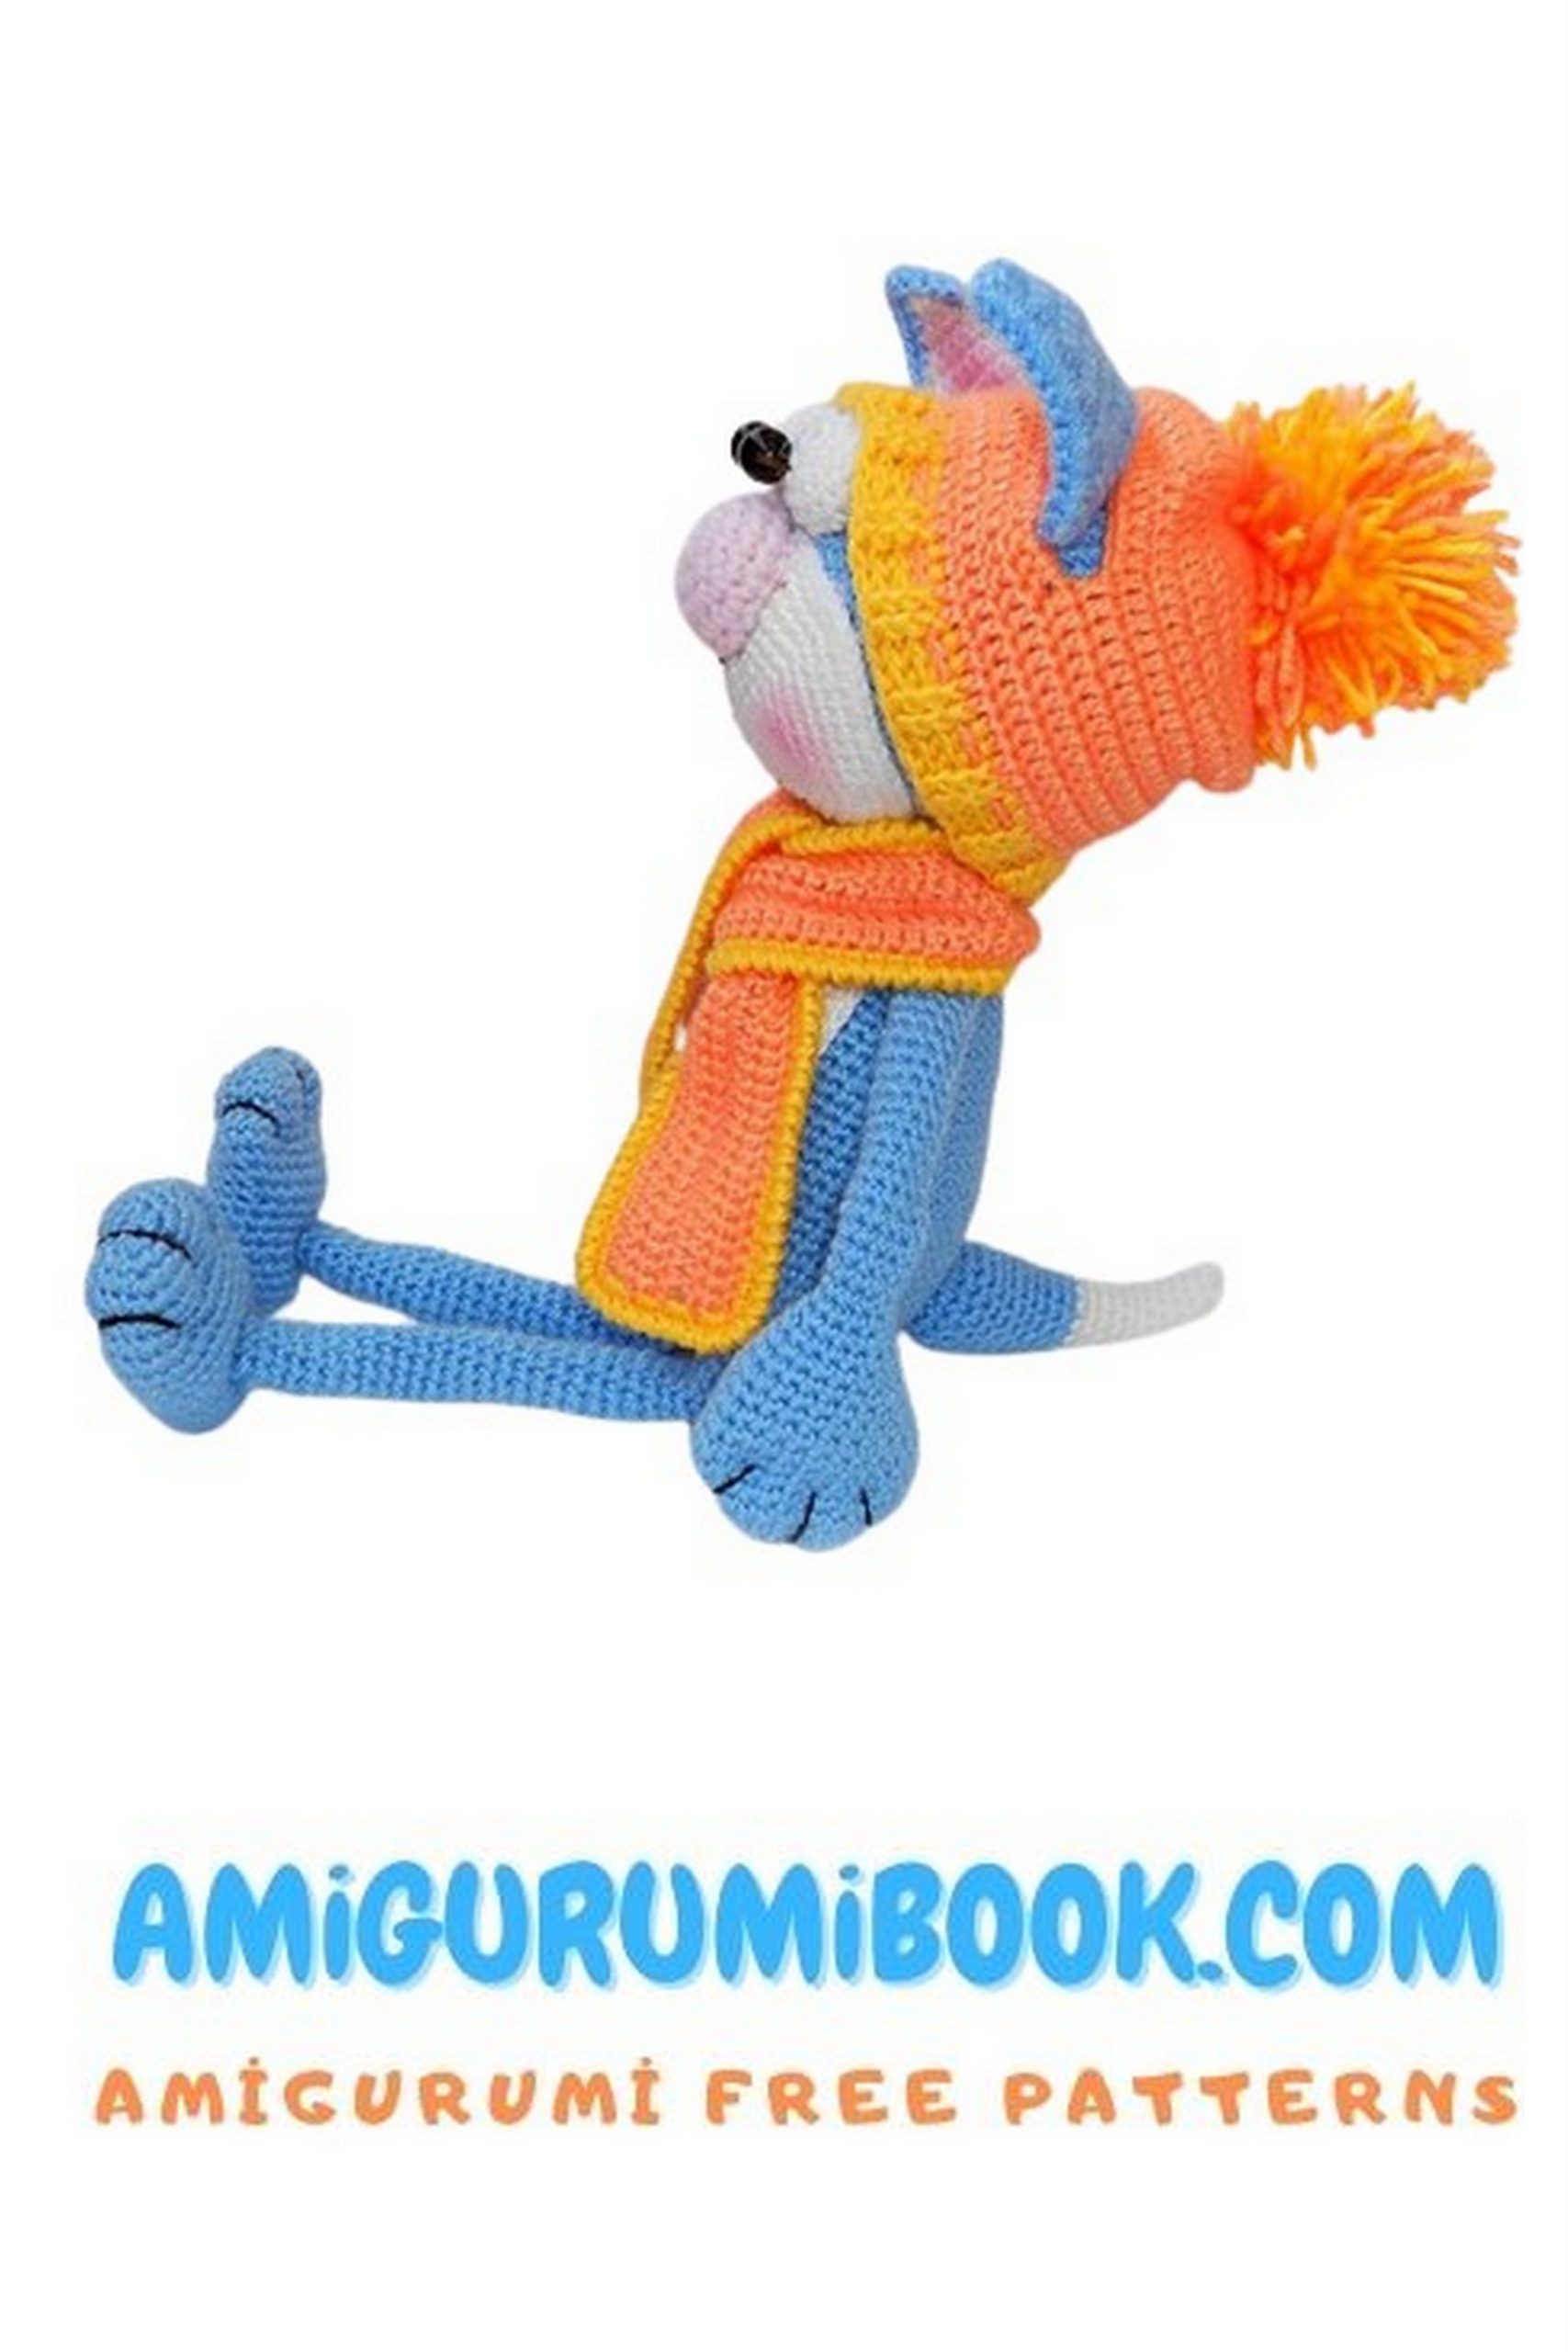
TAIL
1 row – chain of 16 ch, join in a ring, then crochet in a spiral
2-4 row – 16 sc (16)
5 row – decrease, 14 sc (15)
6 row – 15 sc (15)
Repeat row 5 and 6 until the 24th row, until 6 sts remain. Pull tight. In the 20th row, you can change the thread color, then you’ll get a tassel on the tail.
HAT and SCARF
Blue hat:
I knitted it on 5 needles with a size of 3, but you can knit on two and then sew.
Cast on 90 stitches and knit ribbing (2 knit, 2 purl) for 6 cm, then knit 3 cm with stockinette stitch.
(Bind off 1 knit, 2 purl) to the end.
One row of stockinette stitch.
(Bind off) to the end.
One row of stockinette stitch.
(Bind off) to the end.
One row of stockinette stitch.
Cast off the stitches and pull them together, you can make a pompom.
Note: Do not stretch the fabric between the ears. Otherwise, the hat will tilt backward.
SCARF
Cast on 22 stitches and knit ribbing (2 knit, 2 purl), the length depends on the number of threads and your patience.