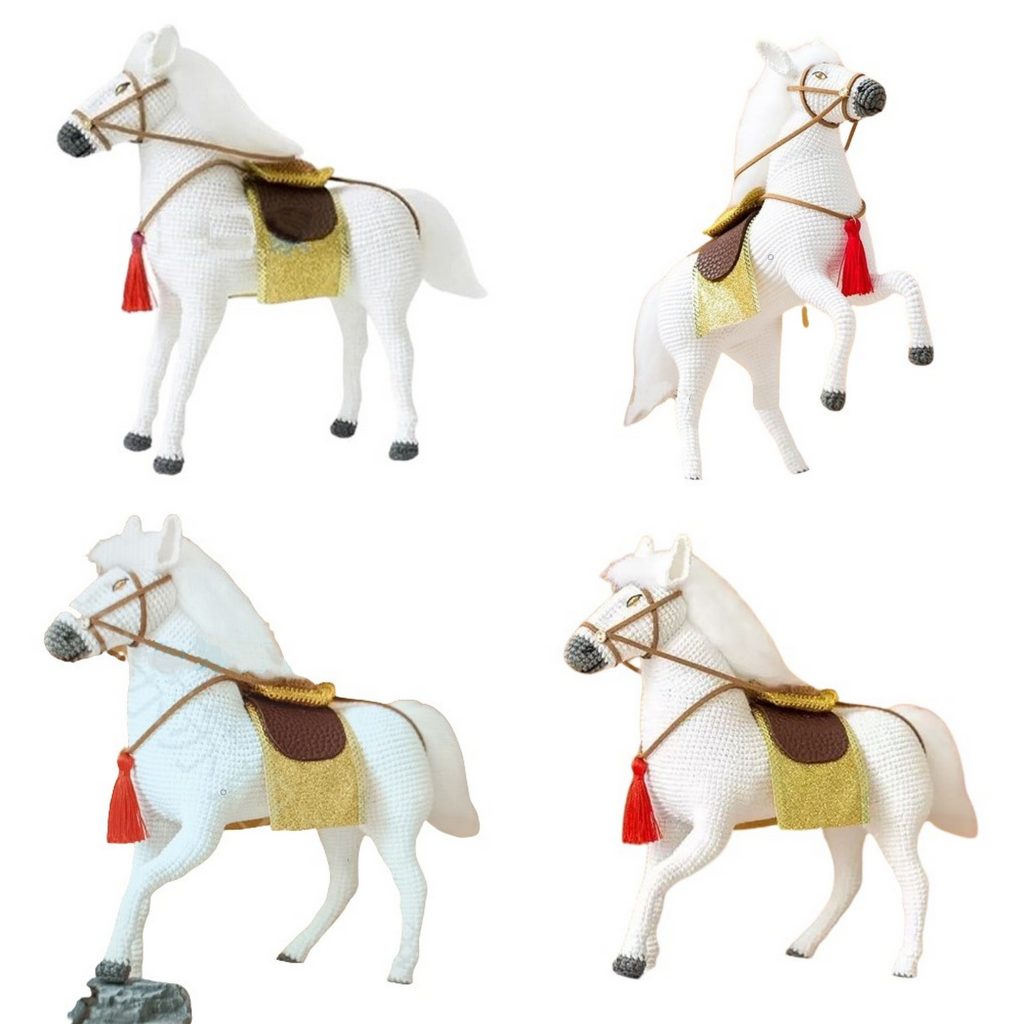
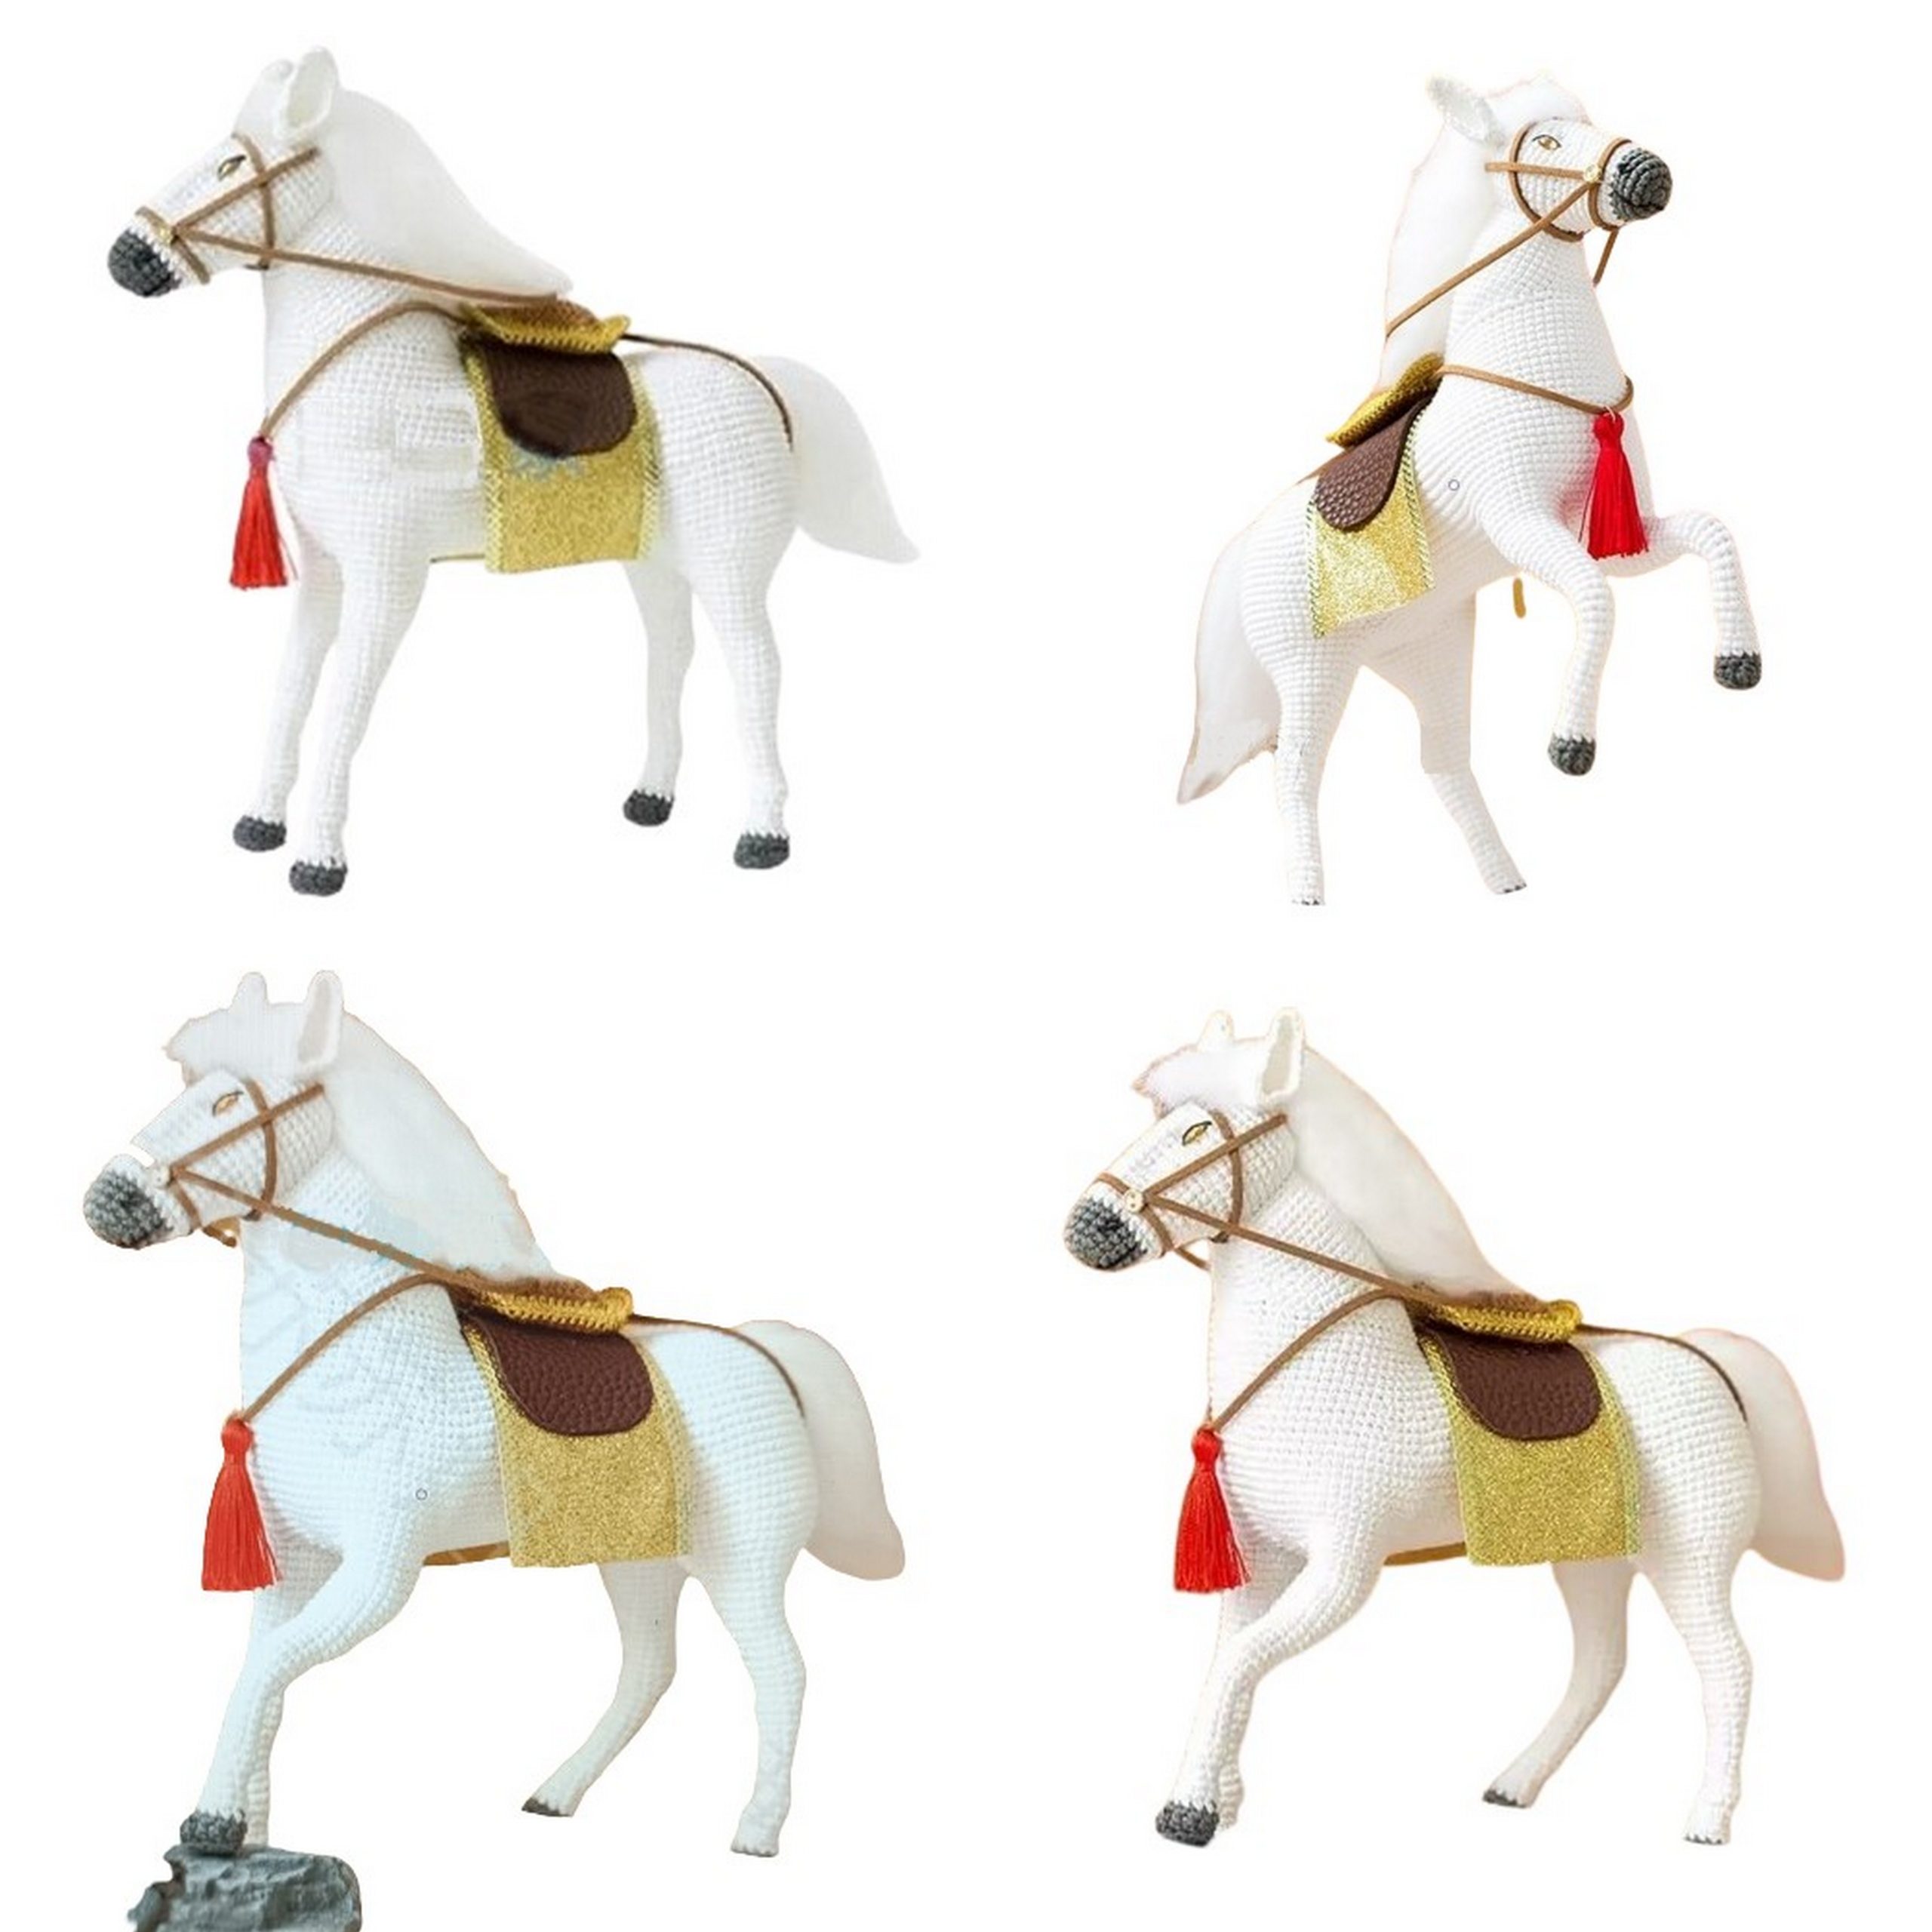
Welcome to the wonderful world of crochet, where creativity knows no bounds! Are you ready to gallop into a new crafting adventure? Saddle up and explore our free Horse Amigurumi pattern, where you’ll learn how to crochet your own lovable equine friend.
With our detailed instructions and helpful tips, crocheting a horse has never been easier. Whether you’re a seasoned crafter or just starting out, this pattern is perfect for all skill levels. As you work through each stitch, you’ll watch in amazement as your yarn transforms into a charming horse, ready to trot into your heart.
This project is not only a joy to make but also makes for a wonderful gift for horse lovers of all ages. Imagine the delight on someone’s face when they receive a handmade horse crafted with love and care.
So grab your crochet hooks and let your imagination run wild as you embark on this enchanting journey. Get ready to crochet your own Horse Amigurumi and experience the magic of bringing a beloved animal to life with our amigurumi free pattern!
This doll consists of two parts: the main body and accessories. First, the main body is made, and then the accessories are made and attached.
If you want to access 1000+ free amigurumi patterns, you can download our application from this link!
ABBREVIATIONS:
MR – magic ring (amigurumi ring)
ch – chain
sc – single crochet
sl st – slip stitch
hdc – half double crochet
dc – double crochet
tr – treble crochet
bptr – back post treble crochet
fptr – front post treble crochet
Note: When crocheting in the round, no special instructions are given. At the beginning, make 1 ch, and at the end of the row, sl st. 1 ch and sl st do not count as stitches.
PATTERN
PART 1 BODY – Amigurumi Horse
The body includes the head, legs, torso, abdomen, neck, and ears.
STEP 1 HEAD
1: 6 sc in MR (6)
2: 2 sc in each st around (12)
3: (1 sc, 2 sc in next st) around (18)
4-5: 18 sc
6: 2 sc in first st, 16 sc, 2 sc in last st (20)
7: 2 sc in first st, 18 sc, 2 sc in last st (22)
8: 22 sc
9: 2 sc in first st, 20 sc, 2 sc in last st (24)
10-28: 24 sc
29: (3 sc, sc2tog) around (18)
30: (2 sc, sc2tog) around (12)
31: (1 sc, sc2tog) around (6)
Fasten off, leaving a 15 cm tail for closing.
STEP 2 LEGS – Amigurumi Horse
All four legs are crocheted in the round and divided into front and back legs, left and right. Then insert wire and stuff.
Front Legs *2
1: 6 sc in MR (6)
2: 2 sc in each st around (12)
3: Bptr around 3 sts, 2 hdc in next st, sc2tog from sc, 2 hdc in next st, bptr around 3 sts (11)
4: 11 sc
Behind the loops of the 2nd row:
5: 11 sc
6: sc2tog, 7 sc, sc2tog (9)
7: 4 sc, sc2tog, 3 sc (8)
8: 2 sc in first st, 6 sc, 2 sc in last st (10)
9: 2 sc in first st, 8 sc, 2 sc in last st (12)
10: 4 sc, sc2tog, 4 sc (10)
11: sc2tog, 6 sc, sc2tog (8)
12-15: 8 sc
16: 2 sc in first st, 6 sc, 2 sc in last st (10)
17: 10 sc
18: 4 sc, 2 hdc, 4 sc (12)
19-20: 12 sc
21: 5 sc, sc2tog, 5 sc (11)
22: 11 sc
23: 2 sc in first st, 9 sc, 2 sc in last st (13)
24: 13 sc
25: 2 sc in first st, 11 sc, 2 sc in last st (15)
26: 15 sc
27: 2 sc in first st, 13 sc, 2 sc in last st (17)
28: 17 sc
29: 2 sc in first st, 15 sc, 2 sc in last st (19)
30: 19 sc
31: 2 sc in first st, 17 sc, 2 sc in last st (21)
32: 21 sc
33: 3 sc, 1 sc in next st, 6 sc, 1 sc in next st, 6 sc, 1 sc in next st, 3 sc (24)
34: 24 sc
After the two legs are ready, leave about 5 cm of yarn.


Back Legs *2
1: 6 sc in MR (6)
2: 2 sc in each st around (12)
3: Bptr around 3 sts, 2 hdc in next st, sc2tog from sc, 2 hdc in next st, bptr around 3 sts (11)
4: 11 sc
Behind the loops of the 2nd row:
5: 11 sc
6: sc2tog, 7 sc, sc2tog (9)
7: 4 sc, sc2tog, 3 sc (8)
8: 2 sc in first st, 6 sc, 2 sc in last st (10)
9: 2 sc in first st, 8 sc, 2 sc in last st (12)
10: 4 sc, sc2tog, 4 sc (10)
11: sc2tog, 6 sc, sc2tog (8)
12-15: 8 sc
16: 2 sc in first st, 6 sc, 2 sc in last st (10)
17: 10 sc
18: 5 sc, 1 hdc, 4 sc (11)
19: 1 hdc, 9 sc, 1 hdc (13)
20: 6 sc, sc2tog, 5 sc (12)
21: 1 hdc, 10 sc, 1 hdc (14)
22: 14 sc
23: sc2tog, 5 sc, 1 hdc, 4 sc, sc2tog (13)
24: 6 sc, 1 hdc, 6 sc (14)
25: 14 sc
26: 7 sc, 1 hdc, 6 sc (15)
27: 7 sc, 1 hdc, 7 sc (16)
28: 16 sc
29: 8 sc, 1 hdc, 7 sc (17)
30: 1 hdc, 7 sc, 1 hdc, 7 sc, 1 hdc (20)
31: 1 hdc, 18 sc, 1 hdc (22)
32: 1 hdc, 10 sc, 1 hdc, 9 sc, 1 hdc (25)
33: 1 hdc, 11 sc, 1 hdc, 11 sc, 1 hdc (28)
34: 1 hdc, 26 sc, 1 hdc (30)
35: (4 sc, 1 hdc) * 6 (36)
36: 36 sc
37: (5 sc, 1 hdc) * 6 (42)
38: 42 sc
After the two legs are ready, leave about 5 cm of yarn.

STEP 3 BODY – Amigurumi Horse
Connect the legs and crochet the torso in the round.
Join to the 5th st of the left back leg, 28 sc, 25 ch, to the 1st st of the left front leg, 16 sc, 10 ch, to the 10th st of the right front leg, 16 sc, 25 ch, to the 20th st of the right back leg, 28 sc, 5 ch, join with the left back leg.
Attention
1: Left back leg 28 sc, along the chain 25 sc, left front leg 16 sc, along the chain 10 sc, right front leg 16 sc, along the chain 25 sc, right back leg 28 sc, along the chain 5 sc (153)
2-5: 153 sc
6: 74 sc, 2 sc in next st, 78 sc (154)
7: 6 sc, sc2tog, 13 sc, sc2tog, 103 sc, sc2tog, 13 sc, sc2tog, 11 sc (150)
8-9: 150 sc
10: 72 sc, 2 sc in next st, 77 sc (151)
11: 5 sc, sc2tog, 13 sc, sc2tog, 102 sc, sc2tog, 13 sc, sc2tog, 10 sc (147)
12: 49 sc, sc2tog, 40 sc, sc2tog, 54 sc (145)
13: 15 sc, sc2tog, 35 sc, sc2tog, 32 sc, sc2tog, 35 sc, sc2tog, 20 sc (141)
14: 2 sc, sc2tog, 19 sc, sc2tog, 20 sc, sc2tog, 21 sc, 2 sc in next st, 20 sc, sc2tog, 20 sc, sc2tog, 19 sc, sc2tog, 7 sc (136)
15: 9 sc, sc2tog, 34 sc, sc2tog, 37 sc, sc2tog, 34 sc, sc2tog, 14 sc (132)
16: 4 sc, sc2tog, 10 sc, sc2tog, 28 sc, sc2tog, 31 sc, sc2tog, 28 sc, sc2tog, 10 sc, sc2tog, 9 sc (126)
17: 16 sc, sc2tog, 85 sc, sc2tog, 21 sc (124)
18: 120 sc, sc2tog, 2 sc (123)
19: (sc2tog, 1 sc) * 5, 25 sc, sc2tog, 35 sc, sc2tog, 25 sc, (1 sc, sc2tog) * 5, 4 sc (111)
20: (sc2tog, 1 sc) * 4, 83 sc, (1 sc, sc2tog) * 4, 4 sc (103)
21: (sc2tog, 1 sc) * 3, 82 sc, (1 sc, sc2tog) * 3, 3 sc (97)
22: (sc2tog, 1 sc) * 2, 82 sc, (1 sc, sc2tog) * 2, 3 sc (93)
23: sc2tog twice, 83 sc, sc2tog thrice (88)
Leave a 50 cm tail.
STEP 4 ABDOMEN – Amigurumi Horse
Crochet the abdomen in the round below the legs and sew up the opening when finished.
1: 2 sc, sc2tog, 12 sc, sc2tog, 23 sc, sc2tog, 6 sc, sc2tog, 8 sc, sc2tog, 6 sc, sc2tog, 23 sc, sc2tog, 12 sc, sc2tog, sc (101)
2: sc2tog thrice, 39 sc, sc2tog six times, 38 sc, sc2tog thrice (89)
3: sc2tog twice, 37 sc, sc2tog four times, 36 sc, sc2tog twice (81)
4: sc2tog, 36 sc, sc2tog twice, 37 sc, sc2tog (77)
STEP 5 NECK
First, stuff and sew the back half of the torso, then crochet around the neck opening, adding stuffing as you go.
Cut yarn after each row.
1: Ch 1, 6 sc (6)
2: From the 3rd st from the right, ch 1, 3 sc, sc2tog (7)
3: From the 4th st from the right, ch 1, 9 sc (9)
4: From the 5th st from the right, ch 1, 11 sc (11)
5: From the 6th st from the right, ch 1, 13 sc (13)
6: From the 7th st from the right, ch 1, 15 sc (15)
7: From the 8th st from the right, ch 1, 17 sc (17)
8: From the 9th st from the right, ch 1, 19 sc (19)
9: From the 11th st from the right, ch 1, 23 sc (23)
10: From the 13th st from the right, ch 1, 2 sc, sc2tog, 19 sc, sc2tog, 2 sc (25)
11: From the 14th st from the right, ch 1, 27 sc (27)
12: From the 15th st from the right, ch 1, 13 sc, sc2tog, 14 sc (28)
13: From the 16th st from the right, ch 1, 30 sc (30)
14: From the 17th st from the right, ch 1, 32 sc (32)
15: From the 19th st from the right, ch 1, sc2tog, 32 sc, sc2tog (34)
16: From the 20th st from the right, ch 1, 36 sc (36)
Continue working in a spiral (beginning without making 1 ch, and ending without making sl st)
17: 2 sc, sc2tog, 19 sc, sc2tog, 18 sc (41)
18: 5 sc, sc2tog, 31 sc, sc2tog, sc (39)
19: 39 sc
20: 2 sc, sc2tog, 17 sc, sc2tog, 16 sc (37)
21: 37 sc
22: sc, sc2tog, 9 sc, sc2tog, 12 sc, sc2tog, 9 sc (34)
23: 34 sc
24: 3 sc, sc2tog, 26 sc, sc2tog, sc (32)
Leave a 50 cm tail.

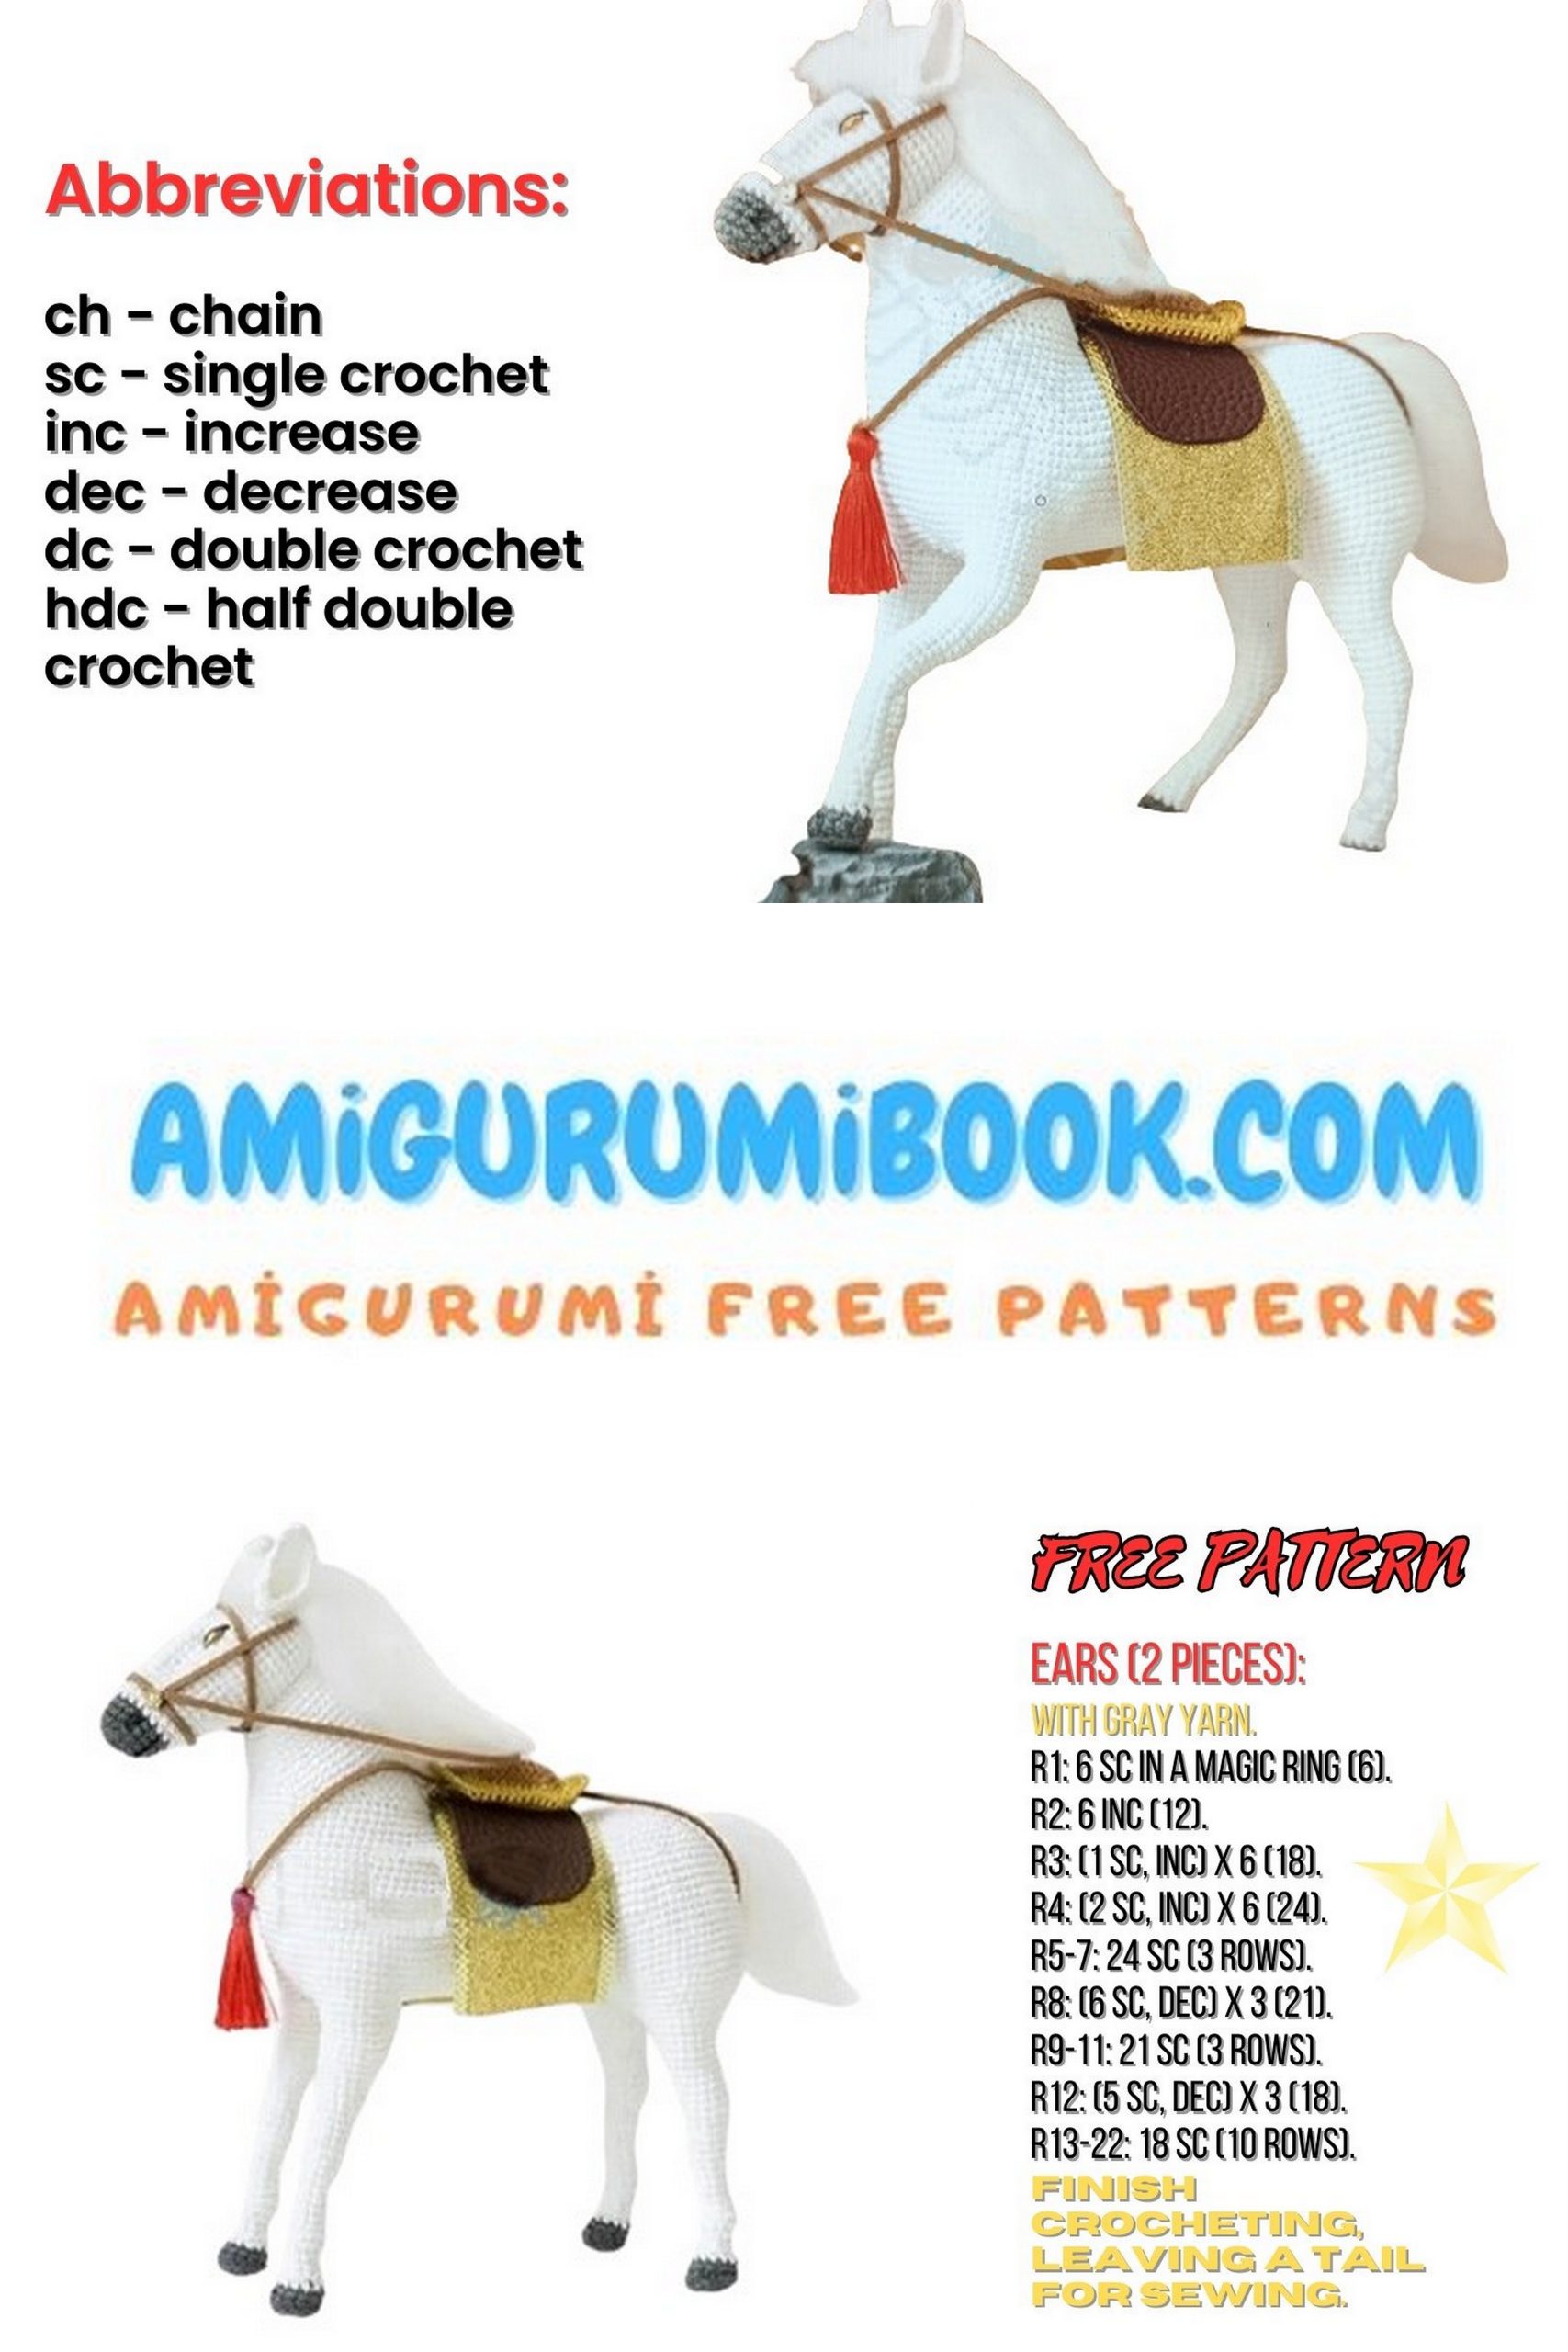
STEP 6 EARS – Amigurumi Horse
Ears * 2
1: 6 sc in magic ring (6)
2: Ch 1, 6 sc (6)
3-6: Ch 1, turn, 6 sc
7: Ch 1, turn, sc2tog, 2 sc, sc2tog (4)
8: Ch 1, turn, 4 sc
9: Ch 1, turn, sc2tog twice (2)
10: Ch 1, turn, 2 sc
11: Ch 1, turn, sc2tog (1)
Insert a thin wire, sc around 21 sts.
Leave about 30 cm of yarn at the end.
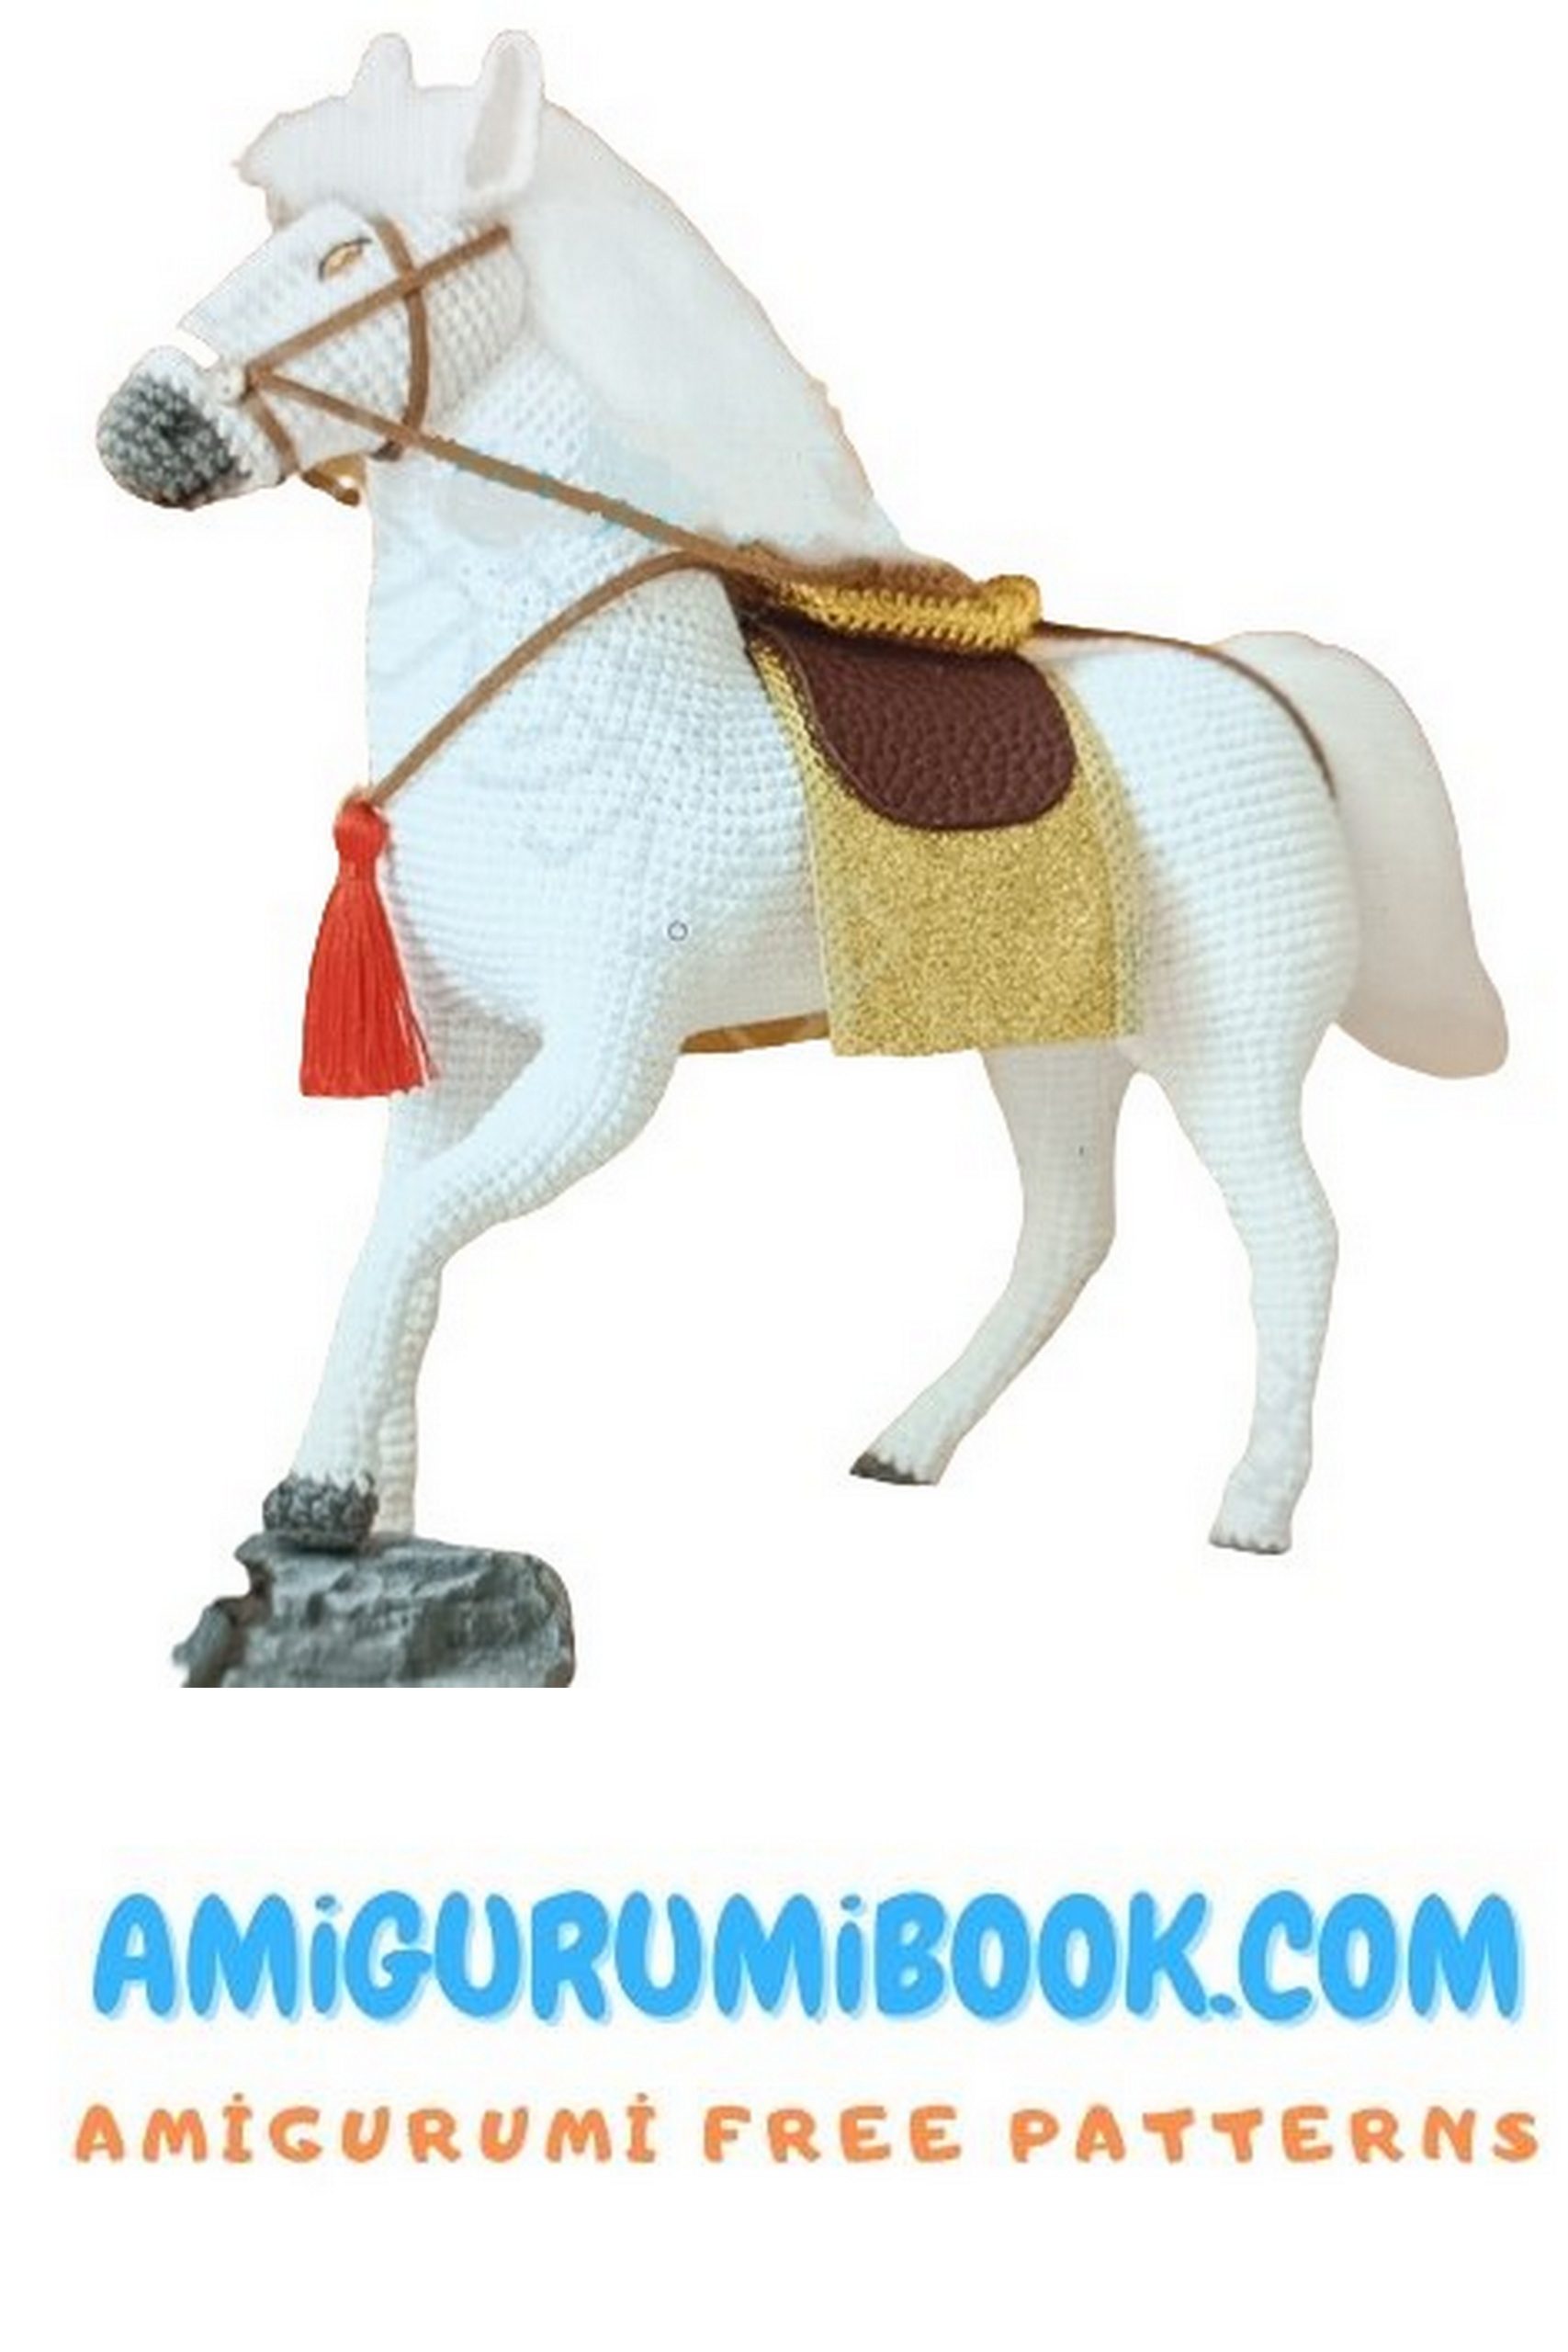
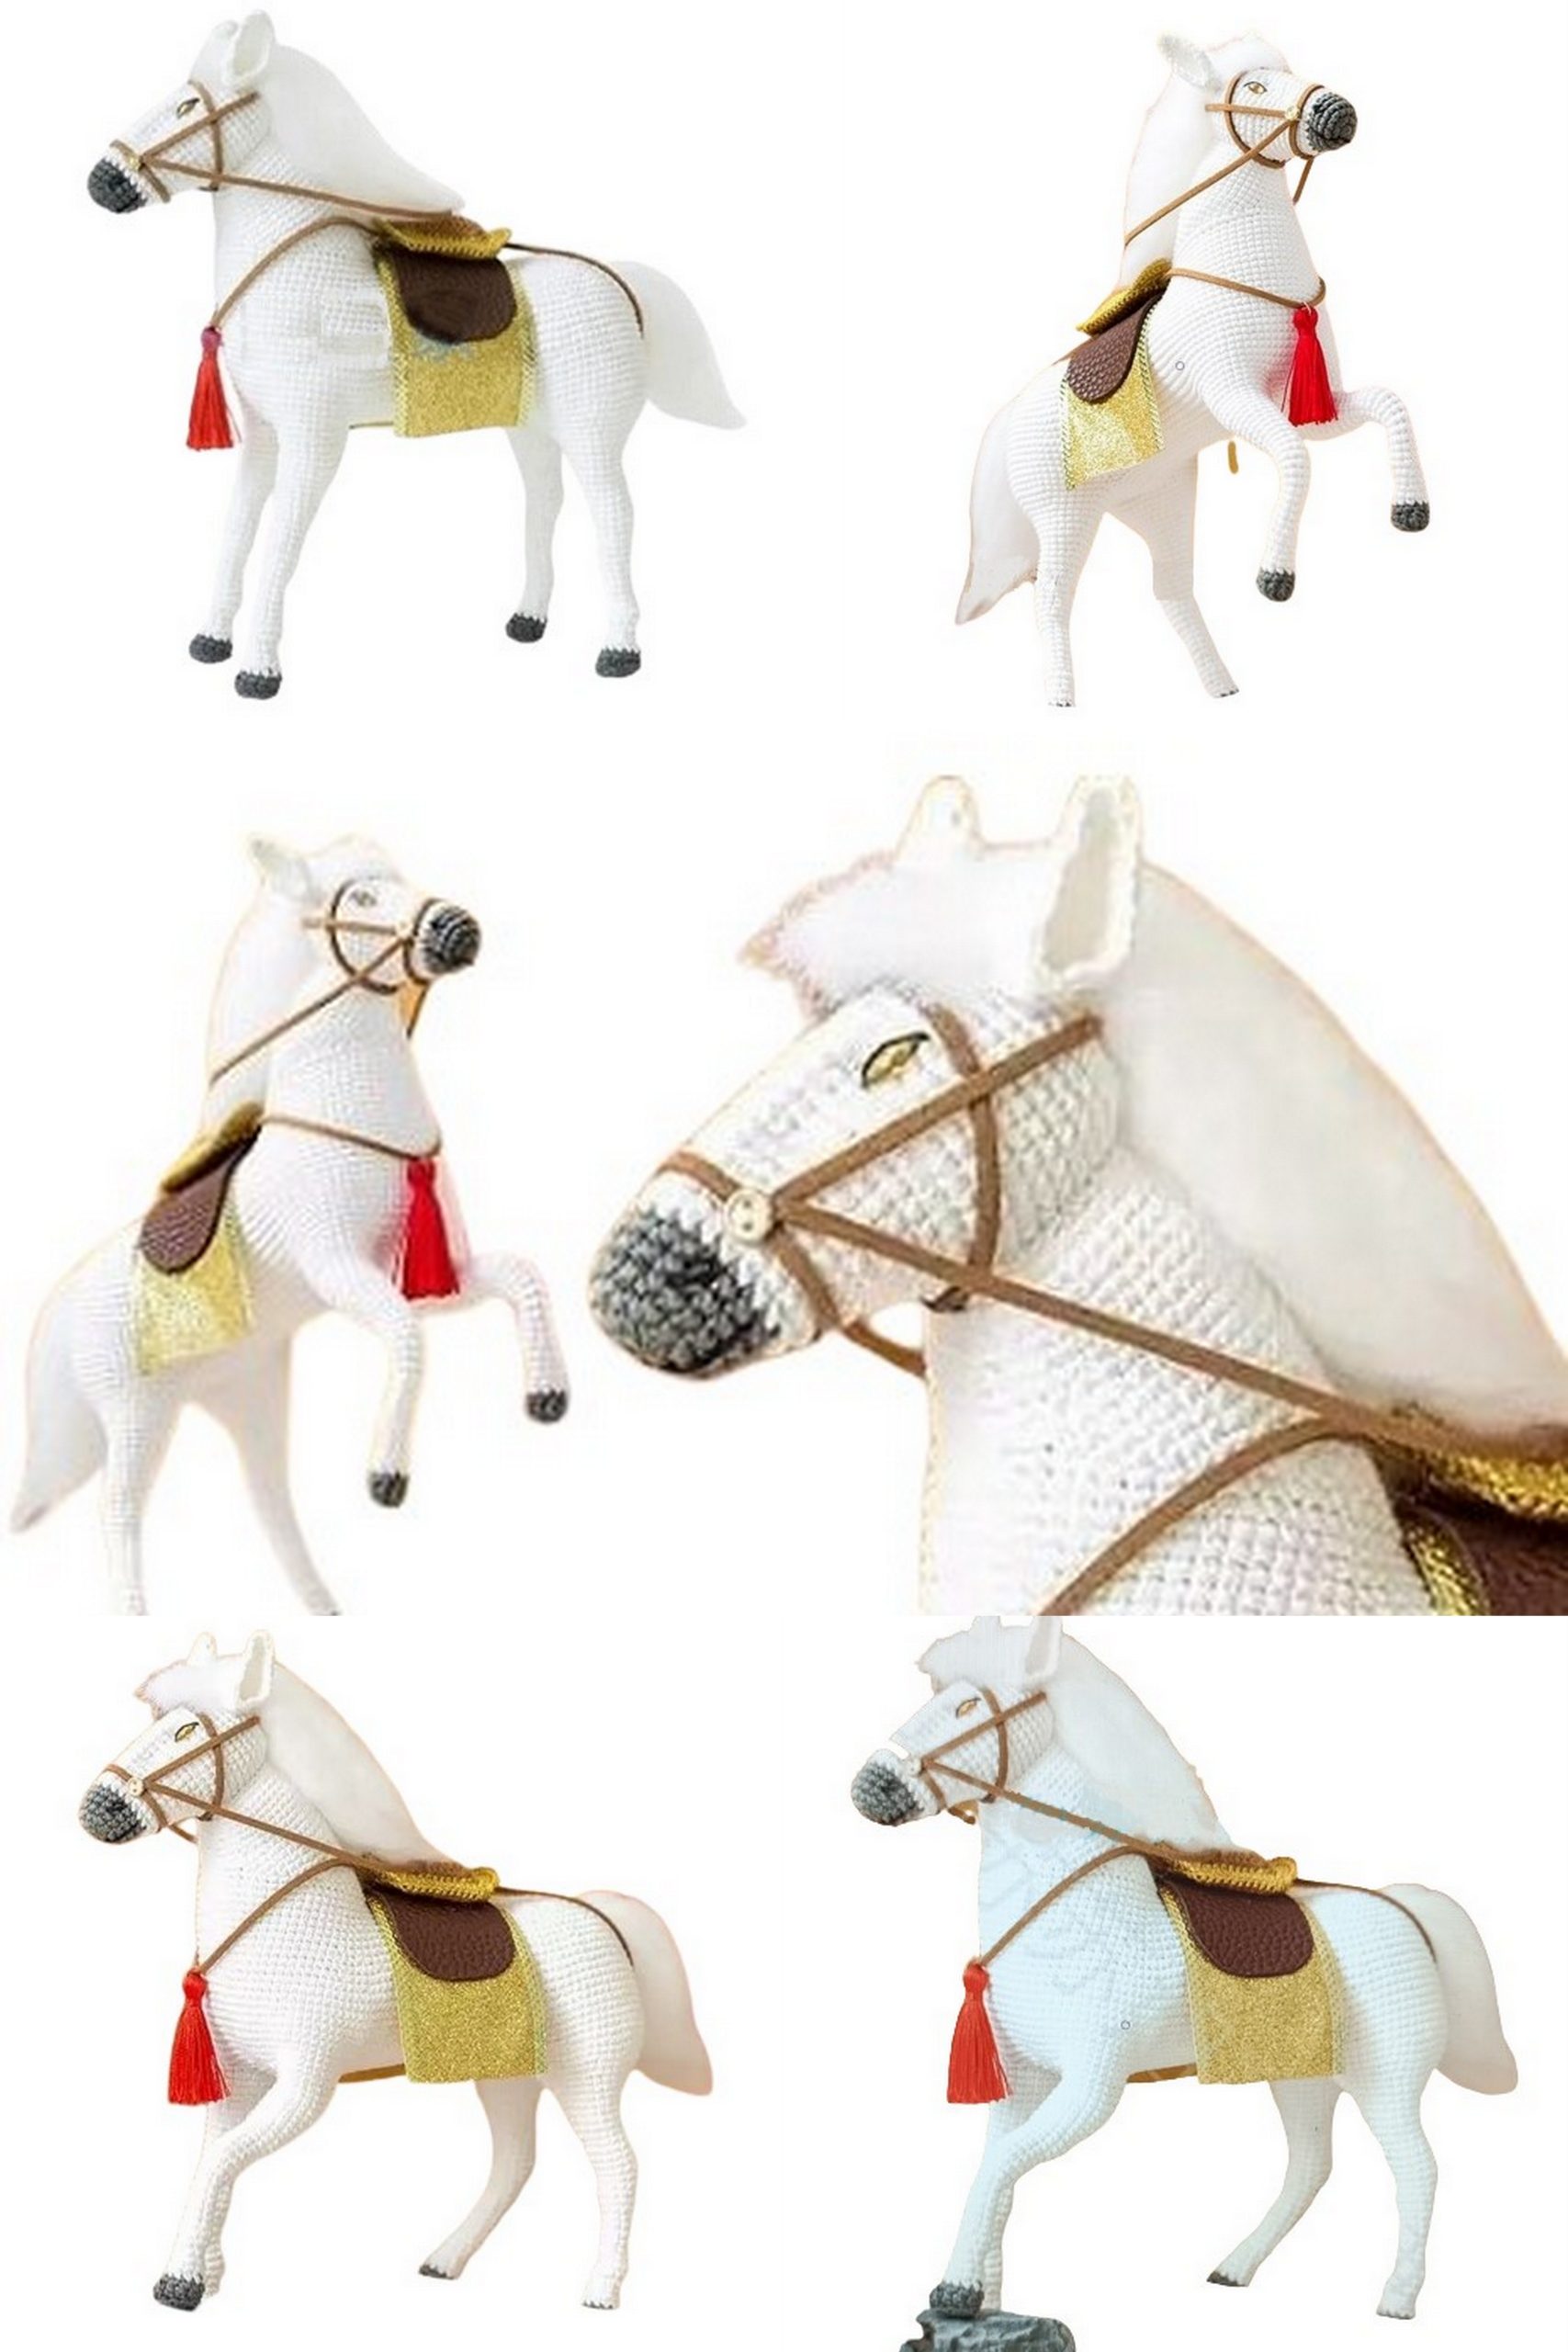
STEP 7 ASSEMBLY – Amigurumi Horse
Sew the pieces together. First, sew the head, then the ears.
PART 2 ACCESSORIES. – Amigurumi Horse
Accessories include facial features, reins, mane and tail, as well as a saddle. Facial features include eyes, mouth, and nose. The saddle consists of three parts: saddle, pad, and knot. The saddle is divided into lower and upper parts.
SADDLE.
Crochet in rows.
1: Ch 9, from the 2nd ch from the hook, 8 sc (8)
2: Ch 1, turn, sc, 6 sc, sc (10)
3: Ch 1, turn, 10 sc
4: Ch 1, turn, sc, 8 sc, sc (12)
5-8: Ch 1, turn, 12 sc
9: Ch 1, turn, sc2tog, 8 sc, sc2tog (10)
10: Ch 1, turn, 10 sc
11: Ch 1, turn, sc2tog, 6 sc, sc2tog (8)
12: Ch 1, turn, 8 sc (8)
13: Turn, 7 sc, sc in next st, 11 sc, sc in next st, 6 sc, sc in next st, 12 sc (42)
14: sc in next st, 6 sc, 2 sc in next st, 11 sc, 2 sc in next st, 6 sc, 2 sc in next st, 11 sc, sc in next st (50)
15: (10 sc, sc in next st, 2 sc in next st, sc in next st, 2 sc in next st, sc in next st) * 2 (62)
16: 12 sc, 2 hdc, 3 dc, sc in next st, 5 sc, sc in next st, 3 dc, 2 hdc, 14 sc, 2 hdc, 3 dc, sc in next st, 5 sc, sc in next st, 3 dc, 2 hdc, 2 sc (66)
17: (Insert wire) 66 sc
Leave about 60 cm of yarn at the end.
Lower part.
1: Ch 12, from the 2nd ch from the hook, 11 sc (11)
2-14: Ch 1, turn, 11 sc
15: Turn, 10 sc, sc in next st, 13 sc, sc in next st, 9 sc, sc in next st, 14 sc (52)
16: sc in next st, 9 sc, 2 sc in next st, 13 sc, 2 sc in next st, 9 sc, 2 sc in next st, 13 sc, sc in next st (60)