
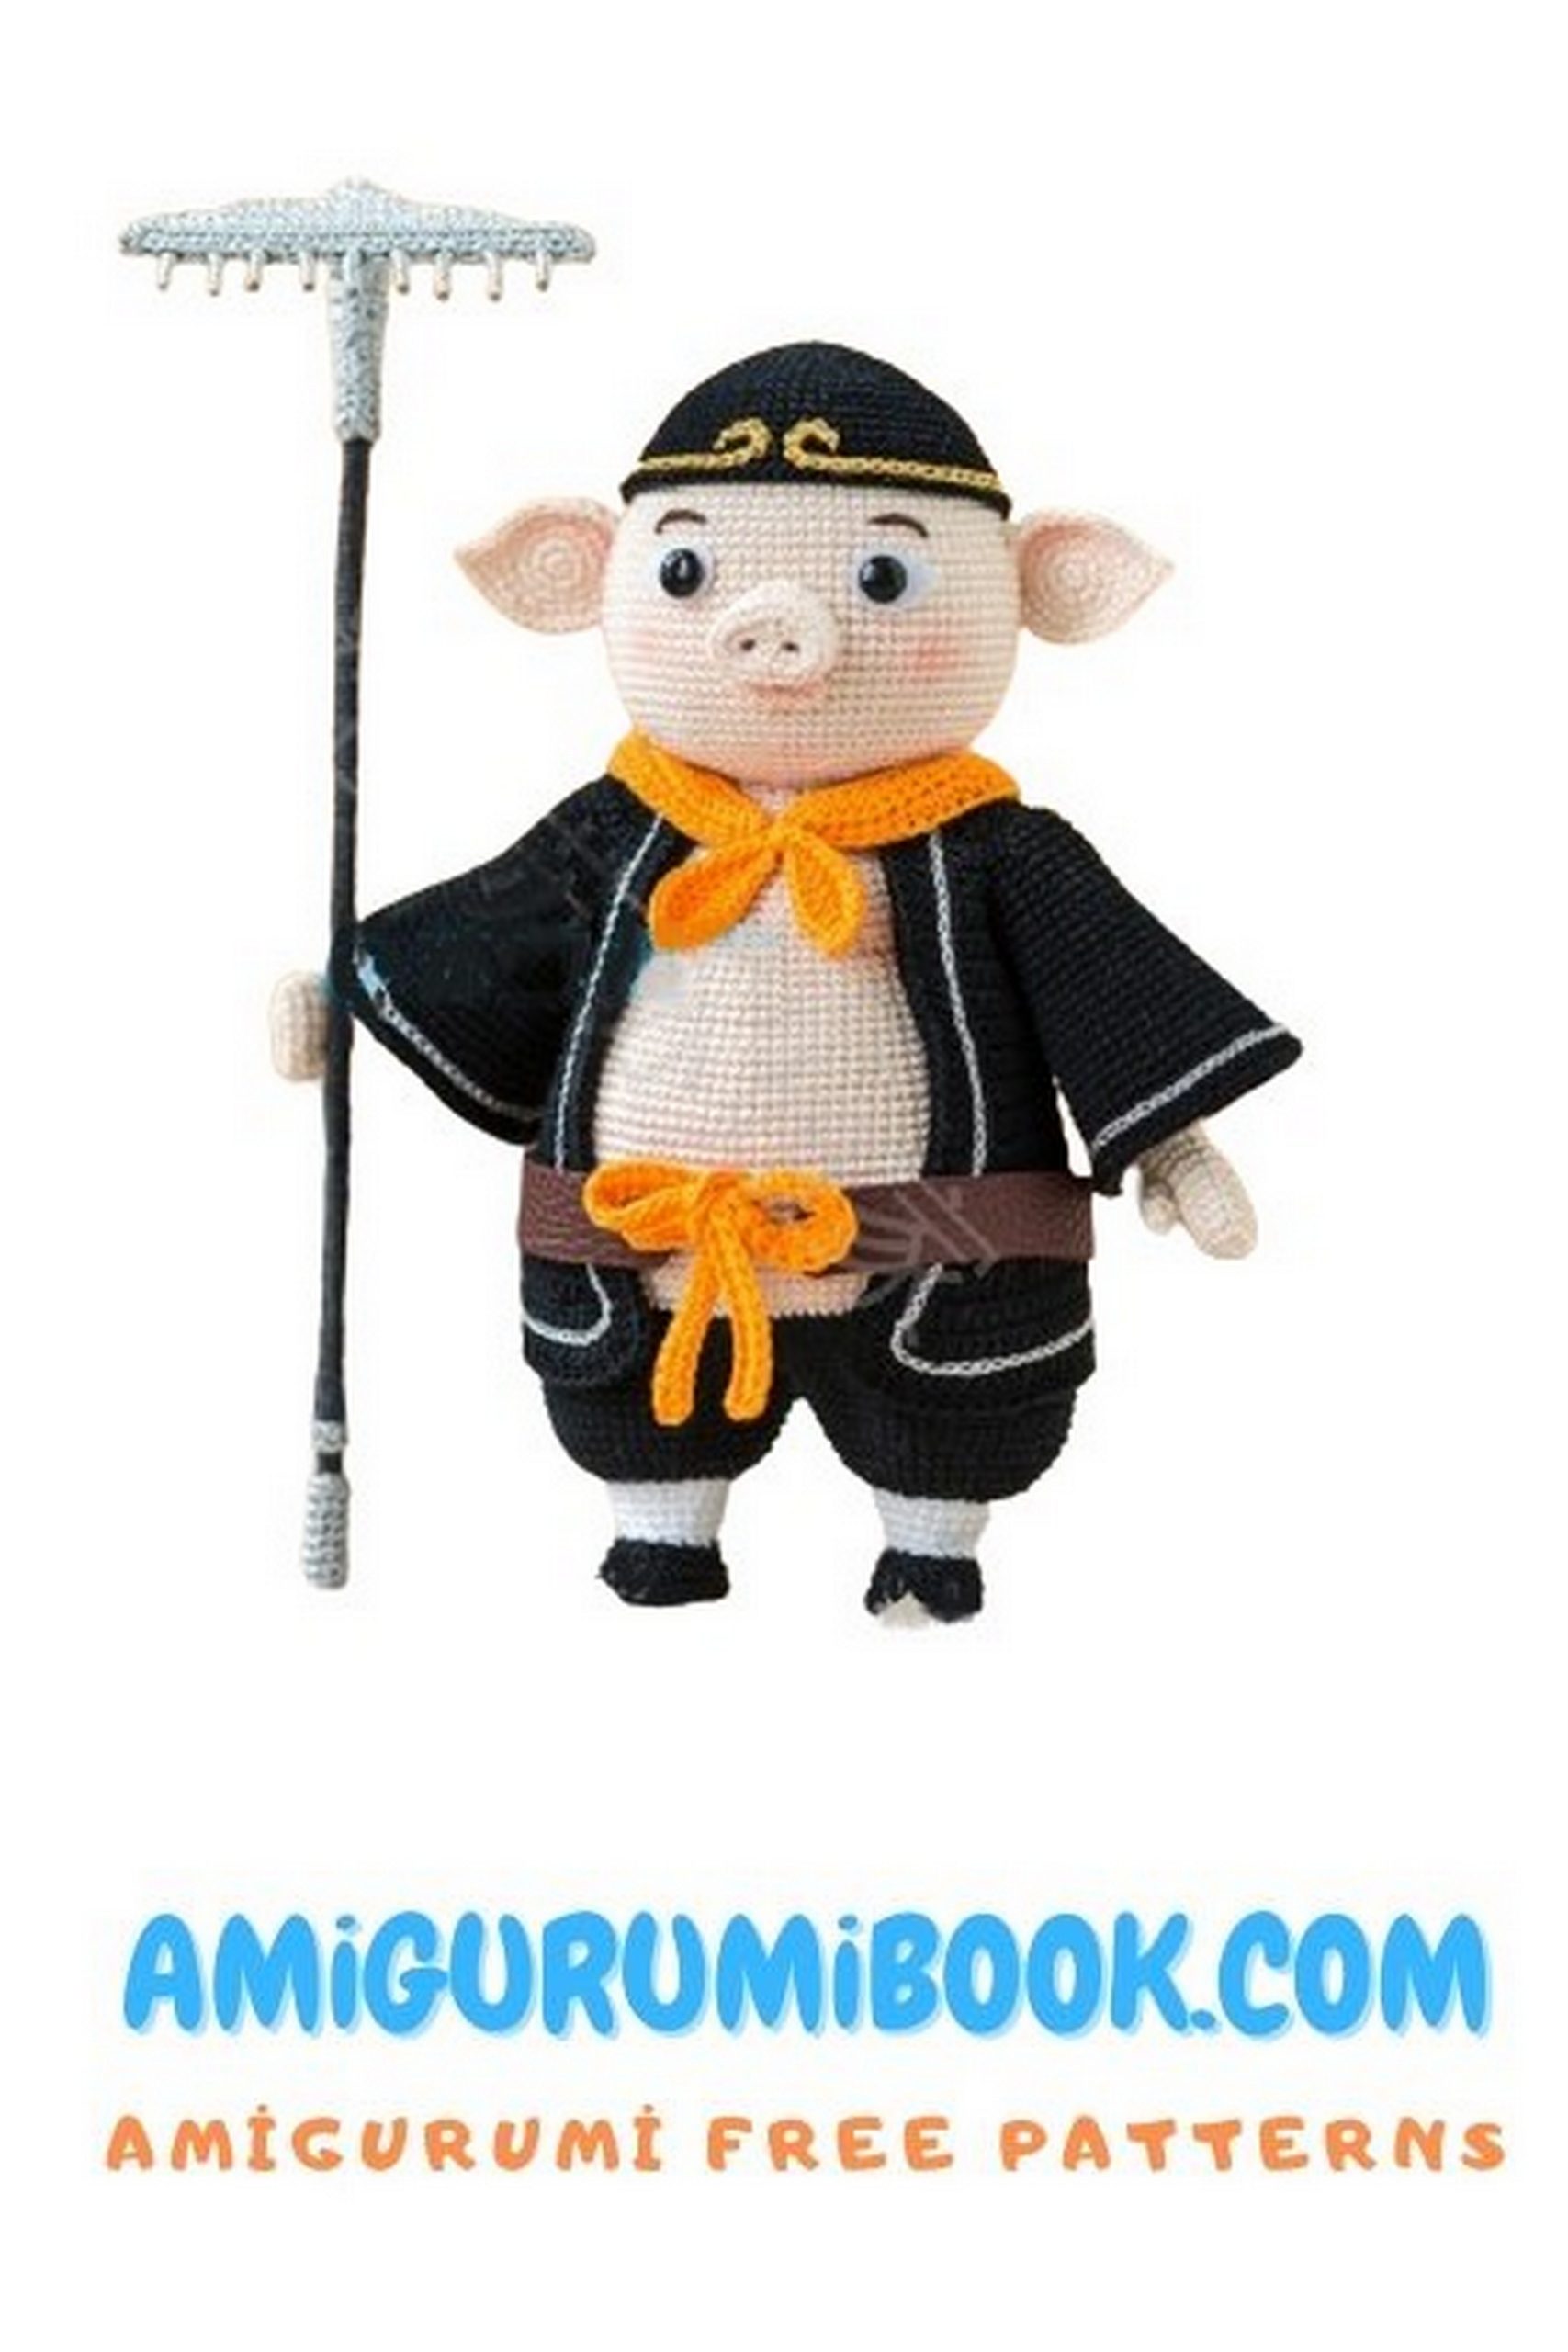
Welcome to the whimsical world of amigurumi crochet! If you’re on the hunt for a project that’s as playful as it is charming, look no further than our free Pig-Man Zhu Amigurumi pattern. This delightful creation invites you to crochet your very own quirky friend, Pig-Man Zhu, who is sure to bring a smile to your face with his endearing personality. Whether you’re a seasoned crocheter or just starting out, this project promises a fun and rewarding journey through stitches and imagination. Join us as we embark on a crochet adventure filled with laughter, creativity, and oodles of charm!
This doll consists of 2 parts: the main body and accessories. First, knit the main part of the item, and then the accessories.
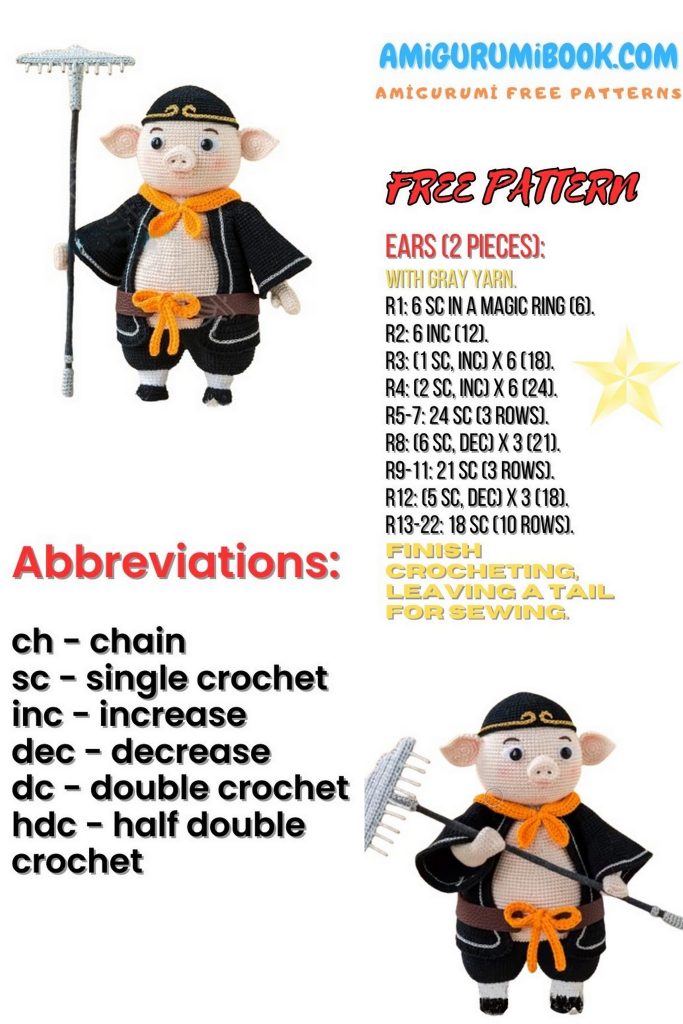
Height – about 23 cm Height with ears – about 26.5 cm
There may be errors in manual measurements. Sizes are provided for reference only.
If you want to access 1000+ free amigurumi patterns, you can download our application from this link!
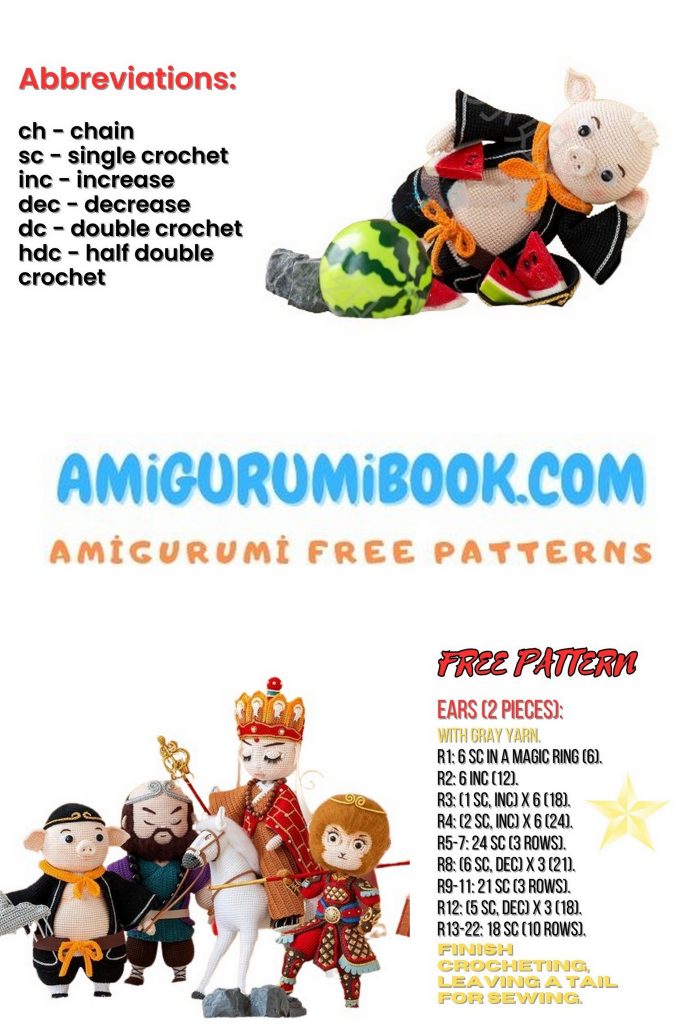
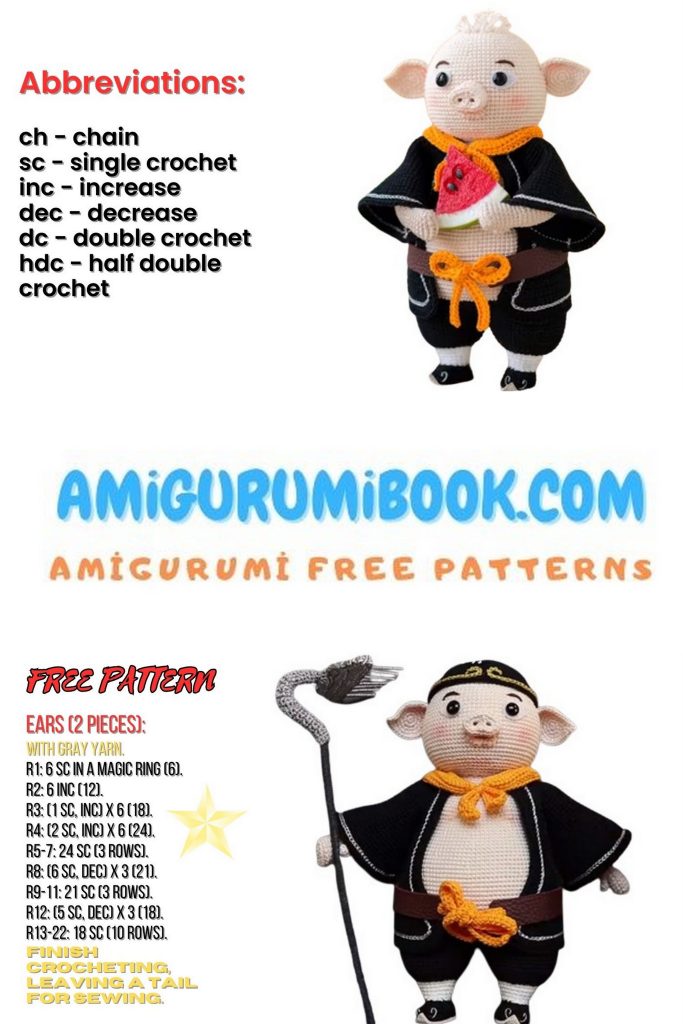
ABBREVIATIONS:
MR – Magic Ring
CH – Chain
SC – Single Crochet
SlSt – Slip Stitch
HDC – Half Double Crochet
DC – Double Crochet
INC – Increase
DEC – Decrease
FPSC – Front Post Single Crochet
BPSC – Back Post Single Crochet

Pig-Man Zhu BODY.
The body includes arms, legs, torso, and head.
Note:
If there are no specific instructions, when crocheting in the round, make 1 CH at the beginning of each row and SlSt at the end of the row.
1 CH and SlSt do not count as stitches.
STEP 1. ARMS.
First, crochet the thumb, then the palm, connect the thumb and palm, and then crochet the arm. See details in the video demonstration.
ARM *2
Thumb:
1. 5 SC in MR
2-R3. 5 SC
Note: After completion, leave a 15 cm yarn tail for sewing the thumb.
Palm:
1. 7 CH, from the 2nd loop from the hook: 5 SC, 3 SC in one loop, 4 SC, INC. (14)
2-R7. 14 SC
8. 2 SC, with thumb 2 SC (skip 3 loops, skip 3 loops), 4 SC, DEC, 3 SC (12)
ARM:
9. (SC, INC, SC) ×4 (16)
10. 16 SC
11. (3 SC, INC) ×4 (20)
12-R36. 20 SC
Note: After the 10th row, add a small amount of stuffing to the palm, leave a 15 cm sewing yarn tail for closing the holes.
Pig-Man Zhu LEGS 2
They are divided into four parts: shoes, shank, trousers, and footwear decoration. The shoes are crocheted in the round with 1 CH at the beginning of the row and SlSt at the end. After everything is done, add decoration to the footwear. See details in the video demonstration. Video time 20’19” (Part 1)


Pig-Man Zhu SHOES.
1. 7 CH, from the 2nd loop from the hook: 5 SC, 3 SC in one loop, 4 SC, INC. (14)
2. INC, 4 SC, 3 INC, 4 SC, 2 INC (20)
3. 8 SC, [SC, HDC], [HDC, SC], 8 SC, 2 INC (24)
4. Turn, 24 SlSt
5. Turn, 24 SC
6. 6 SC, HDC, 2 DEC from DC, HDC, 12 SC (22)
7. 5 SC, DEC, 2 SC, DEC, 8 SC, DEC, SC (19)
Note: After the 6th row, insert cardboard inside the sole, then stuff.
Pig-Man Zhu SHANK.
8. (BPSC) 3 SC, skip 1 loop, SC, skip 1 loop, DEC from SC, skip 1 loop, SC, skip 1 loop, 8 SC (14)
9. (SC, INC) ×7 (21)
10. 21 SC
11. (3 SC, INC, 3 SC) ×3 (24)
12-R13. 24 SC
Pig-Man Zhu TROUSER.
14. (BPSC) (SC, INC) × 12 (36)
15. (5 SC, INC) ×6 (42)
16. 42 SC
17. (3 SC, INC, 3 SC) ×6 (48)
18. 48 SC
19. (7 SC, INC) ×6 (54)
20-R22. 54 SC
Note: After completing the first leg, cut the yarn. After completing the second leg, do not cut the yarn.
STEP 3. BODY
First, connect the two legs together and continue crocheting along both legs. Attach the arms and add shaping wire and stuffing. See details in the video demonstration. Video time 38’22” (Part 1)
Pig-Man Zhu BODY.
1. 1 CH, (join to the 37th loop of the other leg) 49 SC, skip 5 loops on the leg you are crocheting on, skip 5 loops on the second leg, 49 SC (98)
2. (13 SC, INC) ×7 (105)
3-R5. 105 SC
6. 51 SC, 2 INC, 52 SC (107)
7. 107 SC
8-R11. 107 SC
12. 53 SC, INC, 53 SC (108)
13-R14. 108 SC
15. 20 SC, DEC, 61 SC, DEC, 23 SC (106)
16. 106 SC
17. 20 SC, DEC, 59 SC, DEC, 23 SC (104)
18 104 SC
19. (12 SC, DEC, 12 SC) ×4 (100)
20. 100 SC
21. (9 SC, DEC, 9 SC) x5 (95)
22-R23. 95 SC
24. (17 SC, DEC) ×5 (90)
25-R26. 90 SC
27. (8 SC, DEC, 8 SC) ×5 (85)
28-R29. 85 SC
30. (15 SC, DEC) ×5 (80)
31. 80 SC
32. (7 SC, DEC, 7 SC) ×5 (75)
33. 75 SC
34. 25 SC, (SC, HDC)×3, DEC, 10 SC, DEC, (HDC, SC)×3, 24 SC (79)
35. 34 SC, DEC, 3 SC, DEC, 3 SC, DEC, 33 SC (76)
36. 15 SC, DEC, 17 SC, DEC, 5 SC, DEC, 17 SC, DEC, 14 SC (72)
37. 15 SC, DEC, 39 SC, DEC, 14 SC (70)
38. (6 SC, DEC, 6 SC) ×5 (65)
39. 65 SC
Attention
40. 13 SC, (including the 10th loop of the last row of the arm) 15 SC, (skip 5 loops, skip 5 loops), 14 SC, DEC, 14 SC, (including the 10th loop of the last row of the arm) 15 SC, (skip 5 loops, skip 5 loops), 12 SC (84)
41. (6 SC, DEC, 6 SC) ×6 (78)
42. (11 SC, DEC) ×6 (72)
43. (7 SC, DEC)×8 (64)
44. (3 SC, DEC, 3 SC)×8 (56)
45. (5 SC, DEC) ×8 (48)
46. (2 SC, DEC, 2 SC)×8 (40)
47. 40 SC
Note: Insert shaping wire and stuff the body. After completion, leave about 60 cm of yarn for sewing.
STEP 4. HEAD.
1. 6 SC in MR
2. 6 INC (12)
3. (SC, INC) ×6 (18)
4. (SC, INC, SC) ×6 (24)
5. (3 SC, INC)×6 (30)
6. (2 SC, INC, 2 SC) ×6 (36)
7. (5 SC, INC) ×6 (42)
8. (3 SC, INC, 3 SC) ×6 (48)
9. (7 SC, INC) ×6 (54)
10. (4 SC, INC, 4 SC) ×6 (60)
11. (9 SC, INC) ×6 (66)
12. 66 SC
13. (5 SC, INC, 5 SC)×6 (72)
14. 72 SC
15. (11 SC, INC) ×6 (78)
16-R17. 78 SC
18. (6 SC, INC, 6 SC) ×6 (84)
19-R31. 84 SC
32. (5 SC, DEC) ×12 (72)
33. 72 SC
34. (2 SC, DEC, 2 SC) ×12 (60)
35. 60 SC
36. (3 SC, DEC) ×12 (48)
37. (3 SC, DEC, 3 SC) ×6 (42)
38. (5 SC, DEC) ×6 (36)
39. (2 SC, DEC, 2 SC) ×6 (30)
40. (3 SC, DEC) ×6 (24)
41. (SC, DEC, SC) ×6 (18)
42. (SC, DEC) ×6 (12)
43. 6 DEC (6)
Note: After completion, leave about 15 cm of yarn for closing.
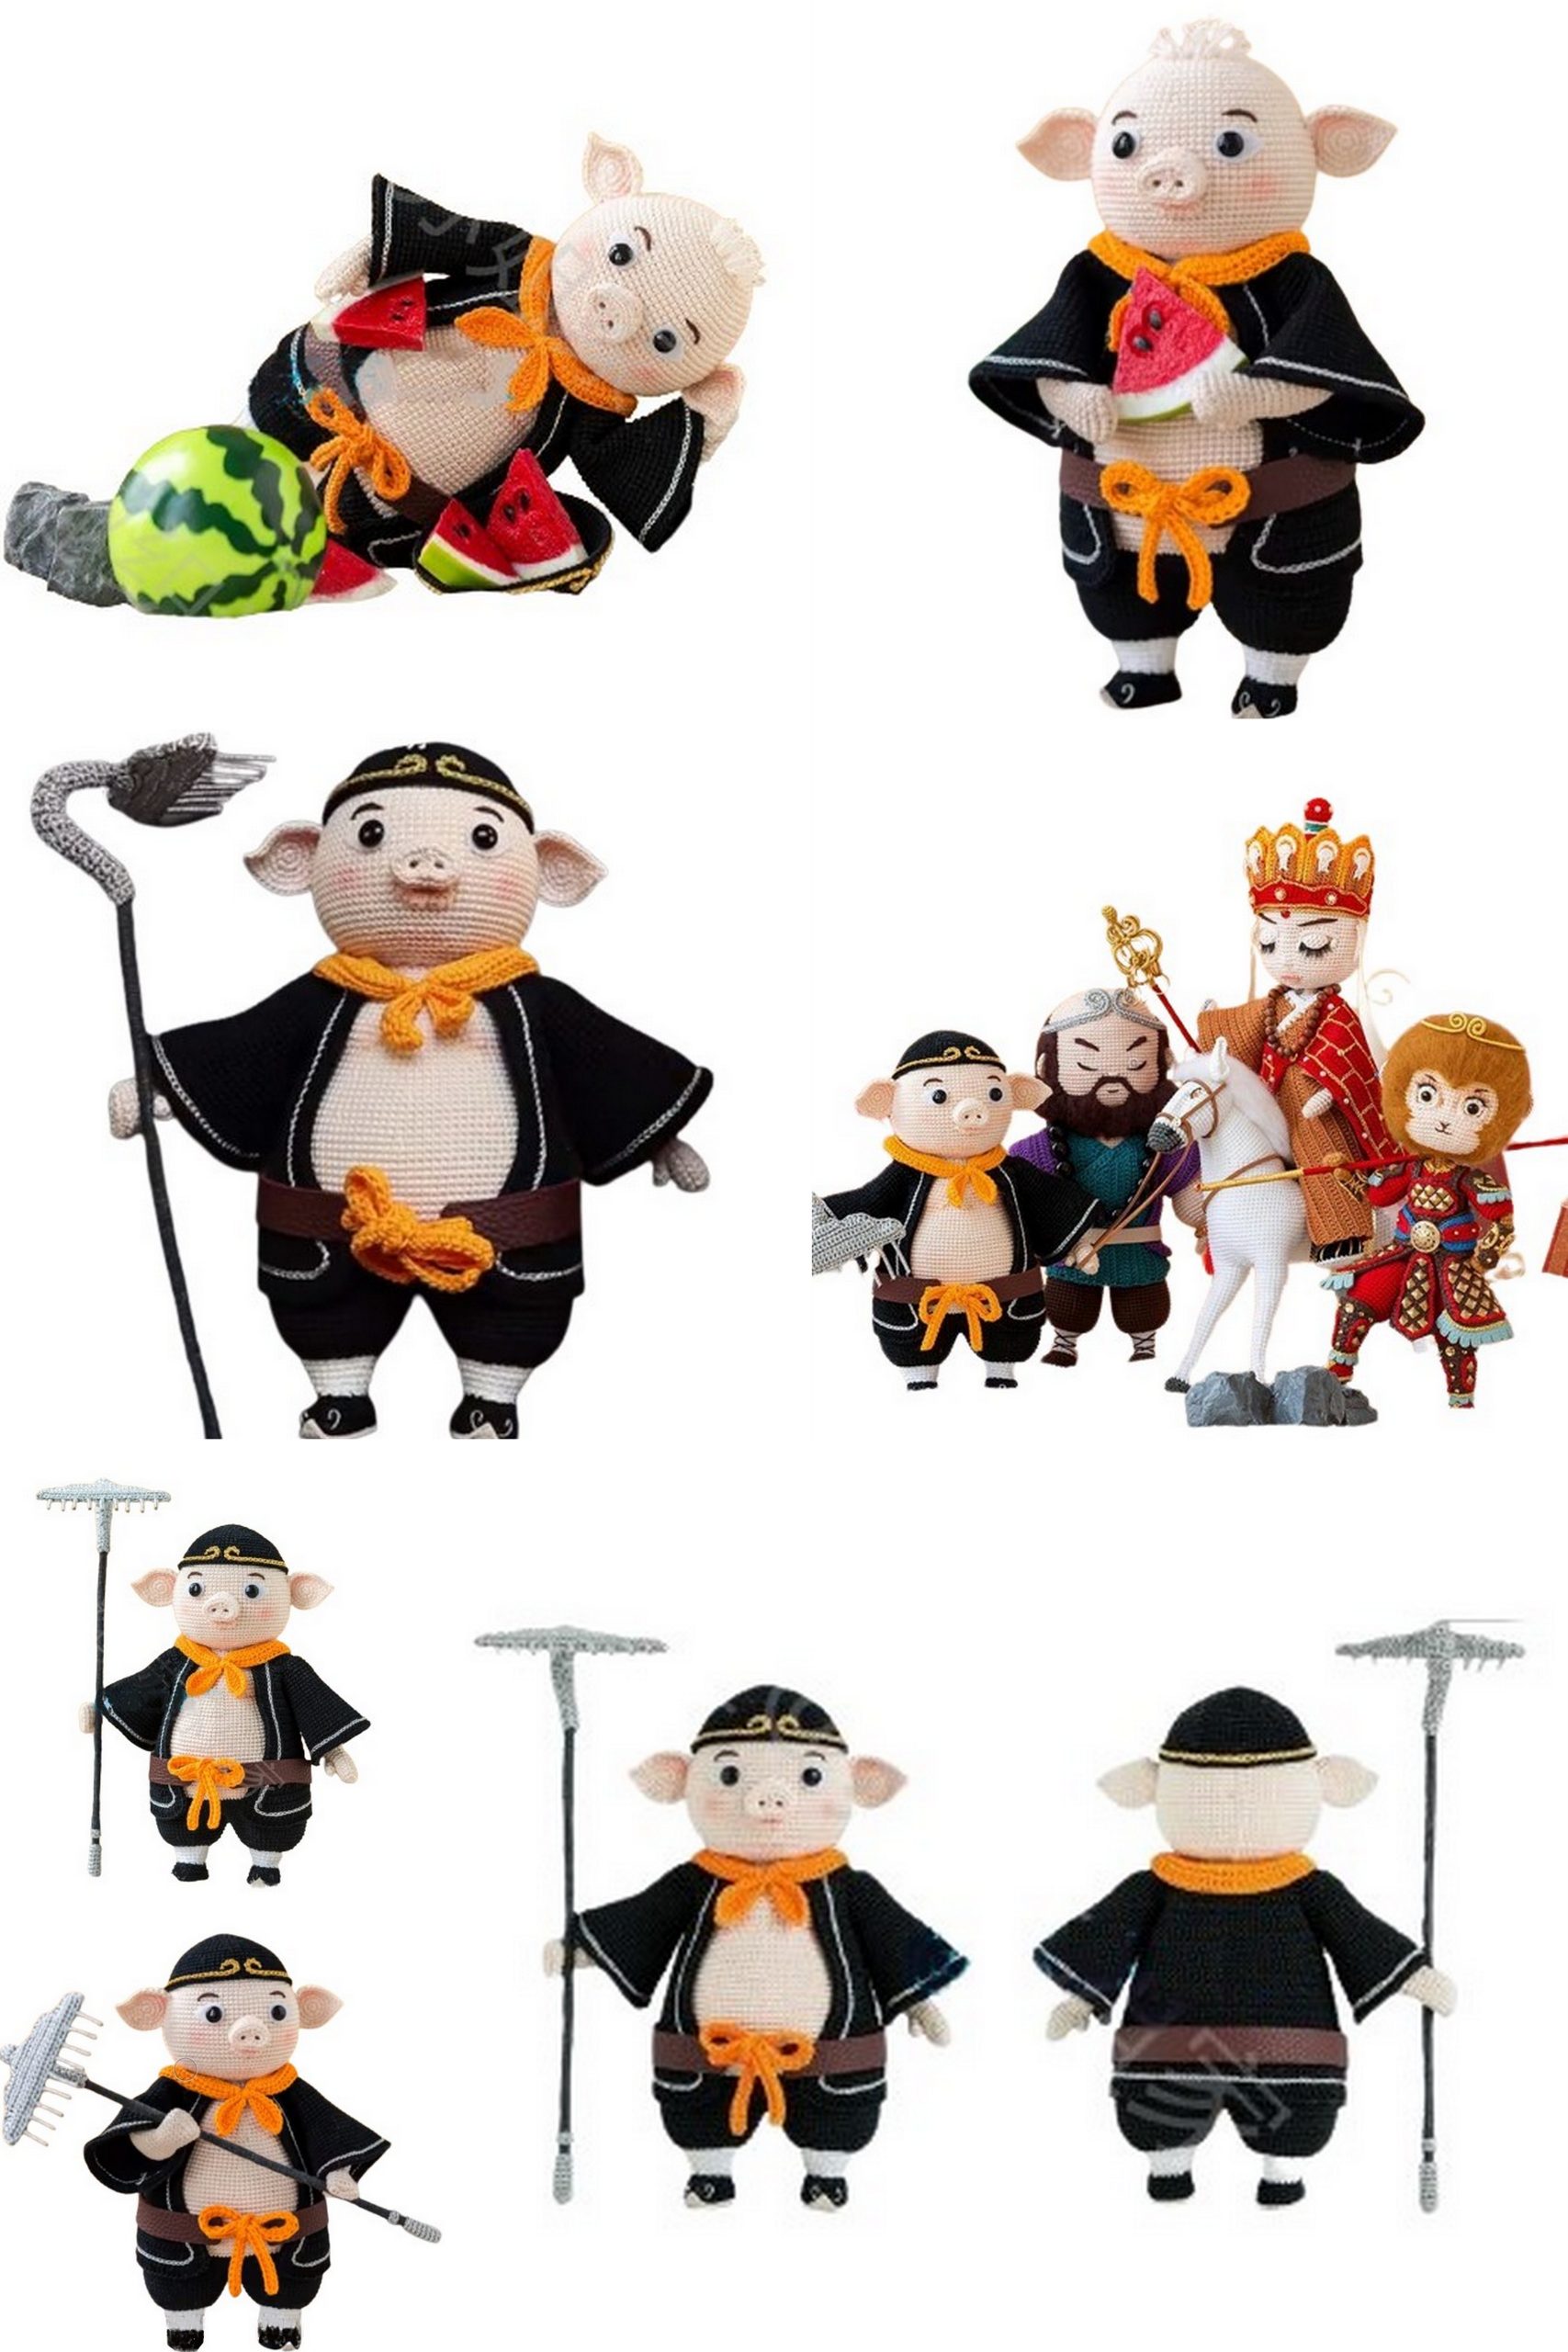
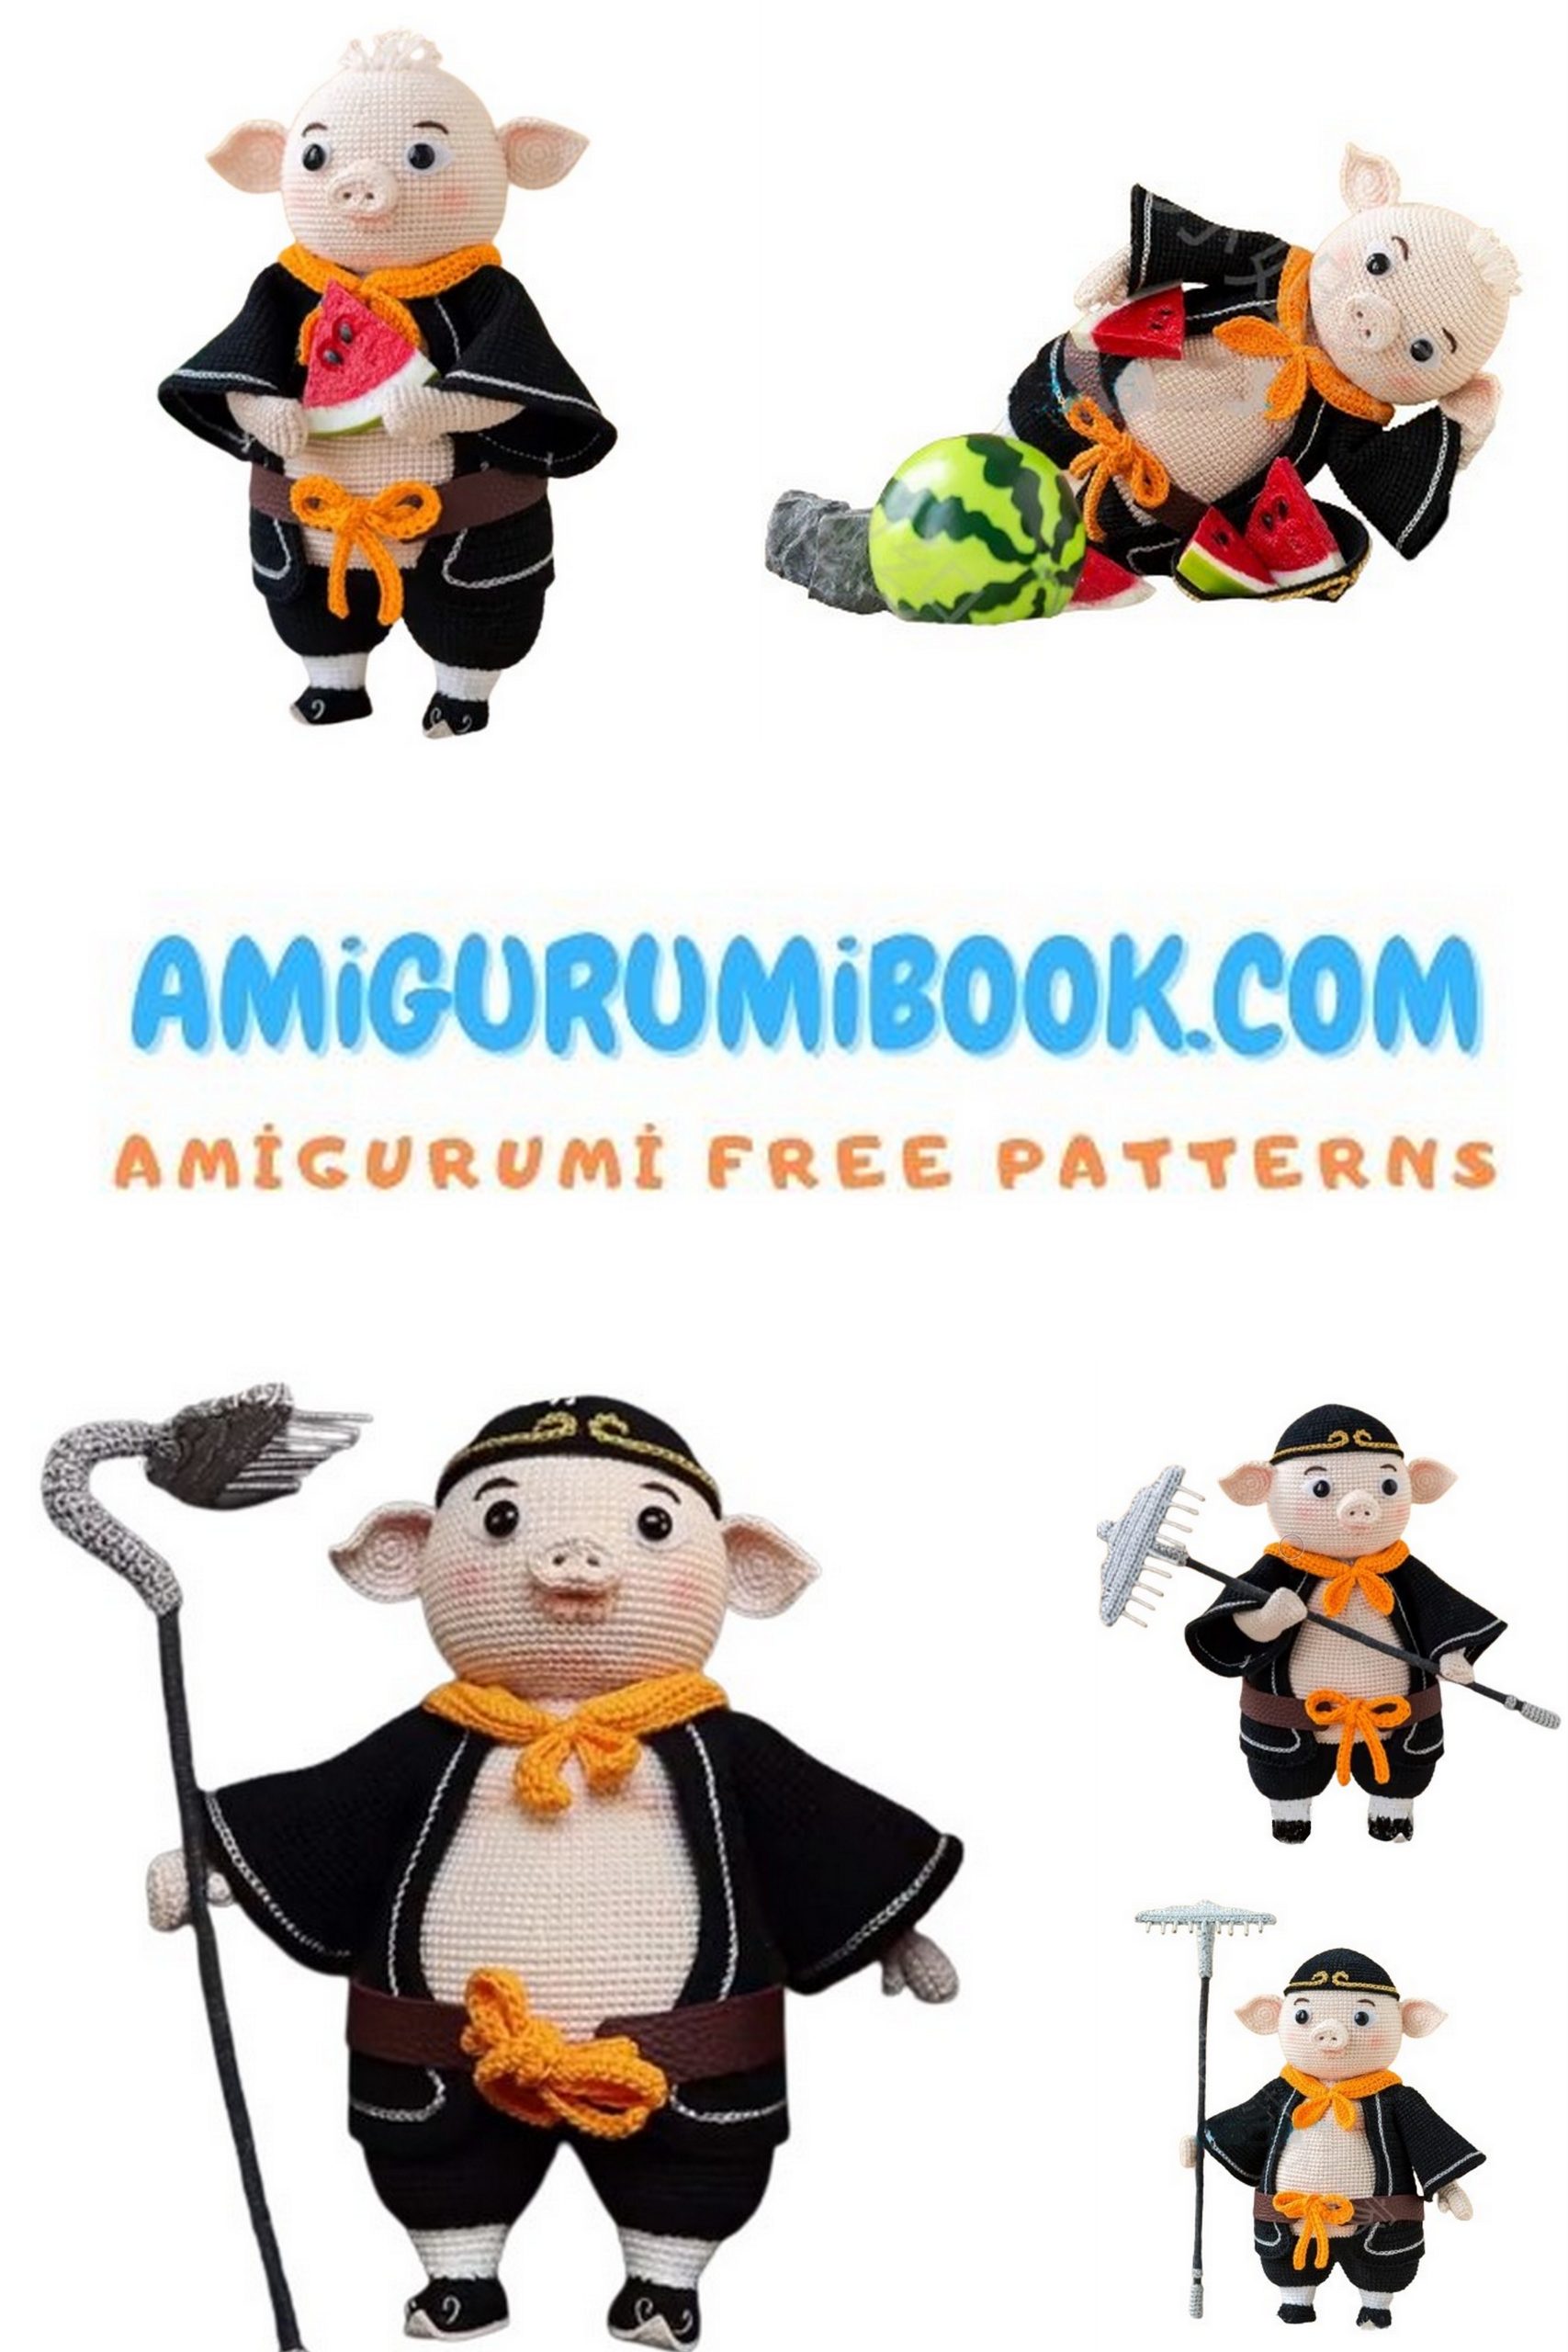
Pig-Man Zhu Accessories
Accessories include facial features, coat, hat, scarf, belt, and ears.
STAGE 1 Facial Features
Crochet the left and right ears, nose, and lips respectively and sew them in the appropriate places on the head. Then add eyes, eyebrows, hair, and blush. See details in the video demonstration. Video time 56’25” (Part 1)
LEFT EAR.
1. 6 SC in MR (6)
2. 6 INC (12)
3. (SC, INC) ×6 (18)
4. (SC, INC, SC) x2, SC, [SC, 2 CH, from the 2nd loop from the hook: SC, SC], SC, (SC, INC, SC) ×3 (24)
5. (3 SC, INC) x2, 2 HDC, SC, 2 CH, from the 2nd loop from the hook: SC, SC, SC, INC, SC, SC, SC, INC, (INC, 3 SC) ×2
Note: Leave a 15 cm yarn tail for sewing.

RIGHT EAR.
1. 6 SC in MR (6)
2. 6 INC (12)
3. (SC, INC) ×6 (18)
4. (SC, INC, SC) x2, SC, [SC, 2 CH, from the 2nd loop from the hook: SC, SC], SC, (SC, INC, SC) ×3 (24)
5. 2 CH, 3 HDC, 2 INC, SC, SC, 2 CH, from the 2nd loop from the hook: SC, SC, 2 INC, (INC, 3 SC) ×2
Note: Stitches in [] are worked into the same loop; leave a 15 cm yarn tail for sewing.
Pig-Man Zhu NOSE.
Nostrils *2
1. 6 SC in MR (6)
2-R3. 6 SC
Note: Cut the yarn for the first nostril, do not cut for the second. Continue crocheting the nose.
1. 3 SC, INC, SC, [SC, FPSC], next nostril, [FPSC, SC], SC, INC, 3 SC (16)
2. SC, INC, 5 SC, 2 INC, 5 SC, INC, SC (20)
3. FPSC: 20 SC
4. 8 SC, (FPSC 4 SC), 8 SC (20)
5. 8 SC, (FPSC SC, 2 INC, SC), 8 SC (22)
Note: [] in the same loop, leave 20 cm yarn for sewing;
Pig-Man Zhu LIPS.
In MR: SC, 2 FPSC, SlSt, 2 FPSC, SC (7)
Note: Leave 20 cm yarn for sewing.
STEP 2 JACKET.
Consists of the main part, sleeves, and decoration. Crochet in turned rows. Armholes are formed during crocheting and trim around the edge of the garment after completion. Then crochet sleeves, add decorations. See details in the video demonstration. Video time 00’12” (Part 2)
1. 31 CH, starting from the 2nd loop from the hook: INC, (3 SC, INC, 3 SC)×4, INC (36)
2. CH, turn, (8 SC, INC)×3, 9 SC (39)
3. CH, turn, 39 SC
4. CH, turn, INC, (4 SC, INC, 4 SC) ×4, SC, INC (45)
5. CH, turn, 2 SC, (INC, SC)×5, 21 SC, (SC, INC) x5, 2 SC (55)
6. CH, turn, (2 SC, INC, 2 SC)×11 (66)
7. CH, turn, 3 SC, 10 CH, skip 18 stitches, 24 SC, 10 CH, skip 18 SC, 3 SC (50)
8. CH, turn, 3 SC, 10 SC, 24 SC, 10 SC, 3 SC (50)
9. CH, turn, 5 SC, INC, (12 SC, INC)×3, 5 SC (54)
10-R11. CH, turn, 54 SC
12. (4 SC, INC, 4 SC) ×6 (60)
13-R20. 60 SC
21. CH, turn, INC, 58 SC, INC (62)
22. CH, turn, 62 SC
23. CH, turn, INC, 60 SC, INC (64)
24. CH, turn, 64 SC
25. CH, turn, INC, 62 SC, INC (66)
26. CH, turn, 66 SC
27. CH, turn, INC, 64 SC, INC (68)
28. CH, turn, INC, 66 SC, INC (70)
29. CH, turn, 70 SC
30. CH, turn, INC, 68 SC, INC (72)
31. CH, turn, INC, 70 SC, INC (74)
32. CH, turn, 74 SC
33. CH, turn, INC, 72 SC, INC (76)
34. CH, turn, INC, 74 SC, INC (78)
35. CH, turn, 78 SC
36. CH, turn, INC, 76 SC, INC (80)
37. CH, turn, INC, 78 SC, INC (82)
TRIM.
1. CH 1, 37 SC, 3 SC in one loop (corner), 80 SC, 3 SC in one loop (corner), 37 SC (160)
2. CH, turn, skip 1 loop, (8 SC, skip 1 loop) × 4, SC, 3 SC in one loop, 82 SC, 3 SC in one loop, SC, (skip 1 loop, 8 SC) × 4, SlSt (155)
3. 2 CH, turn, 33 FPSC, 3 FPSC in one loop, 84 FPSC, 3 FPSC in one loop, 33 FPSC, 2 CH, SlSt (158)
Pig-Man Zhu SLEEVES.
In armhole:
1. 5 SC, SC, 18 SC, SC, 5 SC (30)
2-R4. 30 SC
5. (9 SC, INC) ×3 (33)
6-R7. 33 SC
8. (5 SC, INC, 5 SC) ×3 (36)
9-R10. 36 SC
11. (5 SC, INC) ×6 (42)
12-13. 42 SC
14. (3 SC, INC, 3 SC) ×6 (48)
15-16. 48 SC
17. (7 SC, INC) ×6 (54)
18-19. 54 SC
20. (4 SC, INC, 4 SC) ×6 (60)
21. 60 SC
22. 2 CH, 59 FPSC (60)
Pig-Man Zhu HAT.
It is divided into two parts: the main part and decoration. First crochet the main part, then add the decoration. See details in the video demonstration. Video time 20’30” (Part 2)
1. 6 SC in MR
2. 6 INC (12)
3. (SC, INC) ×6 (18)
4. (SC, INC, SC) ×6 (24)
5. (3 SC, INC) ×6 (30)
6. (2 SC, INC, 2 SC) ×6 (36)
7. (5 SC, INC) ×6 (42)
8. (3 SC, INC, 3 SC) ×6 (48)
9. (7 SC, INC) ×6 (54)
10. (4 SC, INC, 4 SC) ×6 (60)
11. (9 SC, INC) ×6 (66)
12. 66 SC
13. (5 SC, INC, 5 SC) ×6 (72)
14. 72 SC
15. (11 SC, INC) ×6 (78)
16. 78 SC
17. (6 SC, INC, 6 SC) ×6 (84)
18. 84 SC
Note: After completion, use 2 golden threads for decoration and attach them in the appropriate positions.
Pig-Man Zhu SCARF.
It consists of the first and second parts of the item. Crochet in turned rows. Video time 24’32” (Part 2)
First part.
1. 56 CH, starting from the 2nd loop from the hook, 55 SC
2. CH, turn, skip 1 loop, SC, 3 FPSC, INC in FPSC, (10 FPSC, INC in FPSC) × 4, 3 FPSC, SC, SlSt (59)
3. CH, turn, skip 1 loop, 6 SC, 5 FPSC, (4 FPSC, INC in FPSC, 4 FPSC) × 4, 5 FPSC, 6 SC (62)
Note: Leave 20 cm yarn for sewing.
Second part.
1. 23 CH, starting from the 2nd loop from the hook, SlSt, SC, FPSC, 3 FPSC, 2 FPSC, 2 SC, 2 SlSt, 2 SC, 2 FPSC, 3 FPSC, FPSC, SC, SlSt, SlSt, SC, FPSC, 3 FPSC, 2 FPSC, 2 SC, 2 SlSt, 2 SC, 2 FPSC, 3 FPSC, FPSC, SC, SlSt
STEP 5 BELT*2
See details in the video demonstration. Video time 30’32”
1. 47 CH, from the 40th loop from the hook, 44 FPSC (45)
Note: Leave 15 cm yarn for sewing. Size of the leather part: 1.5×28 cm.
STEP 6 RAKES.
They are assembled from 4 pieces of fabric, mesh panels, and shaping wire. First crochet each fabric piece separately, then assemble it. See assembly method in the video. Video time 34’11” (Part 2)
Knitted part 1 and 2.
1. 31 CH, starting from the 2nd loop from the hook, 30 SC
2. CH, turn, 30 SC
3. Starting from the 6th loop in the 2nd row: 20 SC
4-R5. CH, turn, 20 SC
6. CH, turn, skip 1 loop, 18 SC, SlSt (19)
7. Starting from the 7th loop of the 6th row, 6 SC (6)
8. CH, turn, 6 SC
Pig-Man Zhu TRIM.
CH, 3 SC, FPSC, 3 FPSC, 2 SC, FPSC, 4 FPSC, 3 SC, 4 FPSC, FPSC, 2 SC, 3 FPSC, FPSC, 3 SC (38)
Second part.
1. 8 CH, starting from the 2nd loop from the hook, 7 SC
2-R5. CH, turn, 7 SC
6. CH, turn, 3 SC, INC, 3 SC (8)
7-8. CH, turn, 8 SC
9. CH, turn, 3 SC, INC, 4 SC (9)
10. 9 SC
11. CH, turn, 4 SC, INC, 4 SC (10)
12. CH, turn, 2 SC, 2 FPSC, 2 FPSC, 2 SC (10)
13-R14. CH, turn, 10 SC
15. CH, turn. 2 SC, 2 FPSC, 2 FPSC, 2 SC (10)
16. CH, turn, 10 SC
17-R18. CH, turn, 2 SC, 6 FPSC, 2 SC (10)
19. CH, turn, 10 SC
20. CH, turn, 4 SC, skip 1 loop, 5 SC (9)
21-R22. CH, turn, 9 SC
Note: After completion, leave 100 cm yarn for sewing.
Third part.
1. 8 SC in MR
2. (INC) 8 SC
3-R8. 8 SC
Fourth part.
1. 8 CH, starting from the 2nd loop from the hook, 7 SC
Note:
After completion, leave 10 cm yarn for sewing.