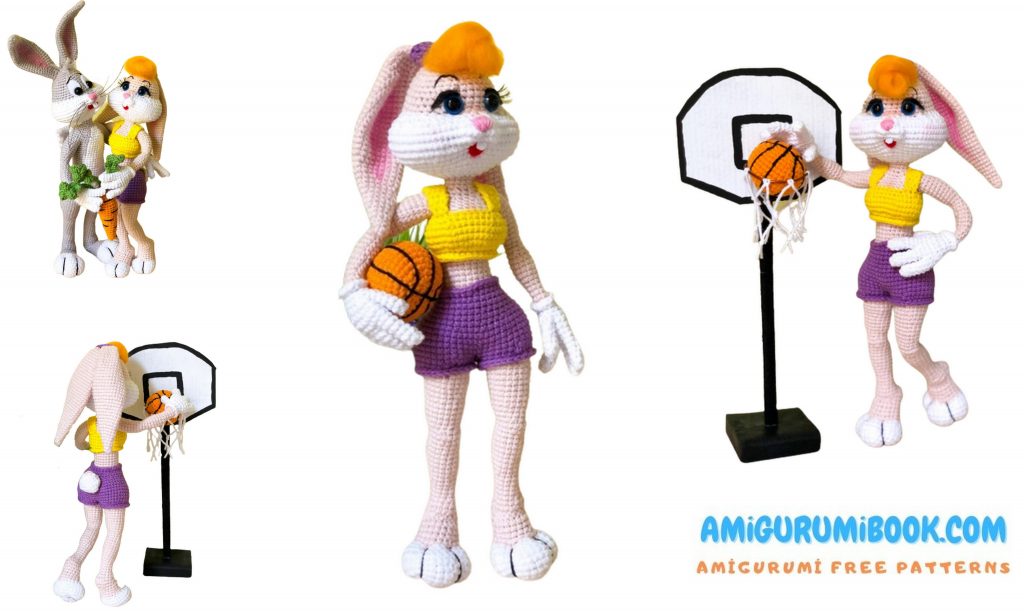
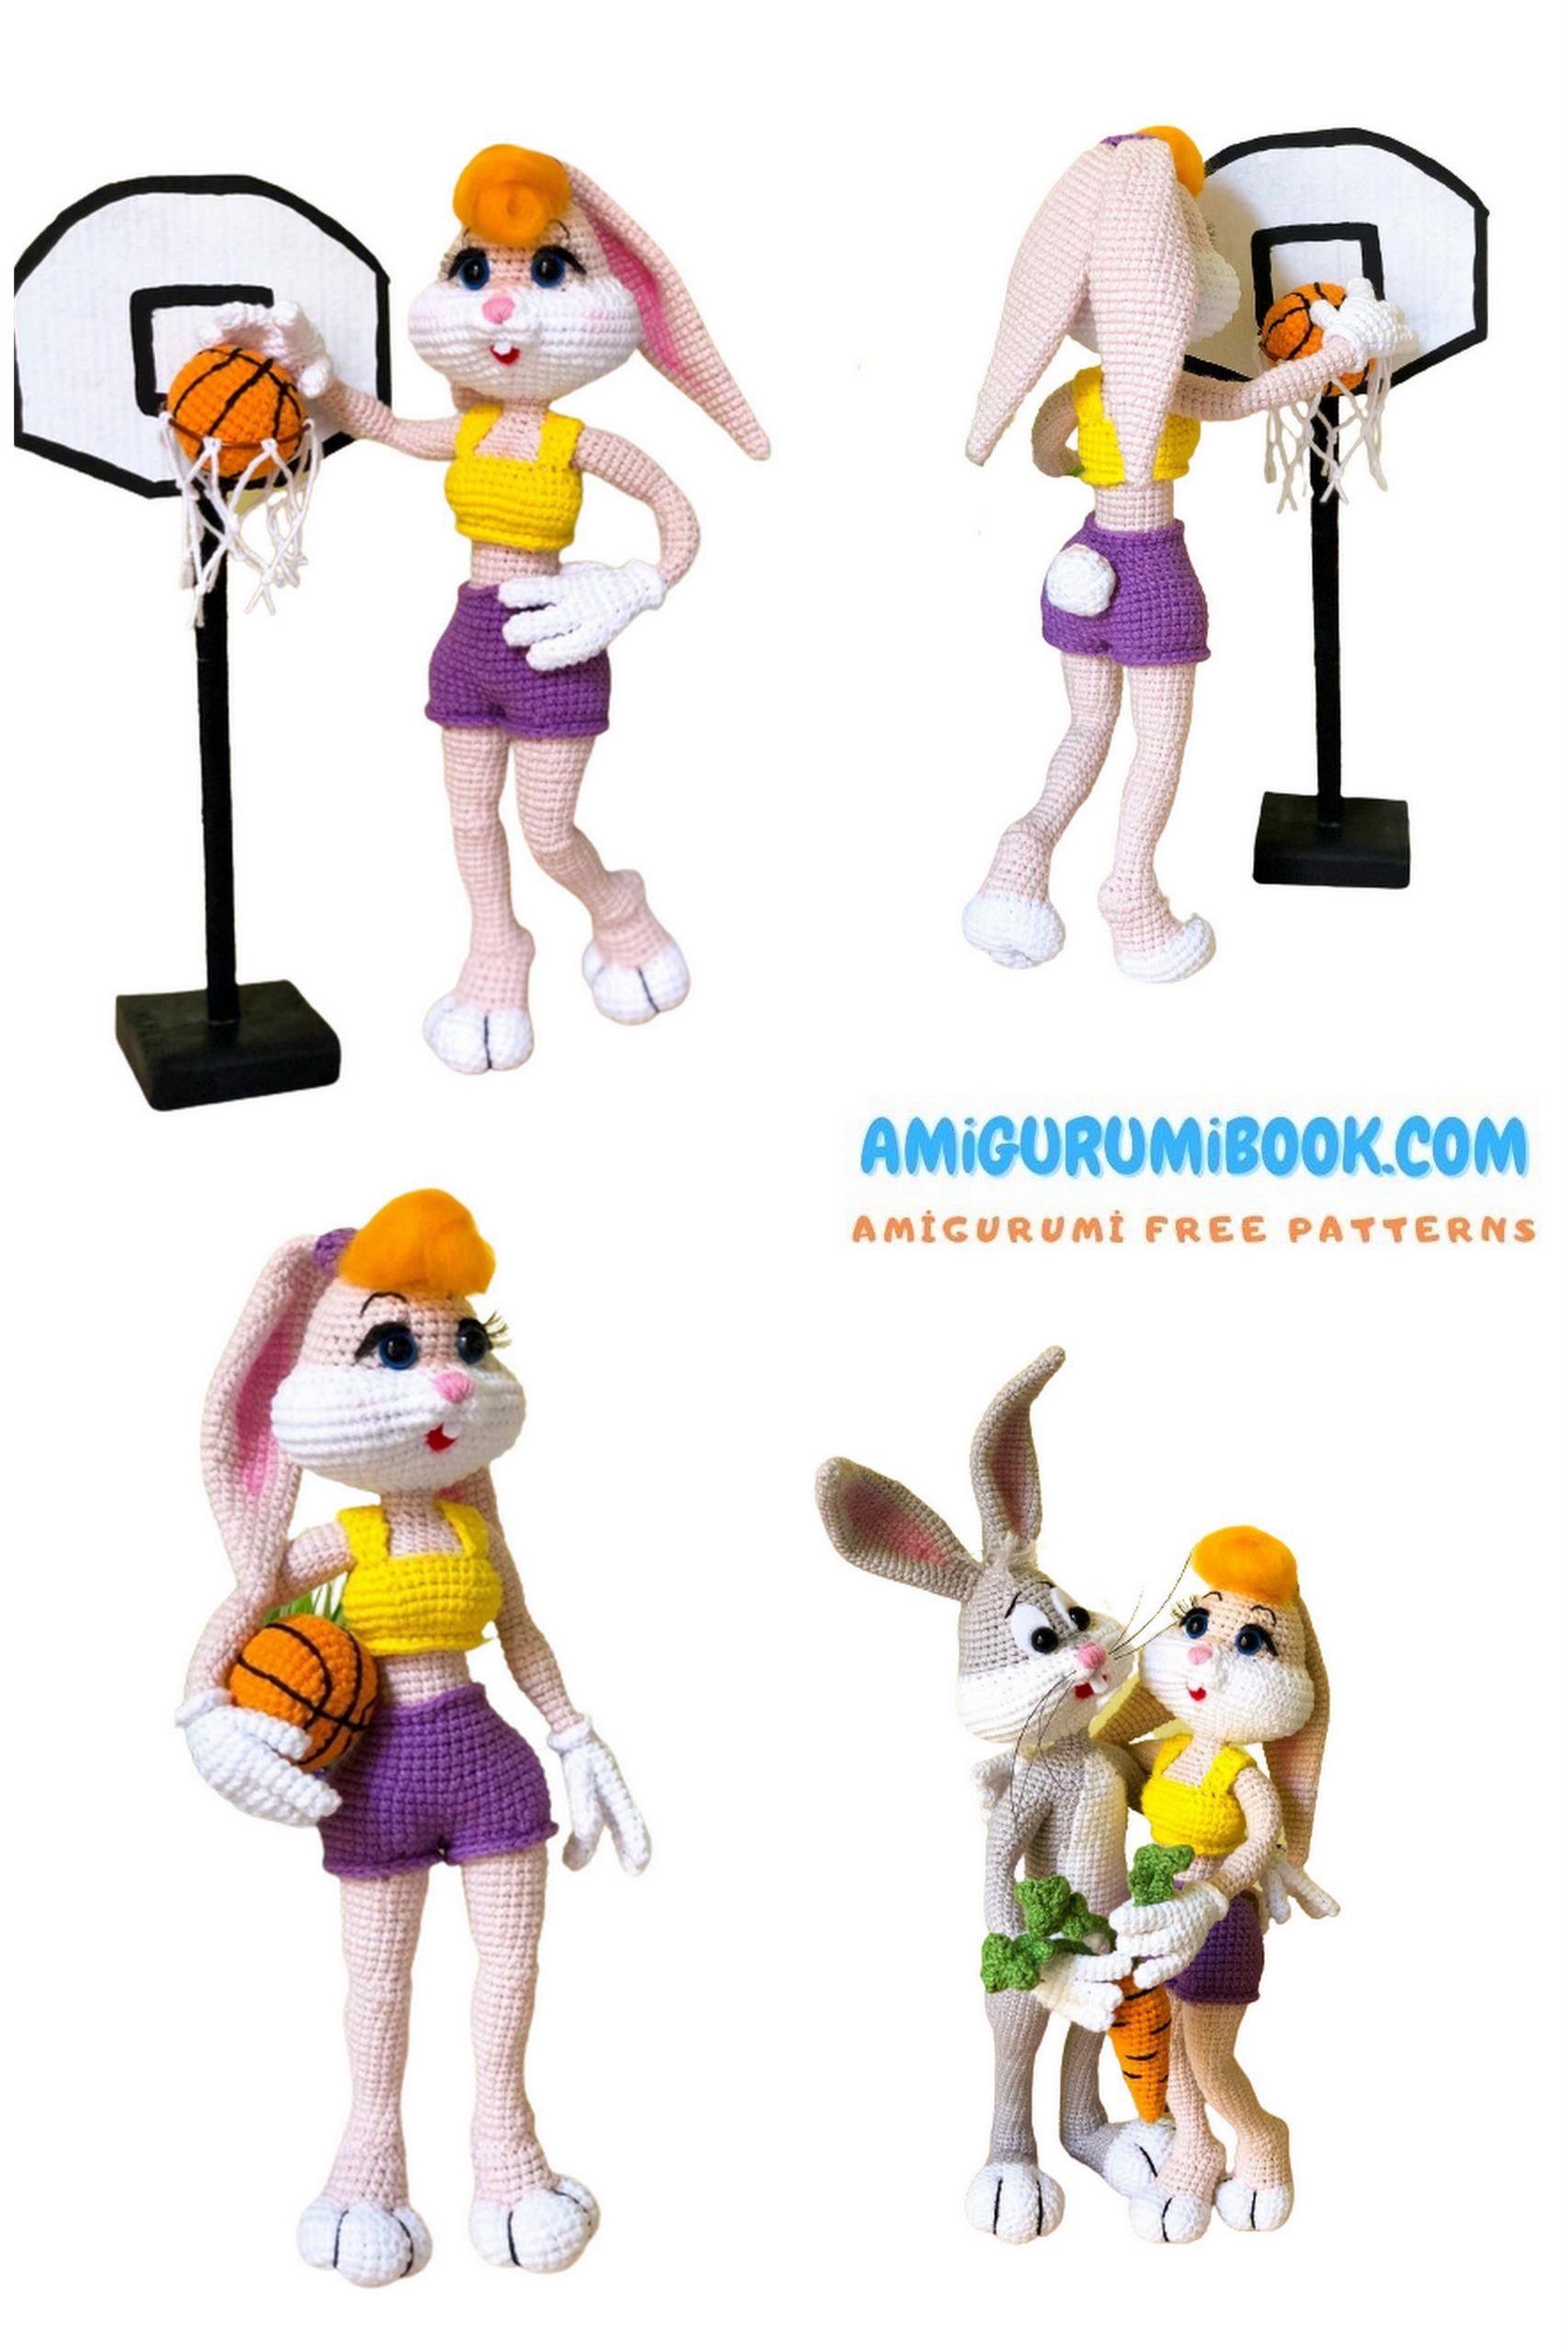
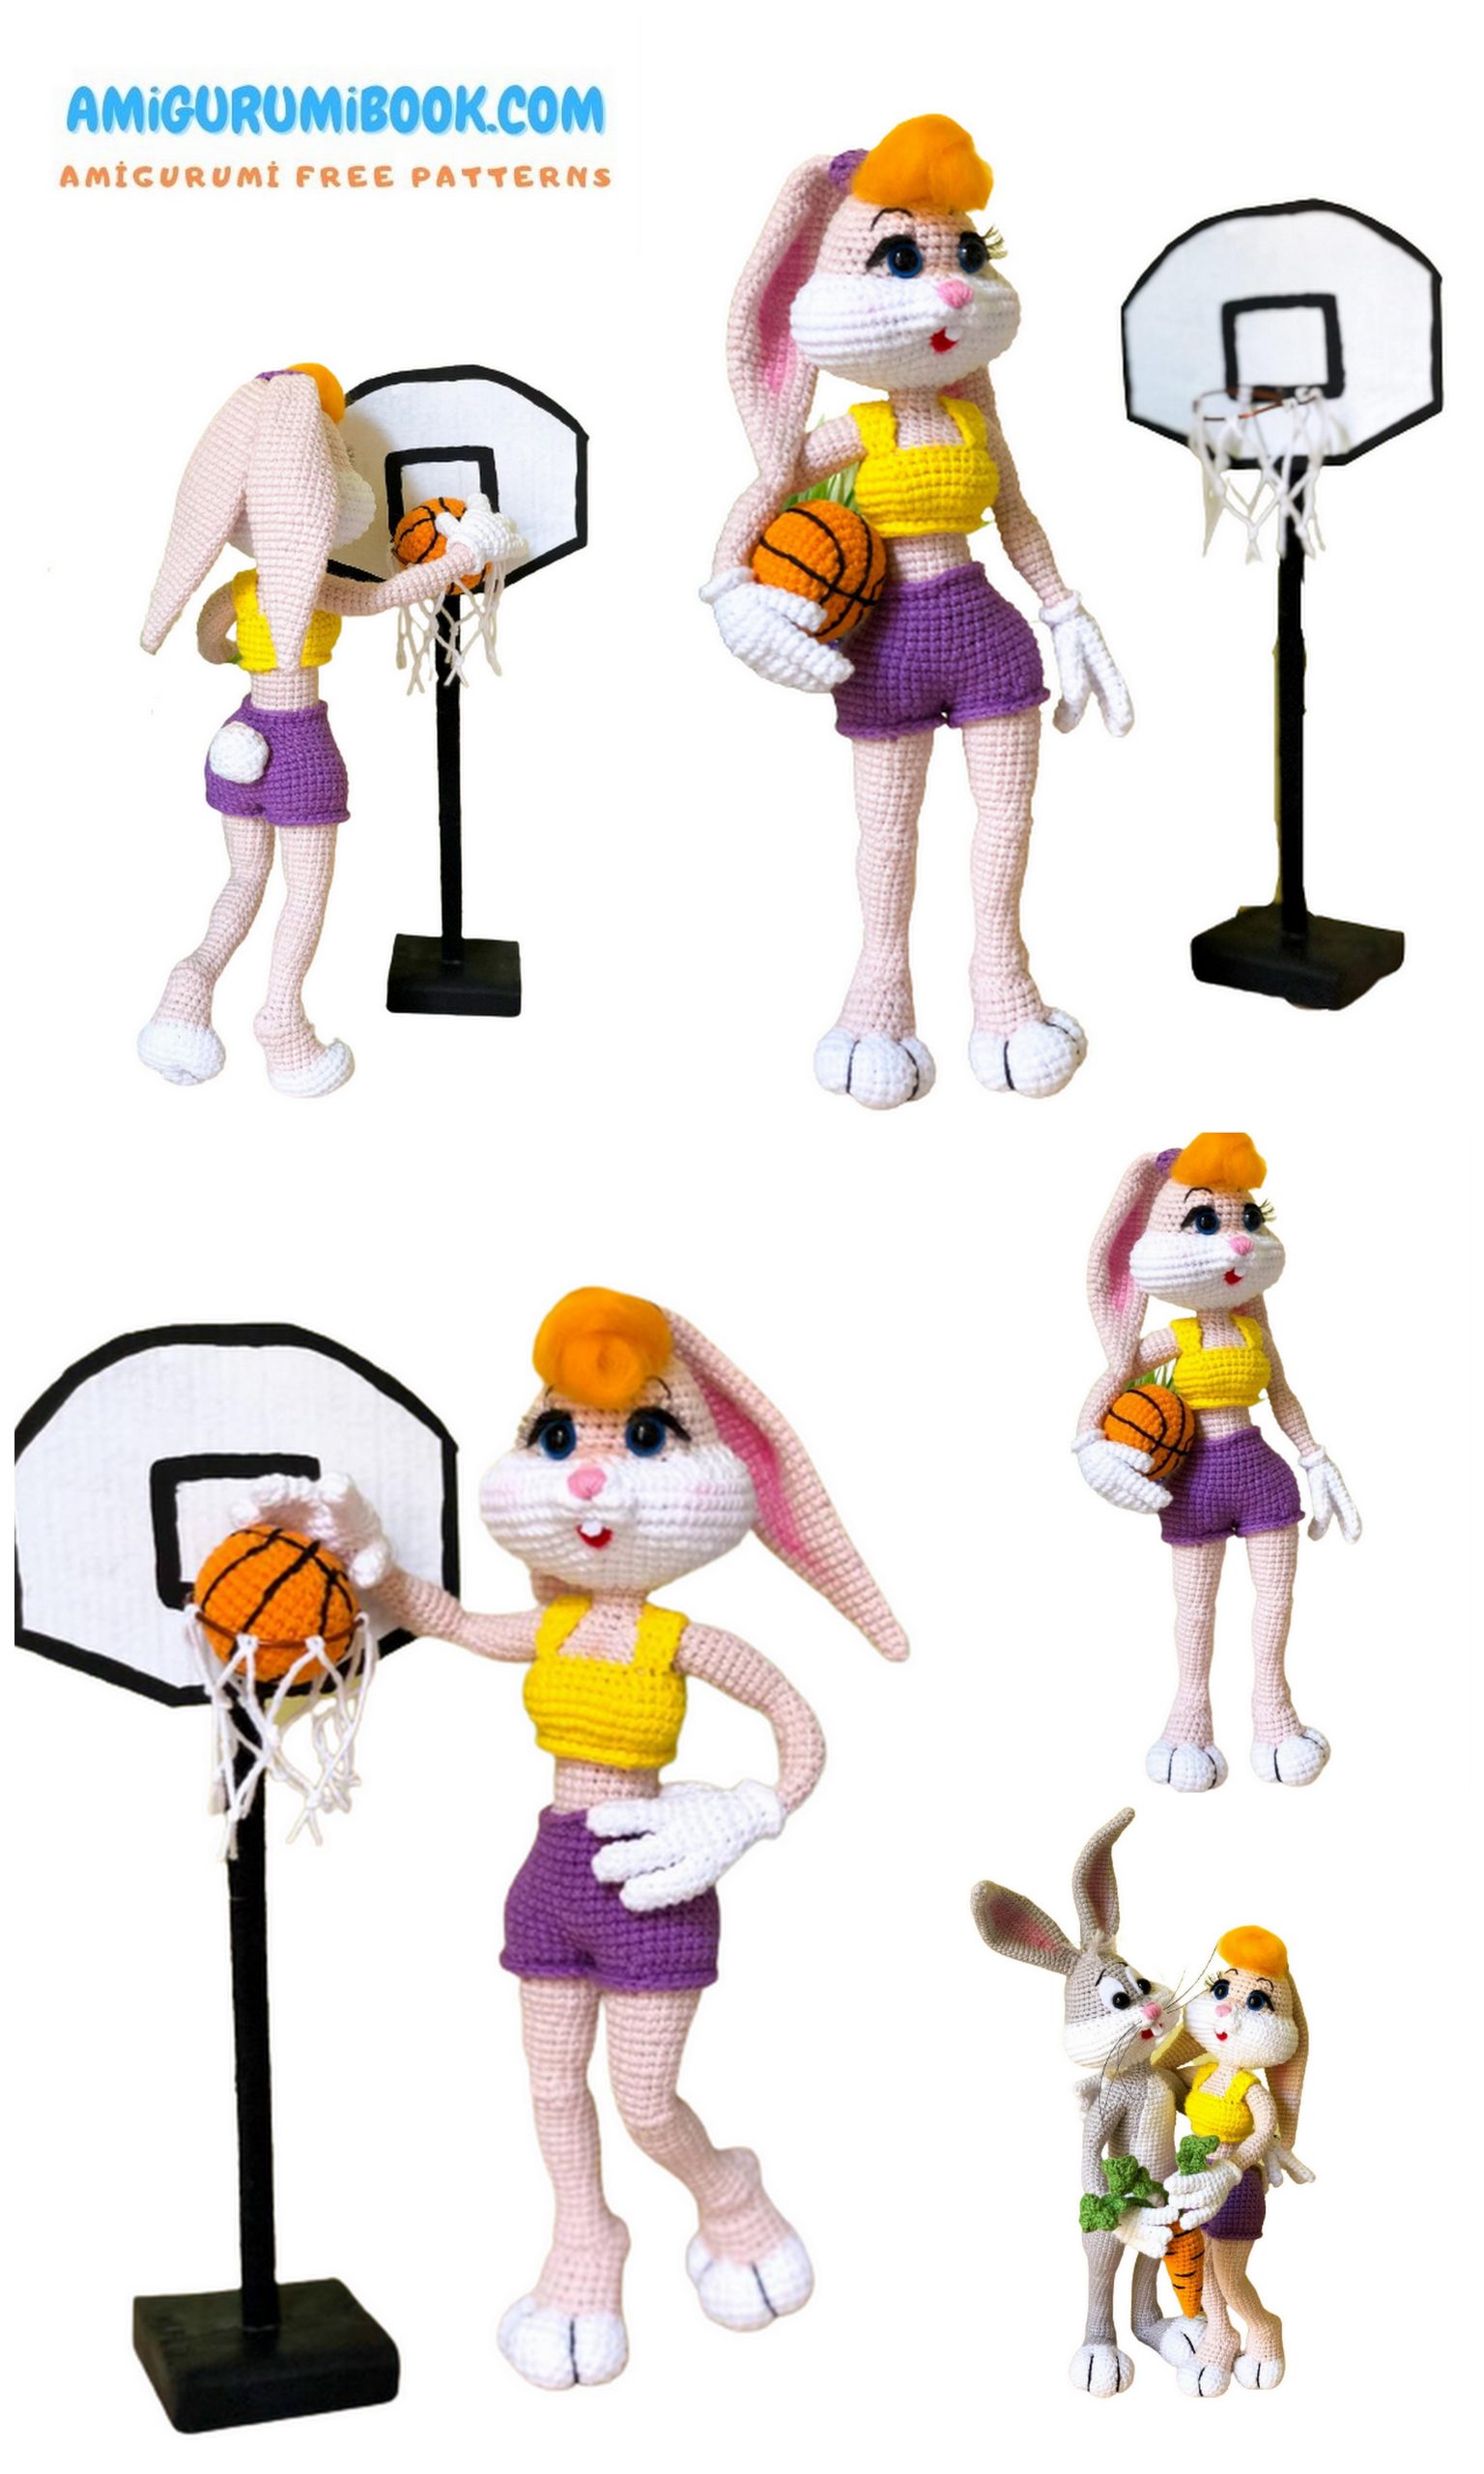
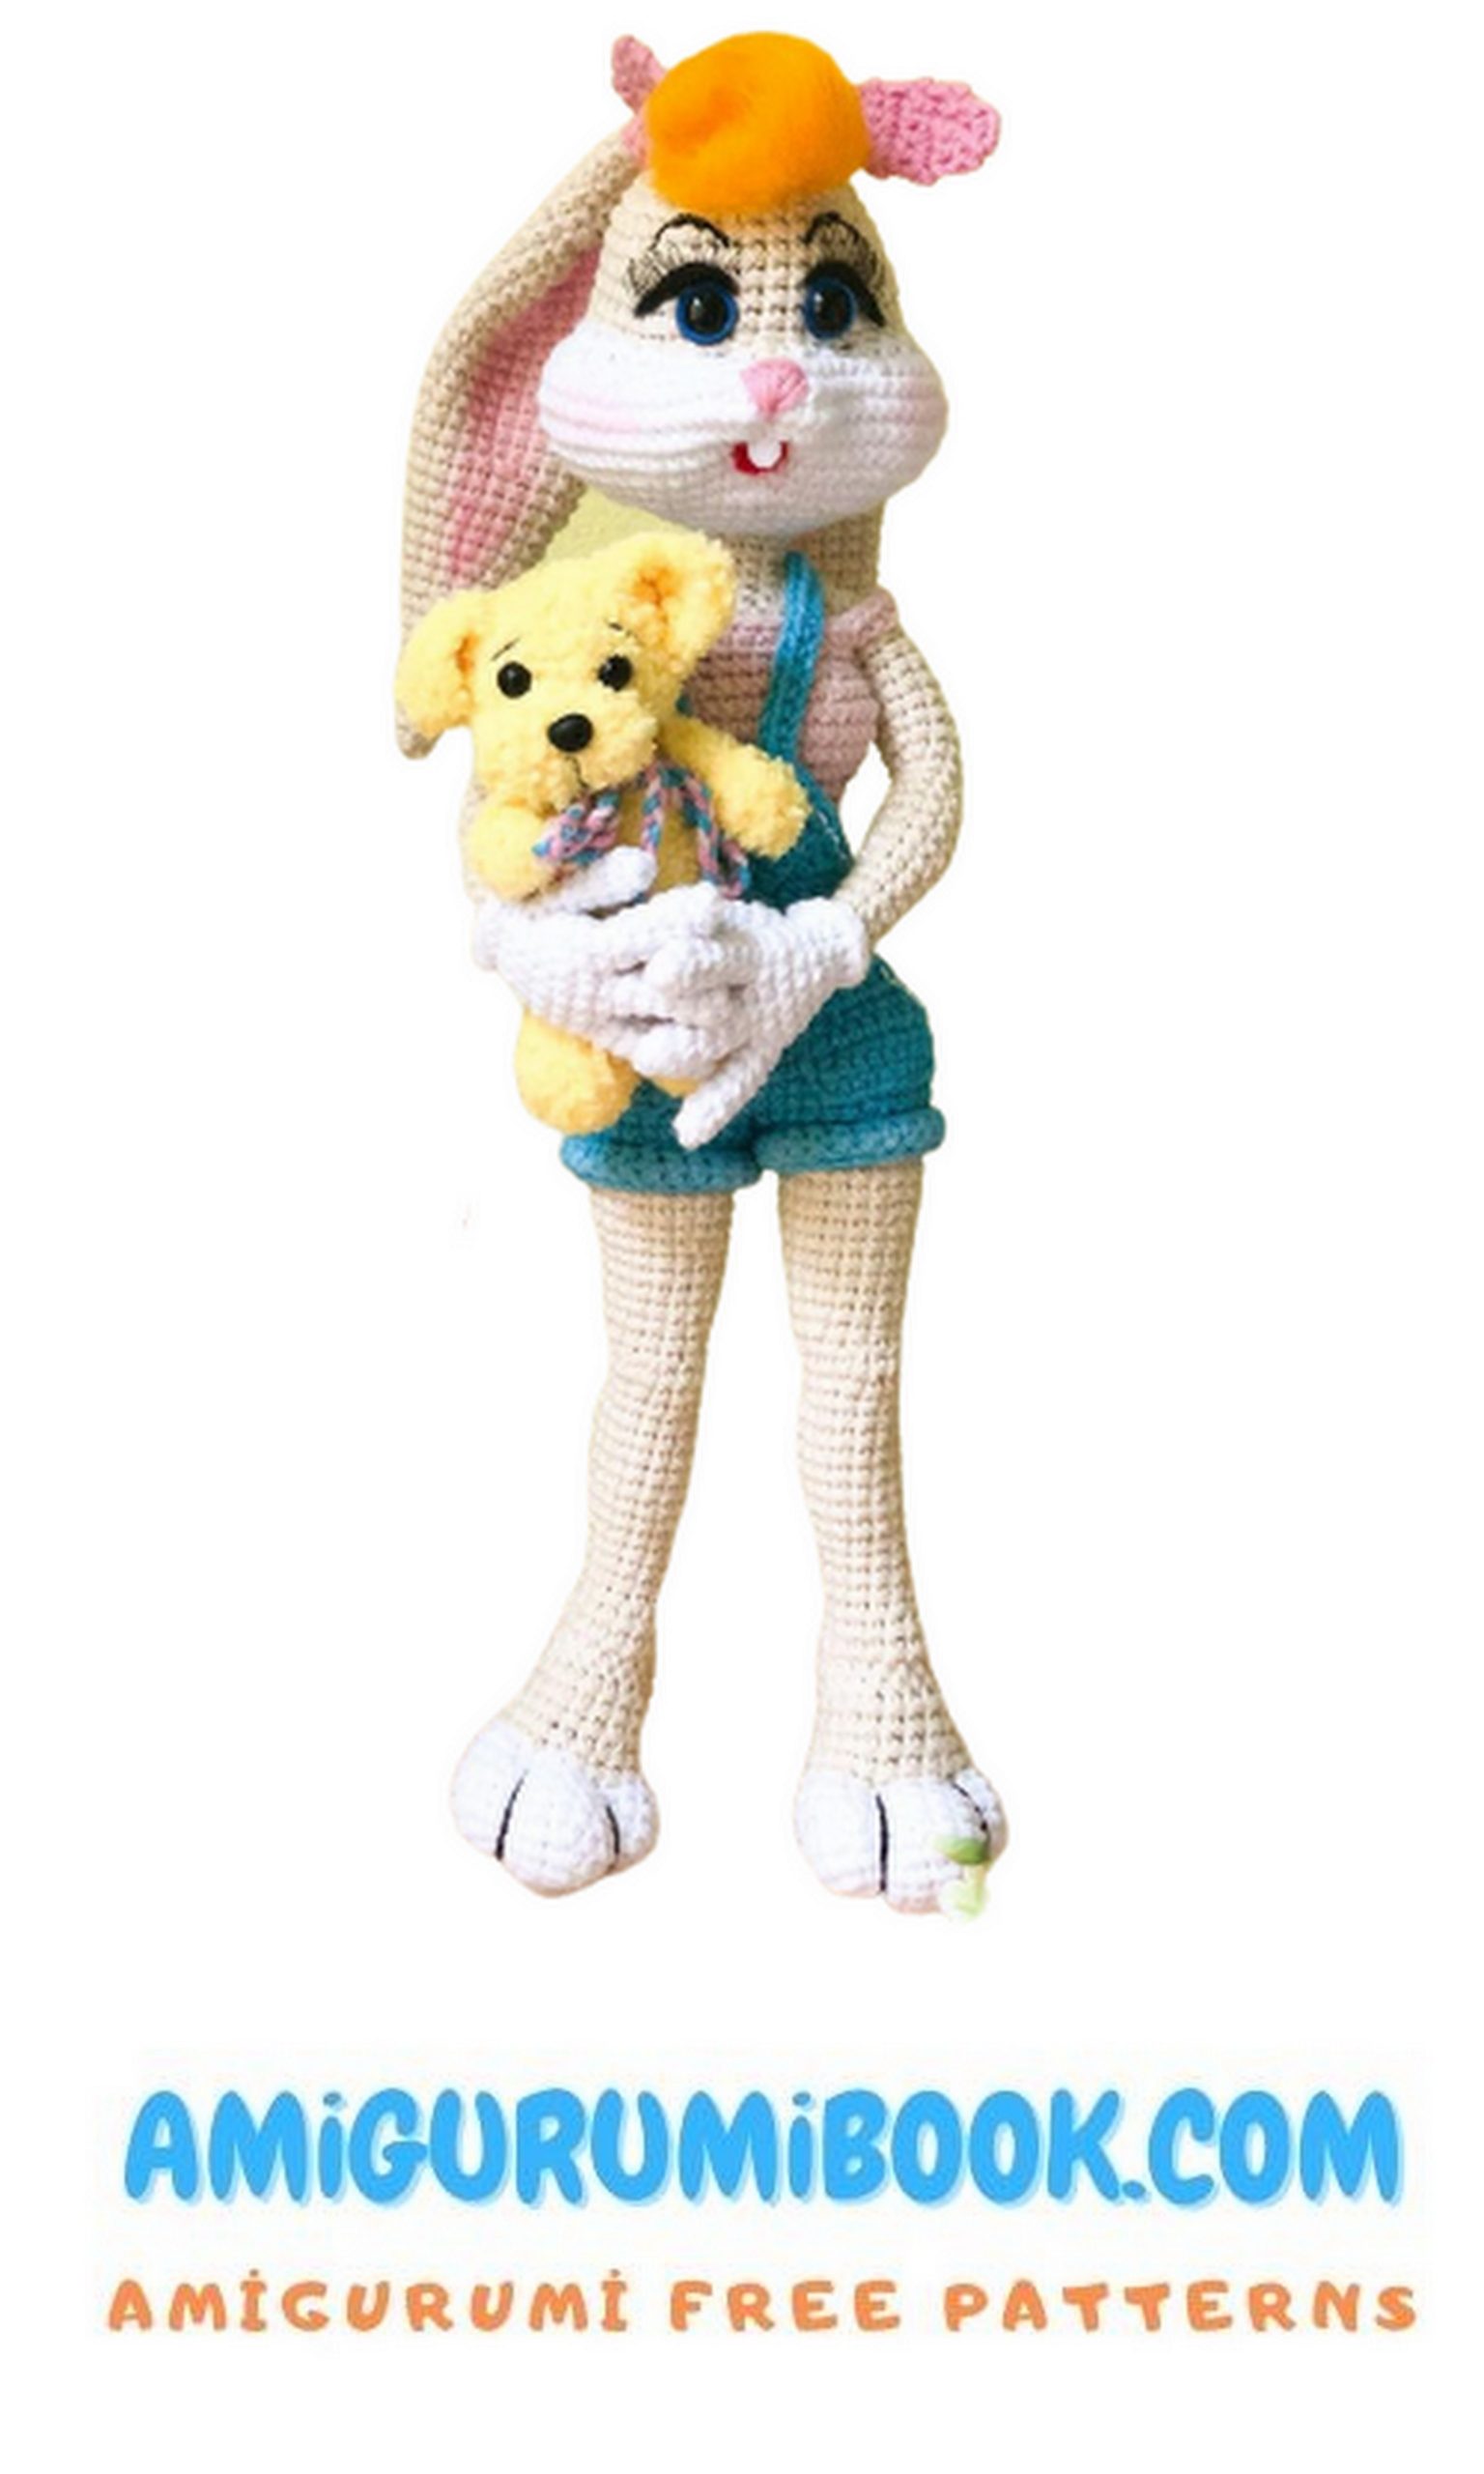
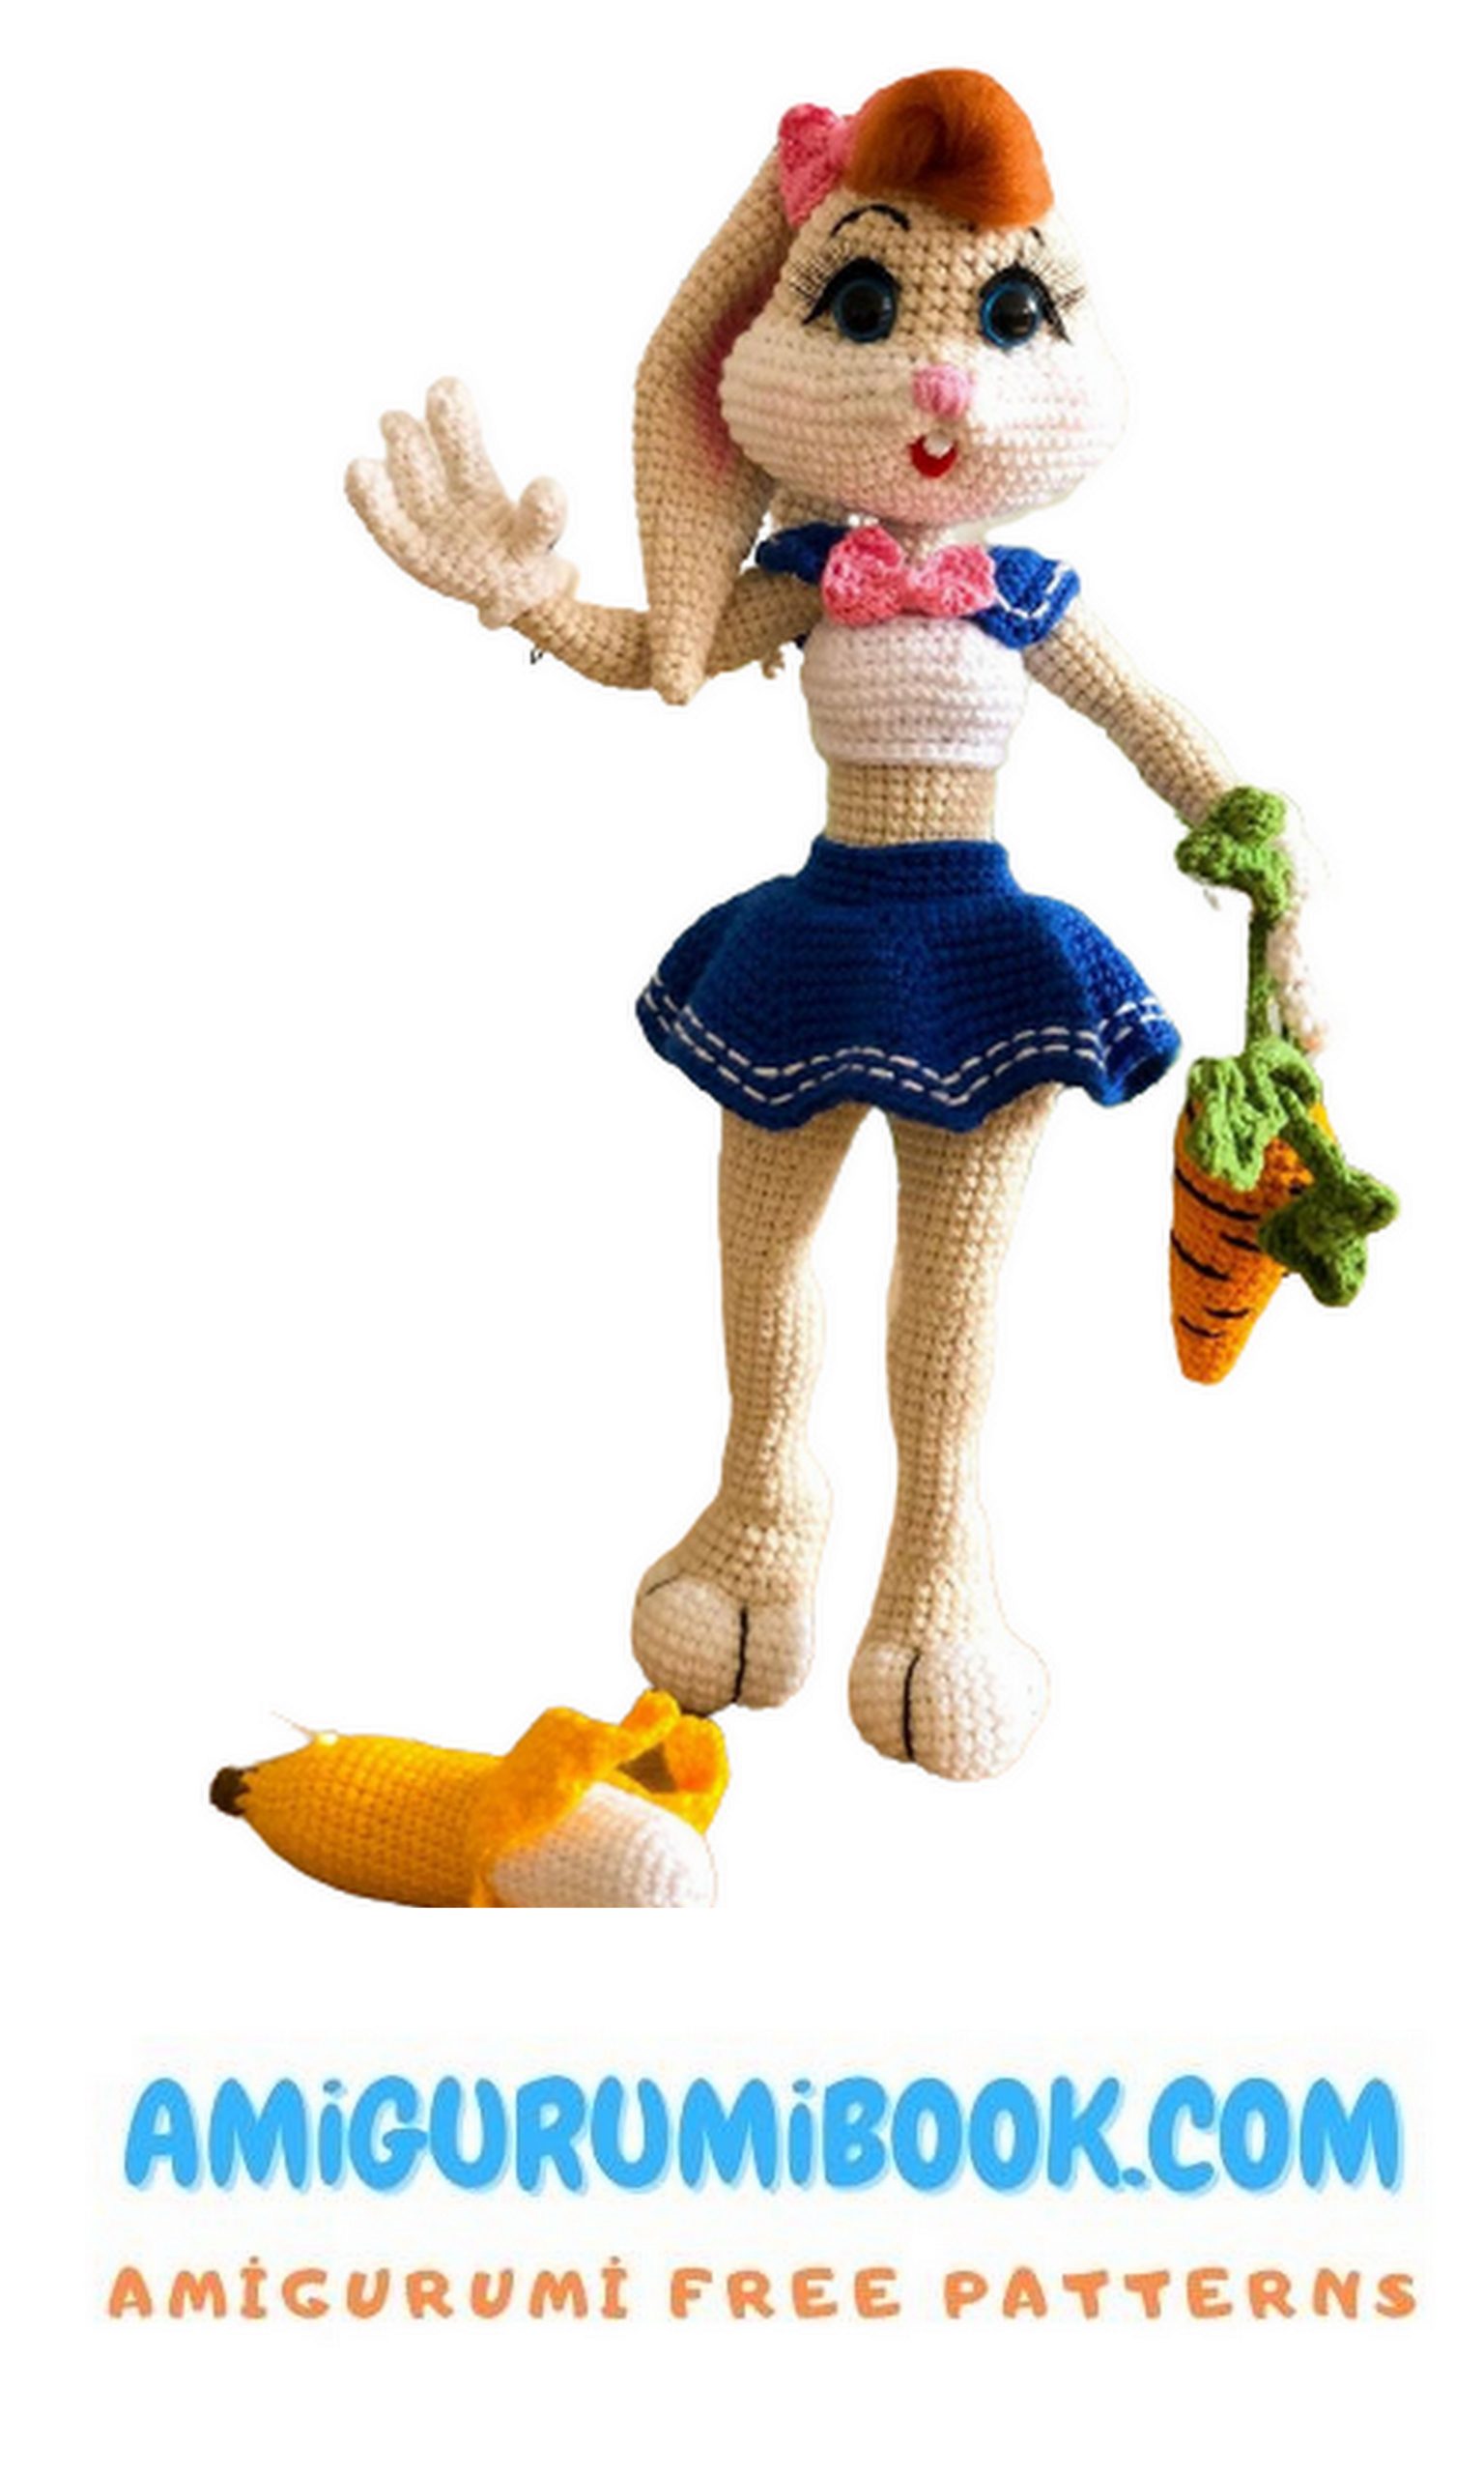
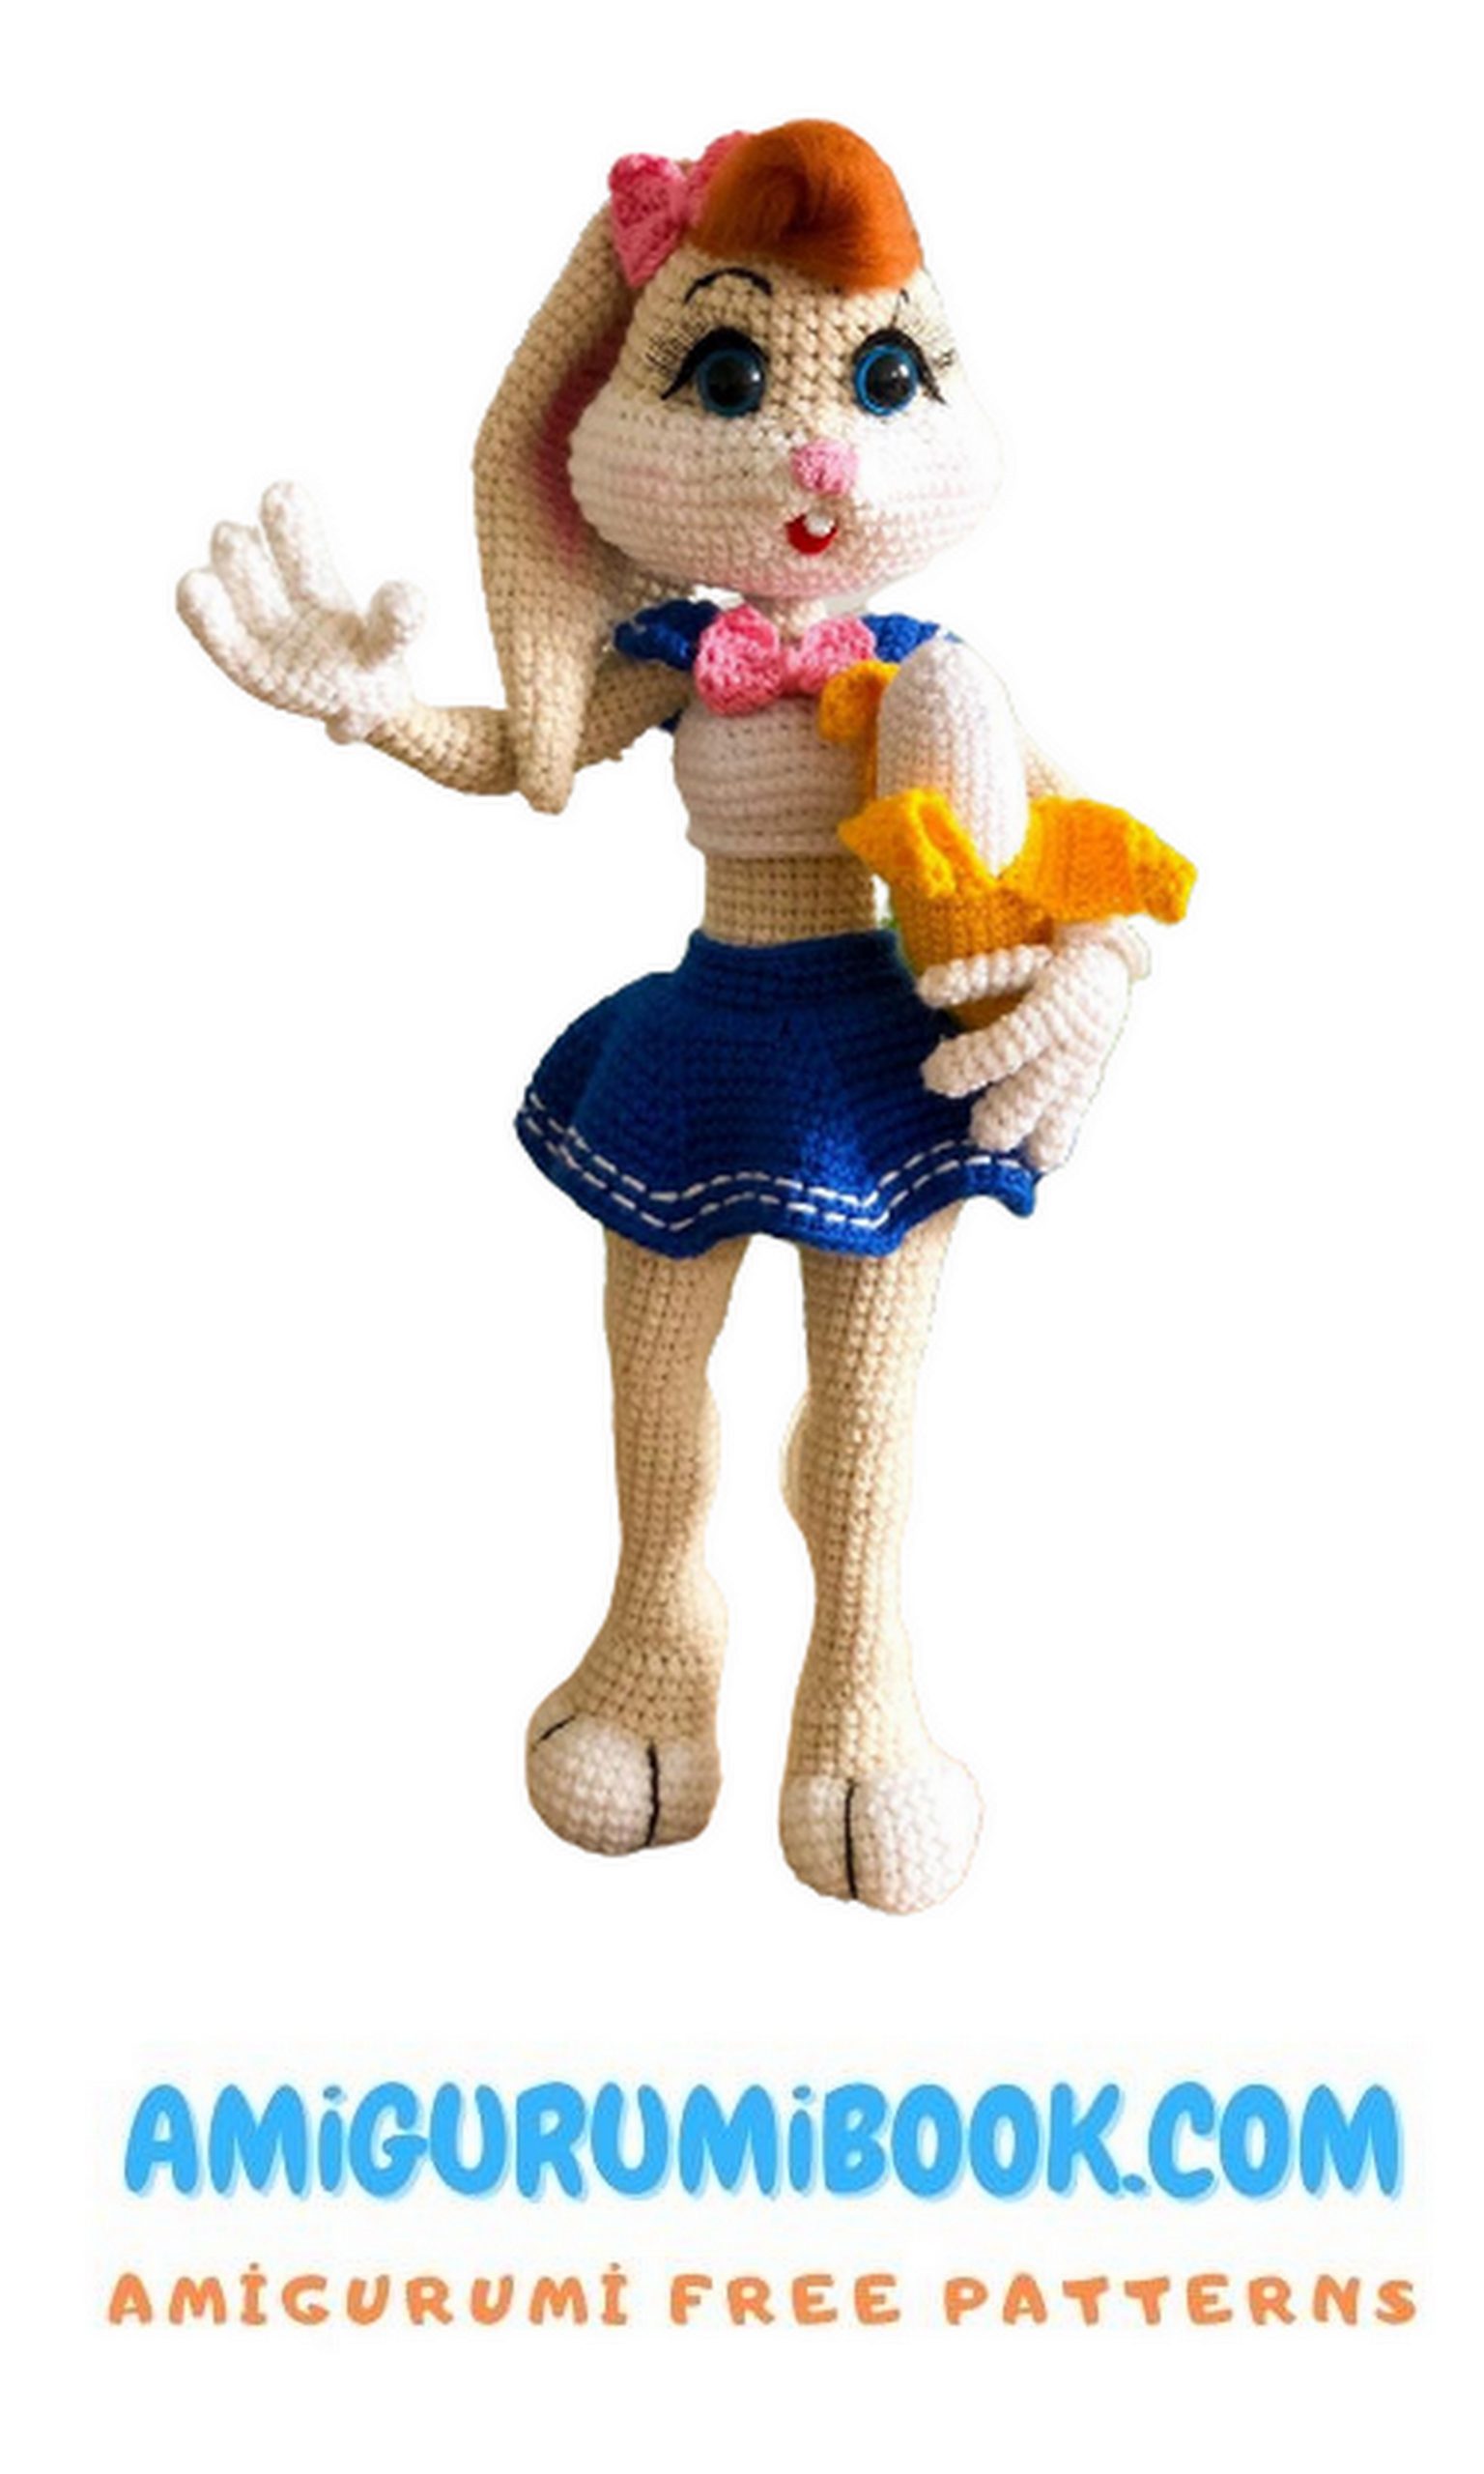
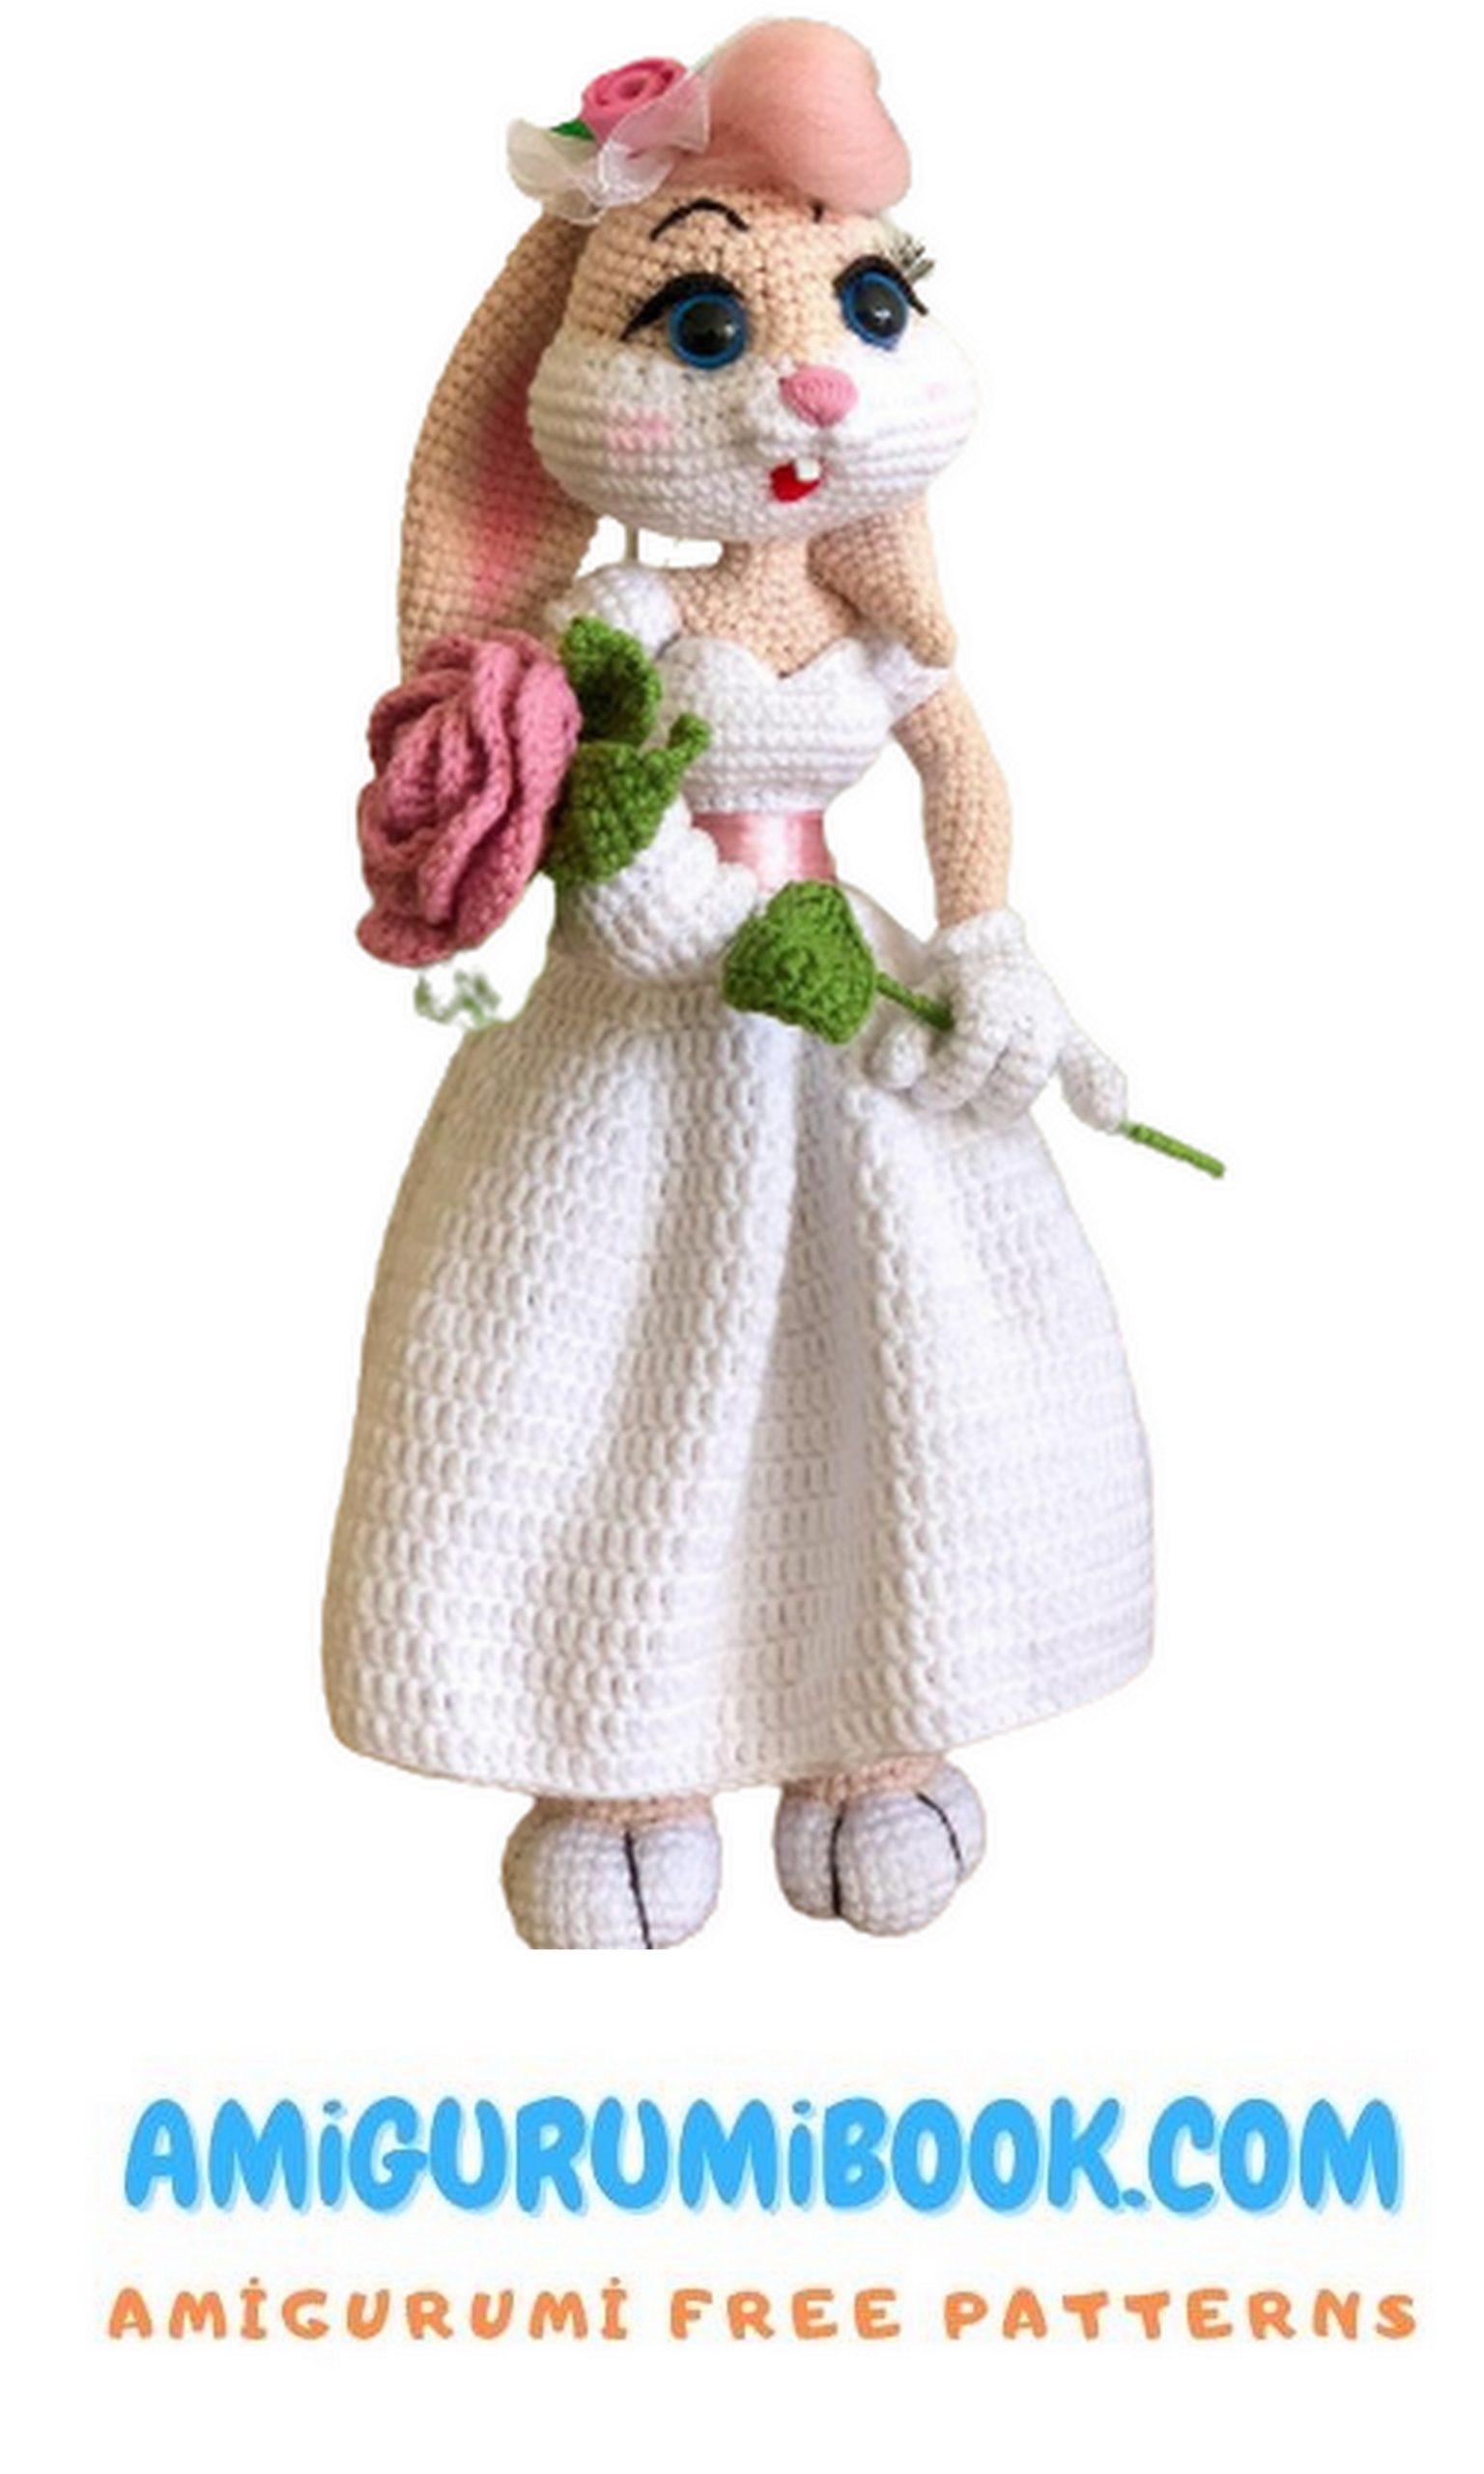
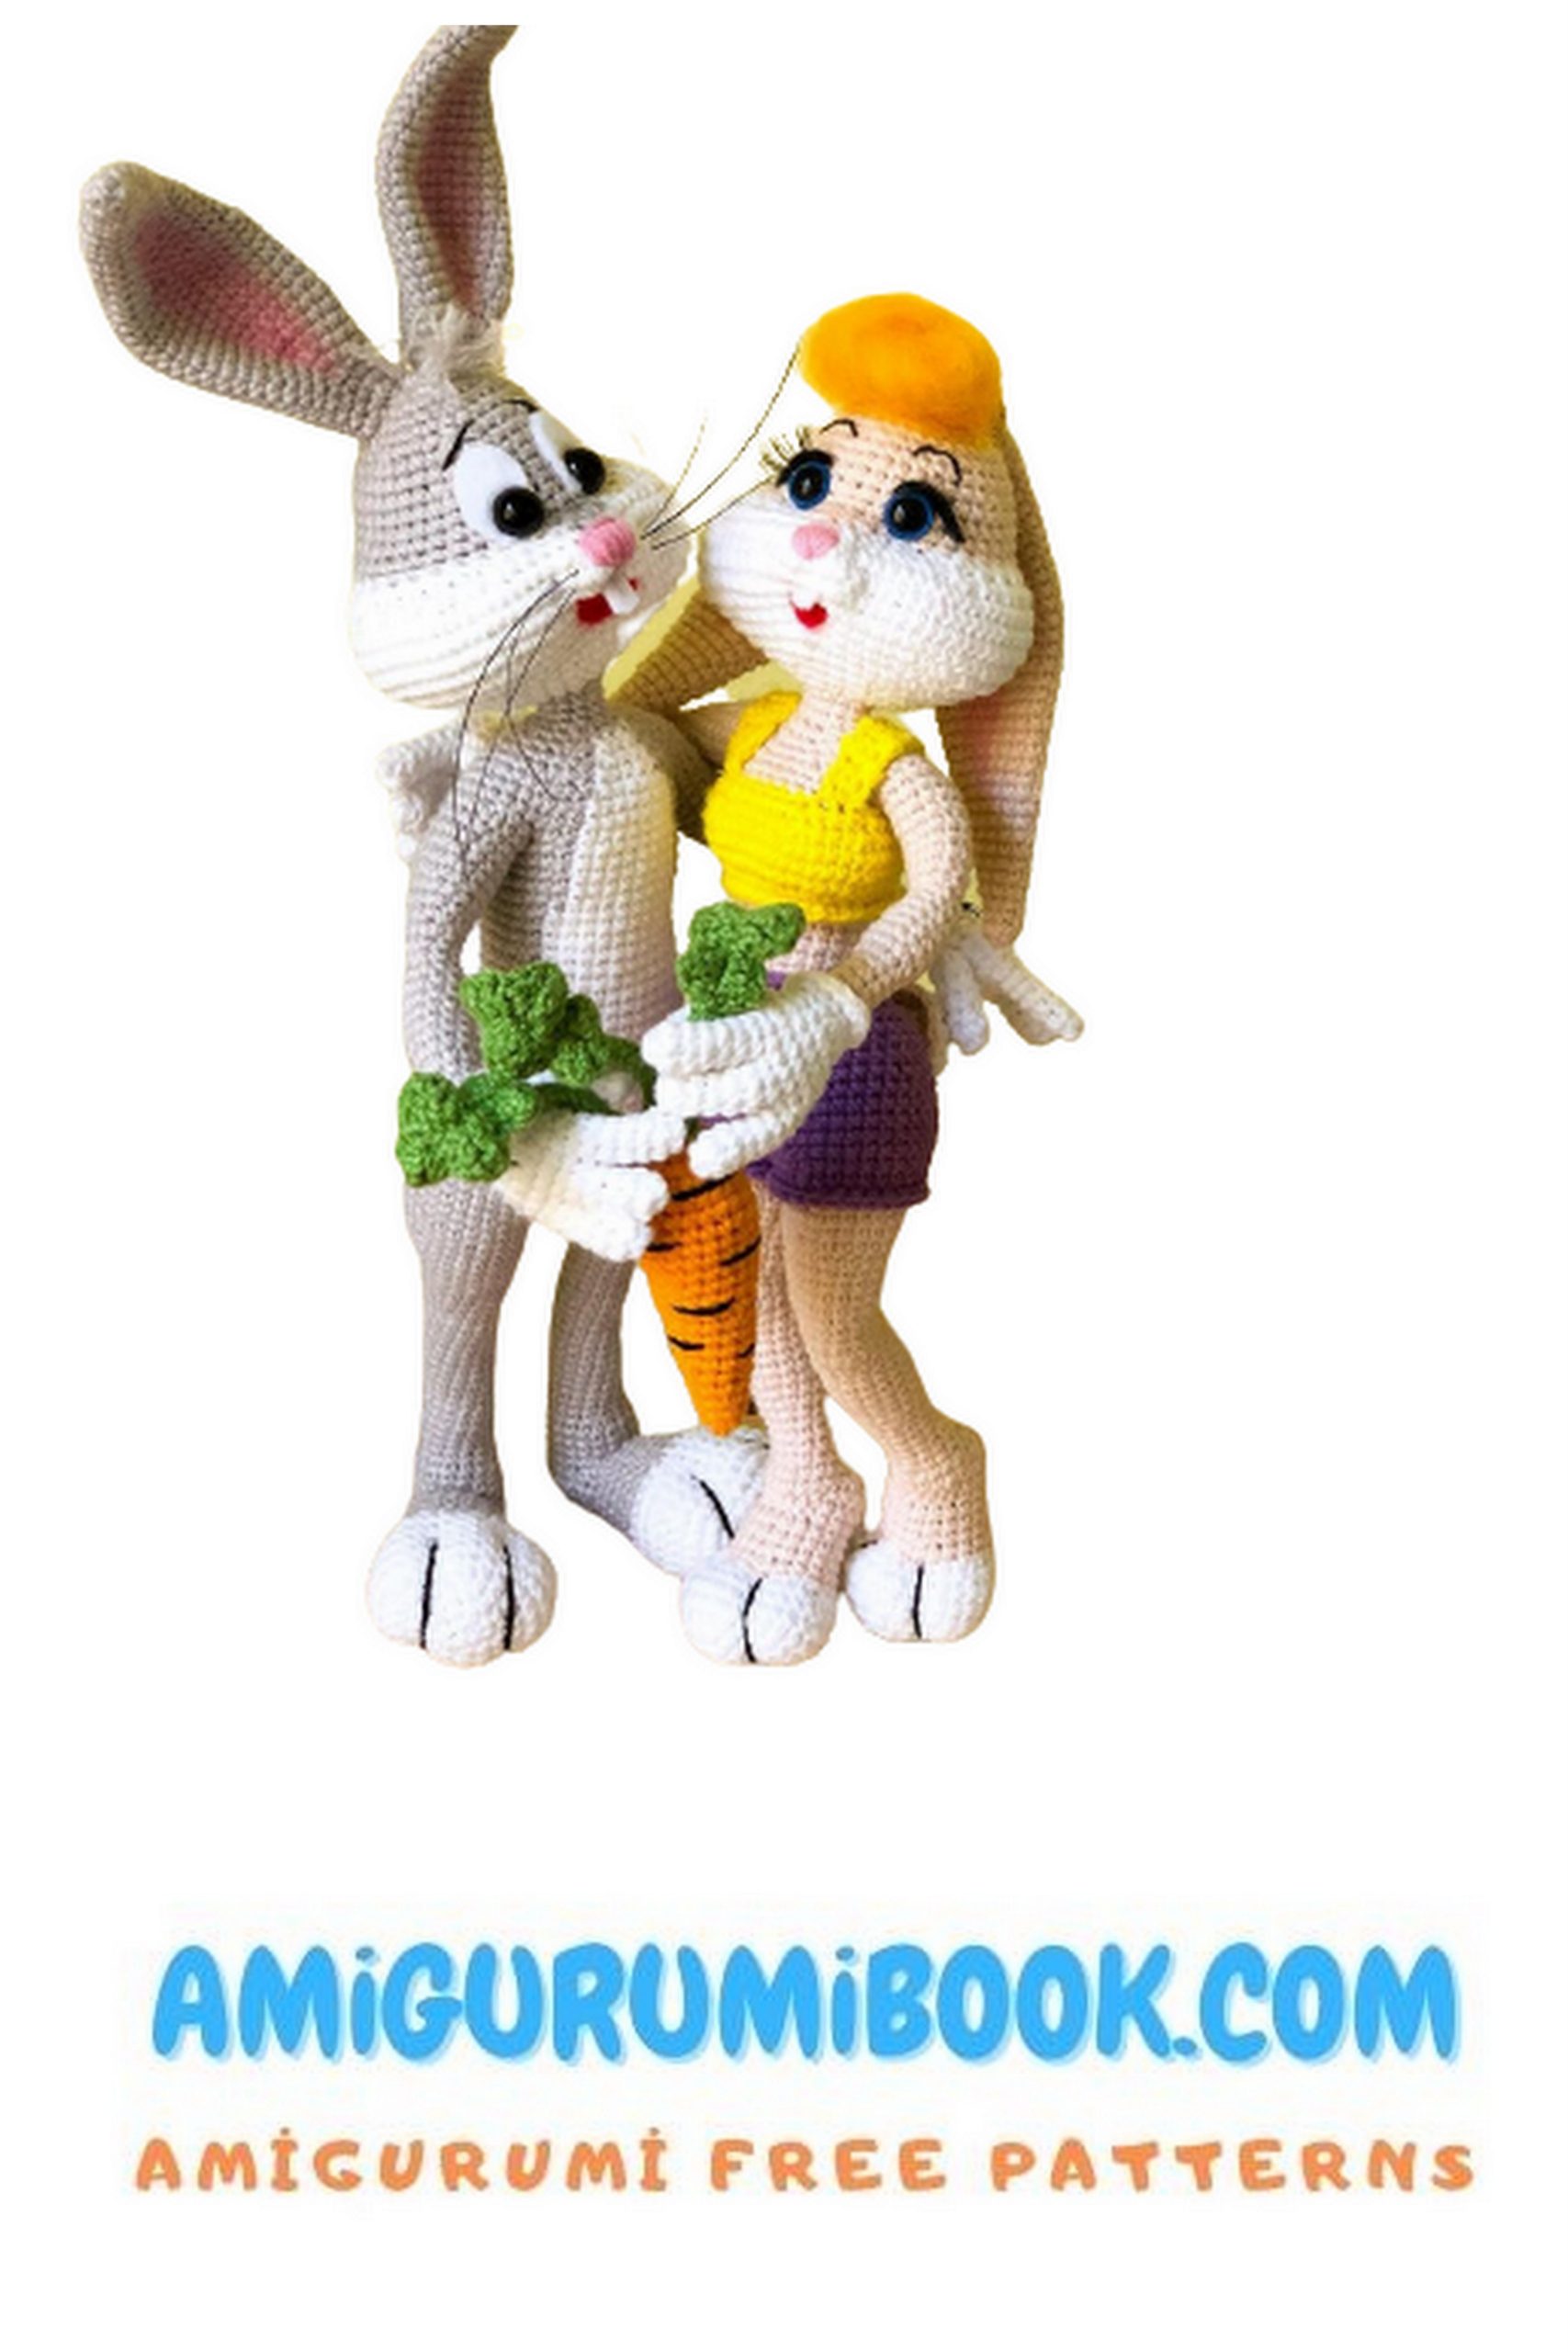
Creating a Lola Bunny amigurumi is a fun and rewarding project for crochet enthusiasts of all skill levels. This free pattern provides clear instructions to help you craft an adorable, handmade version of the beloved character. free crochet patterns – Cute Female Unicorn Amigurumi Free Pattern
You may also like more amigurumi patterns.
In this article, lola bunny amigurumi free pattern is waiting for you. I continue to share amigurumi free patterns.
Materials and Tools:
✓ The main yarn is flesh-colored. For writing a master class, Alize Cotton Gold yarn No. 382 (330m in 100g) 1 skein was used
✓ Yarn of additional white color YarnArt Jeans No. 01 (160m in 50g)
✓ Yellow yarn for a T-shirt. V MK – Alize Cotton Gold No. 110
✓ Purple yarn for shorts. V MK – YarnArt Jeans № 72
✓ Orange yarn for the ball. V MK – Alize Cotton Gold №083
✓ Some black yarn to decorate the ball. V MK – Alize Cotton Gold №060
✓ Some pink yarn for the nose. V MK – YarnArt Jeans № 20
✓ Black strong thread for shaping the eyebrows and tightening the legs and white thread for tightening the muzzle. V MK – Alize Miss (280m in 50g)
✓ Hooks for your yarn. In MK – Clover No. 2.25
✓ Colored eyes (blue) on a secure mount with a diameter of 10mm and false eyelashes
✓ Felting wool is orange (for hair) and red for the mouth. Wool should be in combed sliver (i.e. long and wide flattened sliver of fibers)
✓ Needle for felting No. 38 asterisk (you can use triangular, and No. 36, and No. 40)
✓ Rigid wire for the frame. The MK used aluminum wire with a diameter of 1 mm (about 2.2 m)
✓ Filler (holofiber, sintepukh)
✓ Some black and white felt
To knit a toy, you can use any yarn and a suitable hook for it. The thicker the yarn you choose, the larger the toy will turn out.
When using the above materials, the height of the toy will be about 29 cm.
Difficulty level: above average
If there are no additional instructions, we knit the toy in a spiral for both walls of the loop. In some cases, you need to knit in turning rows or only for the front or back walls (this will always be indicated separately).
Front side of fabric Wrong side of fabric
Use a marker so you don’t lose the start of a new row. As a marker, I use a thread of a contrasting color. I mark the last loop of each row with this thread. I move the marker at the end of each row to the loop on the hook.
A little about the bias loop. Since the crocheted fabric tends to deviate to the right, from time to time we will need to adjust the position of the beginning of the row relative to the knitted fabric (as a rule, move the beginning of the row to the center of the part). To do this, it will be necessary to knit one or more bias loops. The offset loop is just an extra single crochet knitted to move the marker to the desired location.

Abbreviations:
sc – single crochet
ch-chain
DEC – decrease
INC – increase
HDC – half double crochet
trinc – increase knit three single crochets in one loop
trdec – 3 together – make a decrease of three loops
( ) * 3 – repeat the information in brackets three times
(18) – at the end of each line in brackets is the total number of loops in the row
loop – displacement loop
FLO – Front loop crochet
BLO – back loop crochet
sl-st – slip stitch
Thank you for your interest in my master class! I wish you happy knitting!
The master class does not contain crochet lessons.
It is the author’s development of Anna Bagrova.
Intended for personal use only.
It is forbidden to copy and publish on the Internet the entire MC or any of its parts, transfer or sell the MC to third parties.
You have the right to dispose of related toys at your own discretion: give, sell.
PATTERN

Ears (2 pcs)
1st row: 6MAGIC RING INTO(6)
2-3 rows: 6sc (2 rows)
4th row: (1sc, INC)*3 (9)
5-6 rows: 9sc (2 rows)
7th row: (2sc, INC)*3 (12)
8-9 rows: 12sc (2 rows)
10 row: (3sc, INC) * 3 (15)
11-12 rows: 15sc (2 rows)
13rd row: 2sc, INC, (4sc, INC)*2, 2sc (18)
14-15 rows: 18sc (2 rows)
16 row: (5sc, INC) * 3 (21)
17-18 rows: 21sc (2 rows)
19 row: 3sc, INC, (6sc, INC) * 2, 3sc (24)
20-27 rows: 24sc (8 rows)
28 row: 3sc, dec(4sc in 1sc), 17sc (21)
Lay the fold of the loops knitted together inside.
29-30 rows: 21sc (2 rows)
Row 31: 2sc, dec(4sc in 1sc), 15sc (18)
32 row: 18sc (18)
33rd row: 1sc, dec(4sc in 1sc), 13sc (15)
34th row: 15sc (15)
35 row: (3sc, DEC) * 3 (12)
36-37 rows: 12sc (2 rows)
38 row: (2sc, DEC) * 3 (9)
39-41 rows: 9sc (3 rows)
Fold the piece in half, knit 4sc over the two edges. The crease should be in the middle of the ear. Don’t stuff your ears. Fasten the thread. Cut off.

Tail
We knit the first part of the tail with white yarn. We knit in turning rows.
1st row: 2ch
Row 2 (in the second loop from the hook): trinc, ch, turn (3)
3rd row: 3INC, ch, turn (6)
4th row: INC, 1sc, 2INC, 1sc, INC, ch, turn (10)
5th row: 2sc, INC, 4sc, INC, 2sc, ch, turn (12)
6th row: 12sc, ch, turn (12)
7th row: 2DEC, 4sc, 2DEC, ch, turn (8)
8th row: 4DEC (4)
Fasten the thread, cut.
We knit the second part of the tail with yarn of the main color. We knit in turning rows.
1st row: 2ch
Row 2 (second st from hook): INC, ch, turn (2)
3rd row: 2INC, ch, turn (4)
4th row: 4sc, ch, turn (4)
5th row: INC, 2sc, INC, ch, turn (6)
6th row: 2sc, 2sc in FLO, 2sc, ch, turn (6)
7th row: DEC, 2sc, DEC, ch, turn (4)
8 row: 4sc (4)
Attach the details to each other. The beige part should be in contact with the white side, on which there are no loose back walls of the loops of the 6th row. They must stay outside.
Insert the hook from the side of the white part and tie in a circle for both parts with single crochets of the main color yarn. Knit a trinc at the top of the tail.
Stuff the detail.
Mark with a marker the central lower 4 loops of the tail. For them we will later tie the tail into the body. Fasten the thread. Cut off.
Hands (2pcs)
Fingers of one hand (4pcs)
We start knitting with white yarn:
1st row: 6MAGIC RING INTO(4)
2-6 rows: 6sc (5 rows)
Fasten the thread on three fingers, cut off. On the fourth, we continue knitting, attaching the remaining fingers:
7th row: 3sc, 3sc on the 2nd finger, 6sc on the 3rd finger, 3sc on the 2nd, 3sc on the 1st (18)
8-9 rows: 18sc (2 rows)
10 row: (4sc, DEC) * 3 (15)
The marker for the beginning of the row is on the side. In the next row we will attach the fourth (thumb) finger. Knitting 11 and 12 rows for the left and right hands will be different.
Right hand:
Row 11: 5sc, 3sc picking up hand sts and thumb sts, 7sc (15)
Row 12: 3sc, DEC, 3sc in loose sts of thumb, DEC, 3sc, DEC (12)
Left hand:
Row 11: 1sc, 3sc picking up hand sts and thumb sts, 11sc (15)
12 row: 1sc, (DEC, 1sc) – on untied loops of the thumb, 2sc, DEC, 3sc,
DEC, 2sc (12)
Cut 4 pieces of wire 25 cm each. Make a loop at the end of the wire,
finger sized. Wrap the base of the loop with double-sided tape. Insert
three-finger wire. Twist the free ends of the wires together. fill
palm. Insert the wire into the thumb. Twist the free end with
wires of the remaining fingers.
13th row: 12sc (12)
Change the color of the thread to the main one. The color change of the thread always occurs at the extreme
loop of the previous color (!). That is, when the next loop should be different
colors, we knit the current loop as follows:
Row 14 (knit behind BLO): (2sc, DEC) * 3 (9)
If necessary, add filler to the palm of your hand.
15-19 rows: 9sc (5 rows)
20 row: (2sc, INC) * 3 (12)
21-24 rows: 12sc (4 rows)
25 row: (2sc, DEC) * 3 (9)
26-27 rows: 9sc (2 rows)
28 row: (2sc, INC) * 3 (12)
Fill.
29-31 rows: 12sc (3 rows)
32 row: INC, 11sc (13) – the increase is above the middle finger. If you dec it
not so, knit a couple of offset loops to bring the marker to the right place.
33-36 rows: 13sc (4 rows)
Fasten the thread. Cut off.
Attach white thread to the unworked FLO (front walls) loops
14 rows of knitting hands. And tie in a circle:
(2sc, INC) * 4, sl-st (12) Fasten the thread, cut off.
Mark with a marker 4 center loops above the middle finger on the inside
side of the hand. For these loops in the future we will tie our hands into the body.
Legs (2 pcs)
We start knitting with white yarn:
1st row: 4ch (4)
2 row (in the second loop from the hook in a circle): 2sc, trinc, 1sc, trinc (9)
3rd row: 2sc, 3INC, 1sc, 3INC (15)
4th row: 2sc, (1sc, INC)*3, 1sc, (1sc, INC)*3 (21)
5th row: 2sc, (2sc, INC)*3, 1sc, (2sc, INC)*3 (27)
6th row: 4sc, INC, (8sc, INC)*2, 4sc (30)
7-9 rows: 30sc (3 rows)
10 row: (3sc, DEC) * 6 (24)
Bring the marker to the center relative to the initial chain of air loops, knitting the required number of offset loops. DEC got me +3loop.
Change the color of the thread to the main one.
11th row: 5sc, DEC, 4sc, DEC, 4sc, DEC, 5sc (21)
12th row: 21sc (21)
13 row: (DEC, 5sc) * 3 (18)
14th row: 18sc (18)
Bring the marker to the center of the opposite side (this will be the center of the front of the leg), knitting the required number of offset loops. DEC got me +9loop.
15th row: 8sc, INC, 5sc, 4sl-st (19)
16th row: 4sl-st, 5sc, trinc, 5sc, 4sl-st (21)
17th row: 4sl-st, 13sc, 4sl-st (21)
+1sl-st for offset.
Lightly stuff the white part of the leg.
Cut a piece of wire 60 cm, fold it in half, making a loop at the end. Insert into leg.
18th row: 4sl-st, 3sc, DEC, trdec, DEC, 7sc (17)
19 row: 7sc, trdec, 7sc (15)
20 row: (3sc, DEC) * 3 (12)
21-24 rows: 12sc (4 rows)
Stuff the detail. It is good to fill the heel, forming it. Next, stuff the part in the course of knitting, focusing on the knees and calves. Stuff the ankles quite a bit.
25 row: (3sc, INC) * 3 (15)
Align the marker if necessary. DEC me +1loop
26th row: 7sc, INC, 7sc (16)
27-31 rows: 16sc (5 rows)
Align the marker if necessary. DEC me +1loop
32nd row: 7sc, DEC, 7sc (15)
Row 33: (3sc, DEC)*2, 3sc, INC, 1sc (14)
34th row: INC, 13sc (15)
35th row: 12sc, DEC, 1sc (14)
36th row: DEC, 3sc, INC, 3sc, INC, 4sc (15)
37 row: 2sc, INC, (4sc, INC)*2, 2sc (18)
38-41 rows: 18sc (4 rows)
42 row: (5sc, INC) * 3 (21)
43-44 rows: 21sc (2 rows)
Align the marker if necessary. DEC me +1loop
45th row: 6sc, INC, 3sc, INC, 3sc, INC, 6sc (24)
46 row: 24sc (24)
Align the marker if necessary. DEC me +0 loop.
Change the color of the thread to purple (the color of the shorts).
Knitting 47 rows for the left and right legs will be different.
Right leg:
47th row: 5sc, INC, 3sc, INC, 3sc, INC, 10sc (27)
Left leg:
47th row: 10sc, INC, 3sc, INC, 3sc, INC, 5sc (27)
Row 48 (knit behind BLO): 12sc, INC, 1sc, INC, 12sc (29)
+1loop
Fasten the thread. Cut off.
Tie the bottom edge of the shorts. Attach purple yarn to the unworked FLO sts of row 48 of the leg as shown. And tie in a circle: 27sc, sl-st. It is better to start tying from the inside of the thigh of each leg.
Let’s form the toes by making a tightening with a strong black thread. I have two strands of thread.
Mark two points in the upper part of the leg on the border of the main yarn and the white yarn, holding the leg with the front towards you. Points mark at a distance of 4sc from each other.
Below, three rows below the initial chain of ch, also put two dots in the same way.
Let’s proceed according to the scheme:
Such an arrow between the dots means that the thread passes inside the web. The thread in this case passes outside the web.
3 1 3 2 4 3
We insert the needle into t3 (leaving the tip of the thread about 20 cm outside), we bring it out into t1, we enter it into t3, we bring it out into t2, we insert it into t4, we bring it out into t3, we tighten the thread, making a tightening. We tie the remaining ends of the thread into a knot and hide them in the leg.
Mark with a marker:
for the right leg: 21st loop of the 48th row (9th loop from the end) for the left leg: 9th loop of the 48th row Next, we will connect the legs and knit the Body.
Insert the hook into the 9th loop of the left leg and into the 9th from the end of the loop of the right leg (the loops marked with a marker). Insert the hook from the side of the left leg.
Work 3sc behind the loops of both legs.
Continue knitting:
1 row: on the right leg 26sc, on the left leg 26sc (52)
Place a marker for the end of the row. Twist the wires of the legs together.
2-4 rows: 52sc (3 rows)
Align the marker if necessary (center in front). DEC me +0 loop.
In the next row we will tie the tail. We knit for the loops marked with markers.
Row 5: 24sc, 4sc picking up tail and body sts, 24sc (52)
6 row: (11sc, DEC) * 4 (48)
7th row: 3sc, DEC, (6sc, DEC)*5, 3sc (42)
8 row: 42sc (42)
Align the marker if necessary (center in front). DEC me +1loop.
Row 9: 10sc, DEC, 4sc, DEC, 2sc, 2sc picking up the body sts and the remaining front walls of the tail sts, 2sc, DEC, 4sc, DEC, 10sc (38)
10th row: 12sc, DEC, 10sc, DEC, 12sc (36)
Stuff the body in the course of knitting.
11th row: 36sc (36)
Align the marker if necessary (center in front). DEC me +0 loop.
12row: 12sc, 6DEC, 12sc (30)
Change the color of the thread to the main one.
Row 13 (per BLO): (3sc, DEC)*6 (24)
It’s good to kick your ass.
14-19 rows: 24sc (6 rows)
Bring the marker to the center of the back (above the tail), knitting the required number of offset loops. DEC got me +12loop.
Change the color of the thread to the color of the shirt (yellow).
20th row: 8sc, INC, trinc, INC, 2sc, INC, trinc, INC, 8sc (32)
Row 21 (per BLO): 8sc, (1sc, INC)*4, (INC, 1sc)*4, 8sc (40)
22-24 rows: 40sc (3 rows) +1loop
25th row: 10sc, DEC, 3sc, DEC, 6sc, DEC, 3sc, DEC, 10sc (36)
26th row: 10sc, DEC, 1sc, DEC, 6sc, DEC, 1sc, DEC, 10sc (32)
Change the color of the thread to the main one.
In the next row we will tie our hands. We put the parts face to face with each other. Inserting the hook from the wrong side of the hand into the loop marked with a marker, we knit sc for both parts.
Row 27 (whole row in BLO, except sts when the arms are in): 5sc, 4sc picking up the torso sts and left hand sts, 2sc, DEC, 6sc, DEC, 2sc, 4sc picking up the body sts and right hand sts, 5sc (30)
28th row: 4sc, DEC (1 st on the body, 2nd on the arm), 8sc on the arm, 1sc on the body, DEC, 6sc, DEC, 1sc on the body, 8sc on the arm, DEC (1st st on the arm, 2nd on the body), 4sc (36)
29 row: 2sc, DEC, (4sc, DEC) * 5, 2sc (30)
Twist the ends of the wire together. Good for shoulders and chest.
30 row: (3sc, DEC) * 6 (24)
31 row: (2sc, DEC) * 6 (18)
Get a detail.
32 row: (1sc, DEC) * 6 (12)
33-35 rows: 12sc (3 rows)
Cut off the beige thread. But don’t pull. A little later we will change it to white.
Cut off the excess wire, leaving the end about 1 – 1.5 cm. You can wrap the edge of the wire with electrical tape or a fabric-based plaster.
We will knit the straps for the T-shirt.
Mark with markers the central 6 FLO (front walls) loops of the 27th row on the chest. We will tie the straps for three loops on the sides of the central 6 loops.
Attach a yellow thread to the places indicated in the photo and knit for each strap:
1 – 12 rows: 3sc, ch, turn (12 rows)
Fasten the thread. Cut off, leaving a long tail for sewing.
Sew the straps on the back to the untied walls of the loops of the 27th row.
Tie the bottom of the shirt with yellow yarn for FLO 21st row: 30sc, sl-st.
Tie the top of the shorts with purple yarn for FLO 13th row: 30sc, sl-st.
We continue knitting. We turn to knitting Heads. Change the thread color to white.
36 row: (1sc, INC) * 6 (18)
37 row: (2sc, INC) * 6 (24)
38 row: (3sc, INC) * 6 (30)
39 row: 2sc, INC, (4sc, INC) * 5, 2sc (36)
Bring the marker to the center at the back, knitting the required number of offset loops. DEC got me +3loop.
40 row: 7sc, 6INC, 4sc, trinc, 4sc, 6INC, 8sc (50)
41st row: 2sc, INC, 20sc, trdec, 20sc, INC, 3sc (50)
Row 42: 8sc, (INC, 1sc)*6, 4sc, trinc, 4sc, (1sc, INC)*6, 9sc (64)
43rd row: 30sc, INC, 1sc, INC, 31sc (66)
44th row: INC, 29sc, trinc, 3sc, trinc, 31sc (71)
45th row: 3sc, INC, 63sc, INC, 3sc (73)
46 row: 32sc, trdec, 3sc, trdec, 32sc (69)
Taken in [square brackets] knit with yarn of [main] color.
47th row: 10sc, (DEC, 1sc)*6, 5sc, [trdec], 5sc, (1sc, DEC)*6, 10sc (55)
48th row: 3sc, DEC, 5sc, 6DEC, 3sc, [1sc, trdec, 1sc], 3sc, 6DEC, 5sc, DEC, 3sc (39)
Next, we knit all the yarn of the main color.
49-52 rows: 39sc (4 rows)
53 row: (11sc, DEC) * 3 (36)
54row: 36sc (36)
Insert eyes between 50 and 51 side by side at a distance of 5sc from each other.
It is good to fill the cheeks, giving them rounded shapes. So that there are no gaps.
55 row: 2sc, DEC, (4sc, DEC) * 5, 2sc (30)
56 row: 30sc (30)
Align the marker if necessary (center back). DEC me +1 loop.
In the next two rows we will tie in the ears. Ears are applied with folds to the head.
57 row: (3sc, DEC) * 5, 1sc; (2sc, DEC) – capturing the loops of the head and the loops of the first ear
58 row: (2sc, DEC) – capturing the loops of the head and the loops of the second ear, (2sc, DEC) * 5 (18)
Fill the detail to the end. Before we continue knitting and close the hole in the head, we will embroider the nose and make the snouts of the muzzle.
To perform tightenings between 41 and 42 of the head row, mark two points at a distance of 1sc from each other – these will be t1 and t2. Mark two more points under each eye (at the outer and dec inner edges of the eye at a distance of 3sc from each other). The points are under the eye, between the 48th and 49th knitting rows of the head (at the junction of two colors of the knitted fabric – white and main). The location and numbers of the points are shown in the photo:
Make a tightening with a strong white thread.
Let’s proceed according to the scheme:
Such an arrow between the dots means that the thread passes inside
canvases
The thread in this case passes outside the canvas.
2 6 5 2 1 4 3 1
We insert the needle into t2 (leaving the tip of the thread about 20 cm outside), we bring it out to t6, we enter it into t5, we bring it out into t2, we enter it into t1, we bring it out into t4, we enter it into t3, we bring it out into t1, we tighten the thread, making a tightening. We tie the remaining ends of the thread into a knot and hide them in the head.
Add filler to the head. We continue knitting the head.
59 row: (1sc, DEC) * 6 (12)
60 row: 6dec (6)
Pull the hole. Fasten the thread. Cut off.
Embroider eyebrows with black thread in small stitches. To make the dec of the eyebrows be curved. Stitch joints can be tinted with a black marker to make the bend smoother.
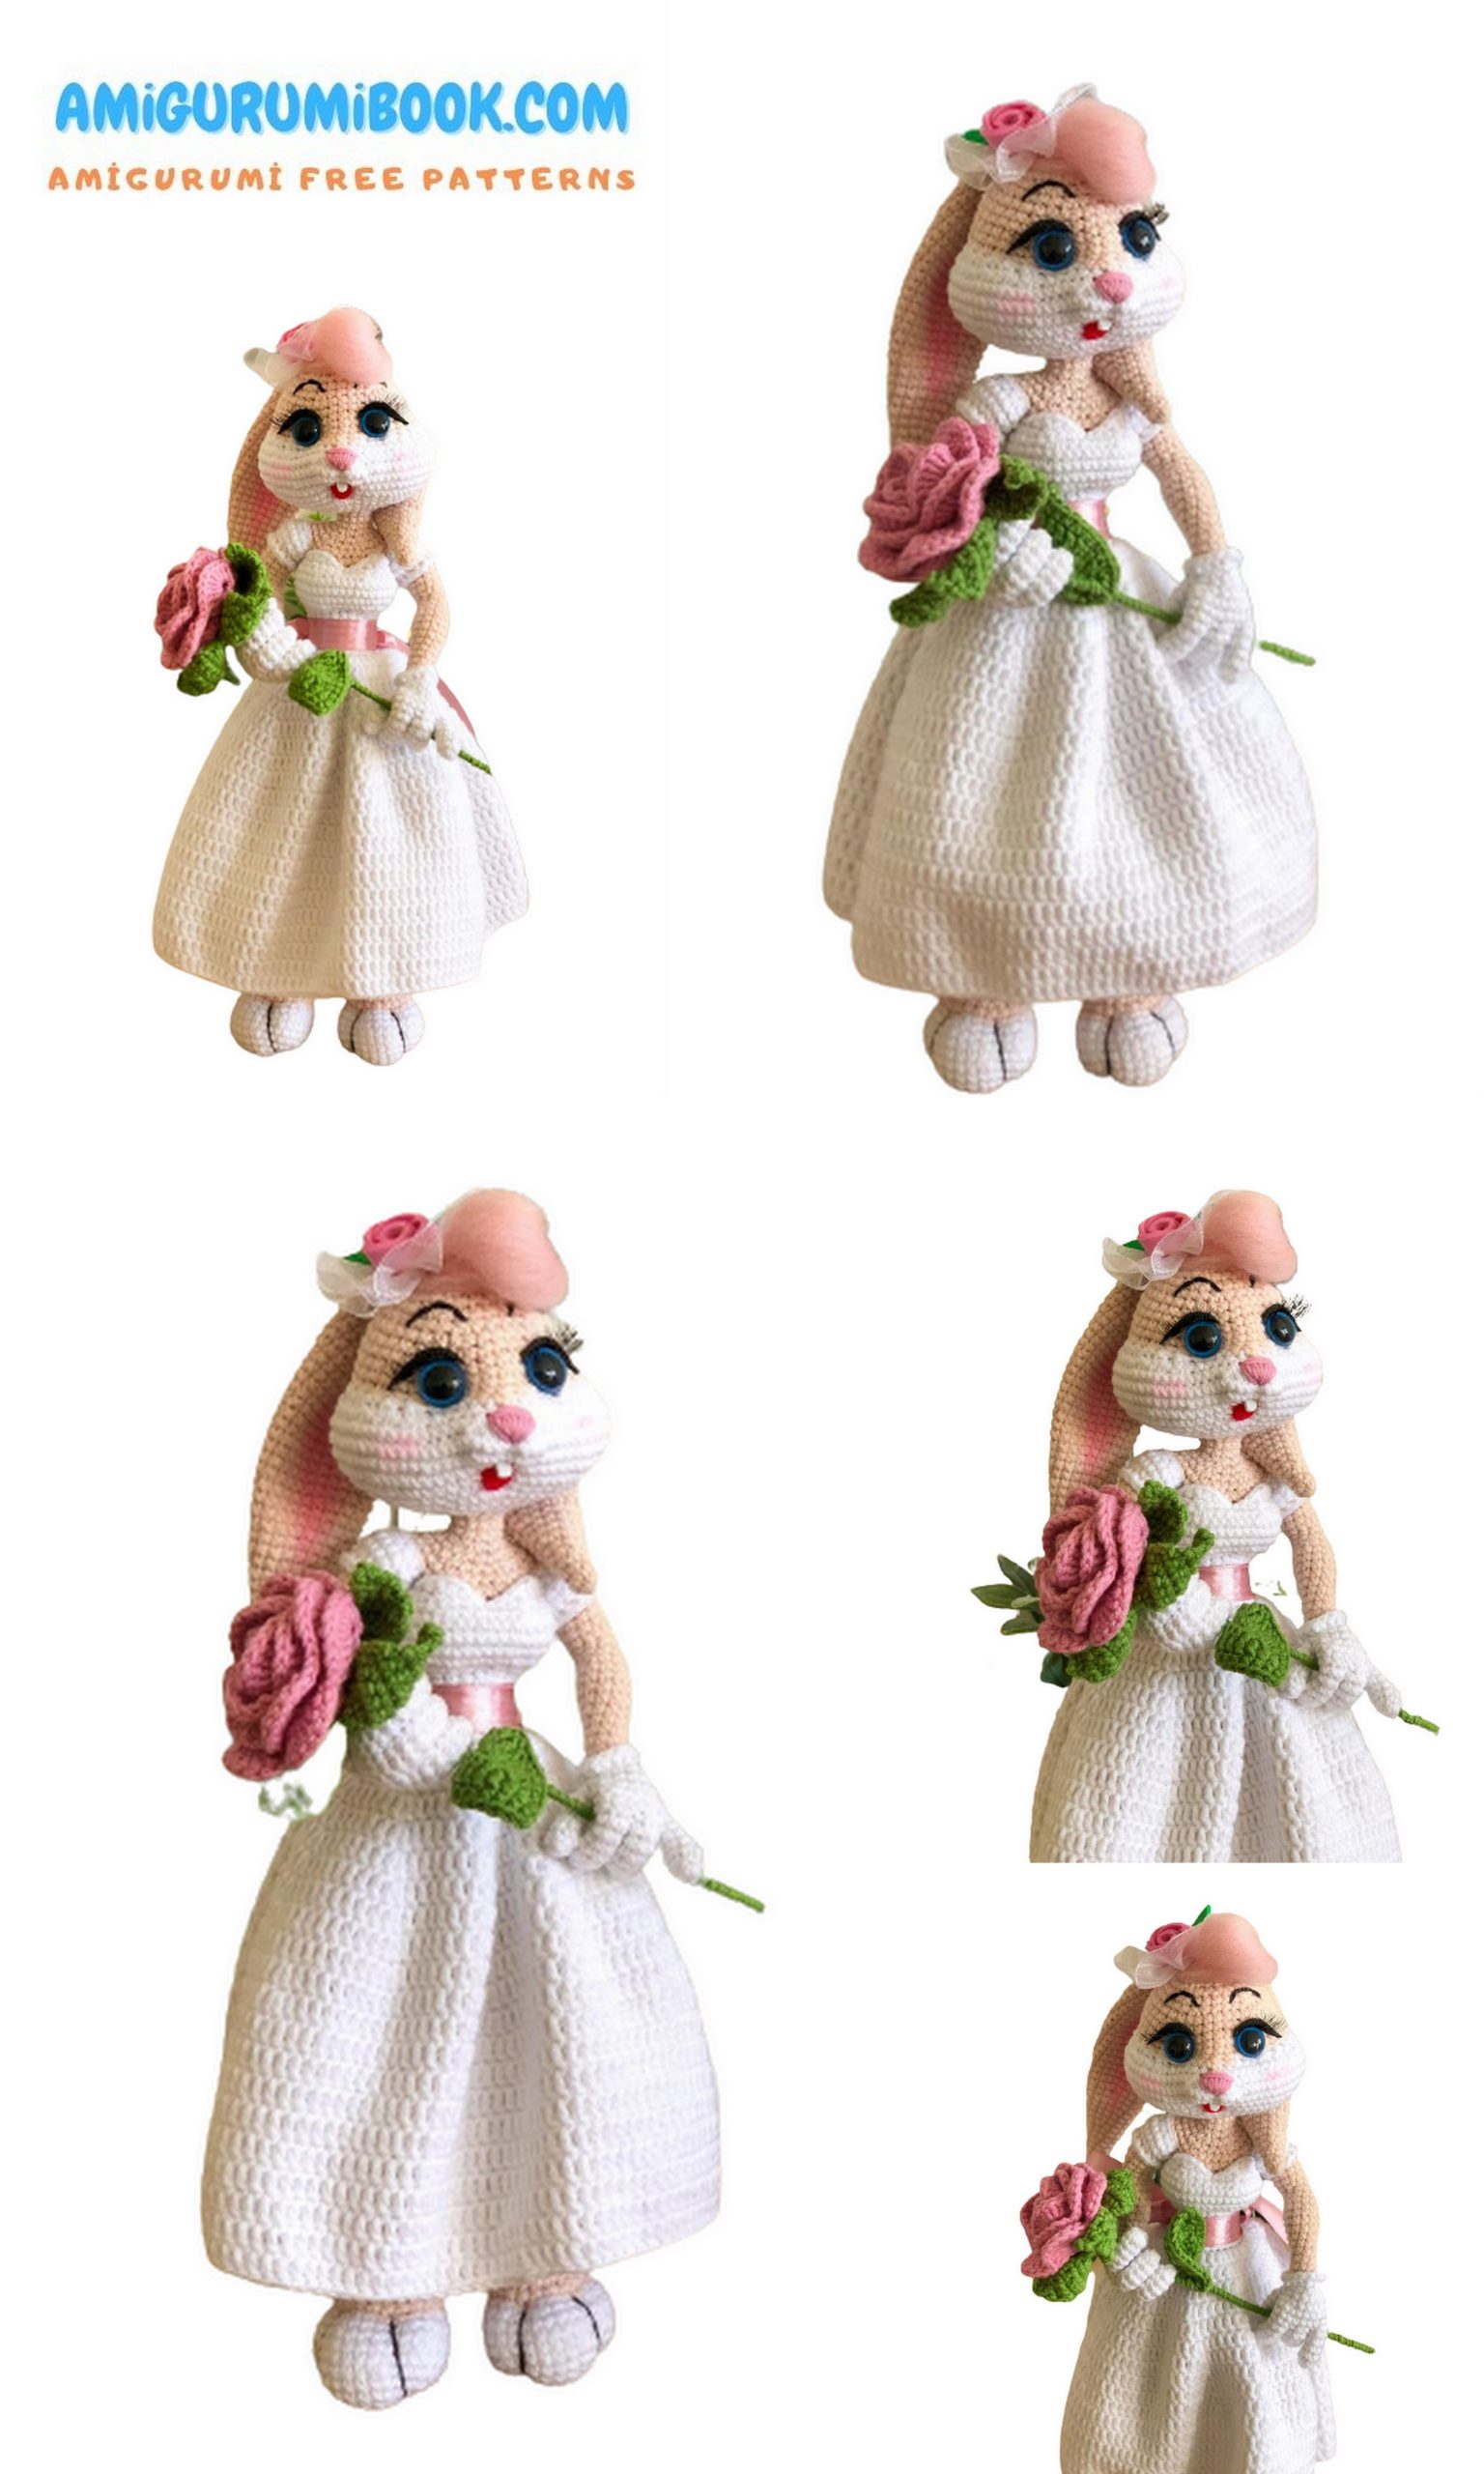
Roll a small piece of red wool in place of the mouth. Or cut a mouth out of red felt and glue it on.
Cut out a tooth and eyelids from felt. The size depends on your desire. DEC me tooth about 5mm*5mm. Eyelids 2-3mm thick, 17mm long.
I recommend gluing the eyelids and the tooth after we tie the hair band.
Scrunchy
Knit with purple yarn.
1 row: 13ch close in a ring around the ears (13)
2-3 rows: 13 HDC (2 rows)
4th row: 13 HDC, sl-st.
Fasten the thread, cut.
Continue the design of the muzzle.
Glue the tooth, eyelids and false eyelashes.
Hairstyle
We take a felting needle and orange felting wool in a combed ribbon.
We pinch off a small piece of wool, as in the first photo, fold it in half, apply it with its free ends to the head (on the top of the head) and pass the needle over the entire area circled in the photo:
Toning
Use any method of tinting familiar to you (dry pastel, paints
or shadows, as in my case). Toning is better in daylight.
We tint the ears inside with a bright pink color (where the fold was laid on the ears).
Lightly tint the cheeks with pink.
We tint the area under the eyelids next to the eye with white (draw the whites of the eye).
We draw a fold on the chest to spice up the image.
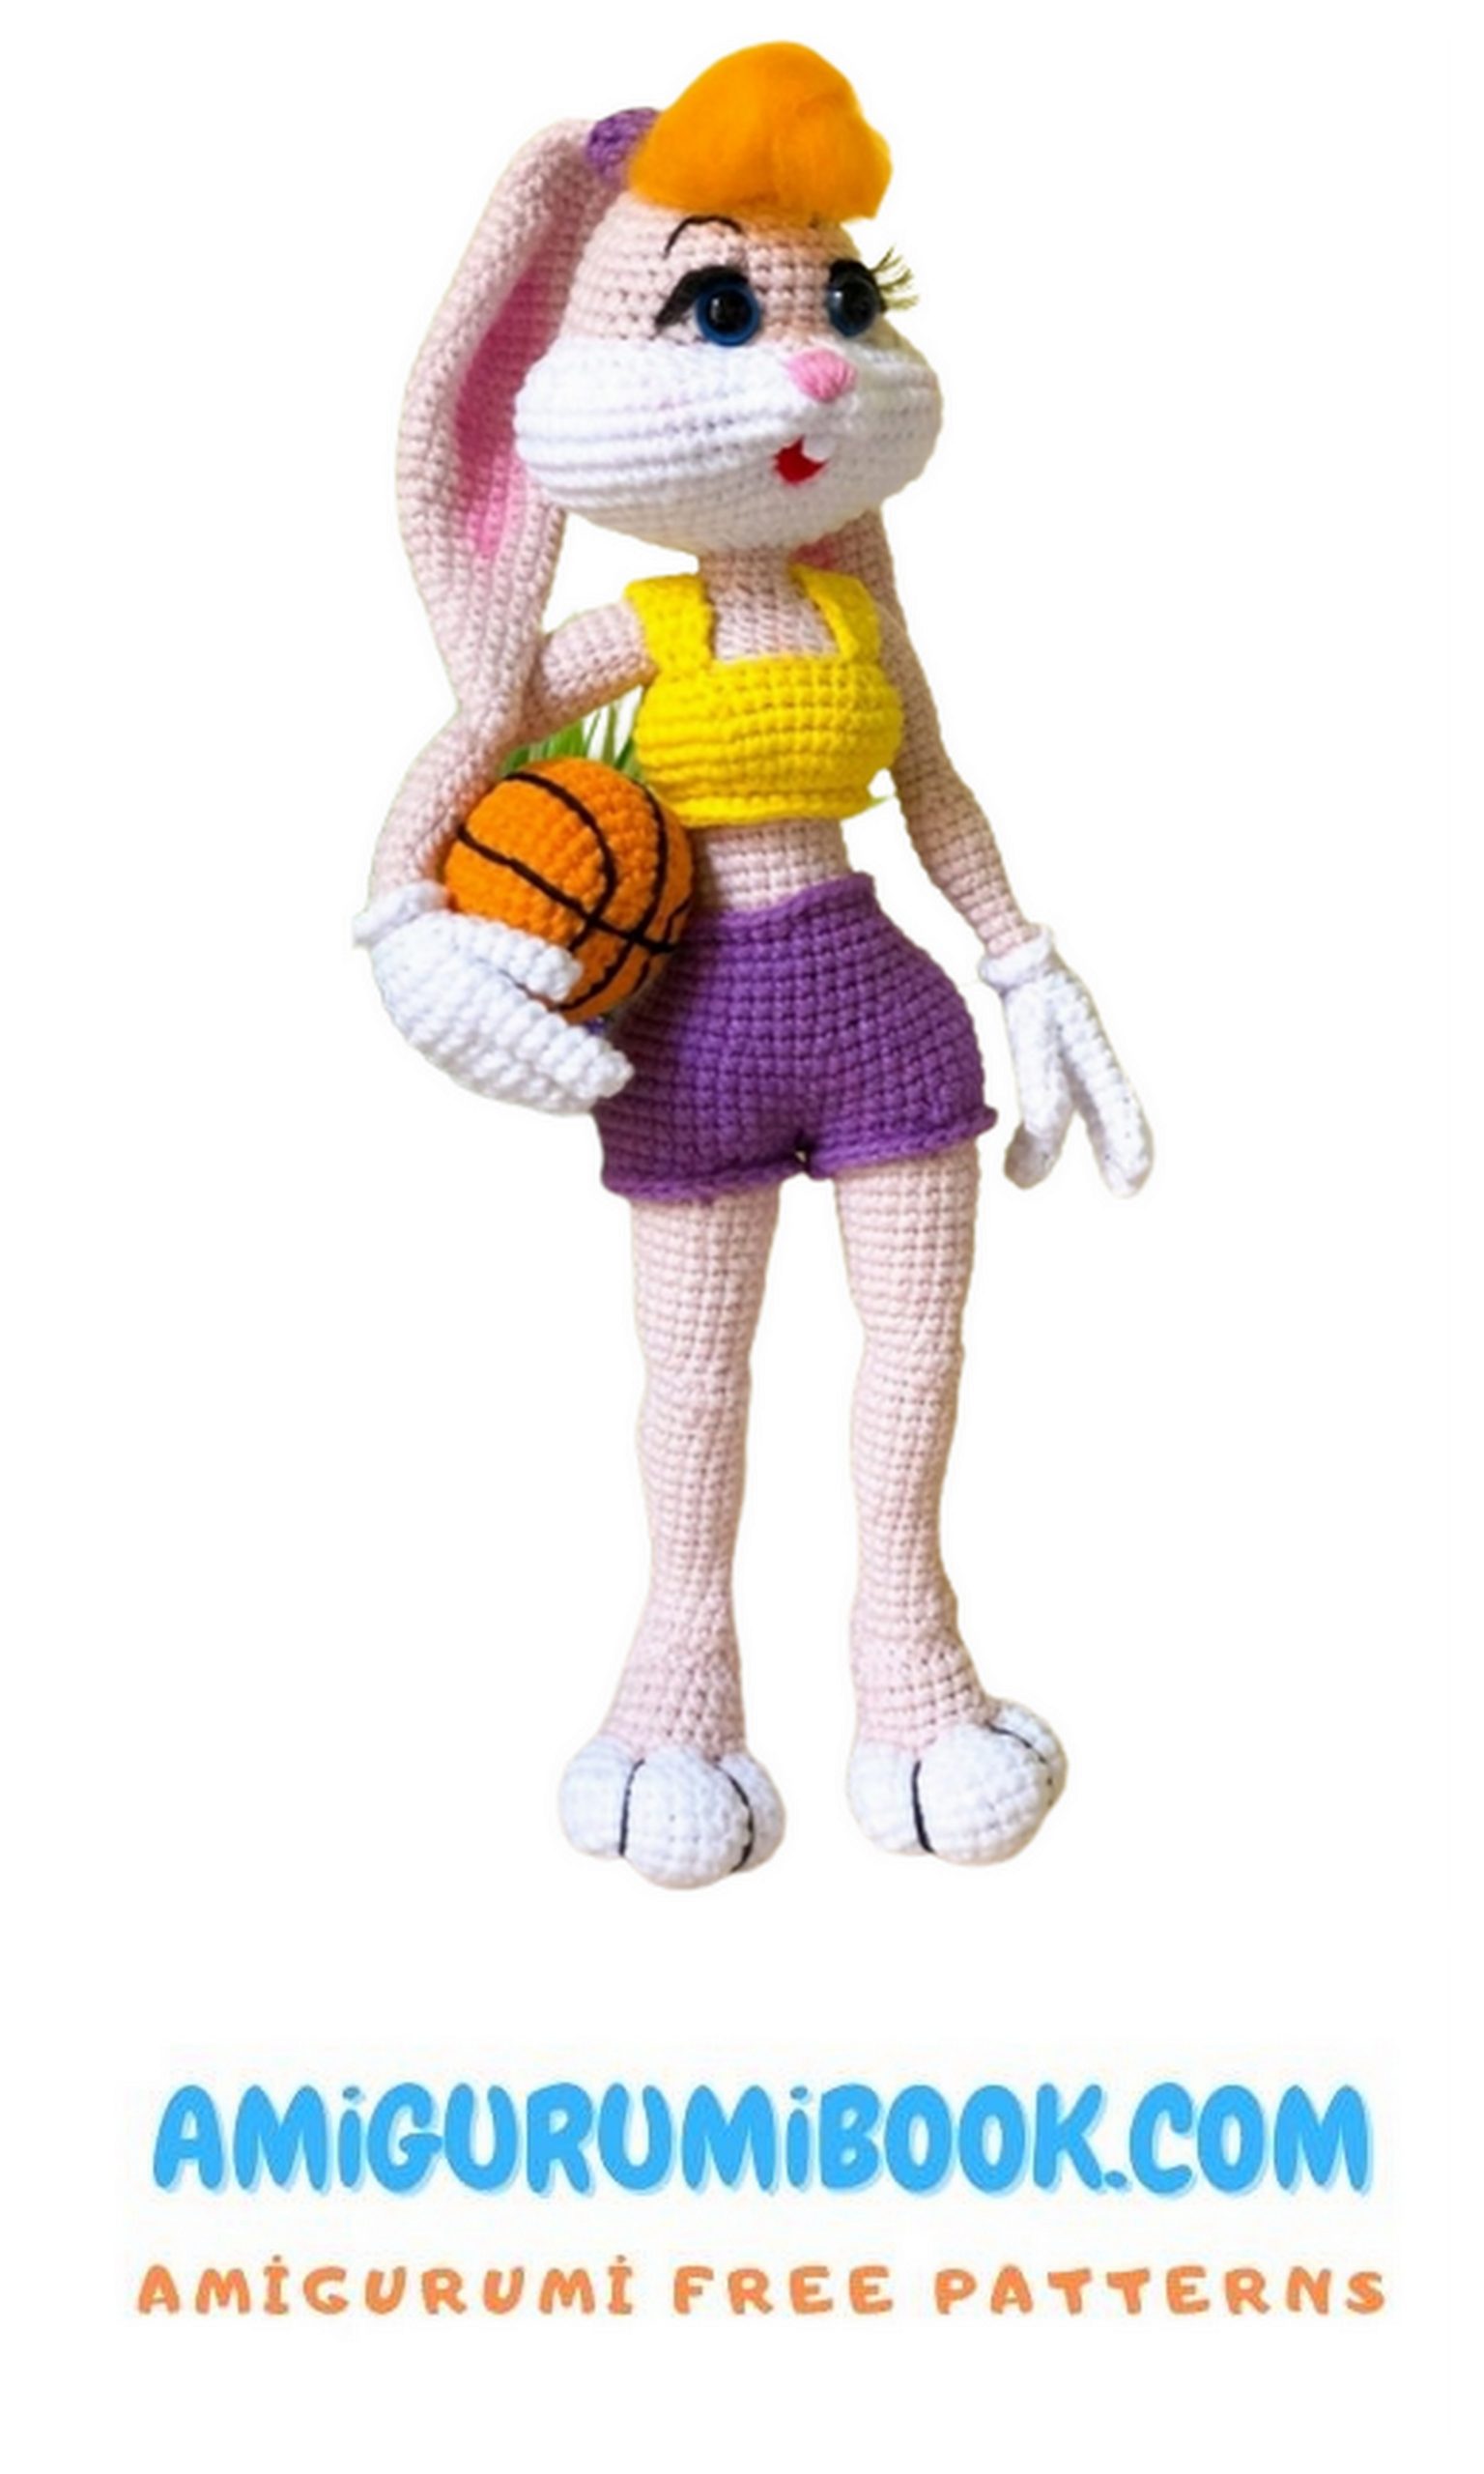
Ball
Knit with orange yarn. Stuff in the course of knitting. Stuff tightly so that after embroidering the pattern, the ball does not lose its shape.
1st row: 6MAGIC RING INTO(6)
2nd row: 6INC (12)
3 row: (1sc, INC) * 6 (18)
4th row: 1sc, INC, (2sc, INC)*5, 1sc (24)
5 row: (3sc, INC) * 6 (30)
6th row: 2sc, INC, (4sc, INC)*5, 2sc (36)
7-12 rows: 36sc (6 rows)
13rd row: 2sc, DEC, (4sc, DEC) * 5, 2sc (30)
14 row: (3sc, DEC) * 6 (24)
15 row: 1sc, DEC, (2sc, DEC) * 5, 1sc (18)
16 row: (1sc, DEC) * 6 (12)
17th row: 6dec (6)
Pull the hole. Fasten the thread, cut.
Embroider a pattern on the ball with a black thread so that it can safely be called a baseball.
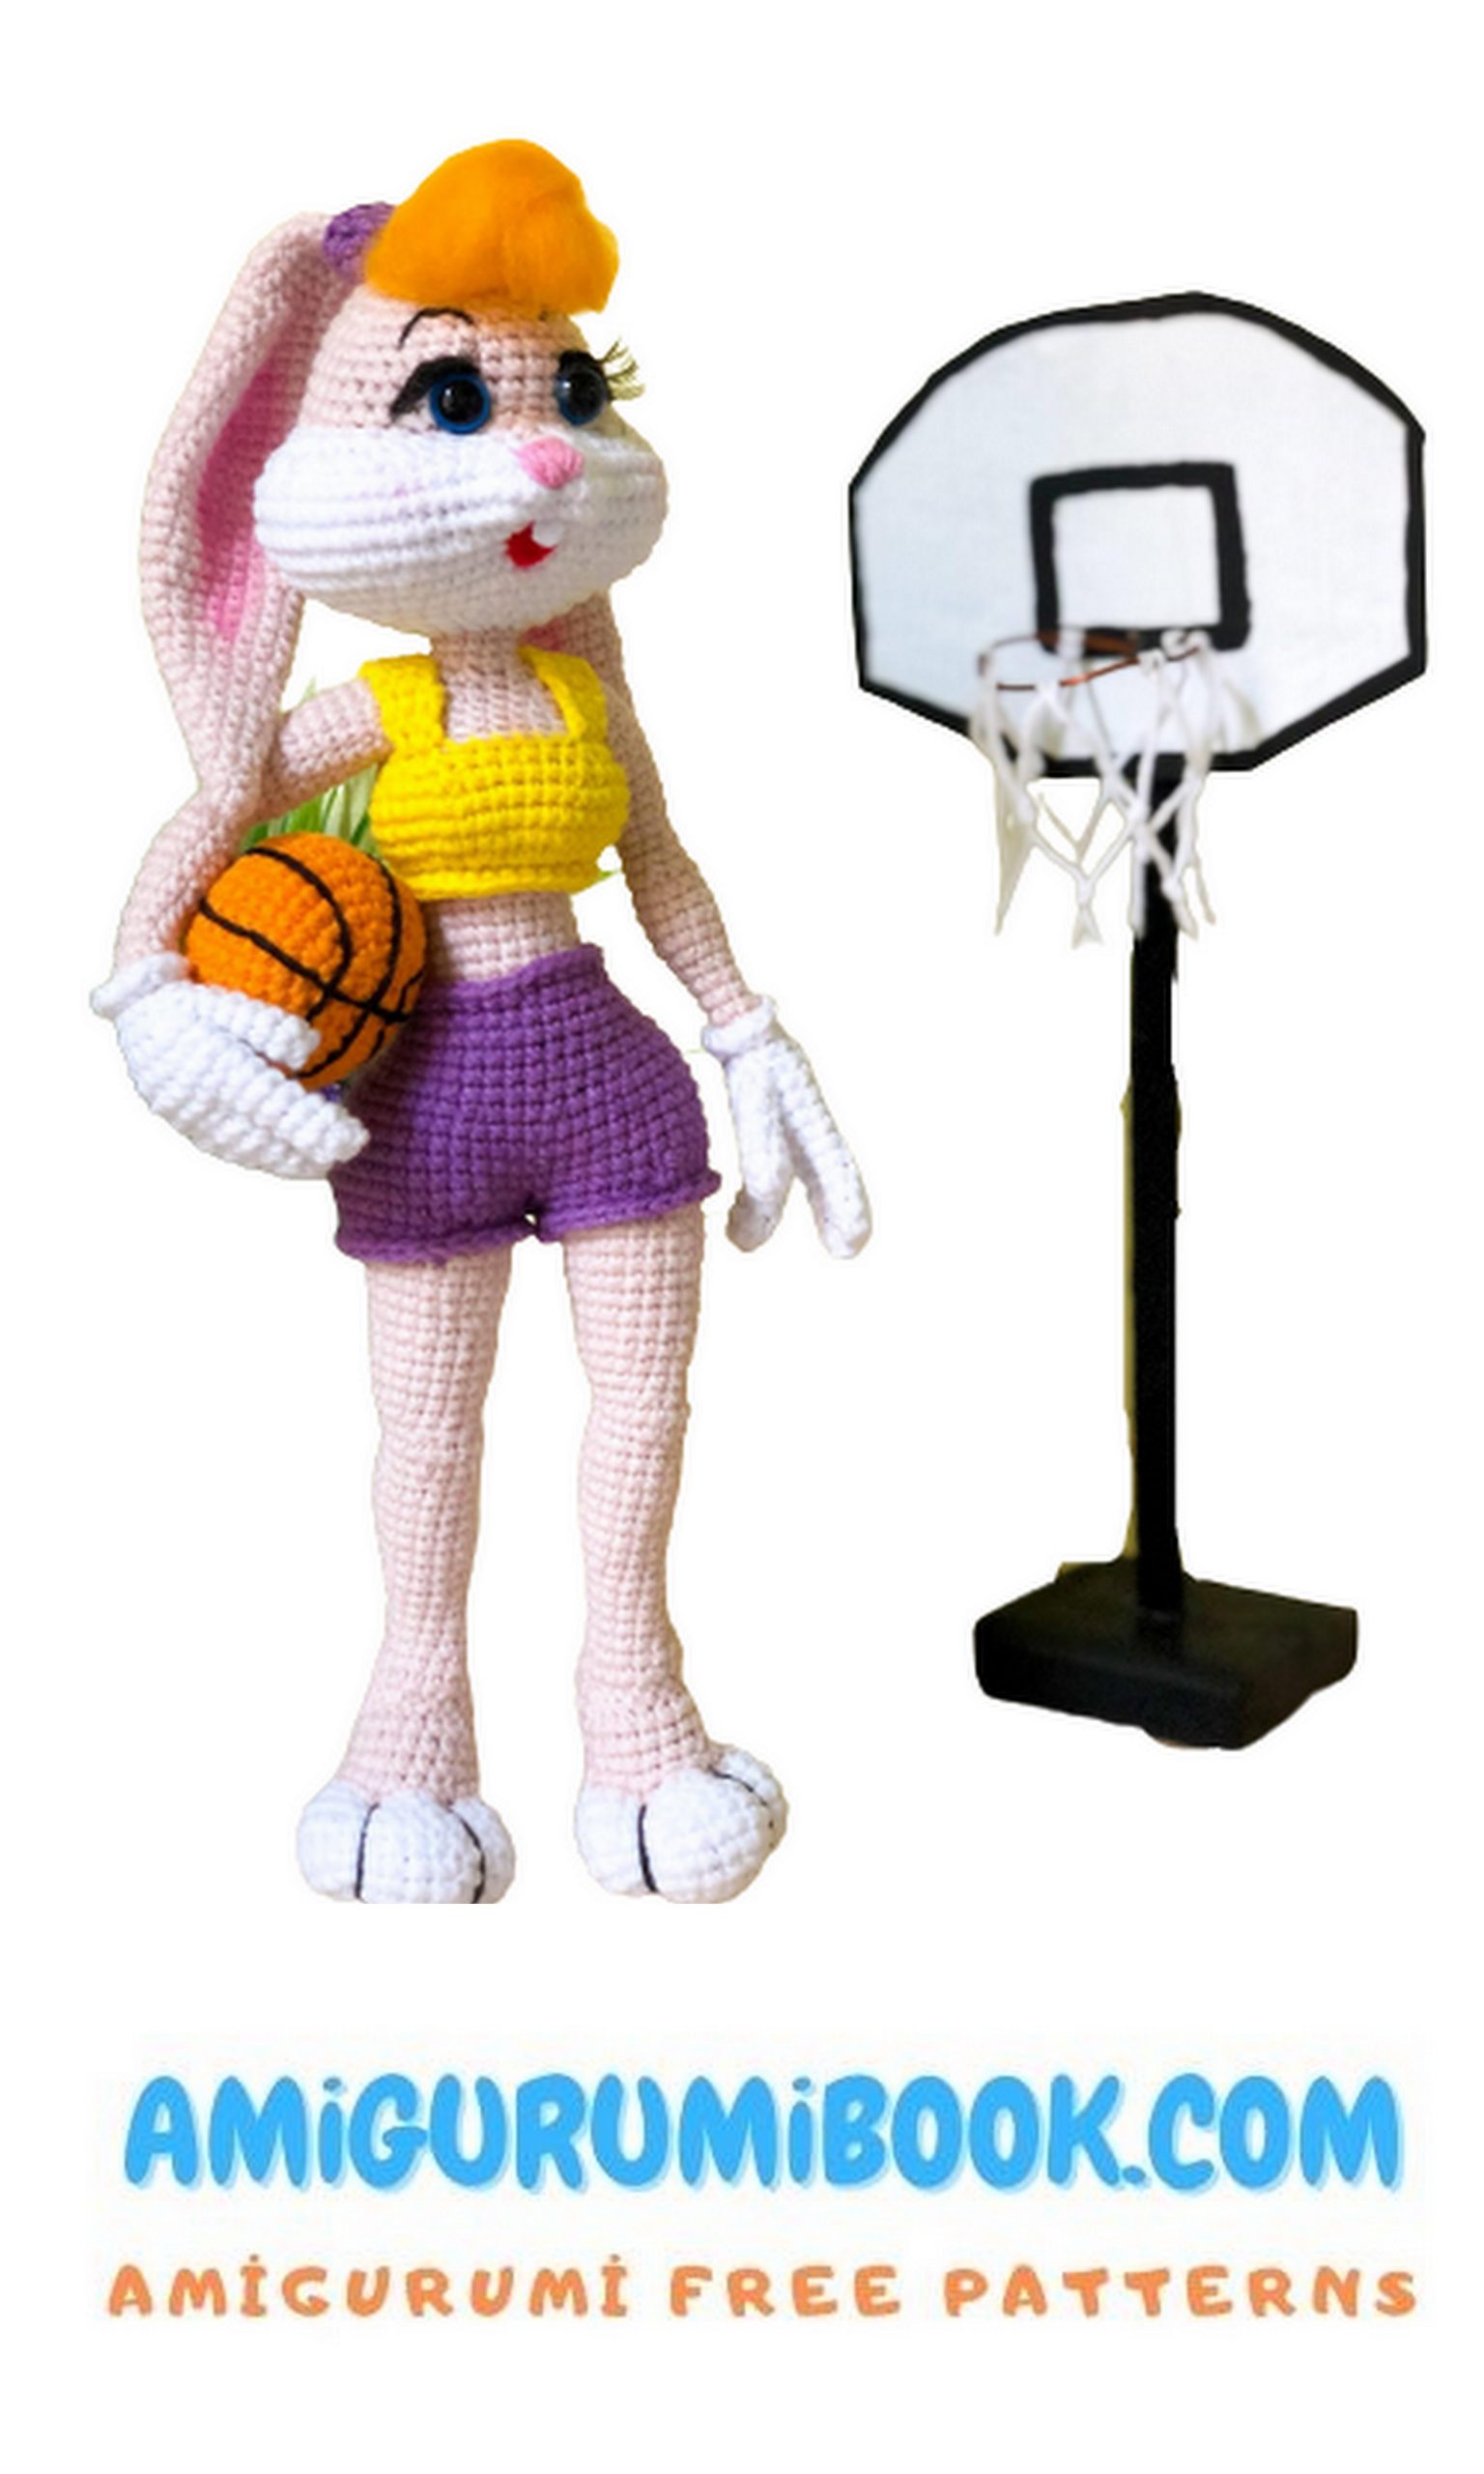
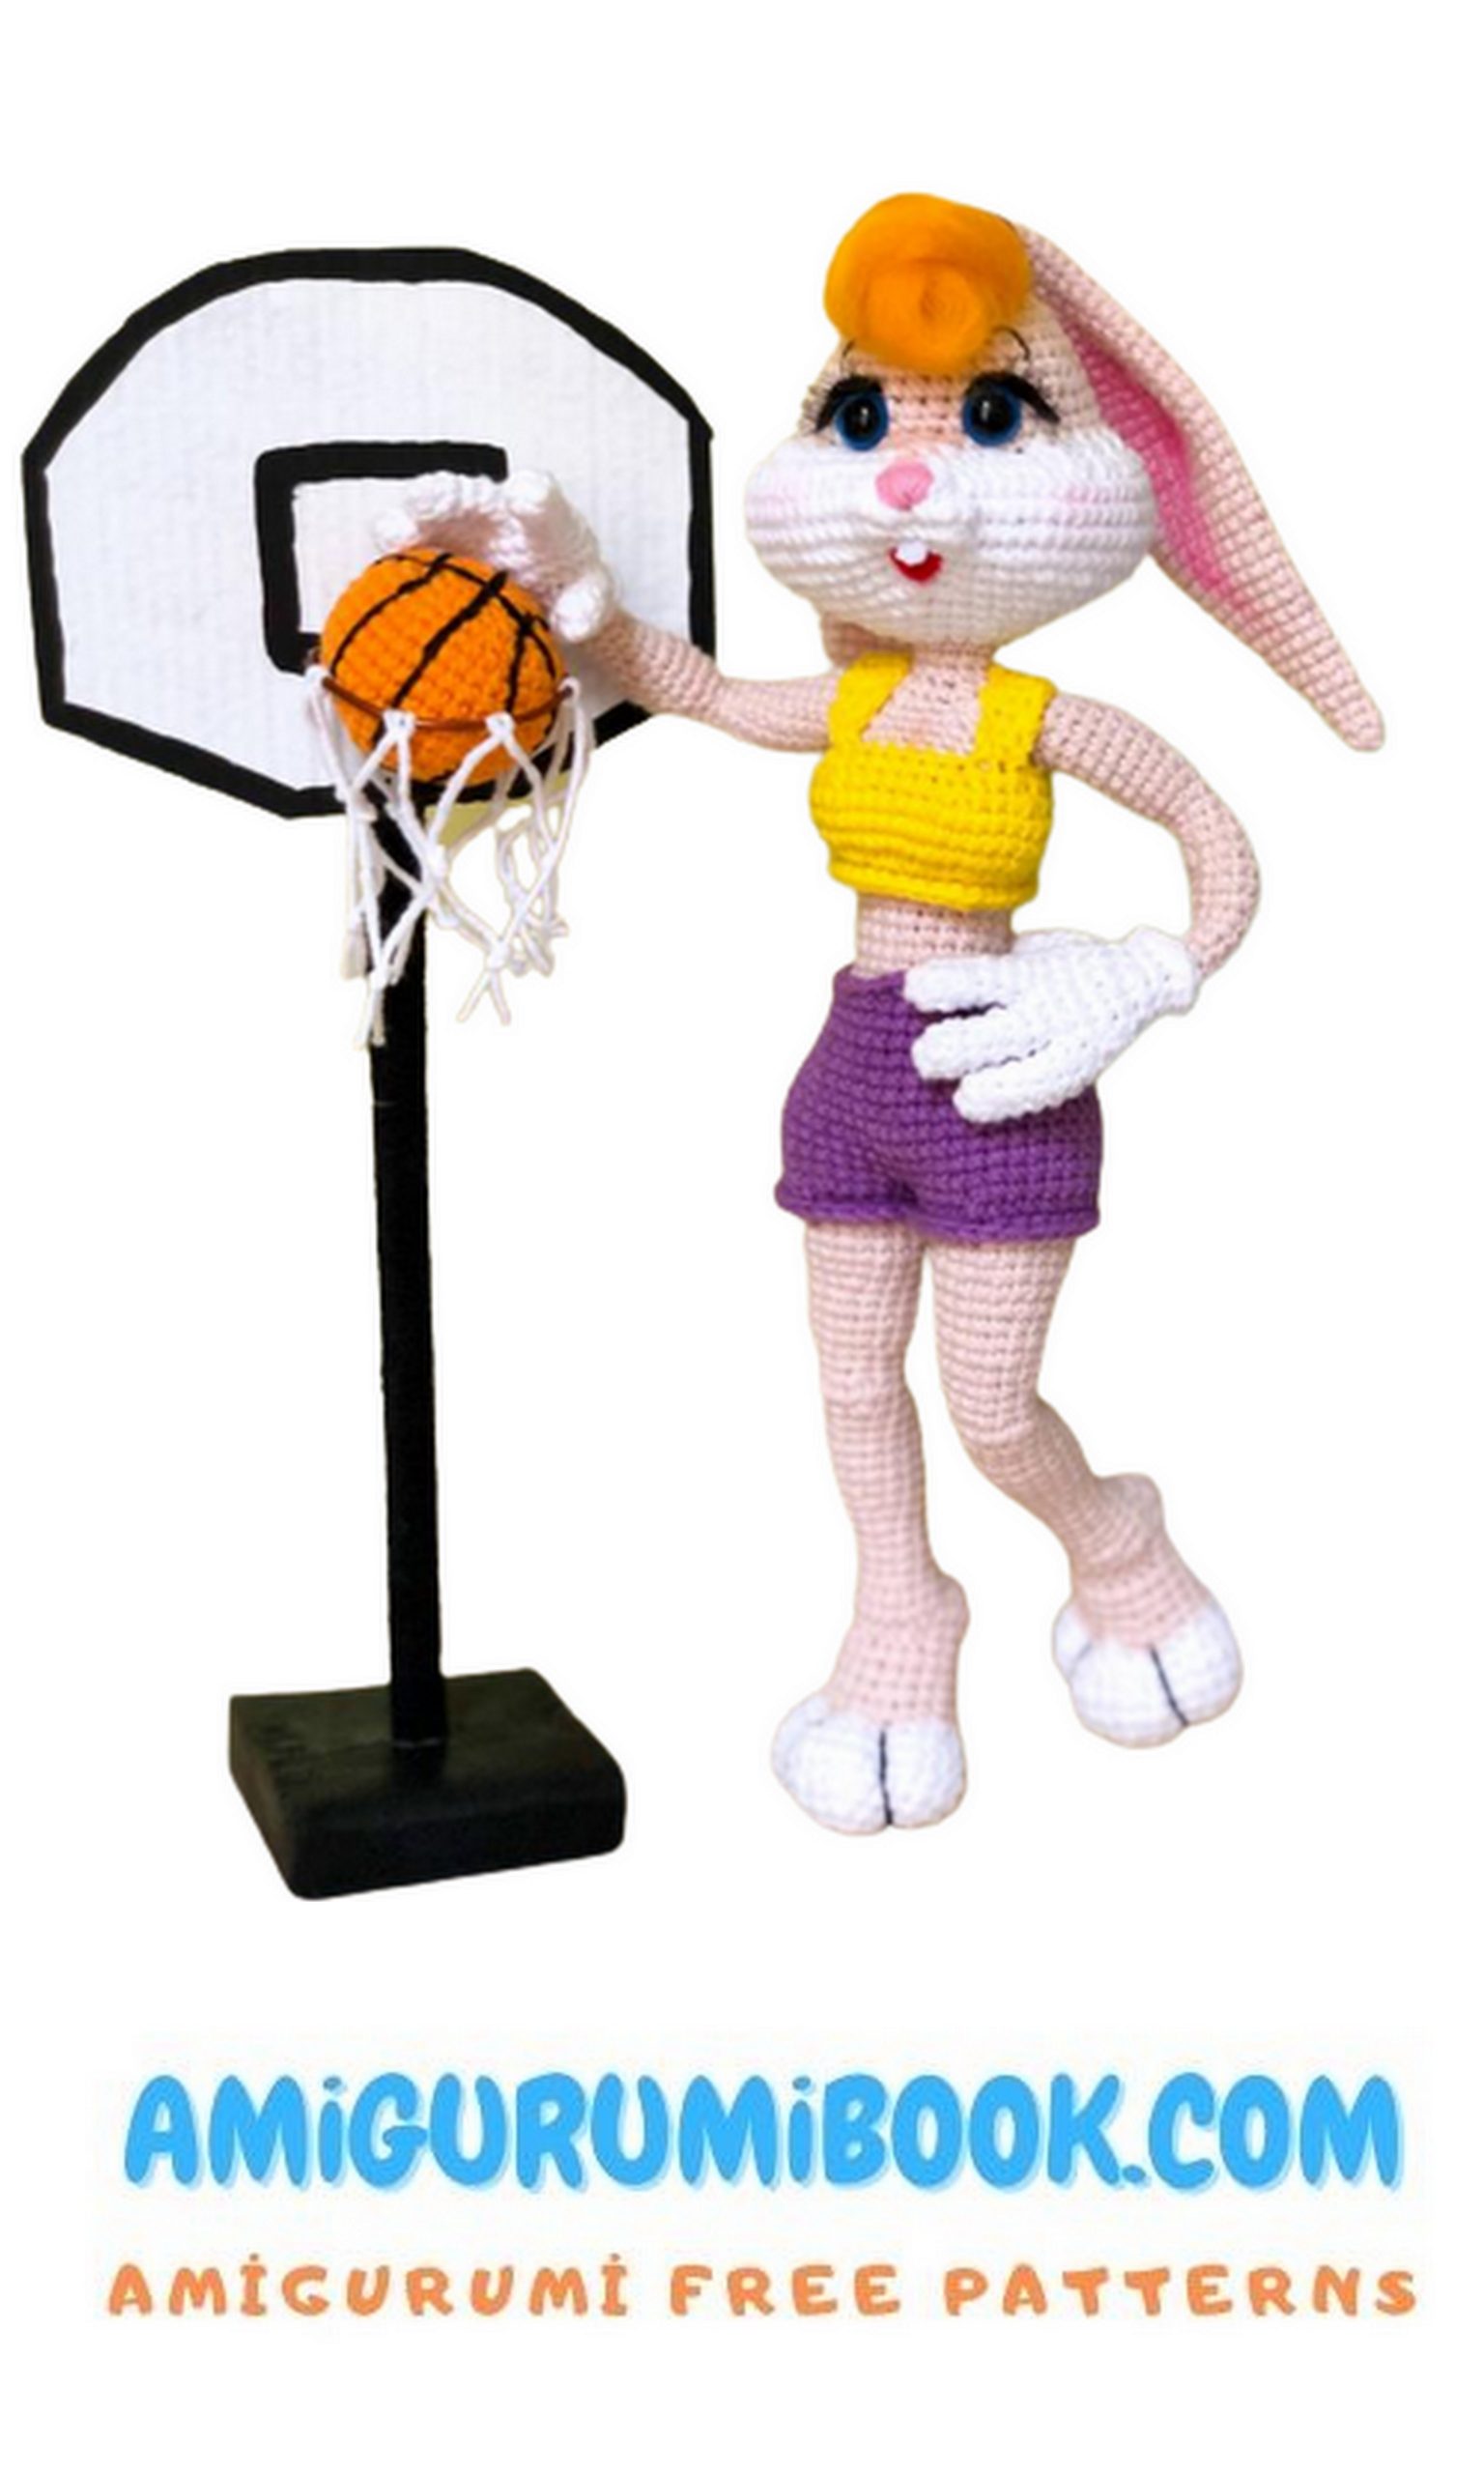
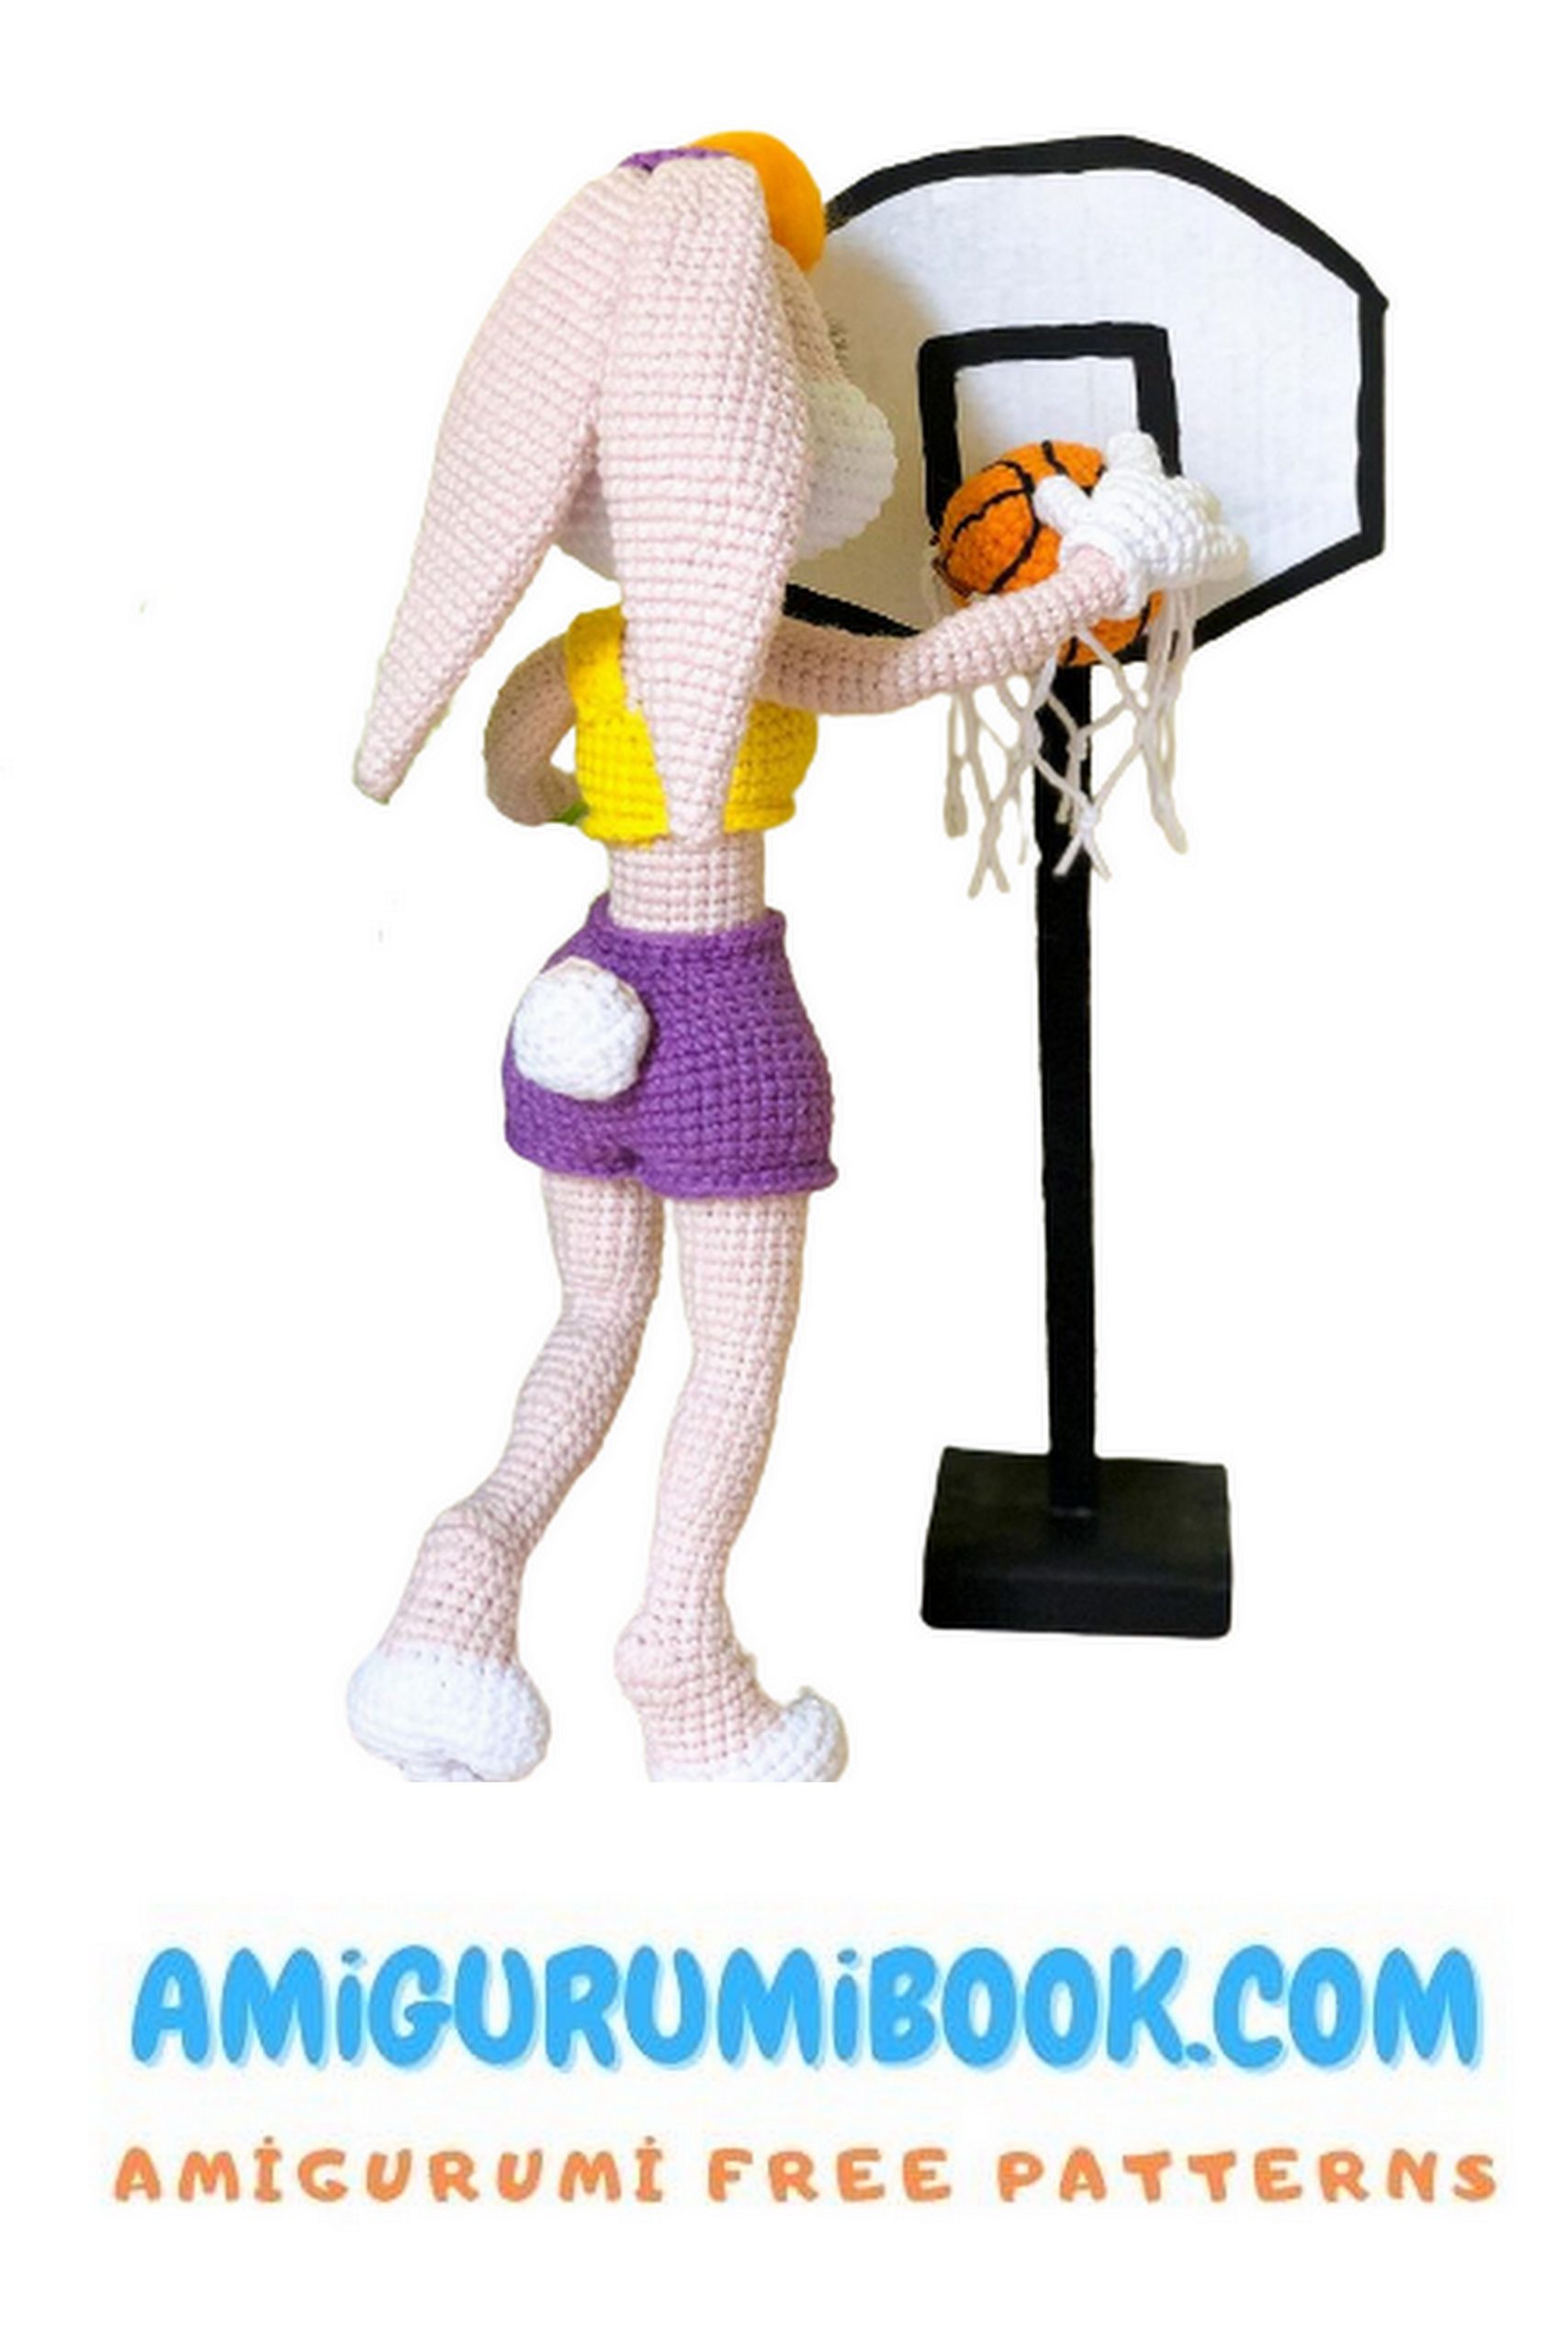
We give our charming basketball player the ball in her hands and send it to the court to throw three-pointers