
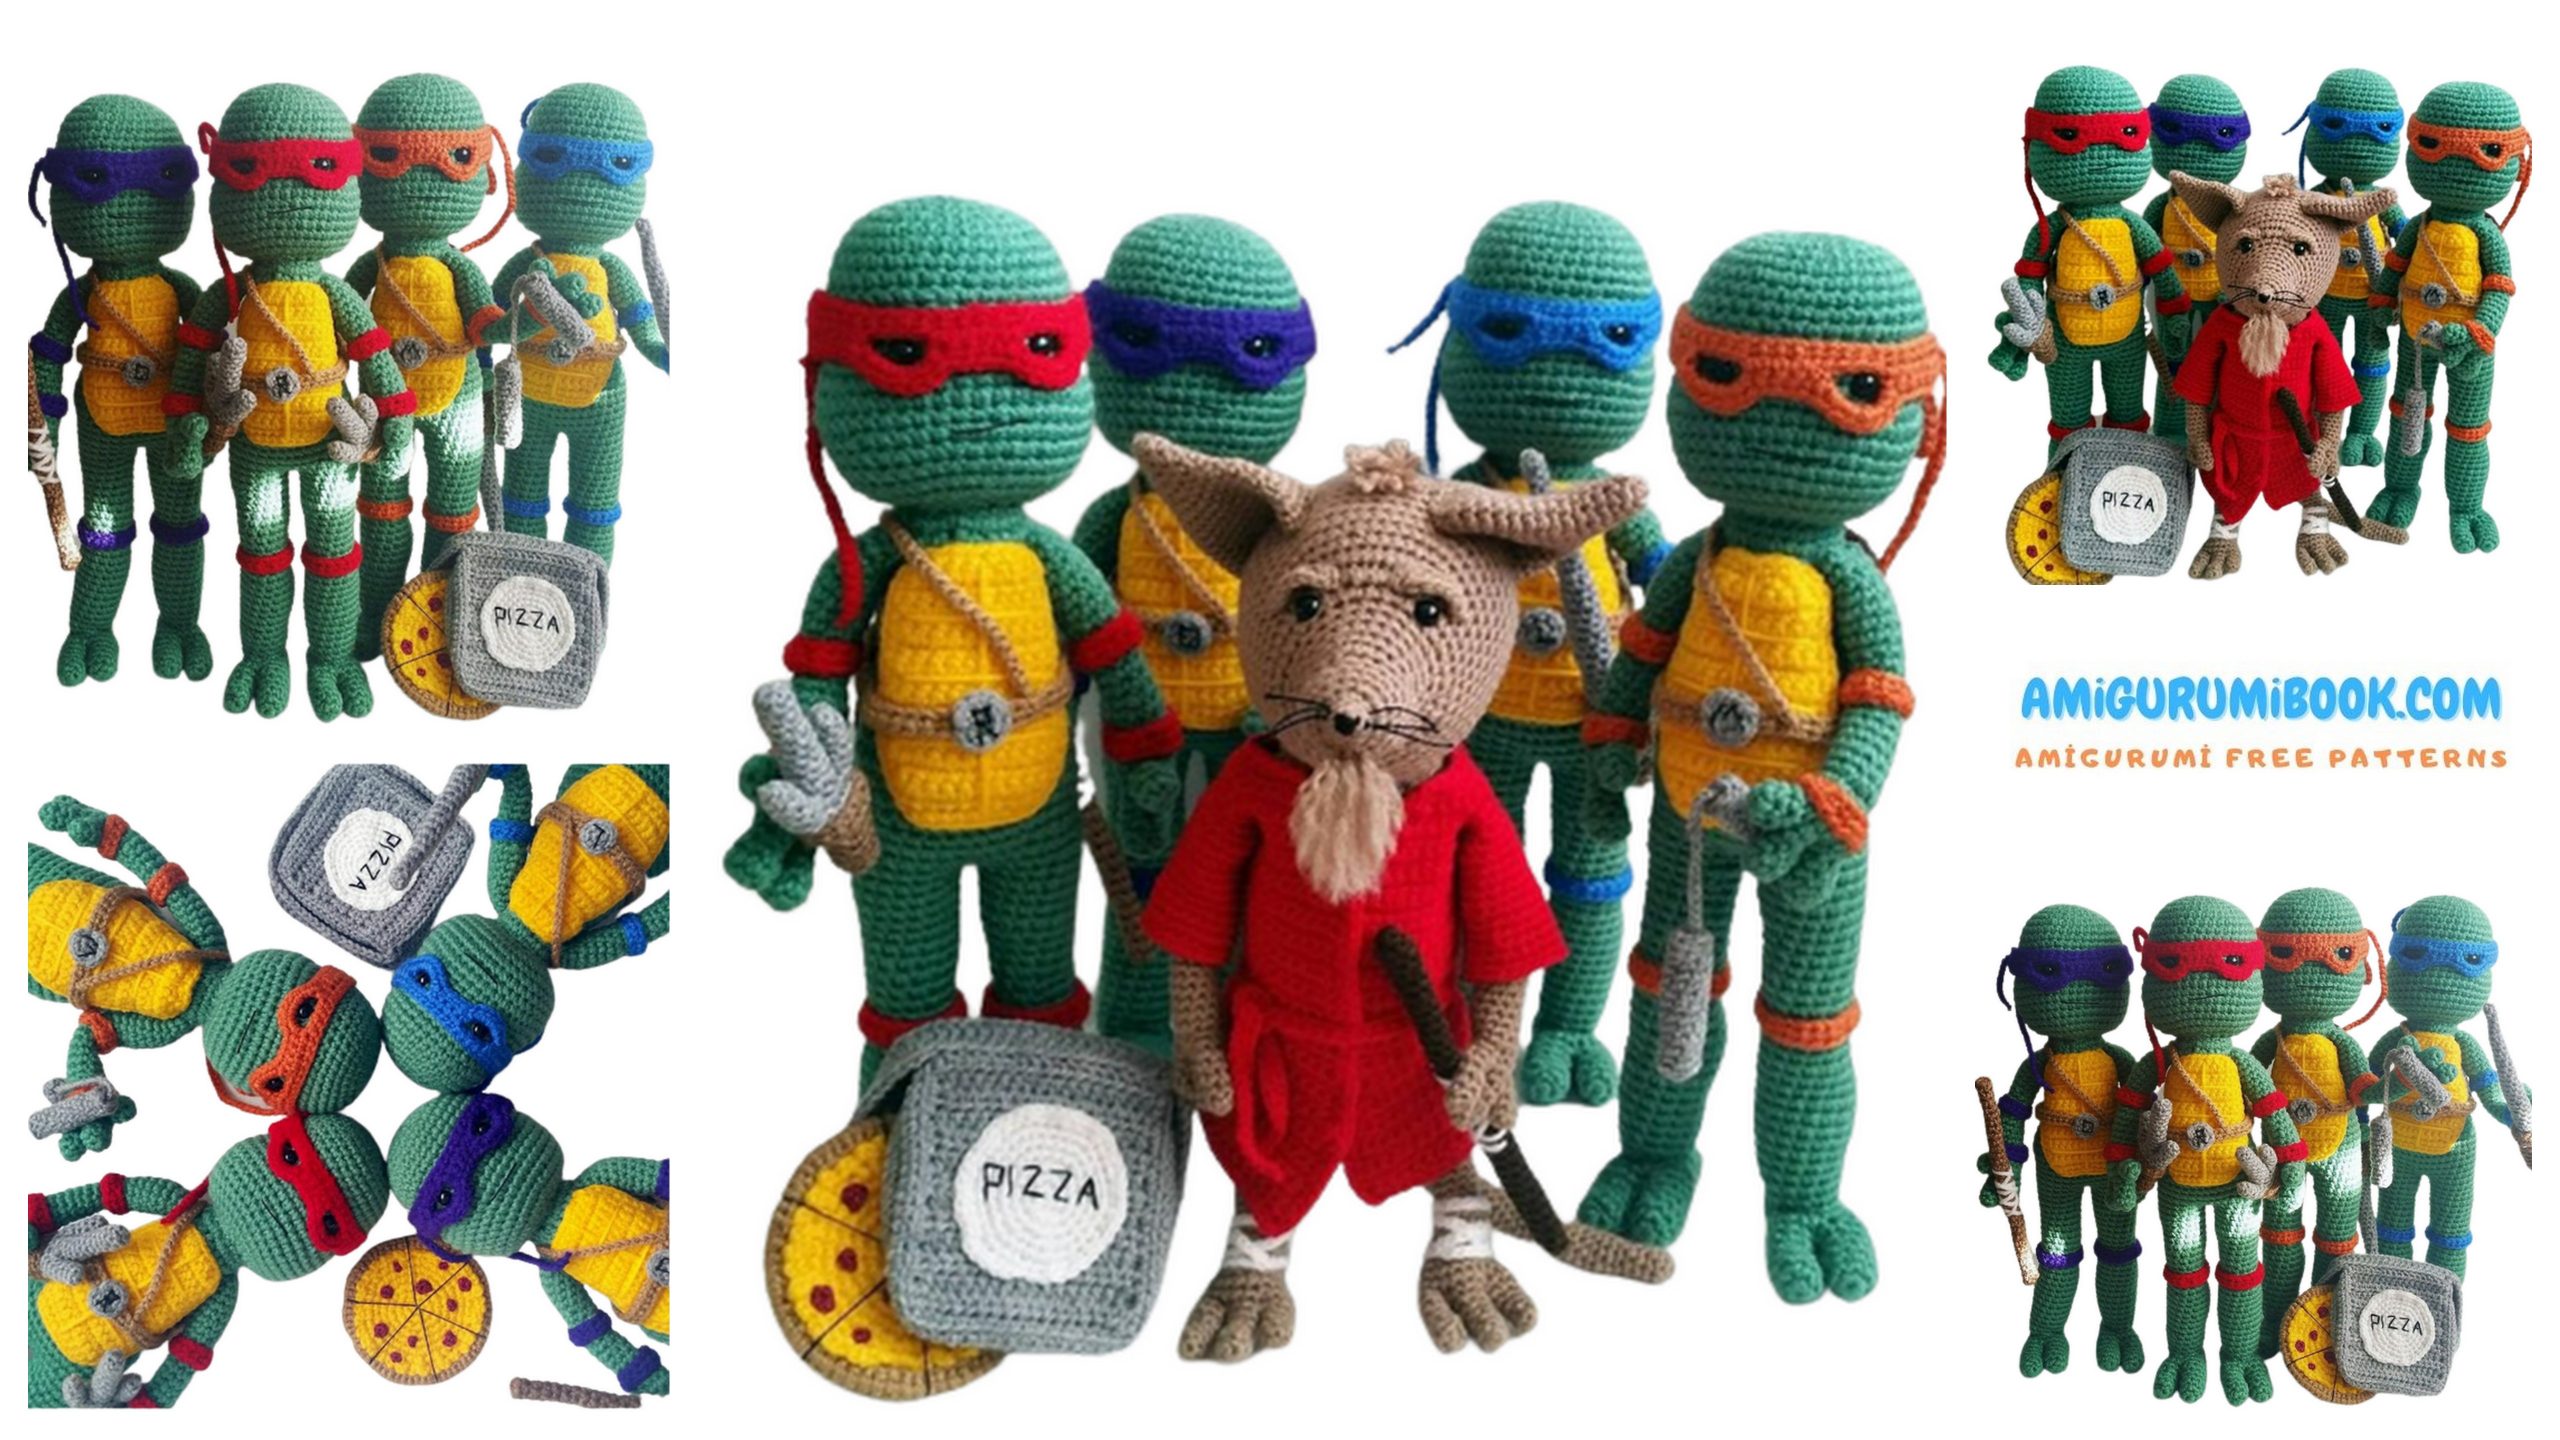
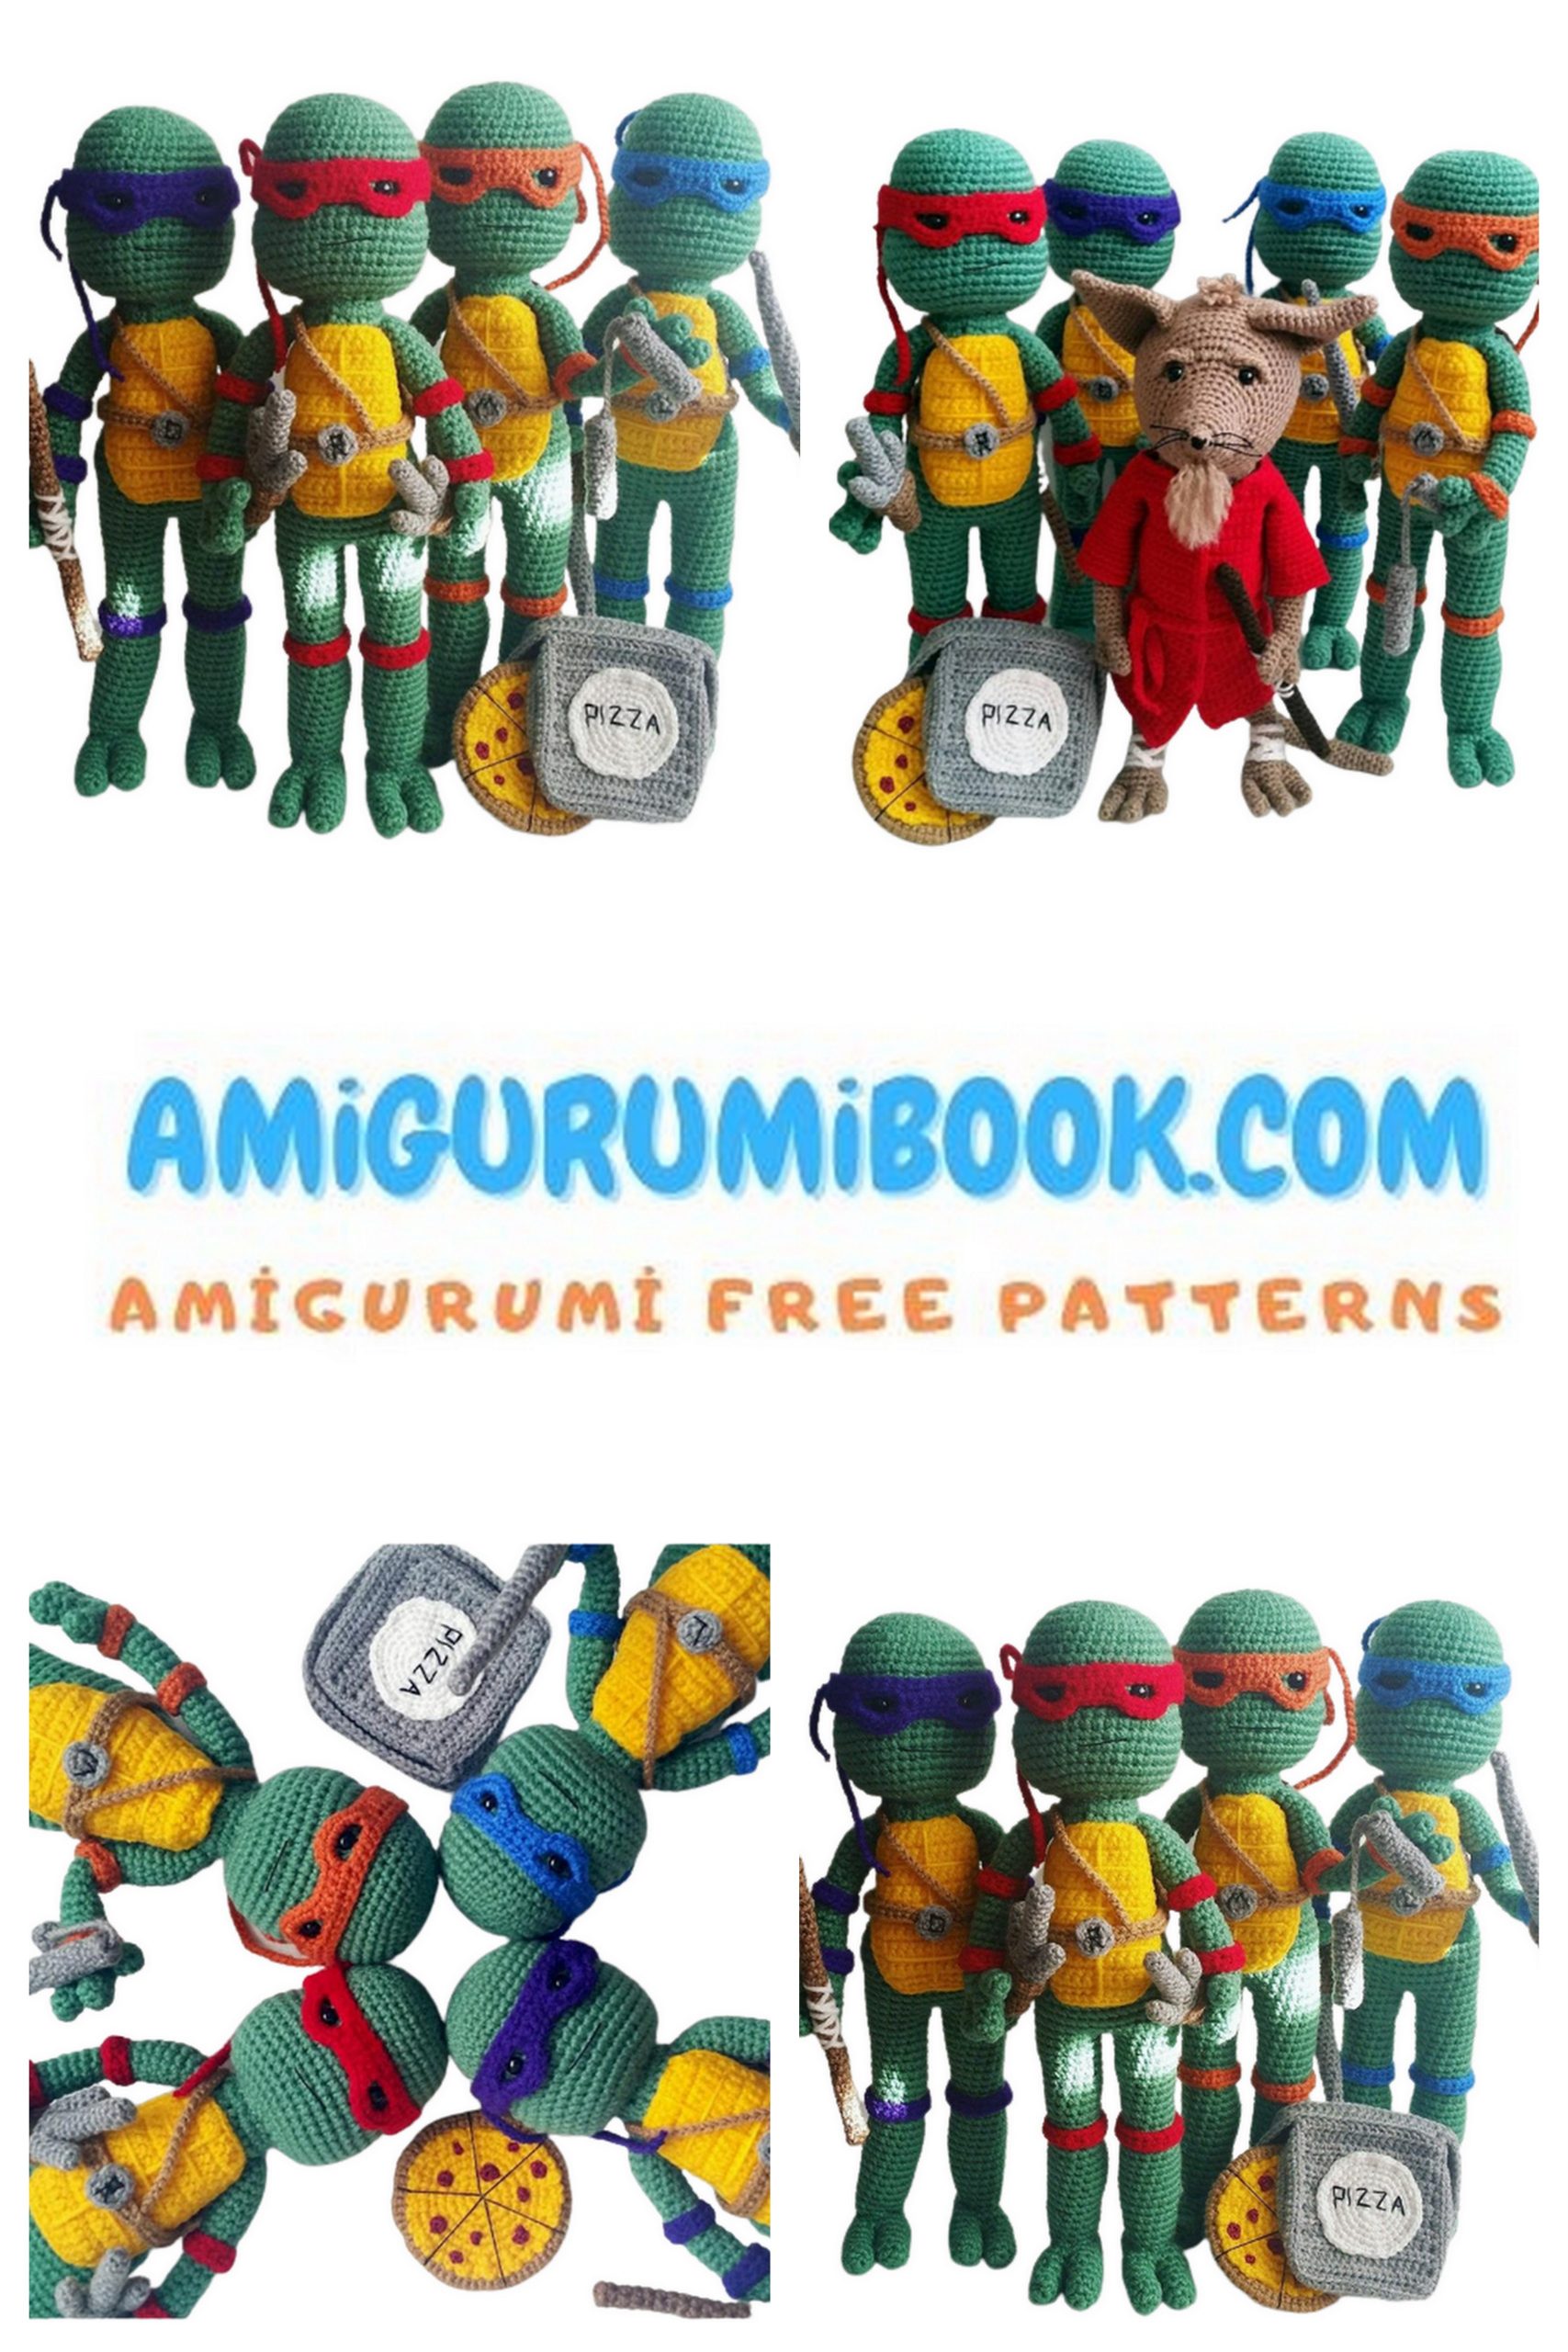
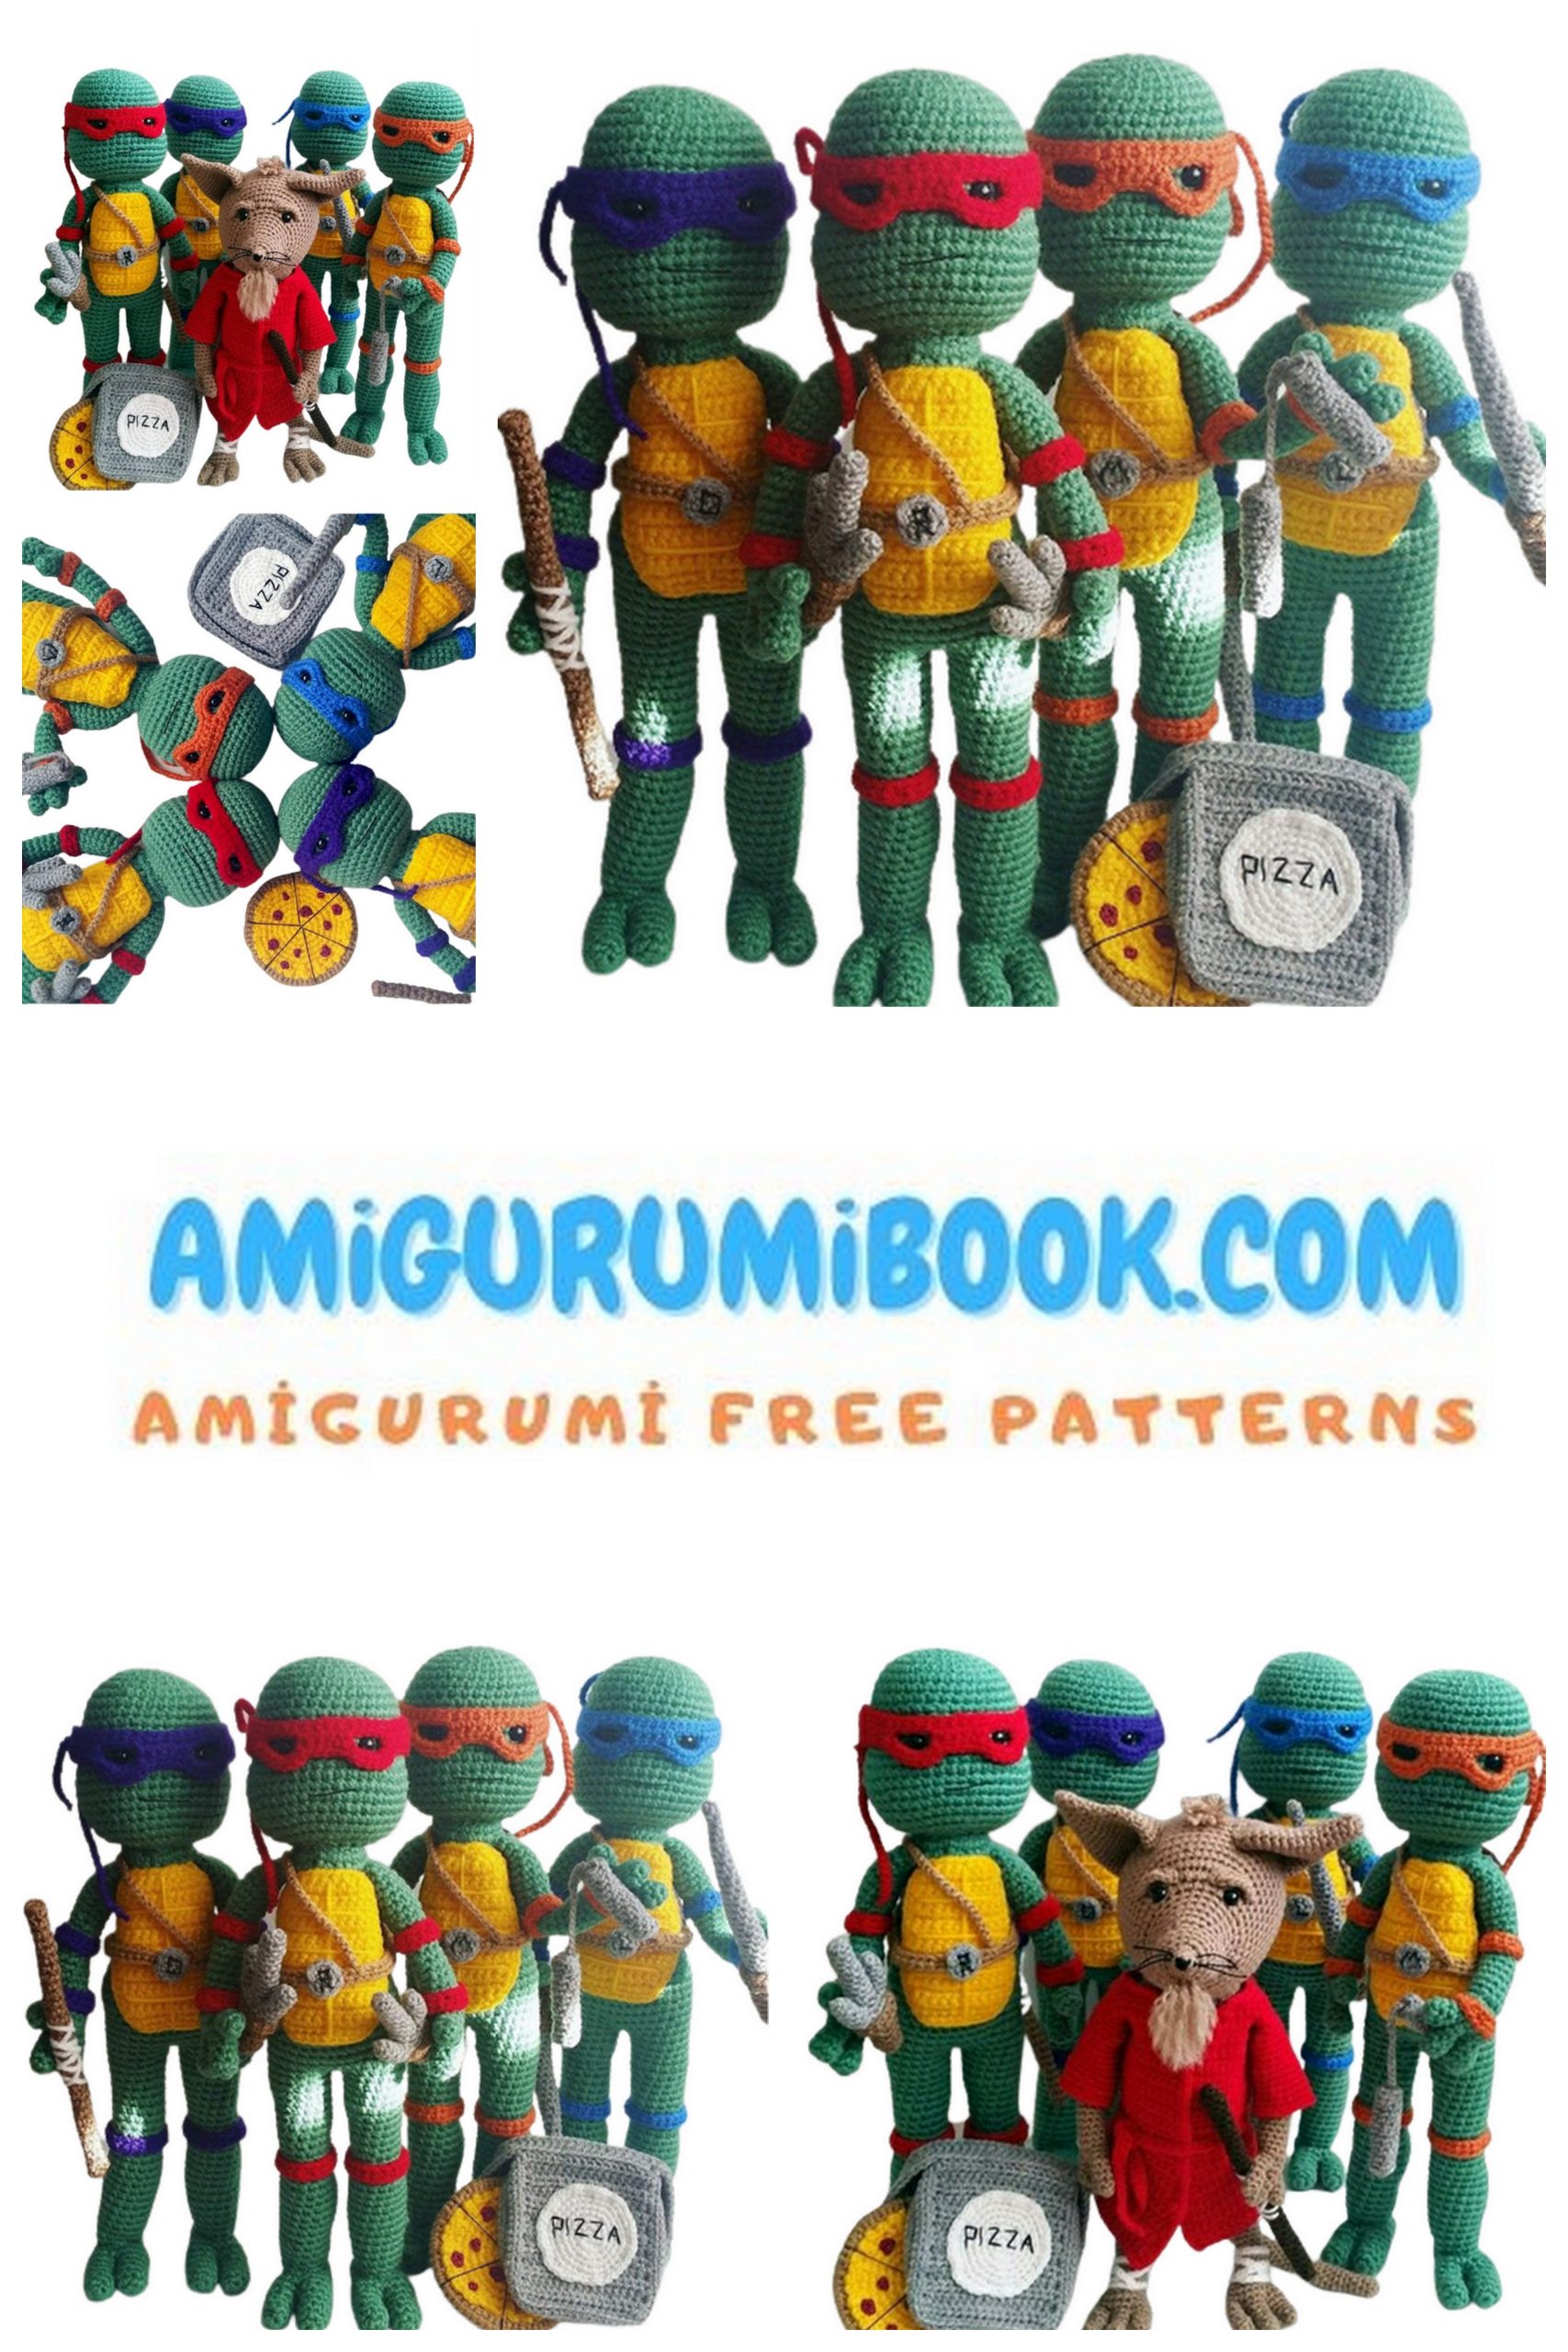
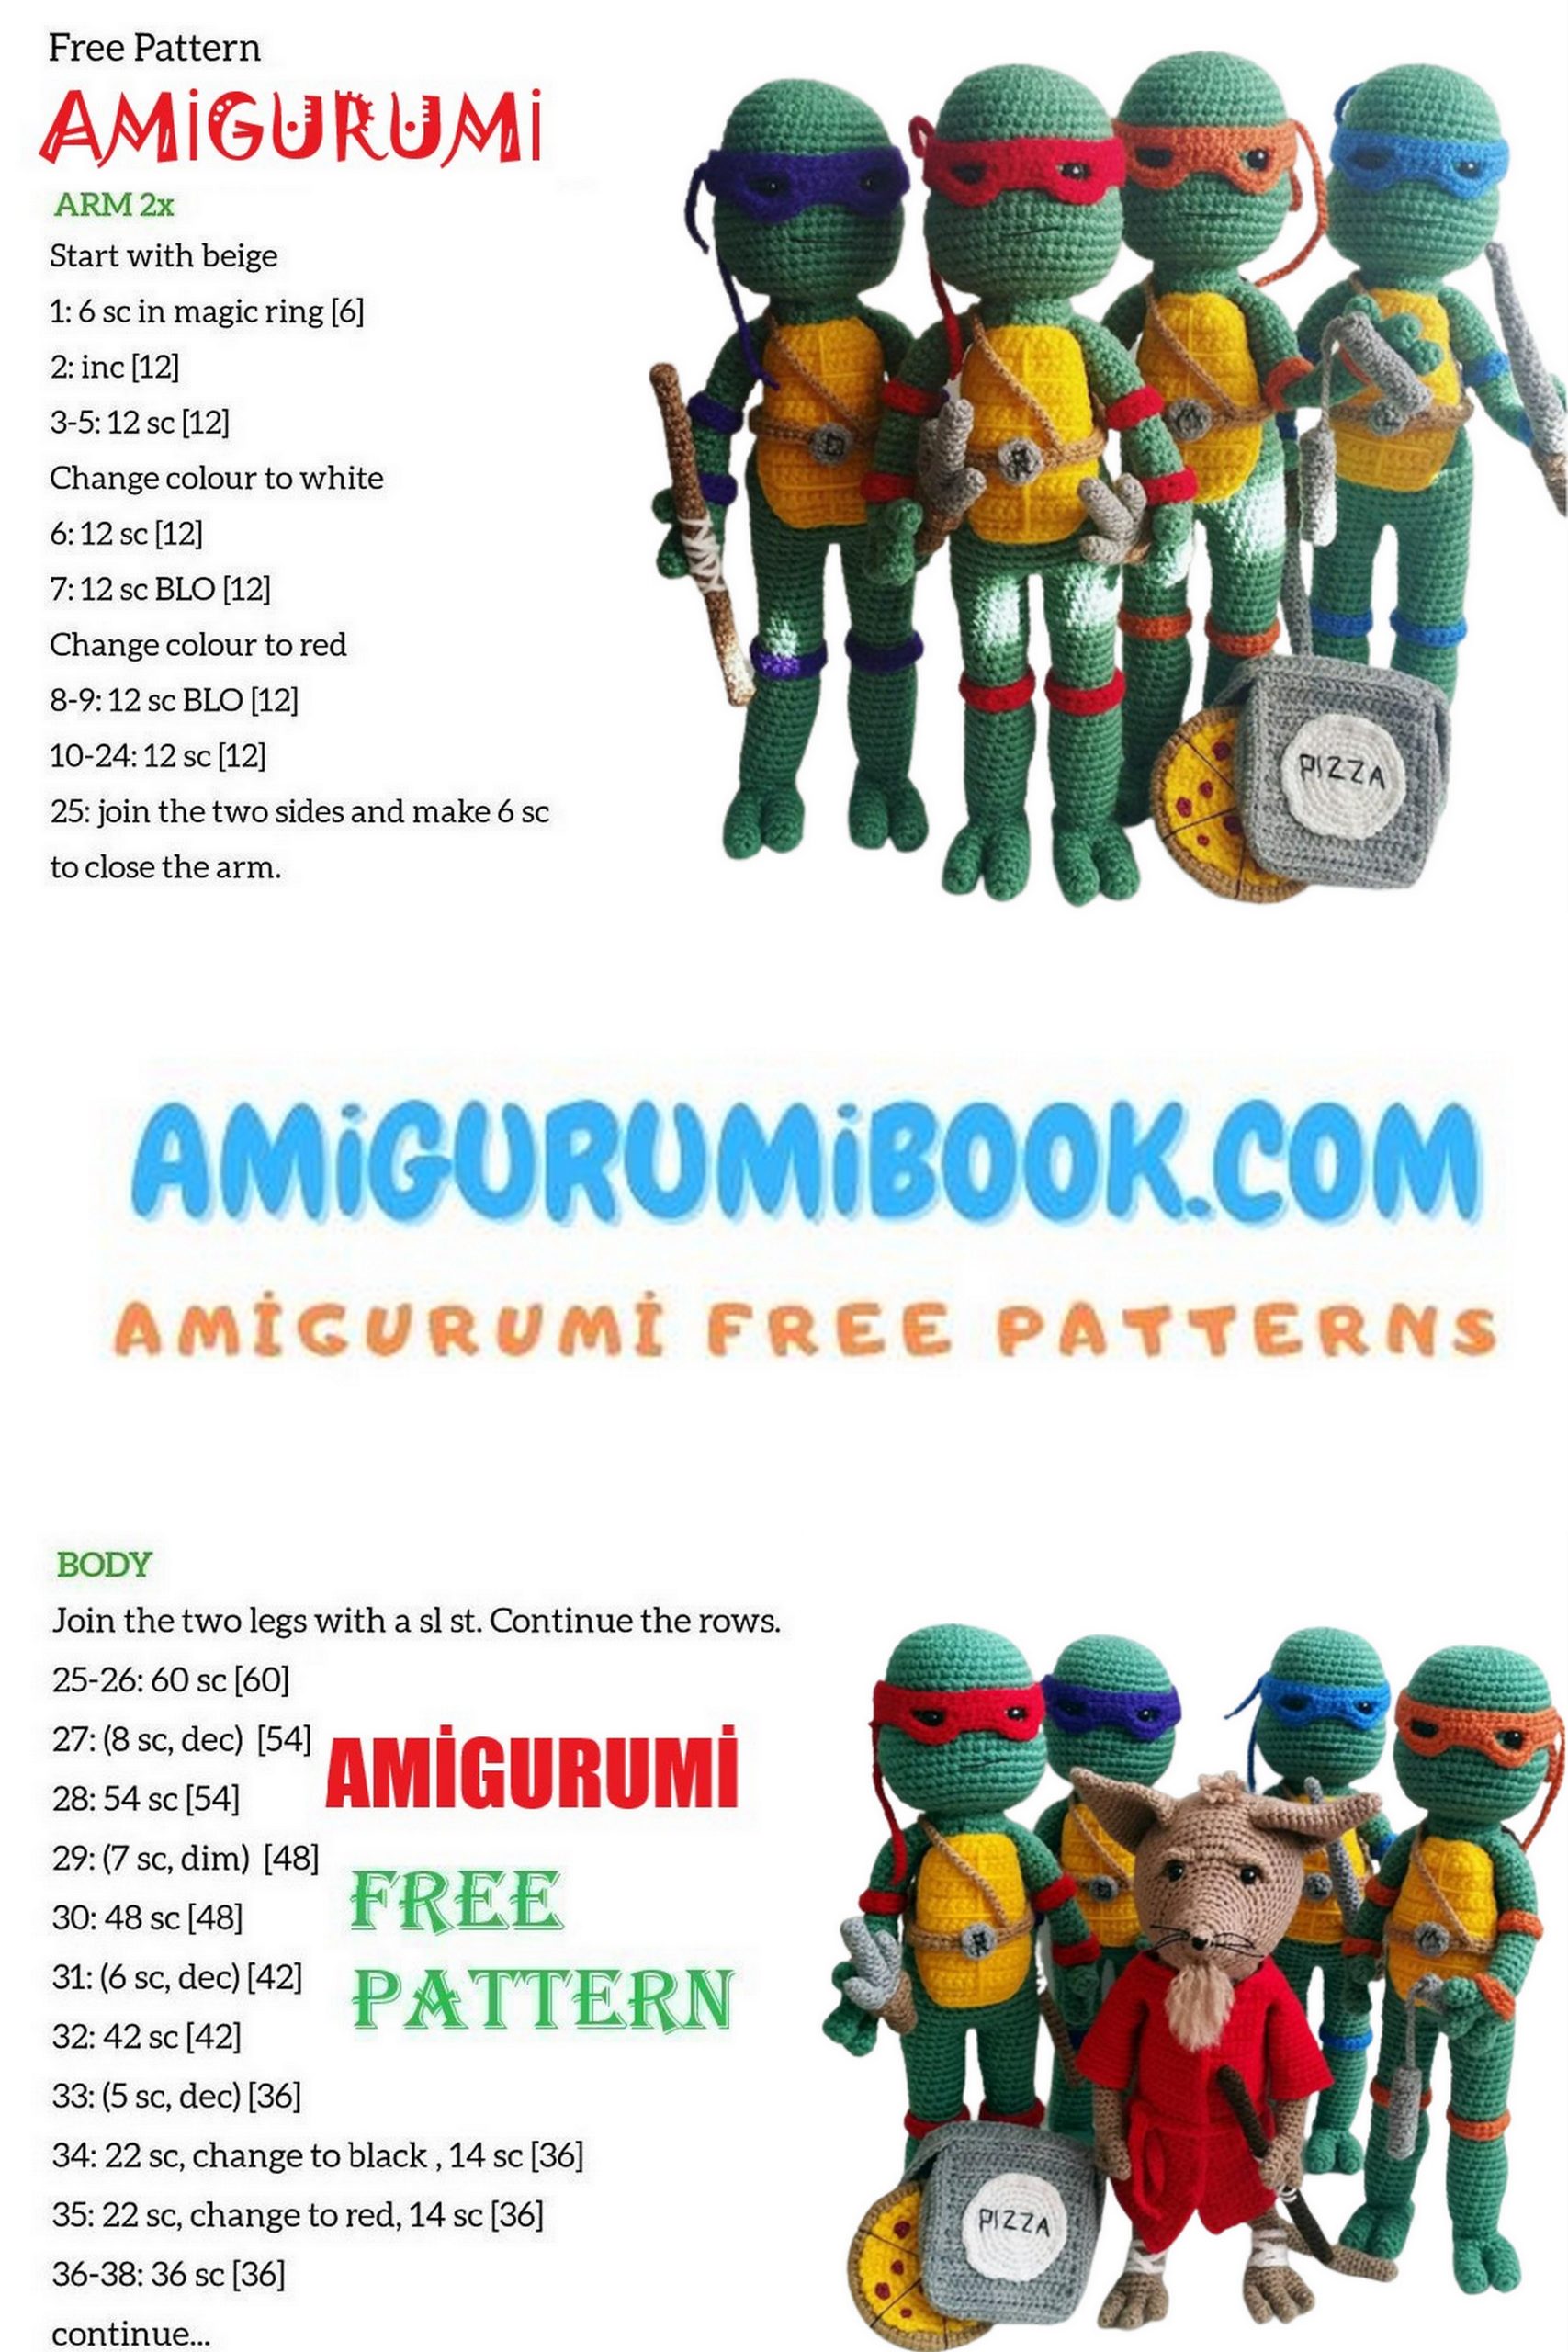
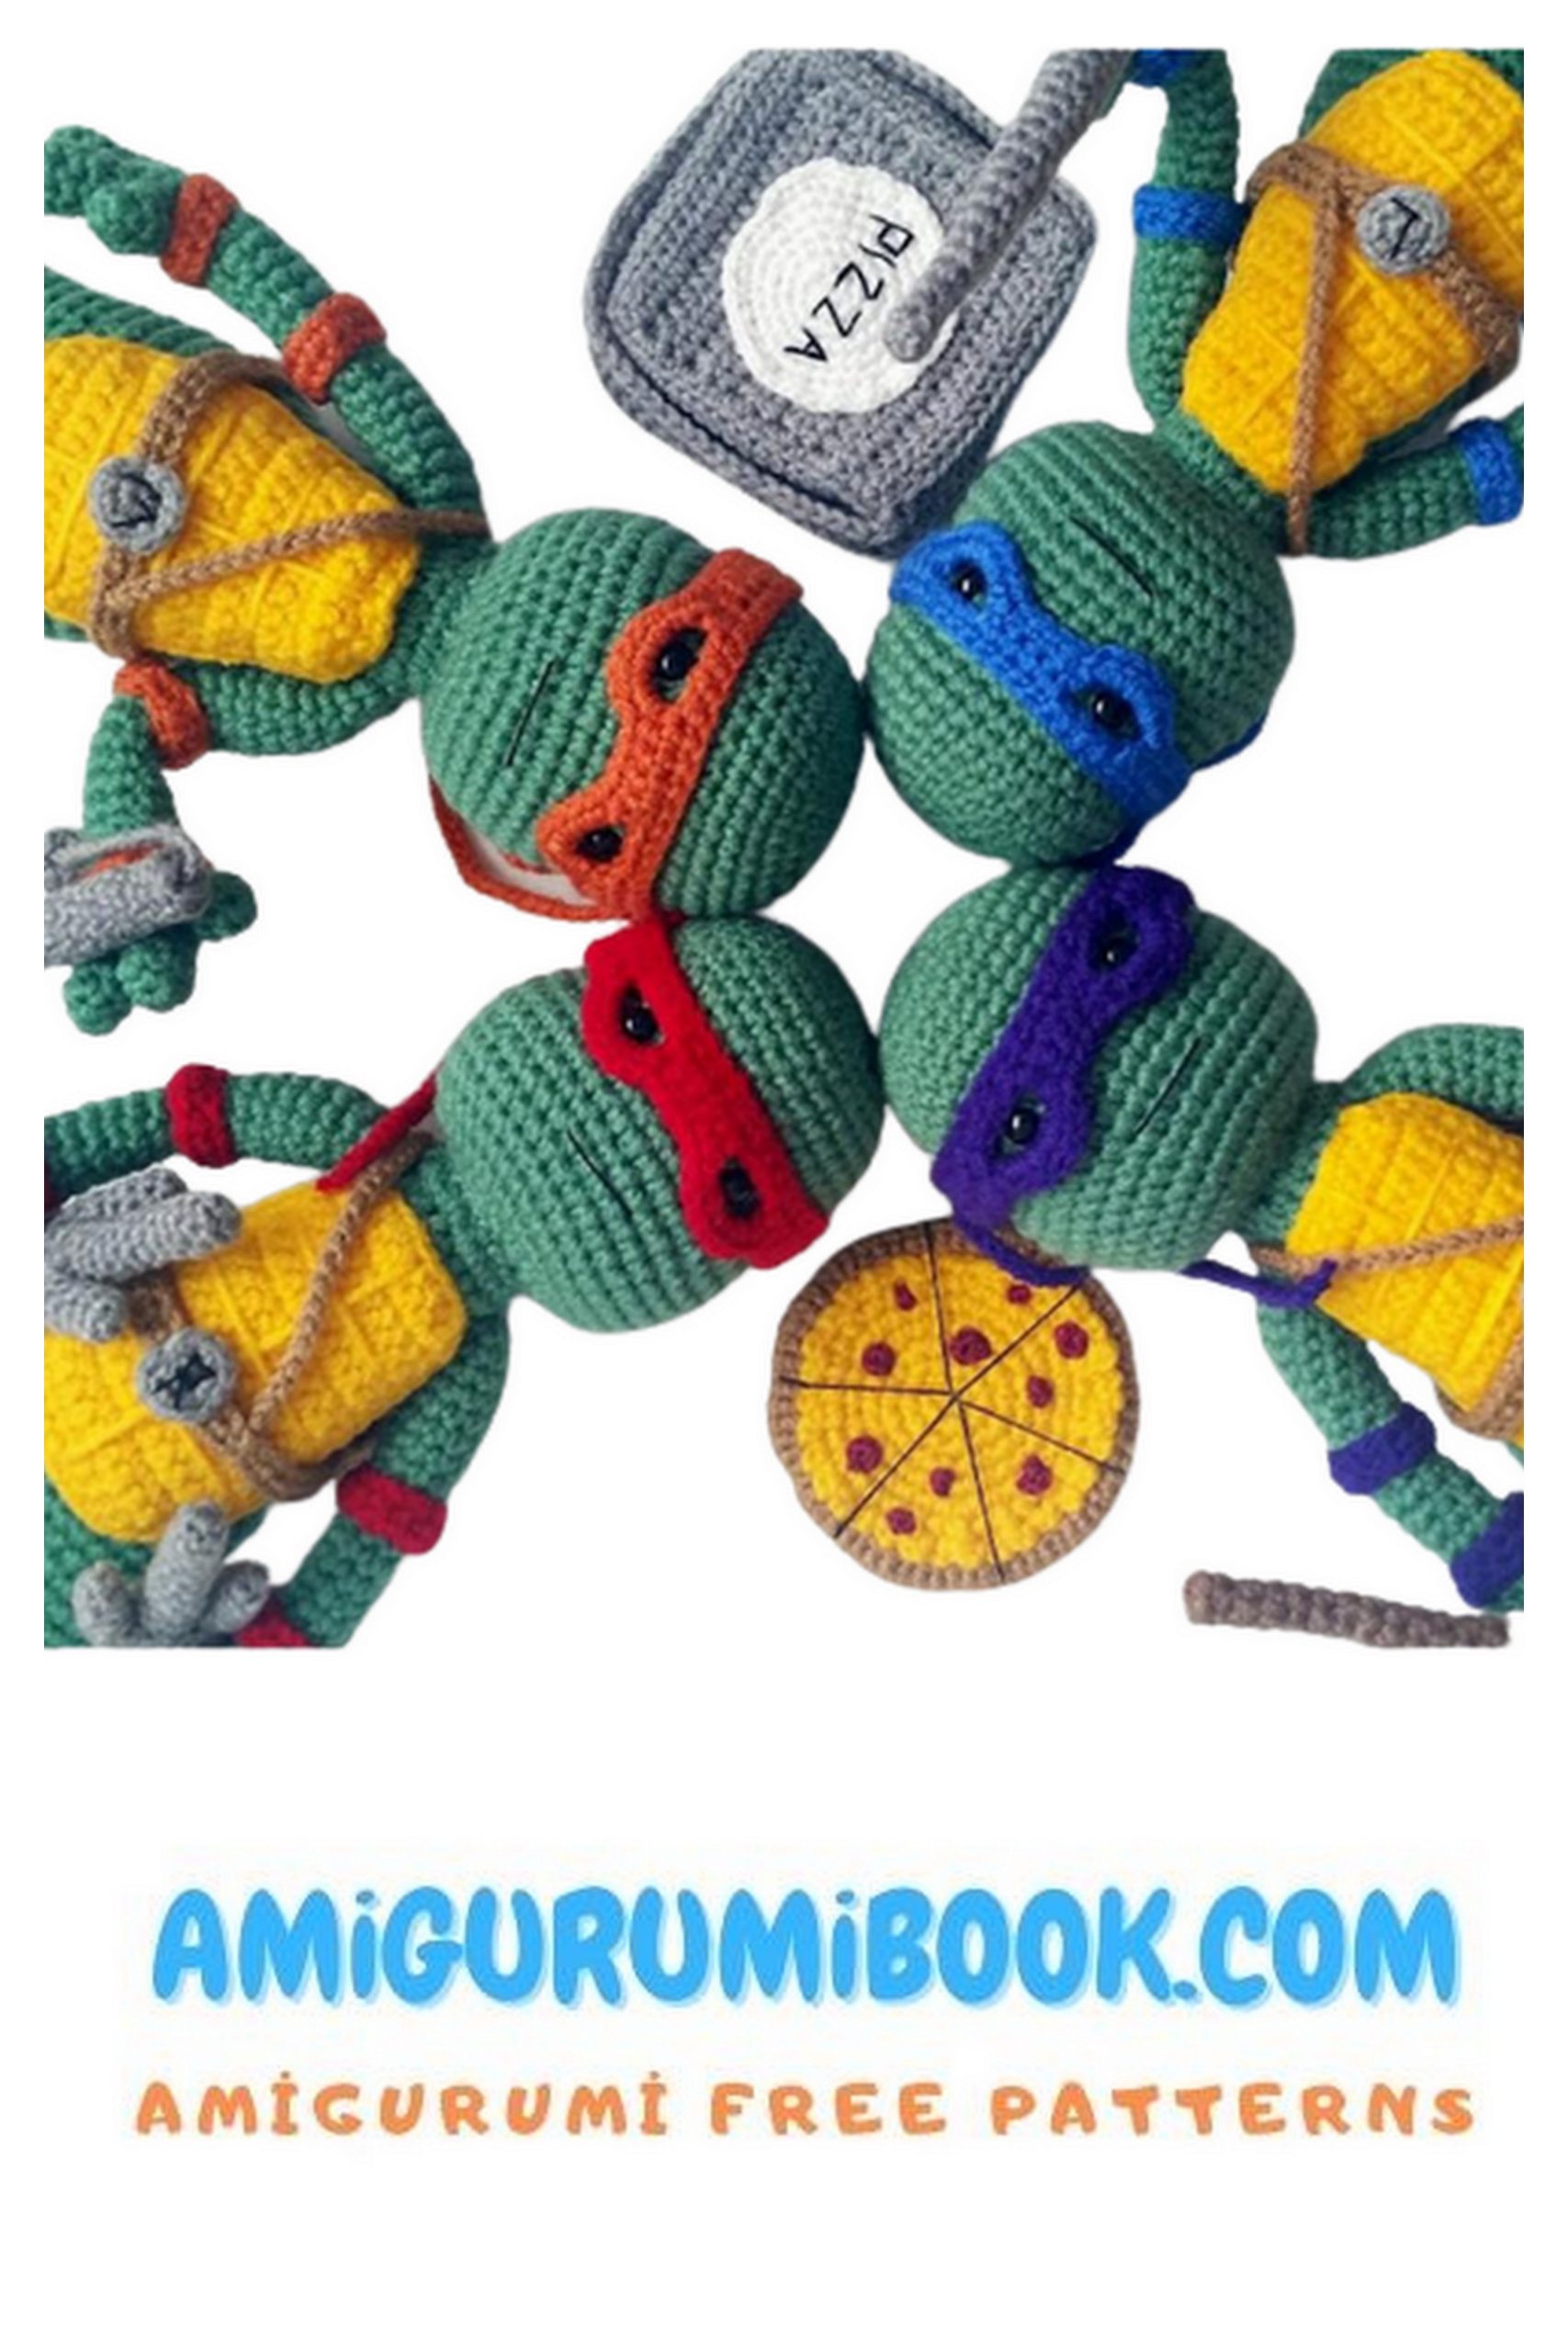
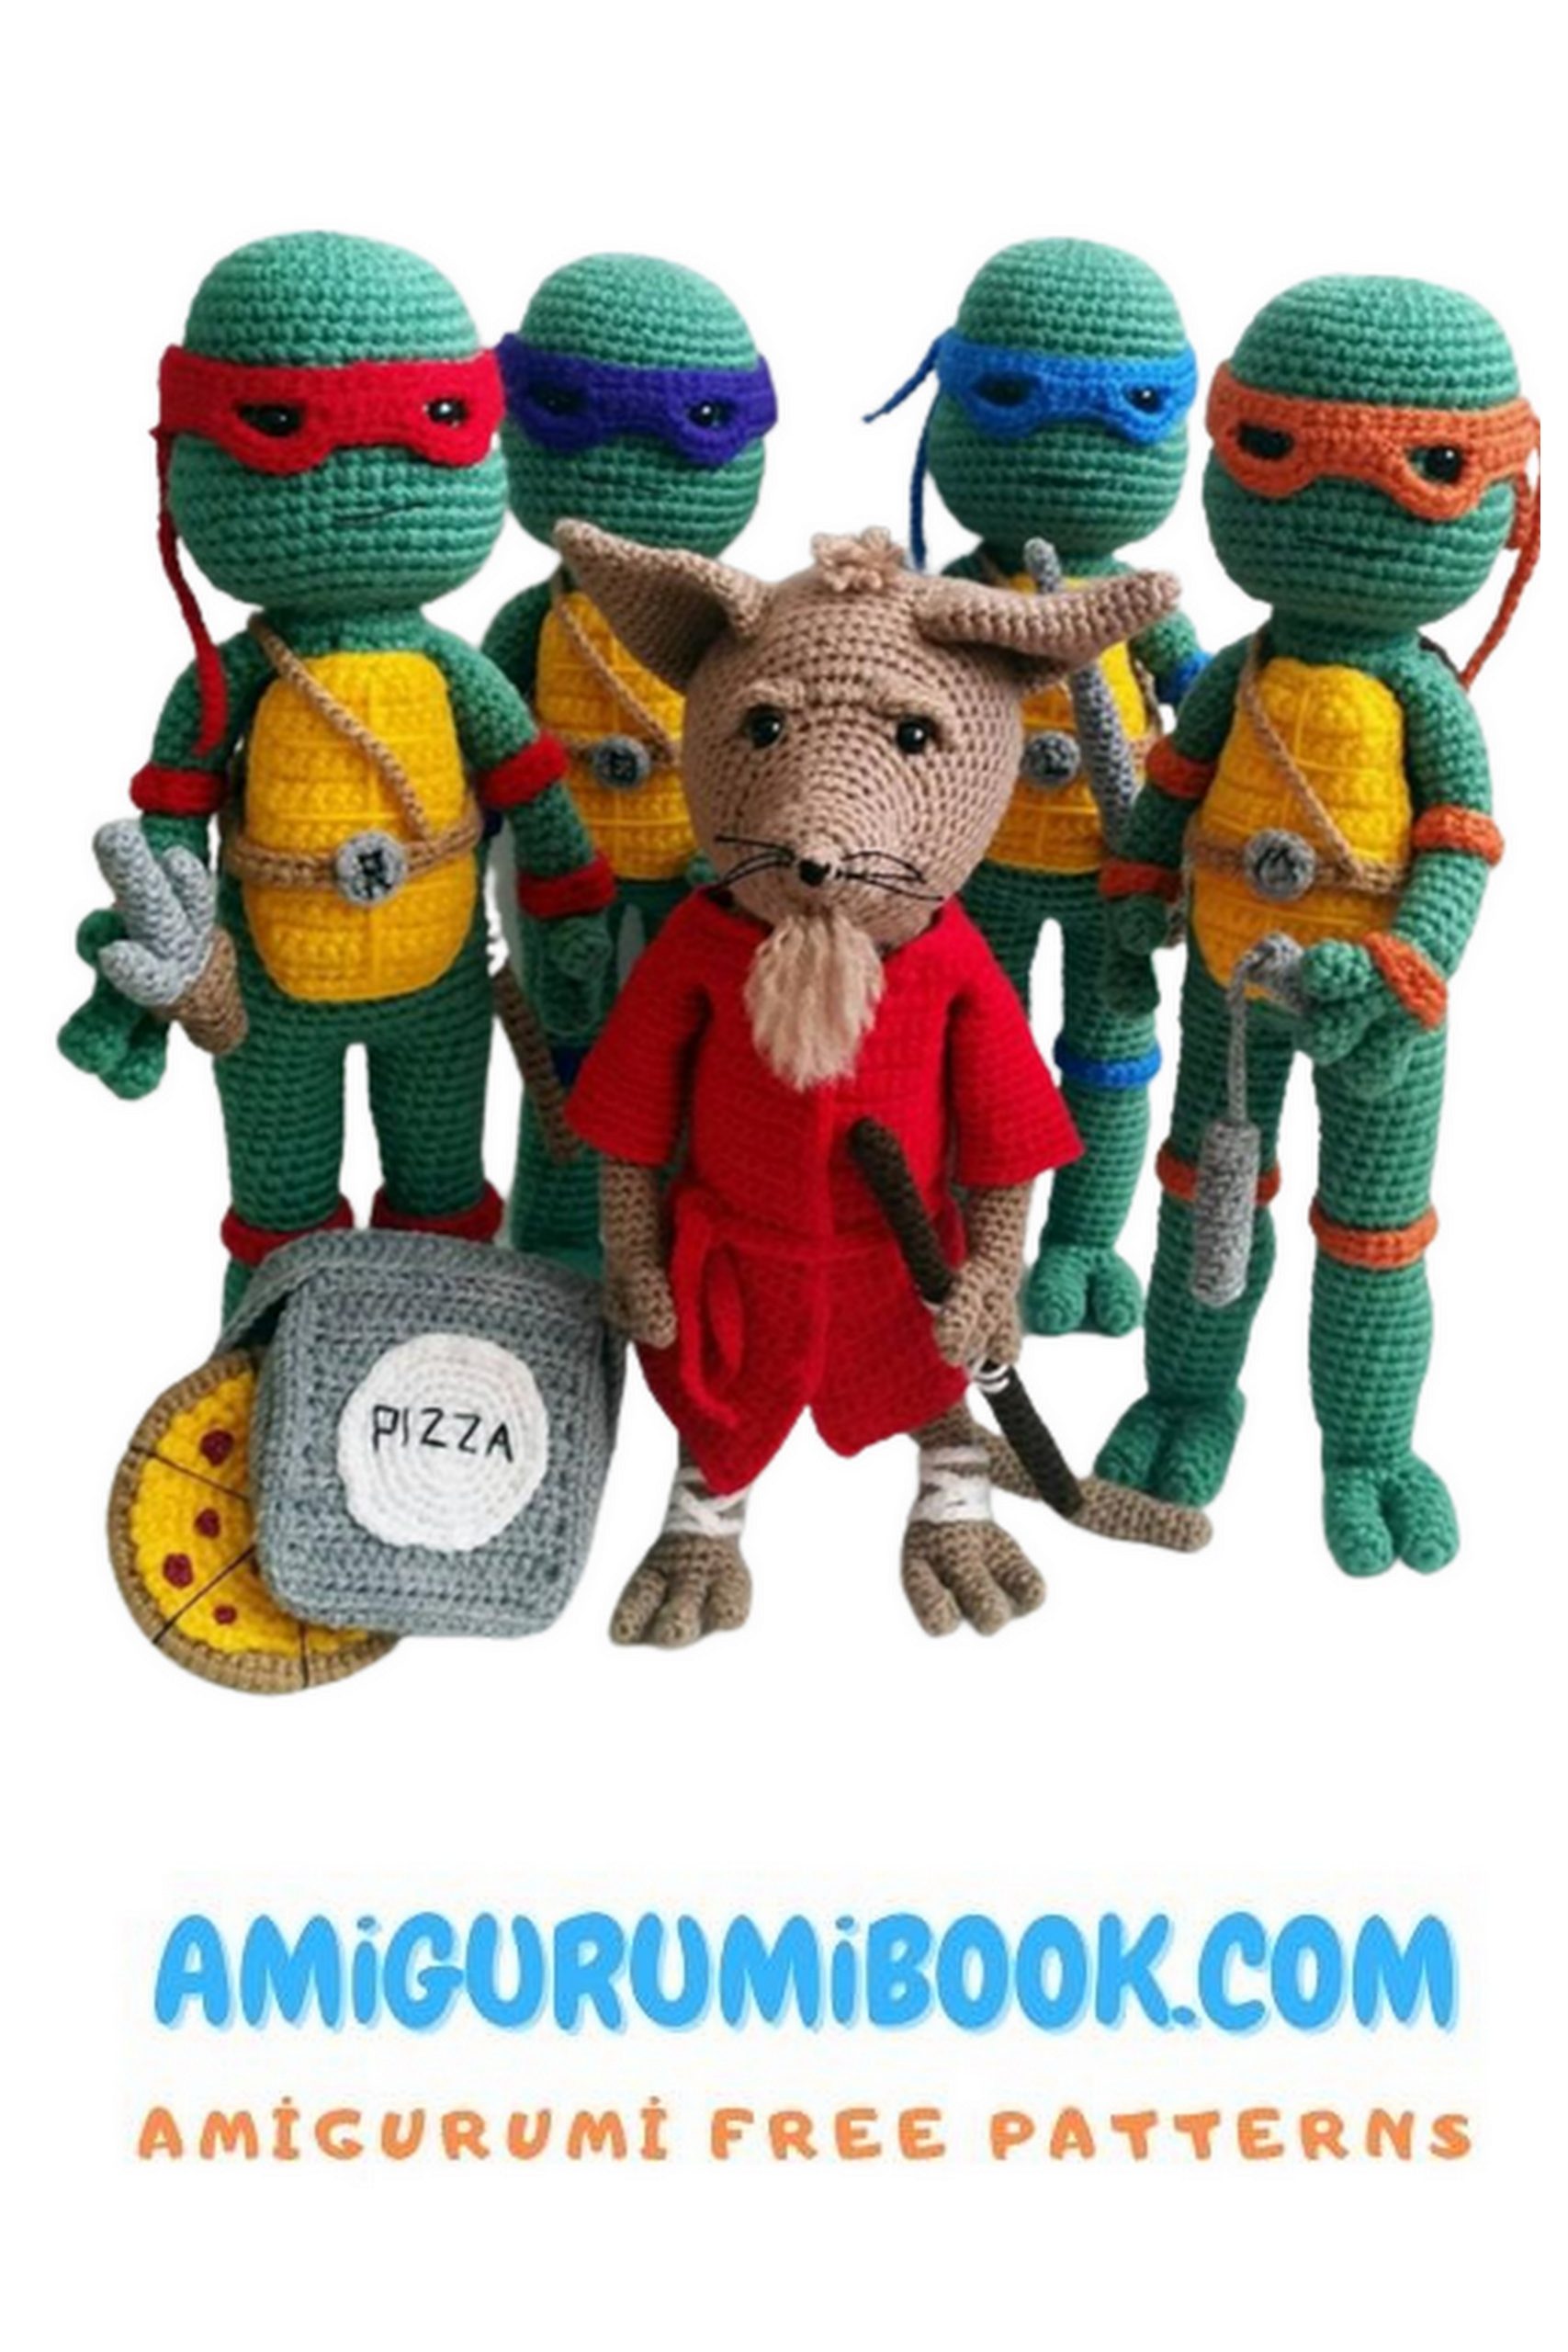
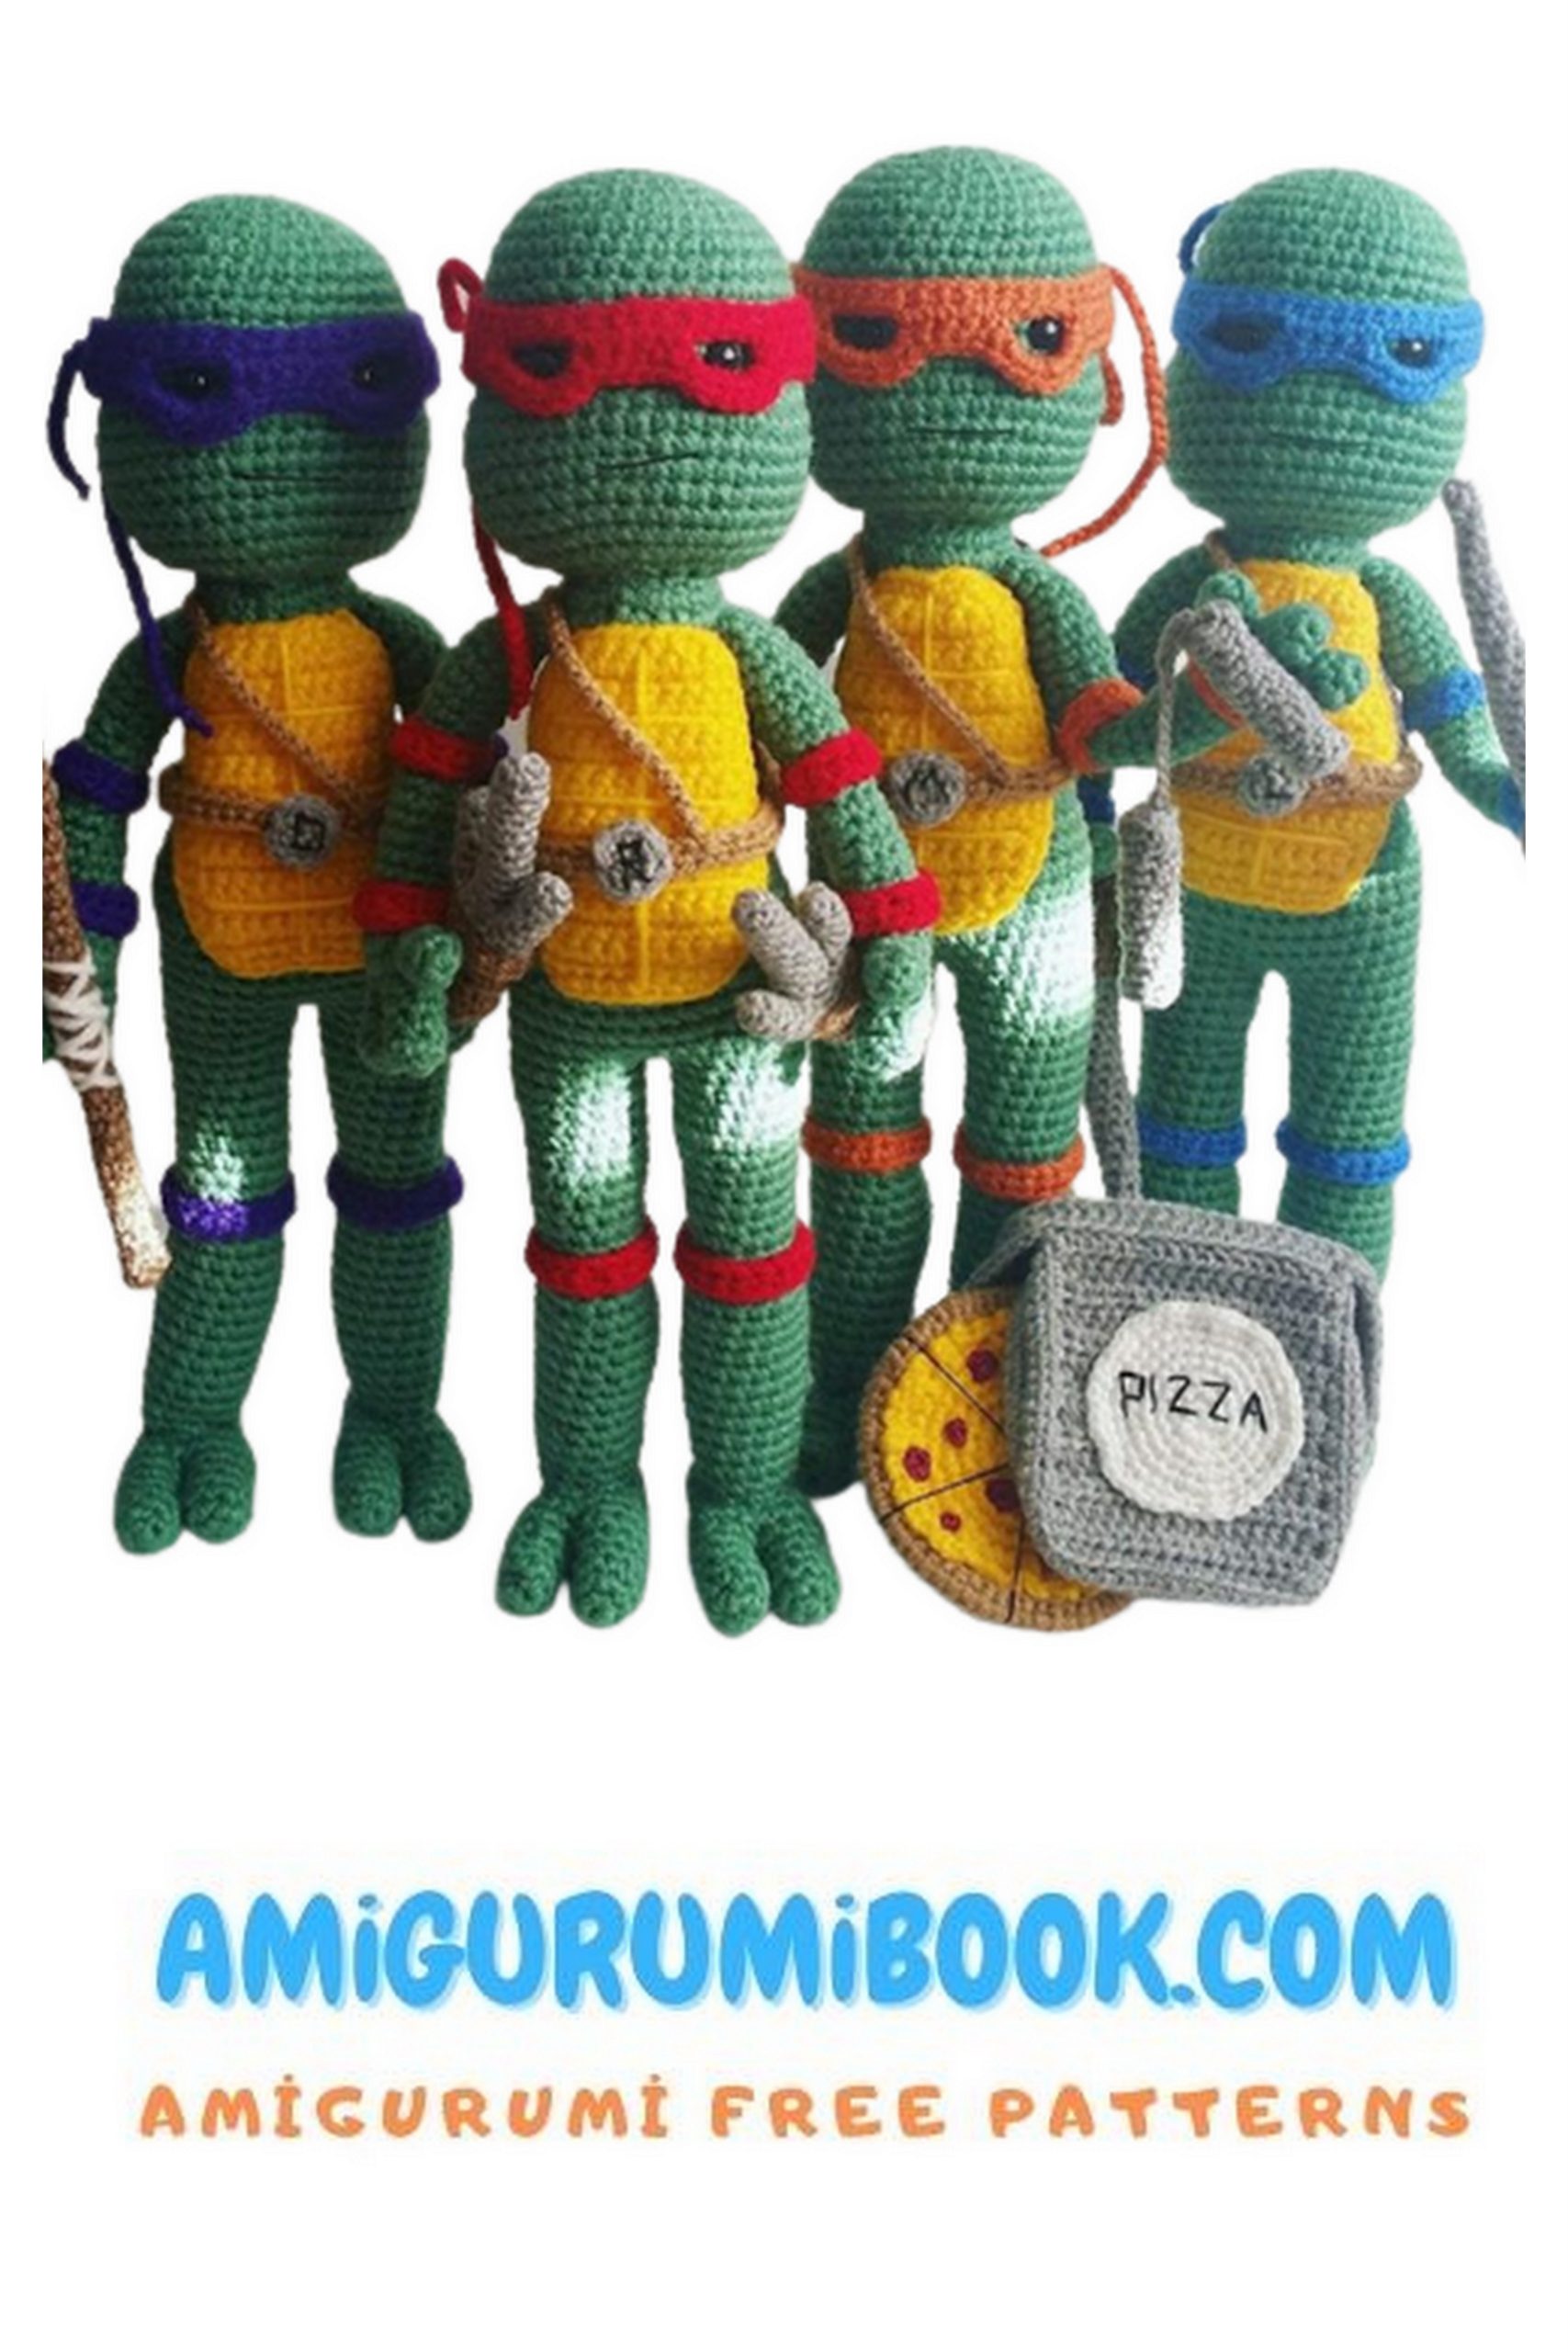
If you’re a fan of the Teenage Mutant Ninja Turtles and enjoy crocheting, creating your own Ninja Turtles amigurumi is a fun and rewarding project. This free pattern provides easy-to-follow instructions to help you craft adorable, miniature versions of your favorite heroes in a half shell. free crochet patterns – Beautiful Pirate Sophie Amigurumi Free Pattern
You may also like more amigurumi patterns.
I share Amigurumi free patterns on my website. In this article, ninja turtles amigurumi free pattern is waiting for you.
Abbreviations:
★ CH – chain
★ Sc – Single crochet
★ İnc – increase (knit 2 sc in one loop)
★ Dec – decrease (knit 2 sc together)
★ Hdc – half double crochet
★ Hdc2vm – knit 2 hdc together (as a decrease)
Materials:
★ Green yarn is the main color (author uses Red Heart Comfort yarn
100% acrylic, 450 g, 790 m)
★ Yarn of blue, purple, red, orange, yellow, gray, brown,
light brown and white – for dressings, shell, weapons and pizza (author
uses Red Heart Super Saver yarn 100% acrylic, 200 g, 300 m)
★ 2.5 mm hook from the author, or suitable for your yarn
★ 1.25 mm hook for pepperoni by the author, or suitable for your yarn
★ Ready eyes or 8mm half beads, or the size you need
★ Filler
★ Needle for stitching
PATTERN
Head (in green):
1 row: 6 sc into magic ring (6)
2 row: inc x 6 (12)
3 row: inc x 12 (24)
4 row: sc in EACH loop (24)
5 row: (1 sc, inc) x 12 (36)
6-11 rows: sc in EVERY loop (36)
12 row: 3 sc, (8 sc, dec) x 3, 3 sc (33)
13 row: In this row, the eyes are installed. You can do this in the knitting process, but it’s possible at the end. To whom it is more convenient. 11 sc, install eye, 7 sc, install eye, 15 sc (33)
14 row: 5 sc, inc x 3, 11 sc, inc x 3, 11 sc (39)
15 row: 7 sc, inc x 3, 13 sc, inc x 3, 13 sc (45)
16-17 rows: sc in EACH loop (45)
18 row: 8 sc, dec, 2 sc, dec, 15 sc, dec, 2 sc, dec, 10 sc (41)
19-22 rows: sc in EACH loop (41)
23 row: 1 sc, dec x 20 (21)
24 row: 1 sc, dec x 10 (11) – fill with filler
25 row: 1 sc, dec x 5 (6)
26 row: dec x 3 (3)
Finish knitting. Pull off the hole. Thread cut, leaving a long end for sewing on.
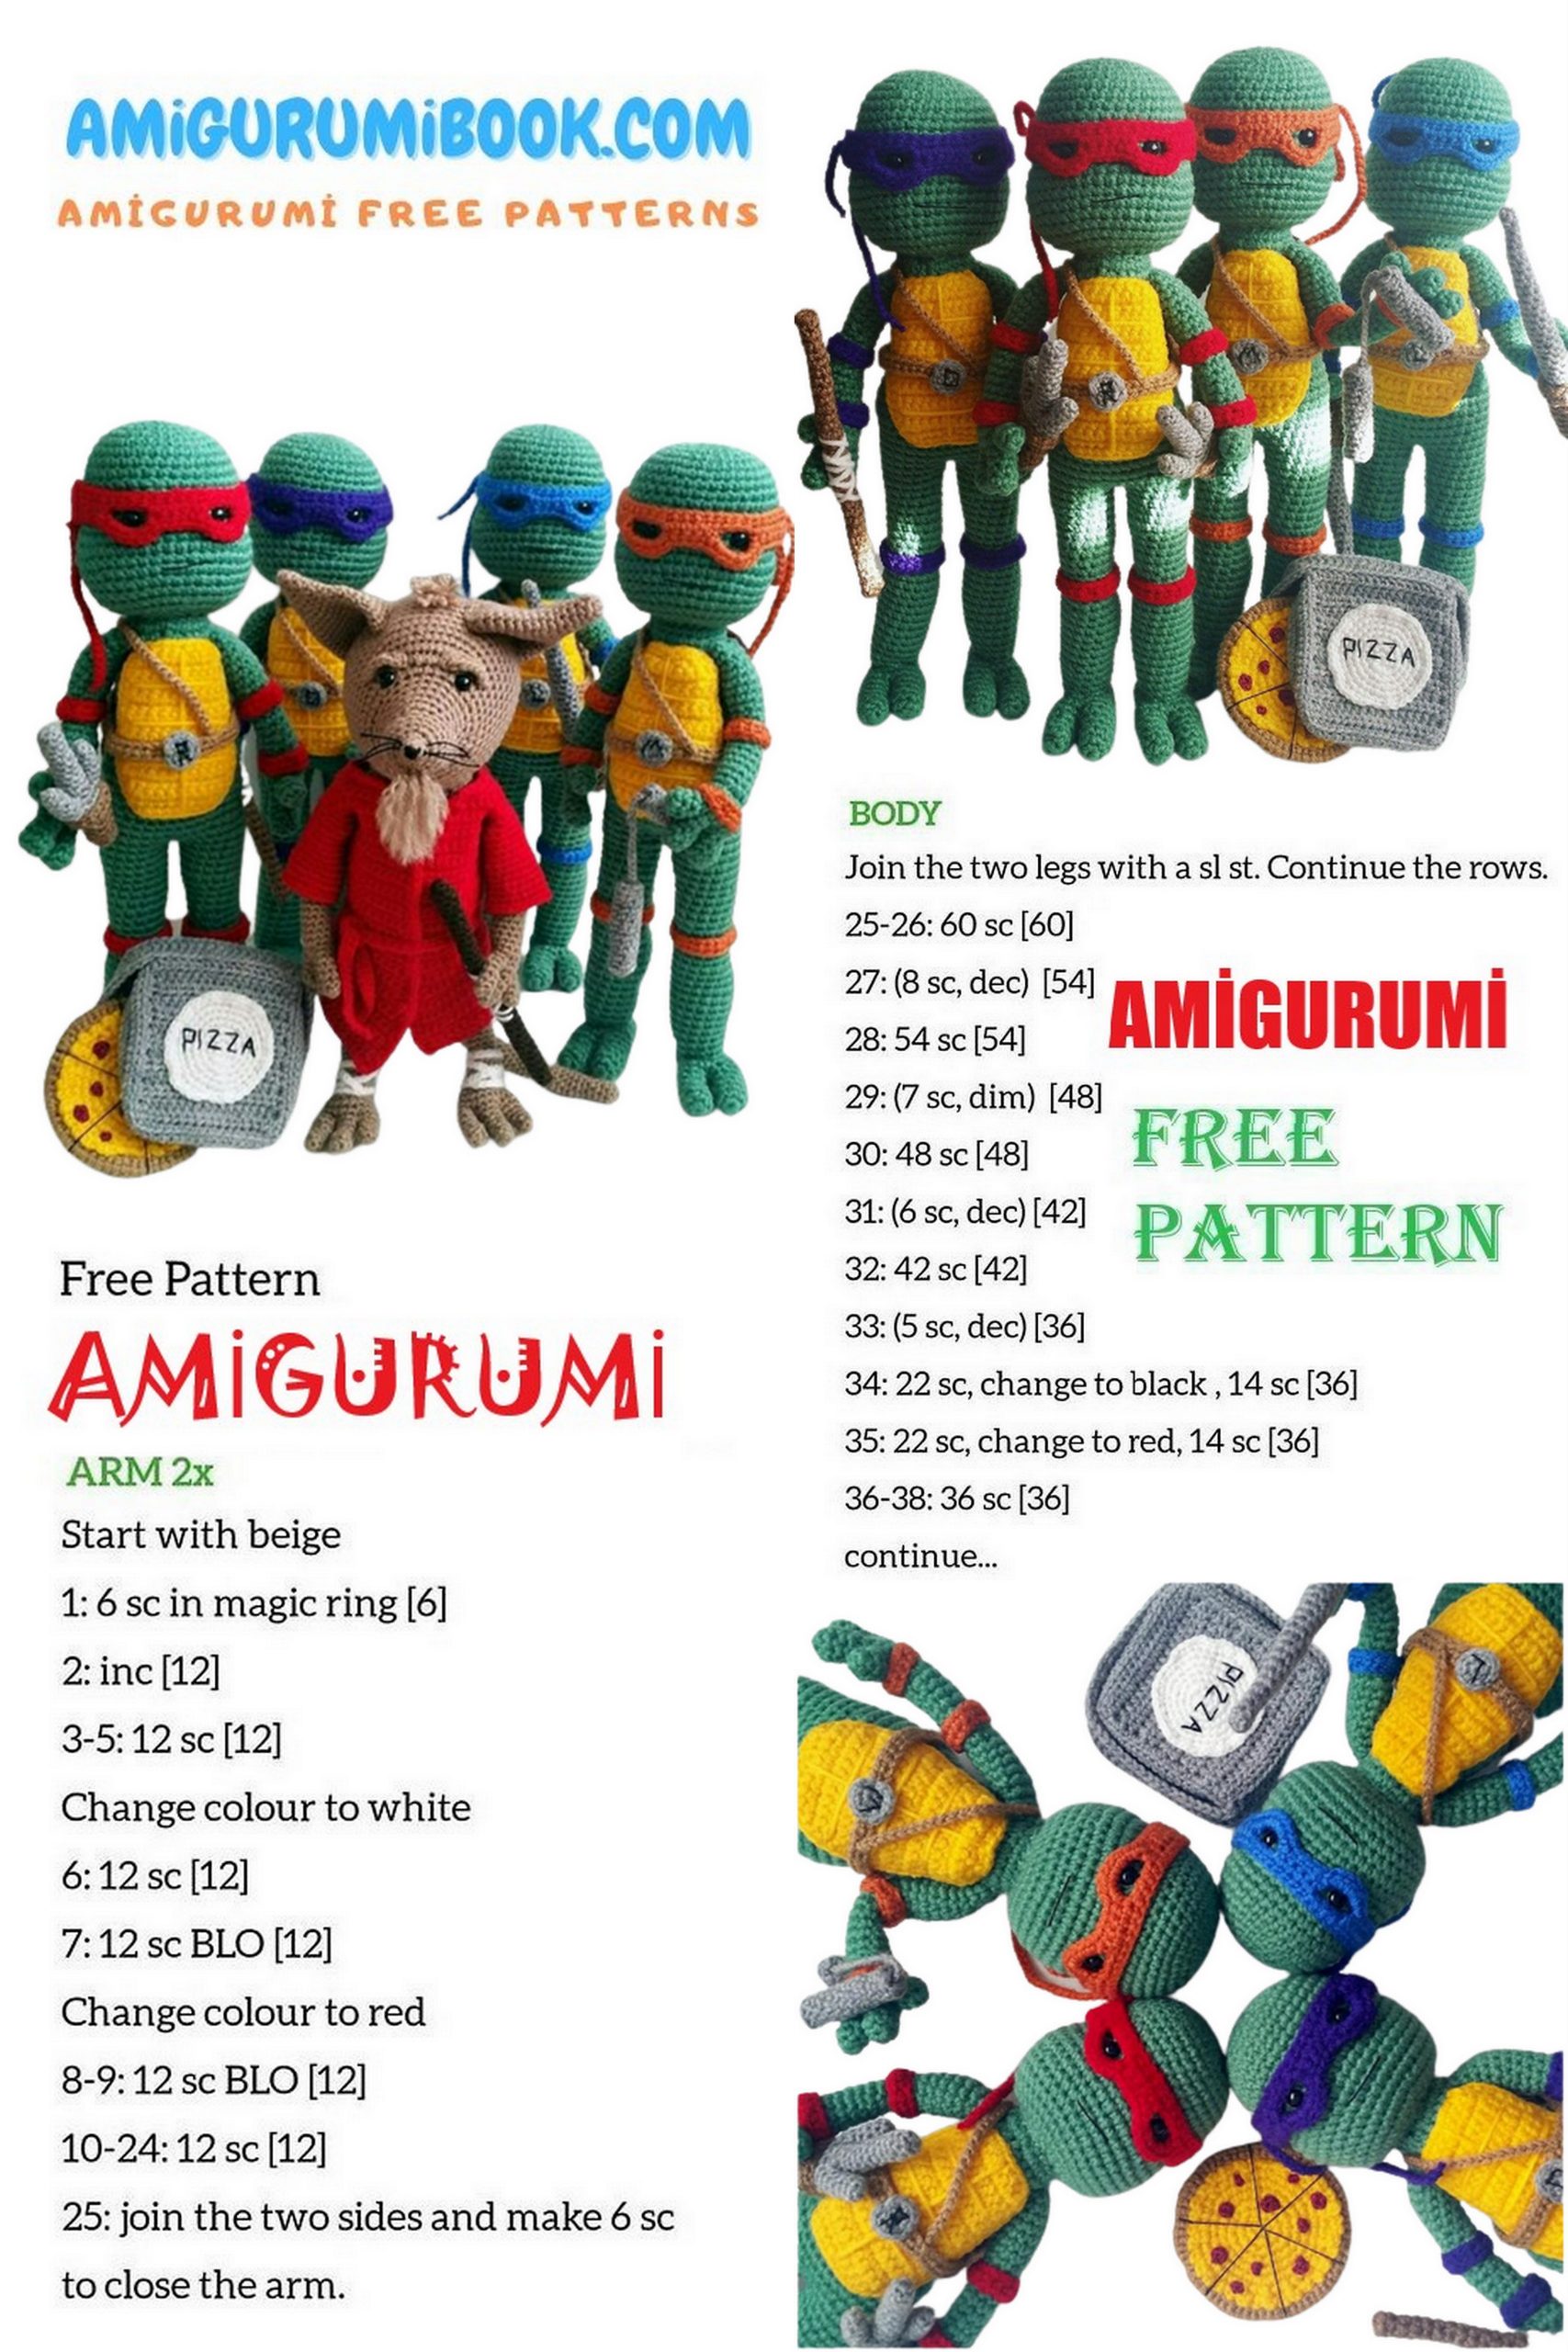
Torso (in green):
Stuff in the course of knitting.
1 row: We start from the neck. Dial 24 CH and lock into the ring (24)
2-5 rows: sc in EACH loop (24)
6 row: (3 sc, inc) x 6 (30)
7-9 rows: sc in EACH loop (30)
10 row: 5 sc, inc x 5, 9 sc, inc x 5, 6 sc (40)
11-13 rows: sc in each loop (40)
14 row: 9 sc, dec, 2 sc, dec, 12 sc, dec, 2 sc, dec, 7 sc (36)
15-18 Rd: sc to EACH loop (36)
19 row: We begin to knit the first leg. 1 sc, skip 18 loops, 17 sc (18)
20-23 rows: sc in EACH loop (18)
24 row: (4 sc, dec) x 3 (15)
25-32 rows: sc in EACH loop (15)
33 row: 13 sc, inc x 2 (17)
34 row: inc x 2, 15 sc (19)
35-39 rows: sc in EACH loop (19)
40 row: (1 sc, dec) x 2, 11 sc, dec (16)
41 row: dec, 14 sc (15)
42-44 rows: sc in EVERY loop (15)
Finish knitting. Cut the thread, leaving a long end for sewing on the foot.
Foot (x2, green):
1 finger:
1 row: 6 sc into magic ring (6)
2 row: (inc, 2 sc) x 2 (8)
3-5 rows: sc per EACH loop (8)
6 row: inc, 7 sc (9)
Finish knitting. Cut the thread.
2 finger:
1 row: 6 sc into magic ring (6)
2 row: (inc, 2 sc) x 2 (8)
3-5 rows: sc per EACH loop (8)
6 row: inc, 7 sc (9)
7 row: Connect both fingers, tie sc (18)
8 row: sc in EACH loop (18)
9 row: 1 sc, (1 sc, dec) x 5, 2 sc (13)
10-13 rows: sc in EACH loop (13)
14 row: 1 sc, dec x 6 (7) – fill with filler
15 row: dec x 3 (3)
Finish knitting. Sew to the foot.
Knit the second foot as well.
Second leg (in green):
Turn the toy over with its back to itself and fasten the thread to the left of the first leg.
1 row: sc in EACH loop (18)
2-3 rows: sc in EACH loop (18)
4 row: (4 sc, dec) x 3 (15)
5-14 rows: sc in EACH loop (15)
15 row: 5 sc, inc x 4, 6 sc (19)
16-20 rows: sc in EVERY loop (19)
21 row: 6 sc, dec x 3, 7 sc (16)
22 row: 6 sc, dec, 8 sc (15)
23-26 rows: sc in EACH loop (15)
Finish knitting. Cut the thread, leaving a long end for sewing. To sew a foot.
Hands (x2, green):
1 finger:
1 row: 6 sc into magic ring (6)
2 row: inc, 5 sc (7)
3 row: sc in EACH loop (7)
4 row: dec, 5 sc (6)
5 row: sc in EACH loop (6)
Finish knitting. Cut the thread.
2 finger:
1 row: 6 sc into magic ring (6)
2 row: inc, 5 sc (7)
3 row: sc in EACH loop (7)
4 row: dec, 5 sc (6)
5 row: sc in EACH loop (6)
6 row: connect both fingers, tie sc (12)
7-9 rows: sc in EACH loop (12)
10 row: (2 sc, dec) x 3 (9)
11-19 rows: sc to EVERY loop (9)
20 row: 1 sc, (3 sc, inc) x 2 (11)
21-24 rows: sc in EVERY loop (11)
25 row: 1 sc, (3 sc, dec) x 2 (9)
26-27 rows: sc in EACH loop (9)
Finish knitting. Cut the thread, leaving a long end for sewing.
Knit the second hand as well.
Thumb (x2, green)
1 row: 6 sc into magic ring
2-4 rows: sc in EACH loop (6)
Finish knitting. Cut the thread, leaving a long end for sewing. Sew to
hand.
Second finger knit as well.
Sew hands to the body
Front part of the shell (yellow):
Knit in rotary rows.
1 row: dial 10 air loops (10)
2 row: 9 sc from the second loop from the hook (9)
3 row: CH, turn, inc, 7 sc, inc (11)
4 row: CH, turn, 11 sc (11)
5 row: CH, turn, inc, 9 sc, inc (13)
6-10 rows: CH, turn, 13 sc (13)
11 row: CH, turn, dec, 9 sc, dec (11)
12-16 rows: CH, turn, 11 sc (11)
17 row:: CH, turn, dec, 7 sc, dec (9)
18 row:: CH, turn, dec, 5 sc, dec (7)
19 row: do not turn! Fully oblige item sc.
Finish knitting. Cut the thread, leaving a long end for sewing.
Embroider the cubes. Sew to the torso.
The back of the shell (brown):
1-18 rows: knit like 18 rows of the front
19 row: do not turn, tie the part until 50 sc (50)
20 row: inc, 49 sc (51)
21 rows: sc in EVERY loop (51)
Finish knitting. Cut the thread, leaving a long end for sewing.
Sew to the body, stuffing with filler.
Headband (blue, purple, red and orange colors):
Knit in rotary rows.
1 row: Dial 30 CH (30)
2 row: 29 sc from the second loop from the hook (29)
3 row: CH, turn, 9 sc, 7 CH, skip 3 loops, 5 sc, 7 CH, skip 3 loops, 9 sc (37)
4 row: CH, turn, 37 sc (37)
Make a tie. Finish knitting. Cut the thread.
Elbow Pads (x2, blue, purple, red and orange colors):
Knit in rotary rows.
1 row: Dial 14 CH (14)
2 row: 13 sc from the second loop from the hook (13)
Finish knitting. Cut the thread, leaving a long end for sewing.
Put on a toy and sew in a ring.
Wristbands (x2, blue, purple, red and orange colors):
Knit in rotary rows.
1 row: Dial 17 CH (17)
2 row: 16 sc from the second loop from the hook (16)
Finish knitting. Cut the thread, leaving a long end for sewing.
Put on a toy and sew in a ring.
Kneepads (x2, blue, purple, red and orange colors):
Knit in rotary rows.
1 row: Dial 23 CH (23)
2 row: 22 sc from the second loop from the hook (22)
Finish knitting. Cut the thread, leaving a long end for sewing.
Put on a toy and sew in a ring.
Belt (light brown):
Knit in rotary rows.
1 row: Dial 52 CH (52)
2 row: 51 sc from the second loop from the hook (51)
Finish knitting. Cut the thread, leaving a long end for sewing. Put on a belt
on a toy and sew into a ring.
Shoulder Strap (light brown):
1 row: Dial 52 CH (52)
Finish knitting. Cut the thread, leaving a long end for sewing.
Sew to the belt.
Buckle (in gray):
1 row: 6 sc into magic ring (6)
2 row: inc x 2 (12)
Finish knitting. Cut the thread, leaving a long end for sewing.
Embroider the first letter of the name.
L – Leonardo Blue Armband
D – Donatello Purple Headband
R – Raphael Red Dressing
M – Michelangelo, orange bandage.
Sew a buckle to your belt. Put a belt on a toy and sew it into a ring.
Six-bo (aka stick, brown):
1 row: 5 sc into magic ring (5)
2-34 rows: sc in EACH loop (5)
Finish knitting. Cut the thread.
Wrap with white thread, as in the photo.
Six-bo – Donatello’s weapon.
Nunchucks (x2, gray):
1 row: 6 sc into magic ring (6)
2 row: (inc, 1 sc) x 3 (9)
3 row: 9 sc behind the back wall of the loop (9)
4 row: 3 sc, dec, 4 sc (8)
4-14 rows: sc in EACH loop (8)
Finish knitting. Cut the thread.
The bottom of the nunchaku (x2, gray)
1 row: 6 sc into magic ring (6)
Finish knitting. Cut the thread, leaving a long end for sewing.
Sew to the base of the nunchaku.
Chain for nunchaku (in gray):
1 row: Dial 17 CH (17)
Finish knitting. Cut the thread, leaving a long end for sewing.
Sew to the base of the nunchaku.
Nunchucks are Michelangelo’s weapons. He has 2 of them, so the details
the base and lower part you need to make 4 pieces, and the chains – 2. But you can
make one nunchak.
Katanas (swords, x2):
Start gray
1 row: 5 sc into magic ring (5)
2-6 rows: sc in EACH loop (5)
7 row: inc, 4 sc (6)
8-13 rows: sc in EACH loop (6)
14 row: inc, 5 sc (7)
15 row: sc in EACH loop (7)
16 row: 3 sc, inc, 3 sc (8)
17-27 rows: sc in EVERY loop (8)
28 row: (3 sc, inc) x 2 (10)
29 row: sc in EACH loop (10)
Change to brown
30 row: sc in EACH loop (10)
31 row: (inc, 4 sc) x 2 (12)
32-34 rows: sc in EACH loop (12)
35 row: dec, 10 sc (11)
36 row: dec, 9 sc (10)
Finish knitting. Cut the thread.
Lower katana (x2, brown):
1 row: 6 sc into magic ring (6)
2 row: (inc, 1 sc) x 2 (8)
Finish knitting. Cut the thread, leaving a long end for sewing.
Sew to the base of the katana.
Finishing katana (x2, brown):
* I don’t know what else to call it.> <*
Knit in rotary rows
1 row: Dial 13 CH (13)
2 row: 12 sc from the second loop from the hook (12)
3 row: CH, turn, sc in EACH loop (12)
Finish knitting. Cut the thread, leaving a long end for sewing.
Sew to the base of the katana, locking it into a ring.
Katanas are the weapons of Leonardo.
Sai (large blade in the middle, in gray):
1 row: 6 sc into magic ring (6)
2 row: inc, 5 sc (7)
3-12 rows: sc in each loop (7)
Finish knitting. Cut the thread.
Sai (small blades, x2, gray):
1 blade:
1 row: 6 sc into magic ring (6)
2-6 rows: sc in EACH loop (6)
Finish knitting. Cut the thread.
2 blade:
1 row: 6 sc into magic ring (6)
2-6 rows: sc in EACH loop (6)
7 row: Connect the three blades (small-large-small), tie sc (15)
8 row: sc in EACH loop (15)
Change to brown
9 row: (3 sc, dec) x 3 (12)
10 row: sc in EACH loop (12)
11 row: (1 sc, dec) x 4 (8)
12-14 rows: sc in EVERY loop (8)
Finish knitting. Cut the thread.
Sai bottom (brown):
1 row: 6 sc into magic ring (6)
Finish knitting. Cut the thread, leaving a long end for sewing.
Sew to the base of the bark.
Sai finish (brown):
Knit in rotary rows
1 row: Dial 13 CH (14)
2 row: 13 sc from the second loop from the hook (13)
Finish knitting. Cut the thread, leaving a long end for sewing.
Sew to the base of the bark, closing in a ring.
The second sai knit similarly.
Sai – Raphael’s weapon.
Pizza dough (light brown):
1 row: 6 sc into magic ring (6)
2 row: inc x 6 (12)
3 row: (1 sc, inc) x 6 (18)
4 row: (inc, 1 sc) x 9 (27)
5 row: sc in EACH loop (27)
6 row: (2 sc, inc) x 9 (36)
7 row: (1 sc, inc) x 18 (54)
8 row: sc in EACH loop (54)
9 row: 54 sc behind the back loop (54)
10 row: (4 sc, inc) x 10, 3 sc, inc (65)
11 row: sc in EACH loop (65)
Finish knitting. Cut the thread.
Cheese (yellow):
1 row: 6 sc into magic ring (6)
2 row: inc x 6 (12)
3 row: (1 sc, inc) x 6 (18)
4 row: (1sc, inc, 1 sc) x 6 (24)
5 row: (3 sc, inc) x 6 (30)
6 row: (4 sc, inc) x 6 (36)
Finish knitting. Cut the thread, leaving a long end for sewing.
Pepperoni (small pieces, crocheted 1.25 mm, 6 pcs.):
1 row: 6 sc into magic ring (6)
Finish knitting. Cut the thread, leaving a long end for sewing.
Pepperoni (large pieces, crocheted 1.25 mm, 6 pcs.):
1 row: 6 sc into magic ring (6)
2 row: inc x 6 (12)
Finish knitting. Cut the thread, leaving a long end for sewing.
Sew pepperoni to cheese. Sew cheese to pizza. “Cut the pizza into pieces.”
Pizza box (in gray):
Start knitting in rotary rows
1 row: Dial 23 CH (23)
2 row: 22 hdc from the second loop from the hook (22)
3-15 rows: CH, turn, 22 hdc (22)
16 row: DO NOT TURN, tie the sc part until 77 sc (77)
17 row: knit for the back wall of the loop, 10 hdc, hdc2vm, 12 hdc, hdc2vm, 12 hdc,
hdc2bm, 10 hdc, hdc2bm, 15 hdc, hdc2bm, 6 hdc, hdc2bm, 3 hdc (74)
18 row: hdc in EACH loop (74)
19 row: start knitting the cover, 1 hdc, CH, turn, 17 hdc behind the front wall
hinges (18)
Continue in the turning rows
20-31 rows: CH, turn, 17 hdc (17)
Finish knitting. Cut the thread.
Side cover (gray):
1 row: Fasten the thread in one of the loops of the cover and knit 55 sc (55)
2 row: 55 sc behind the front wall of the hinge (55)
3-4 rows: sc per EACH loop (55)
Finish knitting. Cut the thread.
Circle on the lid (white):
1 row: 6 sc into magic ring (6)
2 row: inc x 6 (12)
3 row: (inc, 1 sc) x 6 (18)
4 row: (2 sc, inc) x 6 (24)
5 row: (3 sc, inc) x 6 (30)
6 row: (2 sc, inc, 2 sc) x 6 (36)
7 row: 3 sc, (2 sc, inc) x 10, 3 sc (46)
Finish knitting. Cut the thread, leaving a long end for sewing.
Embroider the word “PIZZA”. Sew to the box lid. Put the pizza in the box.
Note: the author assembles the toy after all the details are connected. To me personally
It is convenient to collect along the knitting. You can do as you wish.