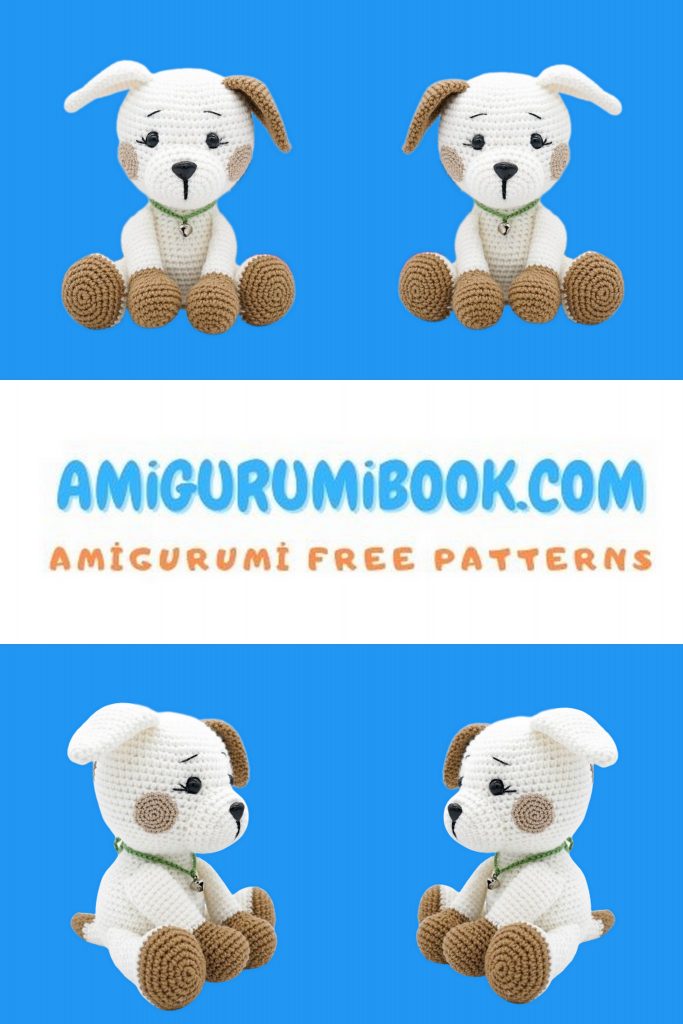
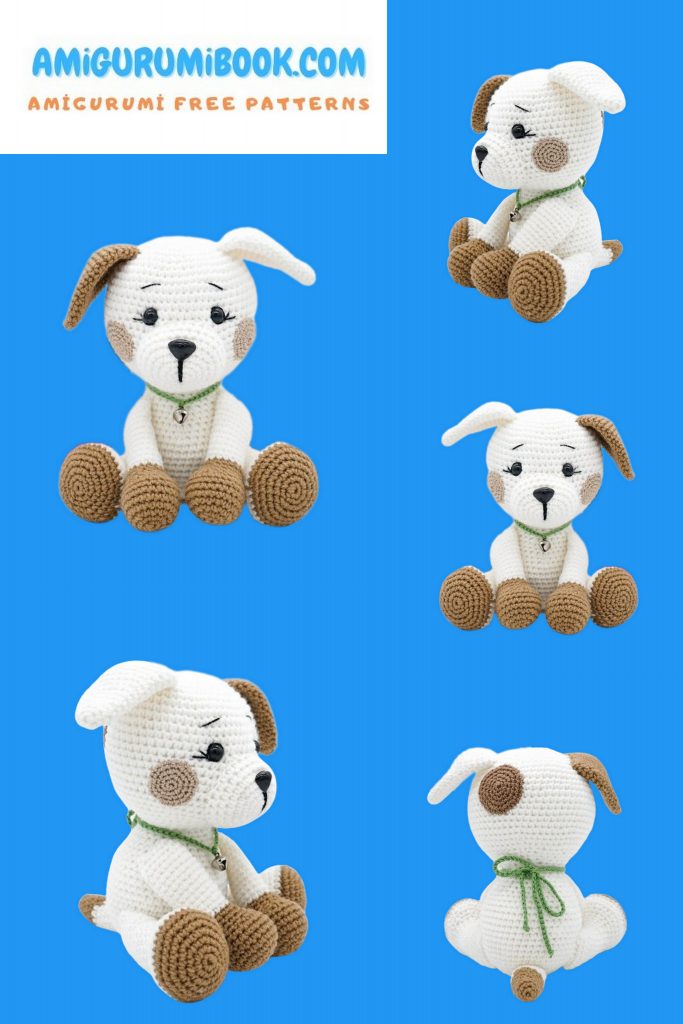
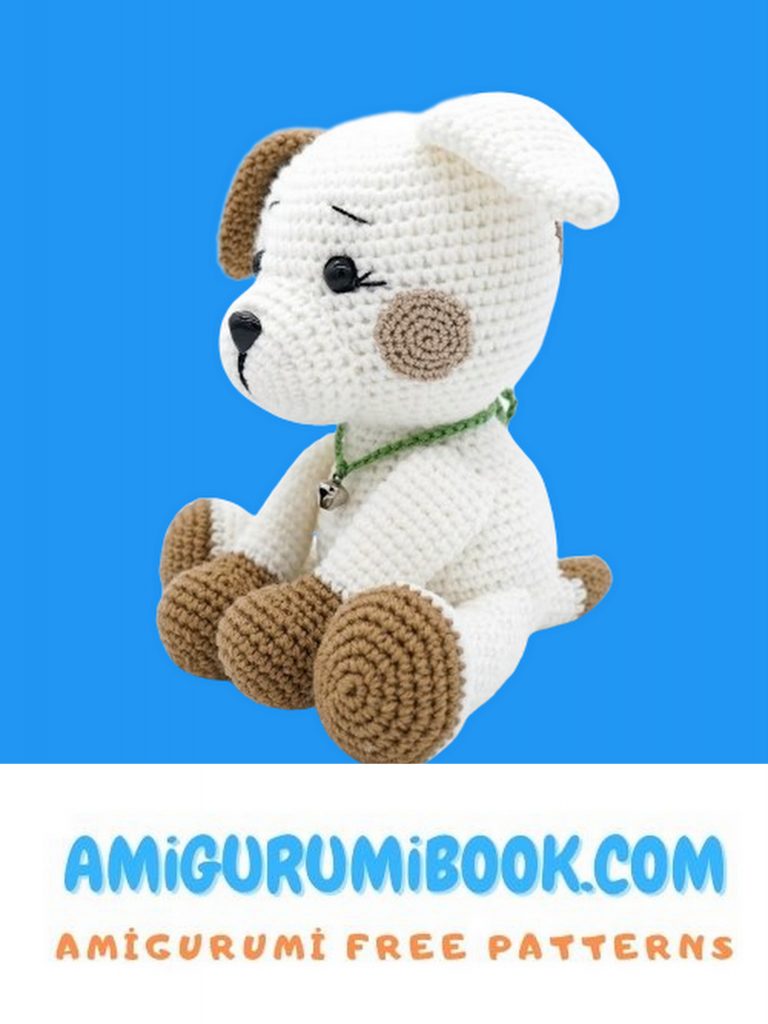
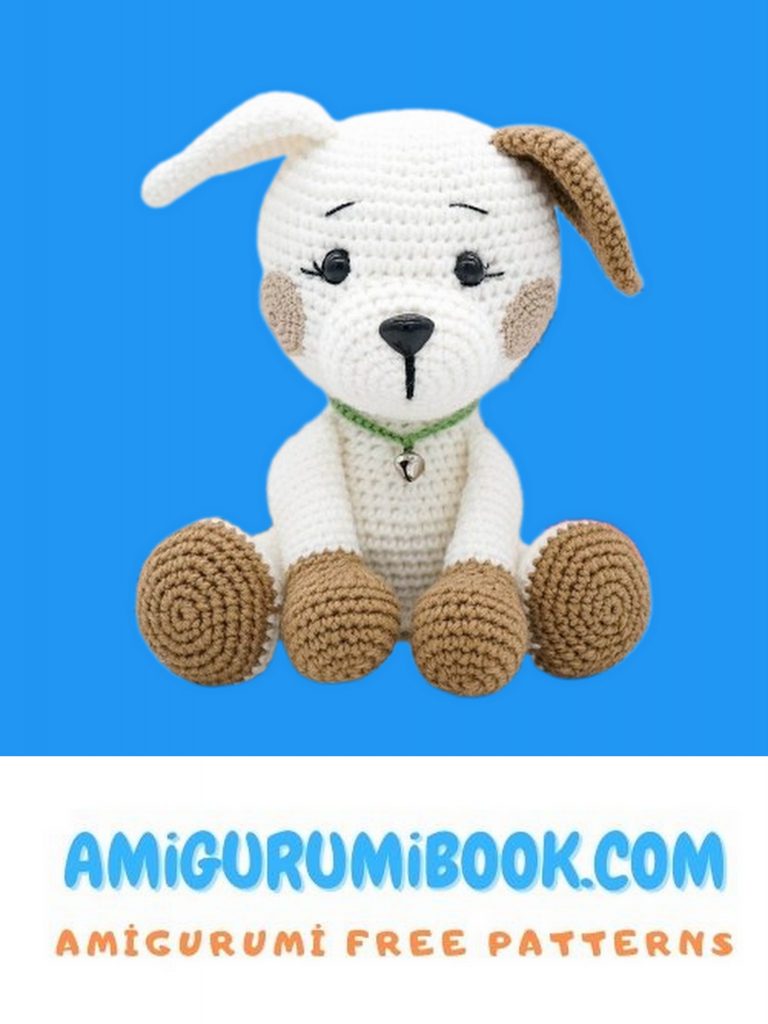
Puppy Dog amigurumi lovers, this adorable crochet project is perfect for anyone who enjoys making cute handmade animals. This free Puppy Dog crochet pattern guides you step by step to create a soft, expressive, and detailed puppy that looks charming from every angle.
Designed with carefully shaped ears, sweet round cheeks, and a perfectly balanced body, this Puppy Dog amigurumi pattern is suitable for both confident beginners and experienced crocheters. Clear instructions and simple stitch combinations make the process enjoyable and easy to follow.
Whether you want to create a handmade gift, add a new design to your amigurumi collection, or simply enjoy a relaxing crochet session, this Puppy Dog project will quickly become one of your favorites.
If you want to access 1000+ free amigurumi patterns, you can download our application from this link!

🧶 Materials
- Yarn from Troitsk “Krokha” (20% wool, 80% acrylic, 50 g / 135 m)
- 2.5–3.0 mm crochet hook
- Safety eyes
- Safety nose
- Fiberfill stuffing
- Tapestry needle
- Scissors
📖 Abbreviations
(12) – number of stitches at the end of the step
ch – chain
sc – single crochet
inc – increase
dec – decrease
(…) x n – repeat instructions in brackets n times
Head
1: 6 sc in magic ring (6)
2: inc in each stitch (12)
3: (1 sc, inc) x 6 (18)
4: (2 sc, inc) x 6 (24)
5: (3 sc, inc) x 6 (30)
6: (4 sc, inc) x 6 (36)
7: (5 sc, inc) x 6 (42)
8: (6 sc, inc) x 6 (48)
9: (7 sc, inc) x 6 (54)
10: (8 sc, inc) x 6 (60)
11–22: 60 sc (60)
23: (8 sc, dec) x 6 (54)
24: (7 sc, dec) x 6 (48)
25: (6 sc, dec) x 6 (42)
26: (5 sc, dec) x 6 (36)
27: (4 sc, dec) x 6 (30)
28: (3 sc, dec) x 6 (24)
🤍 Muzzle
1: 6 sc in magic ring (6)
2: inc in each stitch (12)
3: (1 sc, inc) x 6 (18)
4: (2 sc, inc) x 6 (24)
5: (3 sc, inc) x 6 (30)
6–8: 30 sc (30)
Lightly stuff before sewing to the head.
🤍 Cheeks (2 pieces)
1: 6 sc in magic ring (6)
2: inc in each stitch (12)
3: (1 sc, inc) x 6 (18)
4: (2 sc, inc) x 6 (24)
Do not overstuff. Shape gently before attaching.
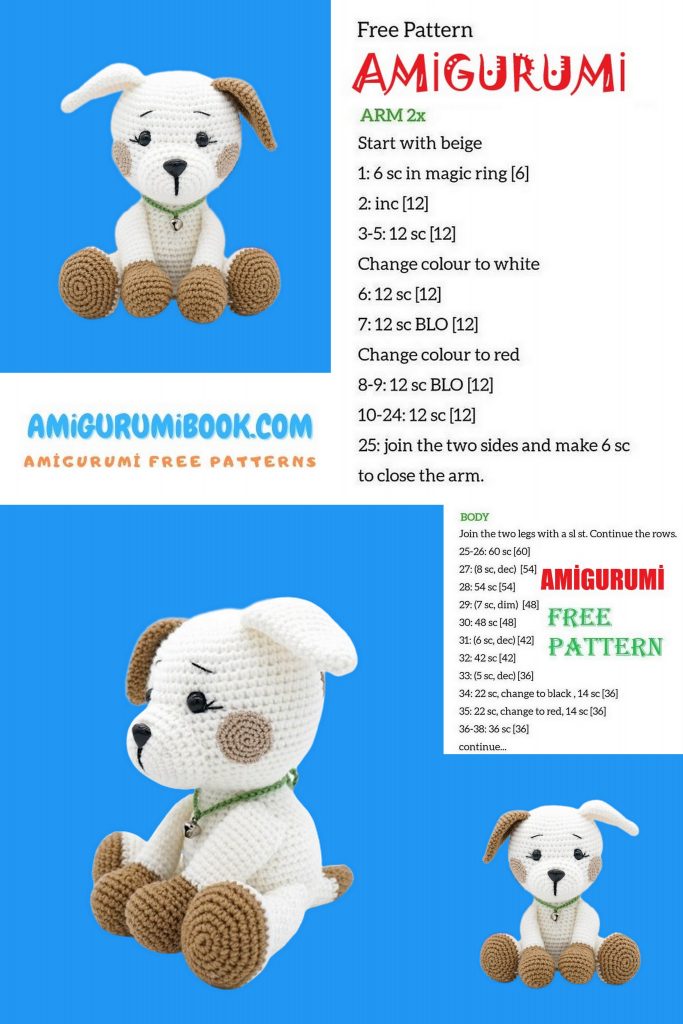
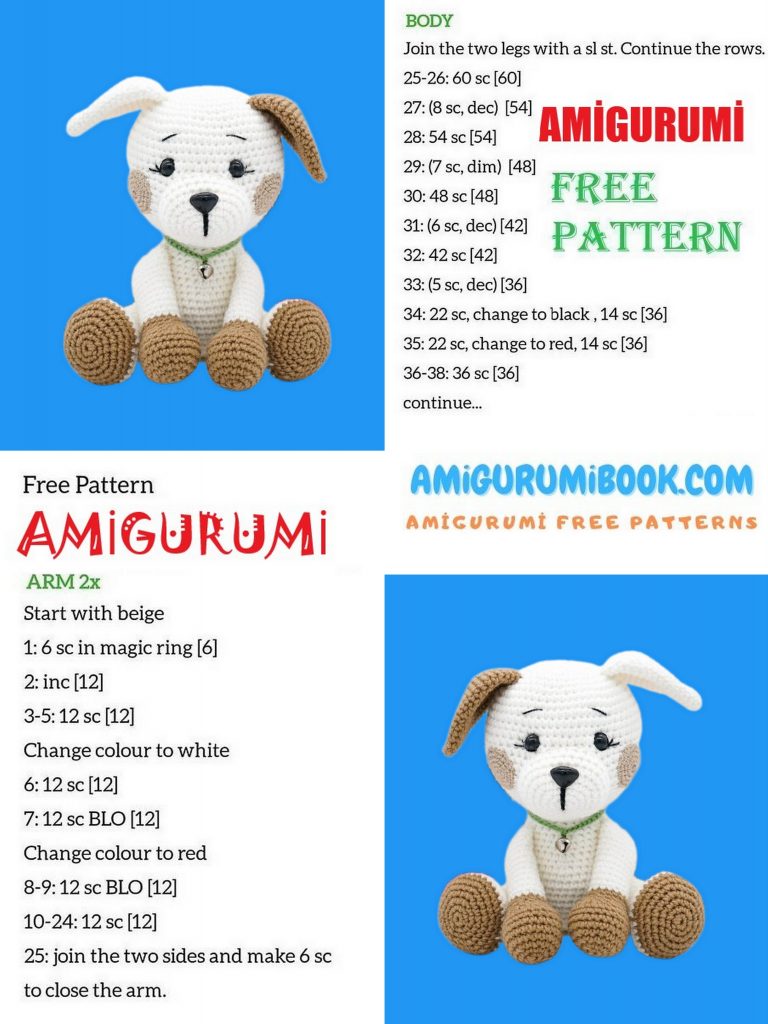
Body
1: 6 sc in magic ring (6)
2: inc in each stitch (12)
3: (1 sc, inc) x 6 (18)
4: (2 sc, inc) x 6 (24)
5: (3 sc, inc) x 6 (30)
6: (4 sc, inc) x 6 (36)
7: (5 sc, inc) x 6 (42)
8: (6 sc, inc) x 6 (48)
9–18: 48 sc (48)
19: (6 sc, dec) x 6 (42)
20: 42 sc (42)
21: (5 sc, dec) x 6 (36)
22: 36 sc (36)
23: (4 sc, dec) x 6 (30)
24: 30 sc (30)
25: (3 sc, dec) x 6 (24)
26: 24 sc (24)
🐾 Front Legs (2 pieces)
1: 6 sc in magic ring (6)
2: inc in each stitch (12)
3: (1 sc, inc) x 6 (18)
4: (2 sc, inc) x 6 (24)
5–8: 24 sc (24)
9: 12 sc, 6 dec (18)
10: 18 sc (18)
⚠ Row 11 in original text contains a math error.
Corrected version:
11: (7 sc, dec) x 2 (16)
12–22: 16 sc (color change in step 13)
23: (6 sc, dec) x 2 (14)
24: 14 sc (14)
Stuff 2/3 firmly.
🐾 Hind Legs (2 pieces)
1: 6 sc in magic ring (6)
2: inc in each stitch (12)
3: (1 sc, inc) x 6 (18)
4: (2 sc, inc) x 6 (24)
5: (3 sc, inc) x 6 (30)
6: (4 sc, inc) x 6 (36)
7–8: 36 sc (color change in step 7)
9: (4 sc, dec) x 6 (30)
10: 30 sc (30)
11: (2 sc, dec) x 6, 6 sc (24)
12: 24 sc (24)
13: (1 sc, dec) x 6, 6 sc (18)
14–23: 18 sc (18)
24: (4 sc, dec) x 3 (15)
25: 15 sc (15)
Stuff 2/3 firmly.
👂 Ears (2 pieces)
One ear in white yarn, one in brown yarn.
1: 6 sc in magic ring (6)
2: (1 sc, inc) x 3 (9)
3: 9 sc (9)
4: (2 sc, inc) x 3 (12)
5: 12 sc (12)
6: (3 sc, inc) x 3 (15)
7: 15 sc (15)
8: (4 sc, inc) x 3 (18)
9: 18 sc (18)
10: (5 sc, inc) x 3 (21)
11: 21 sc (21)
12: (6 sc, inc) x 3 (24)
13: (7 sc, inc) x 3 (27)
14: (8 sc, inc) x 3 (30)
15: 30 sc (30)
16: (8 sc, dec) x 3 (27)
17: 27 sc (27)
Do not overstuff.
🐕 Tail
1: 5 sc in magic ring (5)
2: 5 inc (10)
3: 10 sc (10)
4: (4 sc, inc) x 2 (12)
5: 12 sc (12)
6: (5 sc, inc) x 2 (14)
7–13: 14 sc (14)
Lightly stuff before attaching.
🧵 Assembly Instructions
Body and Legs
- Stuff the body firmly, especially the lower part so the puppy can sit steadily.
- Position the legs evenly on both sides of the lower body.
- Make sure the feet are facing forward and aligned symmetrically.
- Sew each leg securely to the body using small tight stitches.
- Hide all yarn ends inside the body.
Head Attachment
- Stuff the head firmly, shaping the cheeks evenly.
- Align the head on top of the body so the face is centered.
- Pin in place first to check balance.
- Sew the head to the body in a circular motion, matching stitches evenly.
- Add a little extra stuffing through the opening if needed before fully closing.
Muzzle
- Lightly stuff the muzzle before attaching.
- Position it in the center of the face.
It should sit slightly below the midpoint of the head. - Sew around evenly, adjusting stuffing as you go to keep the shape rounded.
Nose
- Attach the nose to the top center of the muzzle.
- Pull gently to shape it slightly raised.
- Secure tightly and hide the yarn inside the head.
Eyes
- Insert safety eyes above the muzzle.
- Leave approximately 5–6 stitches between the eyes.
- Secure washers firmly from inside the head.
Tip: Check facial expression before locking the washers completely.
Ears
- Flatten the ears slightly.
- Position them symmetrically on both sides of the head.
- The ears should sit slightly above the eye level.
- Sew securely and shape them downward naturally.
Tail
- Attach the tail at the back of the body, centered between the legs.
- Angle it slightly upward for a playful look.
- Sew around the base firmly.
Final Shaping
• Adjust stuffing if needed to smooth out bumps.
• Check symmetry from front and side views.
• Gently massage the piece to distribute filling evenly.