
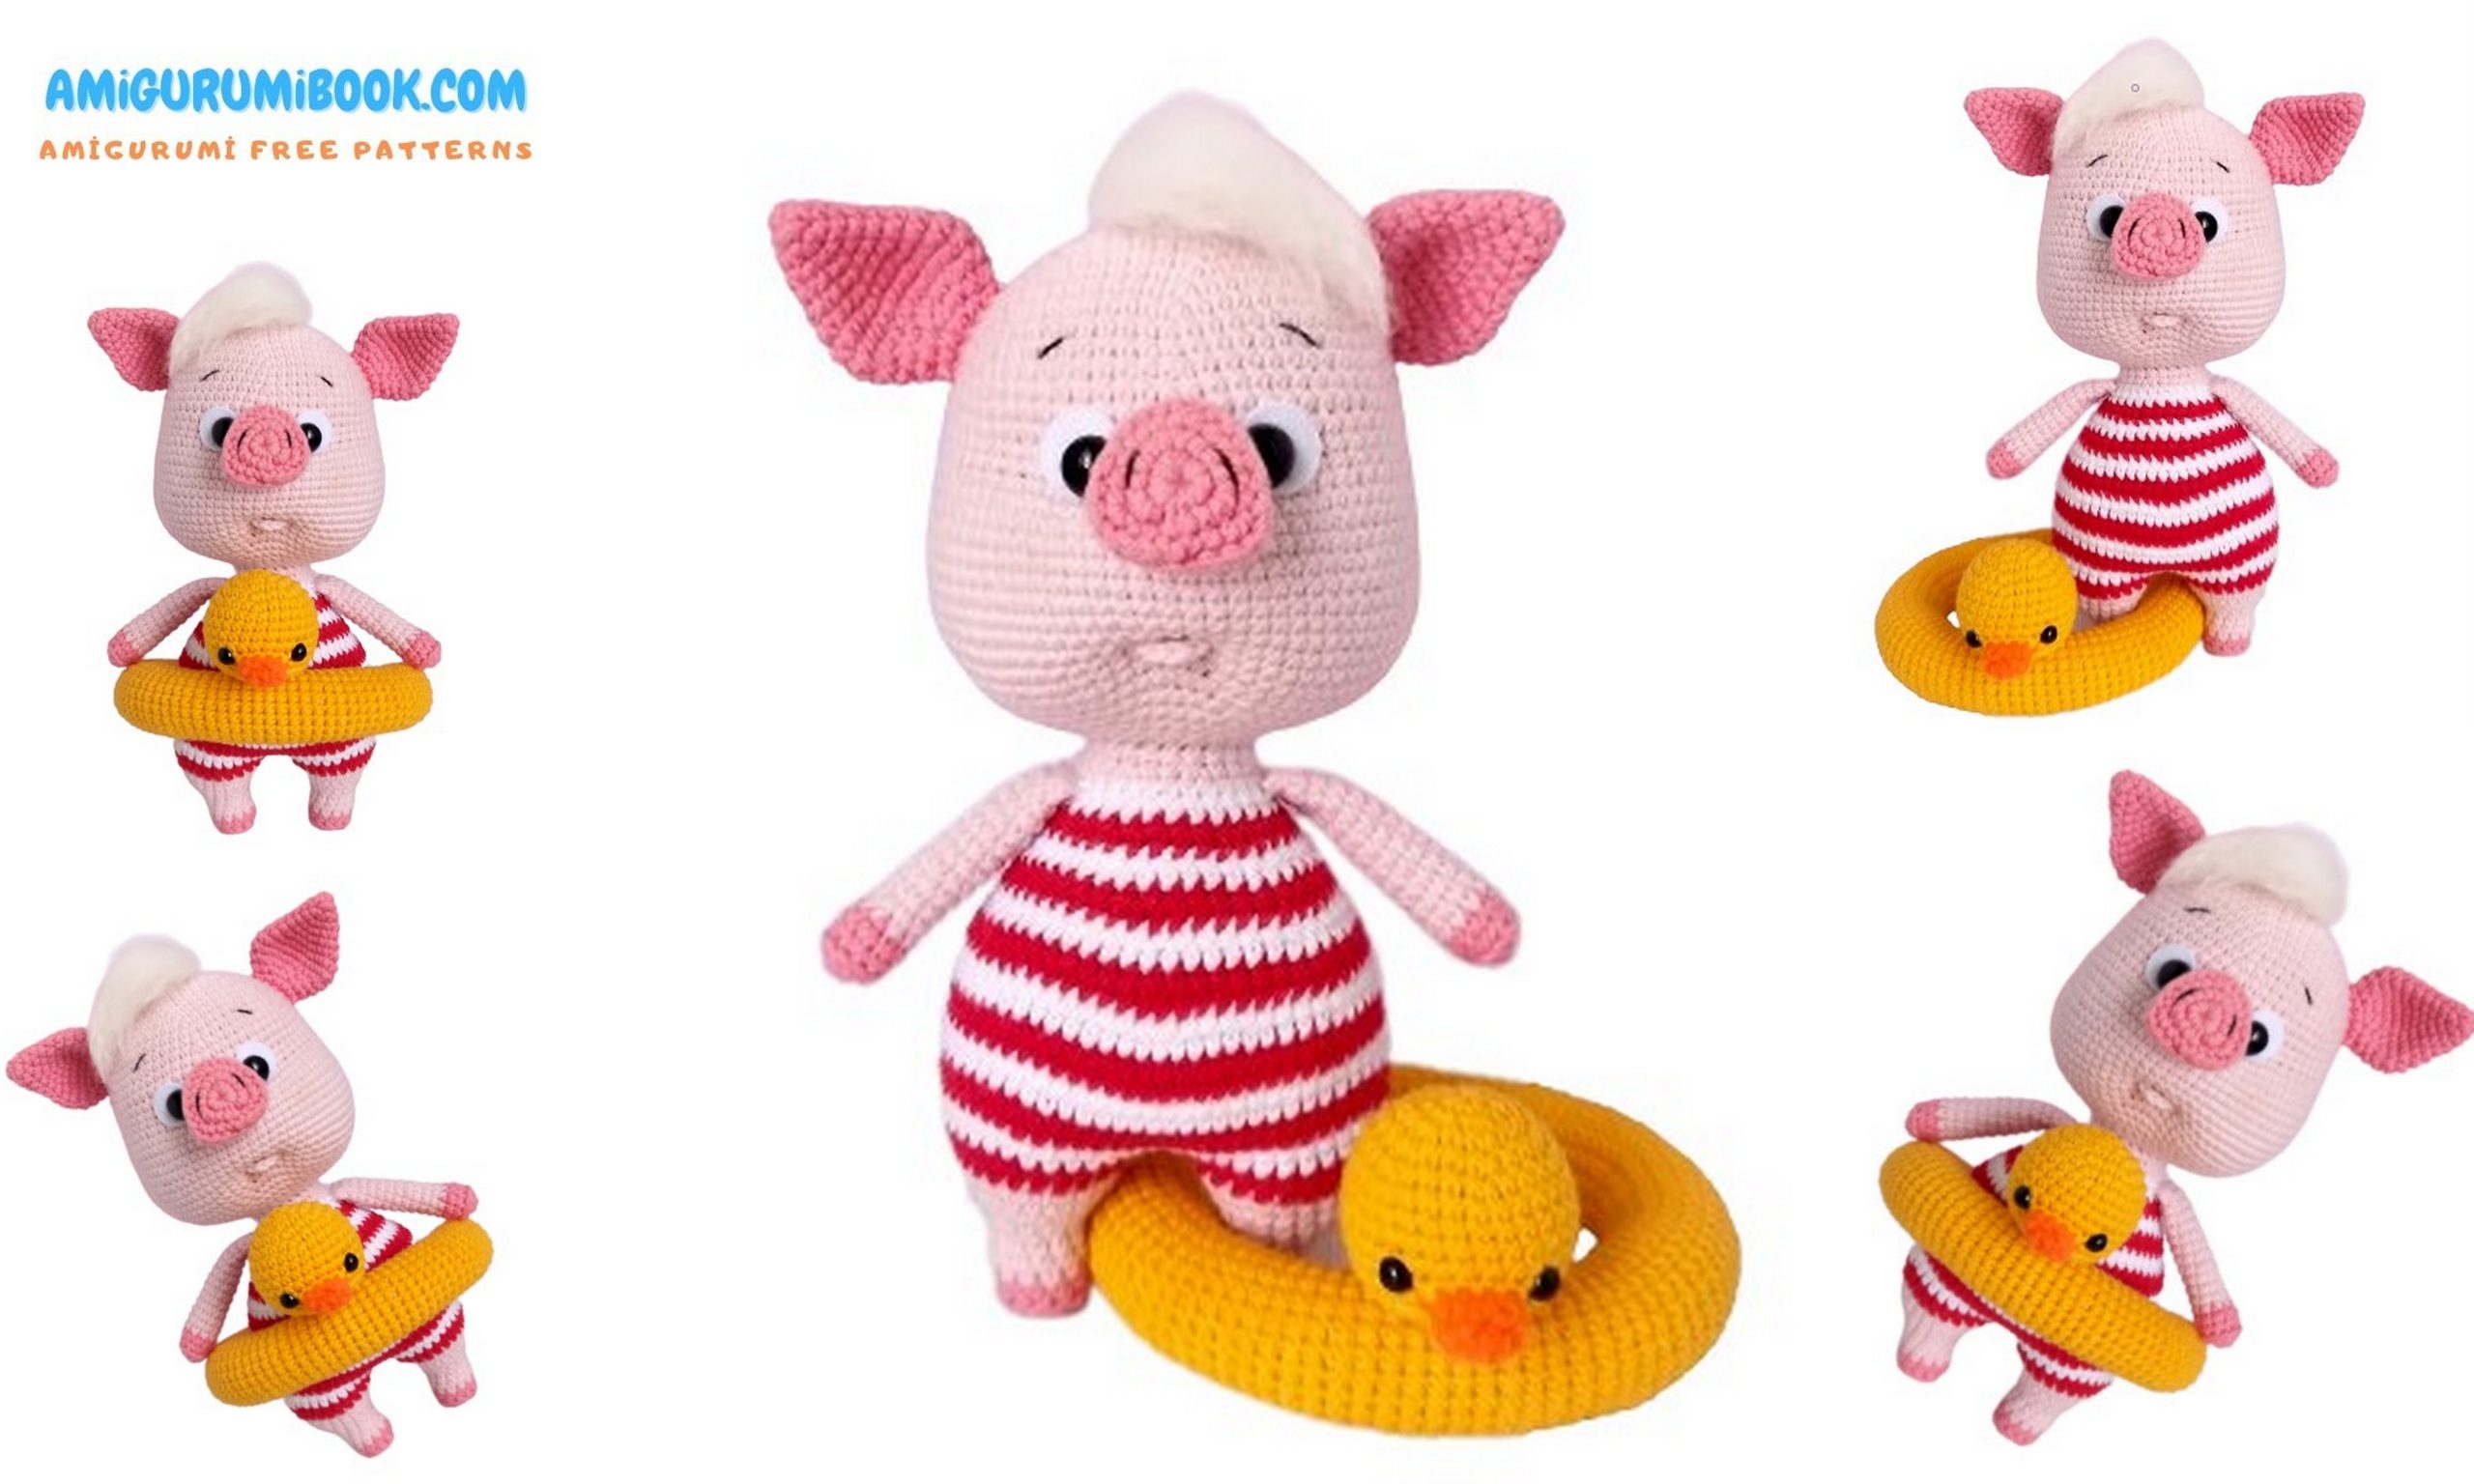
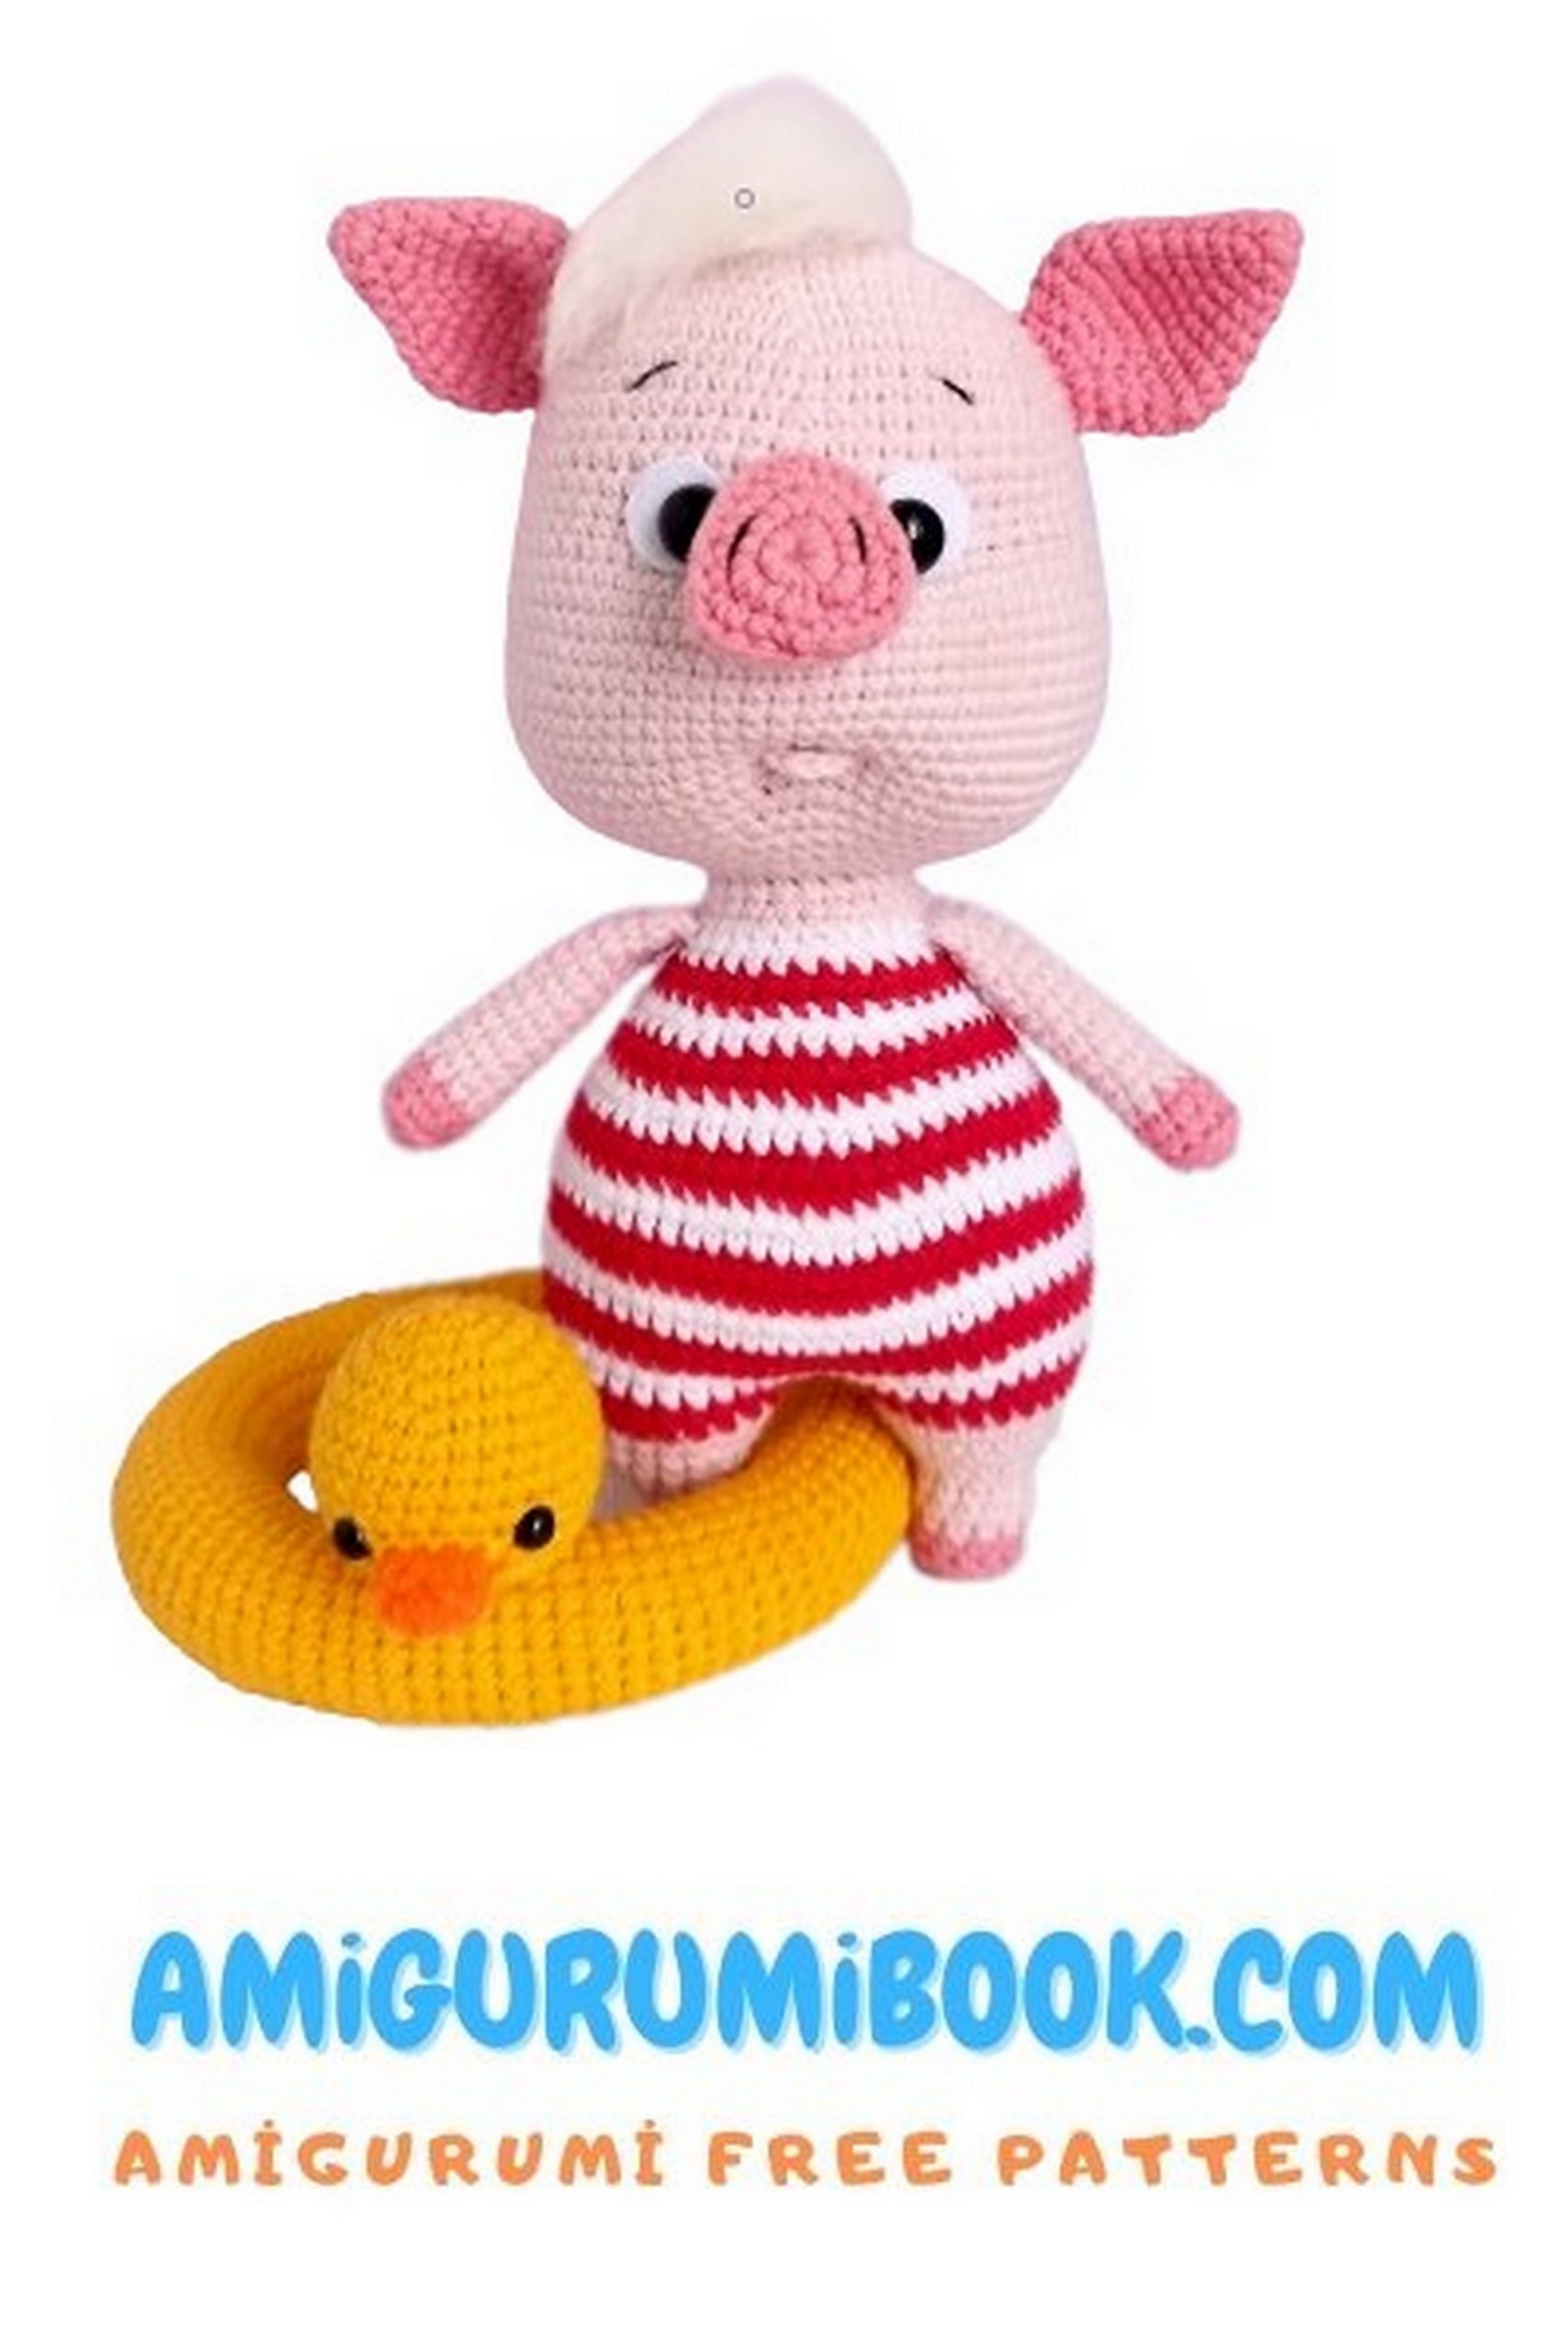
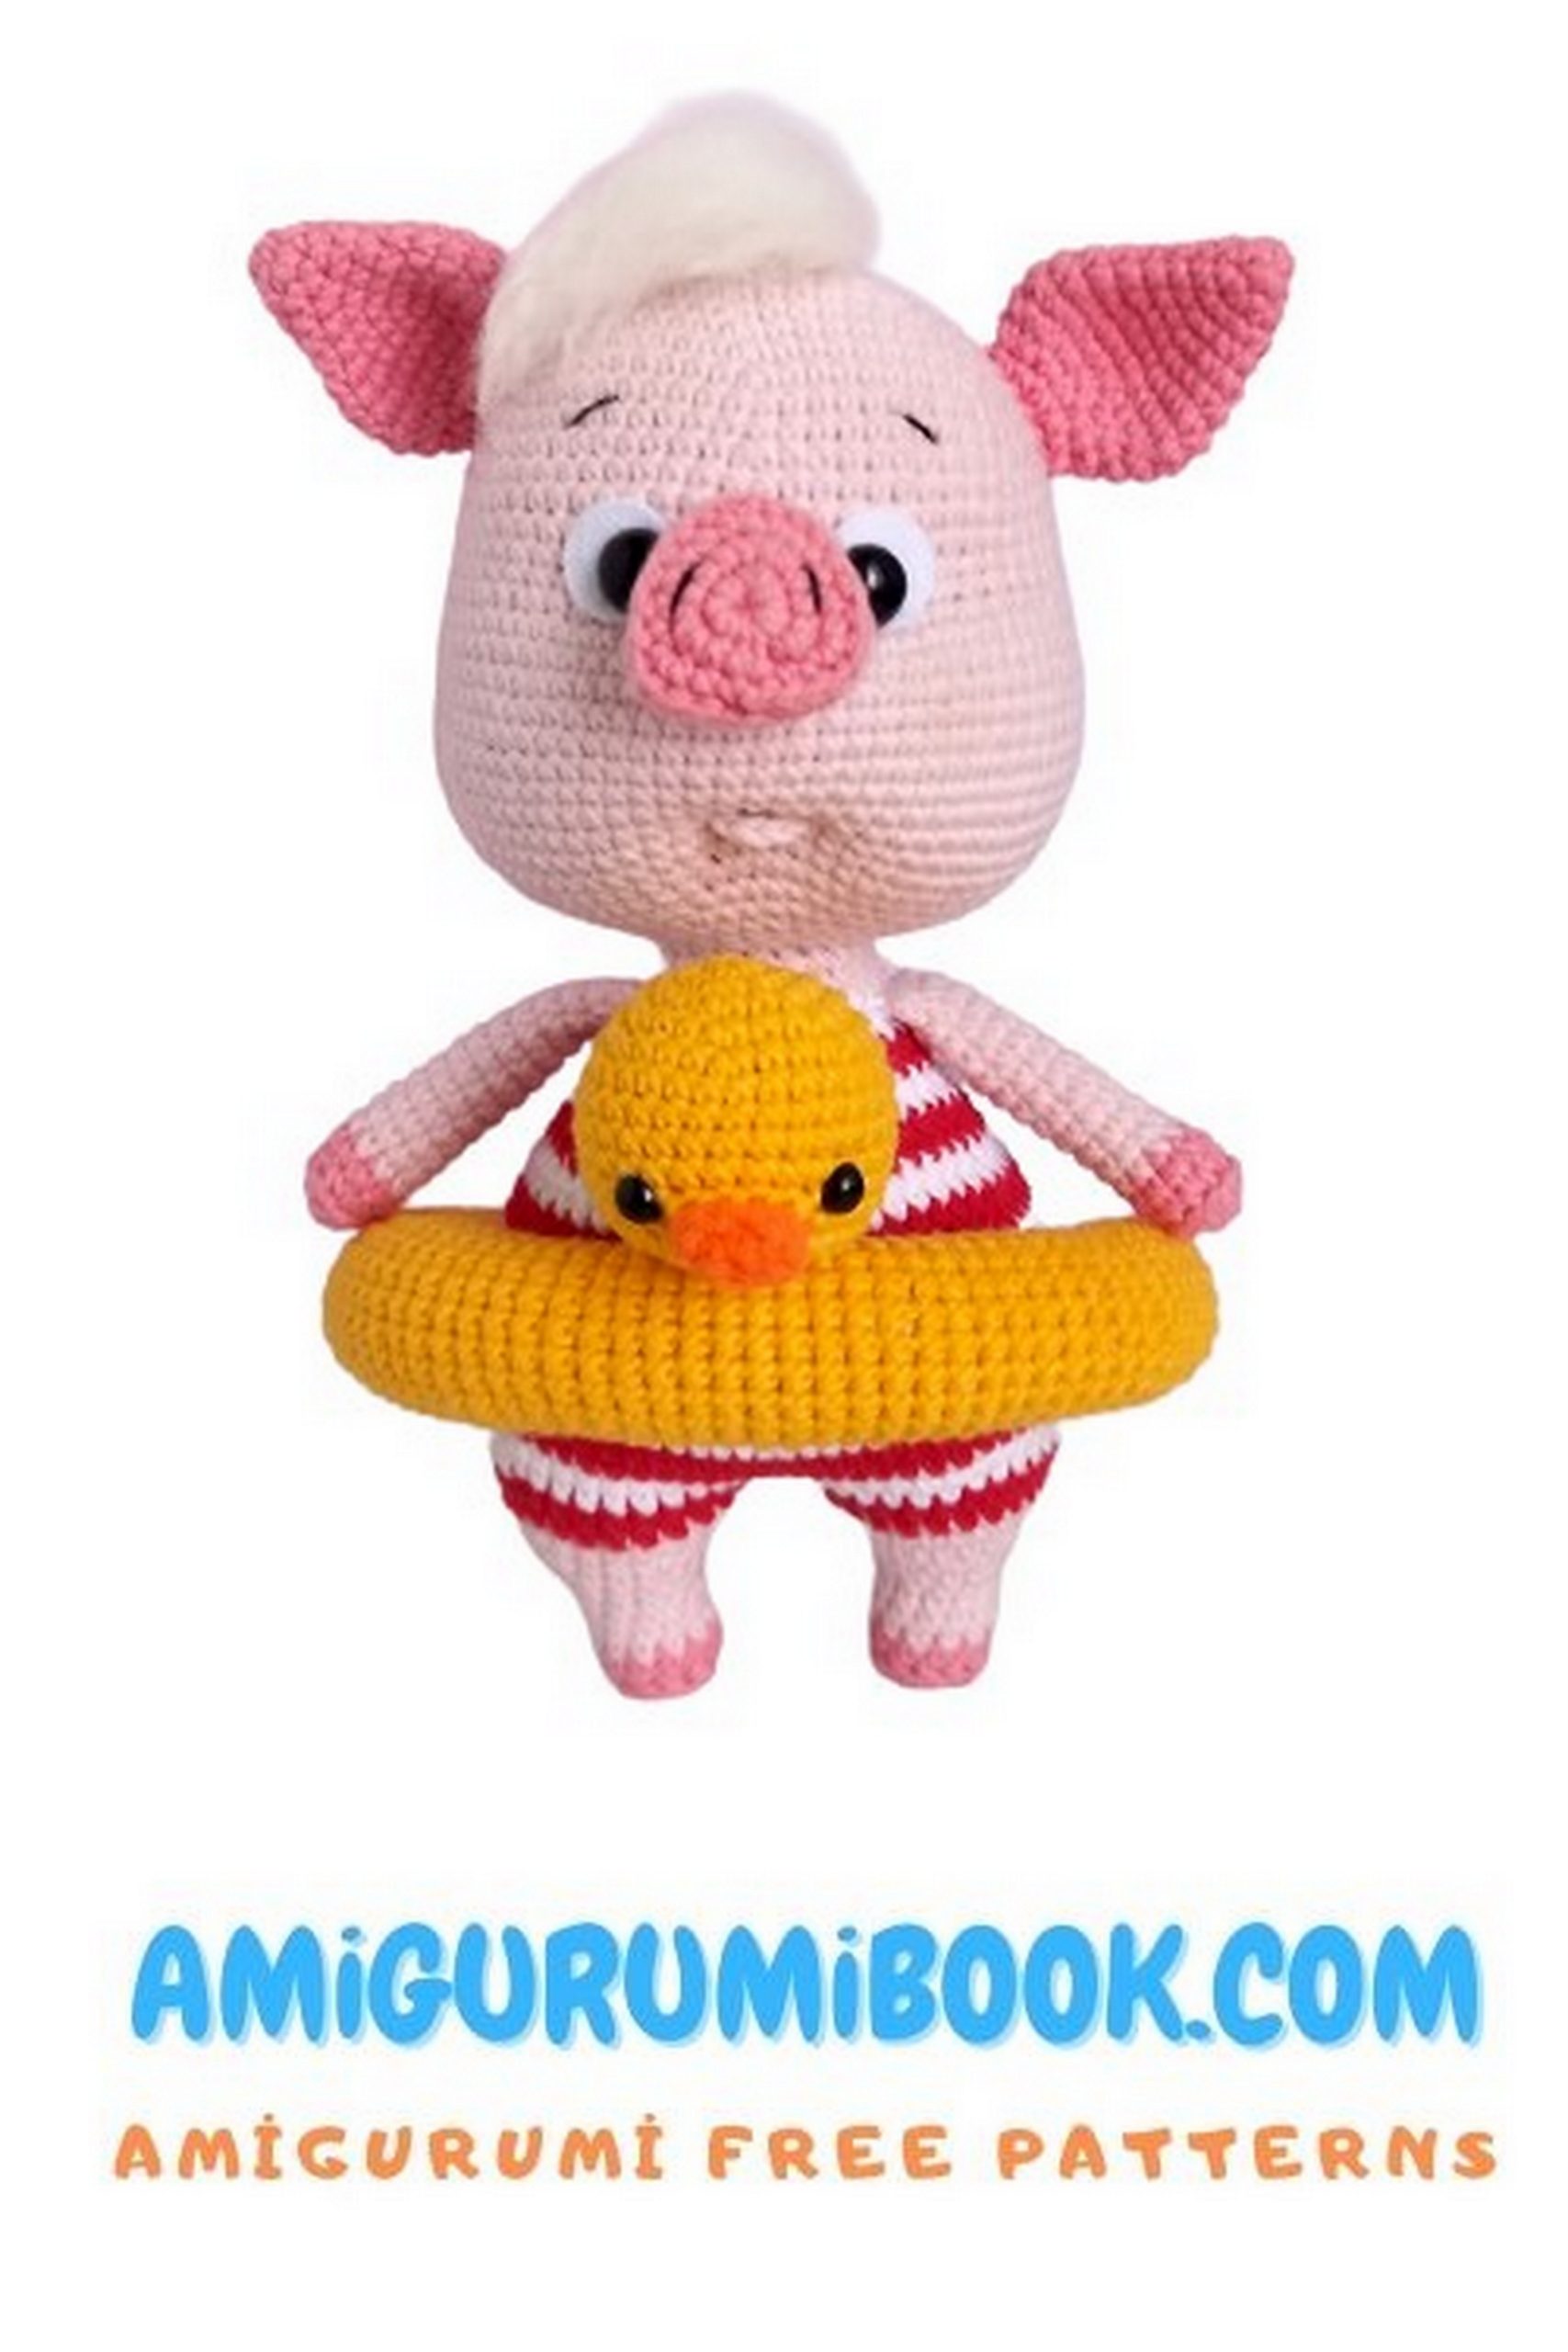
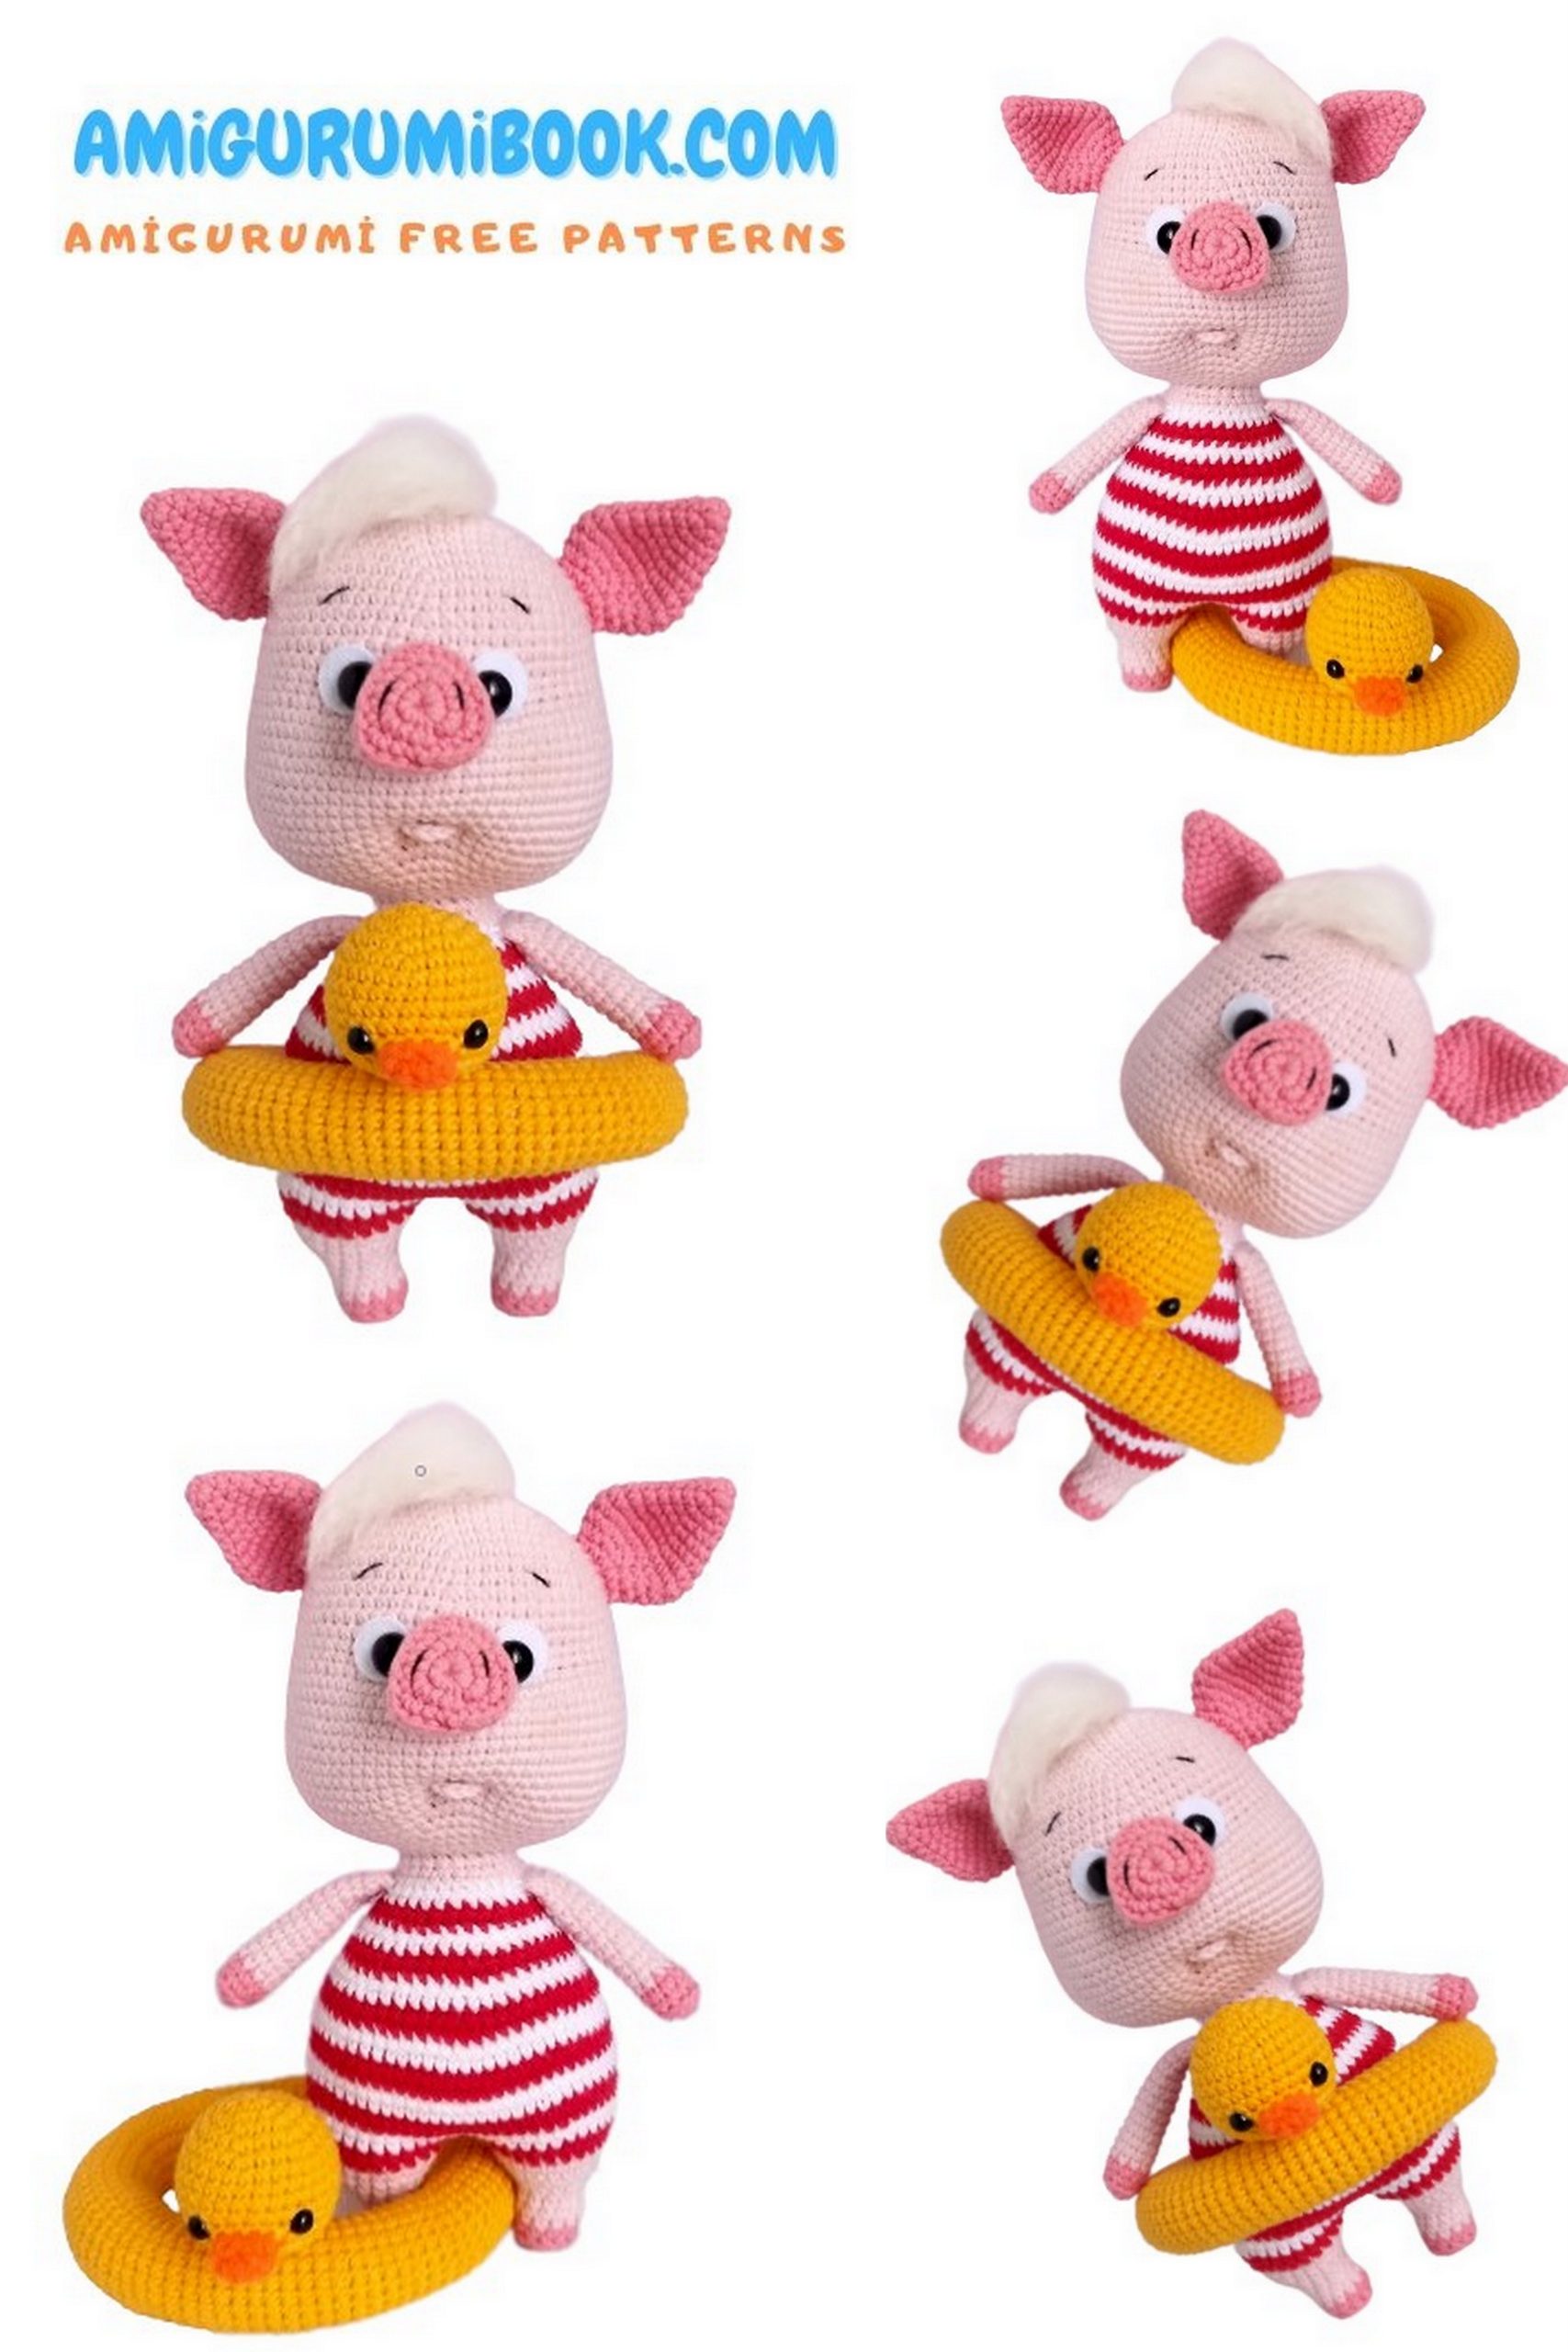
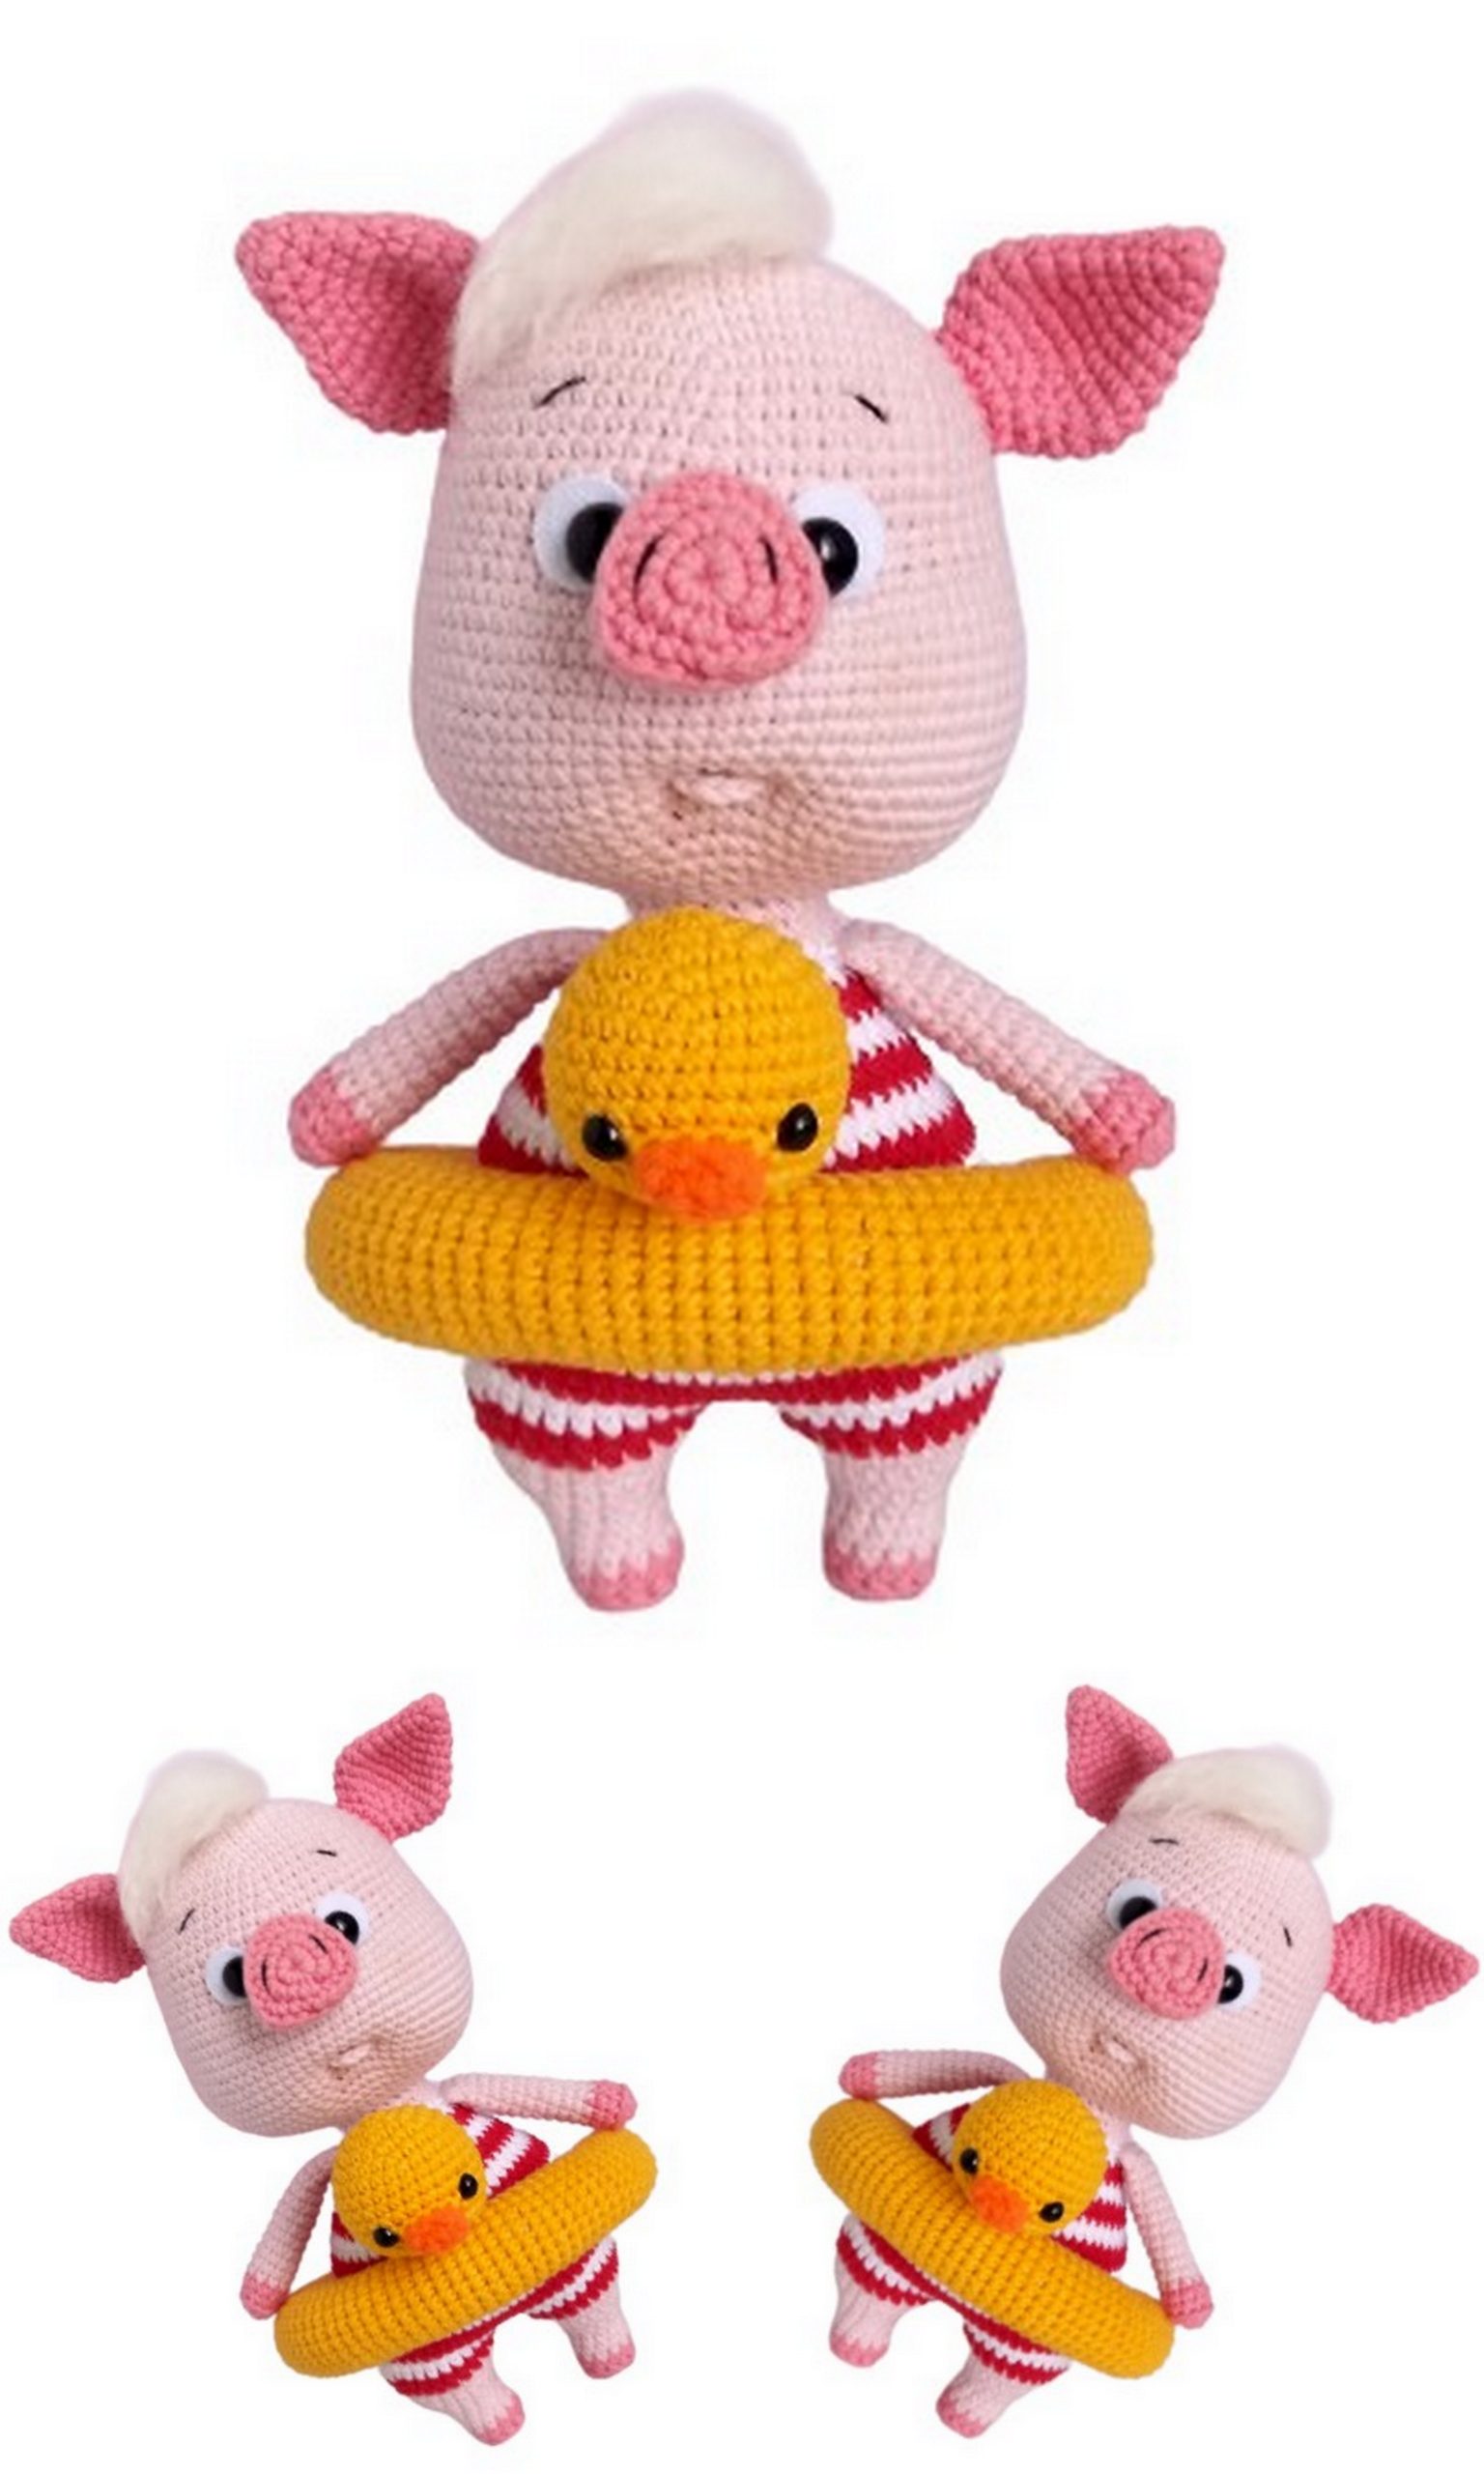
Discover the joy of crafting with this Swimming Pig Amigurumi free pattern, perfect for creating your own adorable crochet toy. Whether you’re a beginner or an experienced crocheter, this charming project brings a playful touch to your handmade collection. free crochet patterns
You may also like more amigurumi patterns.
Discover the joy of creating your very own swimming pig amigurumi with this free crochet pattern. Whether you’re a beginner or an experienced amigurumi maker, this pattern will guide you through each stitch, allowing you to craft an adorable and huggable toy pig.
This swimming pig amigurumi is perfect for any animal lover or collector of cute handmade creations. Its cheerful expression and swimming pose will bring a touch of whimsy and charm to any space. Whether you decide to keep it for yourself or gift it to a loved one, this handmade toy will surely bring smiles and joy.
Follow the step-by-step instructions, from crocheting the body to adding the final details, and let your creativity shine as you choose colors and personalize your swimming pig amigurumi. Get started on this delightful project and create a one-of-a-kind toy that will be cherished for years to come.
This tutorial includes a complete description of the toy knitting process, including the lifebuoy, intermediate photos of the details.
The toy is crocheted from the bottom up, using “half-cross” stitches in a spiral (unless otherwise specified).
The arms and paws are crocheted separately and attached, while the tail is crocheted from the body. The head and ears are sewn on.
When using the specified materials, the finished toy will be approximately 20 cm tall.
Mark the beginning of each row with a contrasting thread, finer than the one used for crocheting the toy.
This pattern does not contain instructional tutorials and is intended for those who already have basic crochet skills.
This description is my original work and is absolutely FREE. You are free to use the toys created from this pattern as you wish. When posting photos of completed works, I would appreciate it if you credit me as the pattern author.
Sincerely,
Materials and Tools Needed:
- Crochet hook suitable for your yarn.
- I used YarnArt JEANS yarn in color No. 18 for the main body, No. 78 for the ears, hooves, and paws, No. 90 and No. 62 (or No. 1) for the swimsuit. For the lifebuoy, I used No. 35 and No. 77. Feel free to choose any yarn of appropriate colors according to your preference.
- For the bangs, a small piece of acrylic yarn in your chosen color. I used “Det’skaya Novinka” by “Pekhorka” in a milk color.
- A small amount of black or dark brown thread for facial details. Choose a thinner thread than the main one used for the toy. I used “Azhurnaya” by “Pekhorka” in No. 02 (black, 280 m/50 g). Do not use the full thickness of YarnArt JEANS for embroidery, as it will look coarse on the face. You can split it into thinner strands.
- Stuffing.
- 10 mm safety eyes with fasteners, or sew-on or adhesive eyes (beads or half-beads, as per your preference).
- White felt circles with a diameter of 15 mm for the whites of the eyes.
- Strong thread for tightening.
- Needle for sewing the details, scissors, pins, marker thread, comb or “velcro” for combing the bangs.
Abbreviations:
Mr. – amigurumi ring
sc – single crochet
ch – chain
inc – increase
dec – decrease
ss – slip stitch
(…)*X – repeat the action in parentheses X times
The number after the equals sign (=) indicates the final stitch count in the row.
PATTERN
Arms:
Start crocheting with color No. 78.
Row 1: 5 sc in a magic ring.
Row 2: 5 inc = 10.
Row 3: 10 sc through the back loops.
Row 4: 10 sc.
Switch to color No. 18.
Rows 5-16: 10 sc.
Crochet 1-2 additional stitches so that the color change is on the inside when attaching to the body.
Slightly stuff the arms, mainly the lower part. Fold in half and crochet 5 sc through both sides. Secure and cut the yarn. We will crochet the paws next.
Hooves:
Start crocheting with color No. 78.
Leave a yarn tail of about 30 cm.
Row 1: 12 sc in a magic ring.
Row 2: (3 sc in one stitch, 3 sc)*3 = 18.
Row 3: 2 sc, (3 sc in one stitch, 5 sc)*2, 3 sc in one stitch, 3 sc = 24.
From the wrong side of the piece, thread the yarn tail remaining after the initial stitches into a needle and sew several stitches around the first row in a circle to tighten the ring and eliminate any gaps.
Row 4: 24 front post double crochet stitches (or 24 sc through the back loops).
Row 5: 24 sc.
Switch to color No. 18.
Row 6: 24 sc.
Row 7: dec 12 times = 12.
Fasten off and cut the yarn.
Head:
Crochet with light pink yarn (No. 18).
Row 1: 6 sc in a magic ring.
Row 2: 6 inc = 12.
Row 3: (1 sc, inc)*6 = 18.
Row 4: (2 sc, inc)*6 = 24.
Row 5: (3 sc, inc)*6 = 30.
Row 6: (4 sc, inc)*6 = 36.
Row 7: (5 sc, inc)*6 = 42.
Row 8: (6 sc, inc)*6 = 48.
Row 9: (7 sc, inc)*6 = 54.
Row 10: (8 sc, inc)*6 = 60.
Rows 11-12: 60 sc.
Row 13: (9 sc, inc)*6 = 66.
Rows 14-18: 66 sc.
In the next row, we will crochet the cheeks and attach the hooves.
Find the top opposite to the side where the nose ends. This will be the top. Identify and mark the 2 central stitches on the top. When crocheting the hooves in row 19, they will be the 3rd and 4th stitches out of 6. Turn the hooves with the top away from you.
Row 19: 18 sc, (1 sc, inc)*6, 6 sc with 6 nose stitches, (inc, 1 sc)*6, 18 sc = 78.
Row 20: 36 sc, 6 sc on the remaining nose stitches, 36 sc = 78.
Slightly stuff the nose.
Rows 21-30: 78 sc.
If you are using safety eyes, install them at this stage, between rows 17 and 18, with 7-8 sc between the placements (center the eyes relative to the nose).
Take felt circles, fold them carefully without creases, and make small incisions, slightly offset from the center toward the edge. Turn the circles and make perpendicular incisions (creating a cross shape). Insert the eyes into the incisions and secure them on the fabric.
Later, after tightening, you can securely fix the felt with glue.
Row 31: (11 sc, dec)*6 = 72.
Row 32: (7 sc, dec)*8 = 64.
Row 33: (6 sc, dec)*8 = 56.
Row 34: (5 sc, dec)*8 = 48.
Row 35: (4 sc, dec)*8 = 40.
Row 36: (3 sc, dec)*8 = 32.
Row 37: (2 sc, dec)*8 = 24.
Stuff the head firmly but not excessively.
Take into account that there will be tightening. Secure and hide the yarn end inside.
Ears:
Row 1: 6 sc in a magic ring.
Row 2: (1 sc, inc)*3 = 9.
Row 3: 9 sc.
Row 4: (2 sc, inc)*3 = 12.
Row 5: (3 sc, inc)*3 = 15.
Row 6: (4 sc, inc)*3 = 18.
Row 7: (2 sc, inc)*6 = 24.
Row 8: (3 sc, inc)*6 = 30.
Row 9: 30 sc.
Row 10: (3 sc, dec)*6 = 24.
Row 11: (2 sc, dec)*6 = 18.
Row 12: (1 sc, dec)*6 = 12.
Row 13: 1 sc, fold in half, crochet 6 sc through both sides of the ear.
Fasten off, leaving a yarn tail of about 45-50 cm for sewing. Cut the yarn.
Legs:
Start crocheting with color No. 78.
Row 1: 6 sc in a magic ring.
Row 2: 6 inc = 12.
Row 3: 12 sc through the back loops or front post double crochet.
Row 4: 12 sc.
Switch to color No. 18.
Rows 5-8: 18 sc.
Row 9: (1 sc, inc)*6 = 18.
Row 10: 18 sc.
Row 11: (2 sc, inc)*6 = 24.
Row 12: 24 sc.
Temporarily secure and cut the yarn on the first leg, leaving about 20 cm. For the second leg, don’t cut the yarn yet. Place the two pieces side by side and determine the degree of offset between the stitches. The color change points should be facing each other and slightly shifted backward. On the first leg, the offset is as desired, but on the second leg, I crocheted an additional 4 sc. Note that your degree of offset may differ from mine. In this case, adjust the number of additional stitches accordingly. Crochet 4 sc on the first leg as well. Do this to ensure that the pieces are the same height. Now you can secure and cut the yarn short. Remove the stitch markers. Count back the additional stitches you added on the first leg (in my case, it’s 4). This is the joining point of the first and second pieces.

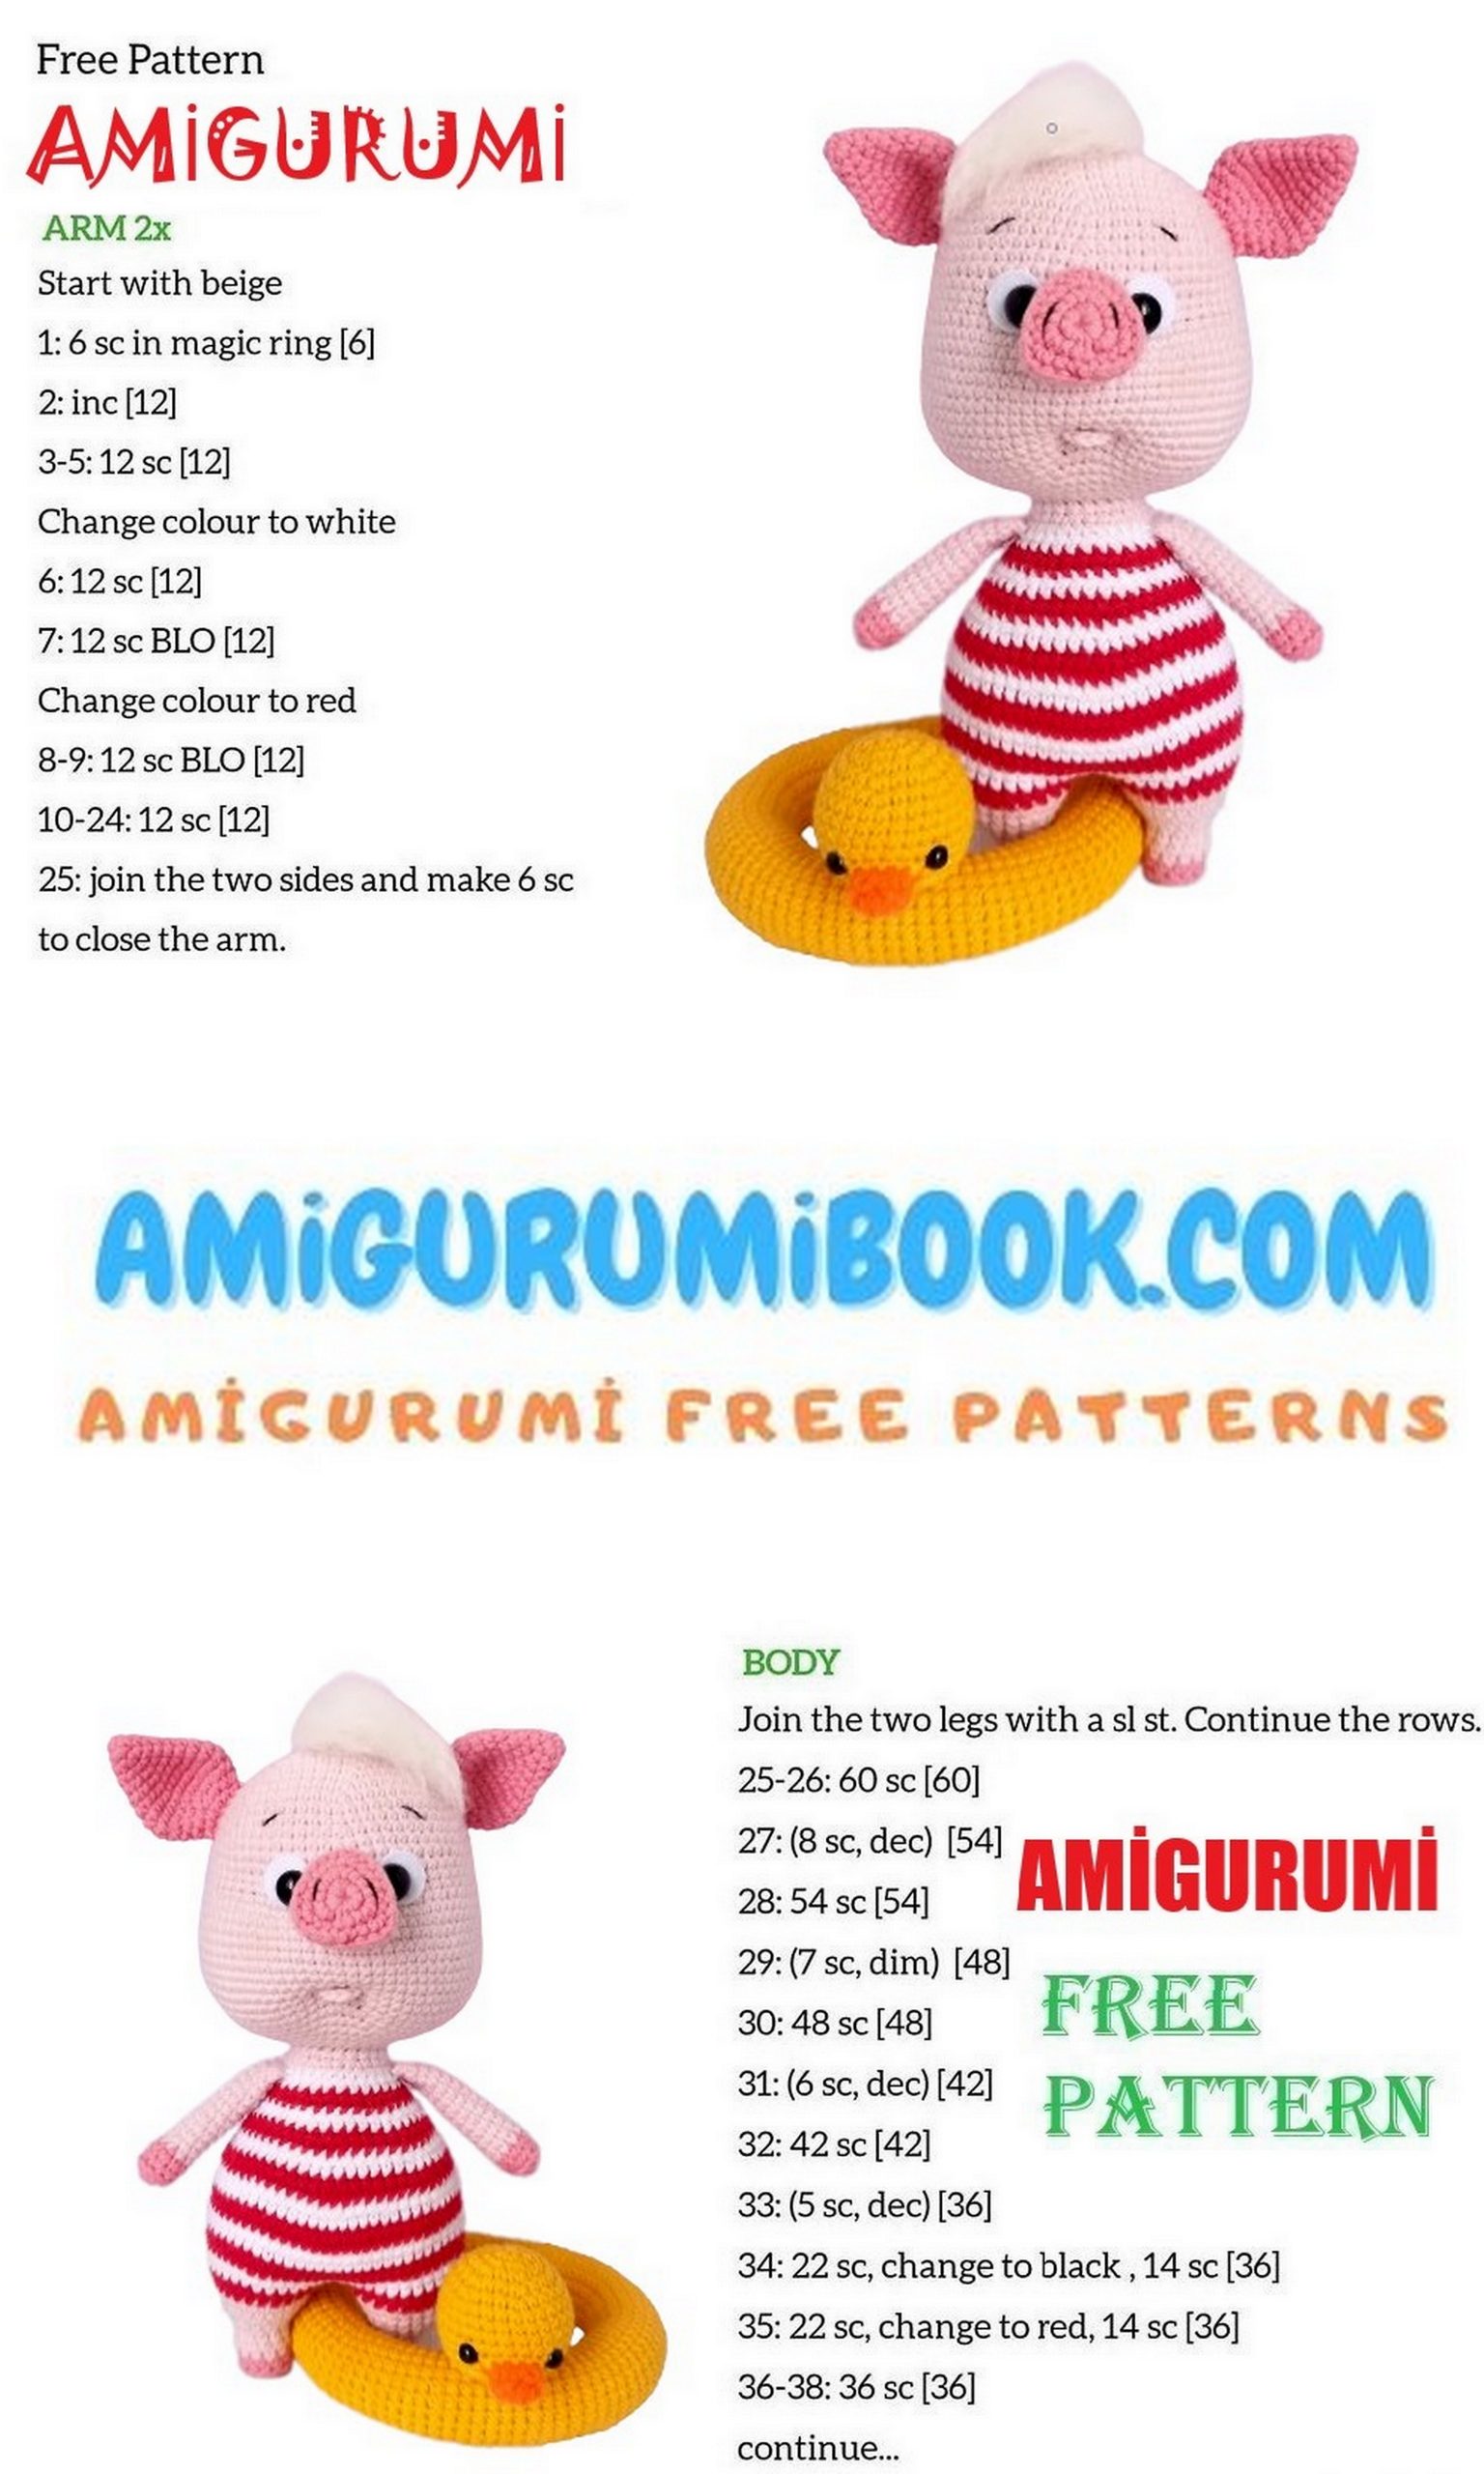
Body:
If you’re making a striped swimsuit, you don’t need to use a stitch marker. It will be easy to orient yourself when changing colors. However, if you’re making a solid-colored swimsuit or using variegated yarn, it’s better to use a stitch marker.
Stuff the body firmly during the crocheting process.
Attach the red yarn for the swimsuit (No. 90) and cut the pink yarn. Crochet a chain of 3 ch and join the legs.
Row 1: 24 sc on the first leg, 3 sc on the chain, 24 sc on the second leg, 3 sc on the chain. Total number of stitches in the row = 54.
Row 2: (8 sc, inc)*6 = 60.
From now on and throughout, alternate colors every 2 rows. Switch to white yarn (I’m using No. 62).
Row 3: 60 sc.
Row 4: (9 sc, inc)*6 = 66.
Switch to red yarn.
Rows 5-6: 66 sc.
Switch to white yarn.
Rows 7-8: 66 sc.
Switch to red yarn.
Rows 9-10: 66 sc.
Switch to white yarn.
Row 11: 66 sc.
Row 12: (9 sc, dec)*6 = 60.
Switch to red yarn.
Row 13: 60 sc.
Row 14: (8 sc, dec)*6 = 54.
Switch to white yarn.
Row 15: 54 sc.
Row 16: (7 sc, dec)*6 = 48.
Switch to red yarn.
Row 17: 48 sc.
Row 18: (6 sc, dec)*6 = 42.
Switch to white yarn.
Row 19: 42 sc.
Row 20: (5 sc, dec)*6 = 36.
Switch to red yarn.
Row 21: 36 sc.
Row 22: (4 sc, dec)*6 = 30.
Switch to white yarn.
Row 23: 30 sc.
In Row 24, we will crochet the upper paws. Stuff the main part of the body tightly but not completely. Leave about 1 cm so that it’s convenient to crochet the paws and the stuffing doesn’t get caught between the stitches. Determine the joining points strictly on the sides: 5 sc together with the paws, and 10 sc between them.
Based on my offset, it looks like this:
Row 24: 8 sc, 5 sc together with the paw, 10 sc, 5 sc together with the paw, 2 sc = 30.
Switch to the body color, No. 18.
Row 25: 30 sc.
Row 26: (3 sc, dec)*6 = 24.
Row 27: 24 sc.
Crochet a few more stitches (for me, it’s 2 sc and a slip stitch in the next stitch), secure the yarn at the back through the center of the back. Leave about 50 cm for sewing the head. Remove the stitch marker (if used). Stuff the piece tightly until the end. When sewing the head, remember to push the stuffing towards the neck. For convenience, you can secure the head to the body with two pins.
Sew the head to the body.
Shaping:
We will shape the mouth and eye sockets with tightening. Mark 6 points on the face with pins.
Determine the center of the face. You can do this by placing a thread, needle, or hook down from the center of the nose. Mark the points between rows 29 and 30.
There are 2 sc between the pins. These are points 1 and 6.
Between rows 18 and 19, mark 4 more points (2, 3, 4, 5) close to the outer and inner corners of the eyes, near each eye.
Insert the needle at point 1, leave an end of the thread about 25-30 cm long, and pull it out at point 2. Then insert the needle at point 3 and pull it out at point 6. Adjust the thread so that it goes under the eye and felt circle, tighten, and tie two knots. Without cutting the thread, insert it at point 6, pull it out at point 5, then insert it at point 4 and pull it out at point 1. Tighten, tie a couple of knots, and hide the threads inside the head with a few securing stitches.
Knot the ends and areas where the threads are inserted and drawn out can be neatly coated with transparent universal glue. I use “Moment Crystal”.
Lower Lip:
Leave a thread tail of about 30 cm, make 6 sc in a magic ring, pull tight. Leave a thread tail of about 40-45 cm, cut the yarn. You will have a piece that resembles a semicircle.
Try the piece and attach it 2-3 rows below the mouth indentation. Secure the middle of the lip slightly below the edges. When sewing, the tension of the thread should be moderate. Do not pull too tight. Take the central thread (left when starting in the magic ring) and insert it into the back of the head at a distance of one row from the center of the magic ring, make a stitch through a row to the center of the magic ring inside the head. You can repeat this process. Make the stitch tight but not too tight. Hide the thread inside the toy with a few entangling stitches.
Use the second thread tail to secure both ends of the lip. Make stitches up and down. Draw the thread out at the nose attachment point (between rows 18 and 19). Due to the stuffing, they will be hidden there.
Attach the Ears:
Sew the upper part of the ears at the level between rows 9 and 10 from the top of the head. The distance between the ears in row 10 is 30 stitches (including increases counted as 2 stitches). So, there are 14 stitches on each side of the center of the face.
Tail:
Crochet the tail directly from the body of the toy. Determine the position, insert the hook and make 7-8 chain stitches. Go back and crochet 2 sc in each chain stitch. Continue until you reach the base, tie a couple of knots, and hide the threads inside the toy.
Embroider the eyebrows and nostrils with a thin dark thread. Optionally, you can add shading on the cheeks, chin, and ears.
Hair:
For the hair, it is better to use acrylic yarn as it is easily styled. I attached the hair in the front half-rounds of rows 1 and 2, resembling tassels on a scarf. About 10-12 strands are enough. Determine the length of the hair before styling. Trim it if needed at this stage. After styling, cutting the hair will make it look rough and unnatural.
Lifebuoy:
For the lifebuoy, you can use different colors. You can make it multicolored, shaped like an animal, fruit, or berry. I decided to make a classic duck lifebuoy .
Start with a chain of 17 stitches using yellow yarn (No. 35), close it into a ring, and crochet a spiral tube. Stuff it as you go. Periodically try it on the waist of the toy until you reach the desired length and join the ends. Mine turned out to be about 28-29 cm.
Now let’s crochet the duck’s head. Start with the beak. Take orange yarn (No. 77).
Chain 5 stitches, starting from the second stitch from the hook, crochet:
Row 1: 4 sc on the first side and 4 sc on the second side of the chain = 8 stitches
Rows 2-3: 8 sc
Fasten off and cut the yarn.
For the head, use yellow yarn (No. 35):
Row 1: 6 sc in a magic ring
Row 2: 6 inc = 12 stitches
Row 3: (1 sc, inc)*6 = 18 stitches
Row 4: (2 sc, inc)*6 = 24 stitches
Row 5: (3 sc, inc)*6 = 30 stitches
Rows 6-9: 30 sc
In the next row, start crocheting the beak.
Row 10: 13 sc, 5 sc together with the beak, 12 sc = 30 stitches
Row 11: 13 sc, 5 sc in the remaining beak stitches, 12 sc = 30 stitches
Row 12: 30 sc
Row 13: (3 sc, dec)*6 = 24 stitches
Row 14: dec in all 12 stitches = 12 stitches
Row 15: dec in all 6 stitches = 6 stitches
Fasten off, leaving a thread tail for sewing, close the opening.
Embroider or attach the eyes and sew the head to the lifebuoy.
That’s it! Your Sugar Doll is ready for the beach!
I sincerely hope that you enjoyed both the process and the result.