
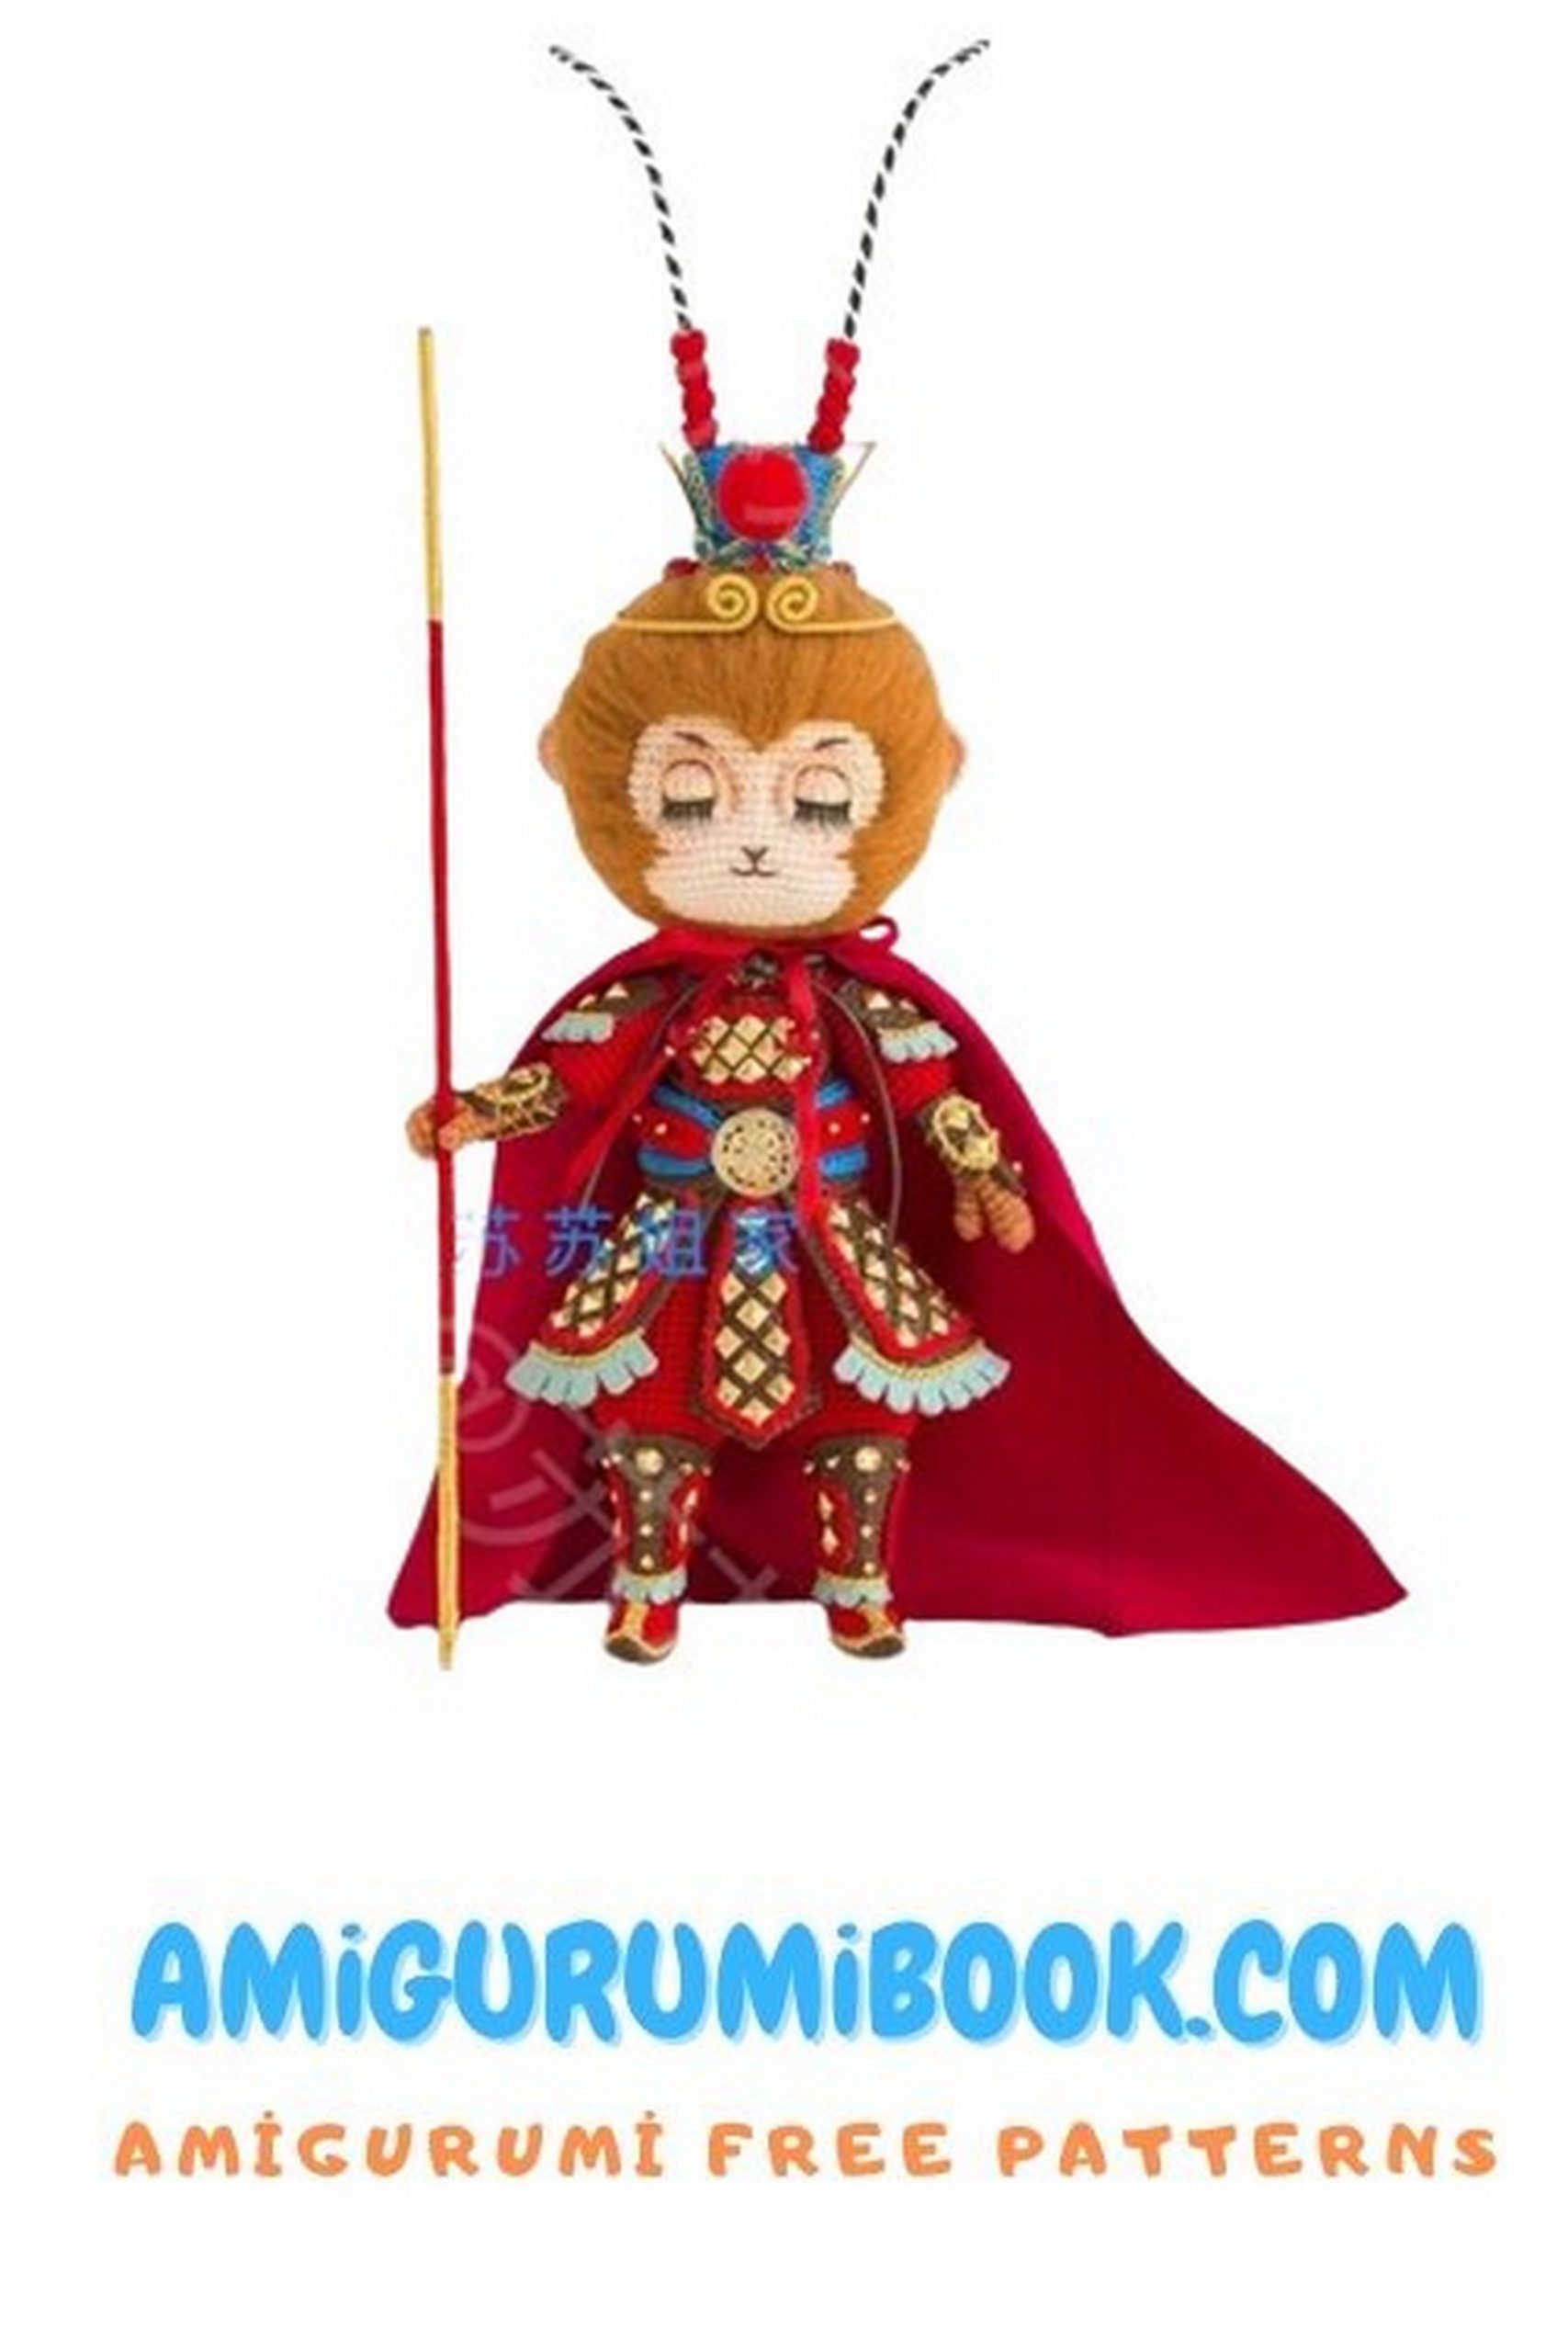
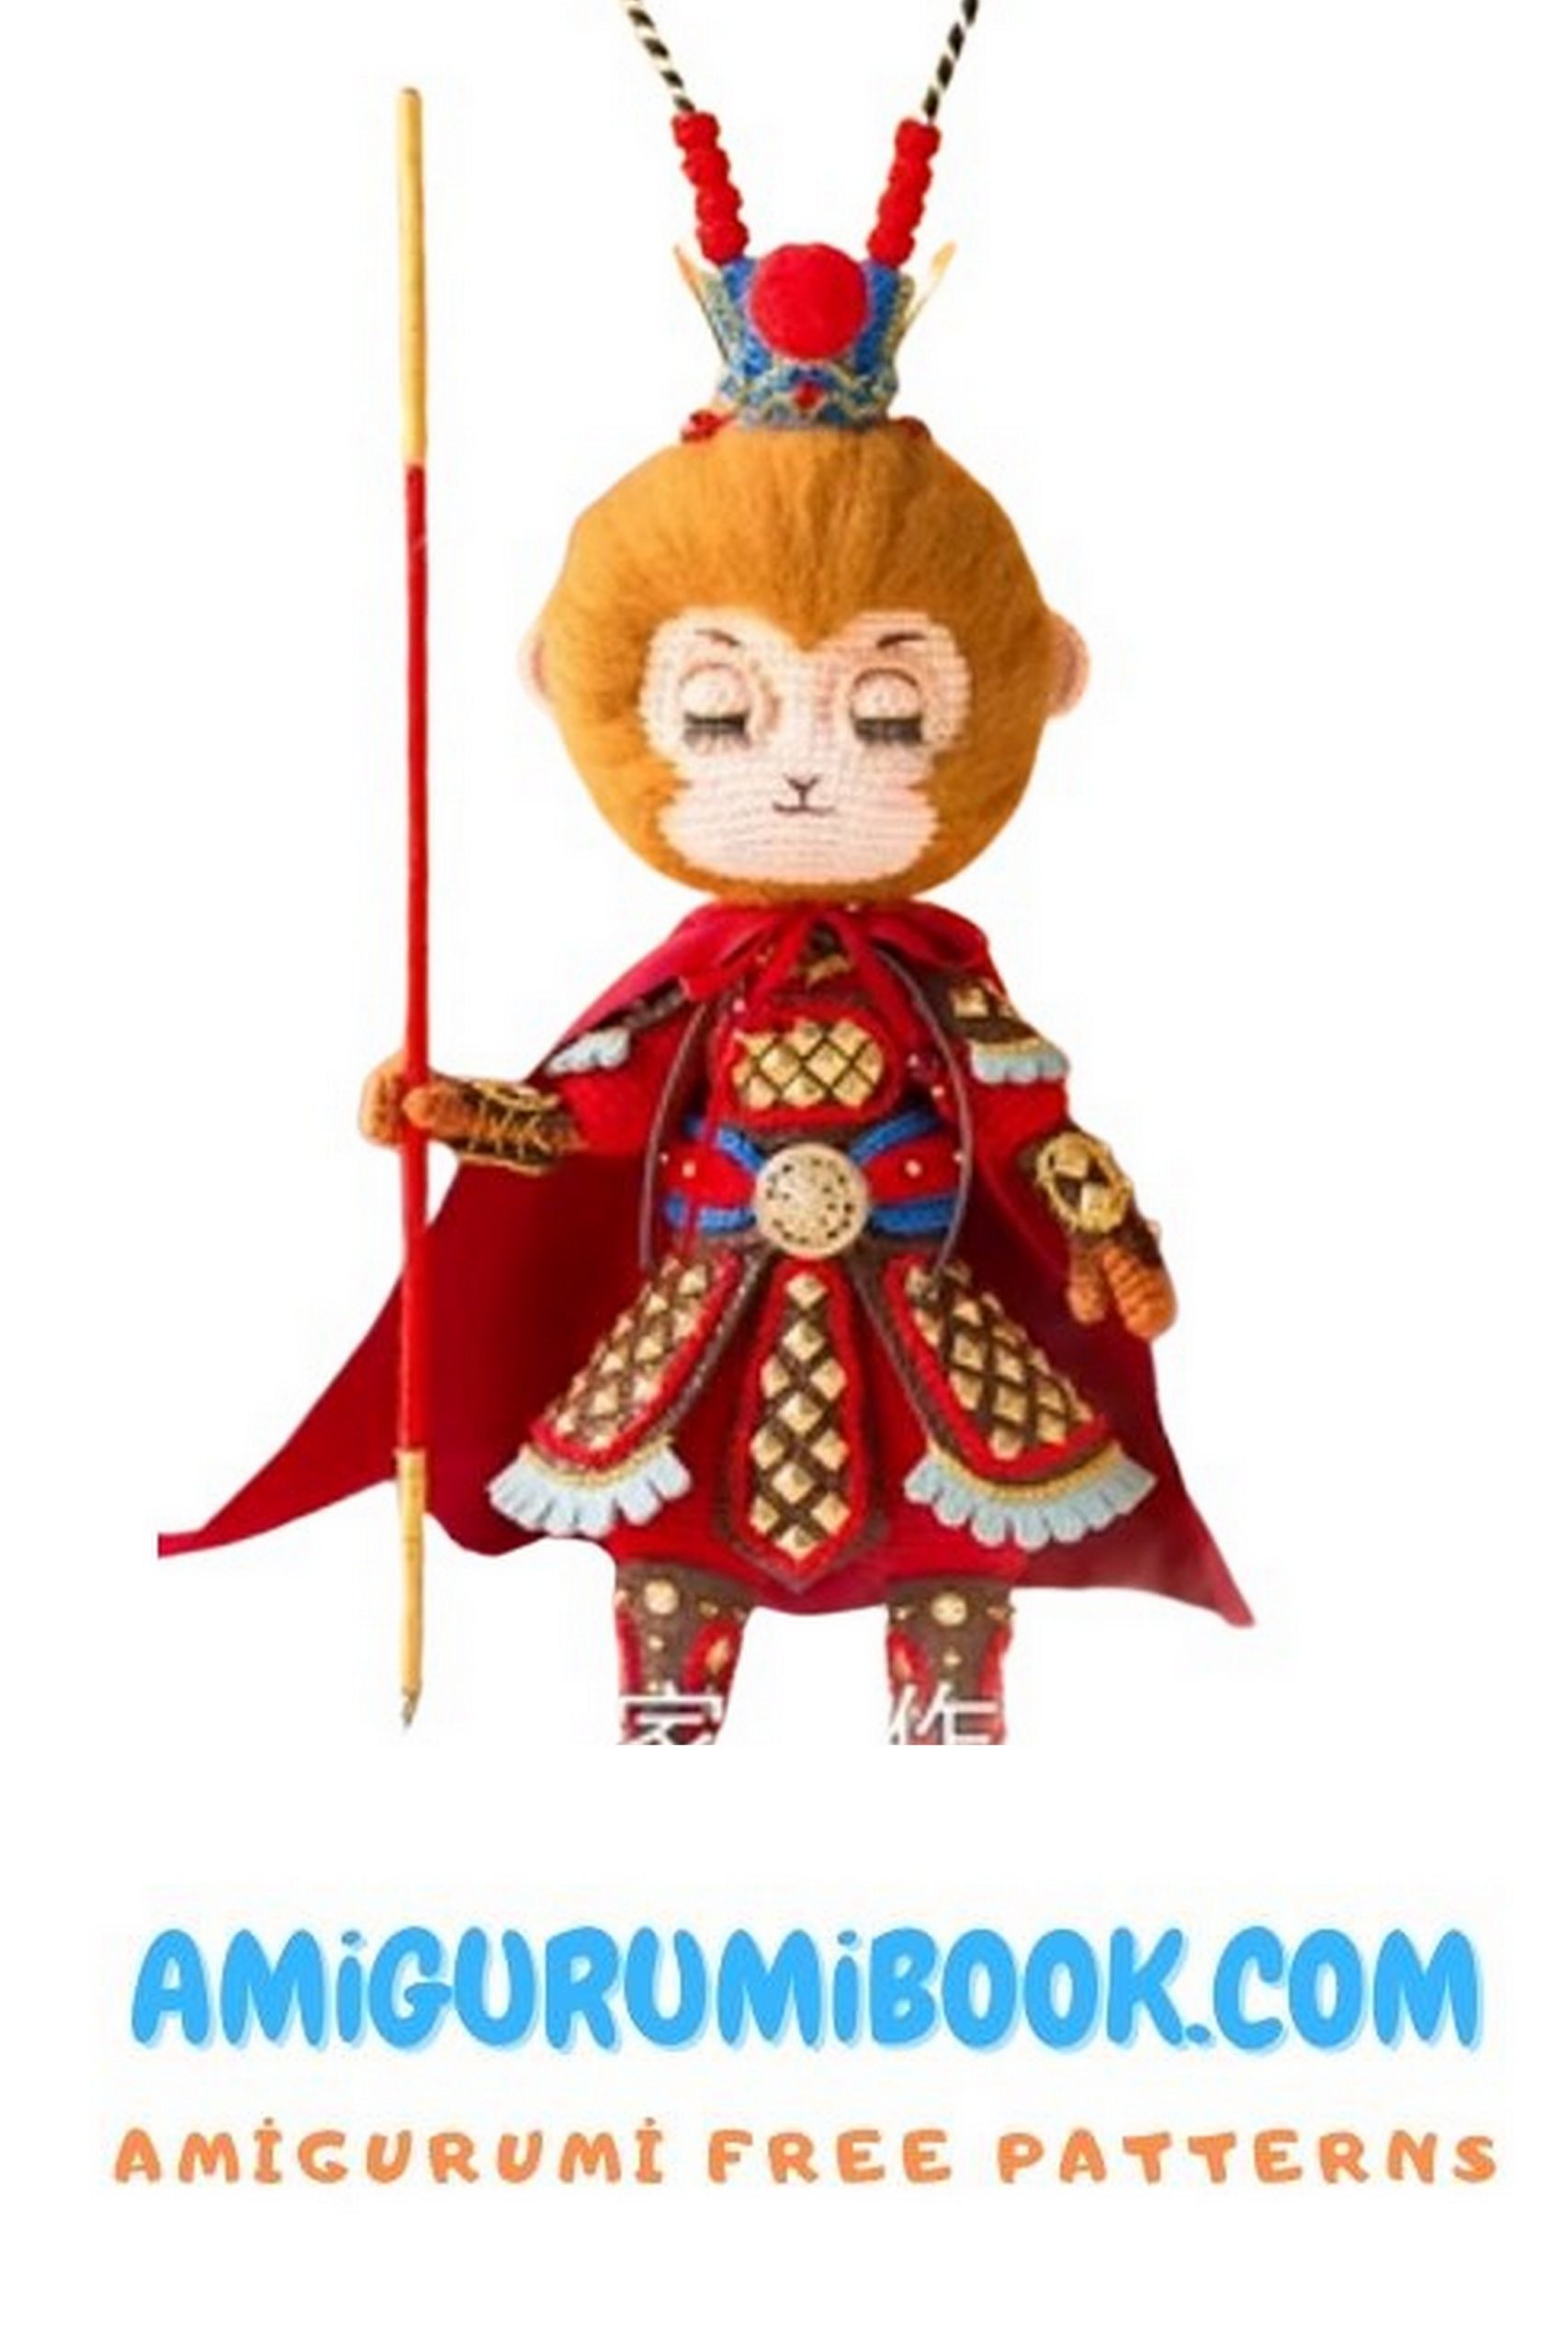
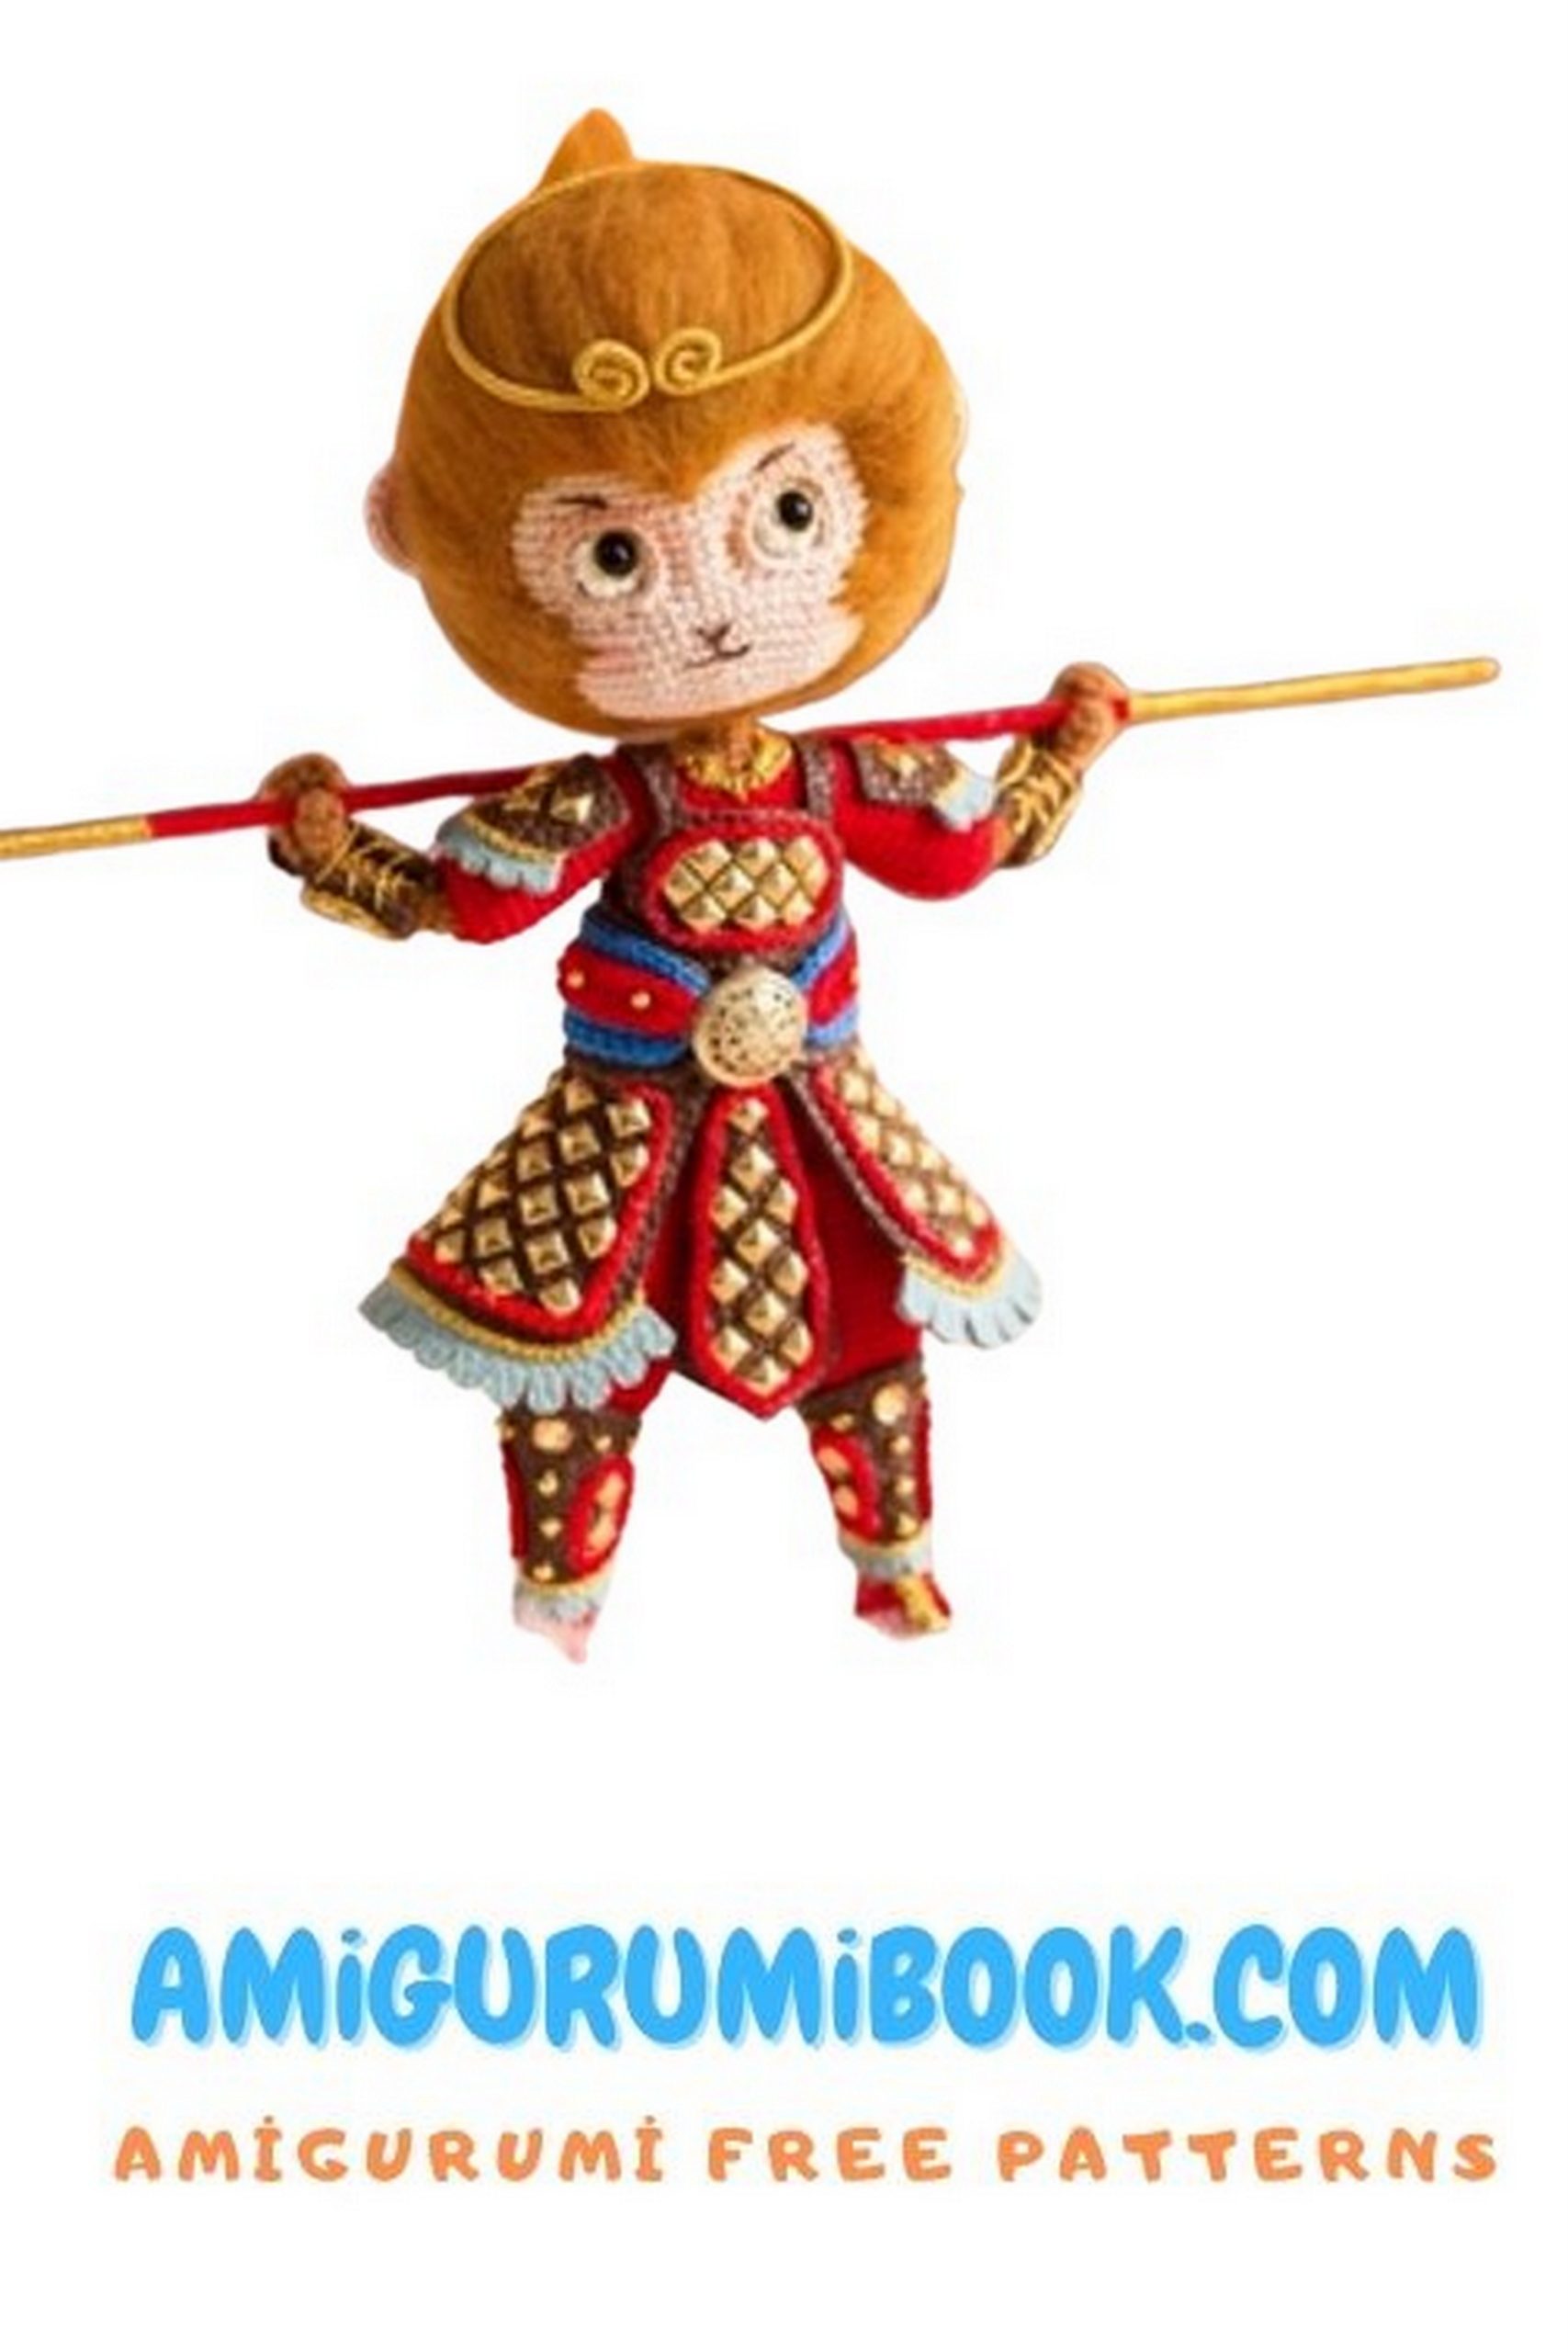
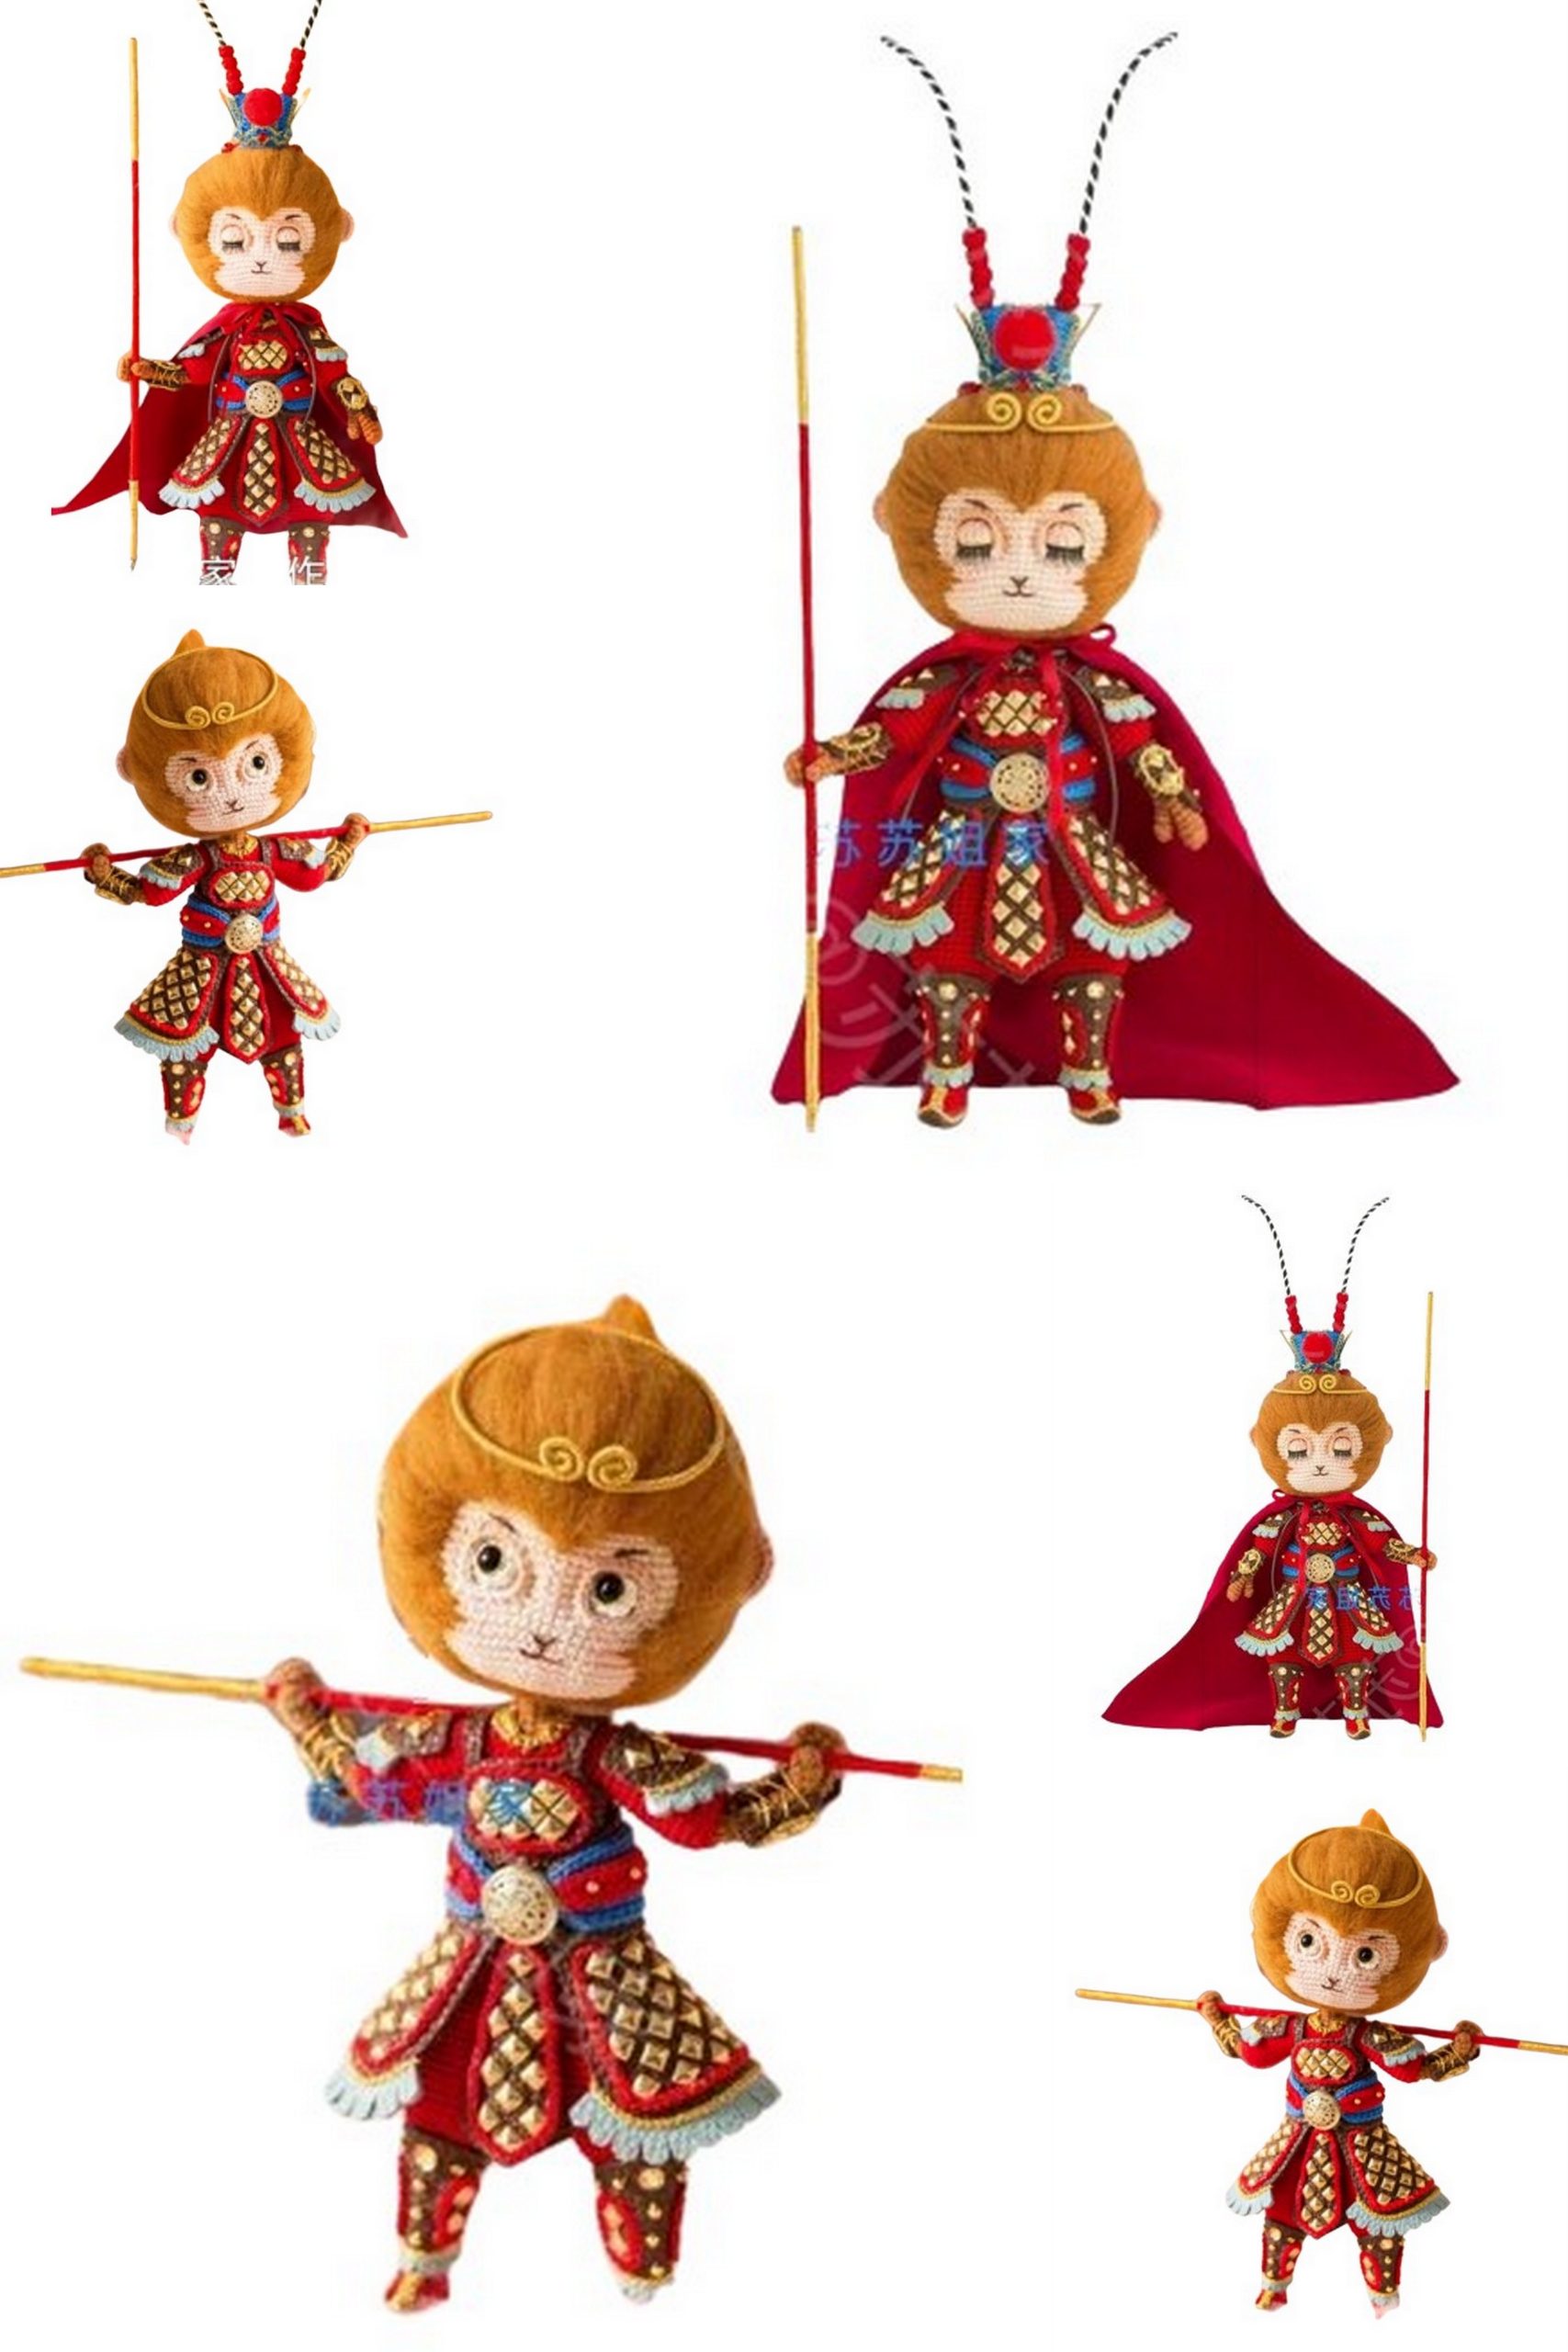
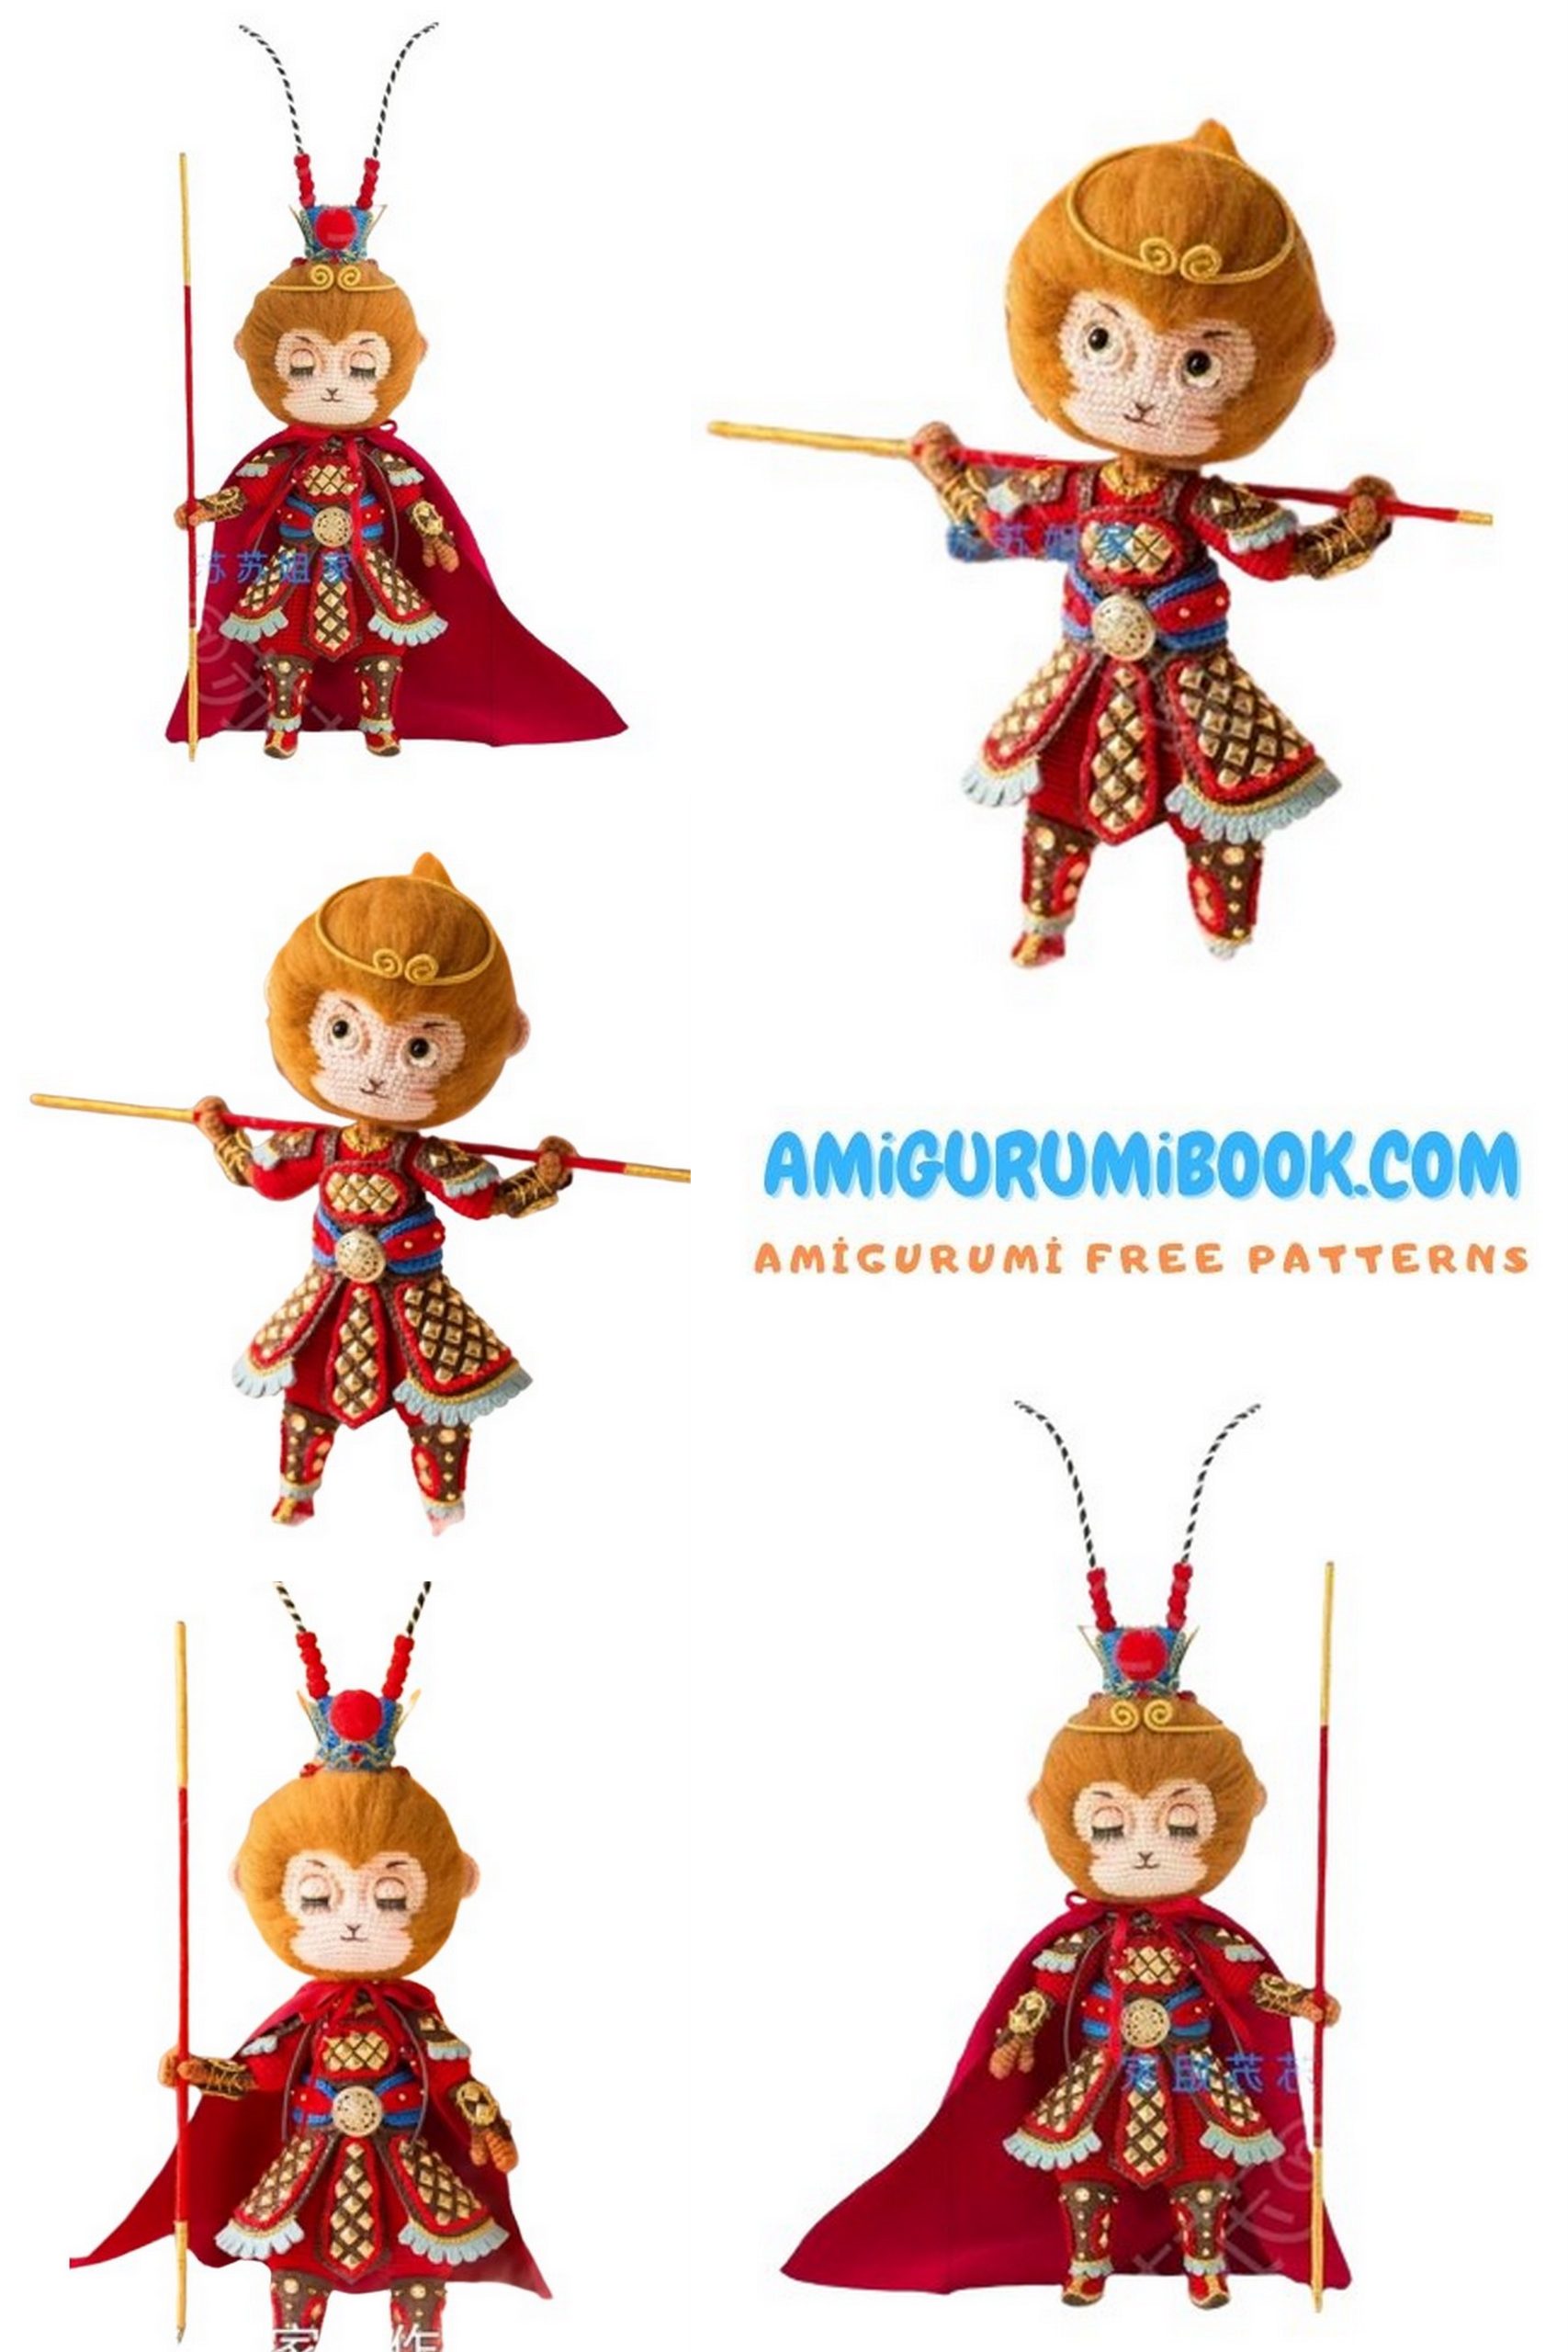
Enter the playful kingdom of crochet with our majestic amigurumi free pattern for The King of Monkeys amigurumi! Whether you’re a crochet enthusiast or a beginner, this regal project is bound to add a touch of whimsy to your crafting repertoire. Perfect for collectors, children’s playtime, or as a unique decor piece, The King of Monkeys exudes charm and charisma with its royal demeanor. With clear instructions and helpful tips, crocheting your own king is a delightful adventure in creativity. So, grab your yarn and let’s crown this monkey monarch!
The King of Monkeys
This doll consists of a main body and accessories. First, make the main body, and then the accessories.
Height approximately 28 cm.
Note: Errors may occur during manual measurement, and the sample sizes are provided for reference only.
If you want to access 1000+ free amigurumi patterns, you can download our application from this link!
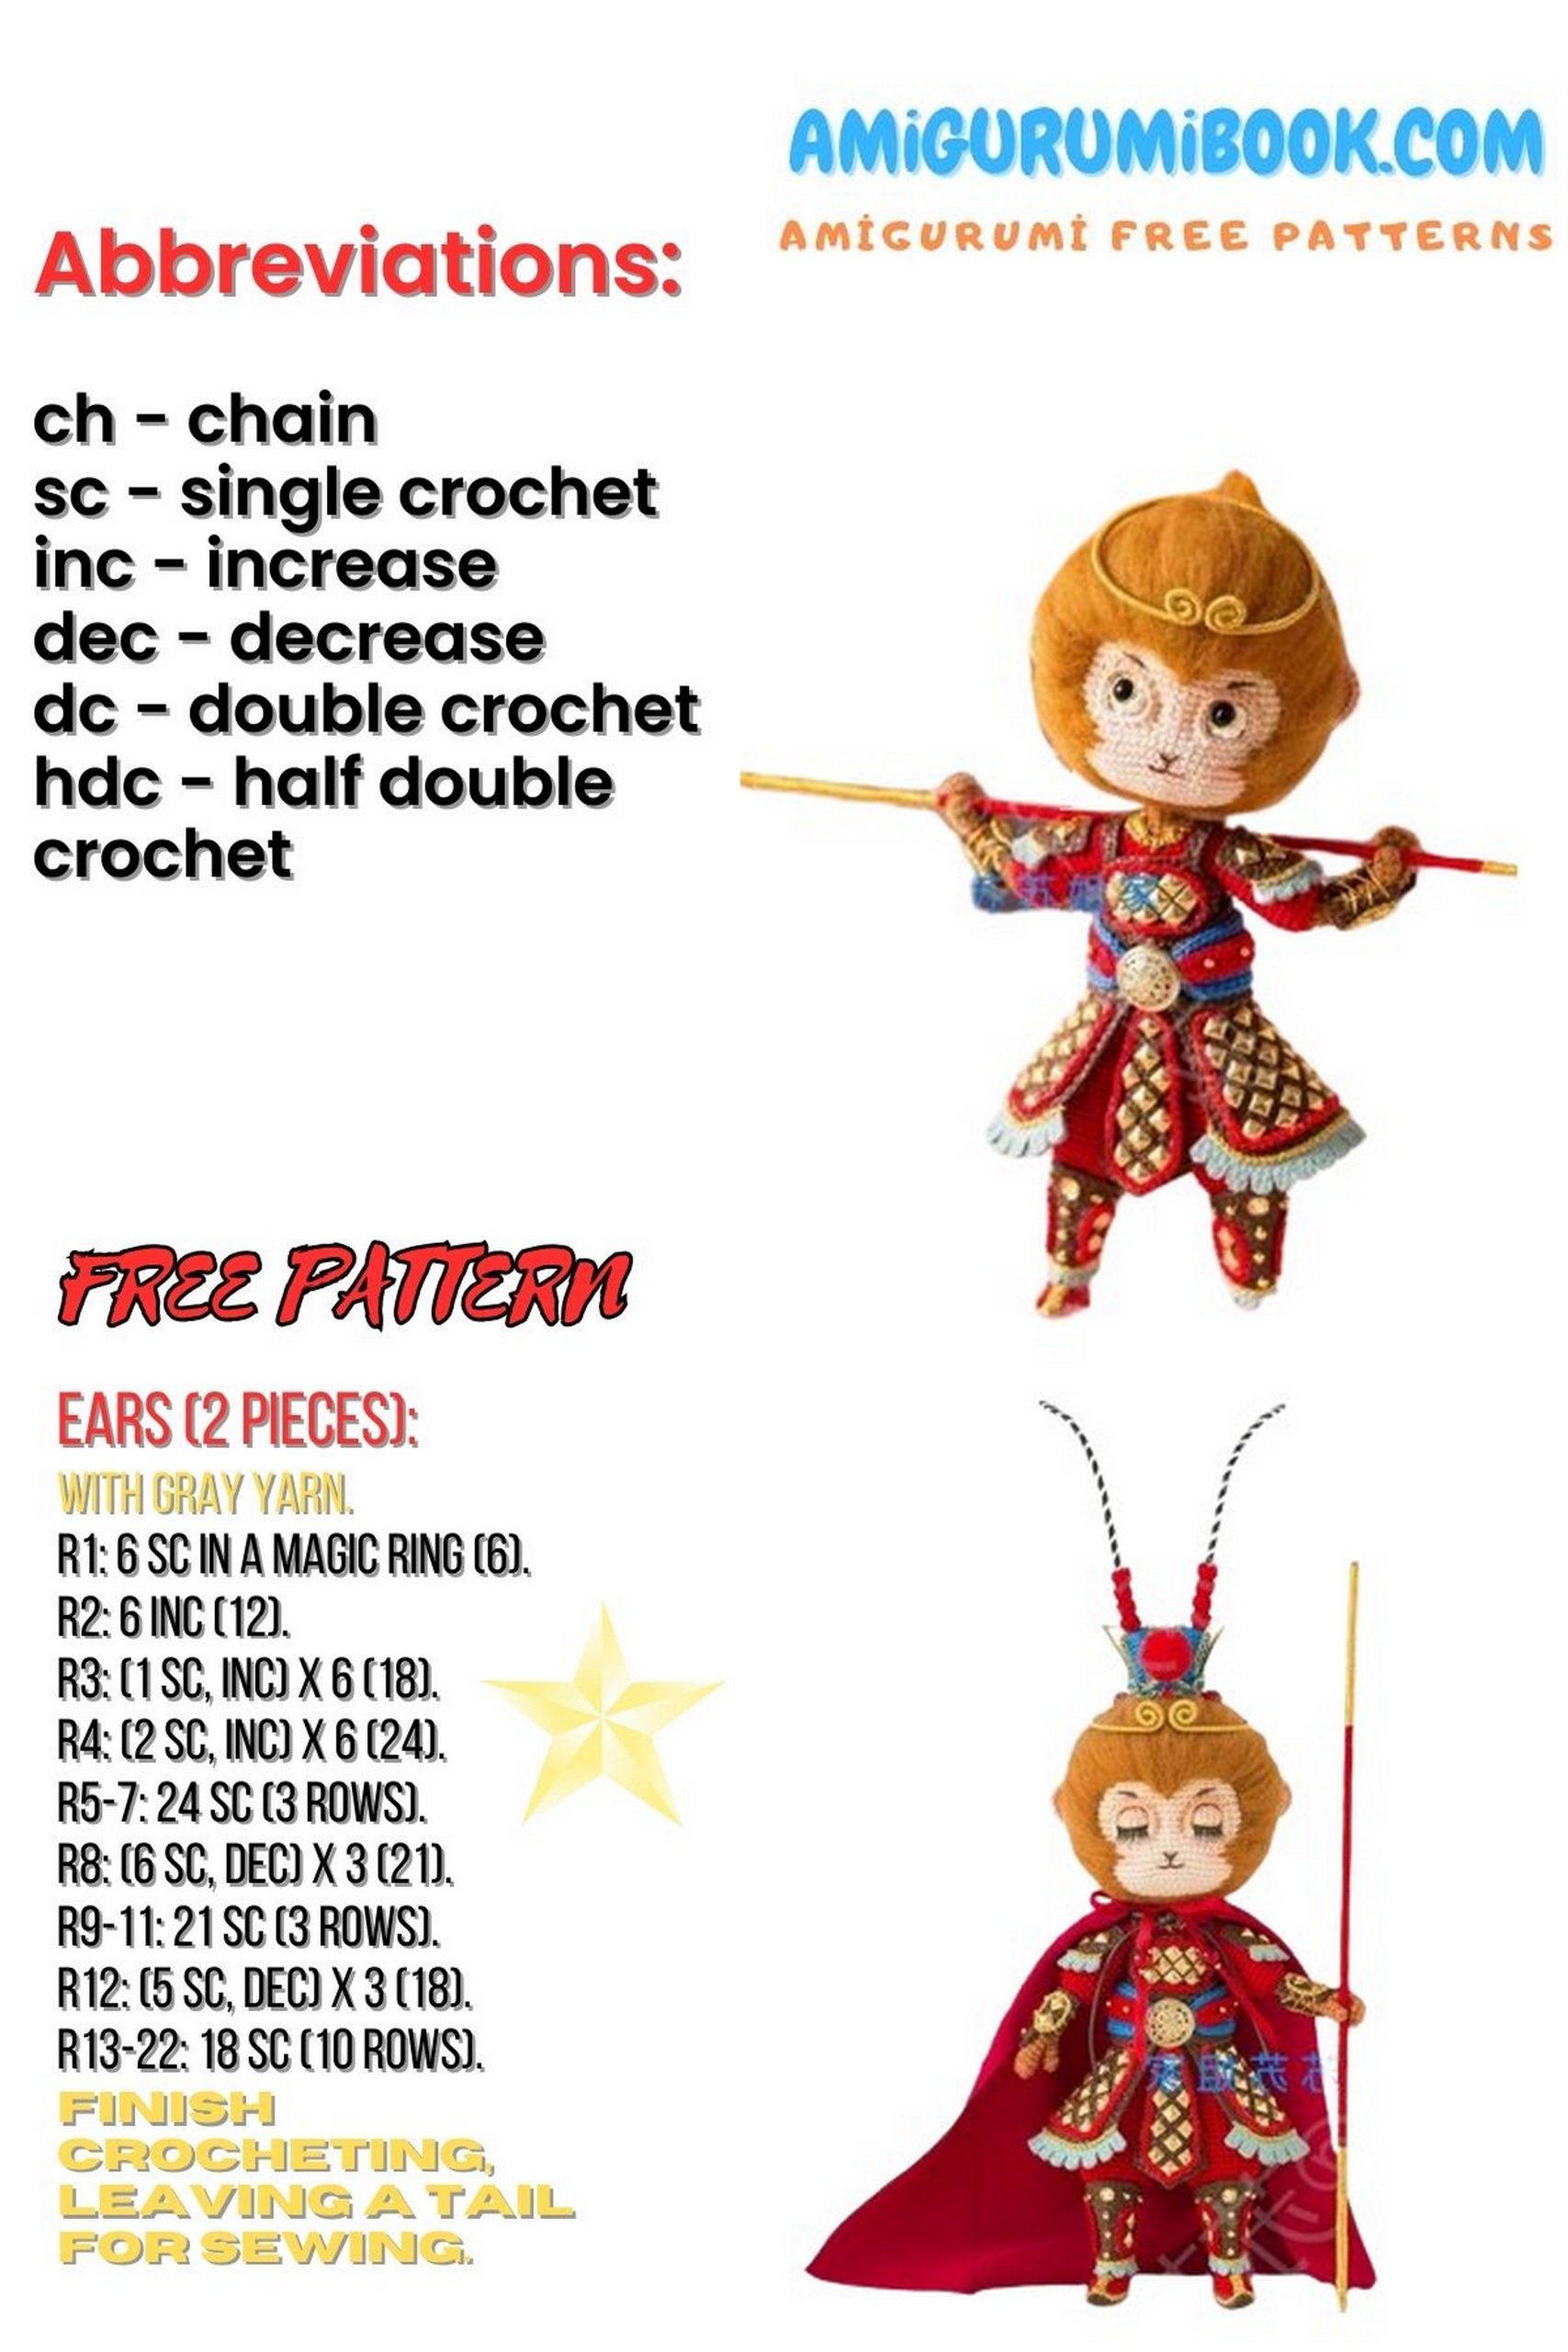
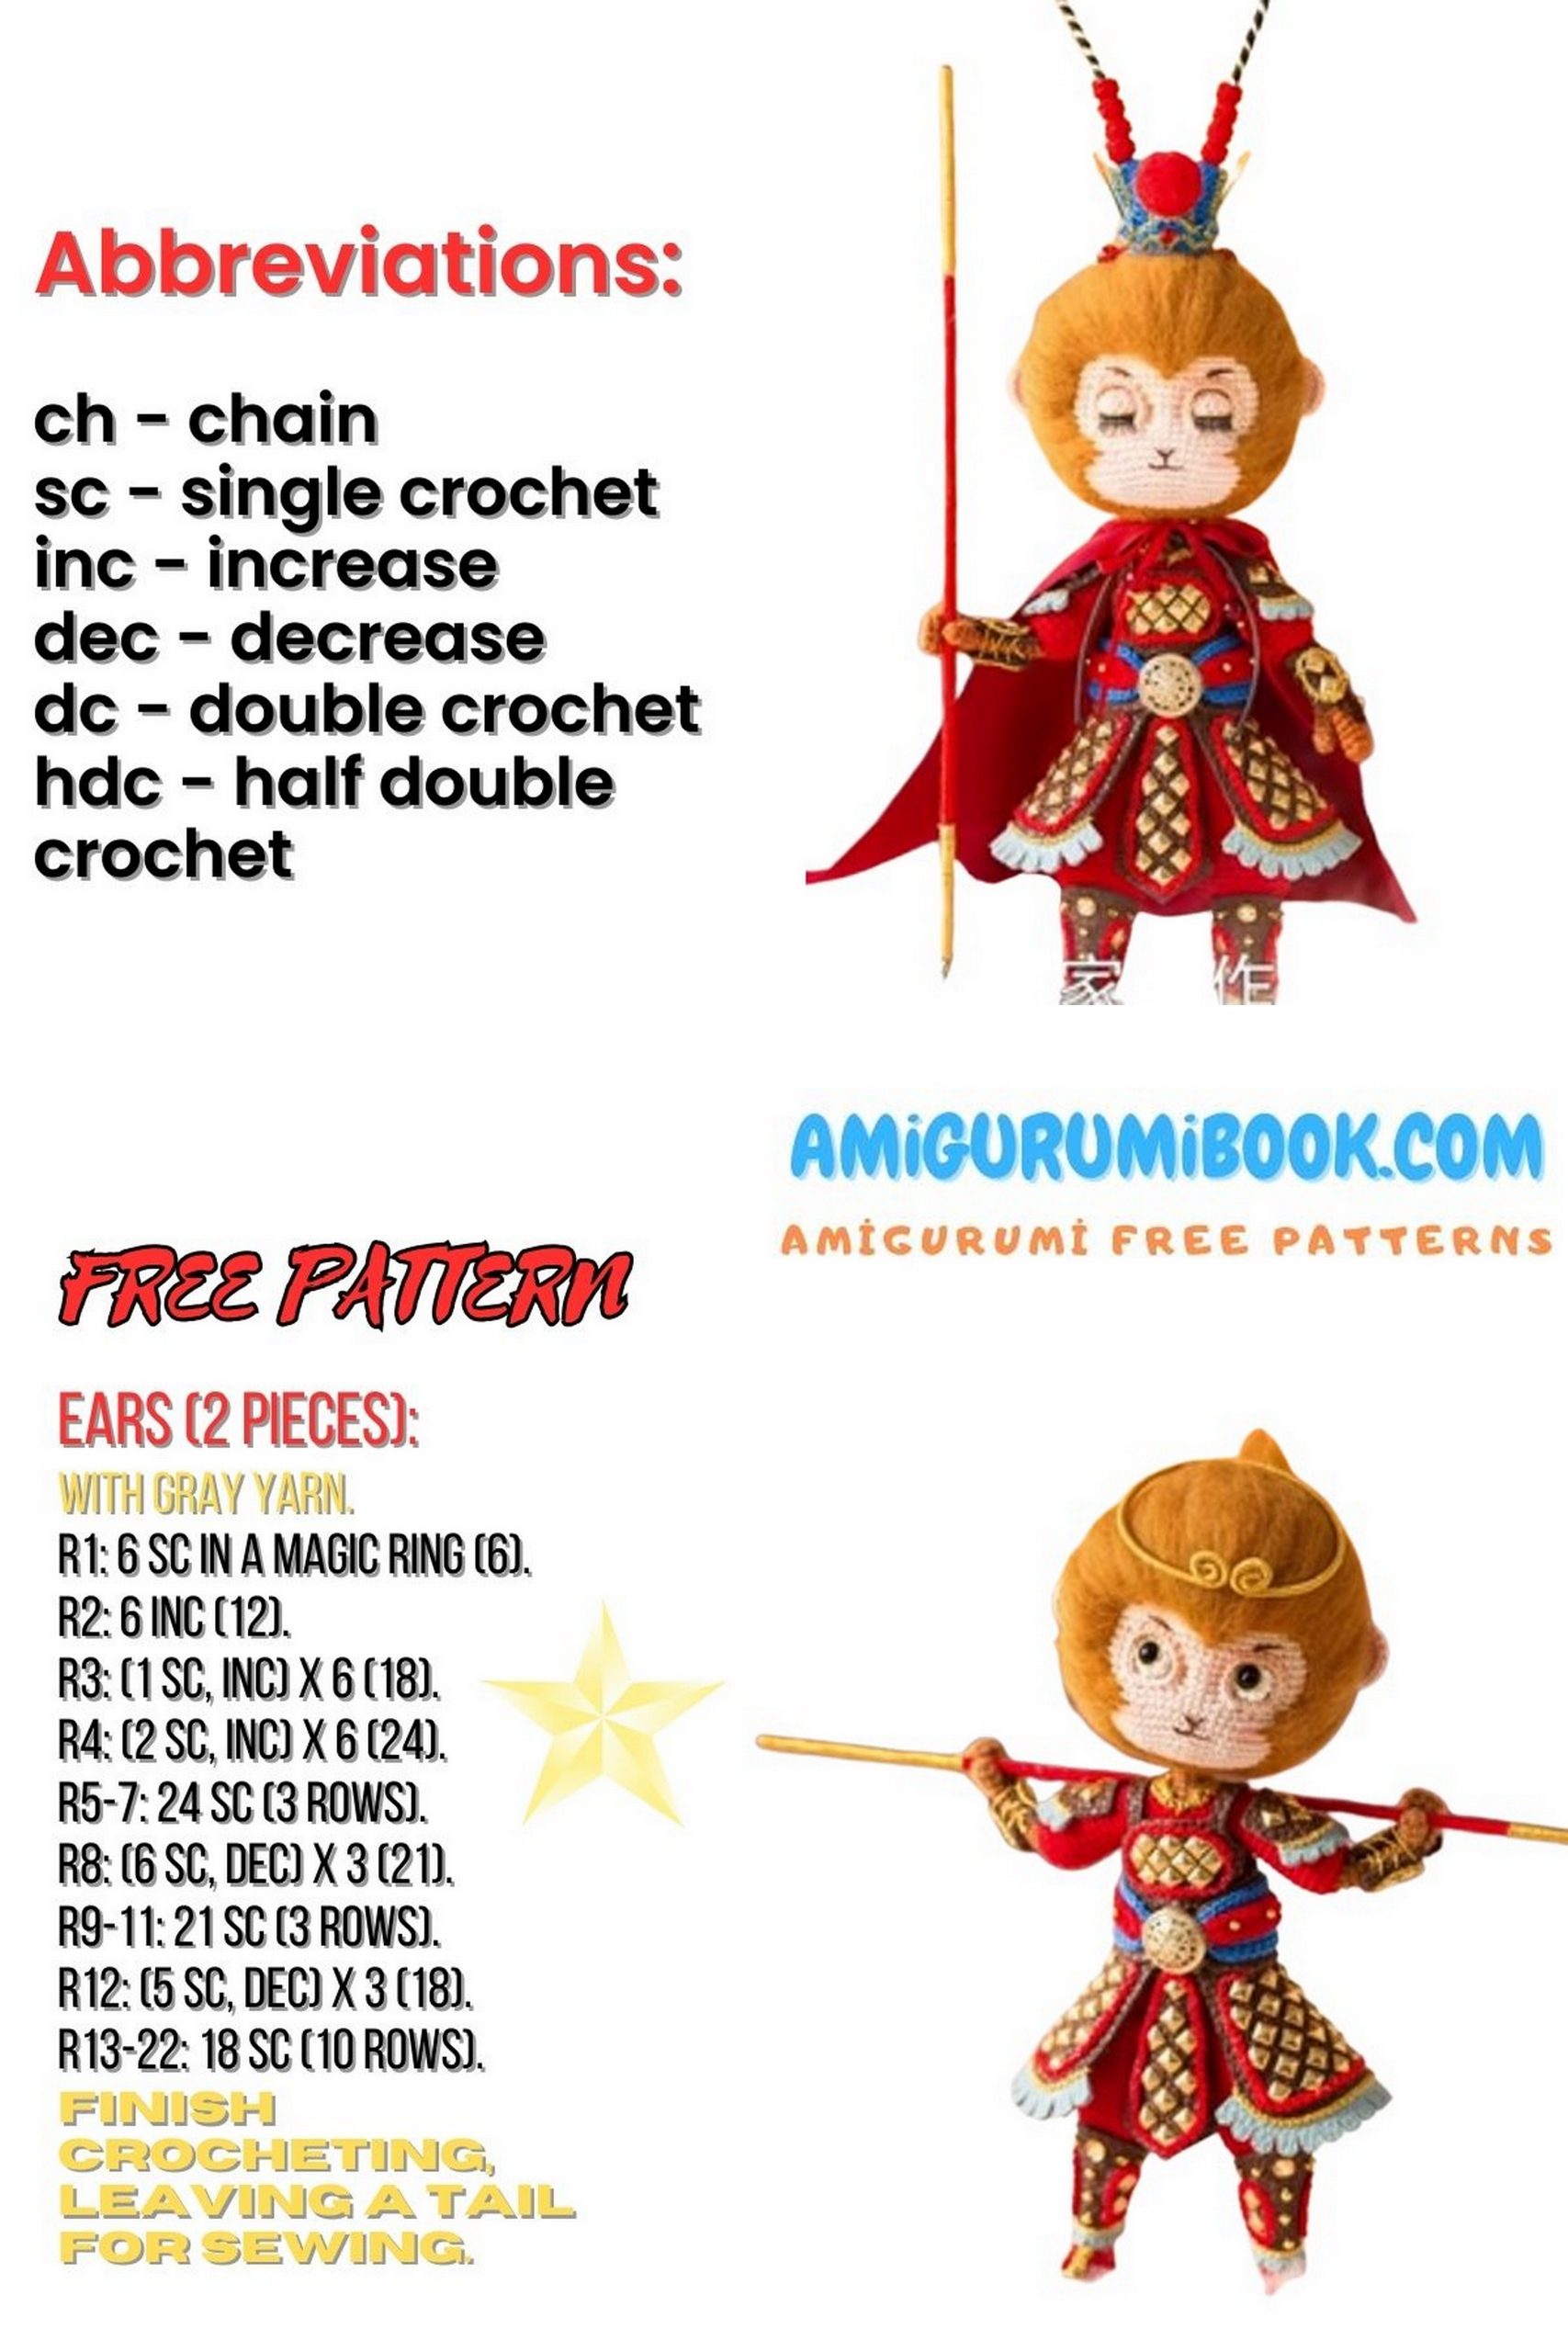
ABBREVIATIONS:
MR – Magic Ring
SC – Single Crochet
CH – Chain
DC – Double Crochet
SL ST – Slip Stitch
INC – Increase (2 SC in the same stitch)
DEC – Decrease (SC two stitches together)
BLO – Back Loops Only
FLO – Front Loops Only

PATTERN
PART 1. BODY
The body consists of: arms, legs, torso, and head.
STEP 1. ARMS *2
The arms consist of a thumb, palm, and sleeve. The thumb and palm are crocheted separately, then joined. Finally, change the yarn to crochet the sleeves.
THUMB. -The King of Monkeys
1. 5 SC in MR
2-R3. 5 SC
PALM-The King of Monkeys
1. 5 CH, from the 2nd loop from the hook: 3 SC, 3 SC in one loop, 2 SC, SL ST (10)
2-R6. 10 SC
7. SC, with the thumb 2 SC, (skip 3 loops on the thumb, skip 3 loops on the palm), 6 SC (9)
8. 9 SC
9. 5 SC, DEC, 2 SC (8)
10-R14. 8 SC
SLEEVE-The King of Monkeys
15. BLO: 8 SL ST (16)
16. (3 SC, SL ST)*4 (20)
17-R19. 20 SC
20. (8 SC, DEC)*2 (18)
21-R23. 18 SC
24. (7 SC, DEC)*2 (16)
25-R26. 16 SC
Note: Change yarn color in the 15th row. After the sleeves are completed, leave a 15 cm thread to sew under the armpits.
STEP 2. LEGS *2
Consist of: soles and pants.
SOLES-The King of Monkeys
1. 8 SC in MR
2-R3. 8 SC
4. (3 SC, INC)*2 (10)
5-R15. 10 SC
PANTS-The King of Monkeys
16. BLO: 10 SL ST (20)
17. (3 SC, INC)*5 (25)
18. (2 SC, INC, 2 SC)*5 (30)
19. (5 SC, INC)*5 (35)
20-R25. 35 SC
26. 17 SC, DEC, 16 SC (34)
27. 34 SC
28. 16 SC, DEC, 16 SC (33)
29. 33 SC
30. 16 SC, DEC, 15 SC (32)
31. 32 SC
32. 15 SC, DEC, 15 SC (31)
33. 31 SC
34. 15 SC, DEC, 14 SC (30)
35. 30 SC
36. 14 SC, DEC, 14 SC (29)
37. 29 SC
Note: Change yarn color in the 16th row. After finishing one leg, cut the yarn, and leave it uncut for the other leg.
STEP 3. BODY- The King of Monkeys
Connect the two legs together and continue crocheting the body, attaching the arms as you go.
1. 1 CH connects the two legs: 12 SC, 2 DEC, 13 SC, 1 SC, 12 SC, 2 DEC, 13 SC, SC (56)
2. (6 SC, DEC, 6 SC)*4 (52)
3. (11 SC, DEC)*4 (48)
4. (5 SC, DEC, 5 SC)*4 (44)
5. (9 SC, DEC) *4 (40)
6. (4 SC, DEC, 4 SC)*4 (36)
7. (7 SC, DEC) *4 (32)
8-R18. 32 SC
19. 7 SC, (with the 6th loop of the last row of the arm), 12 SC, (skip 4 loops, skip 4 loops), 12 SC, (with the 6th loop of the last row of the arm), 12 SC, (skip 4 loops, skip 4 loops), 5 SC (48)
20. (3 SC, DEC, 3 SC)*6 (42)
21. (5 SC, DEC)*6 (36)
22. (2 SC, DEC, 2 SC)*6 (30)
23. (3 SC, DEC)*6 (24)
24. BLO: (SC, 2 SC)*6 (18)
25. (SC, DEC)*6 (12)
26. (SC, DEC)*4 (8)
27-R36 (8)
Note: After the 6th row, stuff and insert a shaping wire approximately 105 cm long. In the 19th row, after attaching the arms, insert a shaping wire approximately 40 cm long and stuff. Refer to the video demonstration for details.
STEP 4. HEAD.
The head is crocheted in a spiral. Stuff as you crochet. Refer to the video demonstration for details.
HEAD- The King of Monkeys
1. 7 SC in MR
2. 7 INC (14)
3. (SC, INC)*7 (21)
4. (SC, INC, SC)*7 (28)
5. (3 SC, INC)*7 (35)
6. (2 SC, INC, 2 SC)*7 (42)
7. (3 SC, INC, 3 SC)*6 (48)
8. (7 SC, INC)*6 (54)
9. (4 SC, INC, 4 SC)*6 (60)
10. (9 SC, INC)*6 (66)
11. 66 SC
12. (5 SC, INC, 5 SC)*6 (72)
13. 72 SC
14. (23 SC, INC)*3 (75)
15-R19. 75 SC
20. 29 SC, skip 2 stitches, BLO: [10 DC], skip 2 stitches, 6 SC, skip 2 stitches, BLO: [10 DC], skip 2 stitches, 30 SC (85)
21-R24. 85 SC
25. 29 SC, 2 CH, 10 unfinished DC, finish all 10 stitches with one loop, 2 CH, 6 SC, 2 CH, 10 unfinished DC, finish all 10 stitches with one loop, 2 CH, 30 SC (75)
26. 29 SC, 2 SC, FLO: SC, 2 SC, 6 SC, 2 SC, FLO: SC, 2 SC, 30 SC (75)
27. 24 SC, (SC, INC)*4, 10 SC, (INC, SC)*4, 25 SC (83)
28-R29. 83 SC
30. (12 SC, DEC)*5, 11 SC, DEC (77)
31. (9 SC, DEC)*7 (70)
32. (4 SC, DEC, 4 SC)*7 (63)
33. (7 SC, DEC)*7 (56)
34. (3 SC, DEC, 3 SC)*7 (49)
35. (5 SC, DEC)*7 (42)
36. (2 SC, DEC, 2 SC)*7 (35)
37. (3 SC, DEC)*7 (28)
38. (SC, DEC, SC)*7 (21)
39. (SC, DEC)*7 (14)
40. (5 SC, DEC)*2 (12)
41-R43. 12 SC
Crochet around the eye sockets with 19 SC.
Note: [ ] denotes crocheting in one stitch. After completing the head, the eye sockets need to be pulled. Refer to the video.
PART 2. Accessories.
Accessories include: shoes, collar, purple-golden crown, hair and facial features, armor, cape, golden hoop, and tight hoop.
STEP 1. Shoes, Collar.
Shoes are divided into the main part and decoration. First, crochet the main part, then make the decoration.
Collar.
Crochet around the body’s back loops. Refer to the video for details.
Shoes*2
1. 7 CH, from the 2nd loop from the hook: 5 SC, 3 SC in one loop, 4 SC, SL ST (14)
2. SL ST, 4 SC, 3 SL ST, 4 SC, 2 SL ST (20)
3. FLO: 6 SC, DC, 2 DEC from SC, DC, 8 SC (18)
4. 5 SC, 3 DEC, 5 SC, DEC (14)
5. 3 SC, DEC, 3 loops together, DEC, 4 SC (10)
6. 3 SC, DEC, 5 SC (9)
Note: After finishing, make the sole and decorate it. Refer to the video.
DECORATION
5CH, from the 2nd loop from the hook: 4sc
COLLAR
(Start from the center behind the half-loops of the 23rd row): CH, sc, 2hdc, 8 dec from hdc, dec from hdc, sc, sl st, CH
STEP 2 Purple Golden Crown
The crown of purple gold is divided into five parts: base, fabric piece 1, fabric piece 2, fabric piece 3, and decoration. First, make each part separately, and then assemble them.
See the video demonstration for details.
BASE
1. 6 sc in MR
2. 6 inc (12)
3. (sc, inc)*6 (18)
4. (sc, inc, sc)*6 (24)
5. (3 sc, inc)*6 (30)
6-9. 30 sc
10. FLO: (sc, skip 1 st, sc)*10 (20)
11. 10 dec
Note: During the process, add stuffing, leave a 15 cm thread for closing after completion.
Fabric piece one. First part
1. 24 CH, from the 2nd loop from the hook, 23 sc (23)
2-3. CH, turn, 23 sc
4. (Insert thin wire) CH, turn, 5 sc, 3 hdc, 7 dc, 3 hdc, 5 sc (23)
Fabric piece one. Second part
1. (on the other side of the first piece) 23 sc
2-3. 23 sc
4. (Insert thin wire) CH, turn, 5 sc, 3 hdc, 7 dc, 3 hdc, 5 sc (23)
Note: After completion, use gold wire for decoration. See the video.
Fabric piece two.
1. 32 CH, from the 2nd loop from the hook: 31 sc
2. CH, turn, 11 sc, [3 hdc, sl st], 2 sc, skip 1 st, [hdc, 3 dc, hdc], skip 1 st, 2 sc, [sl st, 3 hdc], 11 sc
Note: [] means crocheting in the same loop. After completion, use gold wire for drawing and decoration. See the video.
Fabric piece three*8
1. 6 sc in MR
2. 6 sc
STEP 3 Head Decoration
Divided into ears, hair, eyes, and other facial expressions. First, make the ears, then embroider the hair, then make the eyes, and finally embroider the facial expression and apply blush and eye shadow. See the video for details.
EARS -The King of Monkeys
1. 5 sc in MR
2. CH, turn, 5 inc (10)
3. (left ear) CH, turn, 4 sc, 2 hdc, inc from dc, dc, inc from dc, dc (12)
3. (right ear) CH, turn, dc, inc from dc, dc, inc from dc, 2 hdc, 4 sc (12)
Note: After completion, leave a 15 cm thread for sewing. How to sew on ears: see the video.
EYES – The King of Monkeys
1. 6 sc in MR
2. 6 inc (12)
3. (sc, dec, 3 sc)*3 (9)
STEP 4 Golden Mace. Dense hoop
Cut each part of the armor according to the paper template, then attach the decoration to the toy, place the claw-nails according to the scheme, then crochet the belt part and decorate it, and finally attach each part to the torso. See the video for details.
Note:
1: The cloak is first cut and sewn according to the dimensions on the scheme, and then the straps are sewn on.
2: For the golden hoop, first cut a 30 cm thick iron wire, then wrap it with red lace wire, and then wrap it with gold wire from both ends.
3: Tighten the hoop and wrap the gold wire with a fancy strip about 28 cm long to create a concave shape.
Upper body part
Left and right skirts
Front and back armor
BELT
1. 33 CH, from the 2nd loop from the hook, 31 sc, 3 sc in one st, 30 sc, inc (66)
Fabric piece one
2. inc, 30 sc, 3 inc, 30 sc, 2 inc (72)
3. inc, 32 sc, 4 inc, 32 sc, 3 inc (80)
Fabric piece two.
1. 37 CH, from the 2nd loop from the hook: 35 sc, 3 sc in one st, 34 sc, inc (74)
Note: After the second fabric piece is ready, it needs to be decorated and pasted onto the body. Please refer to the video for specific manufacturing methods.
Cloak cutting diagram