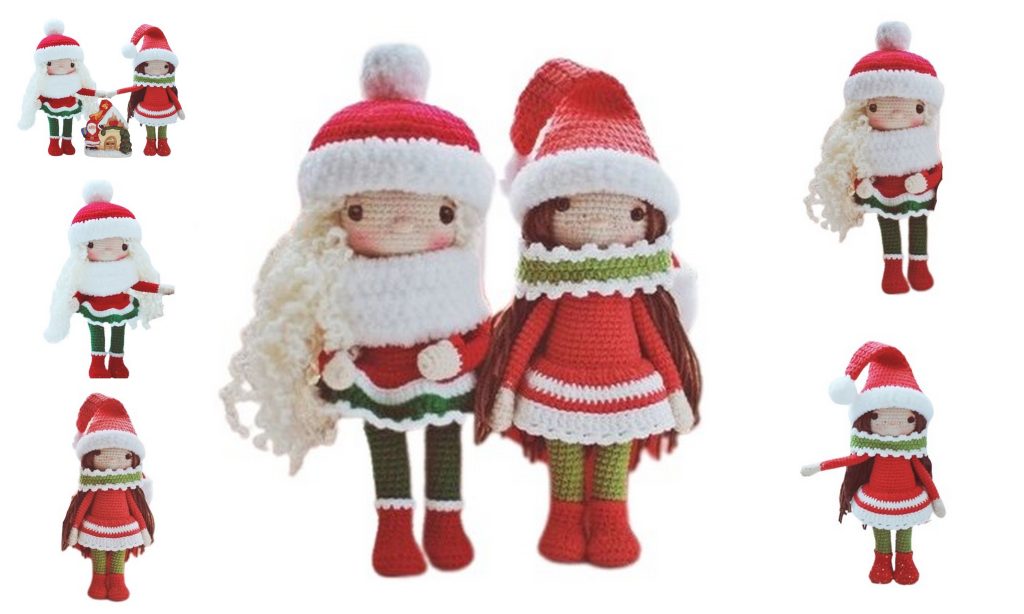
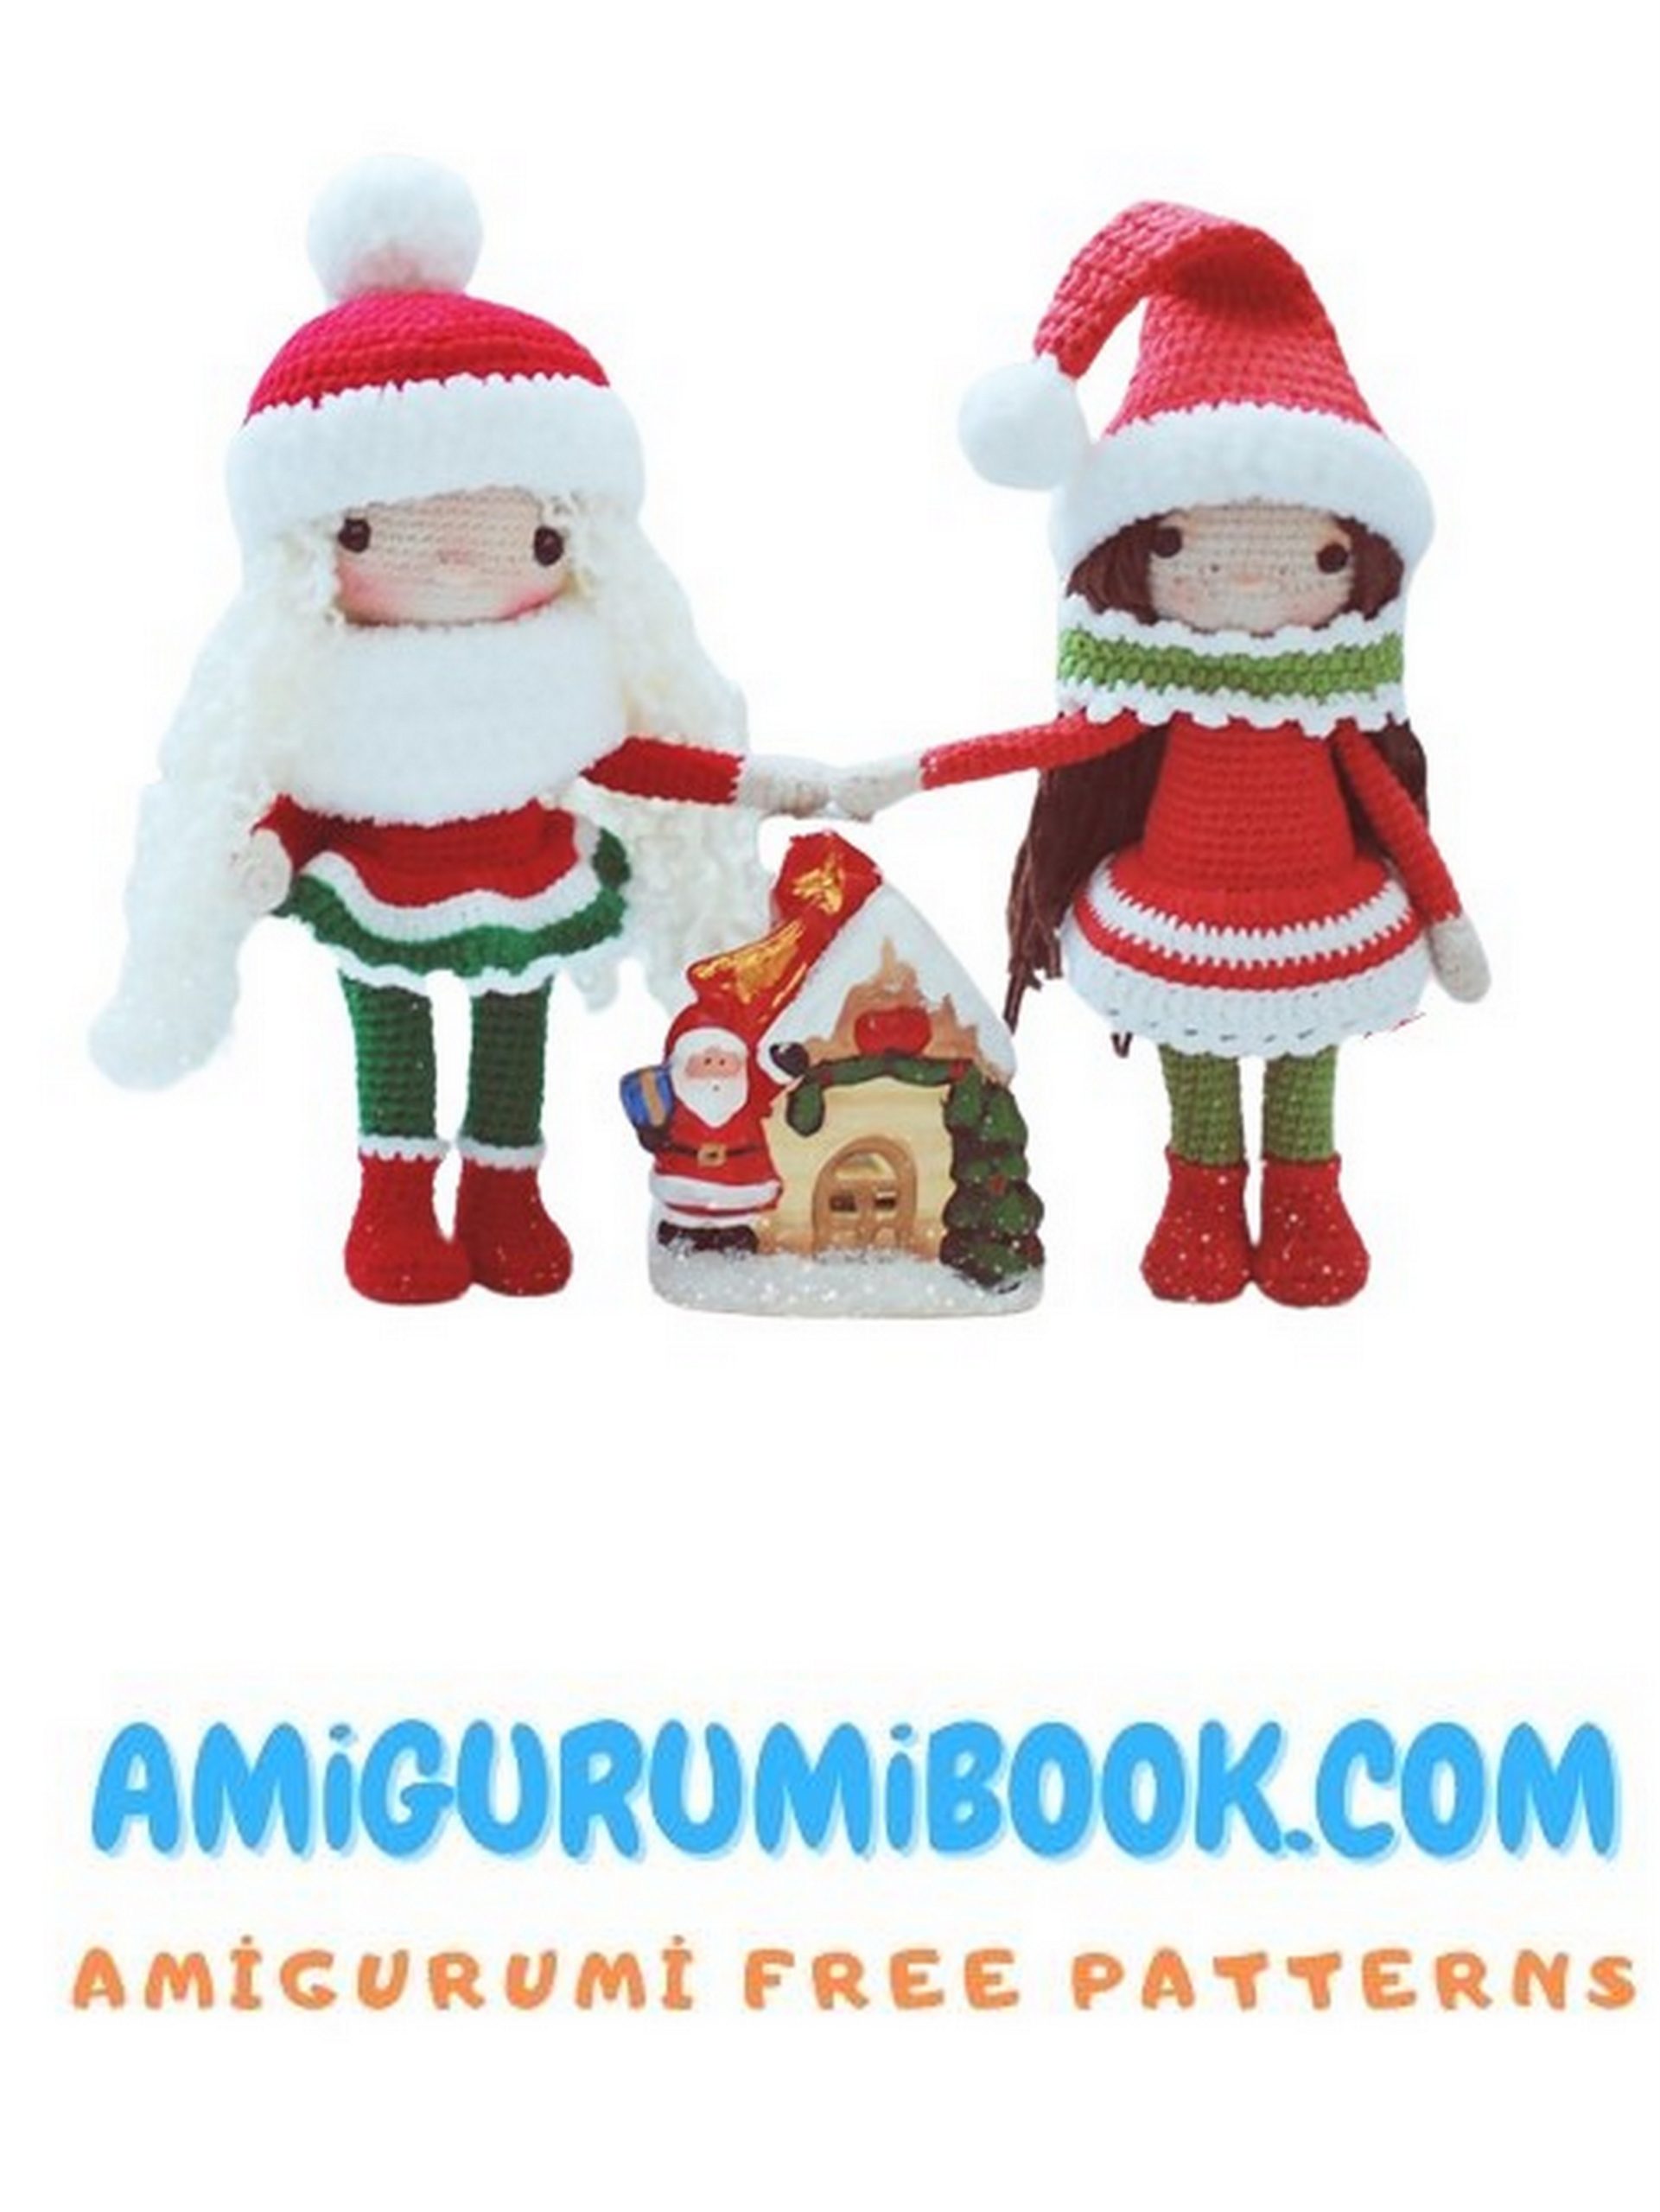
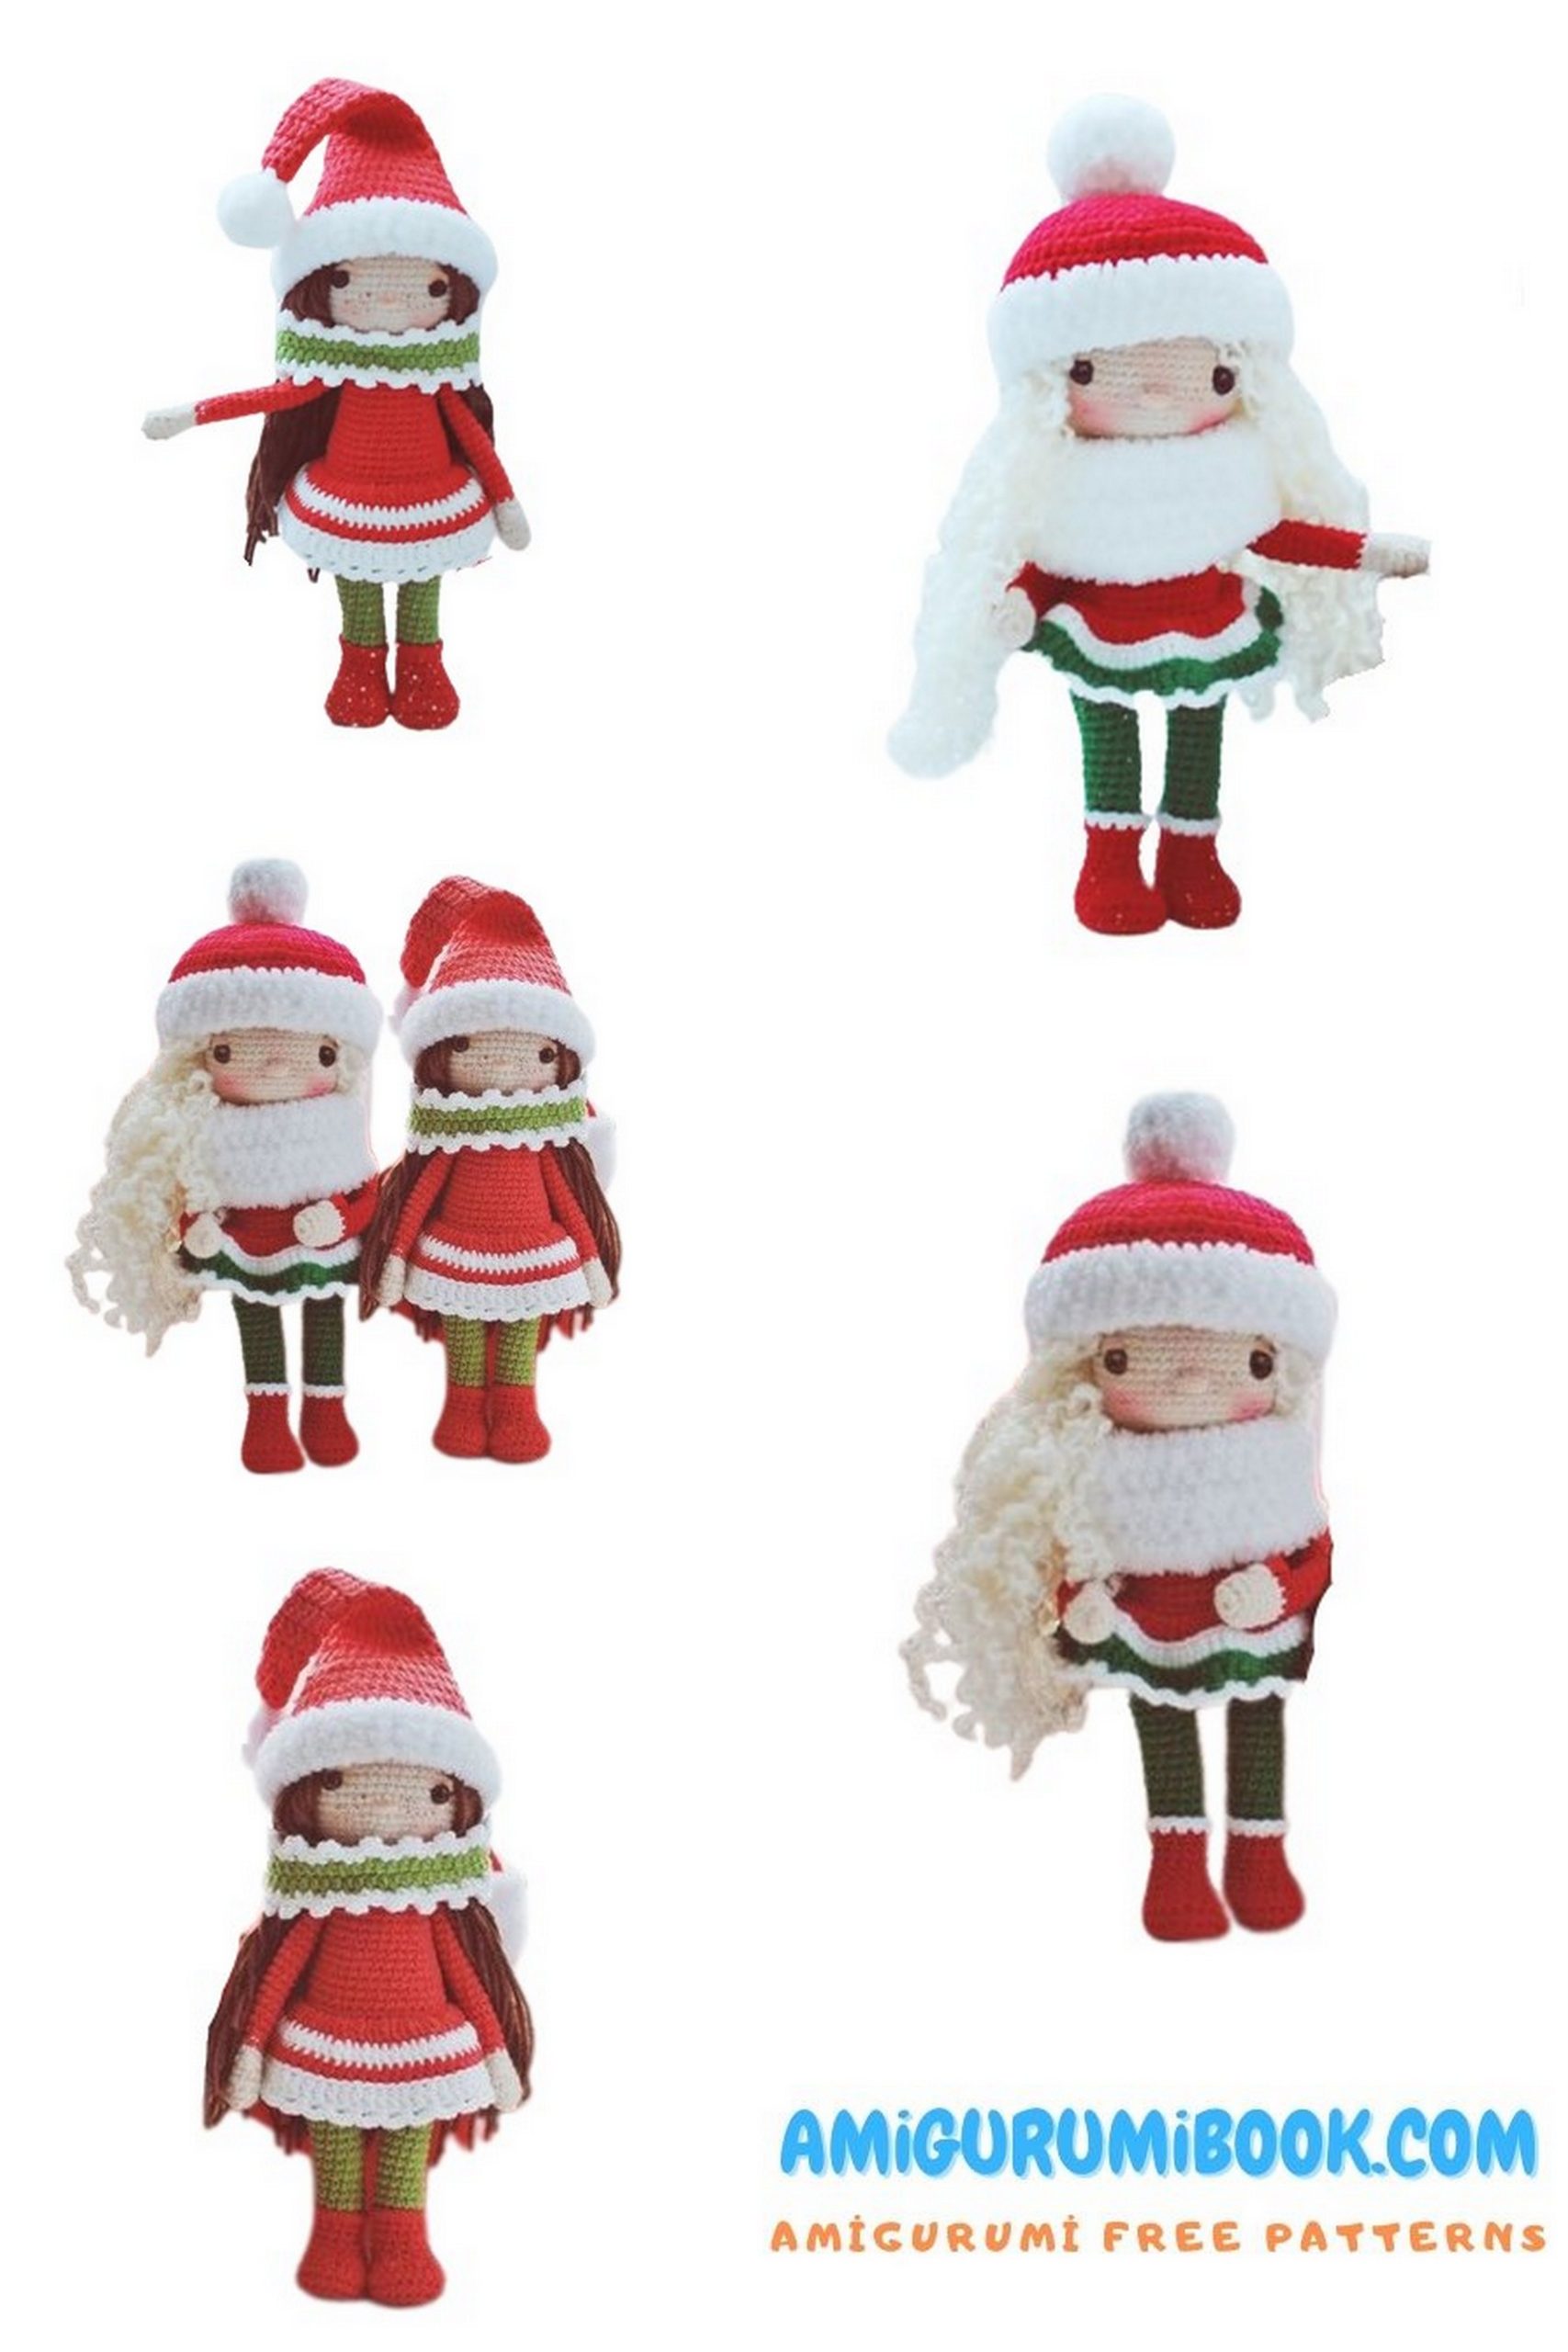
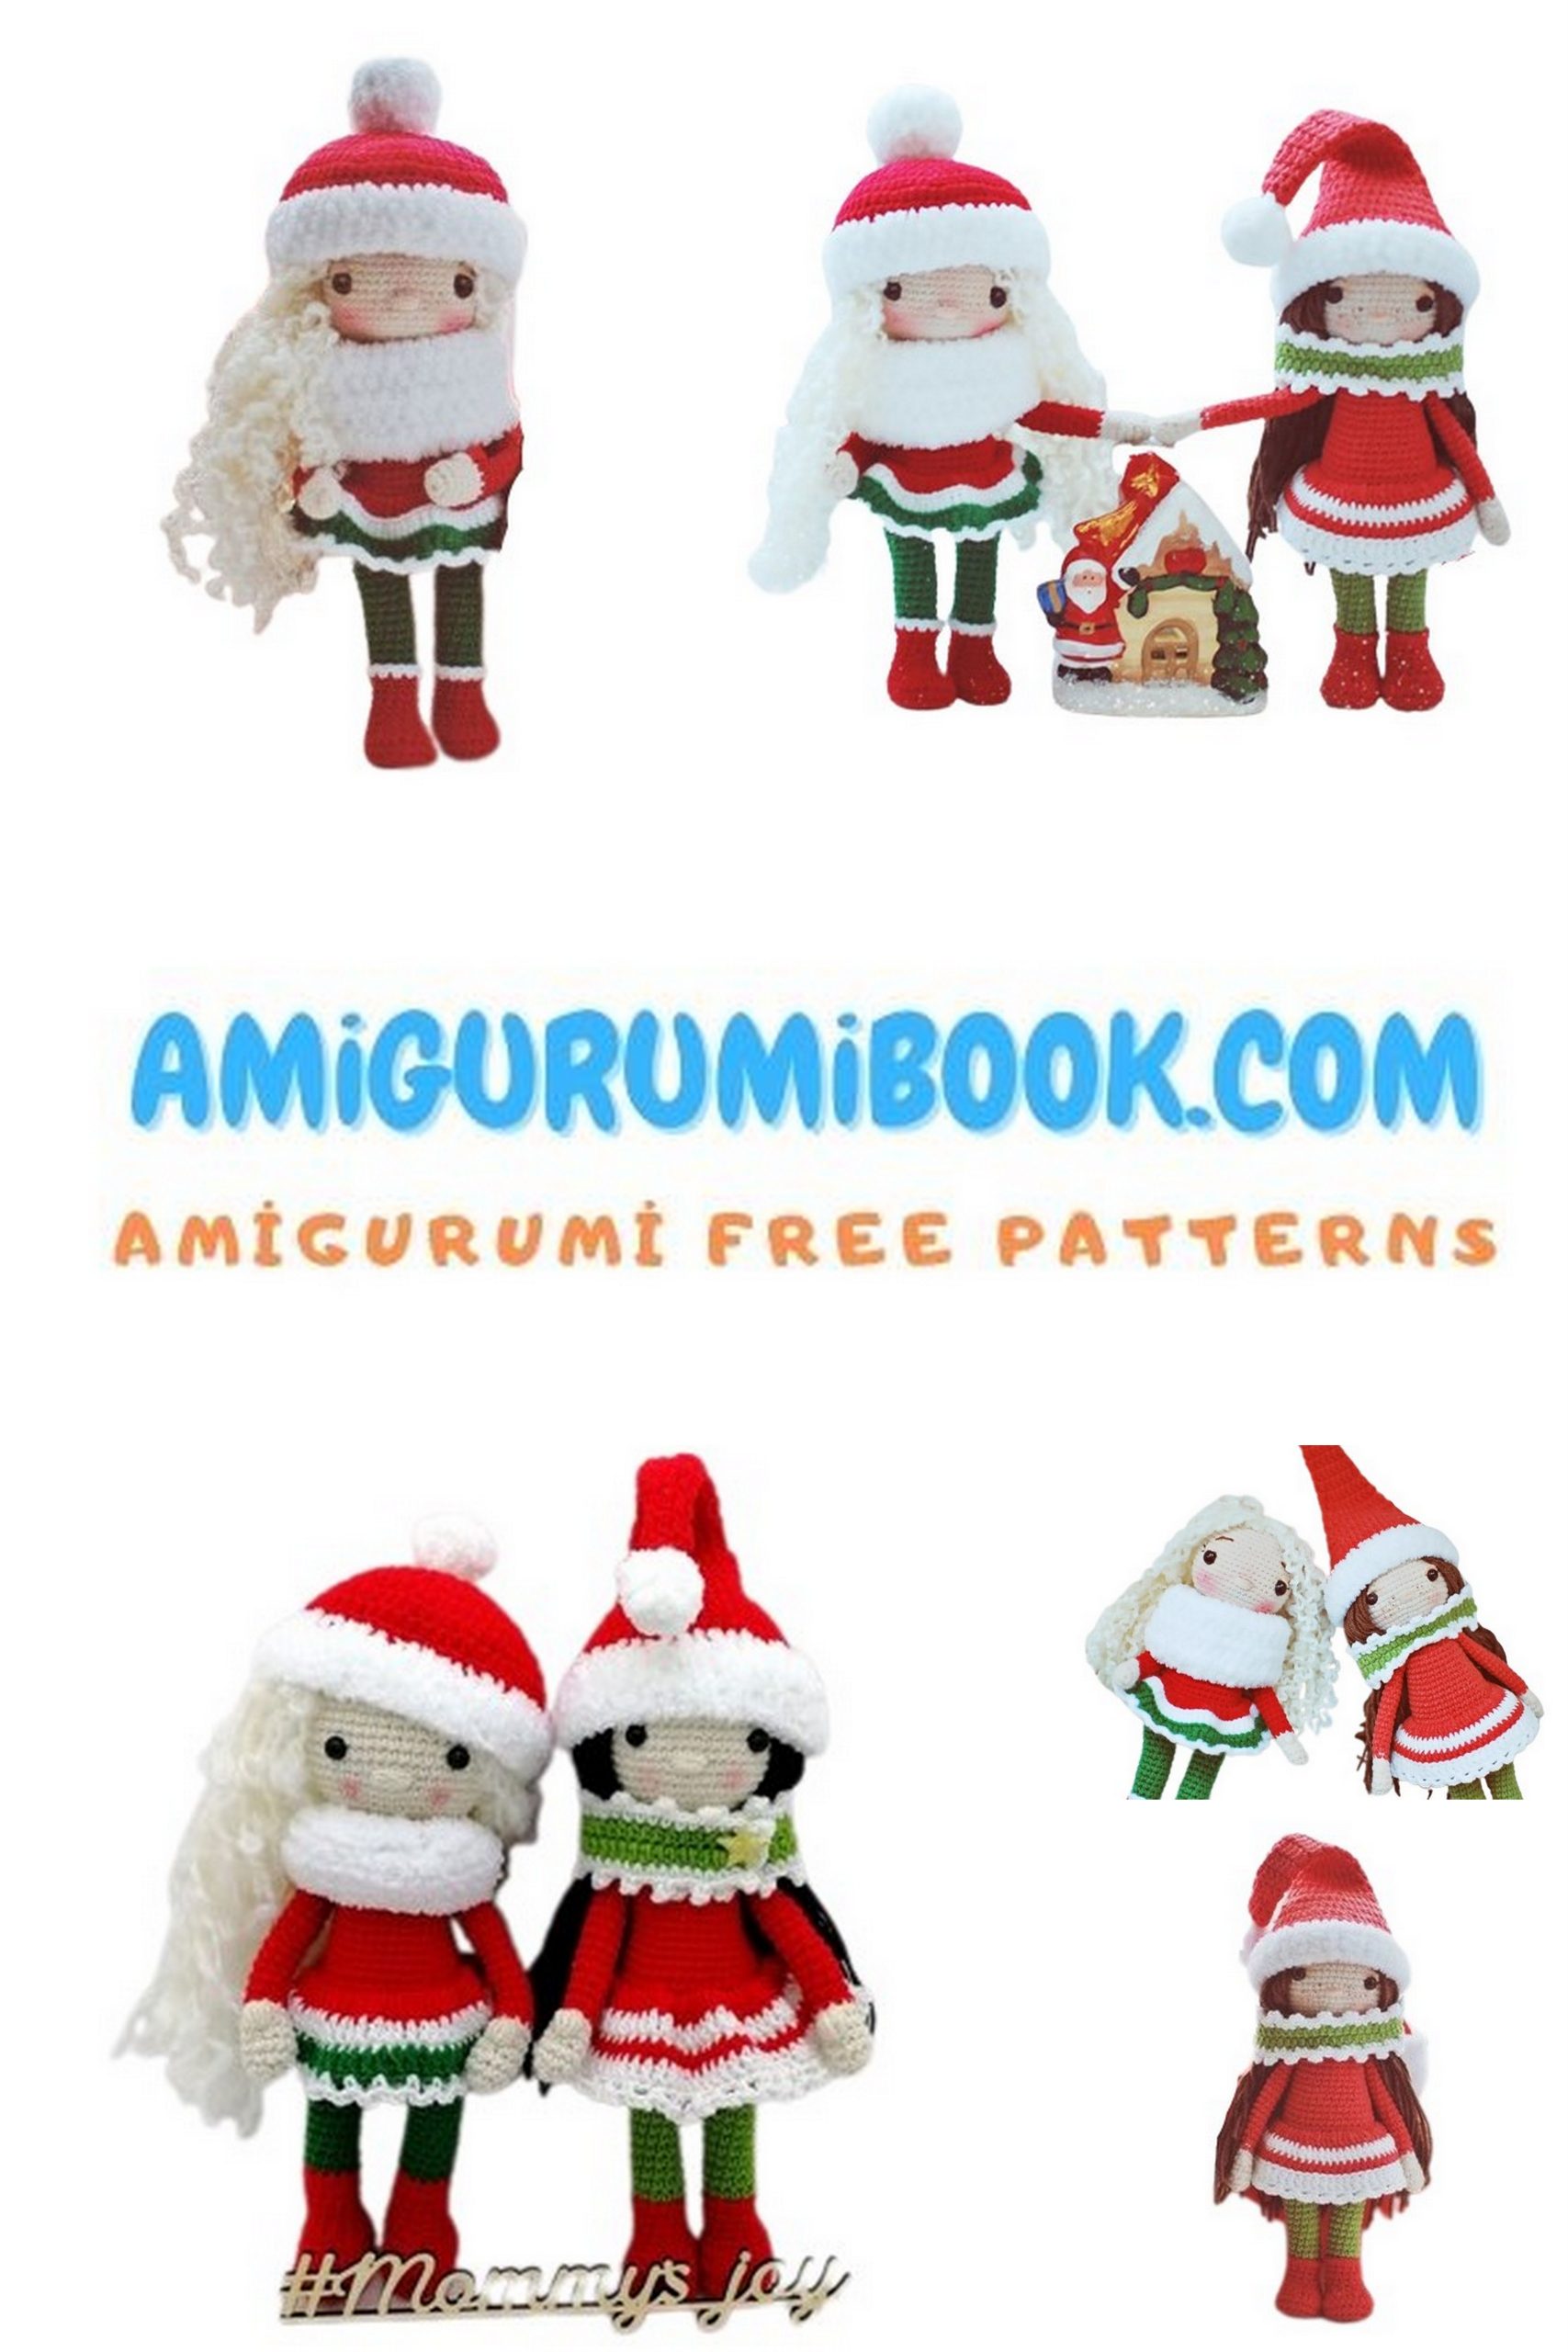
Bring the magic of the holidays to your crochet collection with this Christmas Party Girls Amigurumi Free Pattern! If you love festive decorations, handmade dolls, and cozy winter projects, this adorable crochet tutorial is perfect for you.
Designed with charming holiday outfits and sweet details, these Christmas party girls make wonderful handmade gifts, seasonal décor, or collectible amigurumi dolls. The step-by-step instructions guide you through creating beautifully shaped bodies, festive dresses, and delightful finishing touches.
Whether you’re an intermediate crocheter or looking to level up your amigurumi skills, this Christmas amigurumi doll pattern will add sparkle to your holiday crafting time. Grab your yarn, prepare your hook, and start creating your own magical Christmas doll today! 🎅✨
If you want to access 1000+ free amigurumi patterns, you can download our application from this link!
🎄 Materials
• Yarn for skin tone (light beige or peach)
• Yarn for dress (red, green, white – Christmas theme colors)
• Yarn for hair (brown, blonde, black – optional choice)
• Small amount of white yarn (details & trims)
• Small amount of black yarn (eyelashes & facial details)
• Crochet hook suitable for your yarn (usually 2.0–3.0 mm)
• Polyester fiberfill stuffing
• Safety eyes (8–12 mm) or embroidered eyes
• Tapestry needle (for sewing parts)
• Scissors
• Stitch marker
Optional:
• Decorative beads or mini bows
• Glitter thread for festive effect
✂️ Abbreviations
MR – Magic Ring
CH – Chain
SC – Single Crochet
HDC – Half Double Crochet
DC – Double Crochet
INC – Increase (2 SC in the same stitch)
DEC – Decrease (Single crochet two stitches together)
SL ST – Slip Stitch
FLO – Front Loop Only
BLO – Back Loop Only
FO – Fasten Off
ST – Stitch

Stage 1 – Legs (Make 2)
Start with red yarn.
1: Ch 5. Starting from 2nd ch from hook: 3 sc, 3 sc in last ch, working on opposite side: 3 sc, 3 sc in last ch (12)
2: 3 sc, inc, inc in toe center, inc, 3 sc, 3 inc (19)
3: 3 sc, (inc, 1 sc) ×3, inc, 4 sc, inc, 2 sc, inc, 1 sc (25)
Cut a sole shape from cardboard or plastic matching the foot.
4: BLO 25 sc (25)
5: 3 sc, 11 hdc, 11 sc (25)
6: 2 sc, 3 dec, 1 sc, 3 dec, 10 sc (19)
7: 2 sc, 4 dec, 5 sc, dec, 2 sc (14)
Insert sole here.
8–10: 14 sc (3 rounds)
11: FLO 13 sc, sl st (14)
Fasten off, hide ends. Stuff boot (optional: add weight).
Join green yarn at back and work into BLO of Round 10:
12: 14 sc (14)
13: 12 sc, dec (13)
14–23: 13 sc (10 rounds)
Fasten off.
For the second leg, repeat but do not cut yarn — continue for body join later.
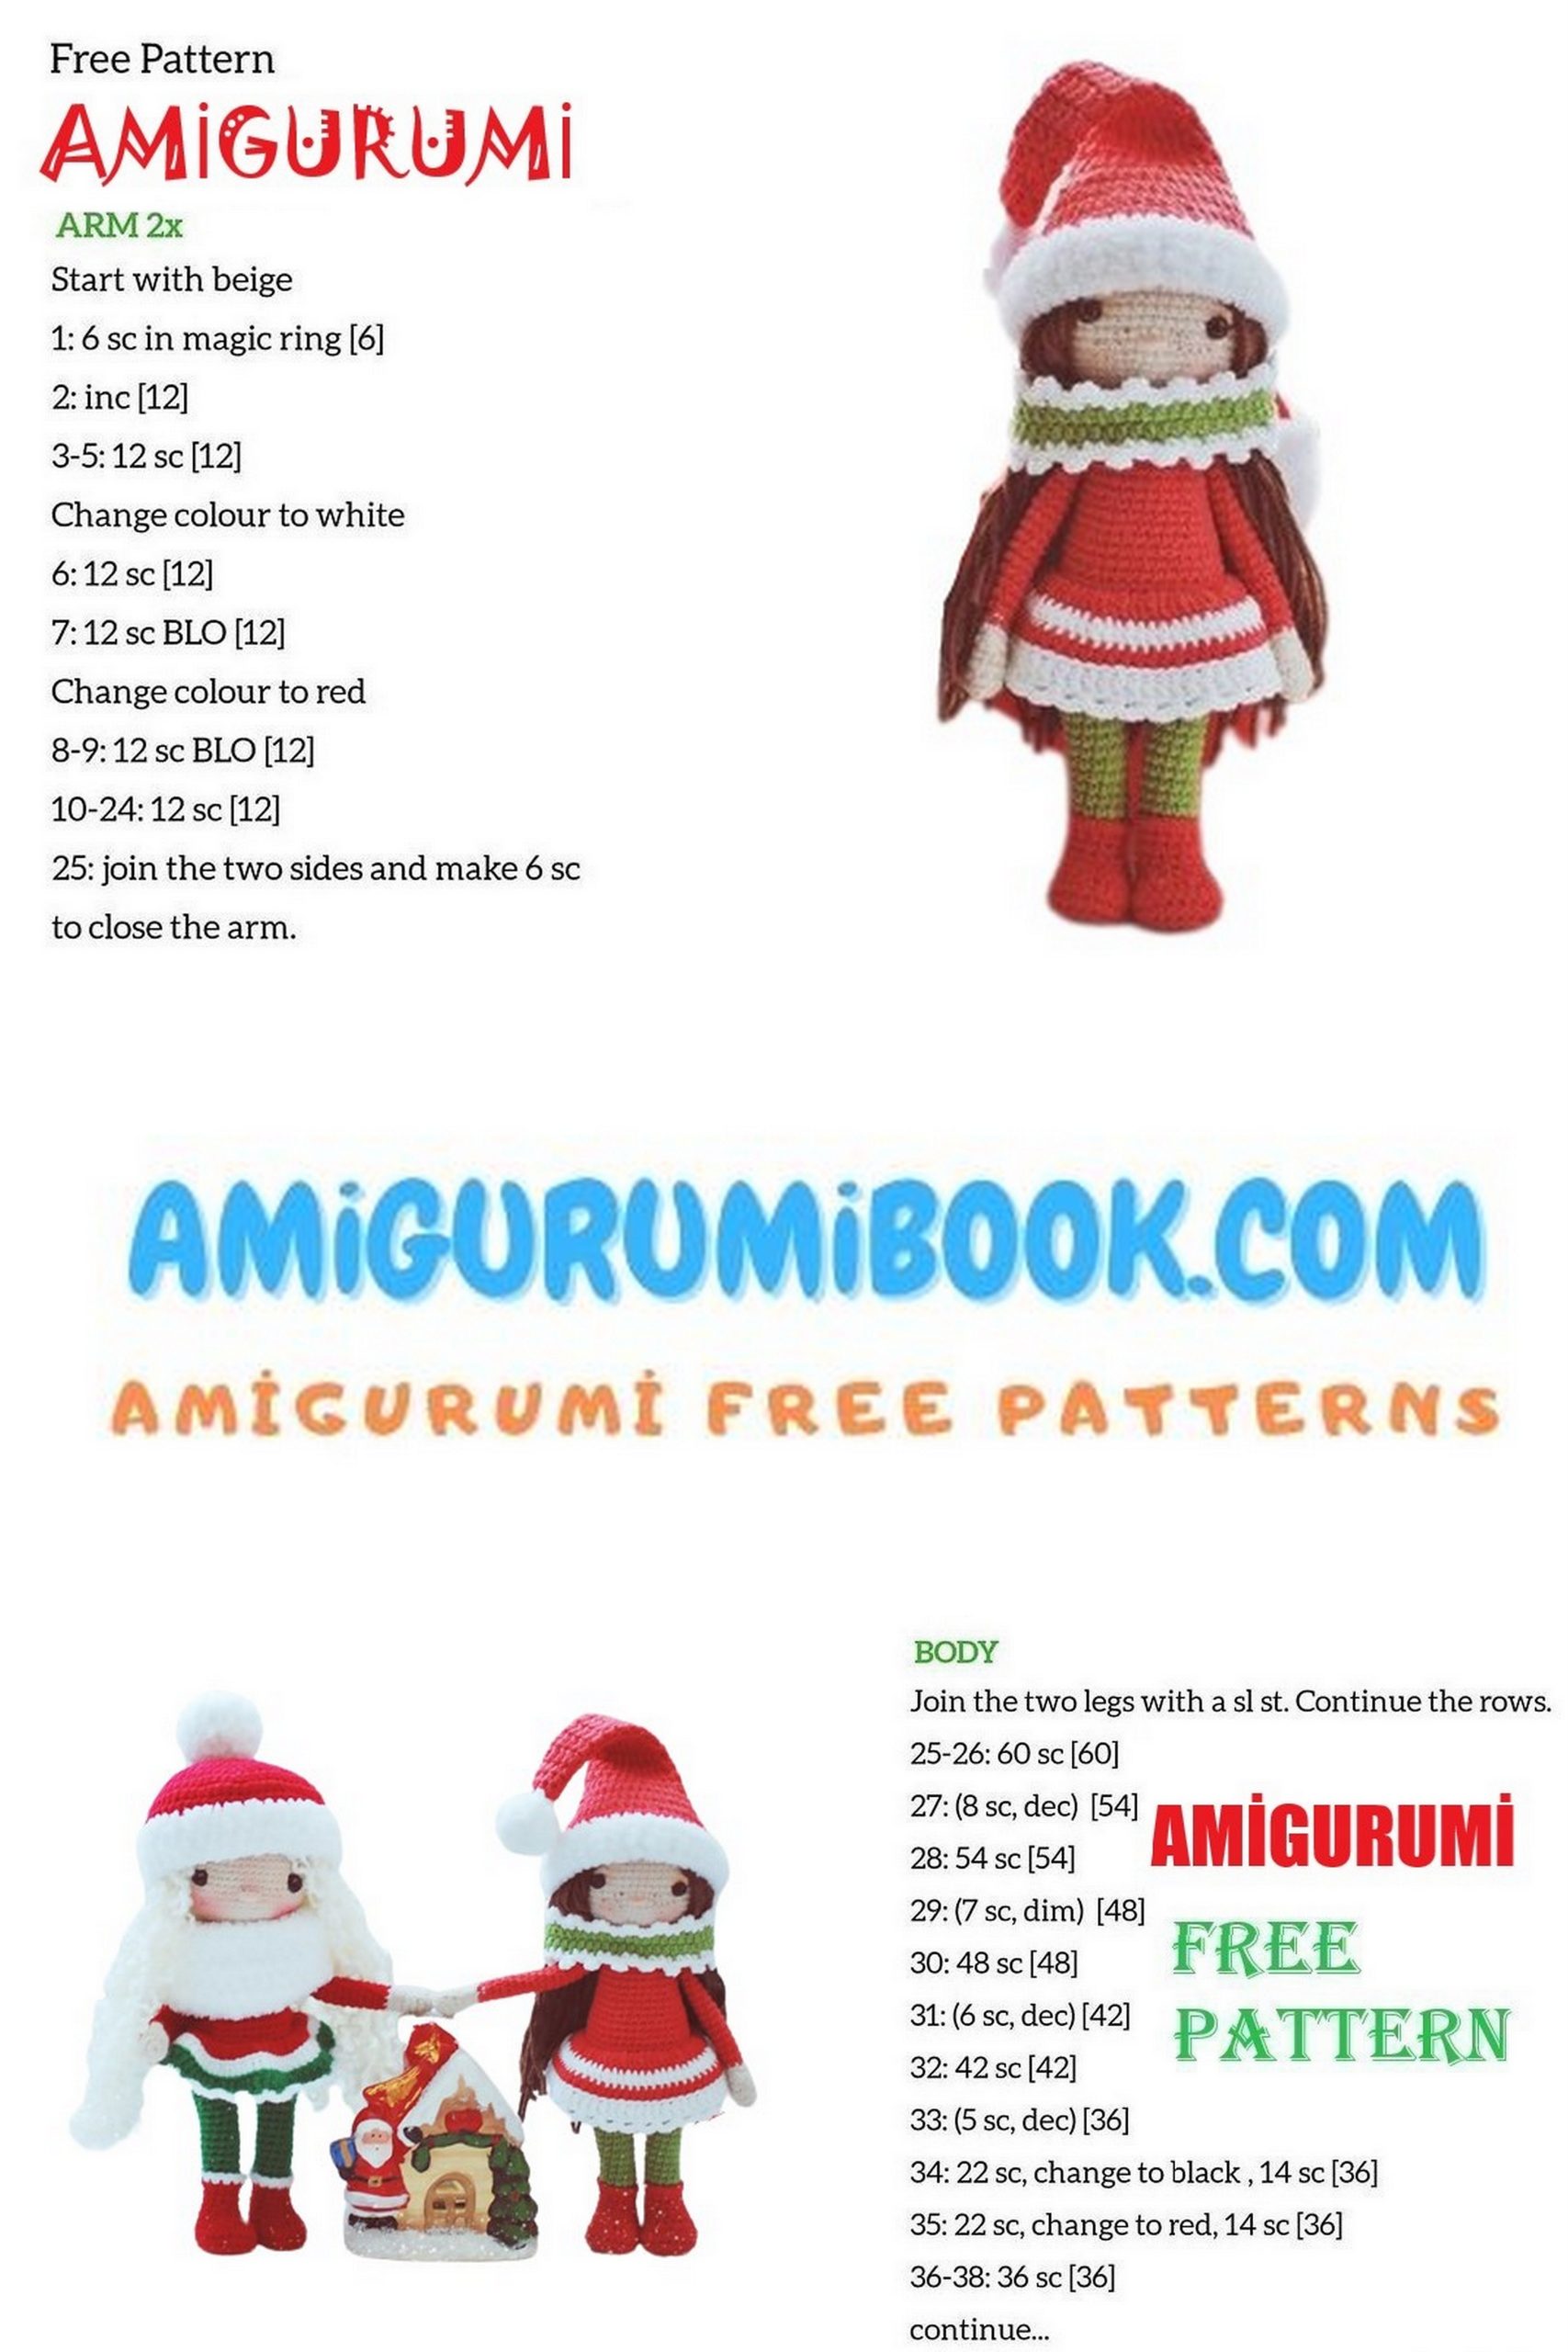
Stage 2 – Arms (Make 2)
Start with flesh-colored yarn. Work in spiral.
1: 6 sc in MR (6)
2: 6 inc (12)
3–4: 12 sc (2 rounds)
5: (dec, 4 sc) ×2 (10)
6: 1 bobble stitch (3 hdc together), 9 sc (10)
7: dec, 3 sc, switch to red yarn, 5 sc (9)
8–22: 9 sc (15 rounds)
Lightly stuff.
Fold flat and close with 4 sc through both sides.
Fasten off leaving tail for sewing.

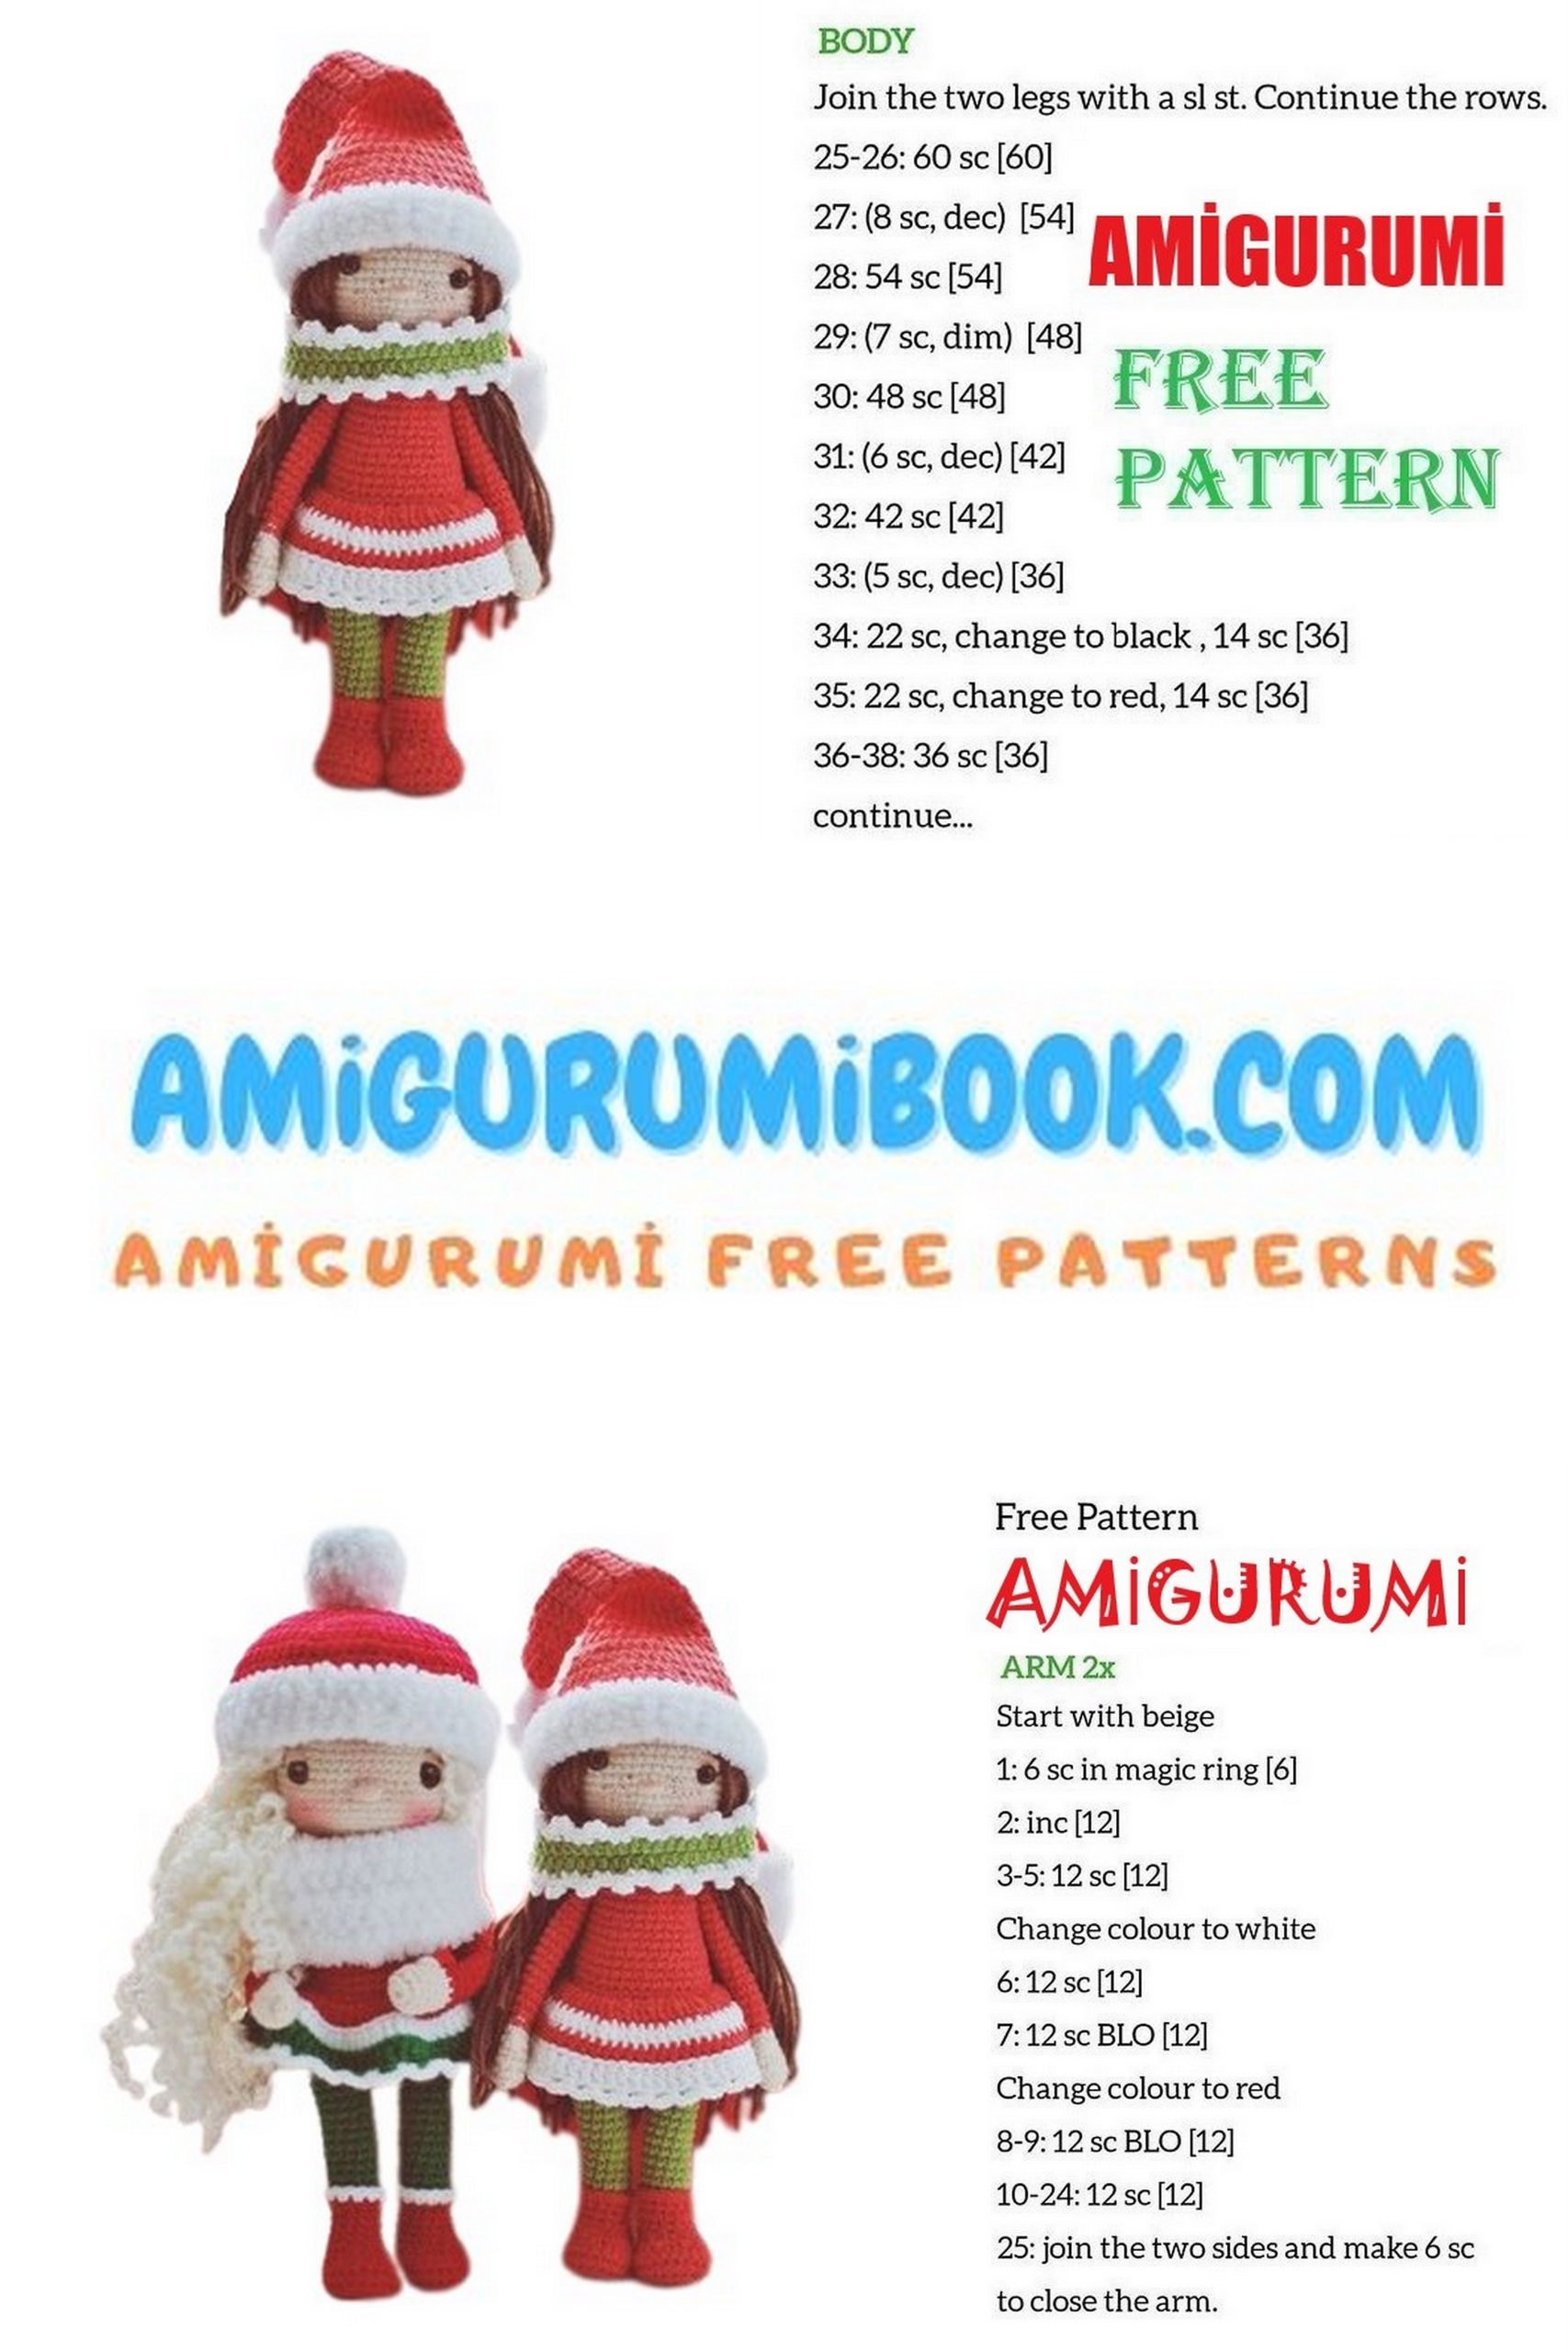
🎄 Stage 3 – Body
On the second leg, work 5 sl st to shift the starting point so the marker sits on the outer right side (when viewed from the toe).
Stuff legs firmly.
Fasten off and secure yarn from the first leg.
Body Join
1: Ch 3. Join to the first worked leg (left leg). Work 6 sc across the back of the leg.
Place marker here – this is the new beginning of the round.
Continue keeping the marker aligned on the side.
If it shifts backward, adjust with slip stitches.
1 (continued):
7 sc (front of left leg),
3 sc in ch space,
13 sc (front of right leg),
3 sc in ch space,
6 sc (back of left leg) (32)
2: 6 sc, inc, 3 sc (over chain), inc, 11 sc, inc, 3 sc, inc, 5 sc (36)
3: 36 sc
4: 9 sc, inc (center front), 13 sc, inc, 6 sc, inc, 5 sc (39)
5: 39 sc
(Adjust marker with 1 sl st if needed.)
6: 9 sc, inc (center front), 1 sc (40)
7–8: 40 sc (2 rounds)
Fasten off green yarn.
Color Change
9: Join red yarn, 40 sc
10: BLO 40 sc
11: 4 sc, (dec, 8 sc) ×3, dec, 4 sc (36)
12–13: 36 sc (2 rounds)
14: 4 sc, (dec, 7 sc) ×3, dec, 3 sc (32)
15–16: 32 sc (2 rounds)
17: 3 sc, (dec, 6 sc) ×3, dec, 3 sc (28)
18–19: 28 sc (2 rounds)
20: Work only 25 sc (leave last 3 stitches unworked).
Place marker here — new beginning of round (arms will be attached next).
Stuff body firmly.
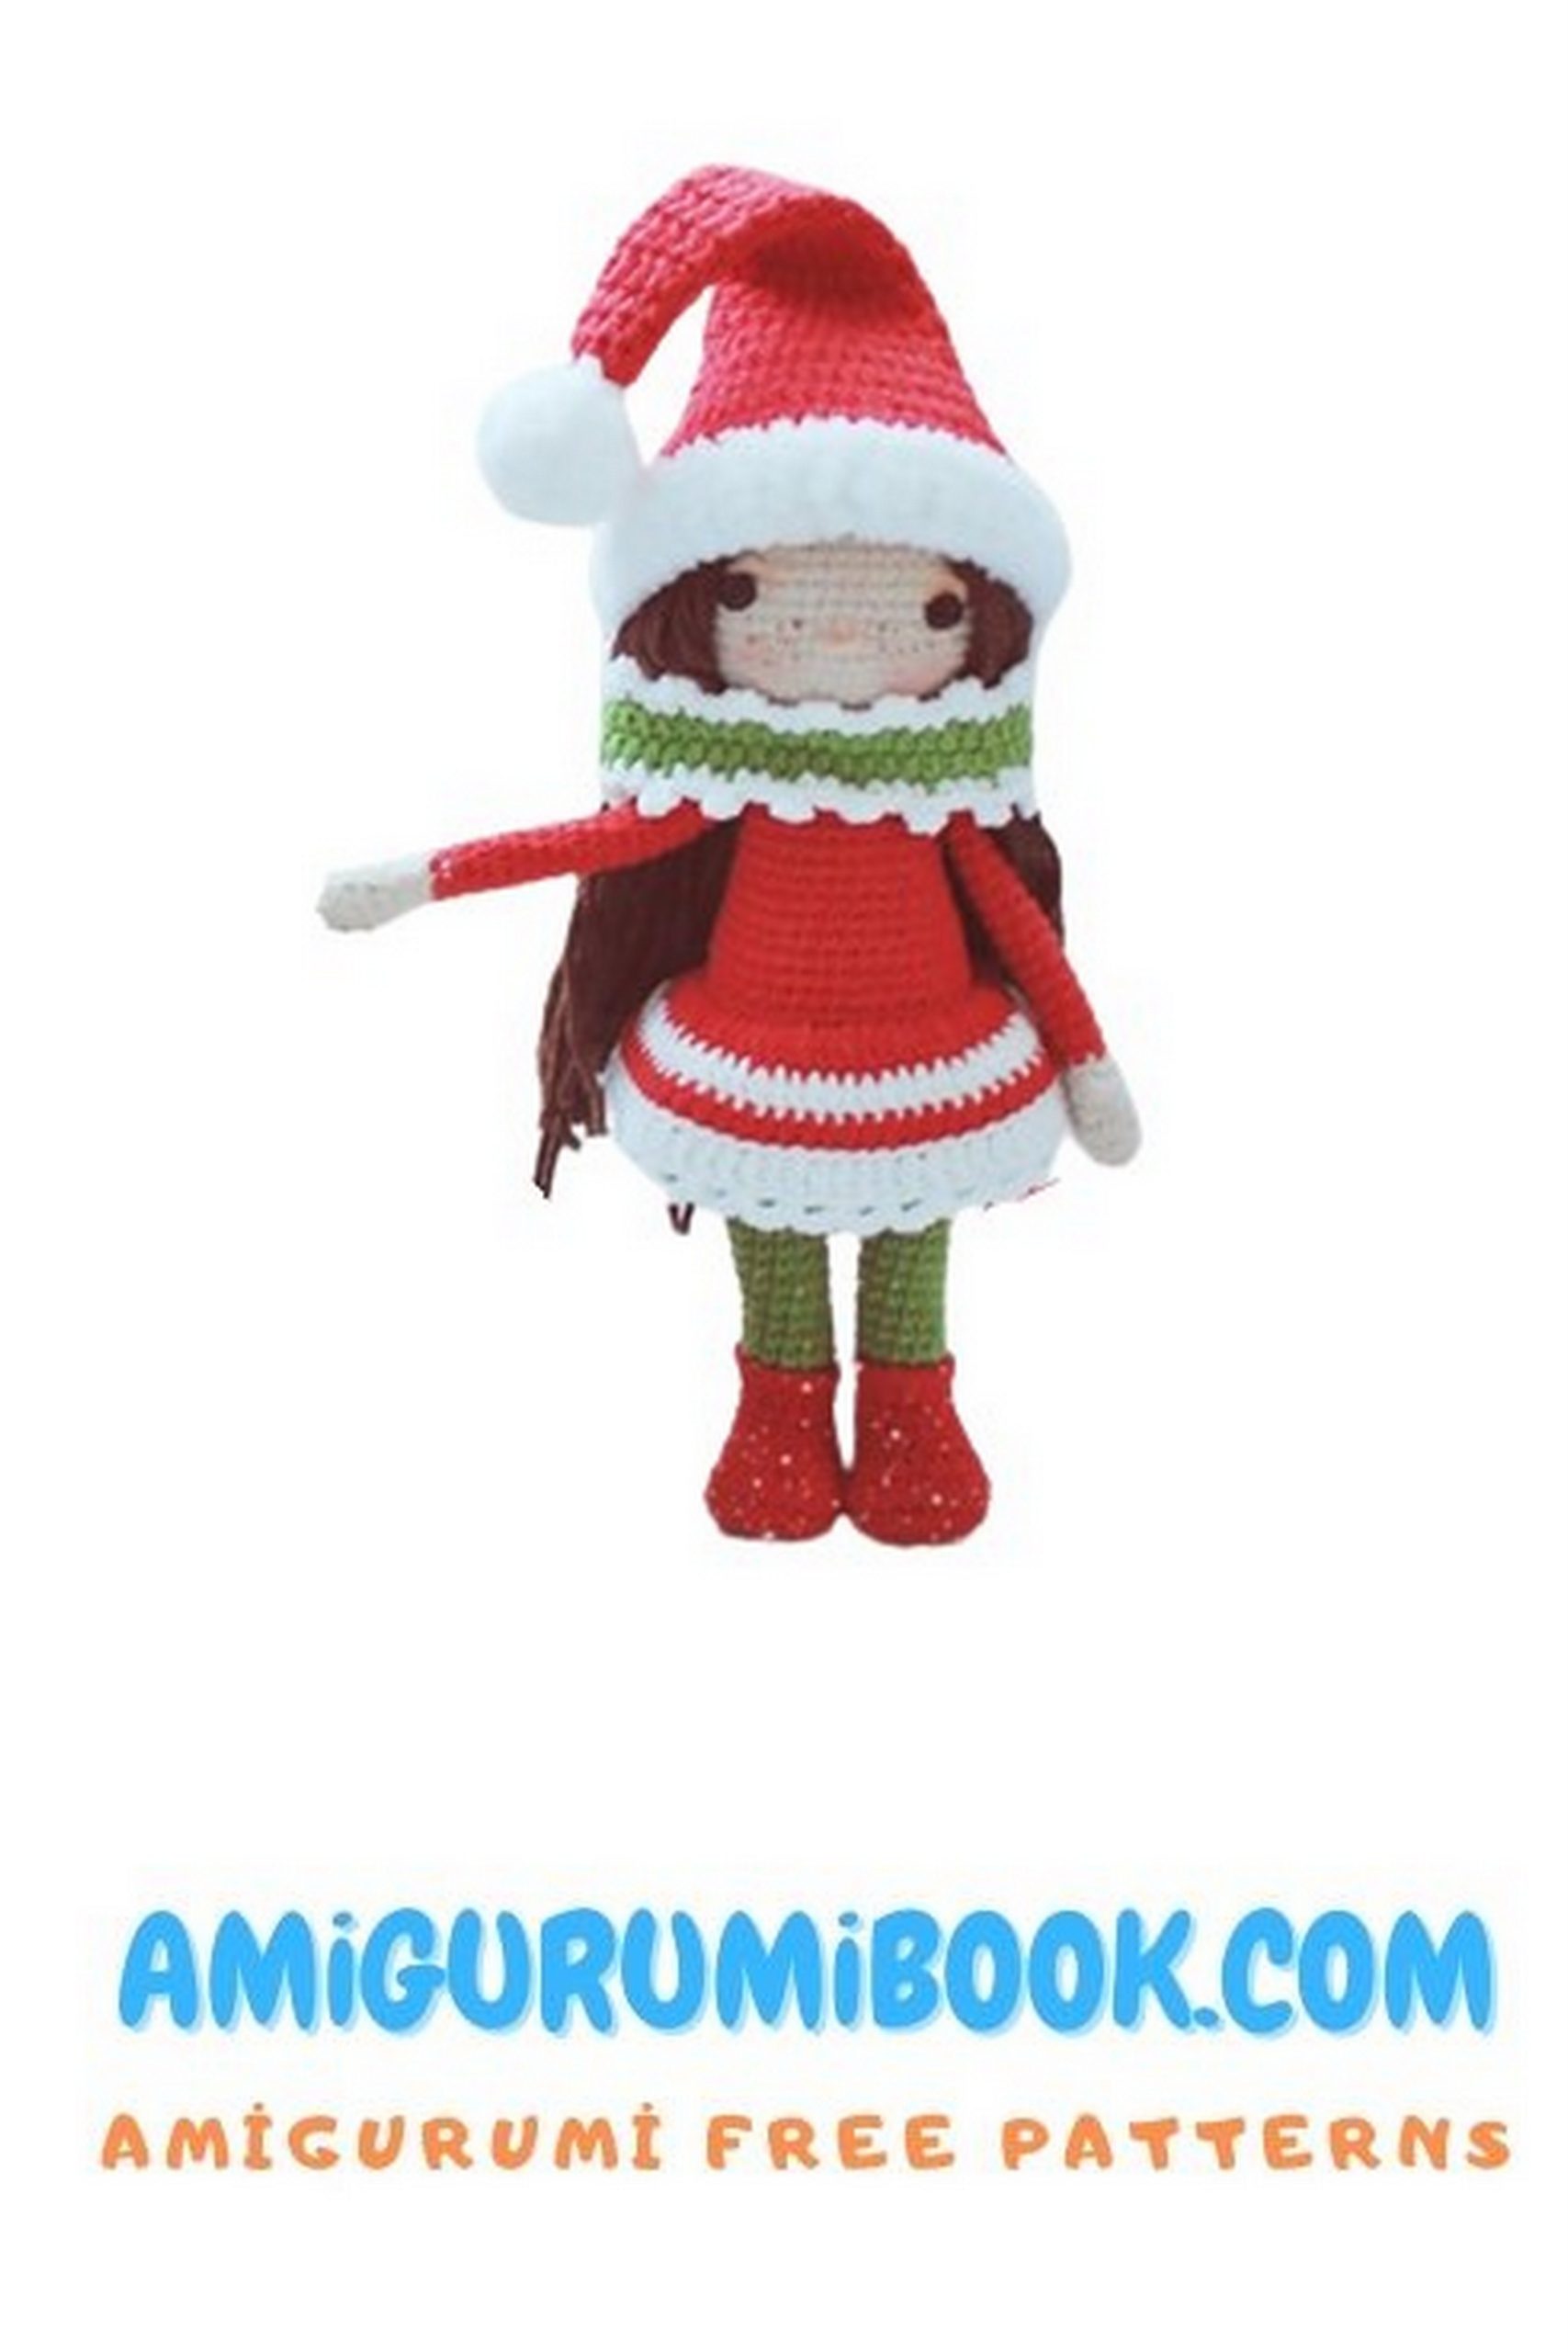
👗 Skirt
Attach red yarn to BLO of Round 9.
1: 2 sc in each stitch around (80)
2–4: 80 sc (3 rounds, alternate colors if desired)
5: (Ch 3, sl st in next stitch) repeat around
Fasten off and hide ends.
Stage 4 – Attach Arms & Begin Head
Continue working from body.
21:
Attach left arm – 4 sc through arm and body,
12 sc (front),
Attach right arm – 4 sc through arm and body,
8 sc (back) (28)
22:
2 sc, dec, 3 sc, dec,
2 sc (center front),
dec, 3 sc, dec (arm start),
2 sc, 8 sc (back) (24)
23: (dec, 2 sc) ×6 (18)
Stuff body firmly.
Switch to flesh-colored yarn.
24: 6 dec, 1 sc (12)
25–26: 12 sc (2 rounds)
→ Neck completed.
Do not cut yarn — continue directly with the head.
🎄 Starting the Head
Continue from the neck without cutting the yarn.
1: 12 inc (24)
2: (inc, 3 sc) ×6 (30)
3: 2 sc, (inc, 4 sc) ×5, inc, 2 sc (36)
4: (inc, 5 sc) ×6 (42)
5: 3 sc, (inc, 6 sc) ×5, inc, 3 sc (48)
6: (inc, 7 sc) ×6 (54)
7–14: 54 sc (8 rounds)
Insert safety eyes between Rounds 10–11, approximately 10 stitches apart (or adjust as desired).
15: (7 sc, dec) ×6 (48)
16: 48 sc
17: 3 sc, (dec, 6 sc) ×5, dec, 3 sc (42)
18: 42 sc
19: (5 sc, dec) ×6 (36)
Insert reinforcement (wire or cotton swabs if desired).
Stuff the head firmly and shape.
20: (4 sc, dec) ×6 (30)
21: (3 sc, dec) ×6 (24) – Stuff more firmly
22: (2 sc, dec) ×6 (18)
23: (1 sc, dec) ×6 (12)
24: 6 dec (6)
Pull tight, fasten off, and hide yarn end inside the head.
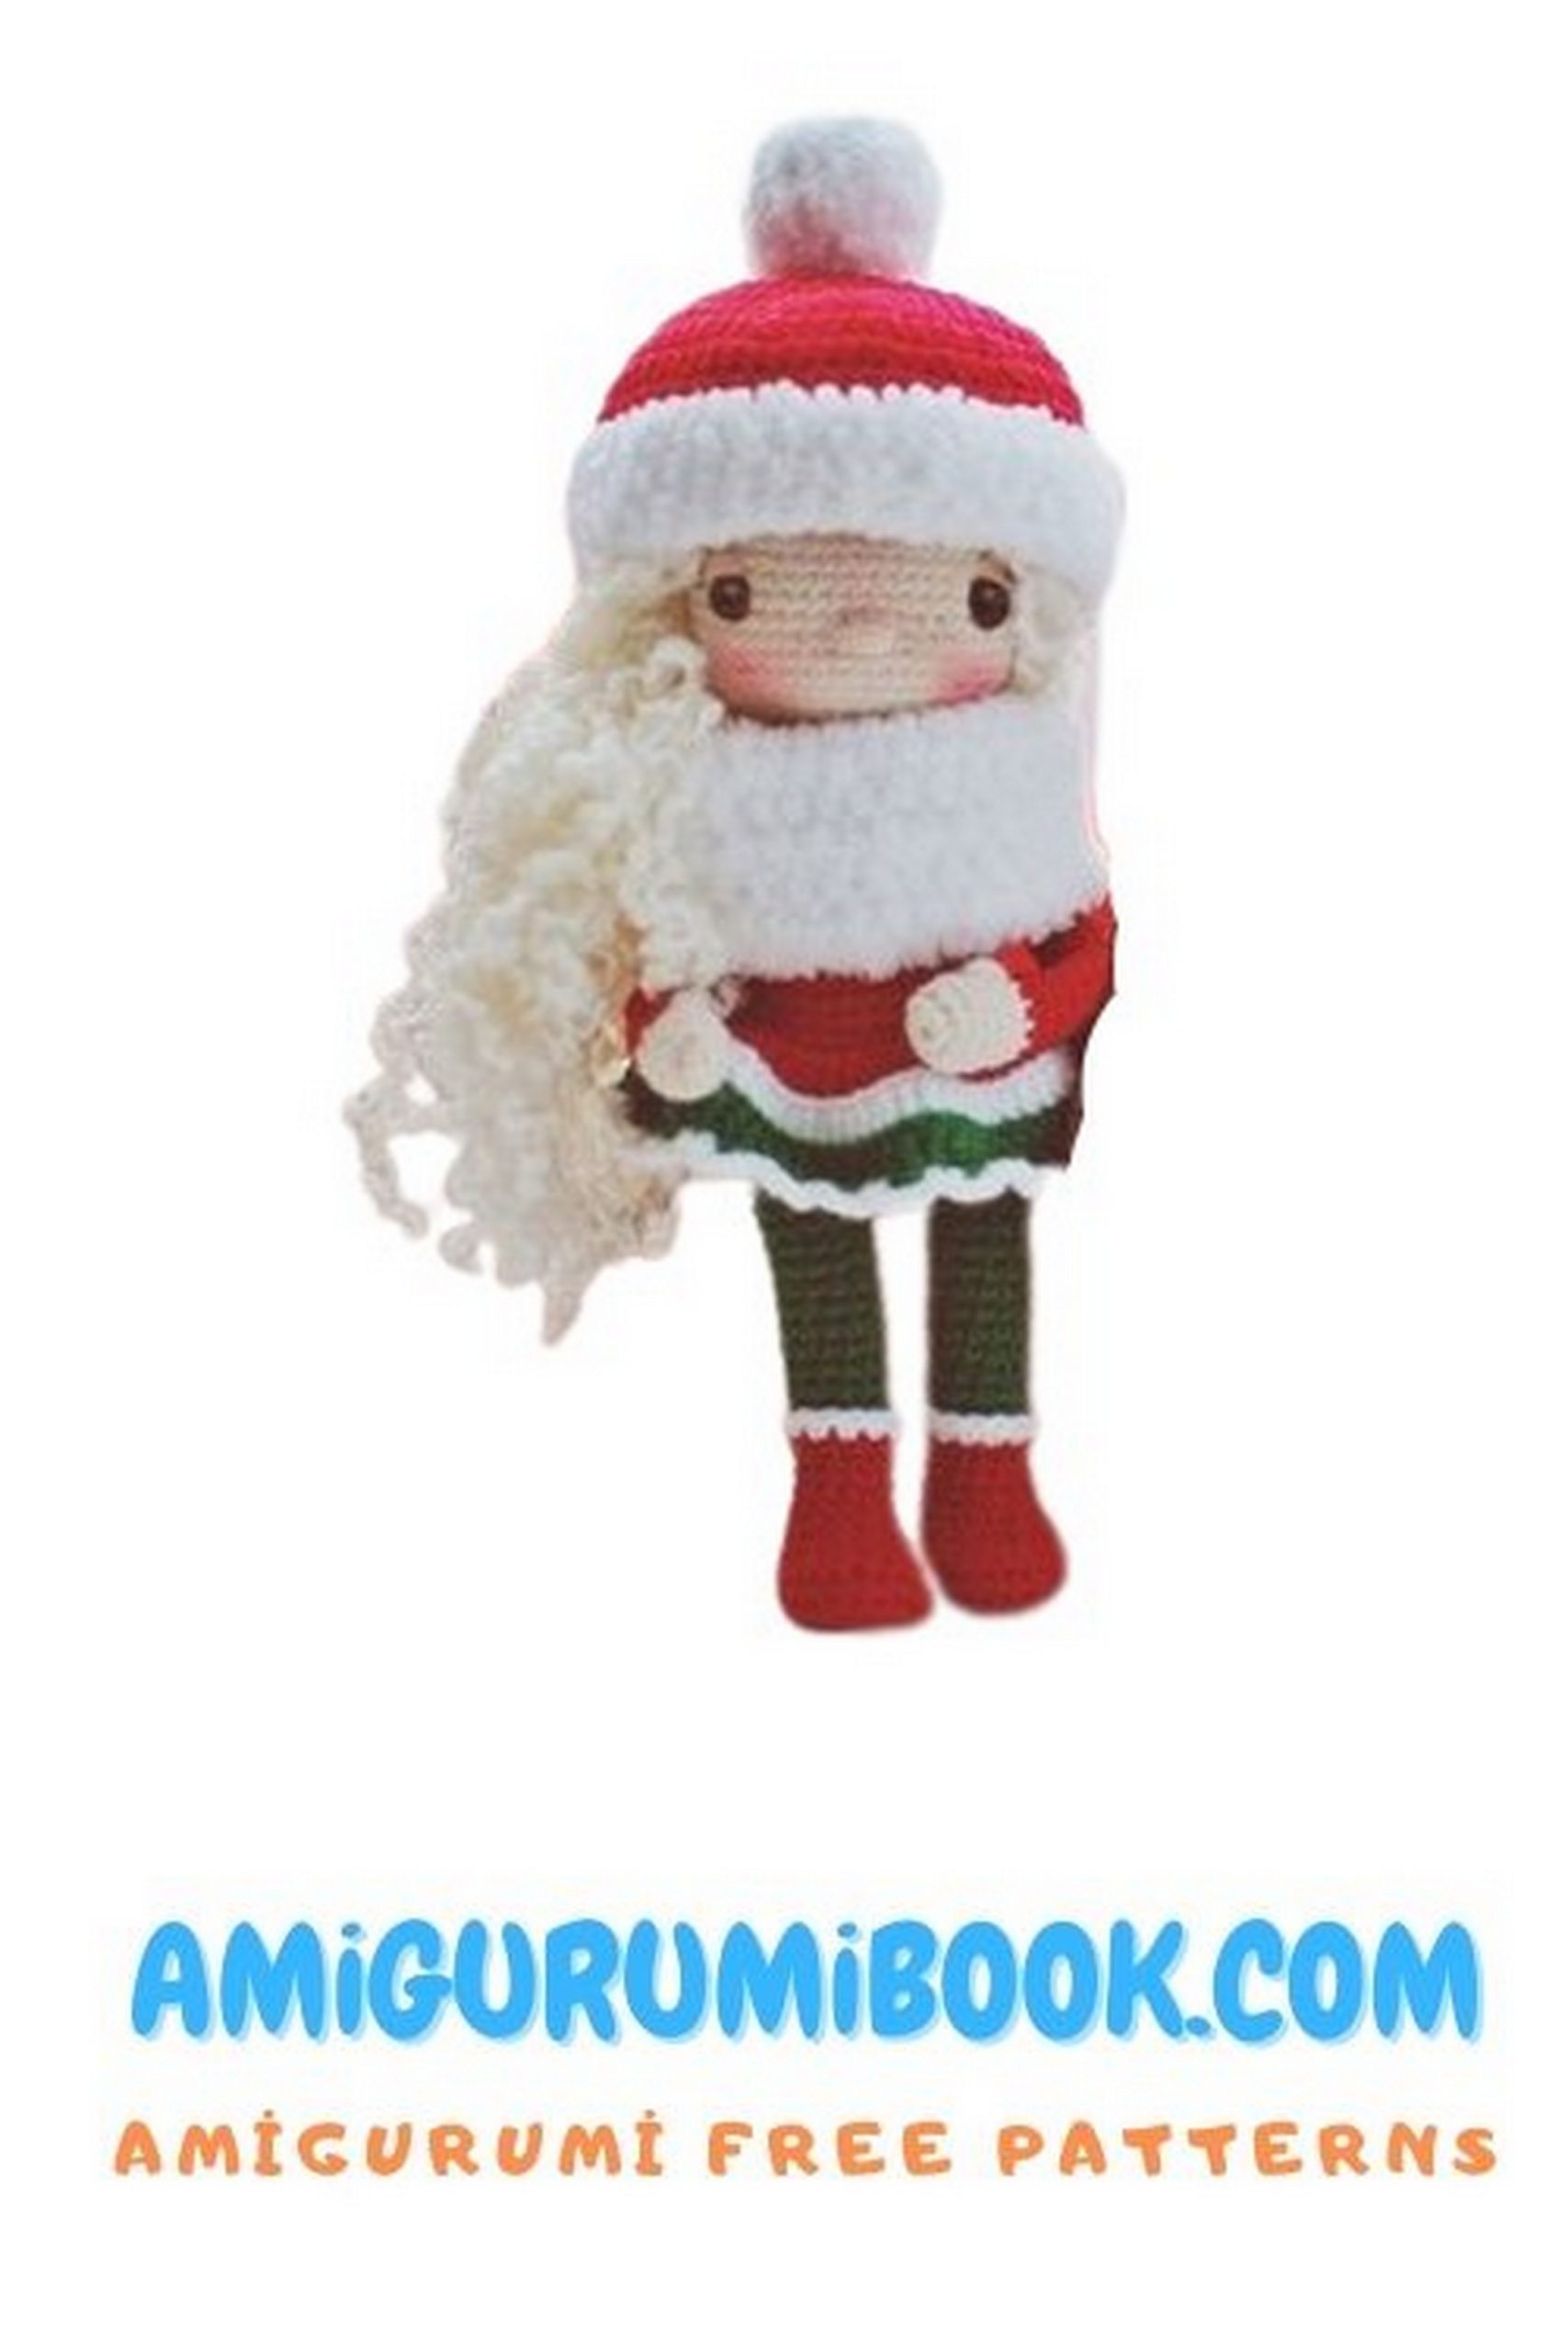
✨ Stage 5 – Finishing
Ears
Make 5 sc in a ring (do not fully close tightly).
Sew near the eyes or position as desired.
Nose
Embroider between Rounds 8–9.
Add eyelids and eyelashes with flesh-colored yarn.
Apply blush with dry pastels if desired.
Hair
Attach strands using the simple knotting (fringe) method.
Start from the crown and fill the back evenly.
🎅 Hat
Use a slightly larger hook or crochet loosely.
Hat Body
Start with slipknot.
1: Ch 8
2–3: 8 sc (2 rows)
4: (inc, 3 sc) ×2 (10)
5–6: 10 sc (2 rows)
7: (inc, 4 sc) ×2 (12)
8: 12 sc
9: (inc, 3 sc) ×3 (15)
10: 15 sc
11: (inc, 4 sc) ×3 (18)
12: 18 sc
13: (inc, 2 sc) ×6 (24)
14: 24 sc
15: (inc, 3 sc) ×6 (30)
16: (inc, 4 sc) ×6 (36)
17: (inc, 5 sc) ×6 (42)
18: (inc, 6 sc) ×6 (48)
19: 48 sc
If needed, adjust size by adding increase or decrease round.
20–22: 48 sc (3 rounds, Alize Softy yarn for trim)
Fasten off and secure.
🎁 Pompom
Start with slipknot.
1: Ch 9
2: 9 sc in MR (9)
3: 4 dec, 1 sc
Pull tight, fasten off.
Sew pompom to the top of the hat.
🧣 Scarf (Option 1)
Using green yarn:
1: Ch 50 (approximately).
Work 3 hdc in each chain across.
In the last chain, make 5 hdc to round the corner.
Edge the scarf with white yarn:
Work sc evenly around the entire piece.
Make a picot (ch 3) in every third stitch.
Fasten off and hide yarn ends.
🎅 Stage 6 – Finishing (Option 2)
Alternate Hat (Looser Fit for More Hair)
Start with a slipknot.
1: Ch 9
2: 9 sl st in MR (9)
3: (1 sl st, inc in sl st) ×9 (27)
4: (2 sl st, inc in sl st) ×9 (36)
5: (3 sl st, inc in sl st) ×9 (45)
6–9: 45 sl st (4 rounds)
Fasten off red yarn.
Switch to white yarn:
10–12: 45 sl st (3 rounds)
Fasten off and secure.
Make a white pompom using the previous pompom instructions and attach to the top.
🧣 Scarf (Option 2 – Simpler Version)
Using white yarn:
1: Ch 50
2–6: 50 sl st (5 rows)
Switch to green yarn:
Edge around the scarf.
Make a picot (ch 3) in every third stitch.
Fasten off and hide ends.