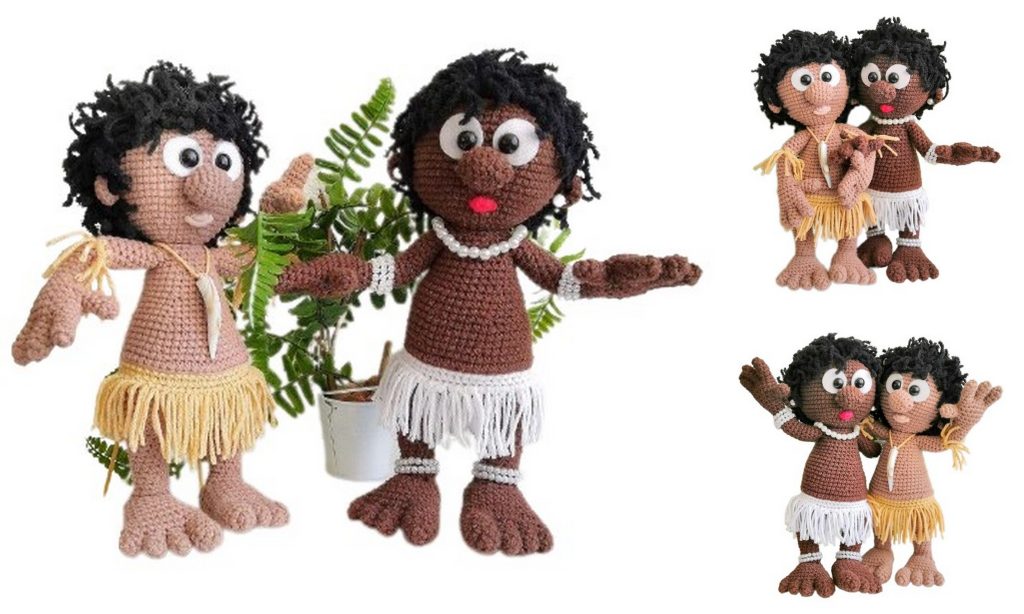
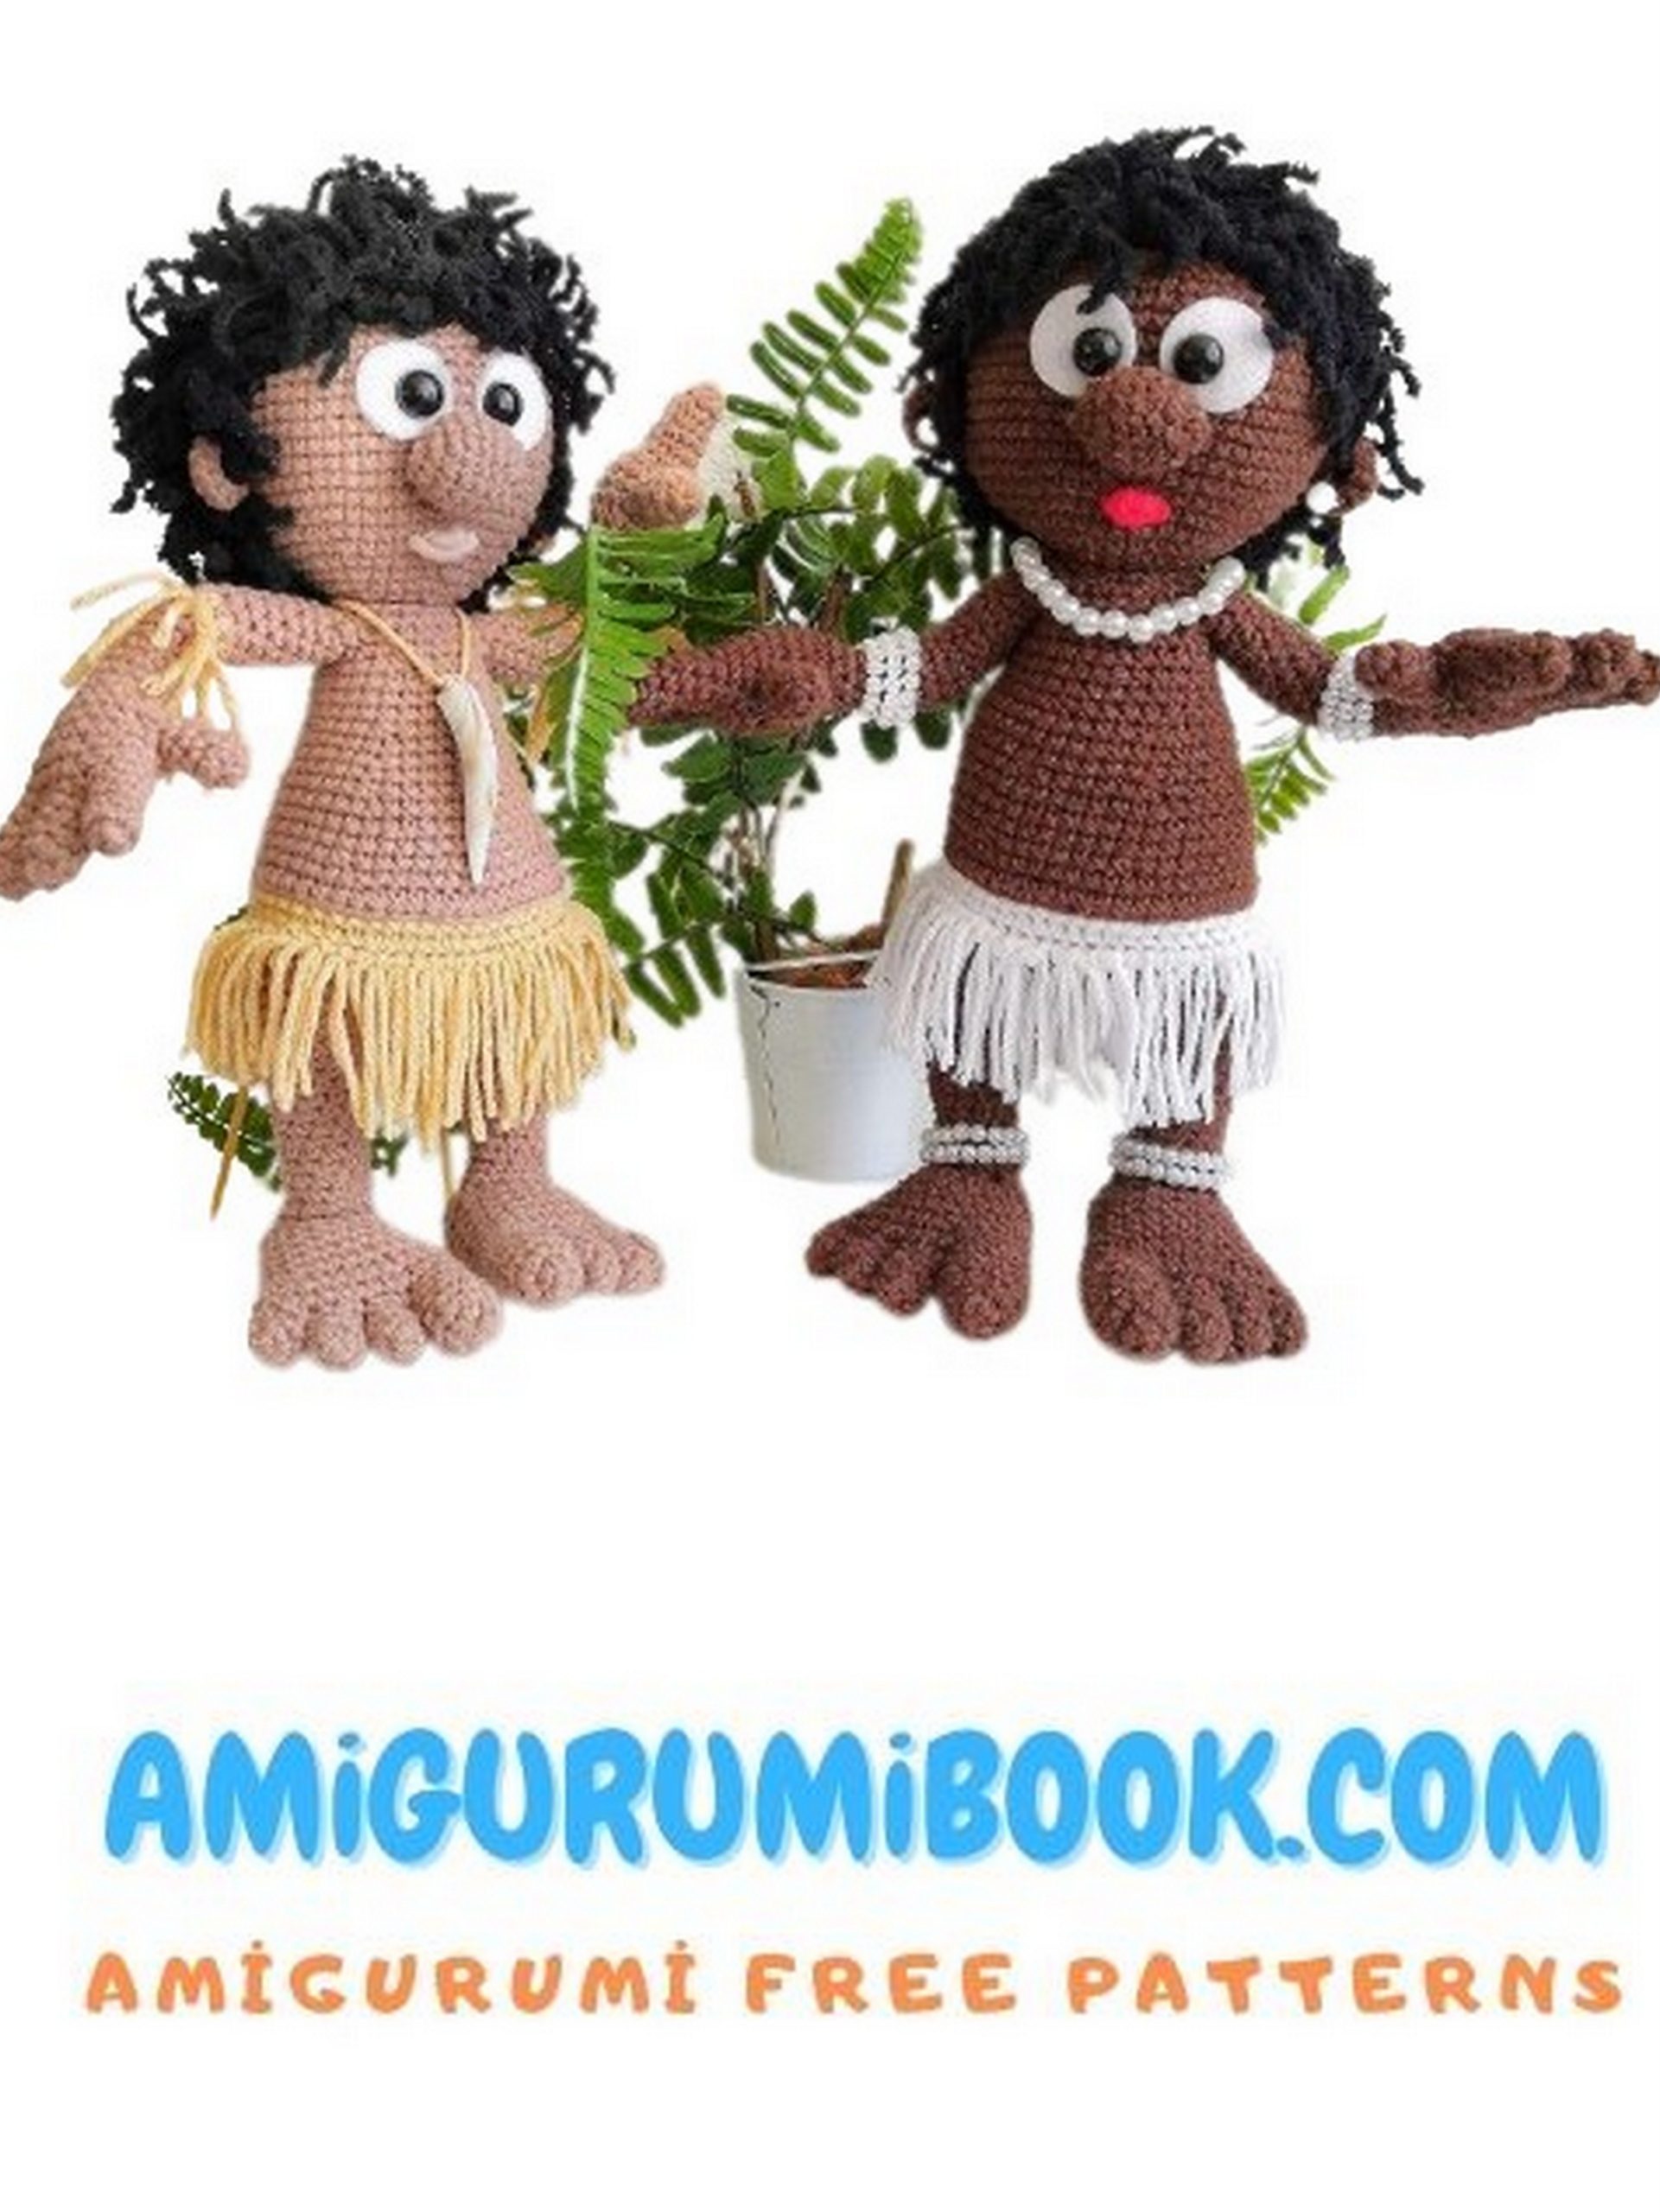
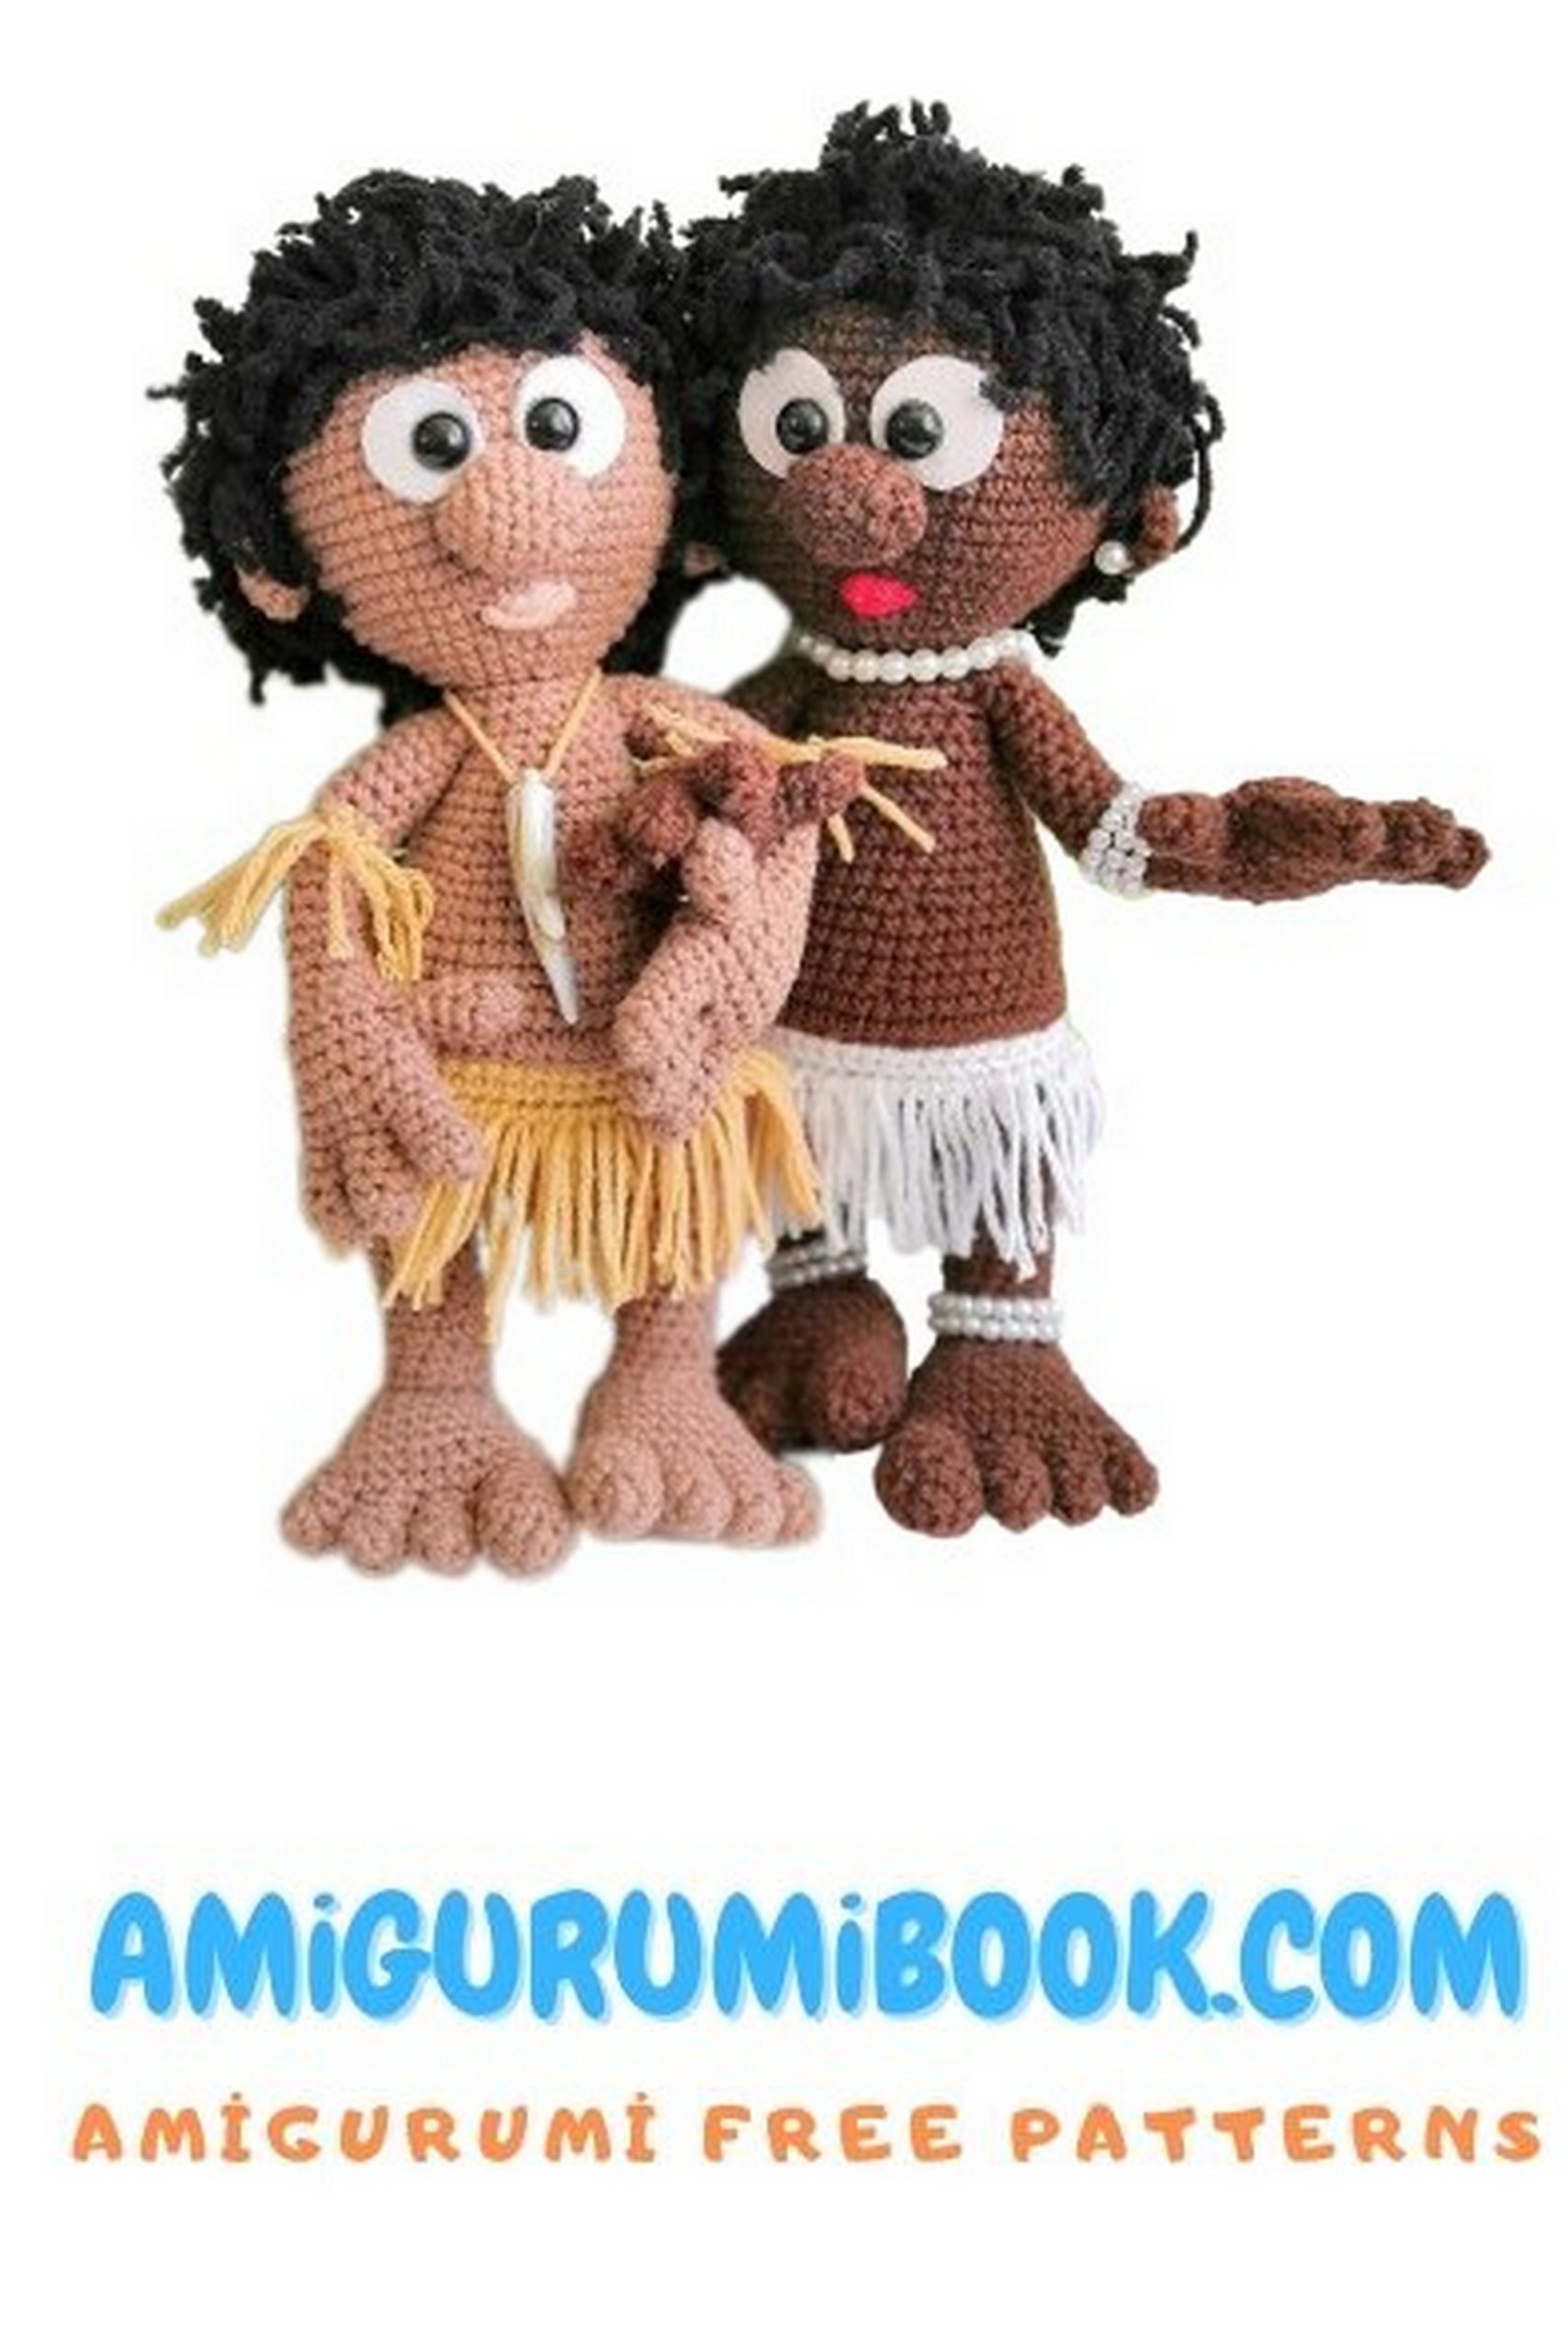
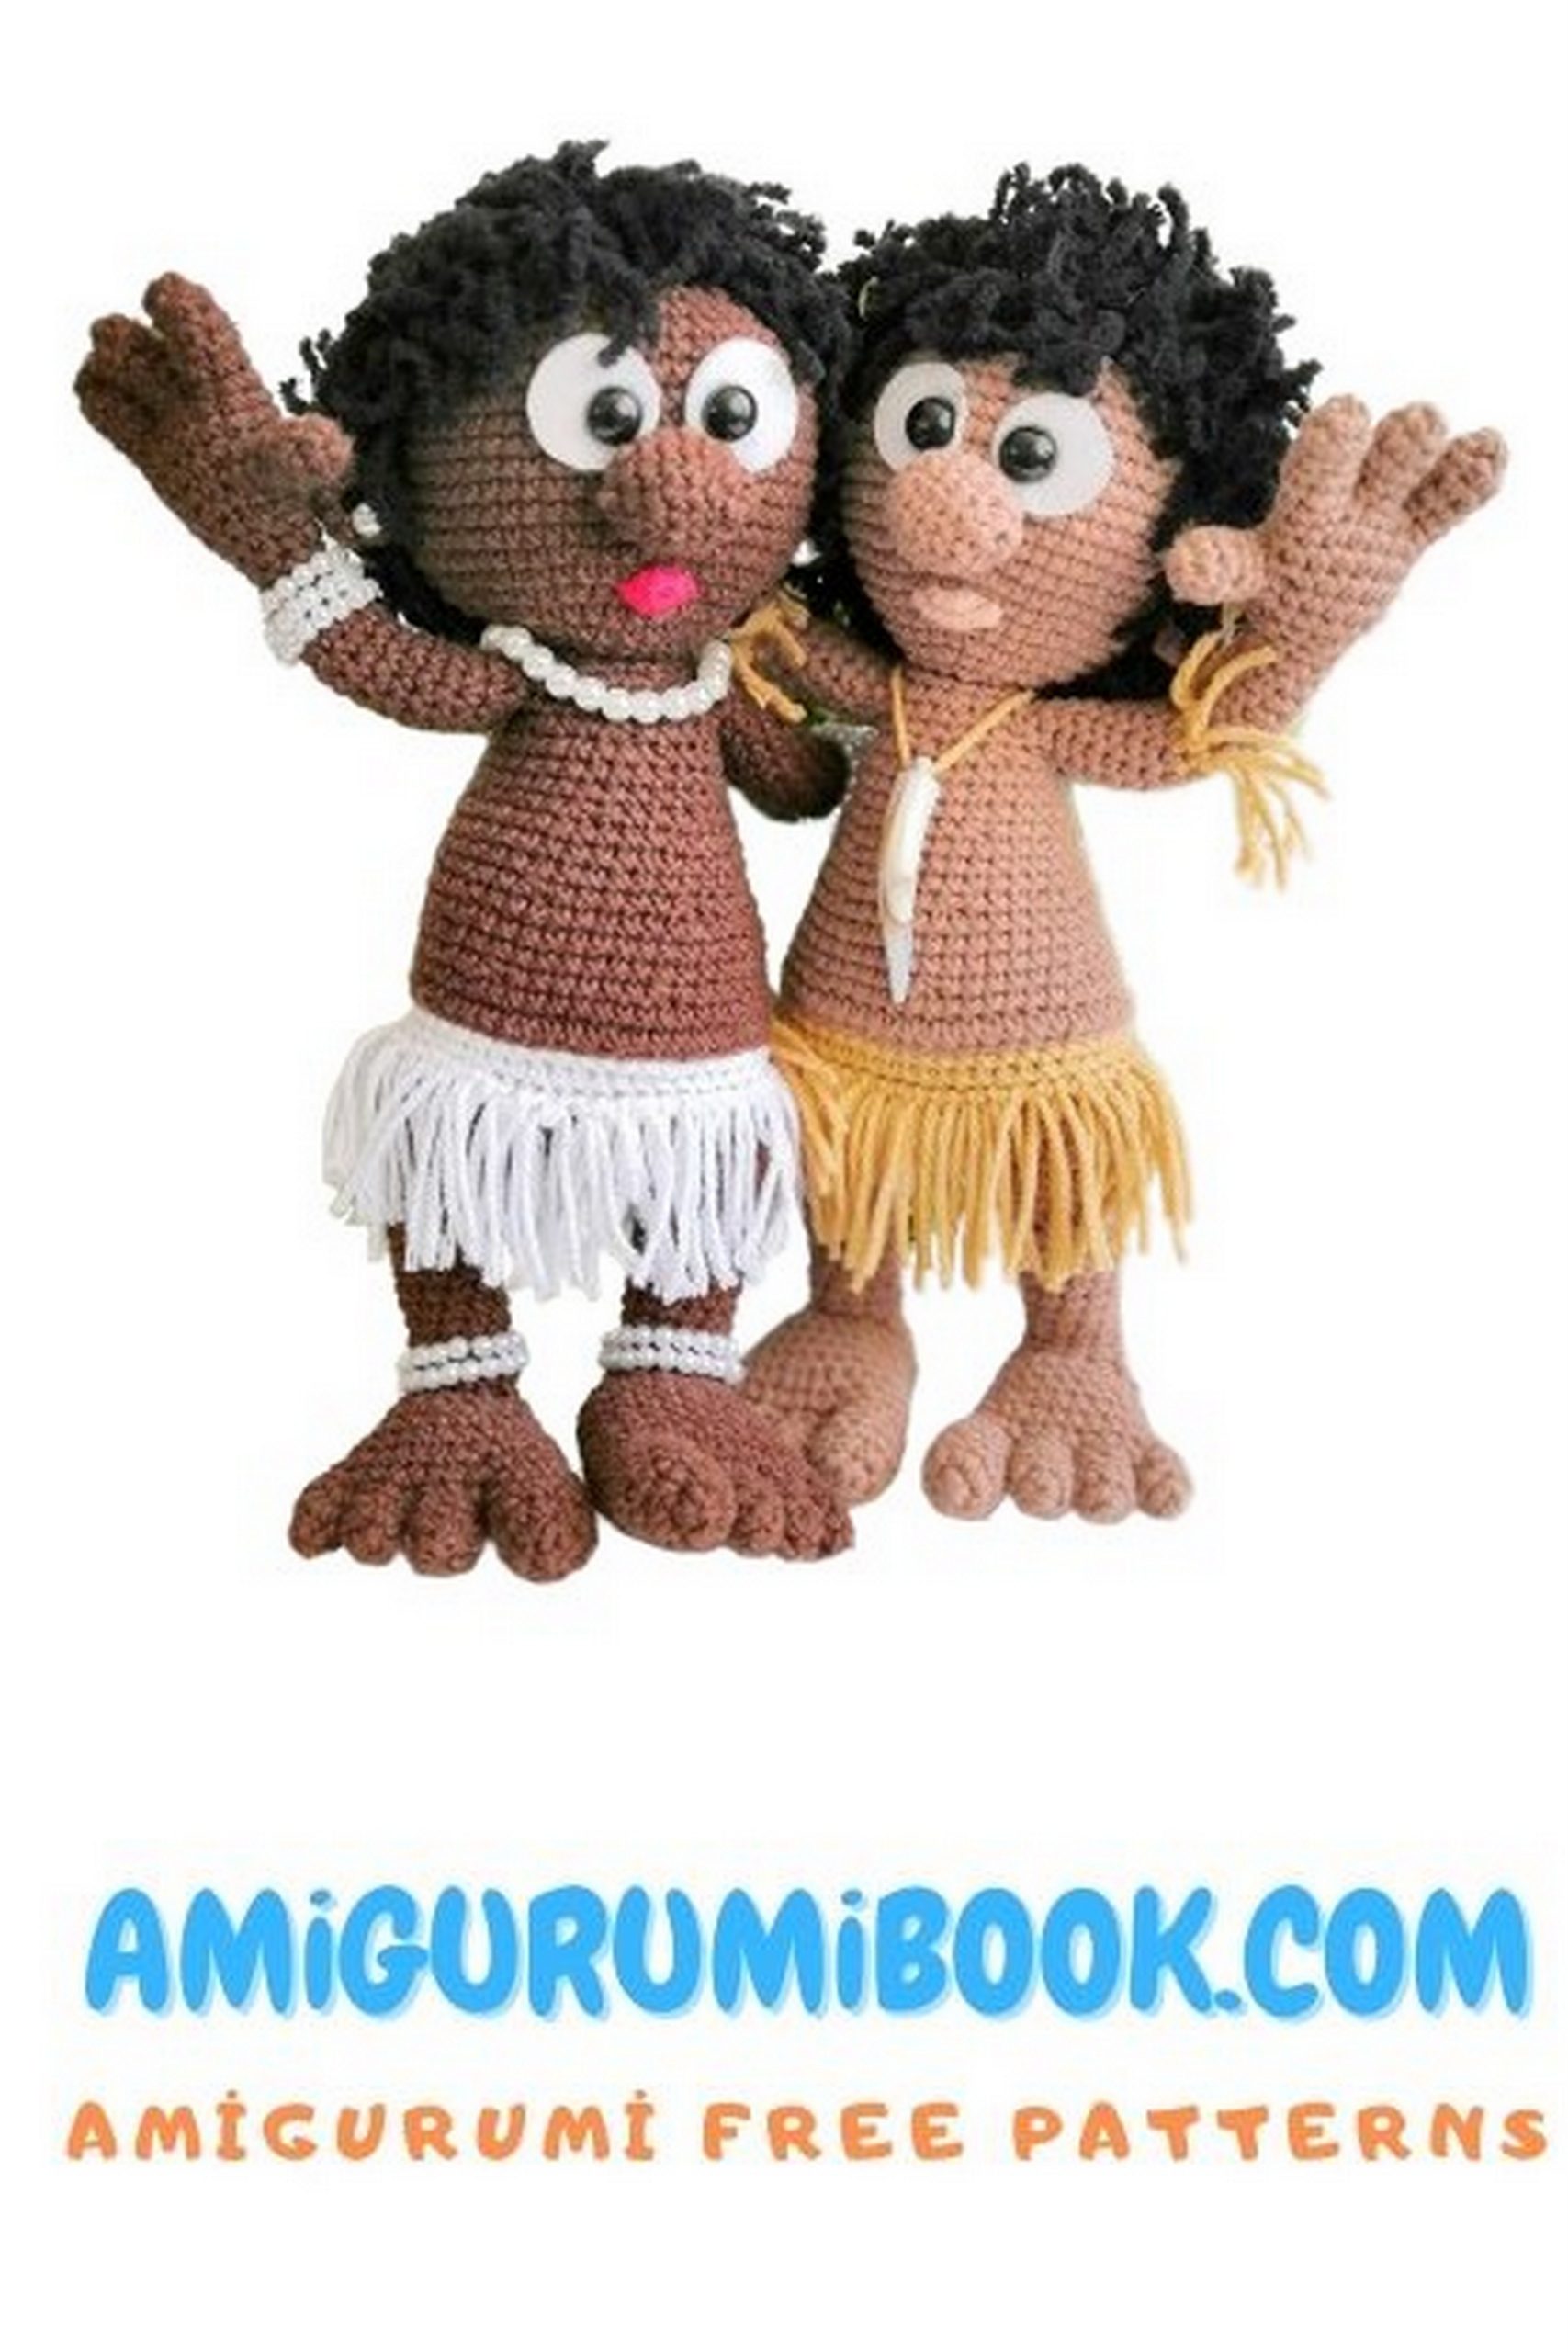
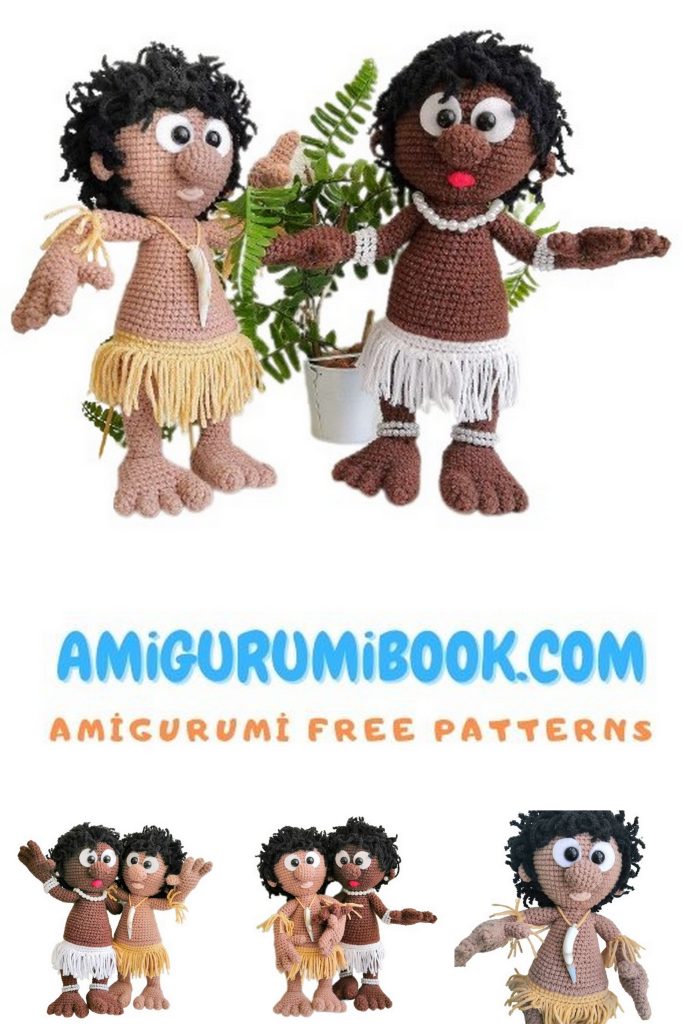
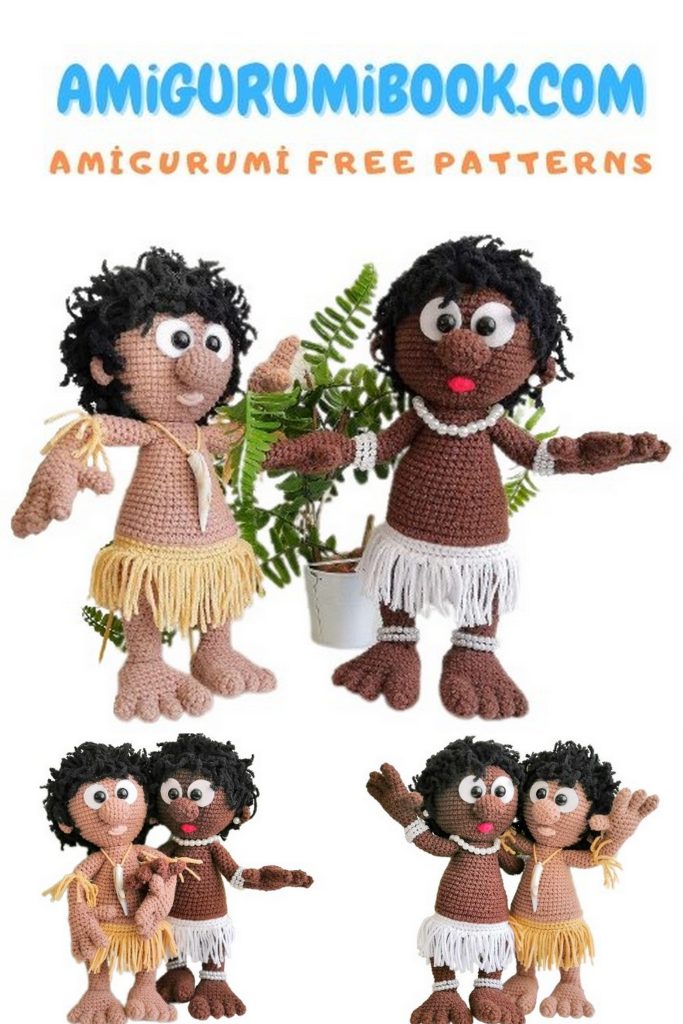
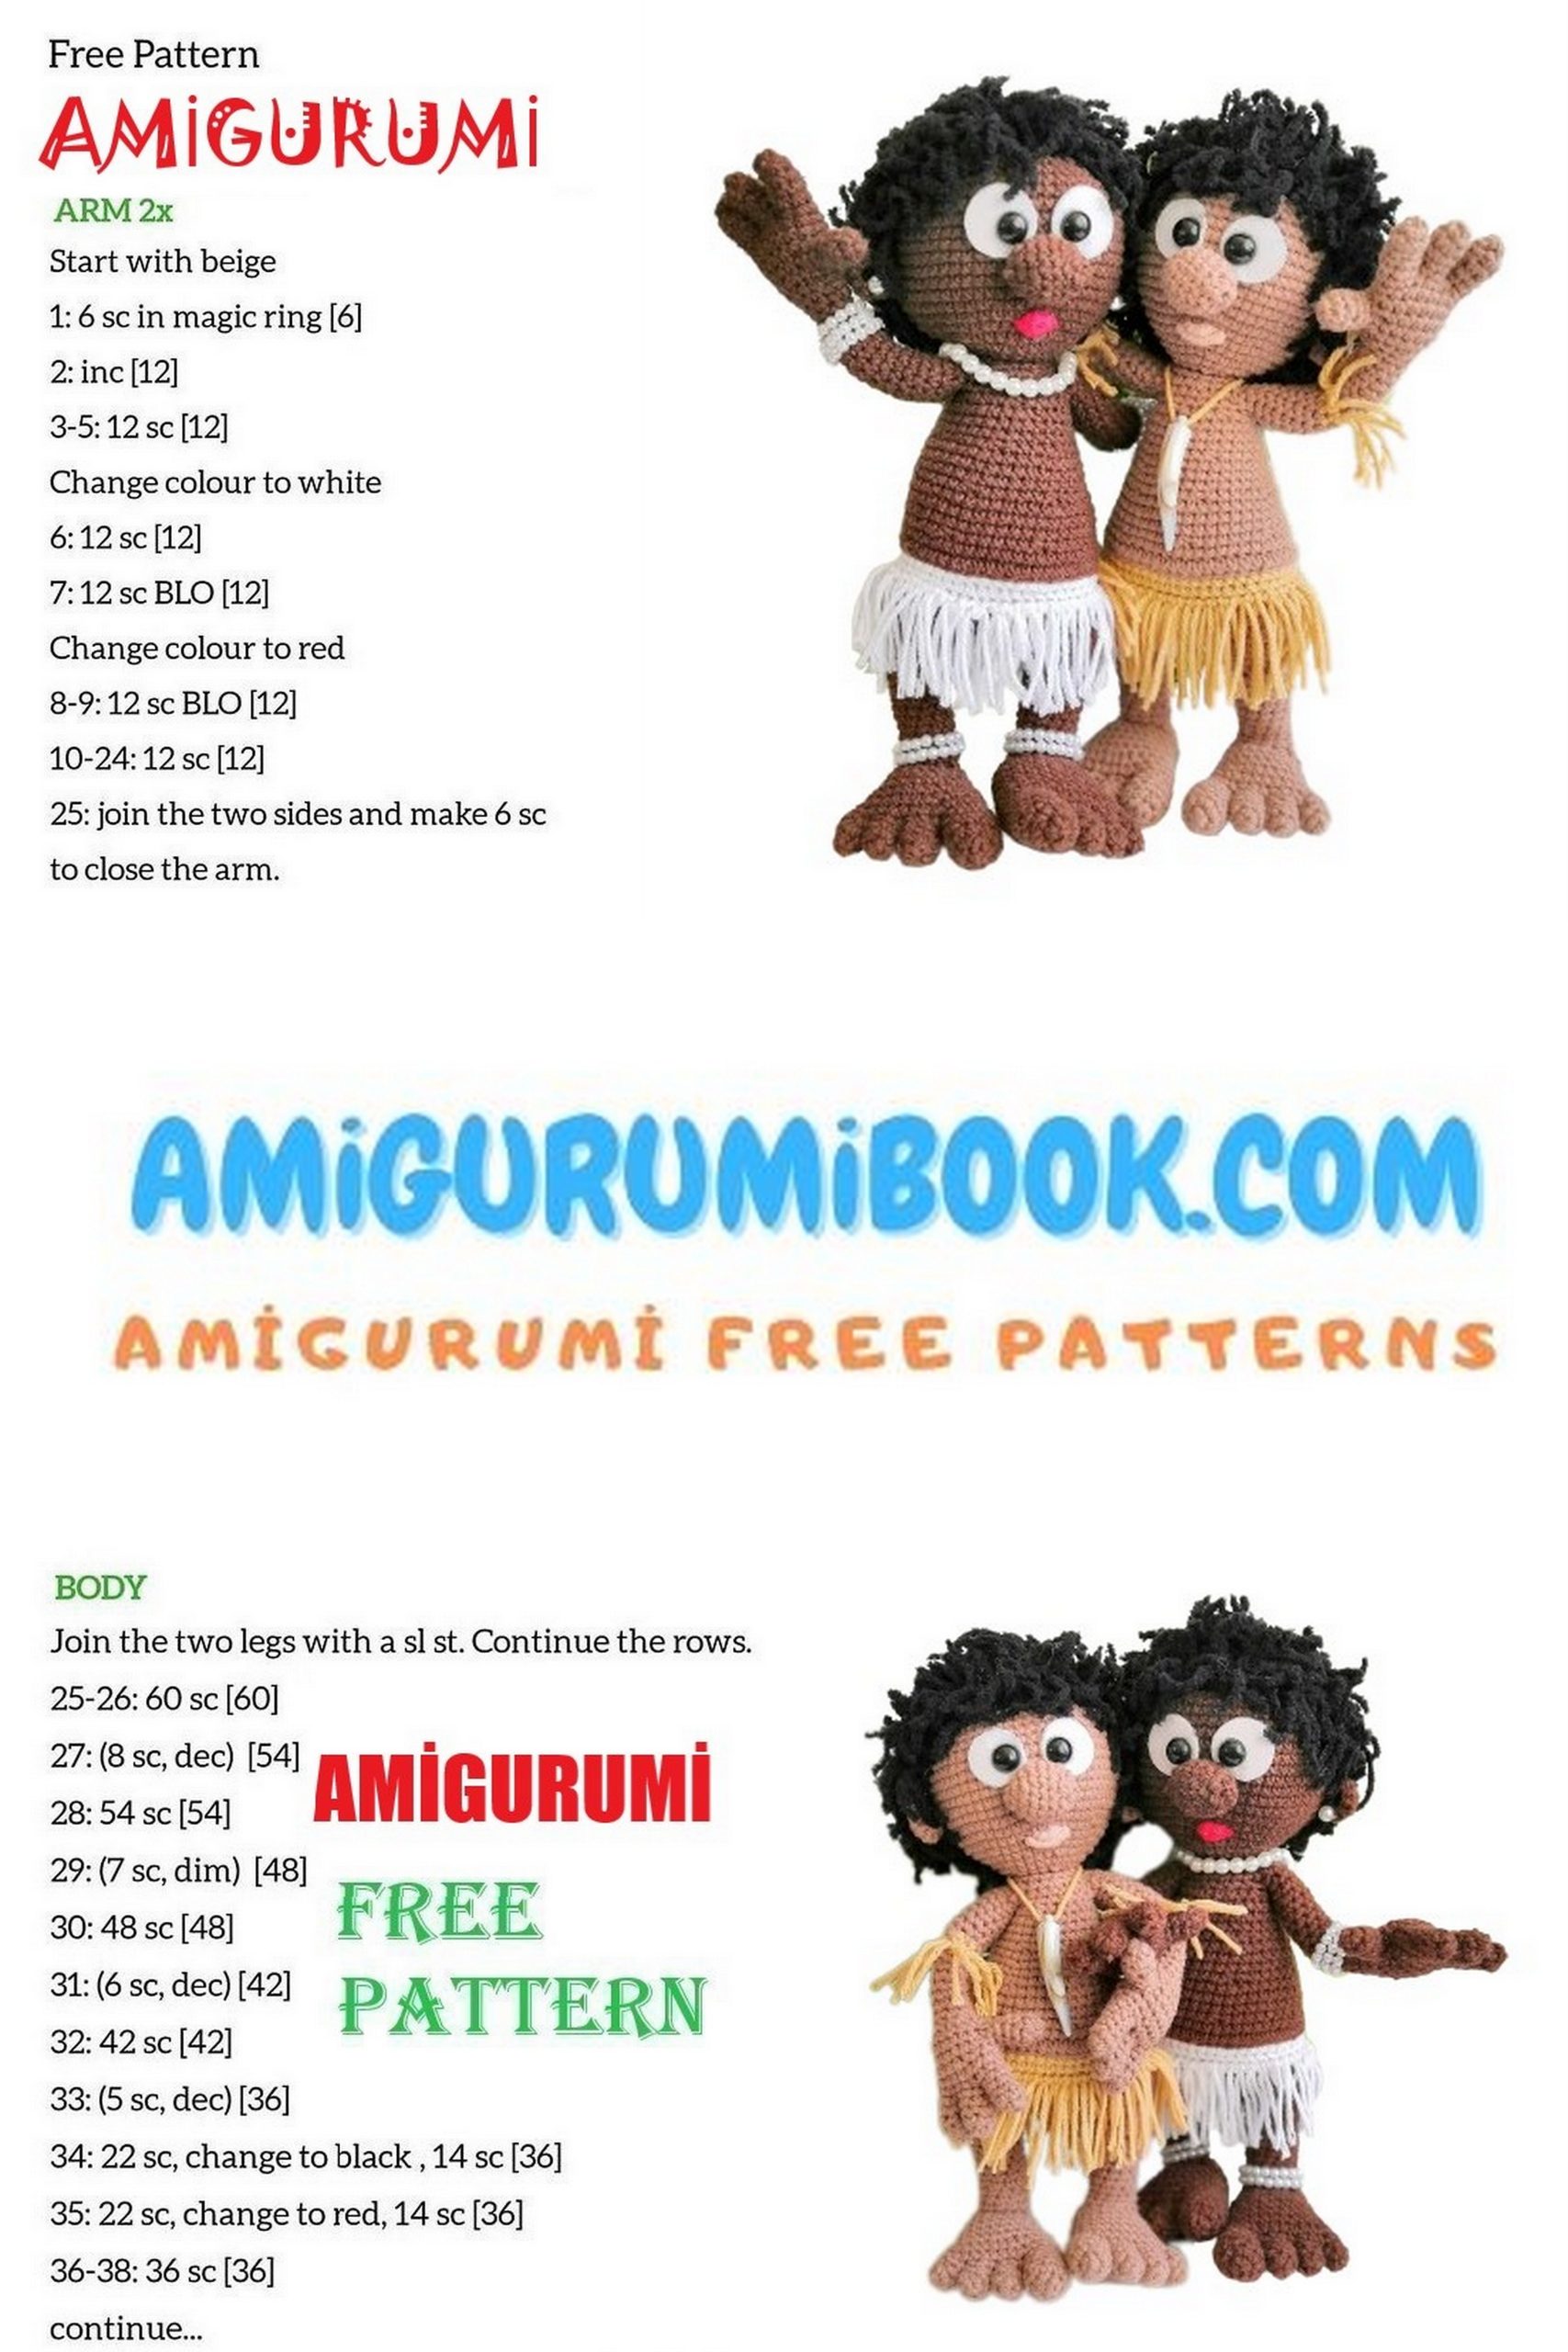
The Chunga and Changa Amigurumi Doll free pattern offers a delightful way to create your own adorable handmade characters. Perfect for both beginners and experienced crafters, this pattern provides clear instructions to bring these charming dolls to life. free crochet patterns
You may also like more amigurumi patterns.
Step into a world of creativity and imagination as we delve into the art of amigurumi with the charming duo, Chunga and Changa! This free pattern opens the door to crafting these adorable amigurumi dolls that are as delightful to make as they are to behold. Whether you’re an experienced crocheter or just starting out, this pattern offers an exciting journey into the world of handmade toys.
Unveiling the Magic of Amigurumi Crafting
Amigurumi, the Japanese art of crocheting or knitting small stuffed animals and creatures, has captured the hearts of crafters worldwide. With this free pattern, you’ll discover the joy of bringing characters to life through yarn and a hook. Chunga and Changa, our endearing amigurumi dolls, are a perfect example of the enchanting possibilities that amigurumi offers.
Your Path to Crafting Delightful Dolls
From their whimsical faces to their intricate outfits, Chunga and Changa dolls come to life stitch by stitch. Our step-by-step instructions, accompanied by detailed photos, guide you through the process with ease. Even if you’re new to crocheting, don’t worry – this pattern includes everything you need to know, making it a fantastic project for both beginners and seasoned crafters.
Unleash Your Creativity
As you embark on this amigurumi adventure, you’ll find that crafting Chunga and Changa dolls is not only a delightful pastime but also an opportunity to unleash your creativity. With every stitch, you’ll be molding characters that radiate personality and charm, each one as unique as the person creating it.
A Whimsical Touch to Handmade Gifts
Imagine the smiles that these handmade dolls will bring to your loved ones. Whether they become cherished playmates, decorative accents, or heartfelt gifts, Chunga and Changa dolls hold the power to brighten any corner of your world.
Start Crafting Today
So, gather your yarn, your crochet hook, and your enthusiasm, and embark on a journey to create your very own Chunga and Changa dolls. As you bring each stitch to life, you’ll be weaving your own tale of creativity and imagination. Let the magic of amigurumi crafting unfold before your eyes. Get ready to be captivated by the world of Chunga and Changa – where yarn and imagination come together to create something truly extraordinary.
TERMS OF USE FOR THE WORKSHOP
Hello, my name is Olga, the author of this crochet workshop. In it, you will find a description of the process of creating the toy, but without basic crochet lessons.
When using the specified materials, Chunga and Changa will have a height of 23-24 cm. Keep in mind that the size of the toy will also depend on the tightness of your crochet stitches and may differ from the stated size.
This workshop is intended for personal use only.
Items made using this workshop can be sold by you without restrictions.
You can contact the author an unlimited number of times to clarify any unclear points.
I wish you enjoyable crocheting and even stitches!
crocheting_with_mv
ABBREVIATIONS
mr – amigurumi ring
ch – chain stitch
sc – single crochet
inc – increase
dec – decrease
bpl – back post loop
sl st – slip stitch
× 6 – number of repetitions in a pattern
(12) – number of stitches in a row
MATERIALS AND TOOLS
1st row: Yarn Art jeans yarn
Color 71 – cocoa (main color)
Color 07 – light beige
2nd row: Alize softy yarn
Color 60 – black
3rd row: A small amount of yarn for the lips in any color
4th row: Crochet hook size #2
5th row: 10 mm safety eyes
6th row: White felt
7th row: Wire (optional)
8th row: Polyester fiberfill
9th row: Sewing needle
10th row: Scissors
11th row: Row marker or contrasting yarn
12th row: Pins for securing parts
13th row: Various accessories
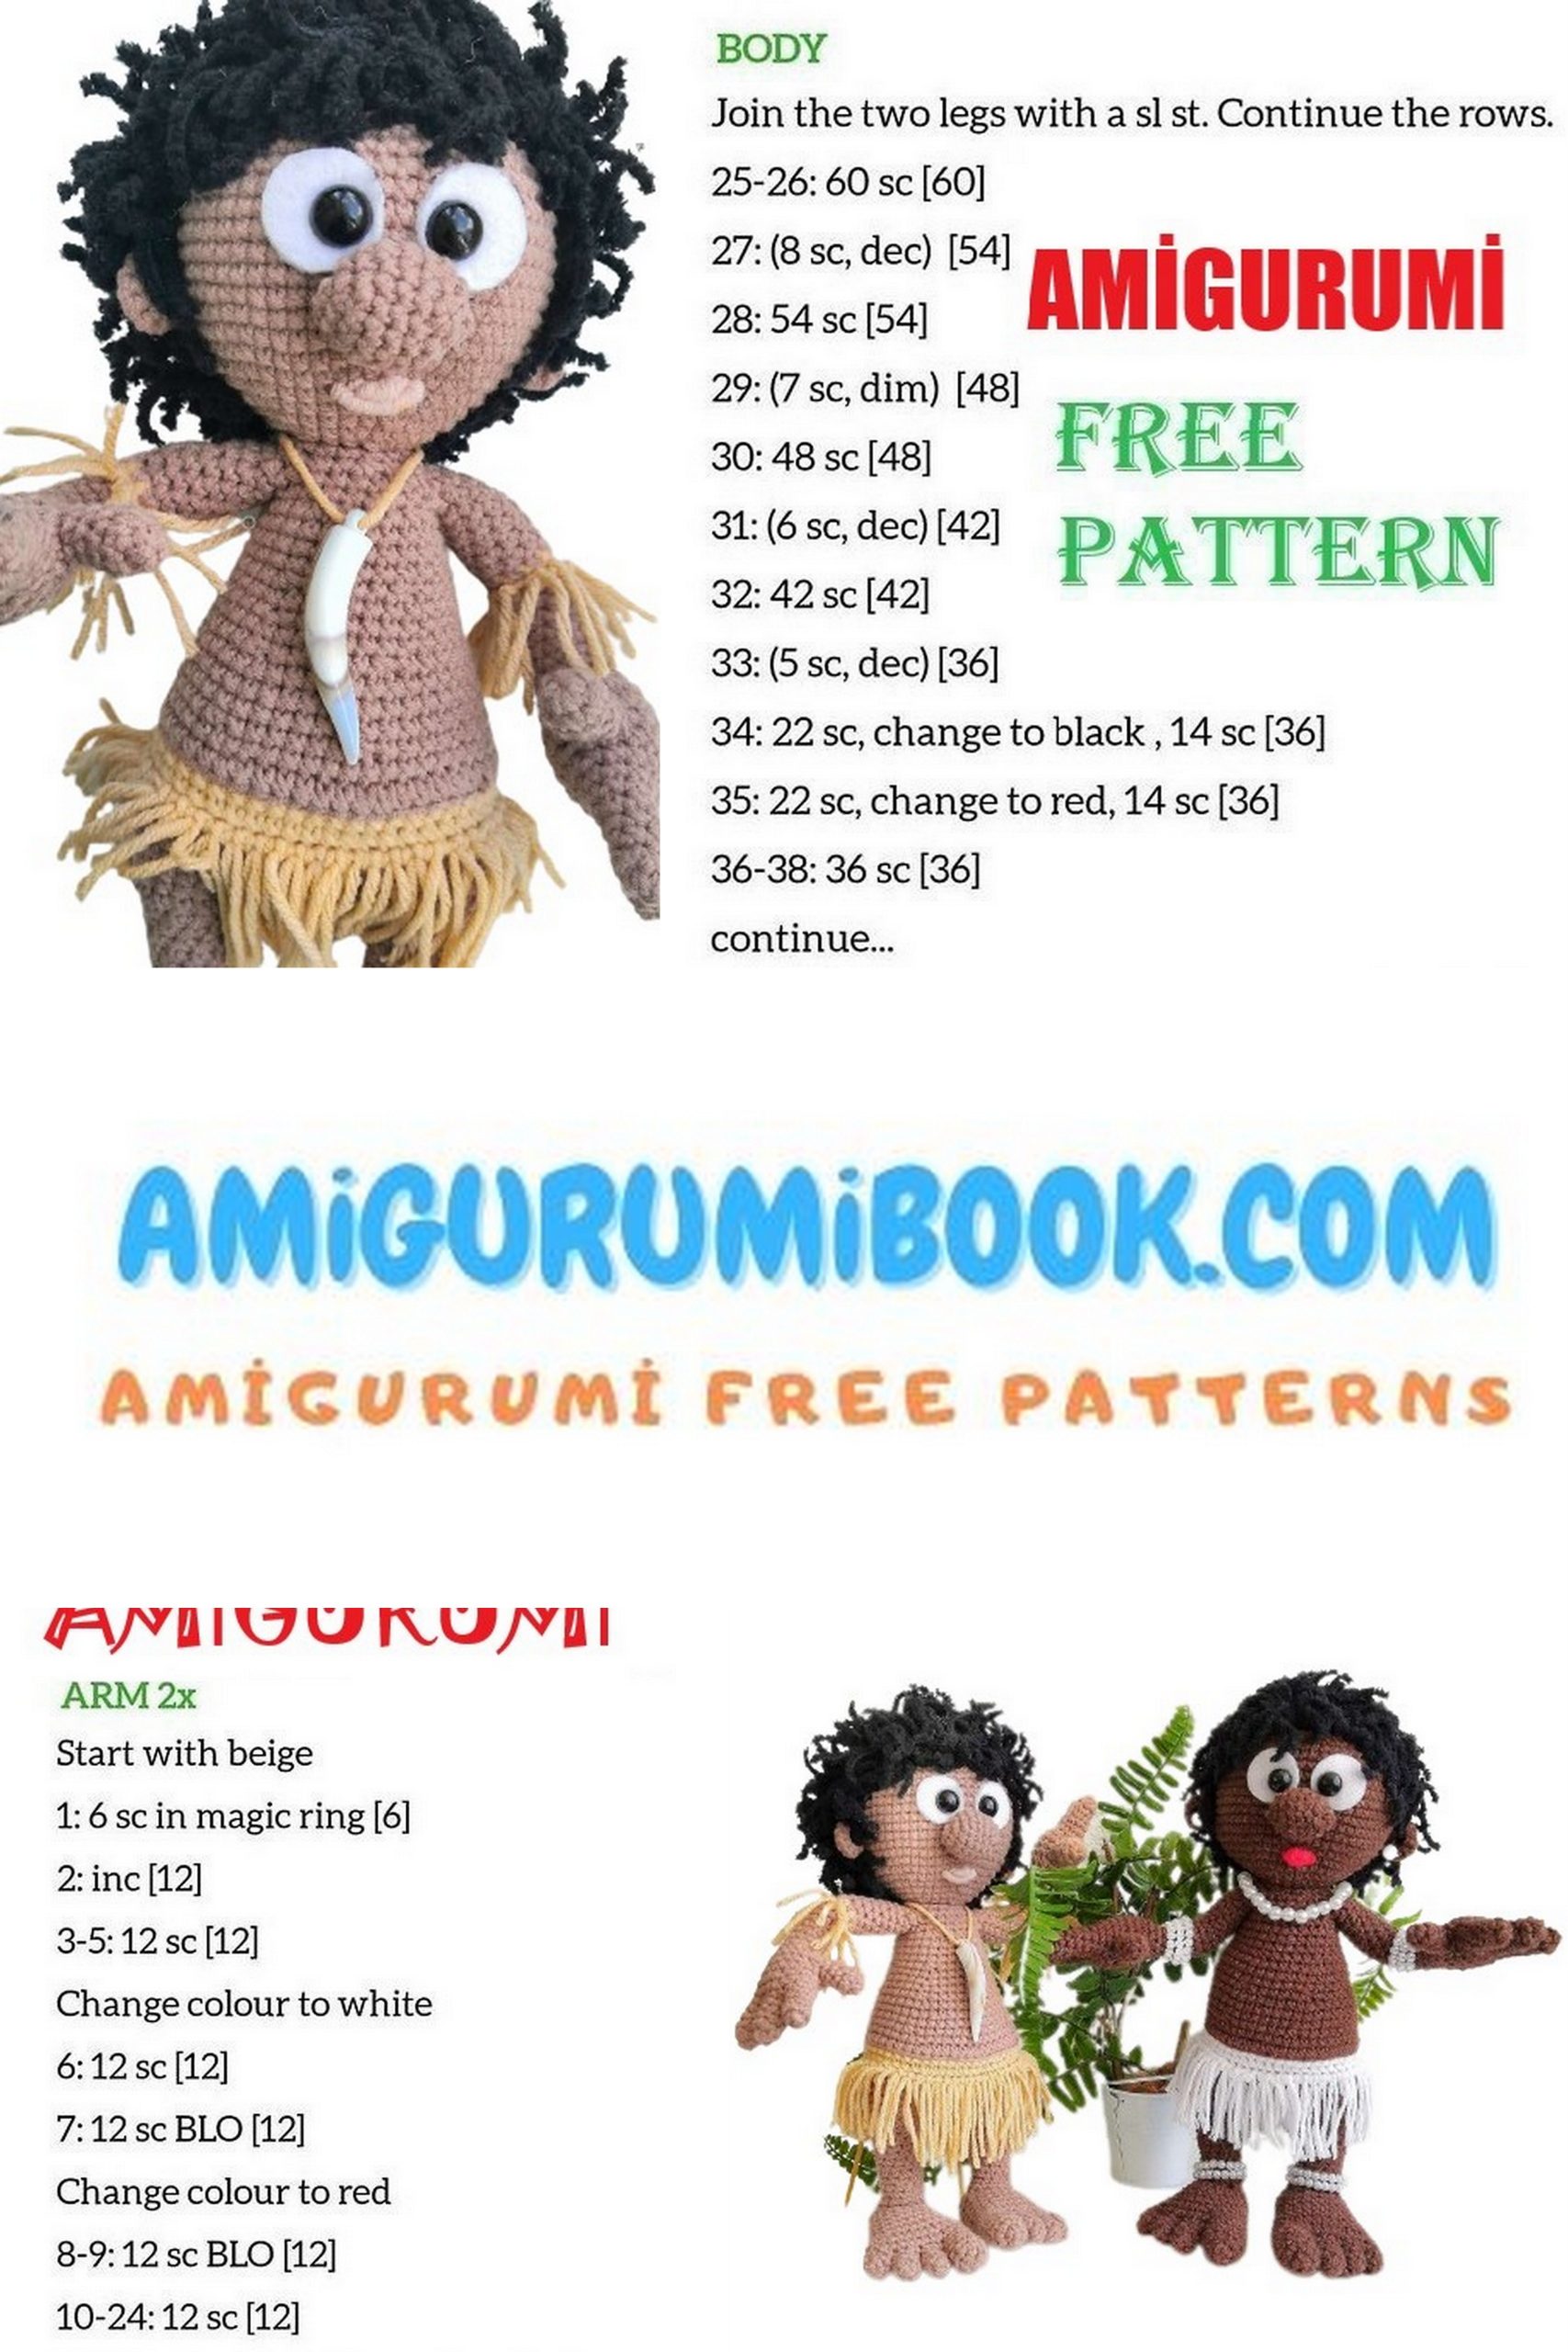
ARMS
We start by crocheting the fingers. Four fingers for each arm.
1st row: 6 sc in an amigurumi ring
2nd-5th row: 6 sc
After the third finger, secure and cut the yarn. For the fourth finger, do not cut the yarn. Continue crocheting onto it.
1st row: Crochet 3 sc, attach the second finger, crochet 3 sc on it. Attach the third finger, crochet 6 sc. Crochet 3 sc on the second finger, 3 sc on the first finger. (18)
2nd-3rd row: 18 sc
In the next row, we will crochet the fourth finger.
FOR THE RIGHT ARM
4th row: Crochet 7 sc, crochet 3 sc around the lower half of the finger and around both sides of the arm, crochet 8 sc. (18)
5th row: Crochet 7 sc, crochet 3 sc around the upper half of the finger, crochet 8 sc. (18)
Stuff the fingers.
6th row: 18 sc
7th row: (1 sc, dec) × 6 (12)
8th row: 12 sc
9th row: Dec, 4 sc, dec, 4 sc (10)
10th-14th row: 10 sc
Switch to beige yarn.
15th row: 10 sc
16th row: 10 sc around bpl
Switch to skin color yarn.
17th-24th row: 10 sc
Fasten off and cut the yarn. Do not stuff the arm if you plan to insert wire.
FOR THE LEFT ARM
Crochet the left arm in the same way, except for the 4th and 5th rows.
4th row: Crochet 8 sc, crochet 3 sc around the lower half of the finger and around both sides of the arm, crochet 7 sc. (18)
5th row: Crochet 8 sc, crochet 3 sc around the upper half of the finger, crochet 7 sc. (18)
Continue crocheting the left arm similarly to the right arm.
LEGS
Start by crocheting the toes. Four toes for each leg.
FIRST TOE
1st row: 6 sc in an amigurumi ring
2nd row: 6 sc
Cut the yarn.
SECOND TOE
1st row: 6 sc in an amigurumi ring
2nd-3rd row: 6 sc
Cut the yarn.
THIRD TOE
1st row: 6 sc in an amigurumi ring
2nd-4th row: 6 sc
Cut the yarn.
FOURTH TOE
1st row: 5 sc in an amigurumi ring
2nd row: 5 inc (10)
3rd-6th row: 10 sc
Do not cut the yarn after the 4th toe. Crochet 5 sc on it. Attach the 3rd toe, crochet 3 sc on it. Crochet 3 sc on the 2nd toe, 3 sc on the 1st toe. Crochet 3 sc on the 2nd toe, 3 sc on the 3rd toe, 3 sc on the 4th toe. (28)
1st-2nd row: 28 sc
3rd row: Dec, 11 sc, dec, 13 sc (26)
4th row: 26 sc
5th row: Dec, 10 sc, dec, 12 sc (24)
6th-7th row: 24 sc
8th row: (2 sc, dec) × 6 (18)
9th-10th row: 18 sc
Start stuffing the toes and the foot.
11th row: (1 sc, dec) × 6 (12)
12th row: 6 dec (6)
Fasten off and hide the yarn. Crochet the second leg in the same way, but do not cut the yarn.
The last row should end with an equal number of stitches on both sides of the inner edge of the leg. If not, add a few stitches. It all depends on the tightness of your stitches. I added 4 extra sc.
BODY
Join the yarn to the second leg where you left off, and crochet 6 ch.
Join to the other leg in the middle of the inner edge.
1st row: Crochet 18 sc on the first leg, 6 sc in the chain, 18 sc on the second leg, 6 sc in the chain. (48)
2nd-4th row: 48 sc
5th row: Crochet sc to the middle of the back. I crocheted 21 sc, but your count may differ. It all depends on the tightness of your stitches.
Switch to beige yarn. From this point on, each new row will start with a new color.
6th row: 48 sc
7th row: 48 sc around bpl
8th row: 48 sc
Switch to skin color yarn.
9th row: 48 sl st (work the entire row in slip stitches)
10th row: Crochet the next row around the bpl of the previous row. When crocheting, insert the hook into both loops of the stitch from the previous row. (48)
11th row: 48 sc
12th row: (6 sc, dec) × 6 (42)
13th-15th row: 42 sc
16th row: (5 sc, dec) × 6 (36)
17th-19th row: 36 sc
20th row: (4 sc, dec) × 6 (30)
21st-23rd row: 30 sc
24th row: (3 sc, dec) × 6 (24)
In the next row, we will attach the arms. Everyone’s crochet tension is different, so before attaching the arms, place them on the body. Determine where to attach them, ensuring that the fingers of the right and left arms are pointing in the right direction. For me, it looked like this:
25th row: Crochet 7 sc, crochet 5 sc around the lower half of the arm and around both sides of the body, crochet 7 sc, crochet 5 sc around the lower half of the arm and around both sides of the body. (24)
26th row: Crochet 7 sc, crochet 5 sc around the upper half of the arm, crochet 7 sc, crochet 5 sc around the upper half of the arm. (24)
Stuff the body with fiberfill, spreading it evenly inside from the walls towards the center. Add more fiberfill as needed. Pay special attention to stuffing the neck, it should be quite firm.
At this point, we’ll insert wire into the arms (optional). Cut a piece of wire to the desired length. Bend the ends of the wire and wrap them with masking tape (adhesive plaster). Insert the wire into the arms. Stuff the arms with fiberfill.
27th row: 1 sc, dec, (2 sc, dec) × 5, 1 sc (18)
28th row: 18 sc
29th row: 1 sc, inc, (2 sc, inc) × 5, 1 sc (24)
For the front bpl:
30th row: (3 sc, inc) × 6 (30)
31st row: 2 sc, inc, (4 sc, inc) × 5, 2 sc (36)
32nd row: (5 sc, inc) × 6 (42)
33rd row: 3 sc, inc, (6 sc, inc) × 5, 3 sc (48)
34th row: (7 sc, inc) × 6 (54)
35th row: 4 sc, inc, (8 sc, inc) × 5, 4 sc (60)
36th-45th row: 60 sc
Cut two circles from white felt with a diameter of 20 mm. Insert the safety eyes into them, and then insert them into the head between rows 41 and 42, with a gap of 4-5 stitches between the eyes. As you crochet, continue stuffing the head with fiberfill.
46th row: 4 sc, dec, (8 sc, dec) × 5, 4 sc (54)
47th row: (7 sc, dec) × 6 (48)
48th row: 3 sc, dec, (6 sc, dec) × 5, 3 sc (42)
49th row: (5 sc, dec) × 6 (36)
50th row: 2 sc, dec, (4 sc, dec) × 5, 2 sc (30)
51st row: (3 sc, dec) × 6 (24)
52nd row: 1 sc, dec, (2 sc, dec) × 5, 1 sc (18)
53rd row: (1 sc, dec) × 6 (12)
54th row: 6 dec (6)
Fasten off, cut the yarn, and hide the ends.
After completing the head, glue the felt circles with the safety eyes onto the head using craft glue.
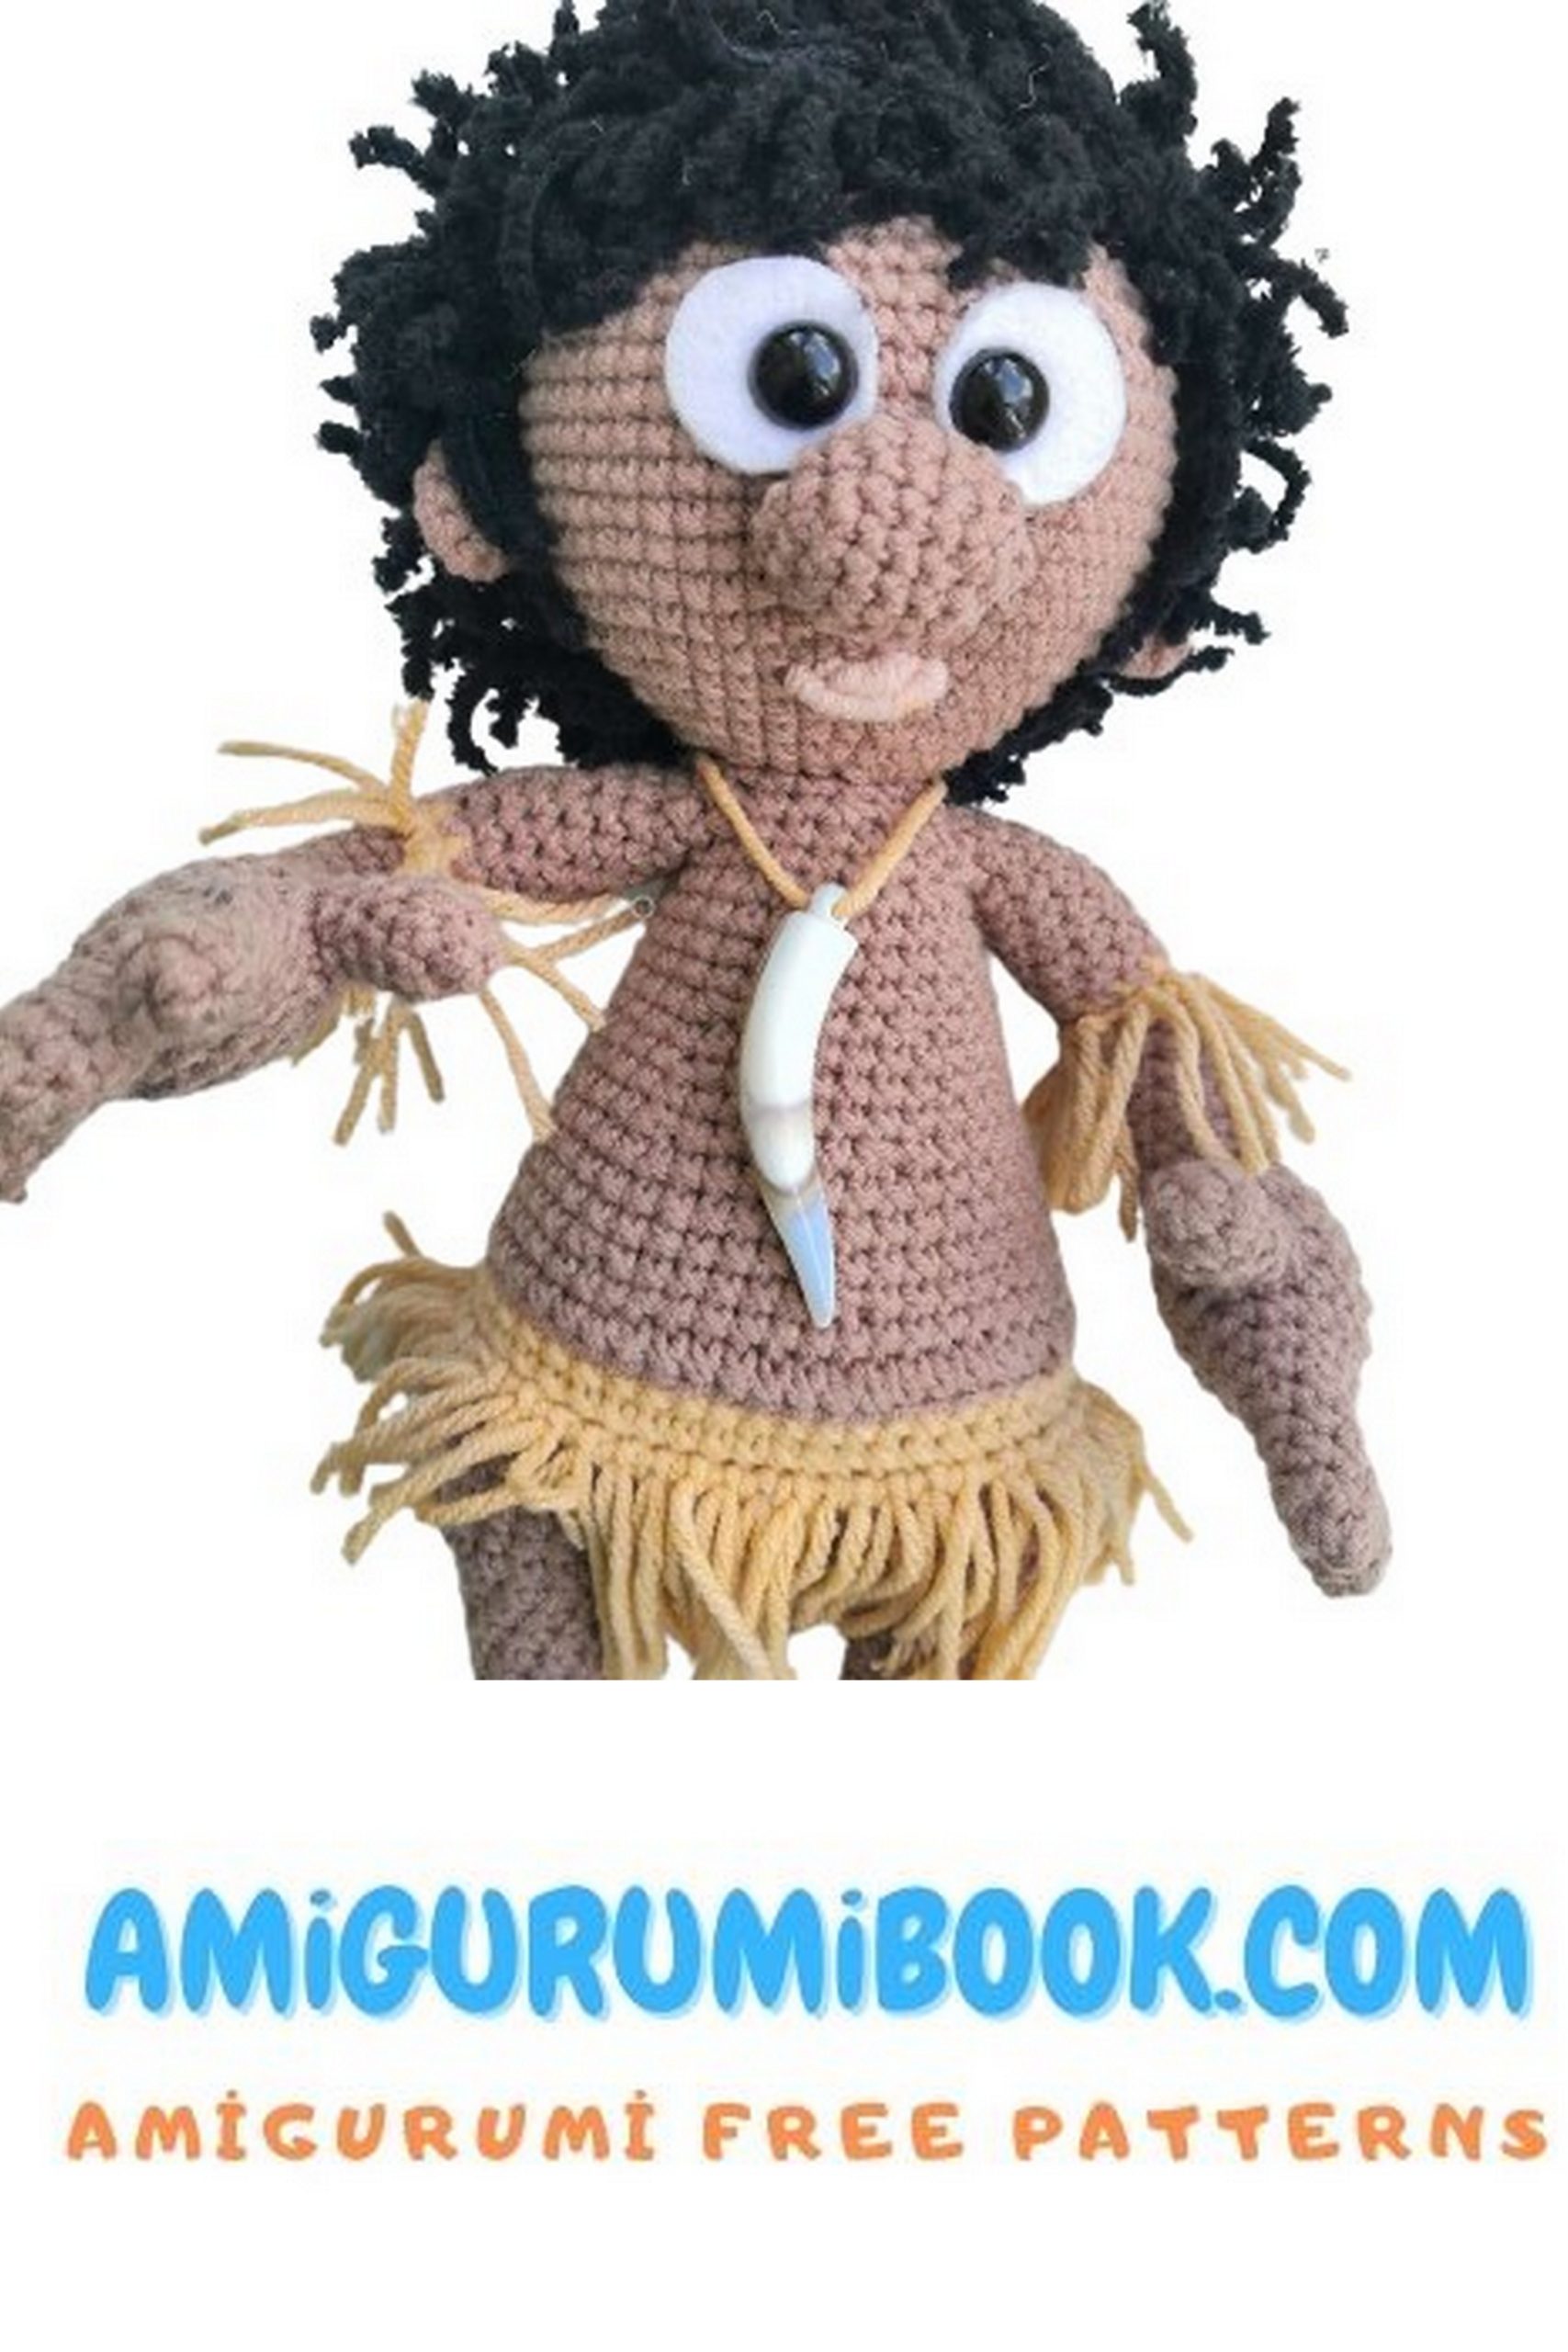
NOSE
1st row: 5 sc in an amigurumi ring
2nd row: 5 inc (10)
3rd row: (1 sc, inc) × 5 (15)
4th-6th row: 15 sc
7th row: (1 sc, dec) × 5 (10)
Stuff the nose.
8th row: 5 dec (5)
Fasten off, cut the yarn, leaving a tail for sewing.
EARS
1st row: 5 sc in an amigurumi ring
2nd row: 5 inc (10)
3rd row: 10 sc
Fasten off, cut the yarn, leaving a tail for sewing.
ASSEMBLY
For those who will glue the safety eyes, glue them between rows 41 and 42, with a gap of 4-5 stitches between the eyes.
Sew the nose below the eyes, approximately between rows 36 and 39.
Sew the ears between rows 37 and 38, parallel to the arms.
Embroider the lips under the nose. In my case, I used the backstitch.
Use pins to mark the boundary where the hairline will be around the head.
Cut strands of Alize softy yarn to approximately 6 cm. Fold them in half and use a crochet hook to attach them to the head. Start by attaching them along the perimeter, then fill the entire head.
FRINGE FOR THE SKIRT
Cut strips of beige yarn, each around 8 cm long. Fold them in half and, in row 9 on the body, attach them to the remaining front stitches.
FRINGE FOR THE ARMS
Cut strands of beige yarn to approximately 4 cm, fold them in half, and attach them to the remaining front stitches on the arms.
Now, add various accessories, and your Chunga and Changa are ready! Thank you for your attention!