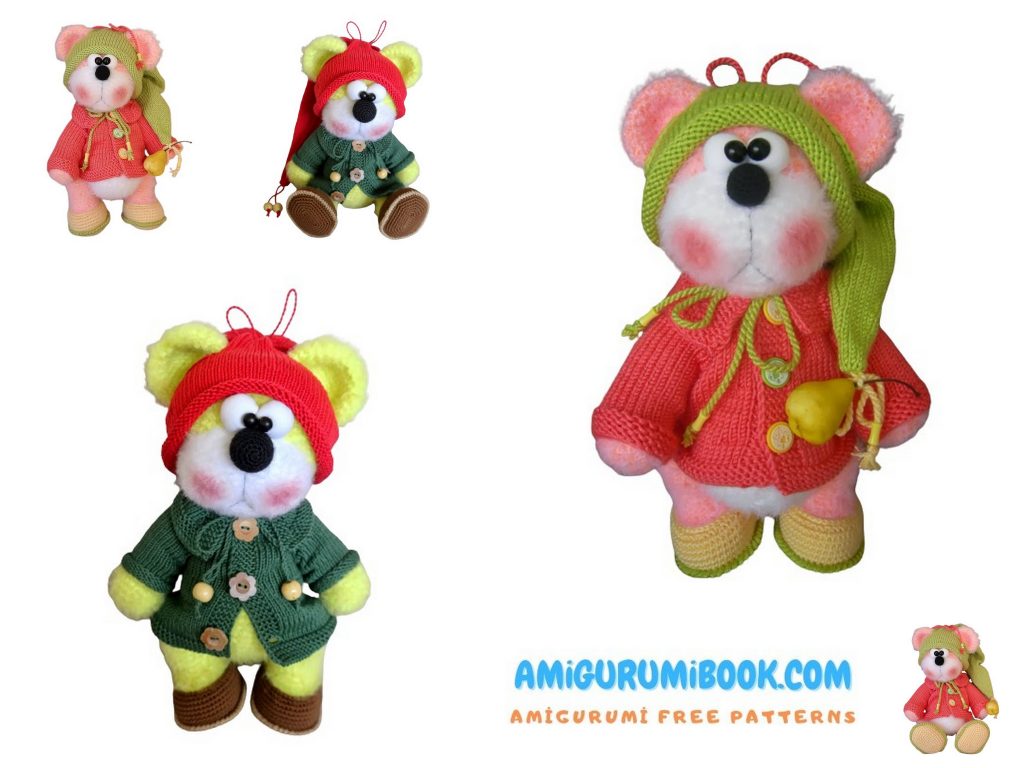
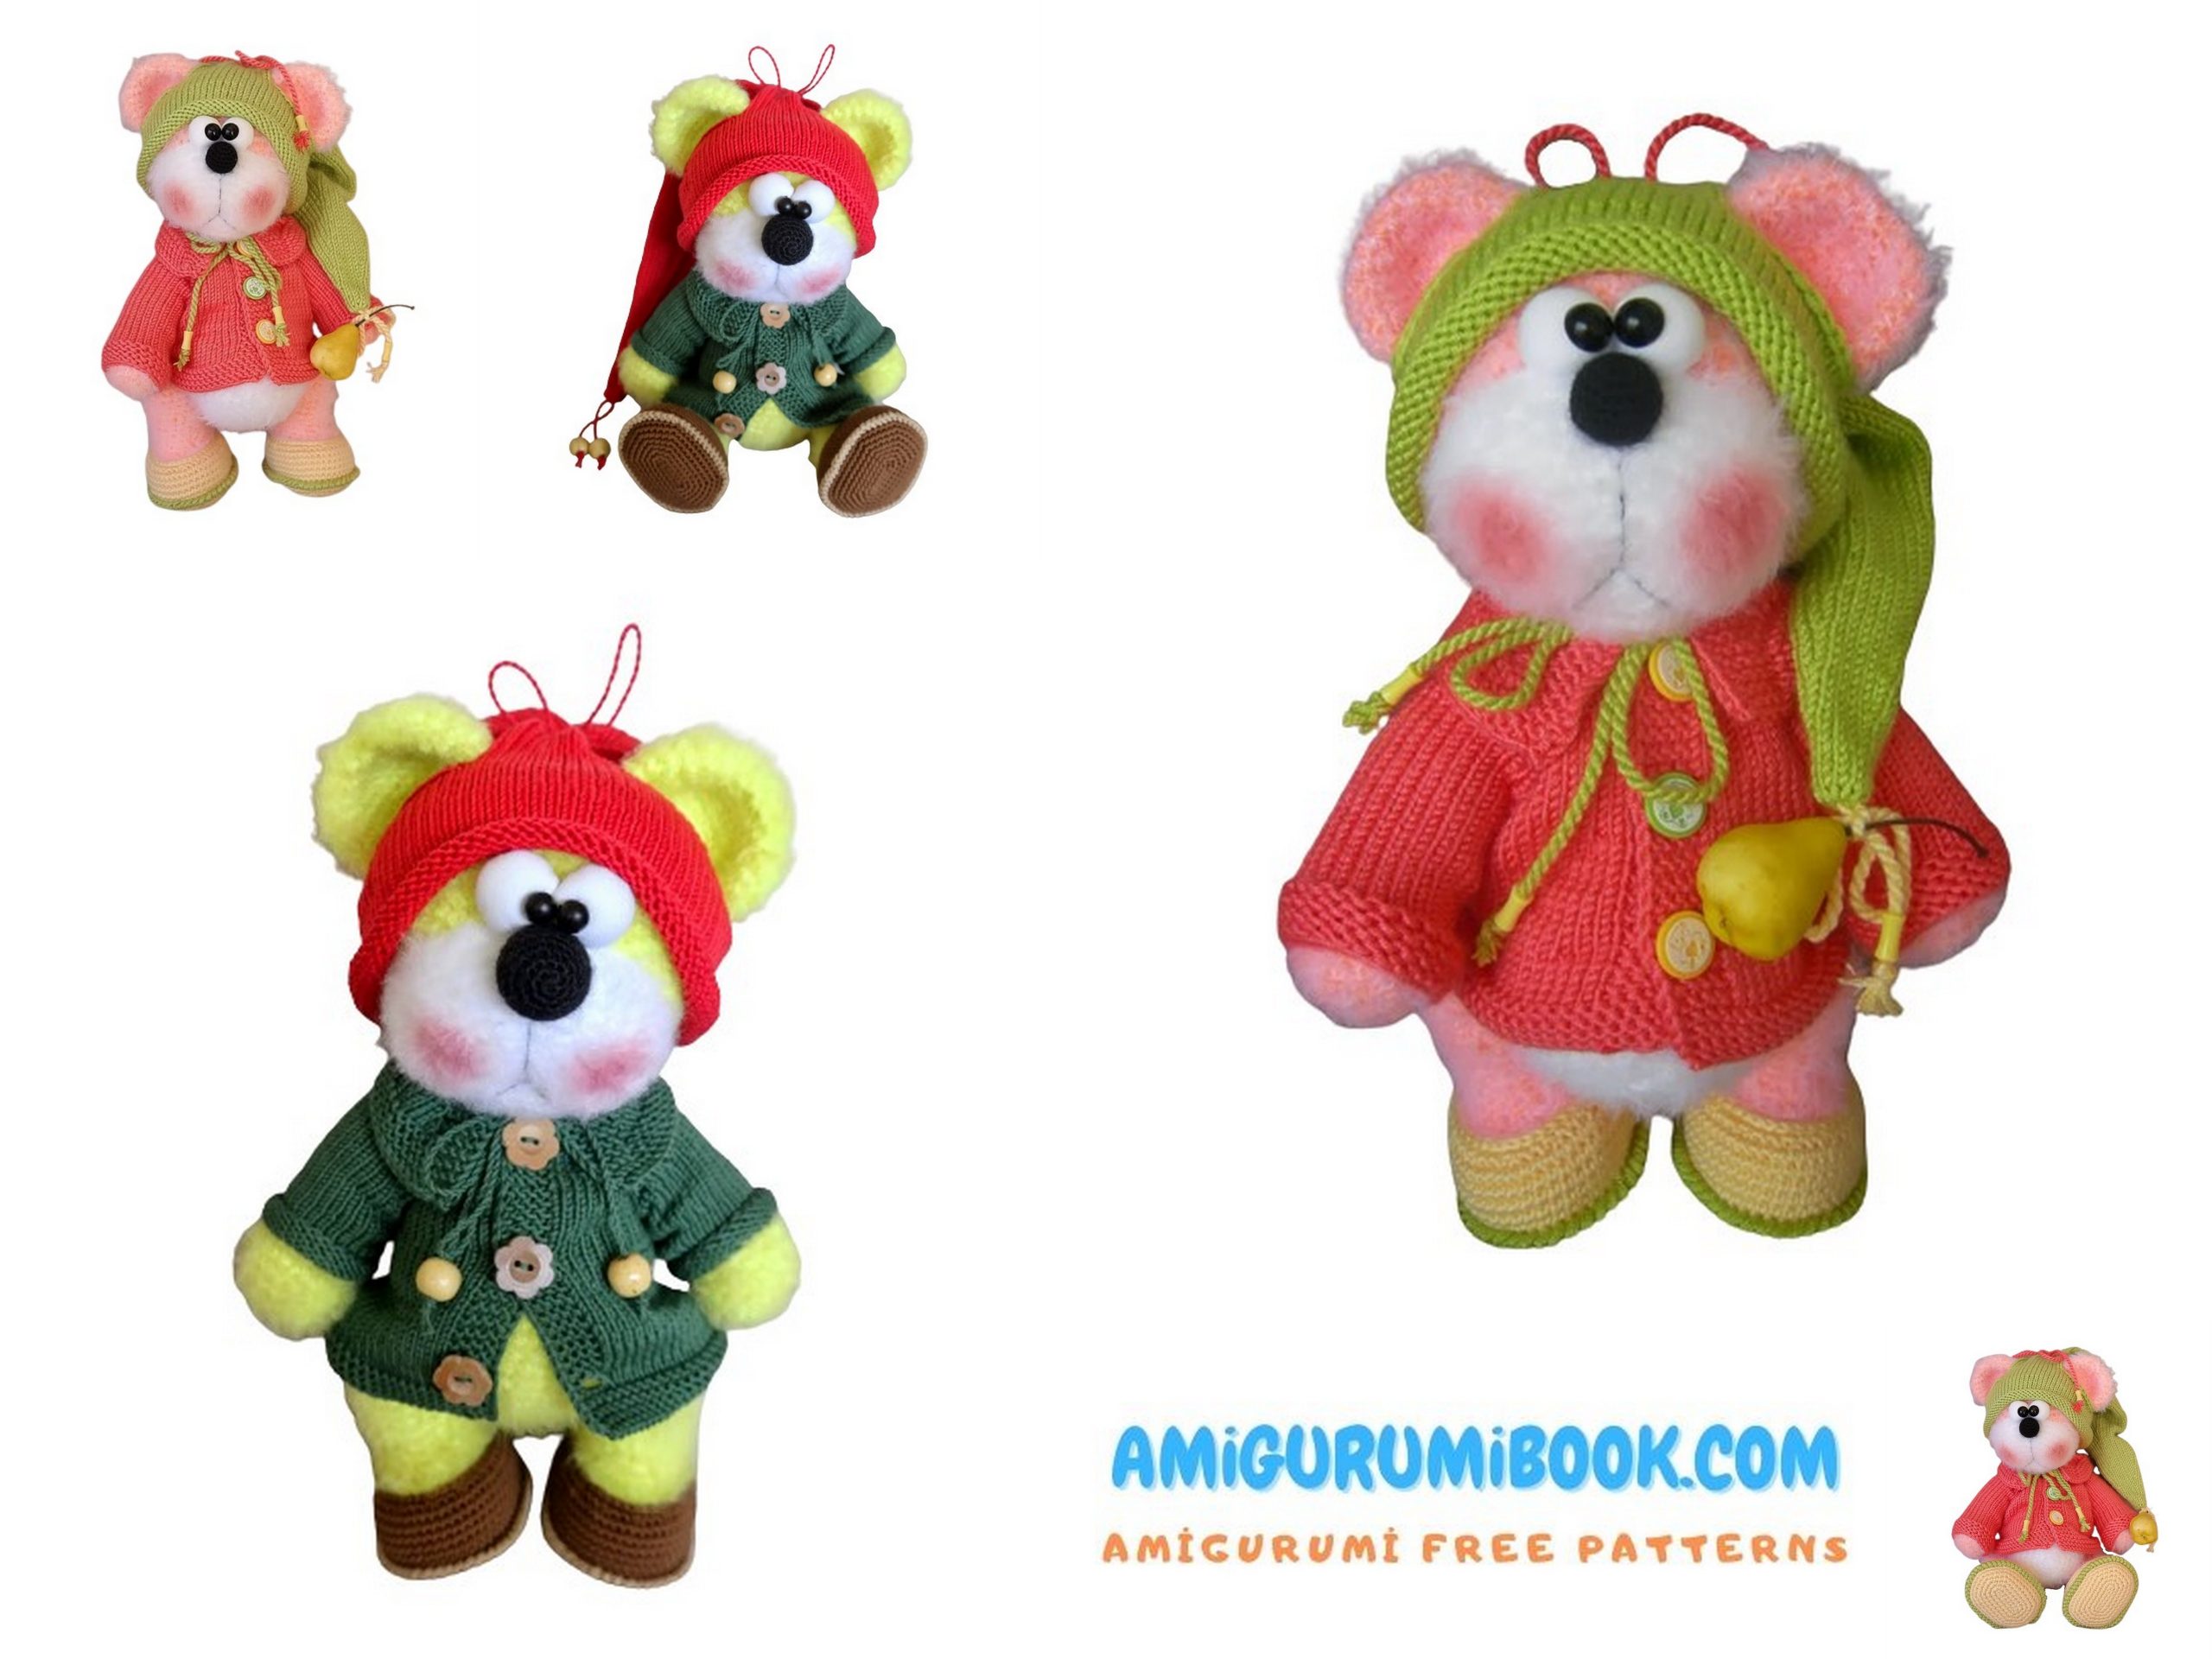
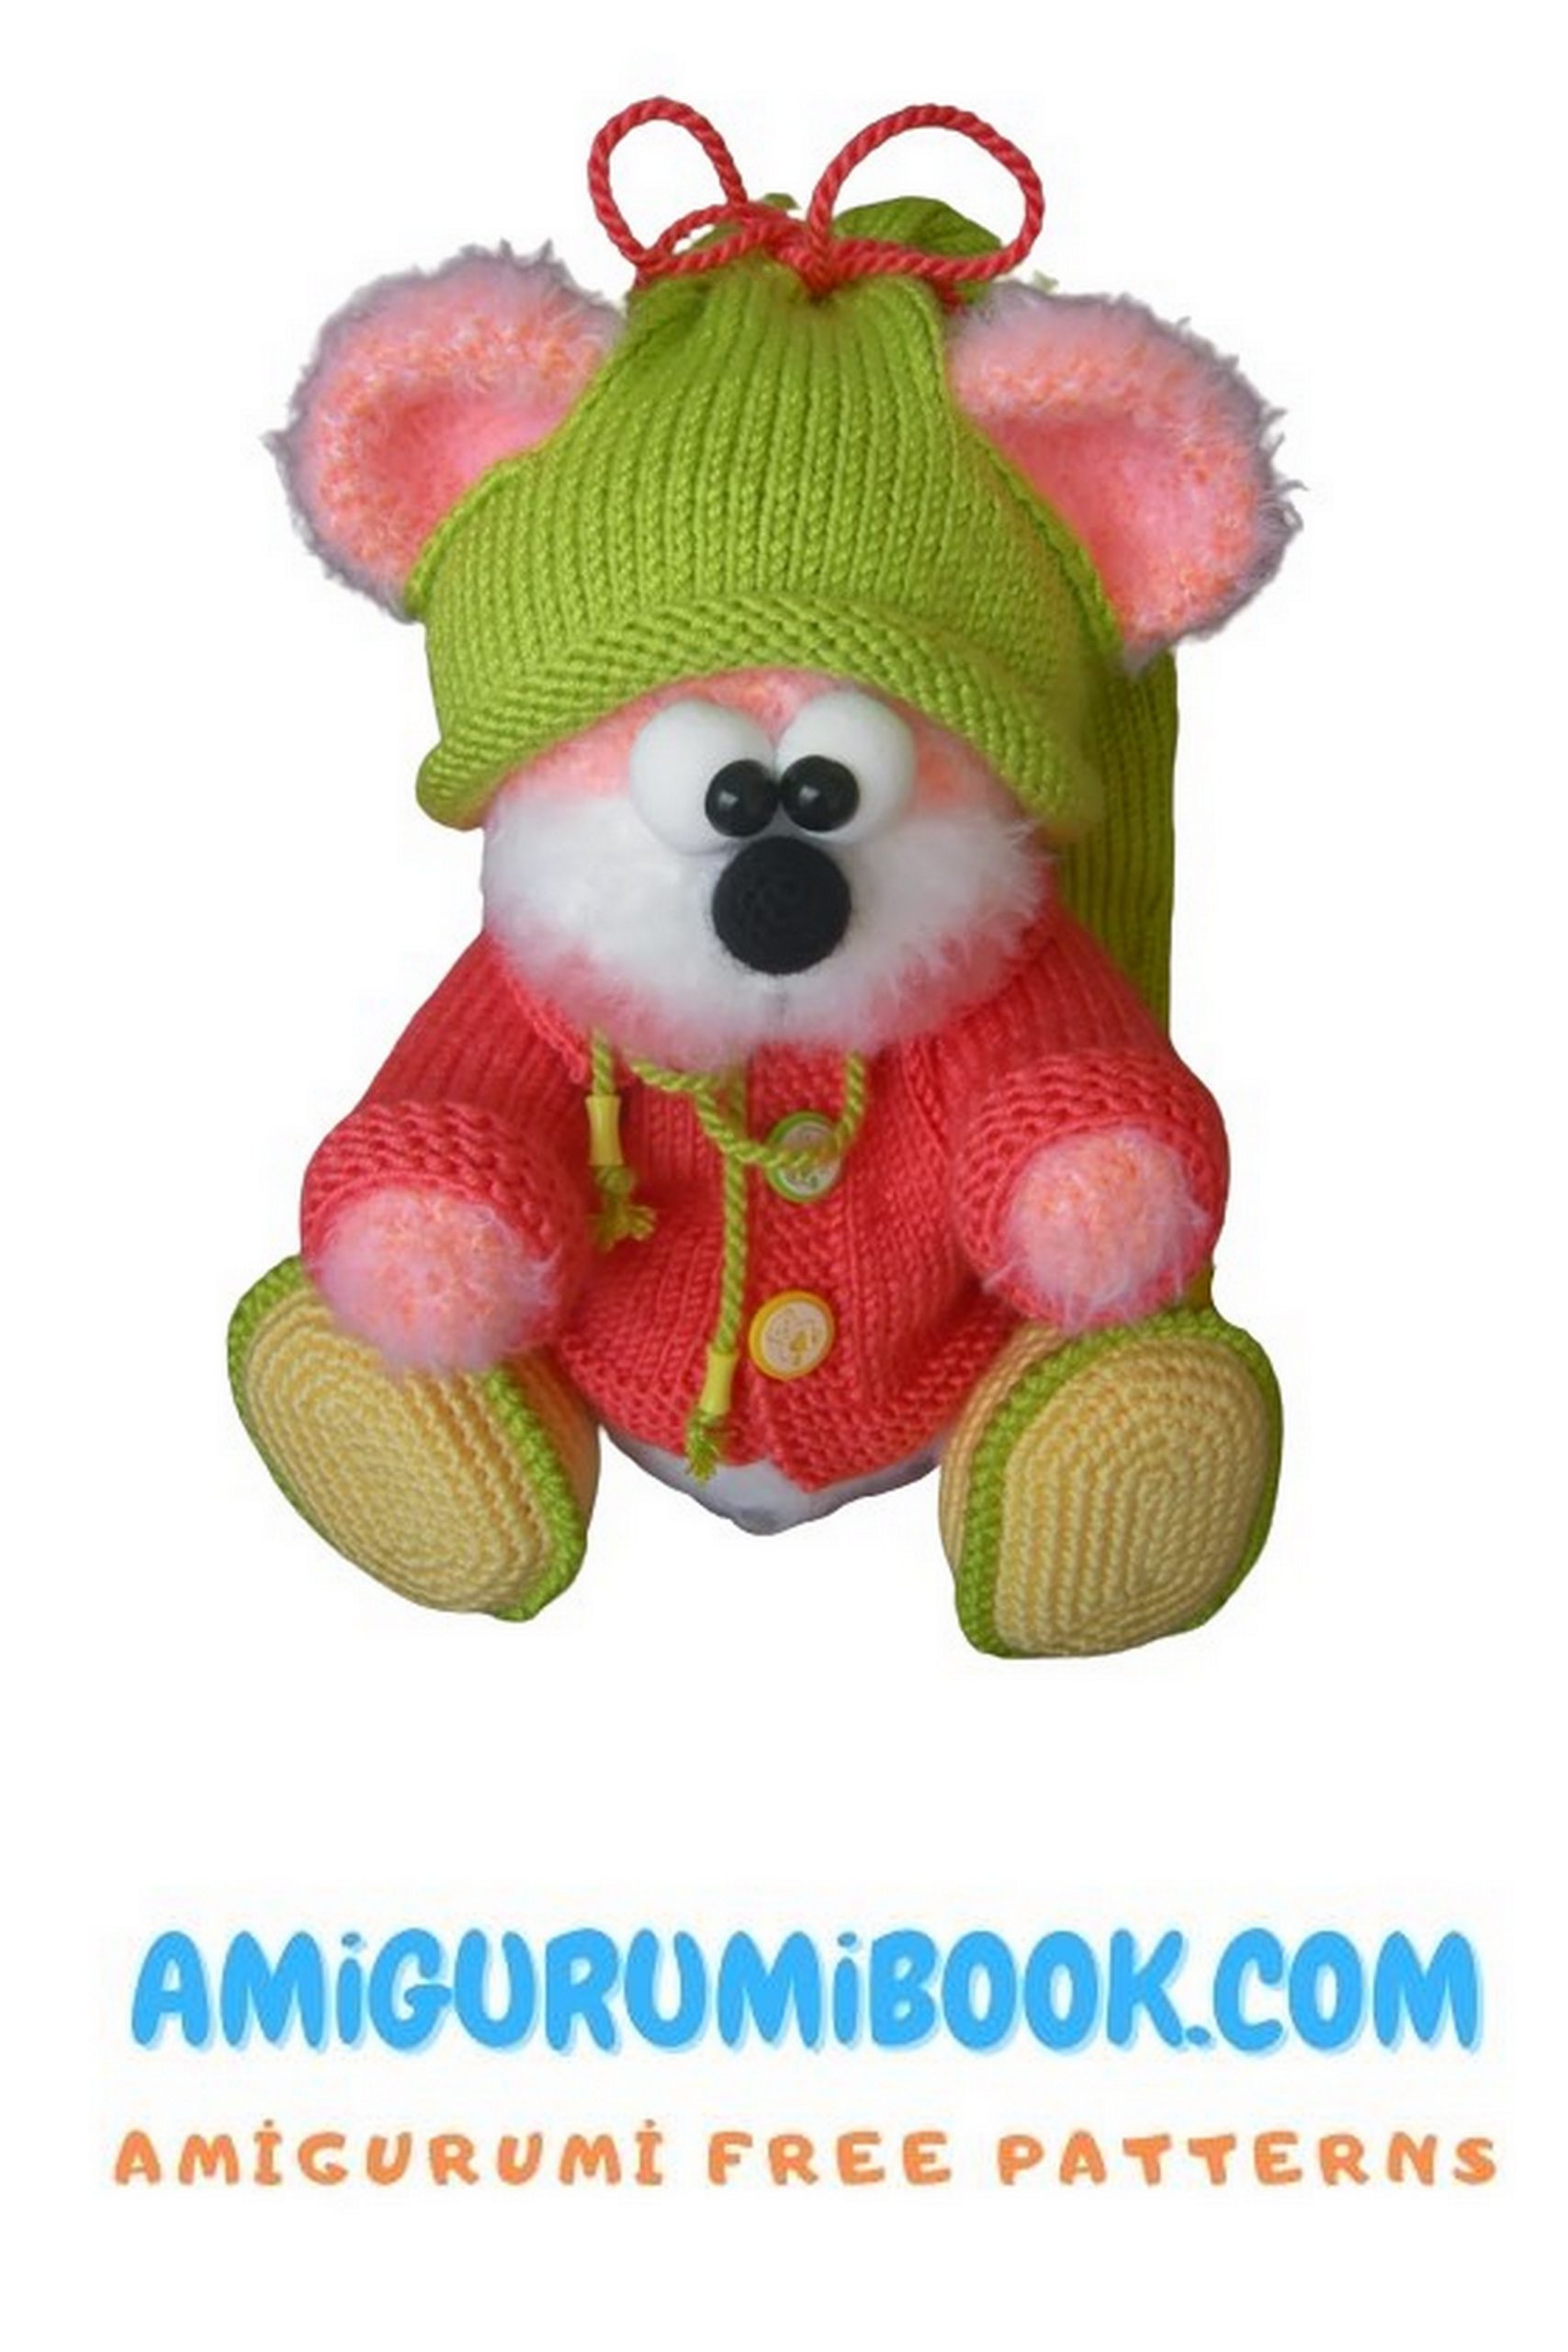
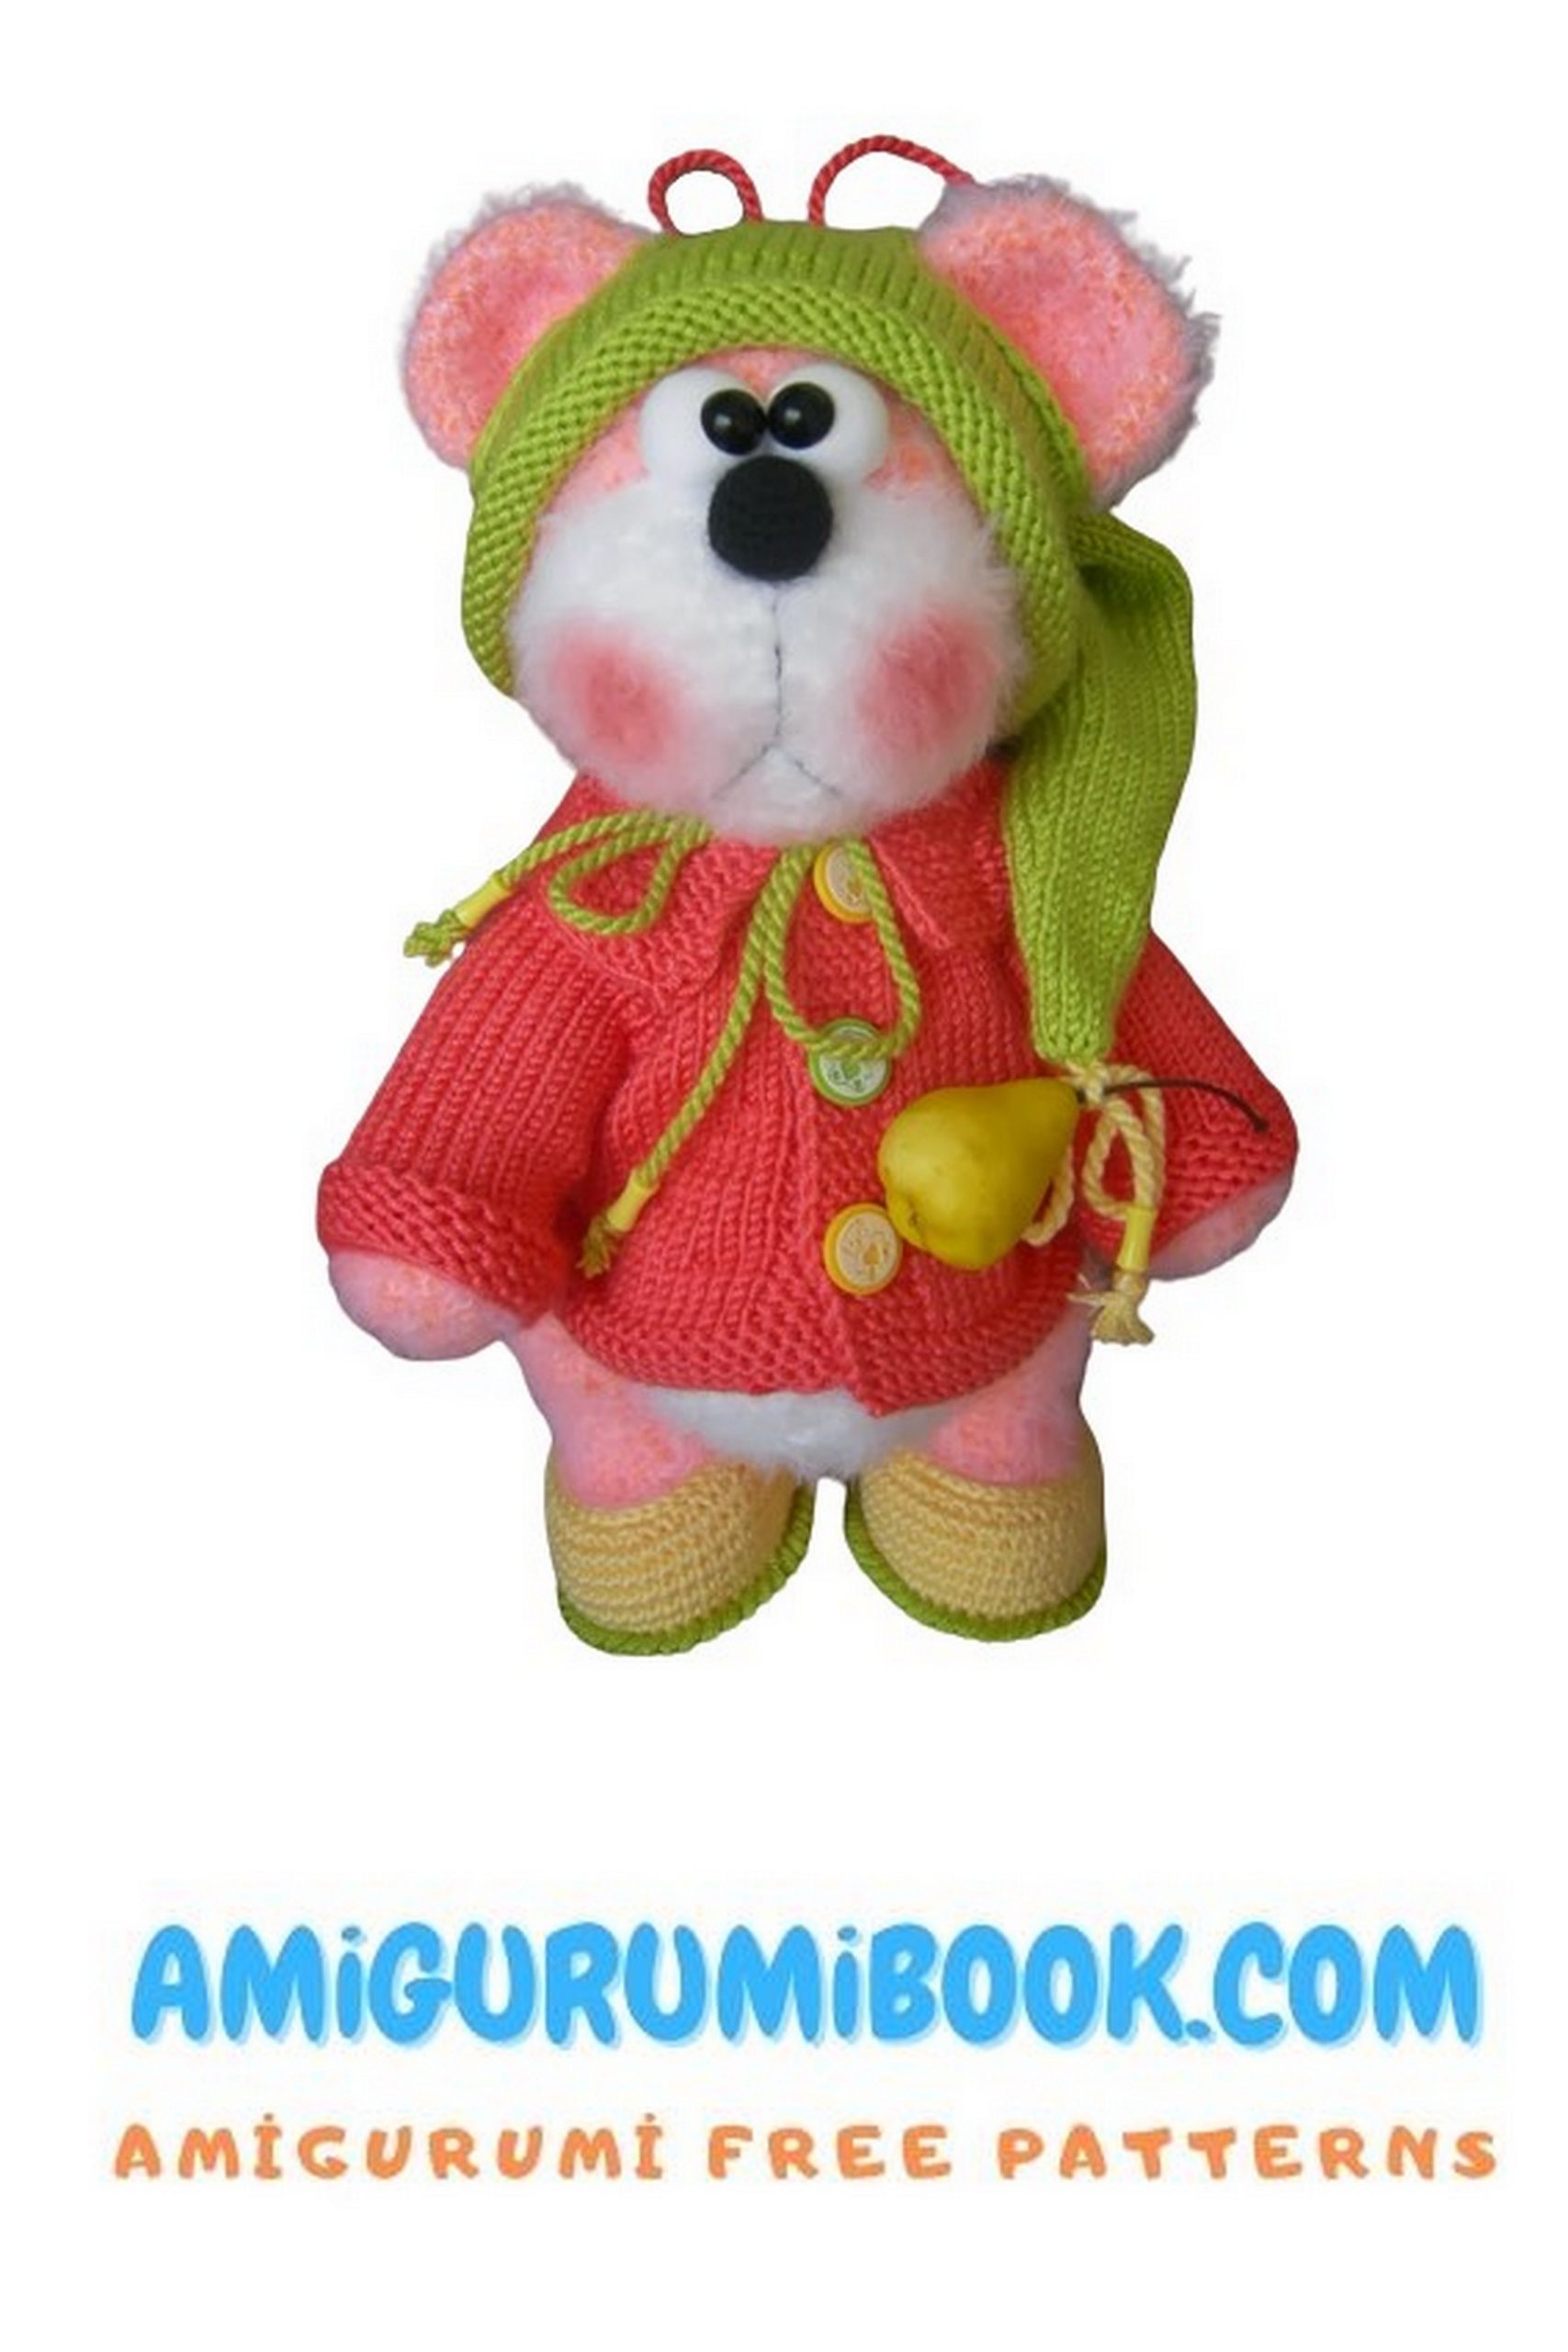
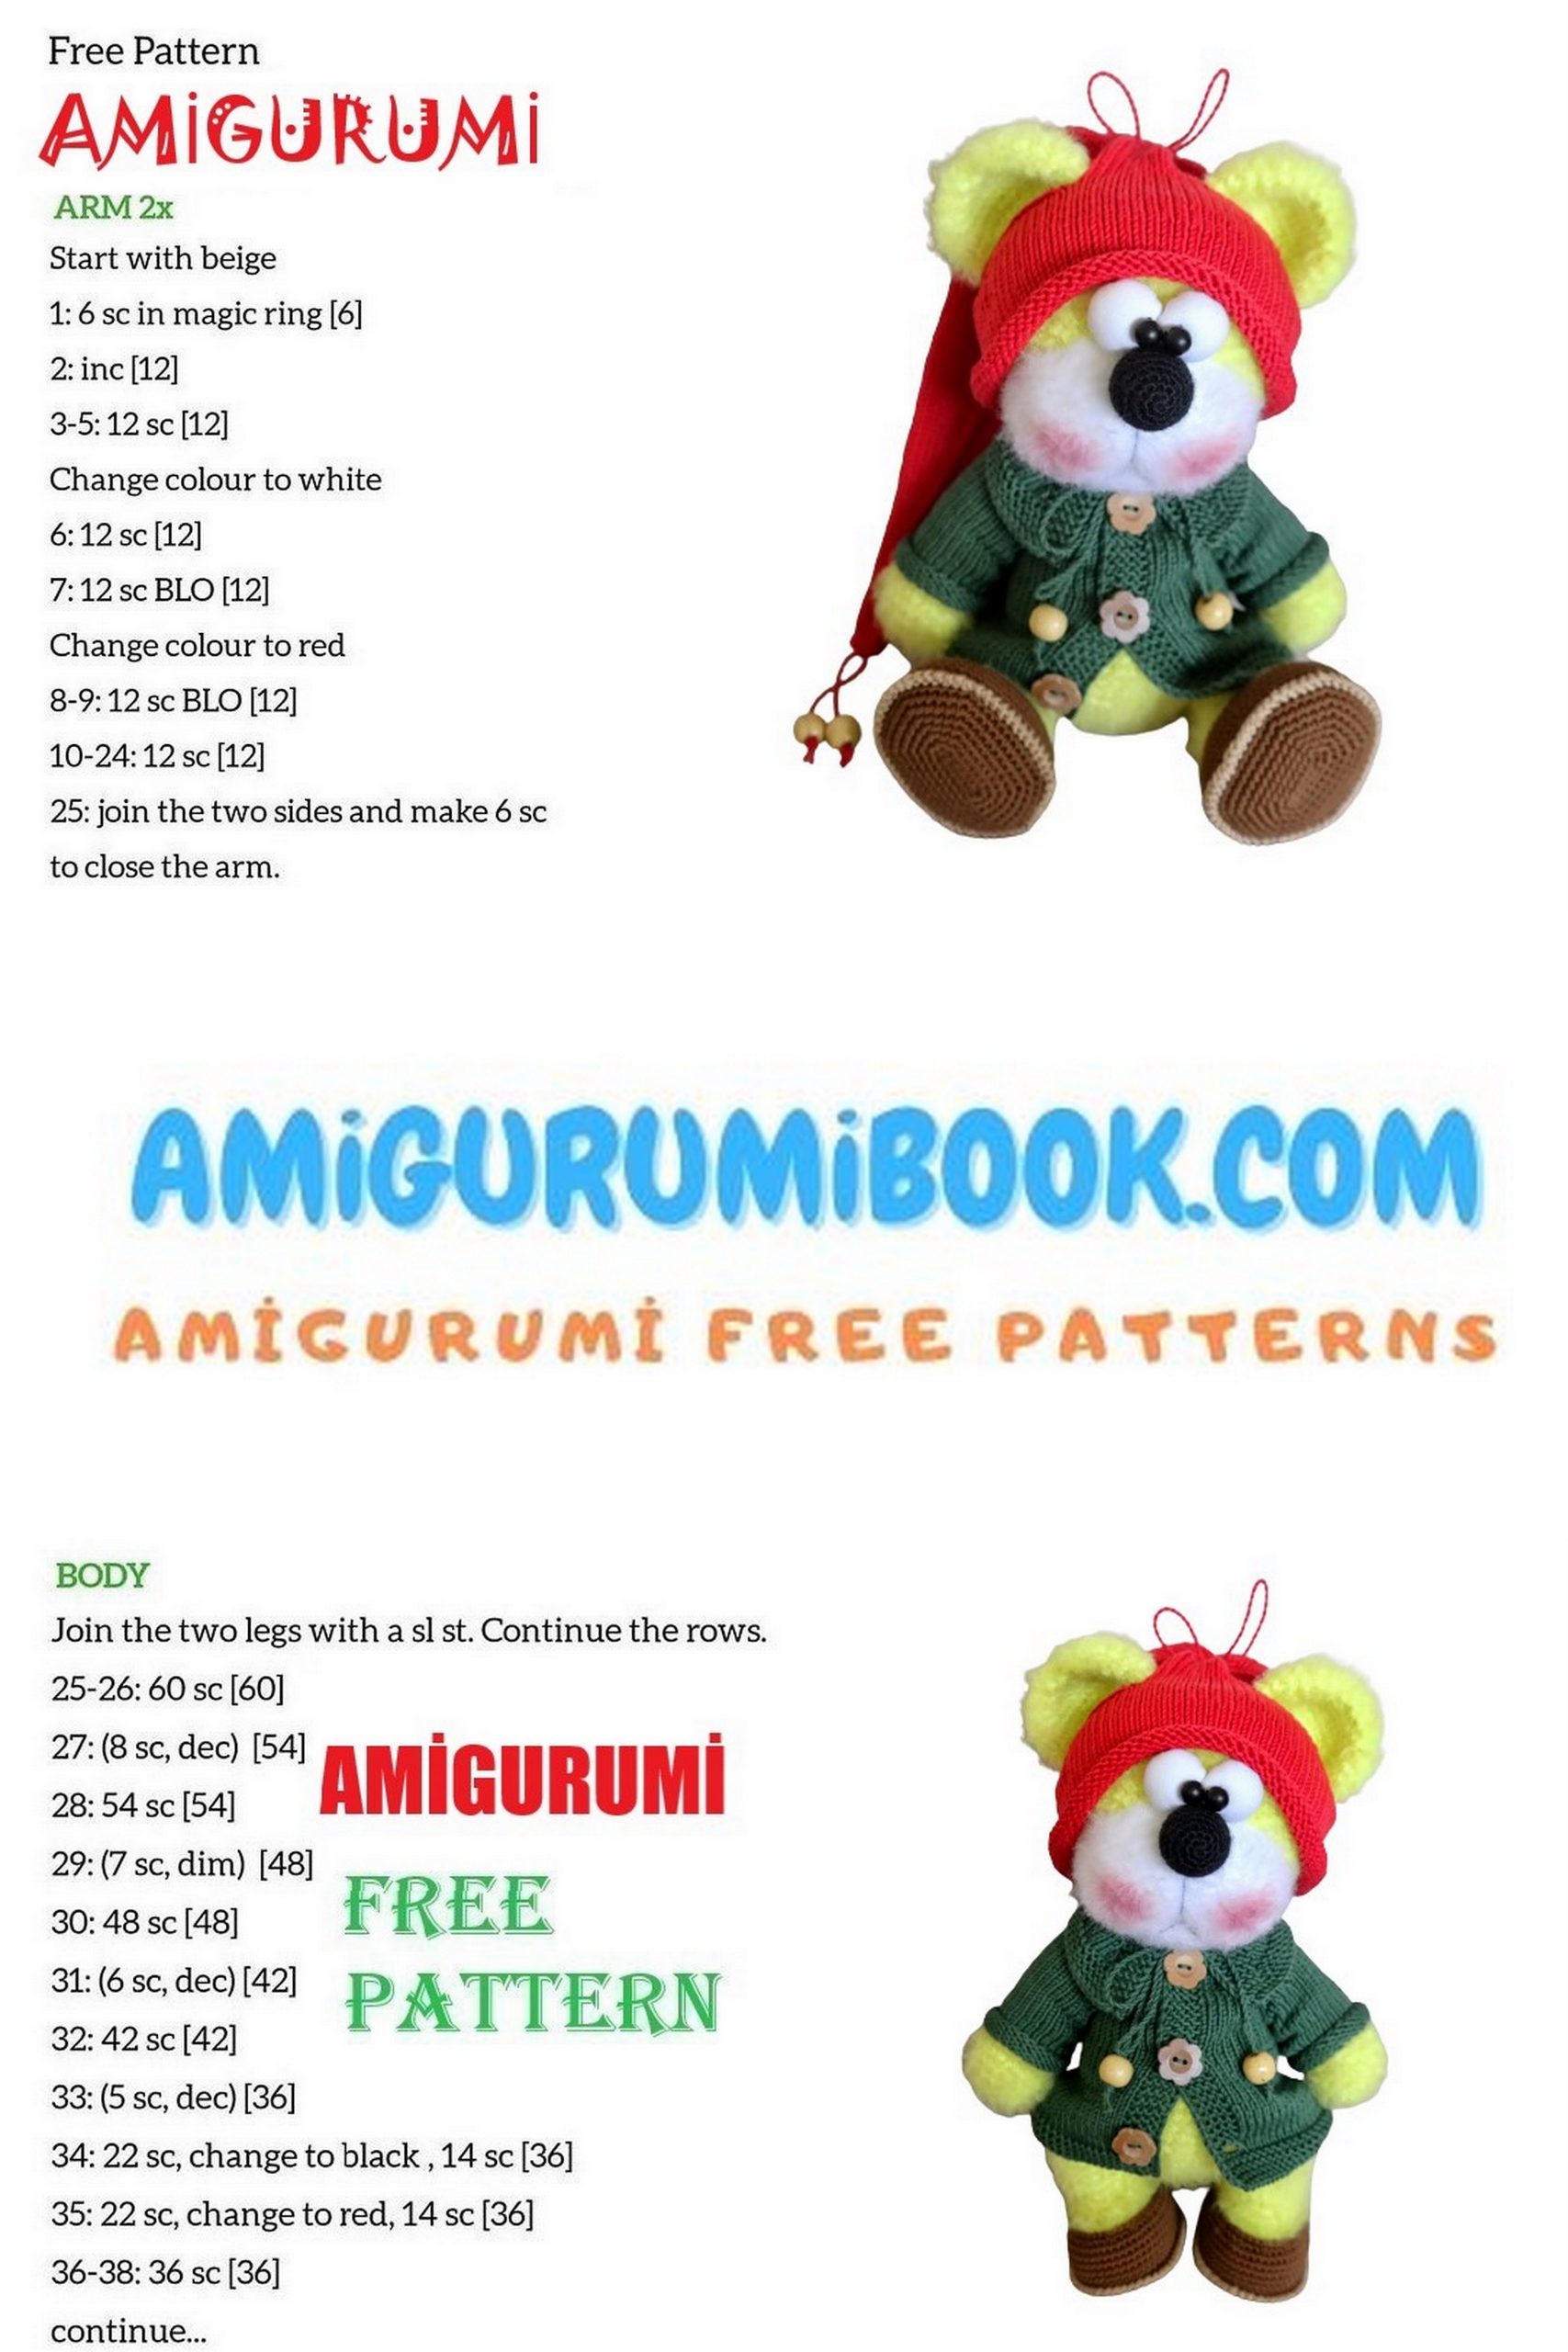
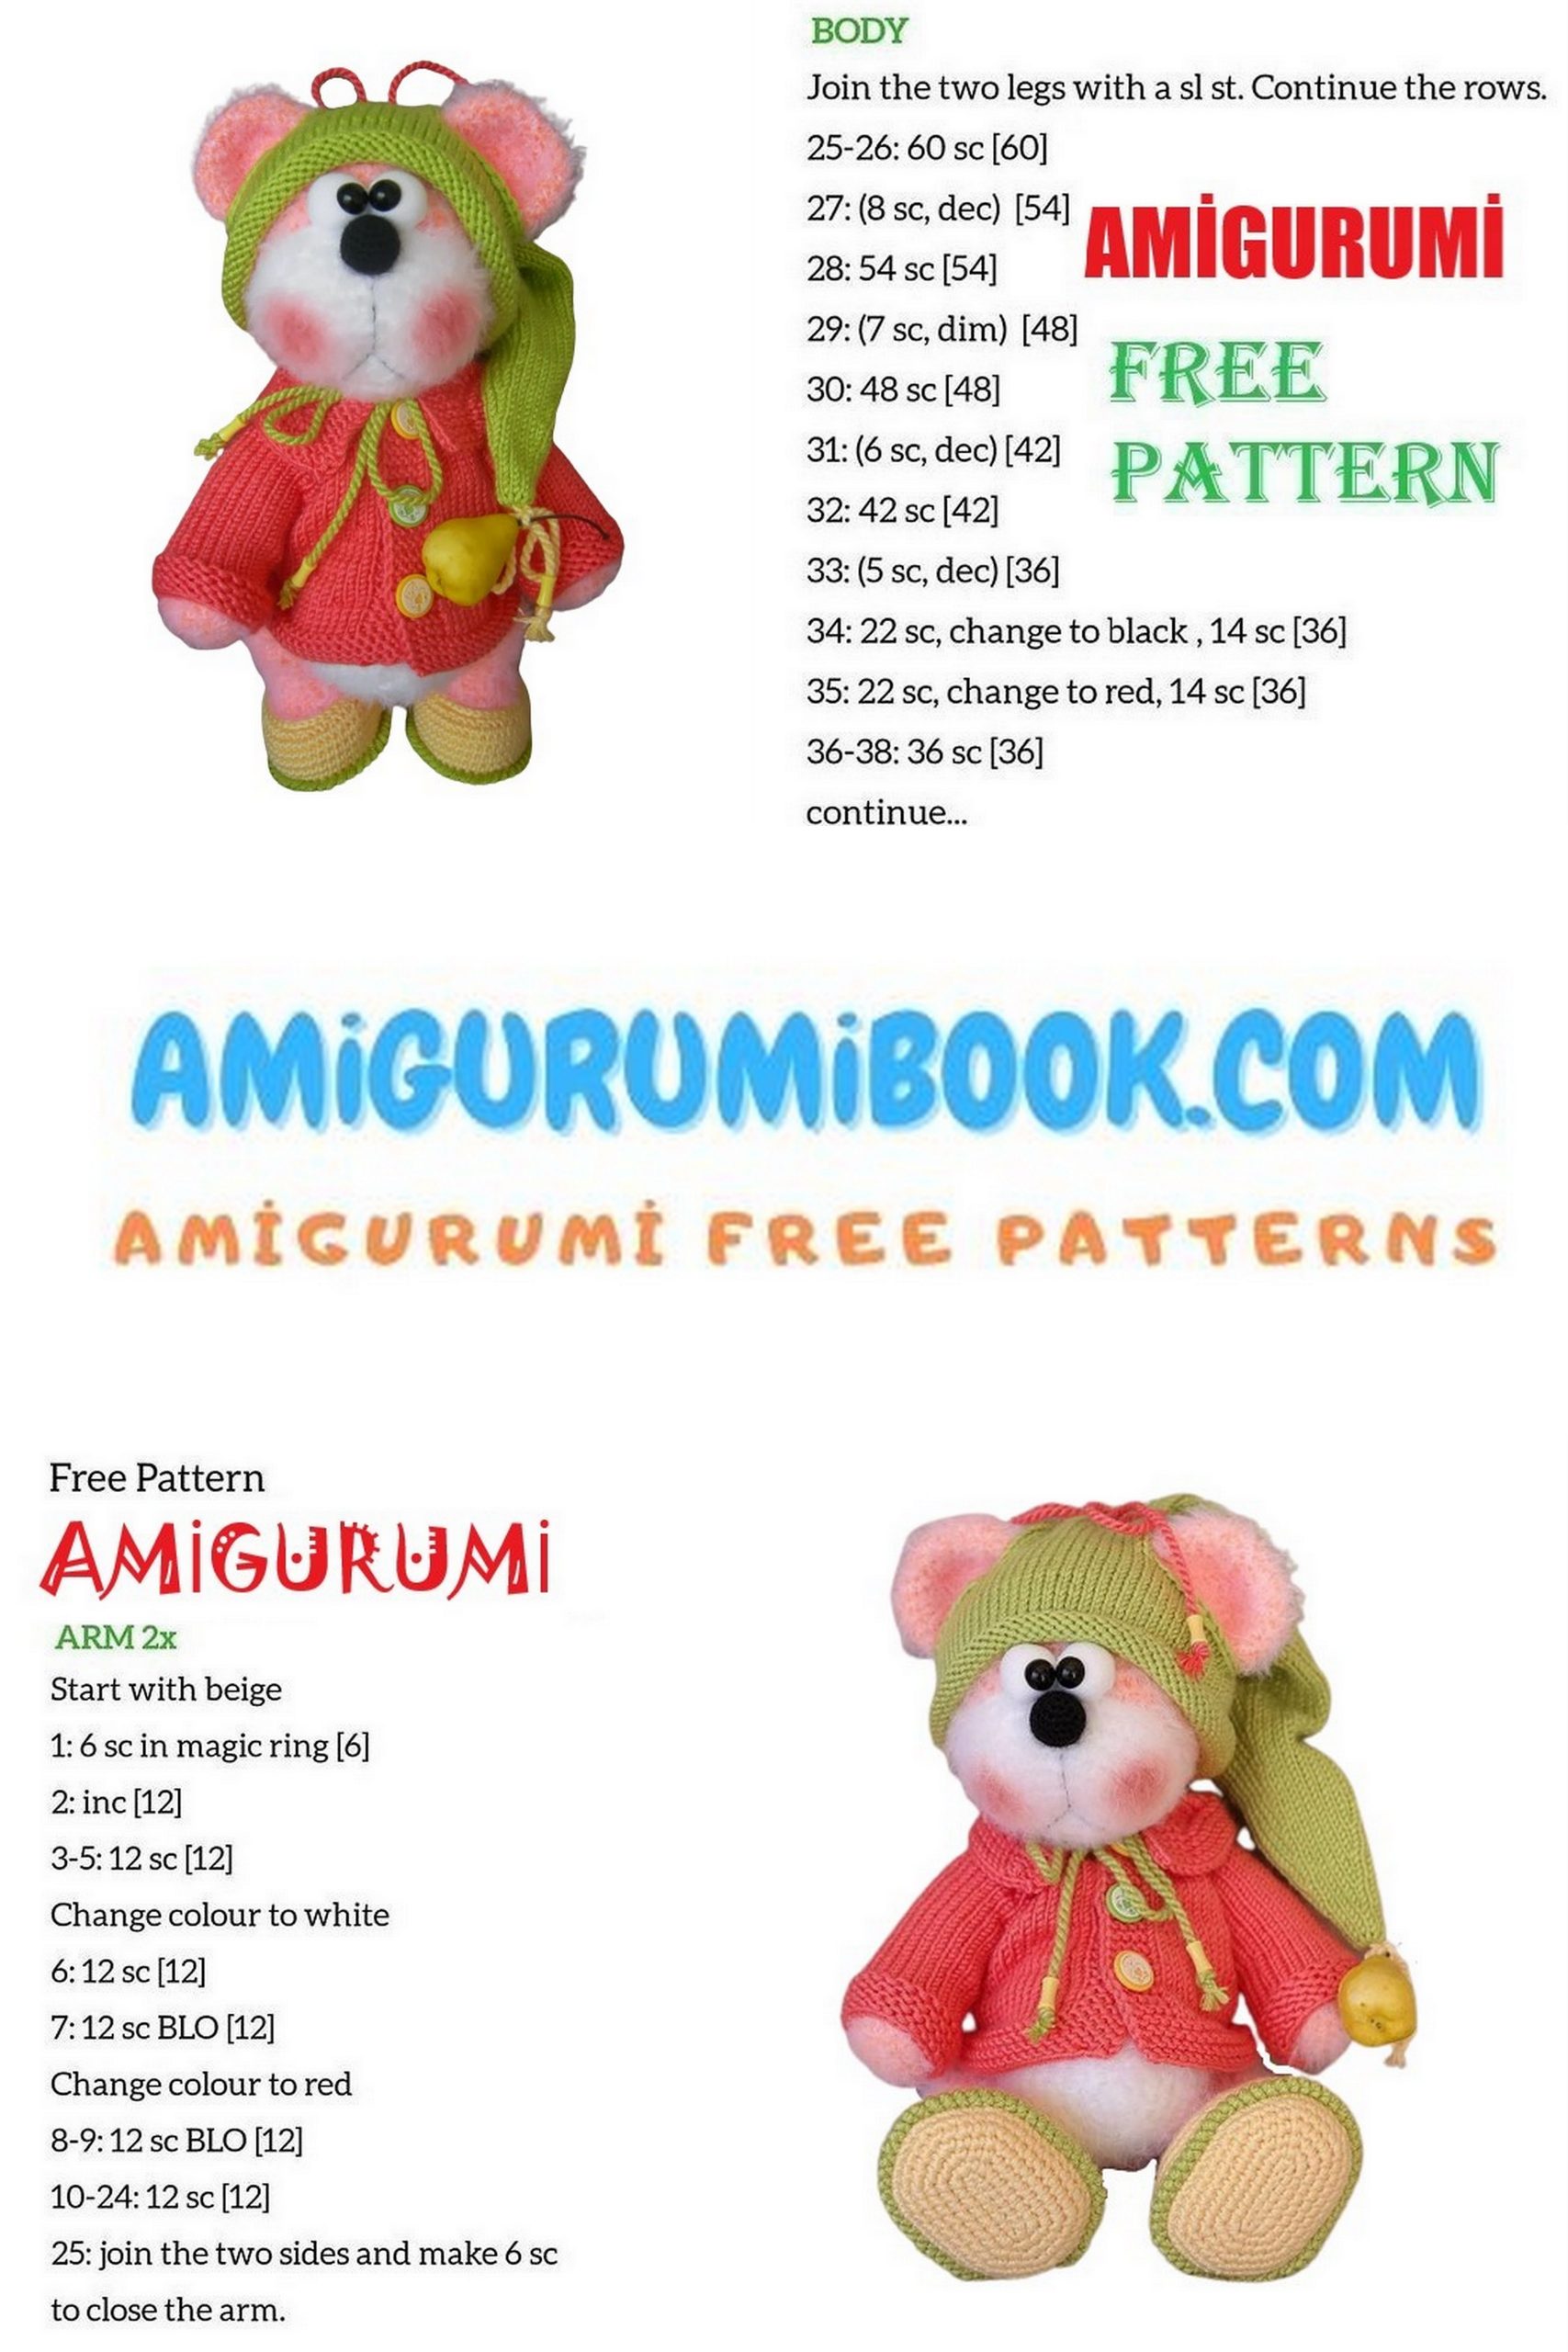
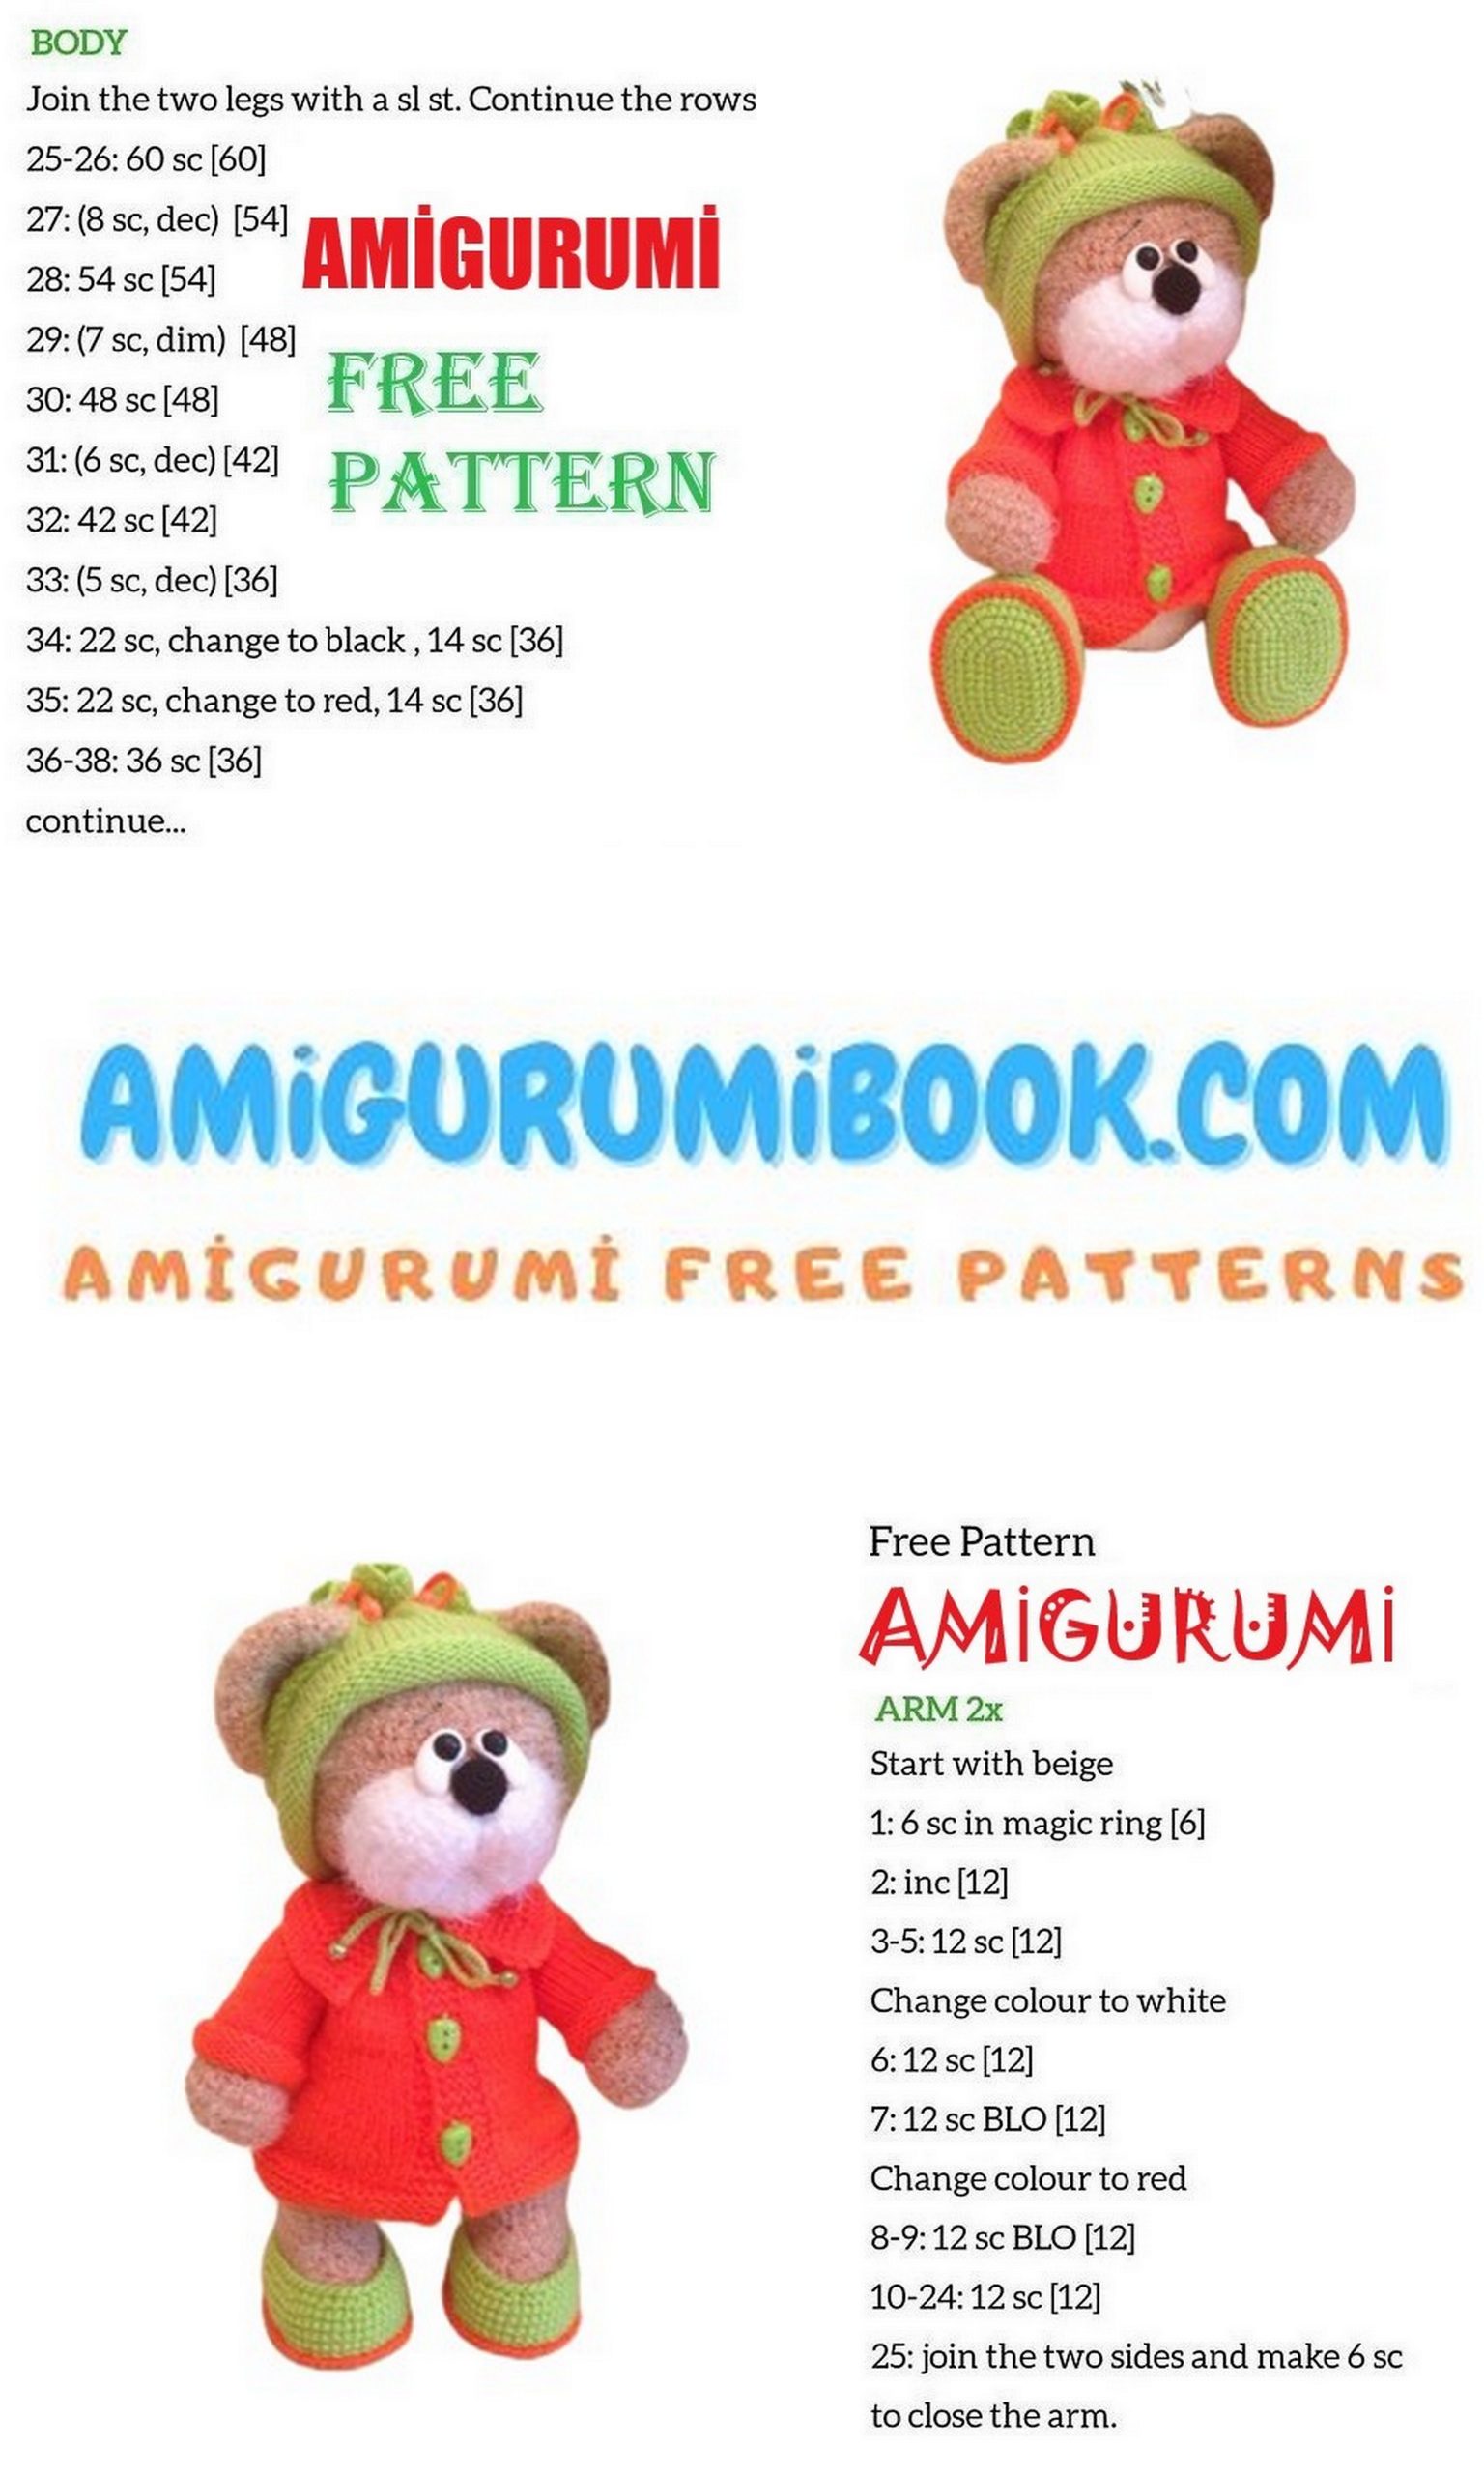
Creating a Squint Teddy Bear Amigurumi is a delightful project for both beginners and experienced crocheters. This free pattern offers step-by-step instructions to craft an adorable, squint-eyed teddy bear that makes a perfect handmade gift or charming decoration. free crochet patterns – Vikings Viki Amigurumi Free Pattern
You may also like more amigurumi patterns.
The most beautiful amigurumi animal patterns are on this site for free. In this article, we shared with you the amigurumi bear pattern.
MATERIALS:
Lotus Grass Stretch-2.5 skeins of the main color and half of the skein of white
Acrylic (for clothes) -100gr / 230m
A little black “Iris” for the nose
Hook 2mm and 1mm
Sock knitting needles set (5pcs) 2.5mm
Circles cut from white cotton fabric, diameter 5.5cm
Two black beads or half beads, diameter 5mm
Cotter pins: discs with a diameter of 25mm (10pcs), cotter pins with a round head
(2pcs), T-shaped 4 (pcs).
You can also use bolt and thread fastening
Cardboard (for insoles in feet)
Sintepon
Markers
Abbreviations:
Ch-chain
Sc – single crochet
Inc- incraise (2 sc in one loop)
Dec- decrease (knit 2 sc together)
Dc double crochet
Sl-st- slip stitch
HEAD:
1.)-6sc in the ring (6)
2.)-inc, until the end (12)
3.)-1sc, inc, until the end (18)
4.)-2sc, inc, until the end (24)
5.)-3sc, inc, until the end (30)
6.)-4sc, inc, until the end (36)
7.)-5sc, inc, until the end (42)
8.)-6sc, inc, before the end (48)
9.)-7sc, inc, until the end (54)
10.)-8sc, inc, until the end (60)
11.)-19.)-60 sc (60)
20.)-8sc, dec, until the end (54)
21.)-7sc, dec, until the end (48)
22.)-6sc, dec, until the end (42)
23.)-5sc, dec, until the end (36)
24.)-4sc, dec, until the end (30)
25.)-3sc, dec, until the end (24)
26 .)-2sc, dec, until the end (18)
we assemble the cotter pin mount, with a round head, as shown in the photo and insert it.
27.)-1sc, dec, until the end (12)
28.)-dec, until the end (6)
we put on the washer and disk, twist the cotter pin antennae with round-nose pliers and tighten the hole.
Muzzle
(knit with white yarn):
1.)-7sc in the ring (7)
2.)-inc, until the end (14)
3.)-1sc, inc, until the end (21)
4.)-2sc, inc, until the end (28)
5.)-3sc, inc, until the end (35)
6.)-4sc, inc, until the end (42)
7.)-8.)-42sc (42)
9.)-18sc, sl-st (unfinished row)
we sew the muzzle to the head between 12 and 26 near the head, 18 sc should be at the top in the center, I sewed on the bridge of our nose with white bobbin threads, we do not fill the muzzle tightly with a secret seam, we mark the bridge of the nose carefully with a brush
TIP
“Since the composition of these threads is mainly acrylic, then before the frenzy, there is no need to comb the parts, it may be skewed, the villi between the loops will be pulled out and the filler will be visible through, because. acrylic has an unpleasant tendency to fall into pills, so we comb the grass very carefully, and let the acrylic remain in the knitted fabric, but this does not in any way concern wool and mohair ”
Ears:
1.)-8sc in the ring (8)
2.)-inc, until the end (16)
3.)-1sc.inc, until the end (24)
4.)-2sc, inc, until the end (32)
5-8 .)-32sc (32)
fold the ears in half and knit a row sc, grabbing both halves, hide the tip, comb only the outer part
NOSE
(we knit with black yarn “Iris”, crochet 1mm, you can tie a bead of the appropriate size):
1.)-6sc in the ring (6)
2.)-inc, until the end (12)
3.)-1sc, inc, until the end (18)
4.)-7.)-18sc (18)
8.)-1sc, dec, until the end (12)
9.)-dec, until the end (6)
EYES:
for this we need two circles of white cotton fabric. I cut them out about 5-6 cm in diamete.)
1-cut out a circle, bend the sides by about 3mm and sew with a basting seam.
2-put a piece of filler into the obtained, slightly tightened circle and tighten it tightly, fasten the thread, sew on a bead or glue a half-bead, also the eyes can be simply tied with white “Iris” threads, crocheted 1mm
1.)-6 sc in the ring
2.)-inc, until the end (12)
3.)-1sc.inc, until the end (18)
4.)-2sc.inc, until the end (24)
5-8 .)-24sc (24)
9.)-2sc.dec, until the end (18)
10.)-1sc.dec, until the end (24)
11.)-dec, until the end (6)
TIP
“If the toy is intended for a very small child, then instead of beads (half-beads), you can cut circles from black felt and sew them to the squirrels, it is also better to sew the head and legs”
we sew the ears between the 5th and 14th rows of the head.
we sew the eyes and nose, the border between the head and the muzzle passes, approximately between the eyes and the nose, the eyes and nose should be sewn back to back (see photo)
Muzzle tightening:
mark three points with pins:
in the center and two between the 6th and 7th rows at a distance of 7 loops, insert the needle into the center point, leaving a small tip and bring it out strictly in the center under the nose, return to the center point and withdraw the stitch at the bottom right point, then picking up the first stitch we insert the needle into the lower left point and return to the center with not strong jerks, pull the face down, tie a strong knot and hide the ends of the threads.
WE MAKE EYEBROWS:
We insert the needle at the top of the head into the dial ring and make two stitches for the eyebrows above the eyes and return to the top of the head, pulling the needle out at a distance of one loop and pulling the eyebrows with not strong roars, tie a knot and hide it
LEGS:
1.)-we recruit a chain of 8ch. (8)
2.) – in the second loop from the hook: 6sc, (2sc in one loop) -3 times, 5sc, inc (16)
3.)-inc, 5sc, 3inc, 5sc, 2inc (22)
4.)-inc, 6sc, (inc, sc) -3 times, 5sc, (inc, sc) -2 times (28)
5.)-2sc, inc, 5sc, (2sc, inc) -3 times, 5sc, (2sc, inc) -2 times (34)
at this stage, cut out the cardboard insoles, they should be 3mm less than the foot and glue
TIP
“If you use colored cardboard and knit with light threads, then it is better to glue the insole with the light side down, and vice versa, if you knit with dark threads, then glue the insole with the dark side down, if the cardboard is white, then the side of which we will glue can be painted with dark paint or felt-tip pen ”
6.)-34sc, behind the back wall (34)
7-9 .)-34sc (34)
10.)-11sc, 6dec, 11sc (28)
11.)-dec, 8sc, 4dec, 8sc, dec (20)
12.)- 9sc, 2dec, 9sc (20)
13.)-9sc, dec, 9sc (19)
14.)-18sc, we knit the last and first stitches together, mark with a marker this will be the beginning of the row
15-22 .)-18sc (18)
in the 20th row between the 7th and 8th loops (right leg)
in the 21st row between the 16th and 17th loops (left leg) insert the cotter pin or bolt fastener tightly stuff the leg
23.)-sc, dec, until the end (12)
24.)-dec, until the end (6)
tighten the hole and hide the tip of the thread
carefully comb the legs, except for the feet
ARMS:
1.)-we collect a chain of 6ch (6)
2.) In the second loop from the hook: 4sc, (3sc in one loop) -3 times, 3sc, (2sc in one loop) -2 times (12)
3.)-inc, 3sc, 3inc, 3sc, 2inc (18)
4.)-sc, inc, 3sc, (1sc, inc) -3 times, 3sc, (1sc, inc) -2 times (24)
5-6 .)-24sc (24)
7.)-2sc, dec, until the end (18)
8.)-3sc, 2dec, 11sc (16)
9-20 .)-16sc (16)
in the 18th row between the 7th and 8th loops, insert the cotter pin, stuff the handle, the cam is denser
21.) – (sc, dec) -4 times, dec (10)
22.)-dec, until the end (5)
we tighten the hole and hide the tip of the thread, carefully comb
BODY:
1.)-6sc in the ring (6)
2.)-inc, until the end (12)
3.)-1sc, inc, until the end (18)
4.)-2sc, inc, until the end (24)
5.)-3sc, inc, until the end (30)
6.)-4sc, inc, until the end (36)
7.)-5sc, inc, until the end (42)
8.)-6sc, inc, before the end (48)
mark with a marker two points between the 12th and 13th stitches, and between the 36th and 37th stitches
TIP
“When fastening the legs at the level of the same row, there is a displacement due to the peculiarity of knitting, one leg is always higher than the other, in order to avoid this as much as possible, the beginning of the row should always be either in front or behind”
9.)-17.)-48sc (48)
18.)-6sc, dec, until the end (42)
19.)-42sc (42)
20.)-5sc, dec, until the end (36)
21.)-36sc (36)
22.)-4sc, dec, until the end (30)
mark with a marker two points between the 9th and 10th loops, and between the 24th and 25th loops
TIP
“If you used a different yarn (thinner or thicker), then the marked points may shift, this is not scary, you just need to mark the attachment points of the handles strictly on the same perpendicular line with the legs and at the same distance from each other”
at this stage we attach the legs
23.)-30sc (30)
24.)-3sc, dec, until the end (24)
fix the handles
25.)-26.)-24sc (24)
27.)-2sc, dec, until the end (18)
28.)-31.)-18sc (18)
we collect the loops on a thread and put the head on the body, tighten it comb the body
TAIL:
we knit a tail in the form of a flower
1.)-7sc in the ring (7)
2p .- (sl-st, three air loops, stsn, sl-st) -in one loop, repeat 7 times we sew the tail on the ass, between the 9th and 10th rows
TUMMY
(we knit with white threads):
1.)-6sc in the ring (6)
2.)-inc, until the end (12)
3.)-1sc, inc, until the end (18)
4.)-2sc, inc, until the end (24)
5.)-3sc, inc, until the end (30)
6.)-4sc, inc, until the end (36)
7.)-5sc, inc, until the end (42)
8.)-42sc (42)
we sew on the tummy, with bobbin threads with a secret seam between the 3rd and 15th rows, we are combing such a toddler at this stage:) now we will dress it!
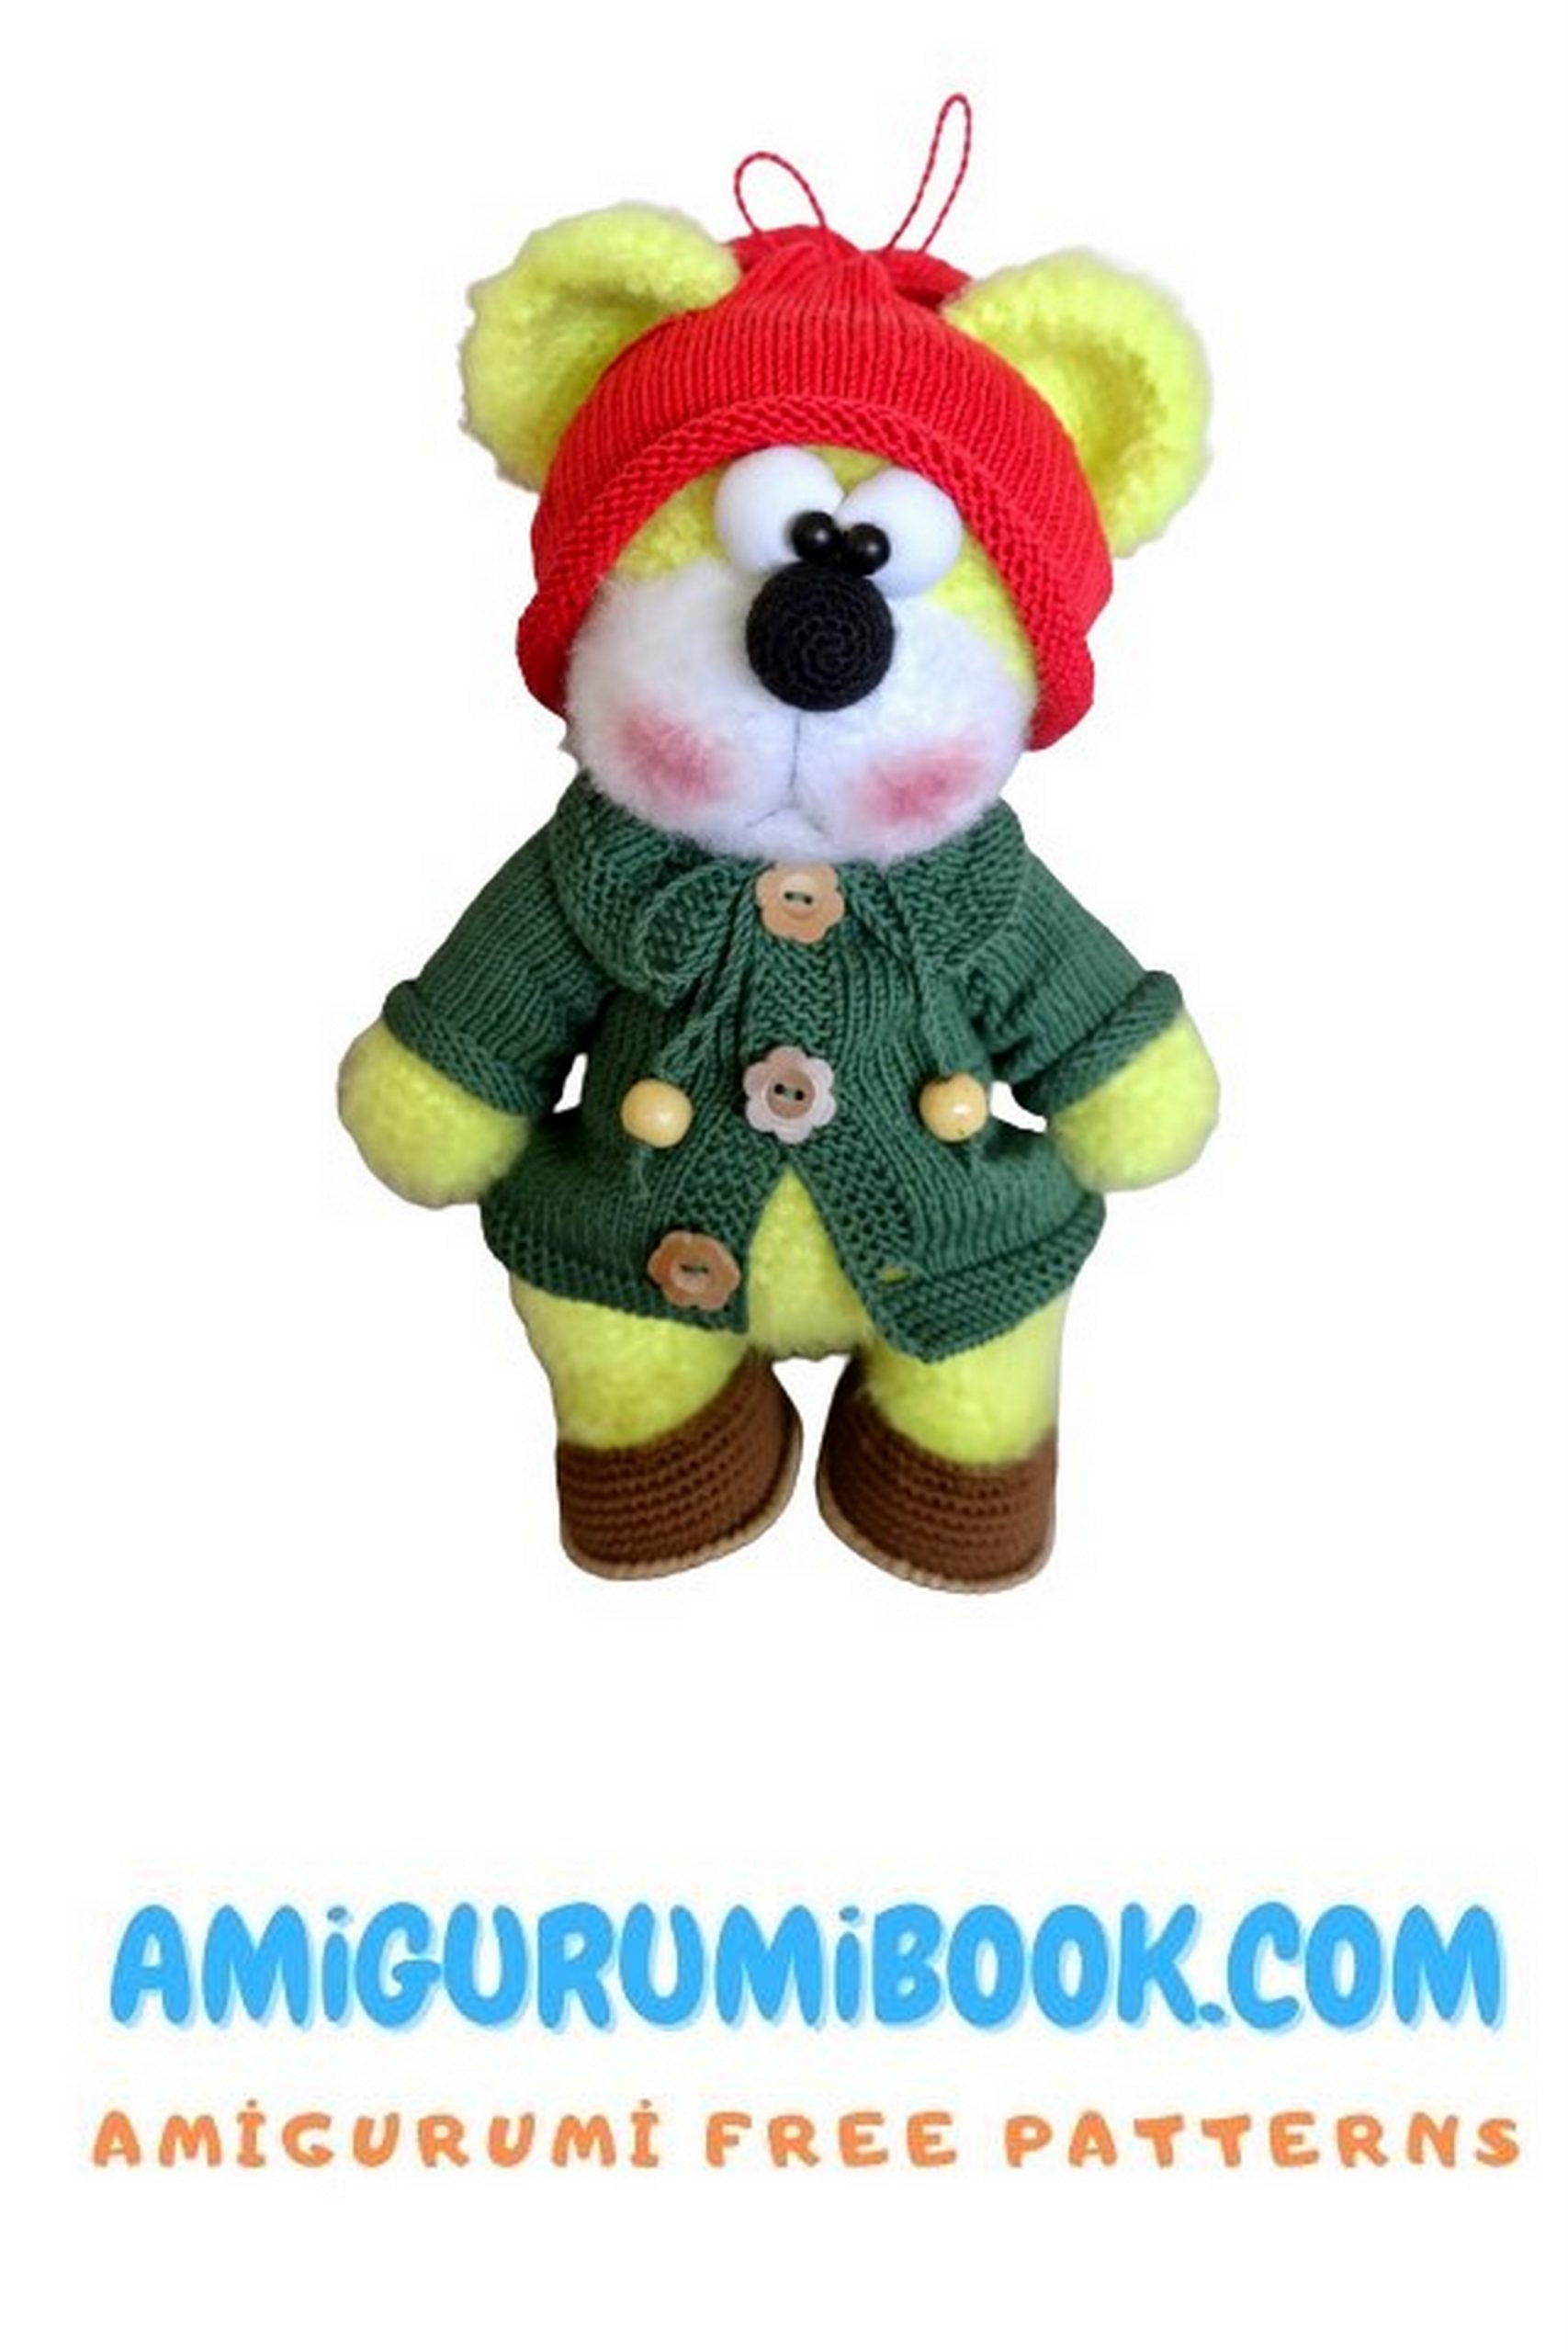
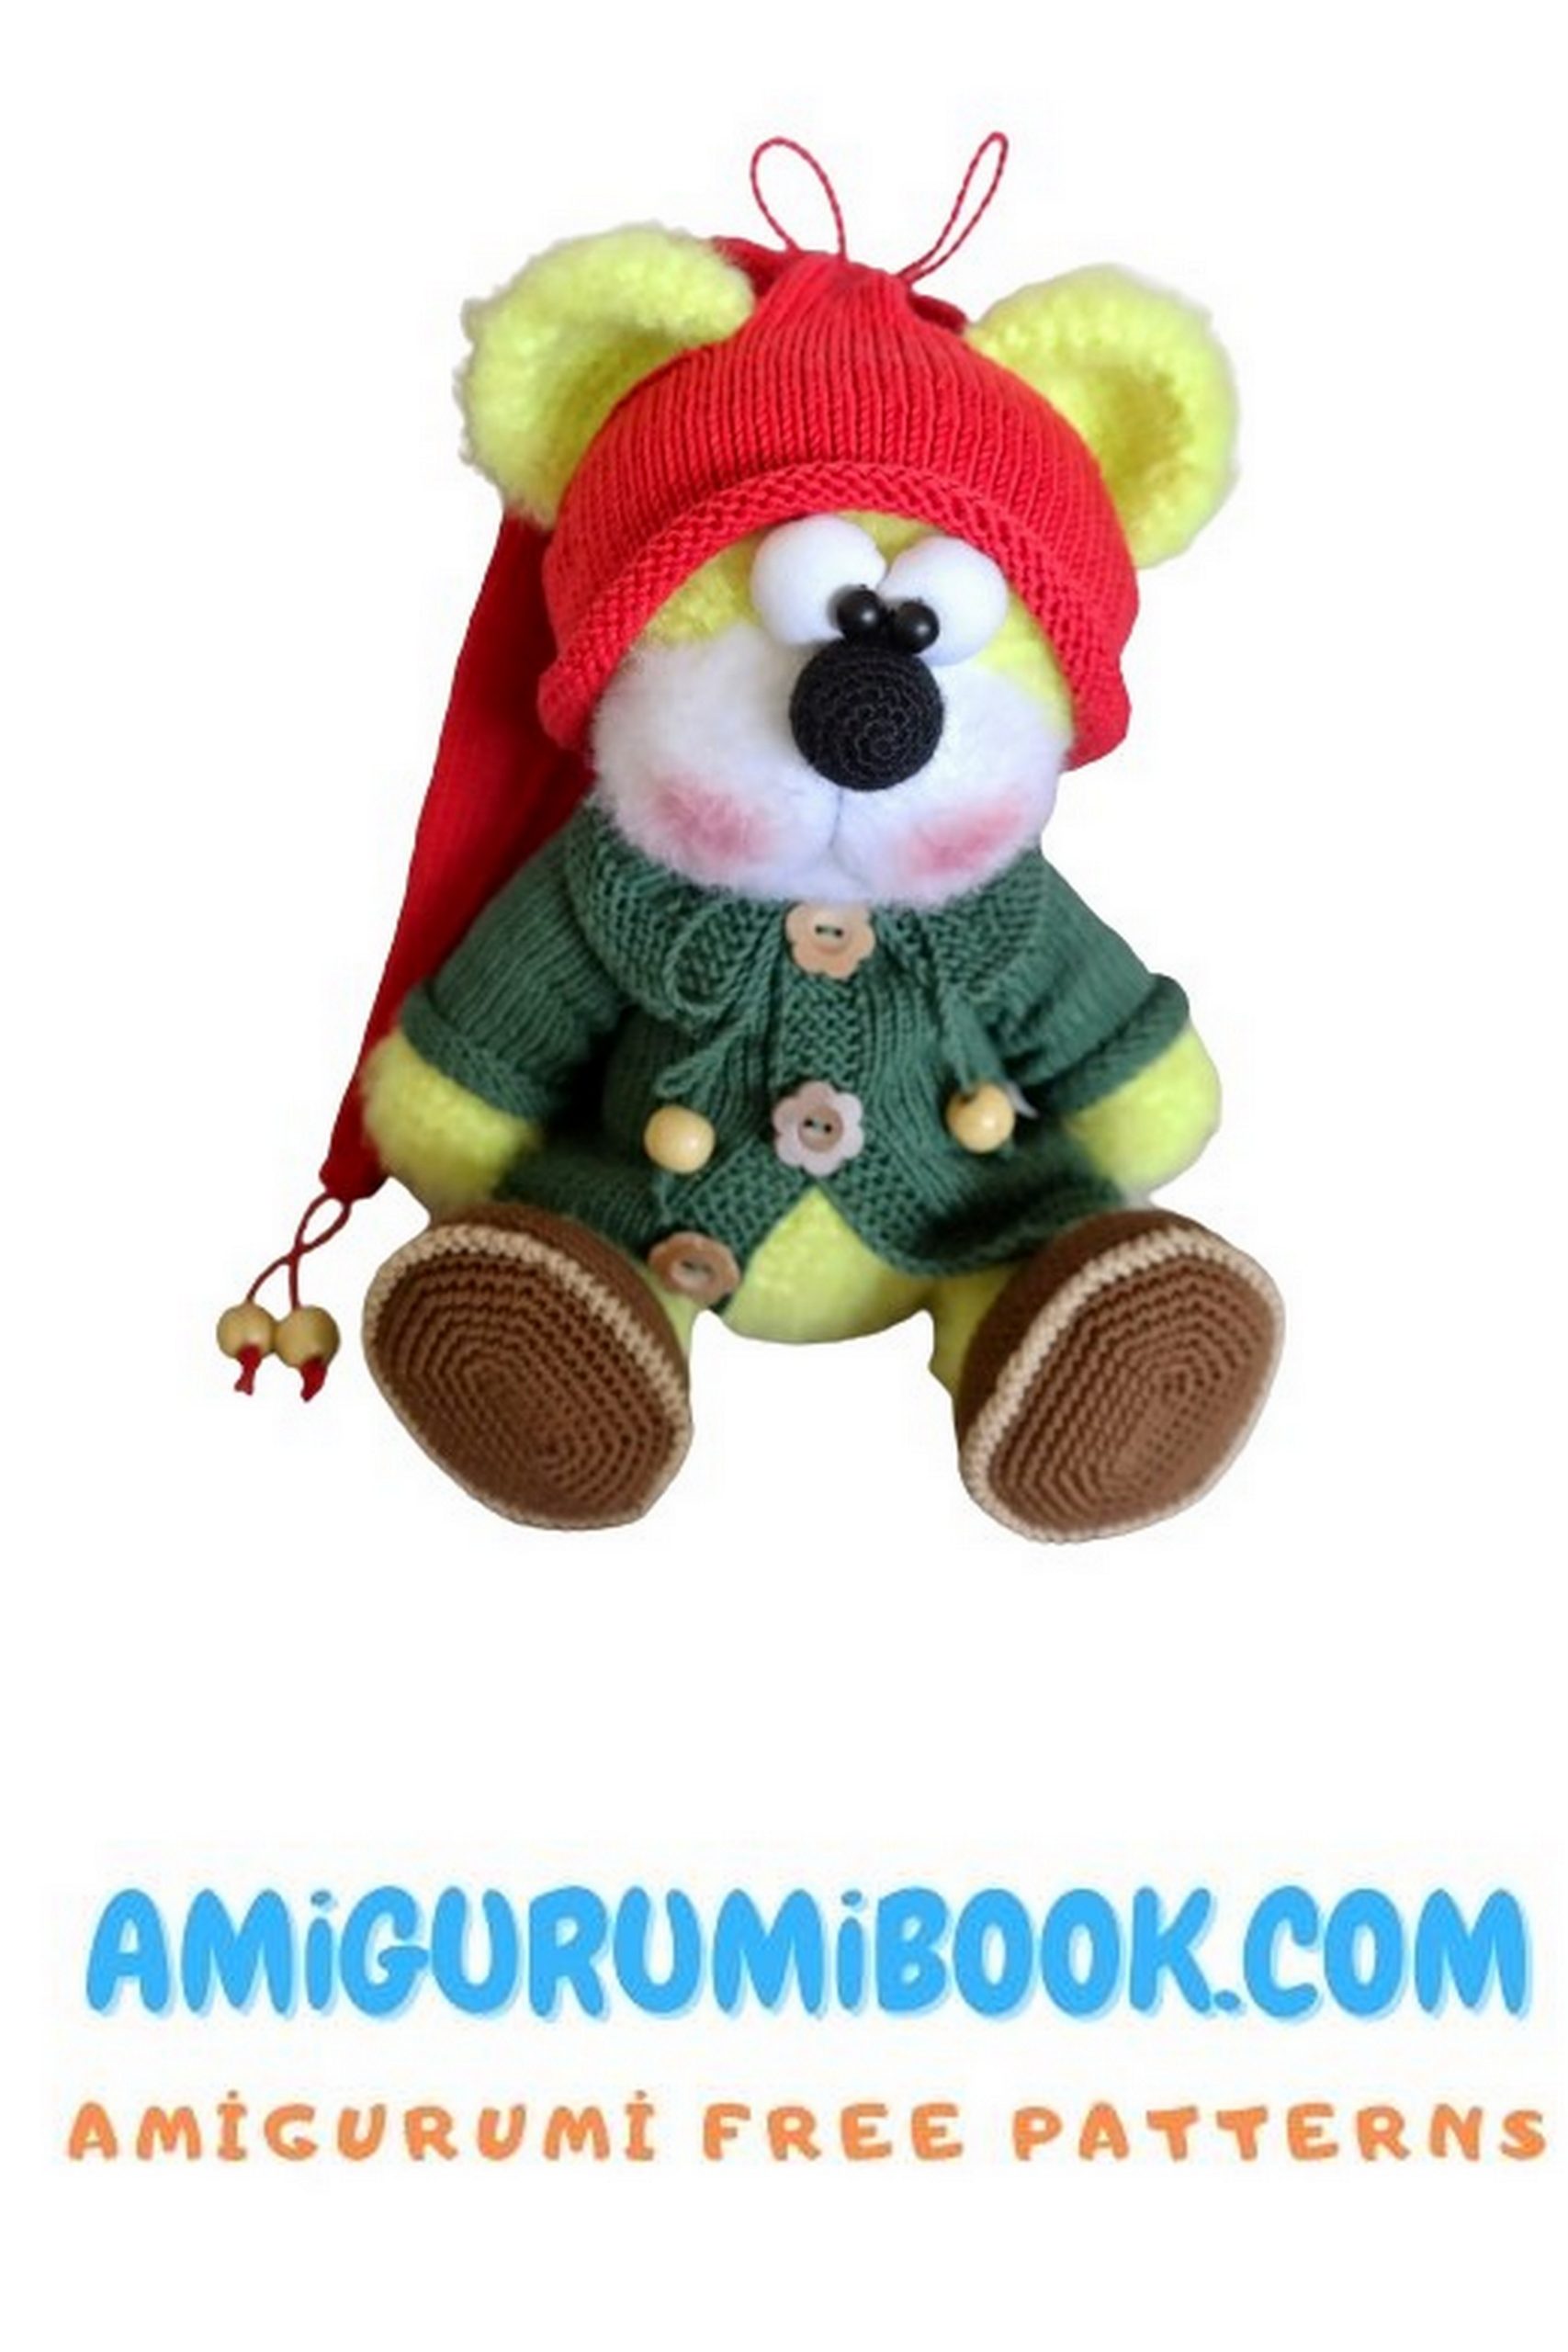
COAT
(we knit with acrylic, knitting needles)
we collect 42p + 2 edge

ATTENTION!!!
Further, the edge is not included in the count, we remove the first edge without knitting, we always knit the last one with the purl. The first and last 4 loops in all rows are knitted with the front (plank)
1.)-purl.
2.)-8knit, yarn, knit, yarn, 6knit, yarn, knit, yarn,
10knit, yarn, knit, yarn, 6knit, yarn, knit, yarn, 8knit
3.)-purl.
4p-2vm, double yarn, 2vm, 5knit, yarn, knit, yarn, 8knit, yarn, knit, yarn, 12knit, yarn, knit, yarn, 8knit, yarn, knit, yarn, 9knit
5.)-purl
6.)-10knit, yarn, knit, yarn, 10knit, yarn, knit, yarn,
14knit, yarn, knit, yarn, 10knit, yarn, knit, yarn, 10knit
7.)-purl
8.)-11knit, yarn, knit, yarn, 12knit, yarn, knit, yarn,
16knit, yarn, knit, yarn, 12knit, yarn, knit, yarn, 11knit
9.)-purl
then there will be increases, we knit them out of the broach of the previous row
10.)-6knit, inc, 6knit, yarn, knit, yarn, 14knit, yarn, knit, yarn,
9knit, inc, 9knit, yarn, knit, yarn, 14knit, yarn, knit, yarn, 6knit, inc, 6knit
do not forget to knit the first and last 4 loops in all rows with the front ones !!!
11.)-purl
12.)-14knit, yarn, knit, yarn, 16knit, yarn, knit, yarn,
21knit, yarn, knit, yarn, 16knit, yarn, knit, yarn, 14knit
13.)-purl
14 rubles-15knit, yarn, knit, yarn, 18knit, yarn, knit, yarn,
23knit, yarn, knit, yarn, 18knit, yarn, knit, yarn, 15knit
15.)-purl
16.)-16knit, yarn, knit, yarn, 20knit, yarn, knit, yarn,
25knit, yarn, knit, yarn, 20knit, yarn, knit, yarn
17.)-purl
18r-2vm, double yarn, 2vm, 13knit, yarn, knit, yarn,
22knit, yarn, knit, yarn, 27knit, yarn, knit, yarn, 22knit, yarn, knit, yarn, 17knit
19.)-purl
20.)-19knit, we knit 24 loops of the sleeves, put them on three knitting needles (8 loops each) and knit in a circular sleeve only we knit 24 rows, then we knit a sleeve strip of 7 rows, alternating one row-purl loops, one row-facial, finish with purl, close all loops, hide the tip of the thread
TIP
“For whom it is difficult to knit on three knitting needles, you can knit the same thing on two, only then sew the sleeve with a knitted seam and the length of the sleeve must be tied several more rows, because the seam can interfere with the stretching of the canvas”
attach the thread to the back, knit 31knit, 24 sleeve loops and knit similarly to the first sleeve, attach the thread to the shelf and knit 19knit
21.)-purl
at this stage we should have 69p + 2cr on the spoke
22.)-6knit, inc, 13knit, inc, 15knit, inc, 16knit, inc, 13knit, inc, 6knit
23 rubles-31 rubles-knit exactly
32 rubles-2vm, dv. yarn, 2vm, 70knit
33.)-purl
34.)-7knit, inc, 13knit, inc, 18knit, inc, 16knit, inc, 13knit, inc, 7knit
35.)-38.)-Knit evenly knit the bar
36.)-45.) – knit all loops with the front and sew on buttons
COLLAR
we turn our coat with the wrong side towards us and we collect along the edge of the neck
41p + 2cr
the first and last 4 stitches in all rows are not included in the count.
1.)-purl
2.)-4knit, inc, 33knit, inc, 4knit
3.)-purl
4.)-4knit, inc, 35knit, inc, 4knit
5.)-purl
6.)-4knit, inc, 37knit, inc, 4knit
7.)-purl
8.)-4knit, inc, 39knit, inc, 4knit
9.)-purl
10.)-4knit, inc, 41knit, inc, 4knit
11.)-purl
12.)-4knit, inc, 43knit, inc, 4knit
knit a bar
13.)-knit
14.)-4knit, inc, 45knit, inc, 4knit
15.)-knit
16p-4knit, inc, 47knit, inc, 4knit
17.)-knit
18.)-4knit, inc, 49knit, inc, 4knit
19.)-knit
we close the loops, hide the end of the thread, twist the cord or knit a chain of ch, or thread the ribbon into the first row of the collar, decorate with beads, we got such a coat
SANDALS
1.)-we recruit a chain of 8ch. (8)
2.) – in the second loop from the hook: 6sc, (2sc in one loop) -3 times, 5sc, inc (16)
3.)-inc, 5sc, 3inc, 5sc, 2inc (22)
4.)-sc, inc, 5sc, (sc, inc) -3 times, 5sc, (sc, inc) -2 times (28)
5.)-2sc, inc, 5sc, (2sc, inc) -3 times, 5sc, (2sc, inc) -2 times (34)
6.)-3sc, inc, 5sc, (3sc, inc) -3 times, 5sc, (3sc, inc) -2 times (40)
7.)-4sc, inc, 5sc, (4sc, inc) -3 times, 5sc, (4sc, inc) -2 times (46)
8.)-5sc, inc, 5sc, (5sc, inc) -3 times, 5sc, (5sc, inc) -2 times (52)
it may seem that the sandal is too big, but it should be like that and should be free to fit the leg, because if it is pulled with difficulty, it will not look beautiful, and also an insole is glued into the leg and it will be difficult to stick it into a very small sandal
9.)-52sc for the back wall (52)
10-13 .)-52sc (52)
11.)- (2sc, dec) -13 times (39)
12.) – very thinly knit sl-st to the end of the row, we get a neat side, attach the thread to the 9th row and knit one row behind the front wall with a “crustacean step”, crochet 3mm
CAP
we collect 78loops, we put them on three knitting needles (26p each)
TIP
“So that the beginning of knitting looks beautiful later, you need to knit the first few loops with the main thread and the tip of the remaining thread from the typesetting row together, then cut off the tip” mark the beginning of knitting with a marker knit in a circle 22 rows
23.)-19knit, closed 12p, 16knit, closed 12p, 19knit
24p-19knit, inc. 12p, 16knit, inc. 12p, 19knit
we plant evenly loops on three knitting needles (26p each) we knit 10 rows in a circle we make decreases: at the end of each knitting needle, we knit two loops together knit we knit 3 rows in a circle we again make three decreases (at the end of each knitting needle, we knit two loops together) continue to in each 4th row, make three decreases until there are 3 loops on the knitting needle, tighten the loops, sew a pompom, tassel, bow, etc. in the area of the row where we made the second decrease, thread the cord, put on the cap, tighten and tie the cord.
Now we are dressing our Kid !!!
EVERYTHING IS READY!!!